Service Accounts
In WebEngage, integrations often need secure, non-human access to systems and APIs. Instead of relying on individual user accounts, which are tied to employee lifecycles, we use service accounts.
A service account is a non-human identity created for applications, automations, or backend services. It enables programmatic access to WebEngage or third-party systems in a secure, auditable, and controlled manner.
Service Accounts are the recommended way to authenticate API requests in WebEngageThey offer a more secure and manageable alternative to Personal API Keys. You can assign specific roles, rotate credentials easily, and manage access across teams and environments.
Note: Personal API Keys will soon be deprecated. Please start using Service Accounts for authentication
Why Service Accounts Are Needed?
Users authenticate with their credentials (username/password or OAuth tokens) through interactive sessions. These credentials are tied to the individual and expire when the user account is removed. For example, if an employee leaves the organization, their credentials become invalid, and any dependent automation will stop working.
Service accounts solve this problem by:
- Providing automation-friendly access for integrations and scheduled jobs.
- Decoupling services from human users, ensuring continuity even if employees leave.
- Enabling fine-grained access control by assigning roles and permissions specific to the task.
- Supporting secure credential management through keys or tokens that can be rotated easily.
- Improving audit-ability so that activity from non-human systems can be tracked independently.
How Service Accounts Work?
Creation
An admin creates a service account or one is generated automatically by a platform.
Assignment of Roles/Permissions
The account is given specific roles that define what it can access. i.e.
- Data Ingestion: This role allows the account to bring data into the system. For example, someone with this role can connect data sources, upload customer data, or send user events and attributes into the platform. Basically, they handle the “input” side i.e. getting all the data WebEngage needs to work with.
- Campaign Execution: This role allows the account to create, schedule, and send campaigns across different channels (like email, push, SMS, etc.). Users with this permission can set up messages, decide who receives them, and control when and how they are sent. It’s focused on the “output” i.e. actually running marketing or engagement campaigns using the data that’s already available.
- Segment Editor: This role allows the account to create and manage audience segments. Users with this role can filter users based on certain conditions (like location, activity, or behavior) to build specific target groups. These segments are then used for analysis or to send personalized campaigns.
Credentials
Credentials are issued in the form of Bearer Tokens. These can be rotated without impacting human users.
Usage
Applications or jobs authenticate using the service account credentials. Workloads running in the platform can attach the service account directly without managing keys.
How to set up Service Accounts?
To set up service accounts for your dashboard, use the following steps.
- Start by navigating to the Service accounts section from the left navigation panel.
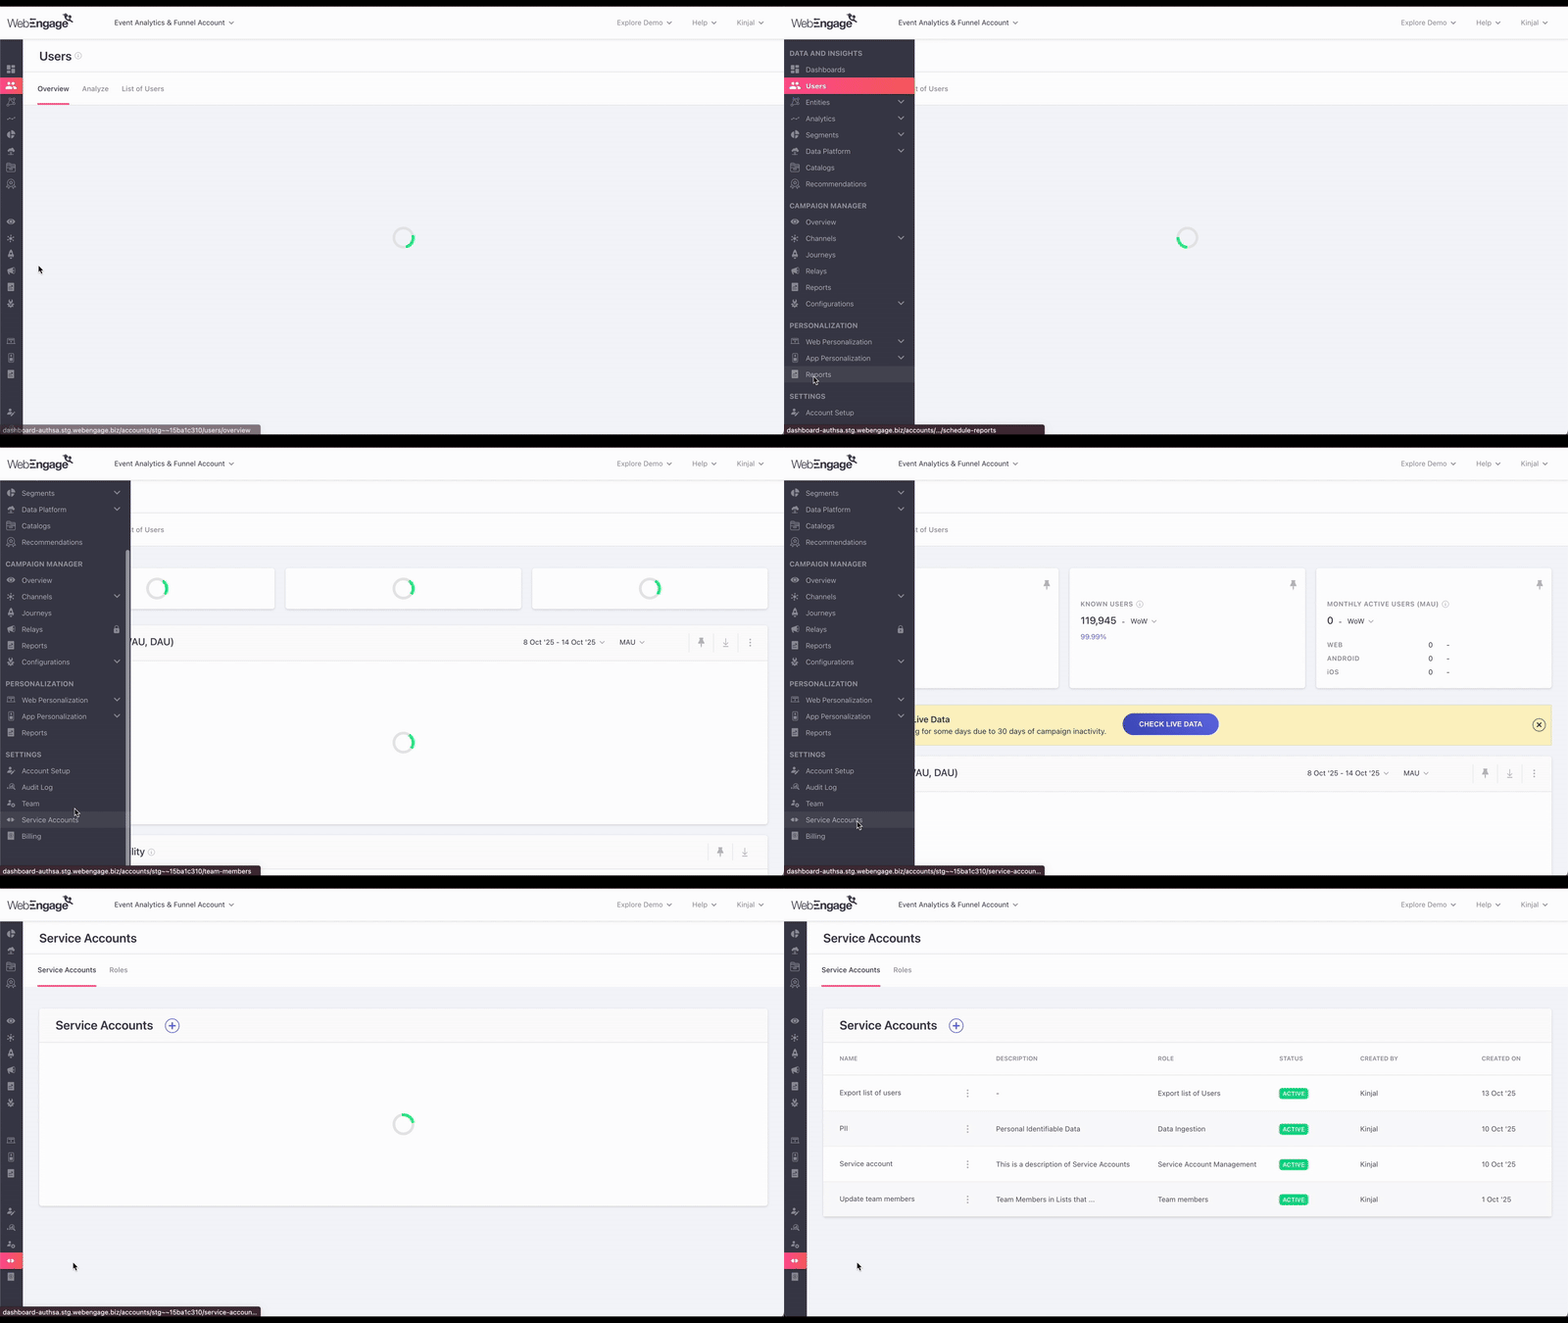
- Once you're there you can start setting up your service accounts, by clicking on the ➕ icon.
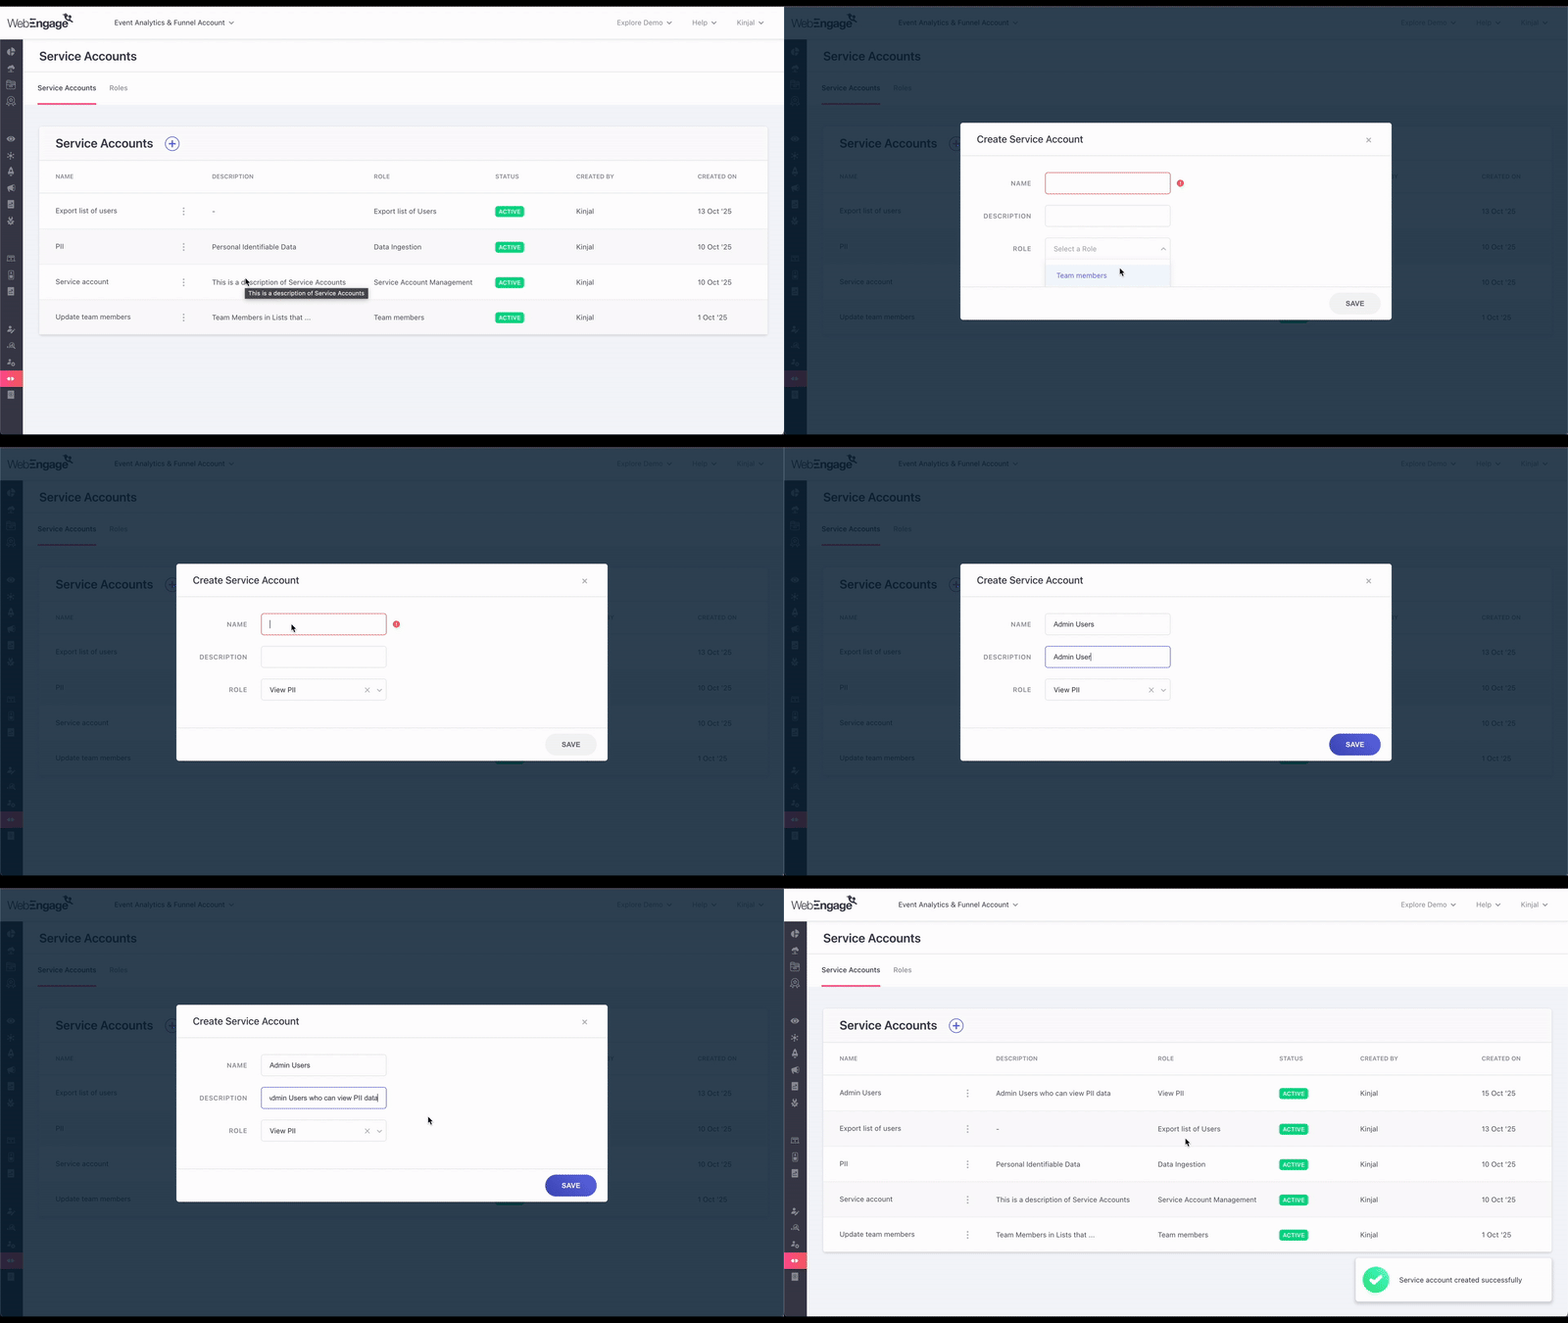
- On clicking on the ➕ icon, you are presented with a modal where you can fill in the required details to set up your service accounts.
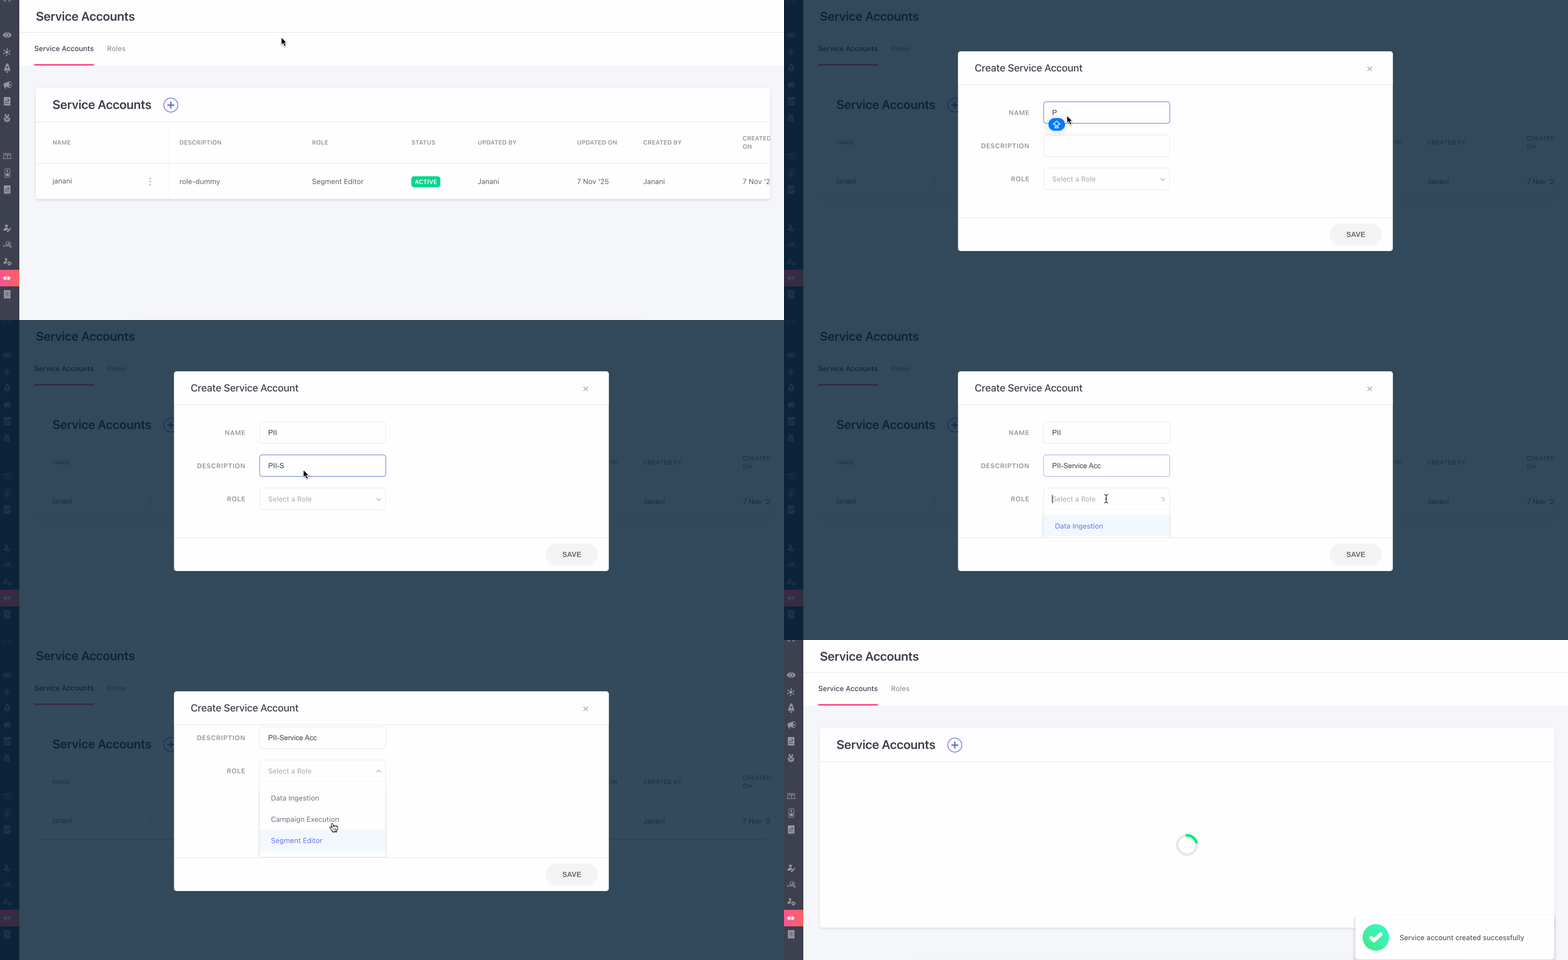
- You can then start by filling in the required details such as Name, Description and the Role you want to give to this service account.
Manage Keys
Service accounts use keys instead of usernames and passwords to authenticate with platforms or APIs. Keys act as credentials that prove the account’s identity.
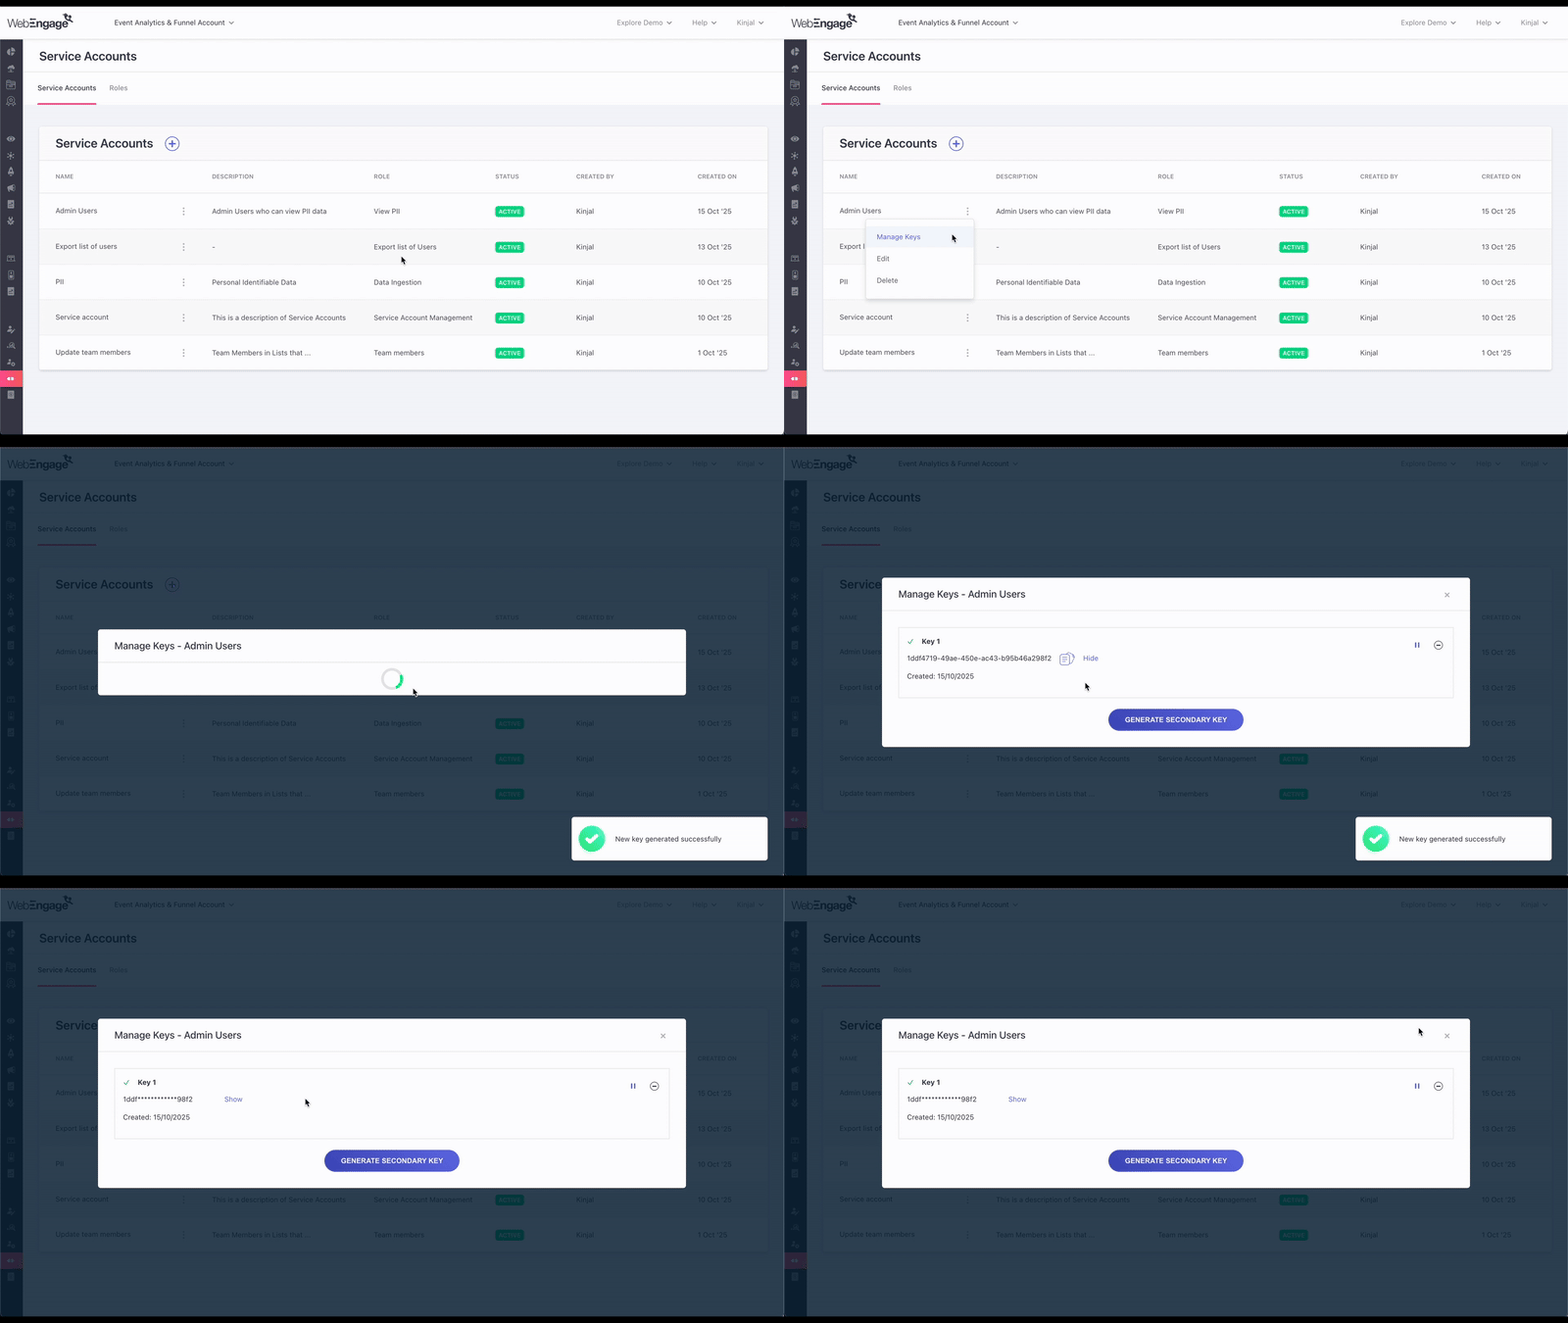
To manage keys:
- Click the burger menu next to the service account name.
- If no keys exist, click Generate Key to create a primary key.
- Optionally, you can create a secondary key by clicking Generate Secondary Key.
Key Rotation
To maintain security, it’s recommended to rotate your API keys periodically.
- Generate a Secondary Key: In the Manage Keys section, create a secondary key.
- Update Your Configuration: Replace the existing key in your deployment configuration with the secondary key. WebEngage will continue to work seamlessly with this new key.
- Verify and Remove the Old Key: After confirming that your integration works correctly with the secondary key, delete the old key. The secondary key will then become the active key for your account.
Edit Service Accounts
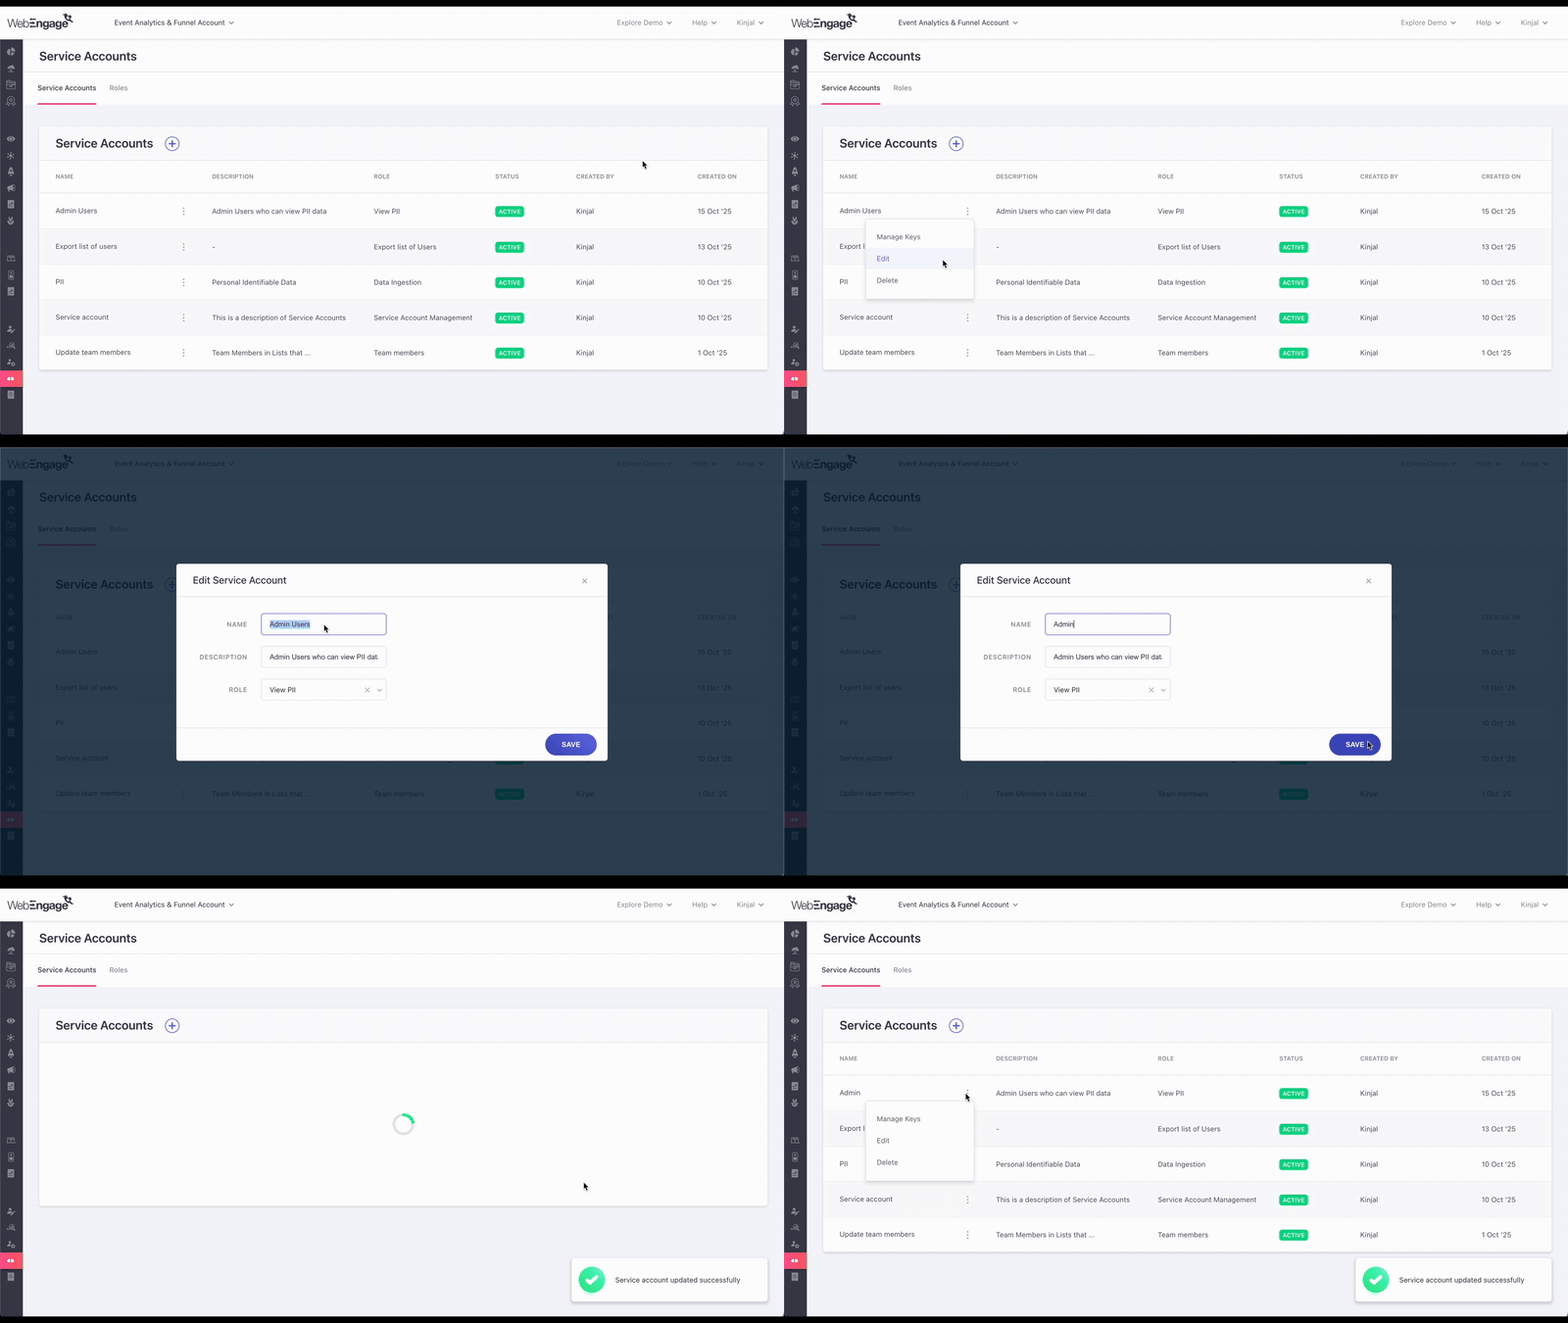
You can also edit your service accounts in by simply clicking on the burger menu and selecting 'Edit'. Once you make the changes, click on 'Save'.
Delete Service Account
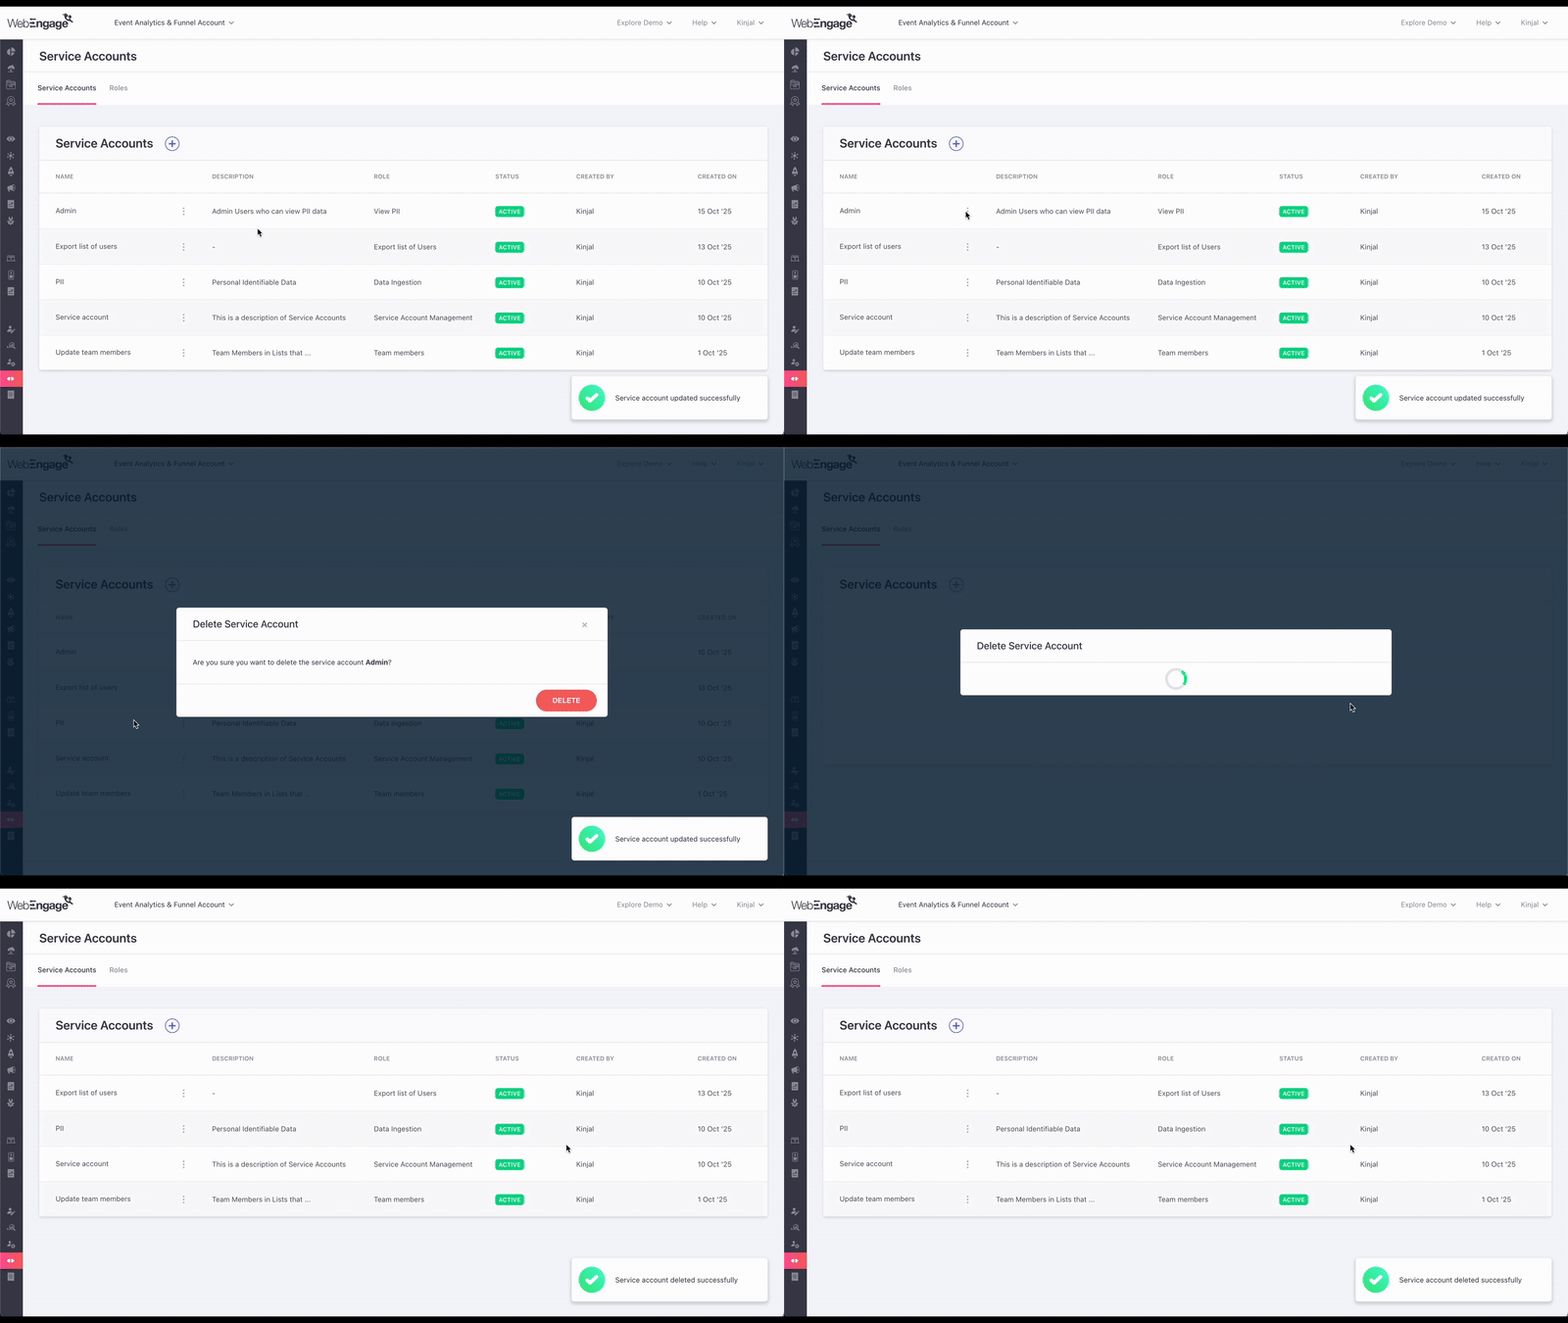
In case you want to delete a service account, you can do so by simply clicking on the delete option in the burger menu adjacent to the service account.
Updated 4 months ago