A step-by-step guide to seamlessly exporting segments to your Facebook Business account
Skip the tedious daily data uploads. Configure your one-time Facebook integration and start re-engaging your users on Facebook and Instagram with highly contextual campaigns instantly!
You can choose to integrate multiple Facebook Business Accounts with your WebEngage account. Simply follow these steps, and you'll be good to go in just 5 mins.
This is a great way to leverage the user data (user attributes) and behavioral data (events & event attributes) tracked for your app and website to create highly defined Audiences for Facebook & Instagram campaigns. Doing so also enables you to create highly targeted Lookalike Audiences that can amplify your visibility to users with matching interests, locations, and gender.
Before we dive into the steps, let's quickly walk you through the implications of export frequency.
Understanding Export Frequency
As discussed under Core Concepts of Segments, you can create 2 types of segments - Static Lists and Live Segments.
all segment created in WebEngage are rolling and dynamic in nature. This means that users are constantly added to / removed from a segment, as per the rules defined by you. This helps ensure that at any given point in time, a segment includes only those users whose actions (events) and attributes match the rules of segmentation specified by you.
Thus, with reference to the context discussed above, here's how each export frequency works for Live Segments:
One-time Export
The segment will be exported only once to the selected Ad Account. This means that if new users are added to the segment, or are removed from it in the future, then you may have to export the list again.
Recurring Export
The segment will be exported as a New Audience by default. This allows us to sync the Facebook Audience in real-time with the Segment. Hence, before each sync cycle, all the users are removed by Facebook from the particular audience and are re-populated with details of the new users that are currently a part of the segment.
How to Export
Please NoteA segment must include a minimum of 20 users for it to be eligible for export to Facebook Business, as per their guidelines.
Step 1: Initiate Export
Once you create a segment in your dashboard, you can export it to multiple Facebook Business Accounts through the following sections:
- Channels > Facebook
- Segments > List of Segments
- Segments > Segment Overview
- Segments > List of Users
Facebook
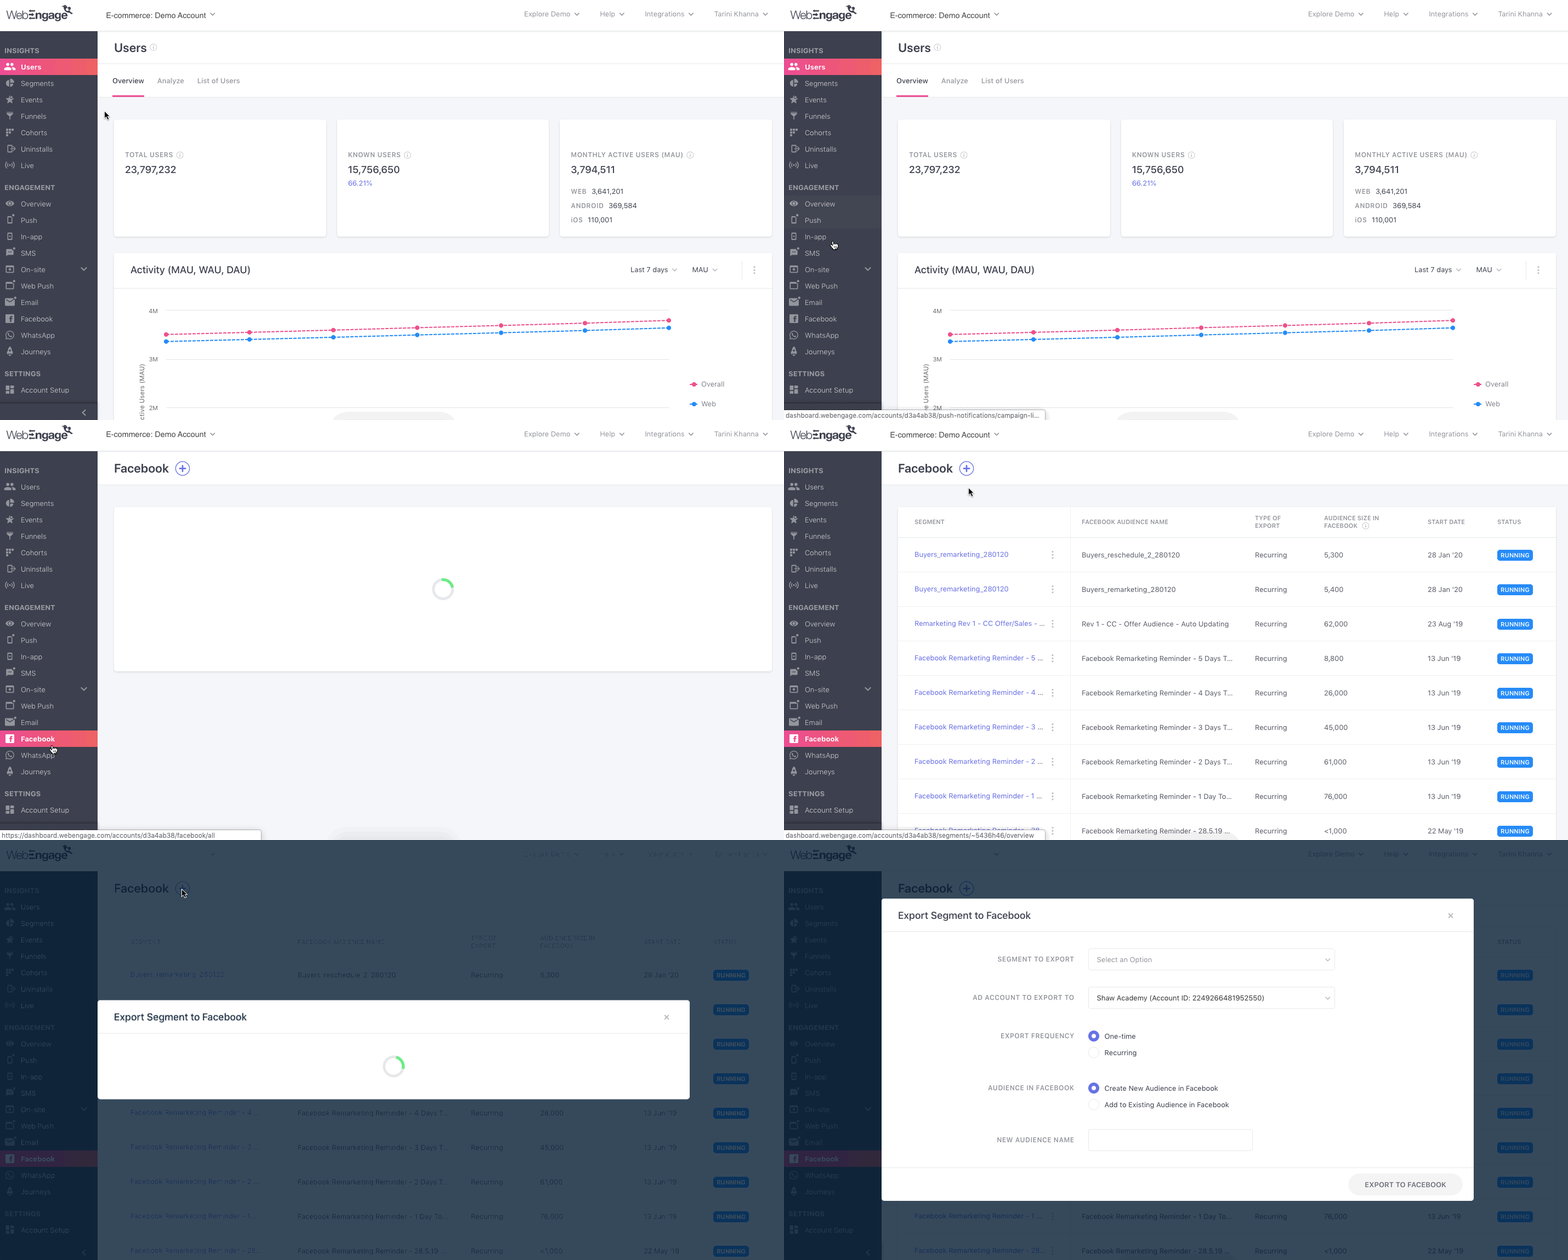
The easiest way to get started is to head over to the Facebook section of your dashboard and click the create icon placed on the top left, In doing so, you will be prompted to customize the export Frequency and select the Audience, as shown below.
Click to enlarge
List of Segments
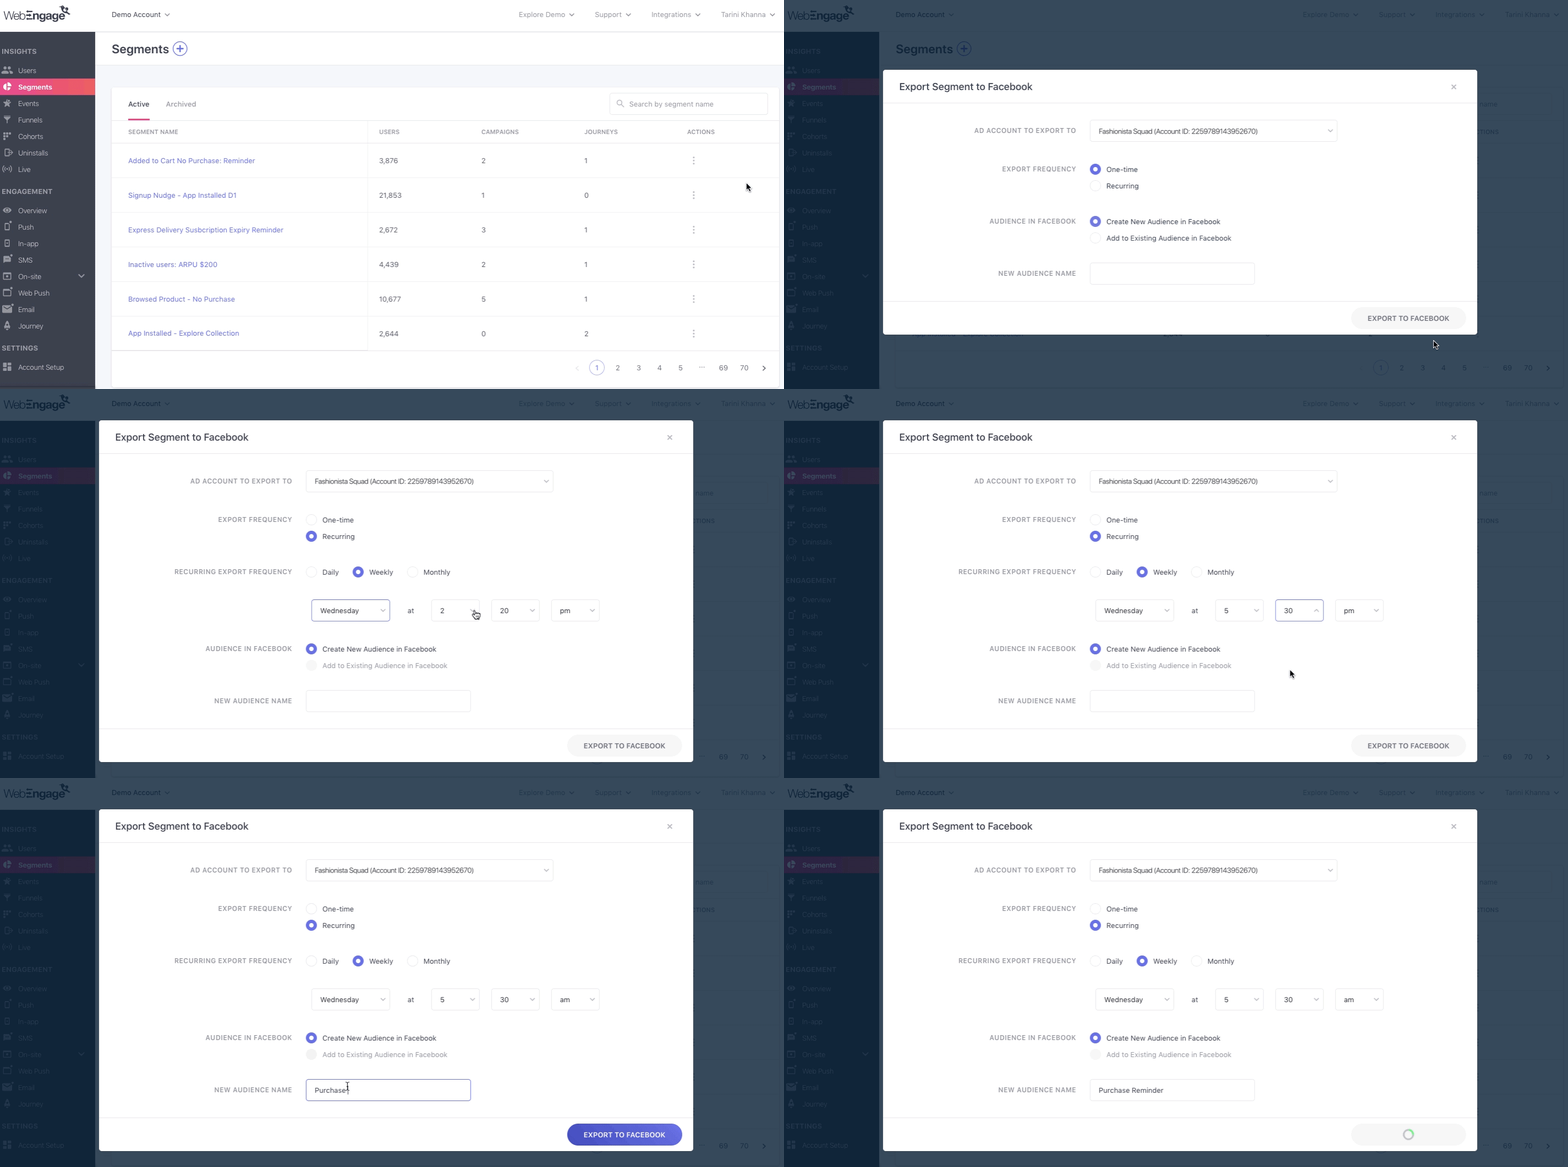
As shown below, click on the overflow menu nested beside a Segment's name in the List of Segments to export it. In doing so, you will be prompted to customize the export Frequency and select the Audience.
Click to enlarge
A Segment's Overview
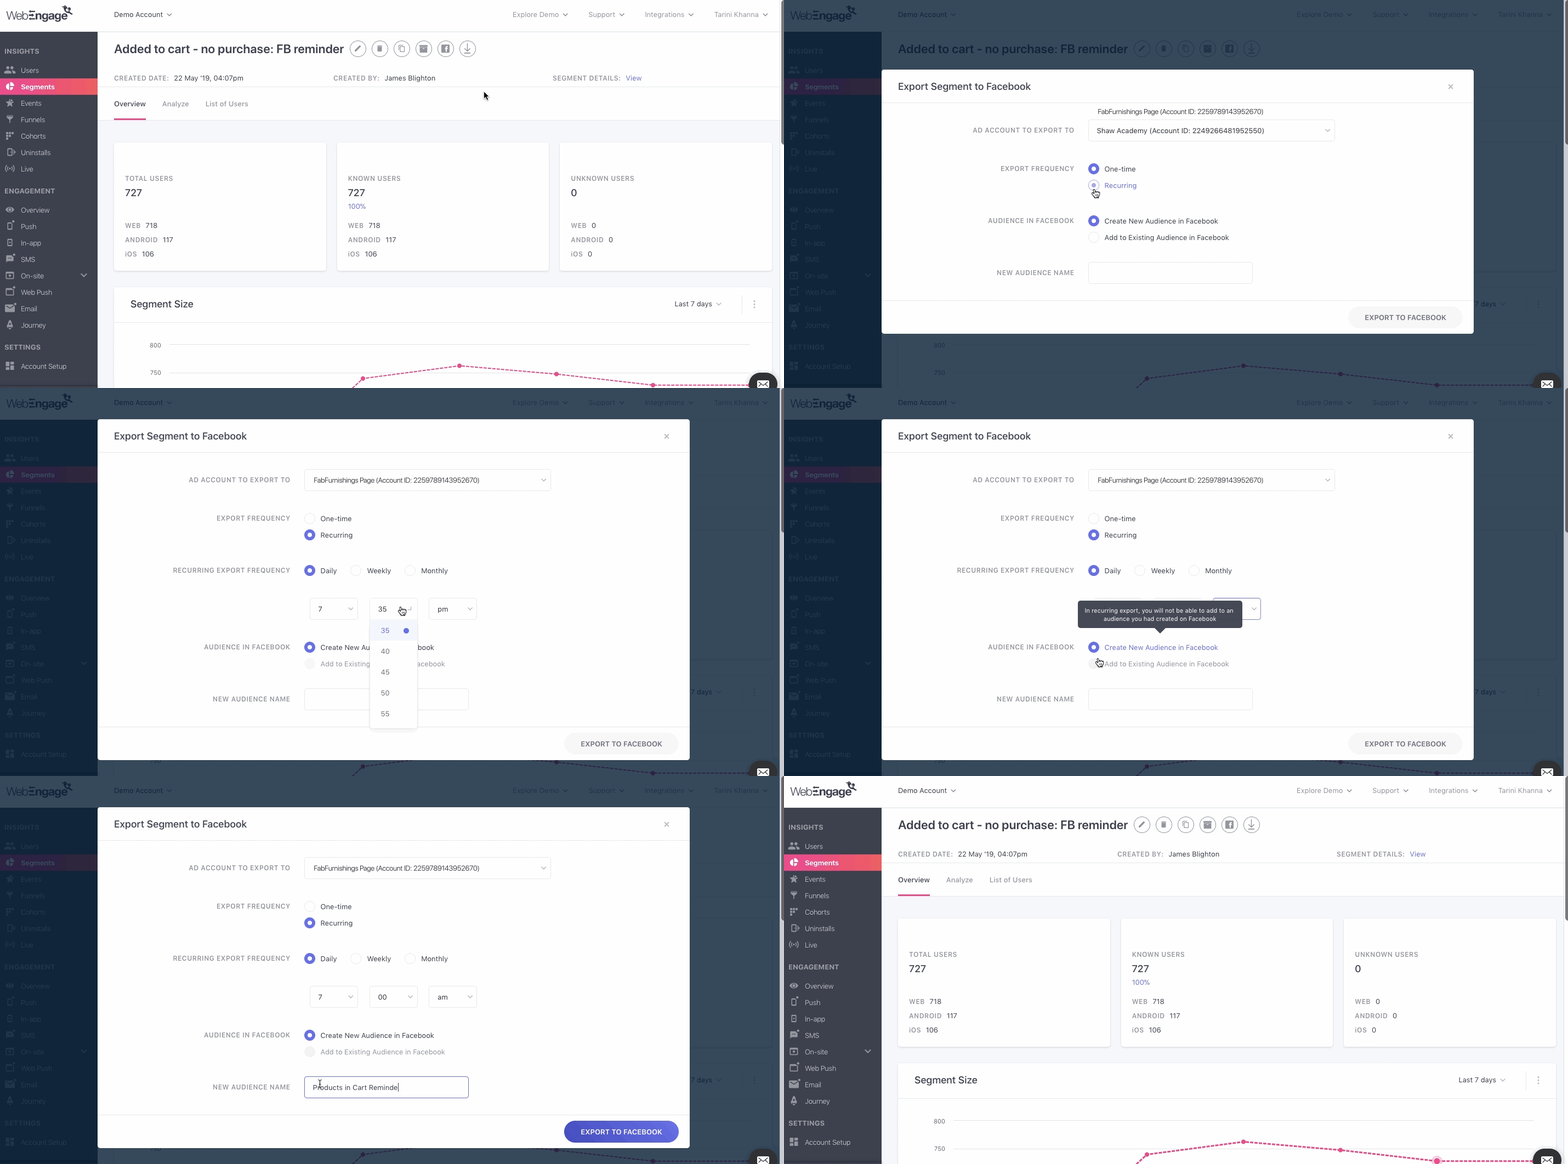
As shown below, click on the Facebook icon on the top panel of a Segment's Overview to export it. In doing so, you will be prompted to customize the export Frequency and select the Audience.
Click to enlarge
A Segment's List of Users
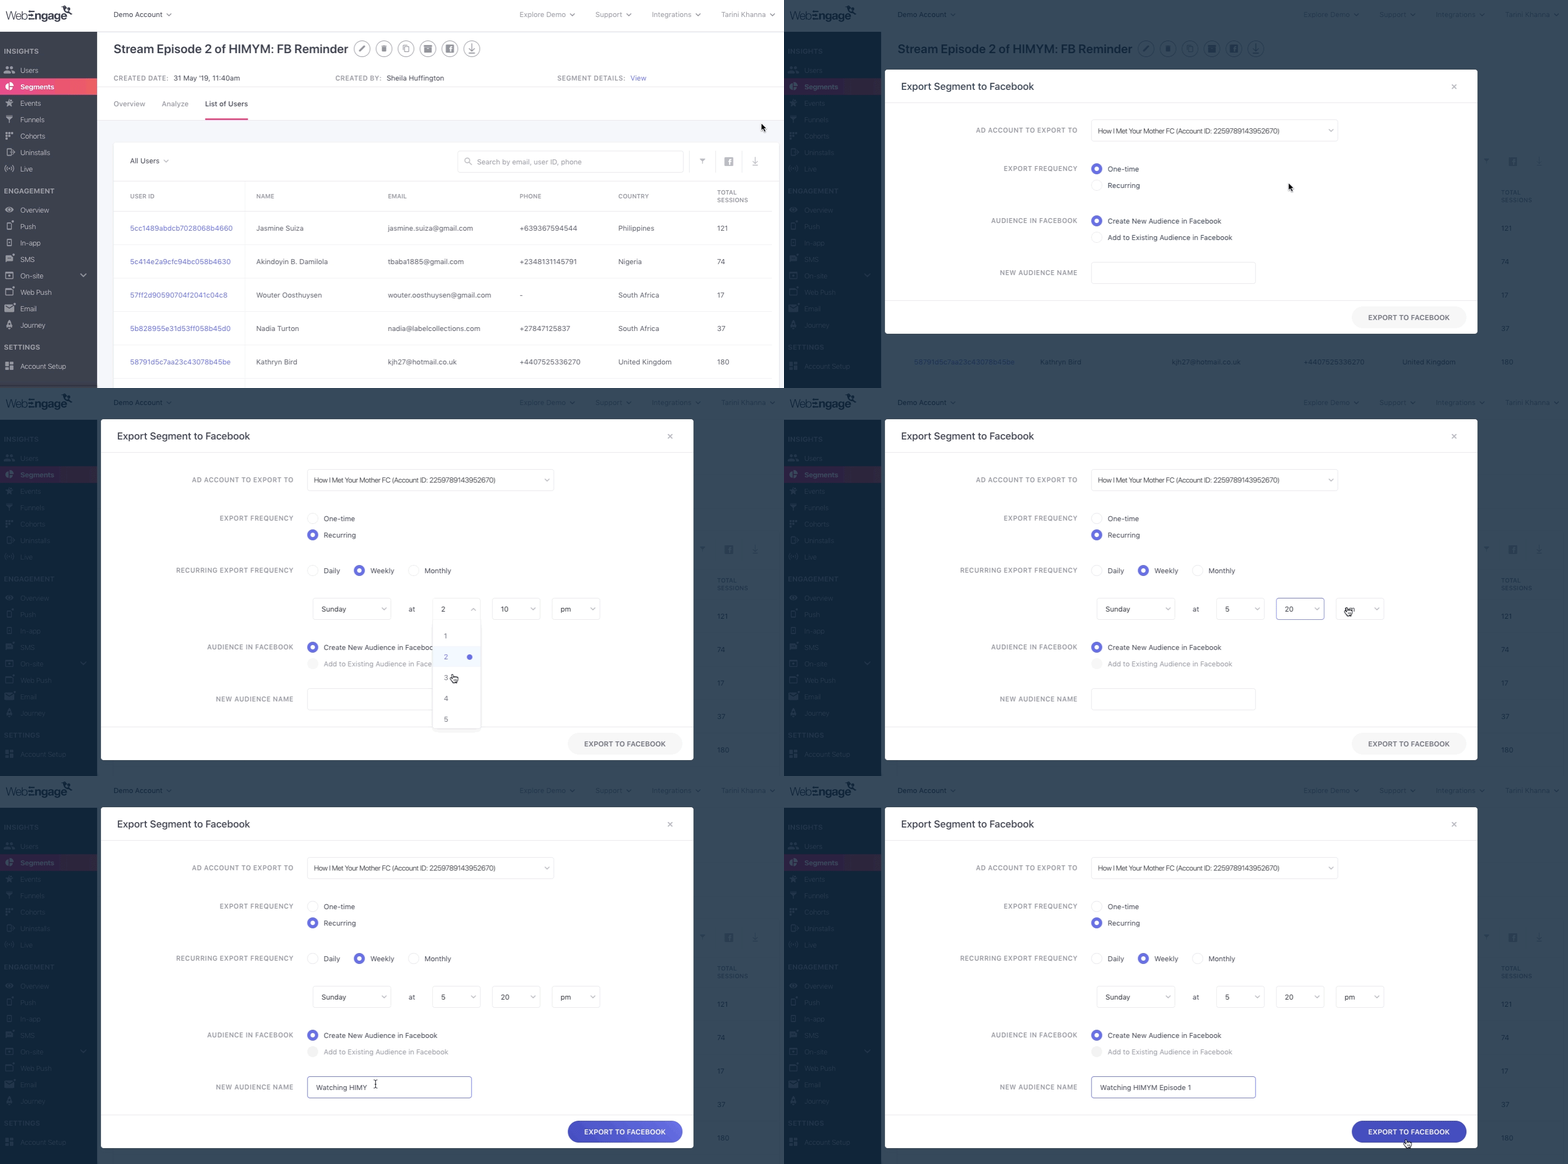
As shown below, click on the Facebook icon placed on the top right of the table to export the List of Users to your Facebook Ad Account. In doing so, you will be prompted to customize the export Frequency and select the Audience.
Click to enlarge
Step 2: Select Ad Account ID
As indicated below, you can export a segment to only one Ad Account at a time. You can always repeat the process to export the segment to additional Facebook accounts integrated with your WebEngage.
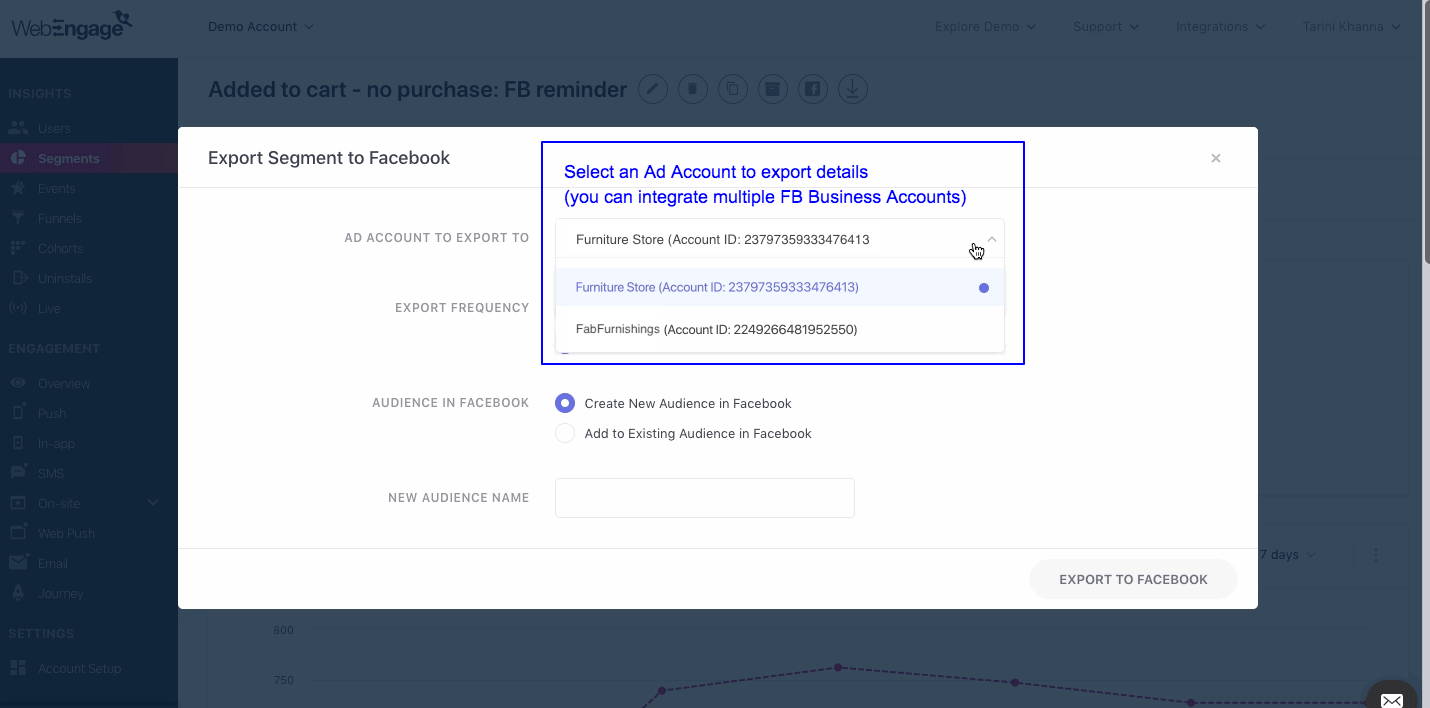
Click to enlarge
Step 3: Select Export Frequency
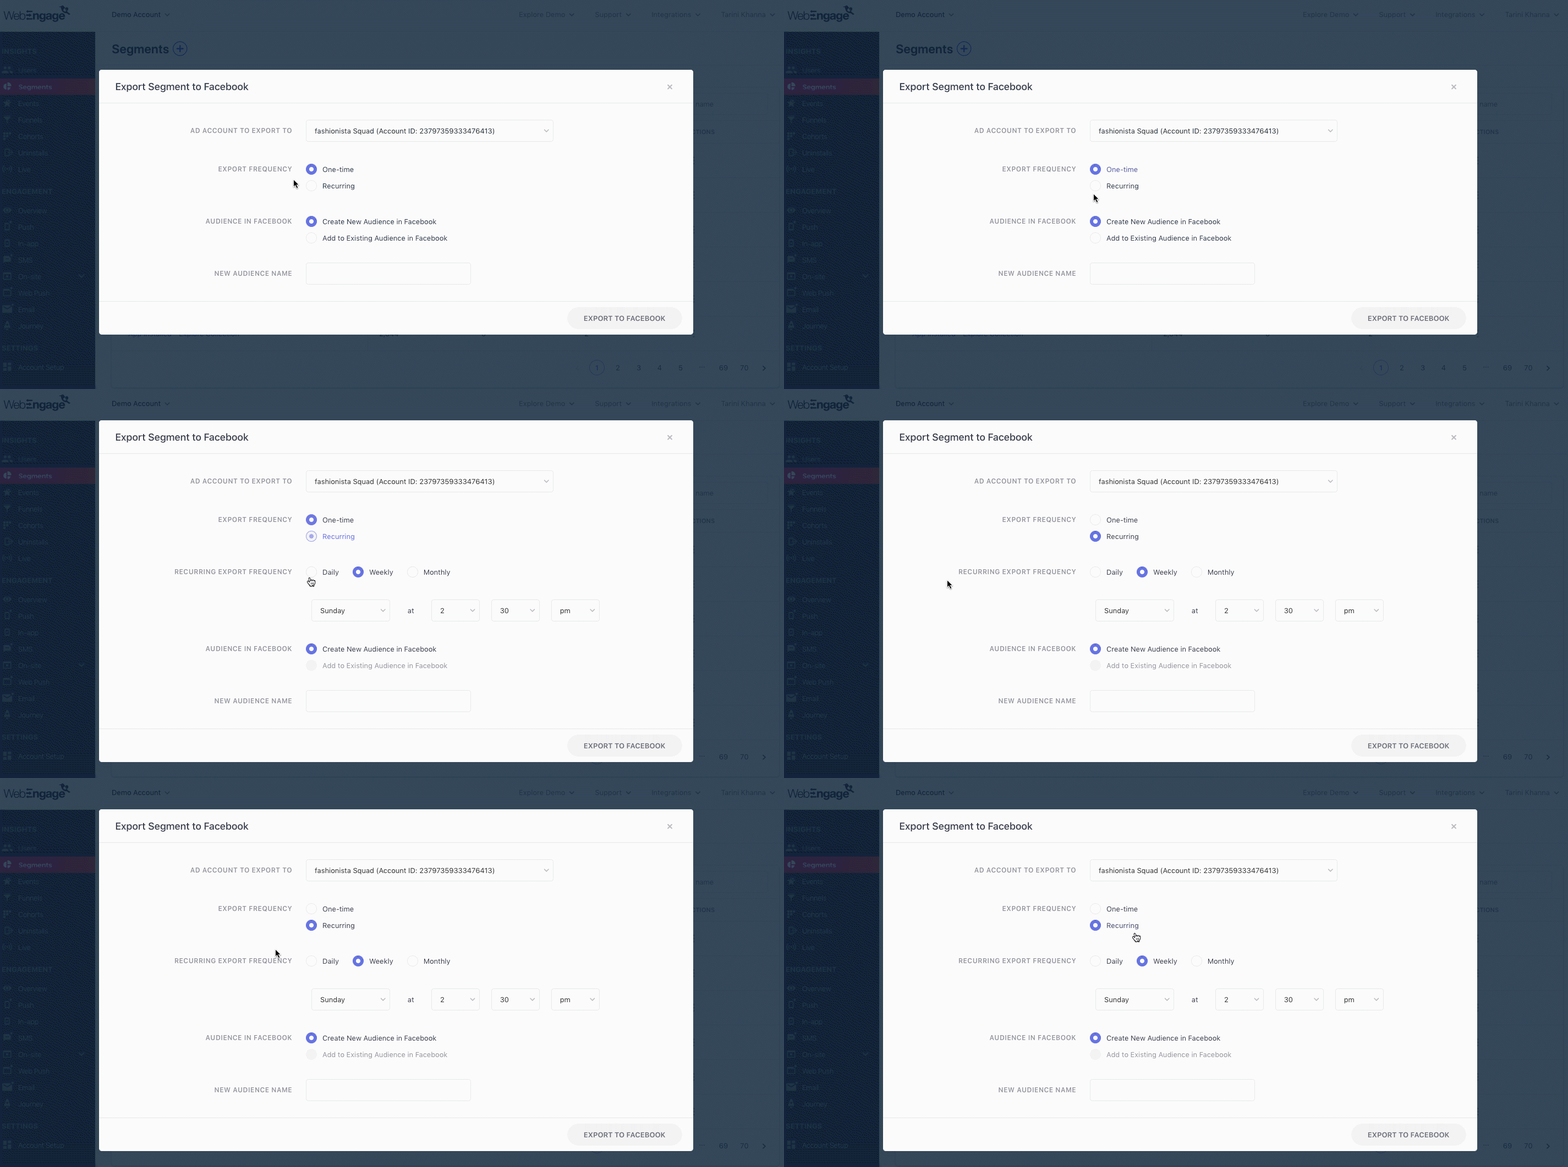
Click to enlarge
As shown above:
-
SelectOne-time to export details of all the users who are included within the segment at present
-
SelectRecurring to sync Facebook Audience with the segment in real-time
- In doing so, you will be prompted with an additional field, allowing you to specify the frequency and time of data export
Step 4 (If Recurring Export is selected): Specify Frequency
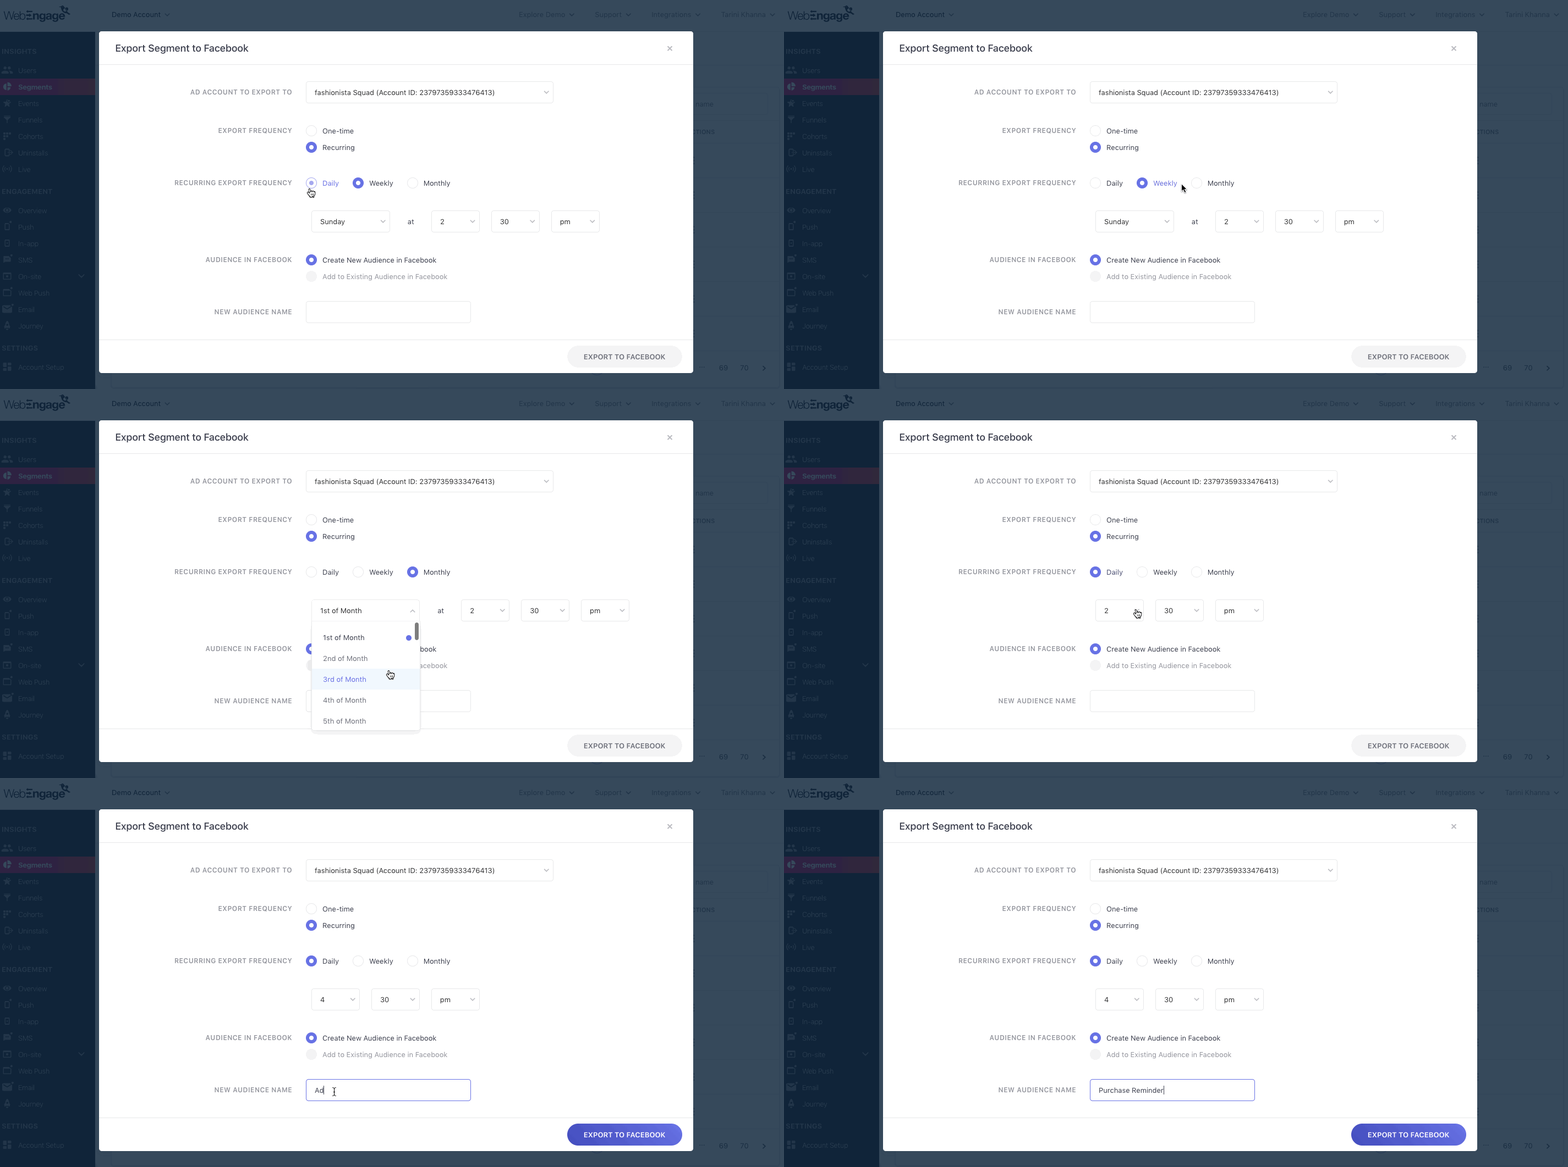
Click to enlarge
As shown above, you can select the frequency of a recurring export as Daily, Weekly or Monthly, depending on the rules of segmentation and your re-engagement strategy.
Step 4 (If One-time Export is selected): Specify Audience Type
Please NoteIf you have chosen Recurring Export at Step 2, then the segment will be exported as a New Audience by default. In such cases, this option will be disabled.
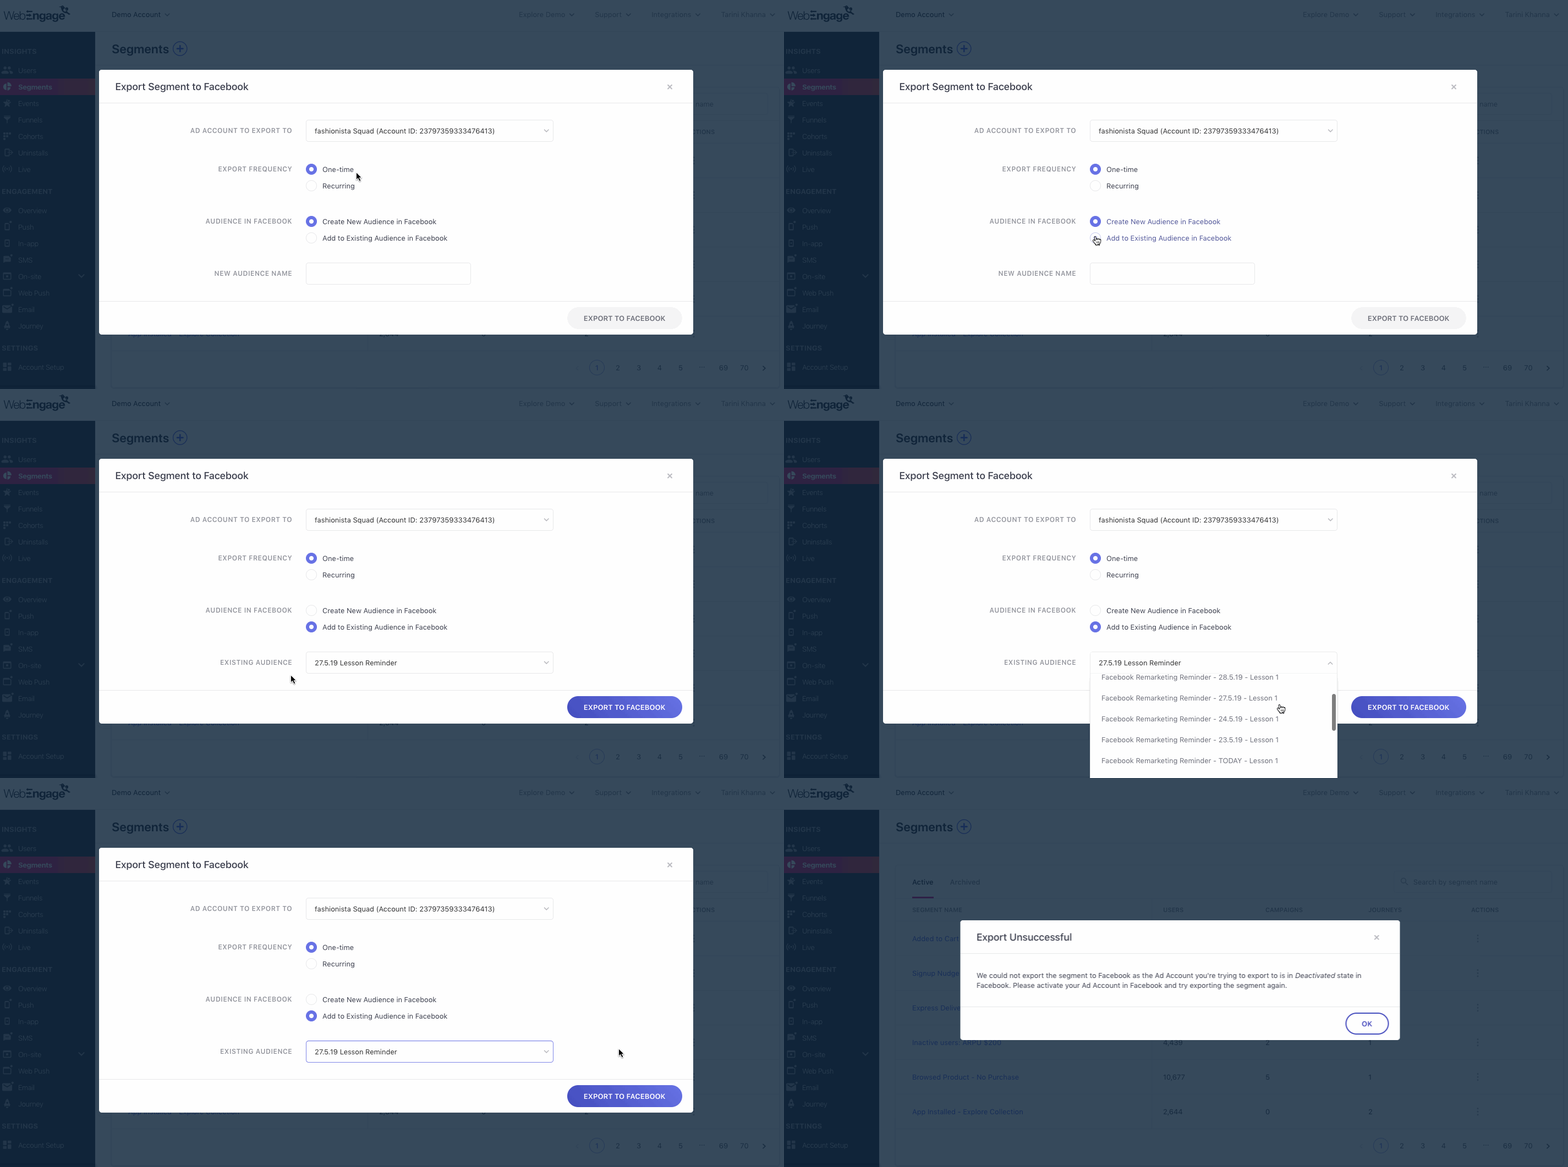
Click to enlarge
As shown above:
- SelectCreate New Audience in Facebook to export the segment as a separate list in your Business Account
- SelectAdd to Existing Audience in Facebook to export segment to an existing list
- In doing so, you will be prompted to select from a list of Existing Audiences (in the selected Ad Account), in the following field.
Step 5: Select/ Name Audience
-
If you have chosen_Create New Audience..._ at Step 4, then give it a unique name that helps you instantly identify it's purpose and user properties in your Facebook Ad Account.
-
If you have chosen_Add to Existing Audience..._ at Step 4, select the name of the Facebook Audience to which you'd like to add the user details.
And you're good to go!Click Export to Facebook and start working on a solid Facebook-Instagram re-targeting strategy :) Here are a few ideas to get you started.
User Details Exported to Facebook
Facebook allows third-party integrations like WebEngage, to export to a limited pool of details to any Business Ad Account, in a specified format. For the same reason, the format of the user details listed below could be different from the User Attributes shown under a User Profile or other sections of your dashboard.
- For all the user details listed below, if the corresponding information is unavailable, then the field will remain blank (value will be set to Null).
Here's a list of all the user details that are exported to your_Facebook Audience:_
User Details | What It Means |
|---|---|
| User's first name |
| User's last name |
| User's gender |
| User's registered email address |
| User's registered phone number |
| This filed includes:
|
| The year of birth, as tracked against the system user attribute, |
| The month of birth, as tracked against the system user attribute, |
| The date on which the user was born, as tracked against the system user attribute, |
| City, as per user's current location |
| State, as per user's current location |
| Country, as per the user's current location |
| Postal code/ ZIP code of the user's current location |
| Indicates the anonymous ID or unique ID assigned to a user in your WebEngage account |
How Facebook Identifies User's Facebook Profiles
Once a segment is exported to your Ad Account, Facebook runs an internal algorithm, to identify the users on the basis of Email ID, Phone Number and Mobile Advertising ID (IDFA/IDFV in case of iOS and Advertising ID in case of Android). If any of these identifier is present then the user will be added to your Facebook Audience.
For unknown users in the segment (for whom email id or phone number isn't present) Mobile Advertising ID acts as the main identifier.
When User's Phone Number & Email Address is Encrypted
WebEngage supports encryption of Personally Identifiable Information like the user's phone number and email address. Thus, when encrypted details are passed on to Facebook (through segment export), the user's Facebook profile will be found based on their MOBILE_AD_ID.
Thus, if an Advertising ID / Vendor ID is not captured for a user, then they will not be added to your Facebook Audience.
Managing Export List
Depending on the number of users included within the segment, it may take up to a few minutes to complete the process. As shown below, you can track the progress and sync status of all exported segments through this section.
As shown above:
- You can choose to delete an integrated Ad Account or modify the integration's name anytime you like through the overflow menu placed on its right.
- You can choose to Edit the rules of segmentation or Pause a recurring export anytime you like, using the Actions menu nested beside each exported segment.
- Once the export is complete, you will be able to see the exact number of users that have been found on Facebook under the column, Audience Size in Facebook.
- This number is updated daily at 12 pm UTC and 12 am UTC.
- However, in cases where the audience strength is less than 1,000 users, you will simply see <1,000 against the segment.
We hope this has enabled you to successfully export segments to your Facebook Business Account. Please feel free to drop in a few lines at [email protected] in case you have any further queries or related feedback. We're always just an email away!
Updated about 2 months ago