Understanding Properties
Property Basics
At WebEngage, we constantly strive to make the platform more dynamic so that your customers can have a seamless user experience. One such way to target the user based on their preference is App In-line Content.
To achieve a high level of personalization, WebEngage uses Property IDs where you can run your personalized notification. In simple terms, Property IDs are the predefined placeholders on the app's page/ screen to run your campaigns. To run App In-line campaign, it is mandatory to register the same at WebEngage.
Property IDs or Properties make it possible for users to create display ads that look native to the app and give them the option to run personalized campaigns on the app to help achieve their use cases without hindering the end user’s experience.
Please NoteA maximum of 40 campaigns can be created for a property
The general rule for creating App In-line Content is Create Property and Integrate WebEngage SDK >Register Property on the WebEngage > Link Property to the Campaign.
Create Property and Integrate WebEngage SDK
Learn more about Integrating Properties on Android and iOS.
Register Property on WebEngage

Click to enlarge
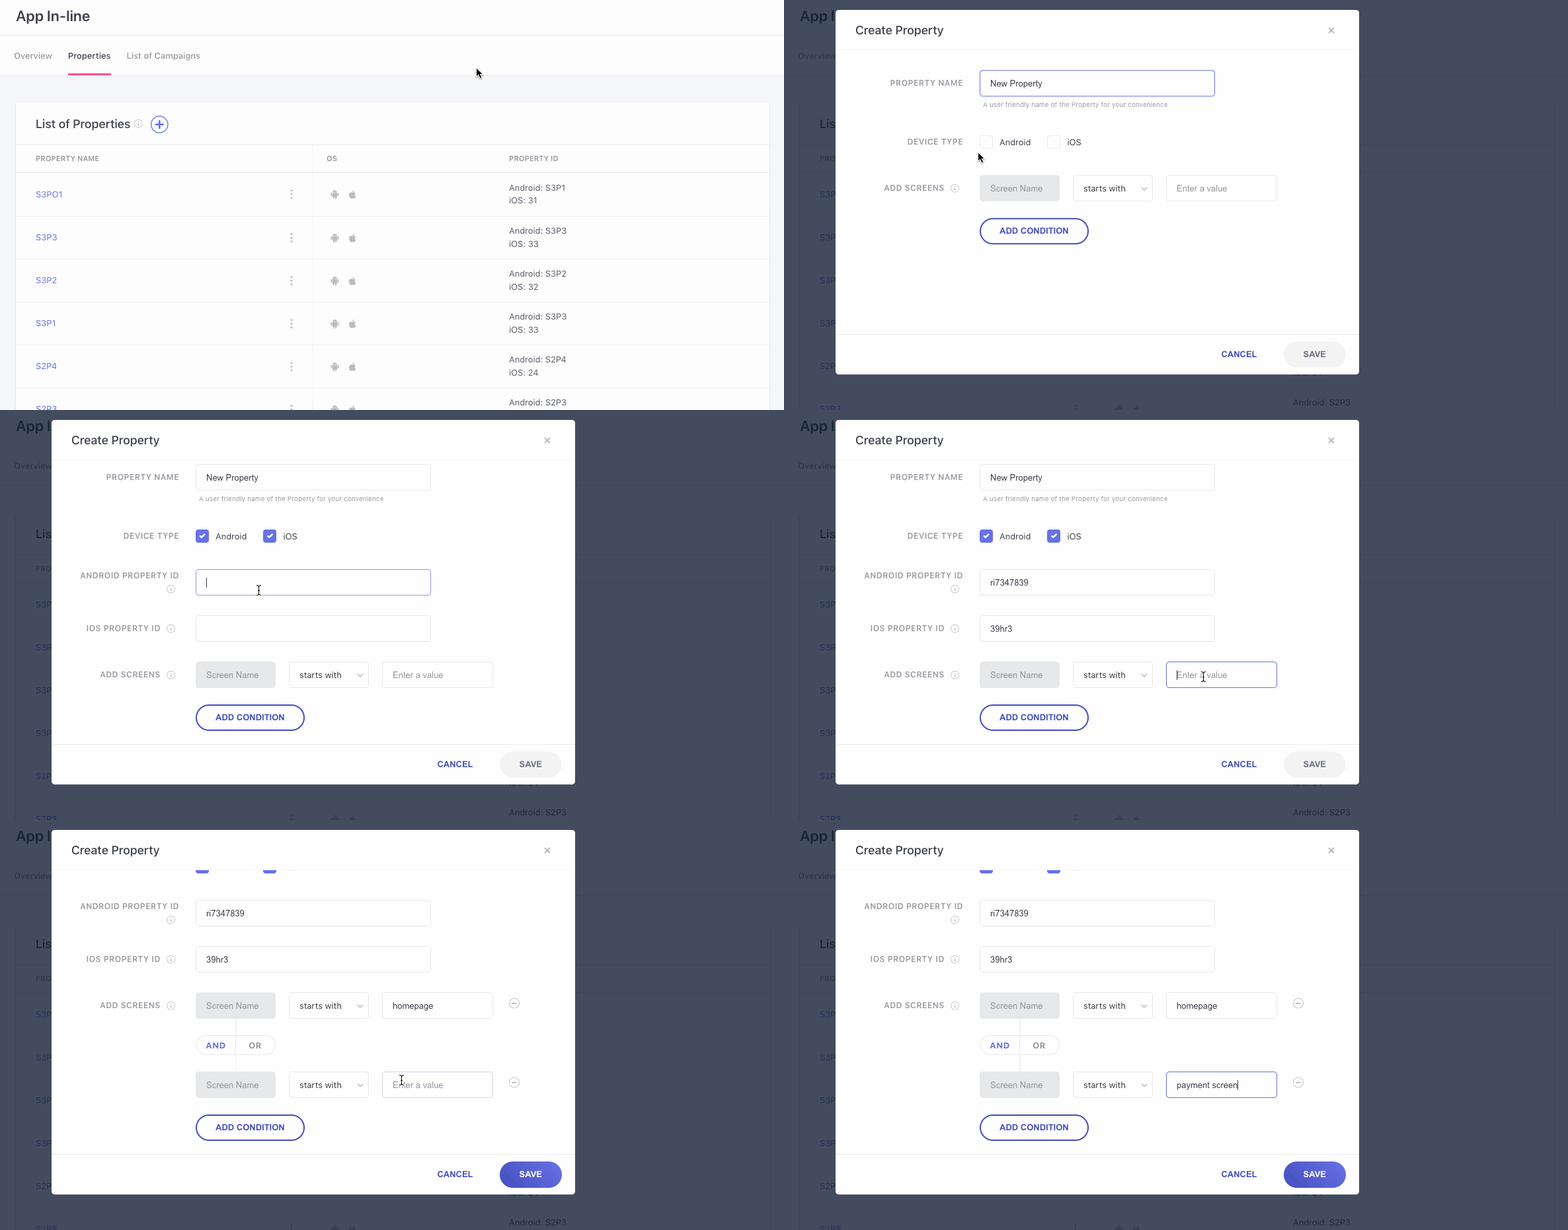
Step 1: Click on the Plus sign next to List of Properties. A new page pops up that will let you create your own property. The input fields required are as follows:
Property Name: It is necessary to give the property a name. In the input box, enter the name of the property that you want.
OS Type: You can choose to create campaigns exclusively for your Android or iOS users by specifying a Target Device. The following options can be selected here:
-
Android and iOS
-
Android
-
iOS
Property ID: Enter the Property ID for Android/iOS or both.
Please NoteWhile registering the property ID, kindly make sure the ID exactly matches as registered in your app.
Add Screens: You can choose to selectively engage users who visit a specific screen or a combination of related screens, in an ongoing session. Here's how you can configure this targeting rule:
- Step 1: Select a condition to set the context in which the Screen Name(s) should be understood by your app.
Screen Names can be prefixed by any one of the following conditions:
Equal to
Not equal to
One of
None of
Starts with
Does not start with
Ends with
Does not end with
Matches regex (regex is a sequence of characters that define a search pattern - used in several coding languages. Detailed read)
Does not match regex
Contains
Does not contain
Is empty (implies that message can be shown on any screen that has not been tagged with a name in your app's code)
Is not empty (implies that message can be shown on any app screen that has been tagged with a name in your app's code)
- Step 2: Add the Screen Name(s) as tagged in your app's code.
Please check in with your tech team to ensure that the values entered here match the names in the code. Any discrepancy between the two can cause your campaign to fail or randomly appear across your app, leading to confusing user experiences.
Please NoteAfter creating a Property, more screens cannot be added while creating campaigns.
- Step 3 (Optional): Click the Add Condition button to add more Screen Names to the targeting rules
In doing so, a new row will be added to the screen. Repeat Steps 1 & 2 and proceed. Further, you can choose to club multiple Screen Names by the AND/OR logic to define the scope of App In-line targeting.
How It Works: Clubbing Screen Names by AND/OR LogicAND: Clubbing Screen Names by the AND logic helps you narrow down the number of screens where the App In-line Content will be shown. It implies that when Condition 1 AND Condition 2 are met only then the campaign will run.
OR: Clubbing Screen Names by the OR logic helps you increase the number of screens where the App In-line Content will be shown. It implies that when either Condition 1 OR Condition 2 is met then the campaign will run
Please NoteWhile adding screens using the AND/ OR login, you will not be able to add more screens while creating the campaigns. However, you WILL BE able to change the Screen Name conditions from AND to OR and vice versa.
Step 2: Click Save to save the property created.
Link Property to Campaign
Refer tothis doc to link campaigns to property.
Accessing Properties
List of Properties
You can analyze the collective impact of all the Properties in your campaigns on driving key business goals and shaping user experience.
Property Overview
Here you can have a quick overview of the properties and details associated with them.

Click to enlarge
Property Details
As shown below, you can access Property by clicking on the hyperlinked name from the table below.

Click to enlarge
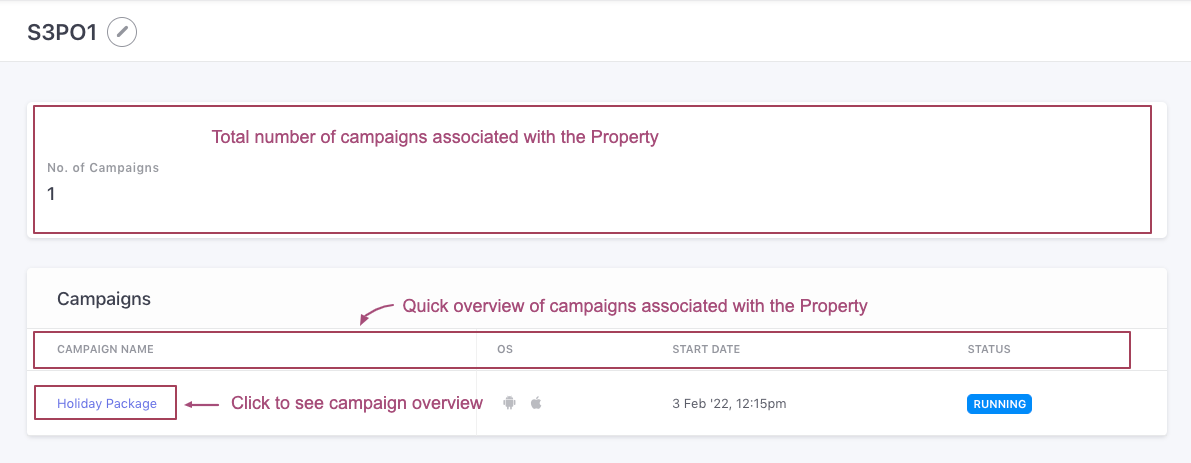
Property Details
This section gives you the details of the number of campaigns and their details, associated with the Property.

Click to enlarge
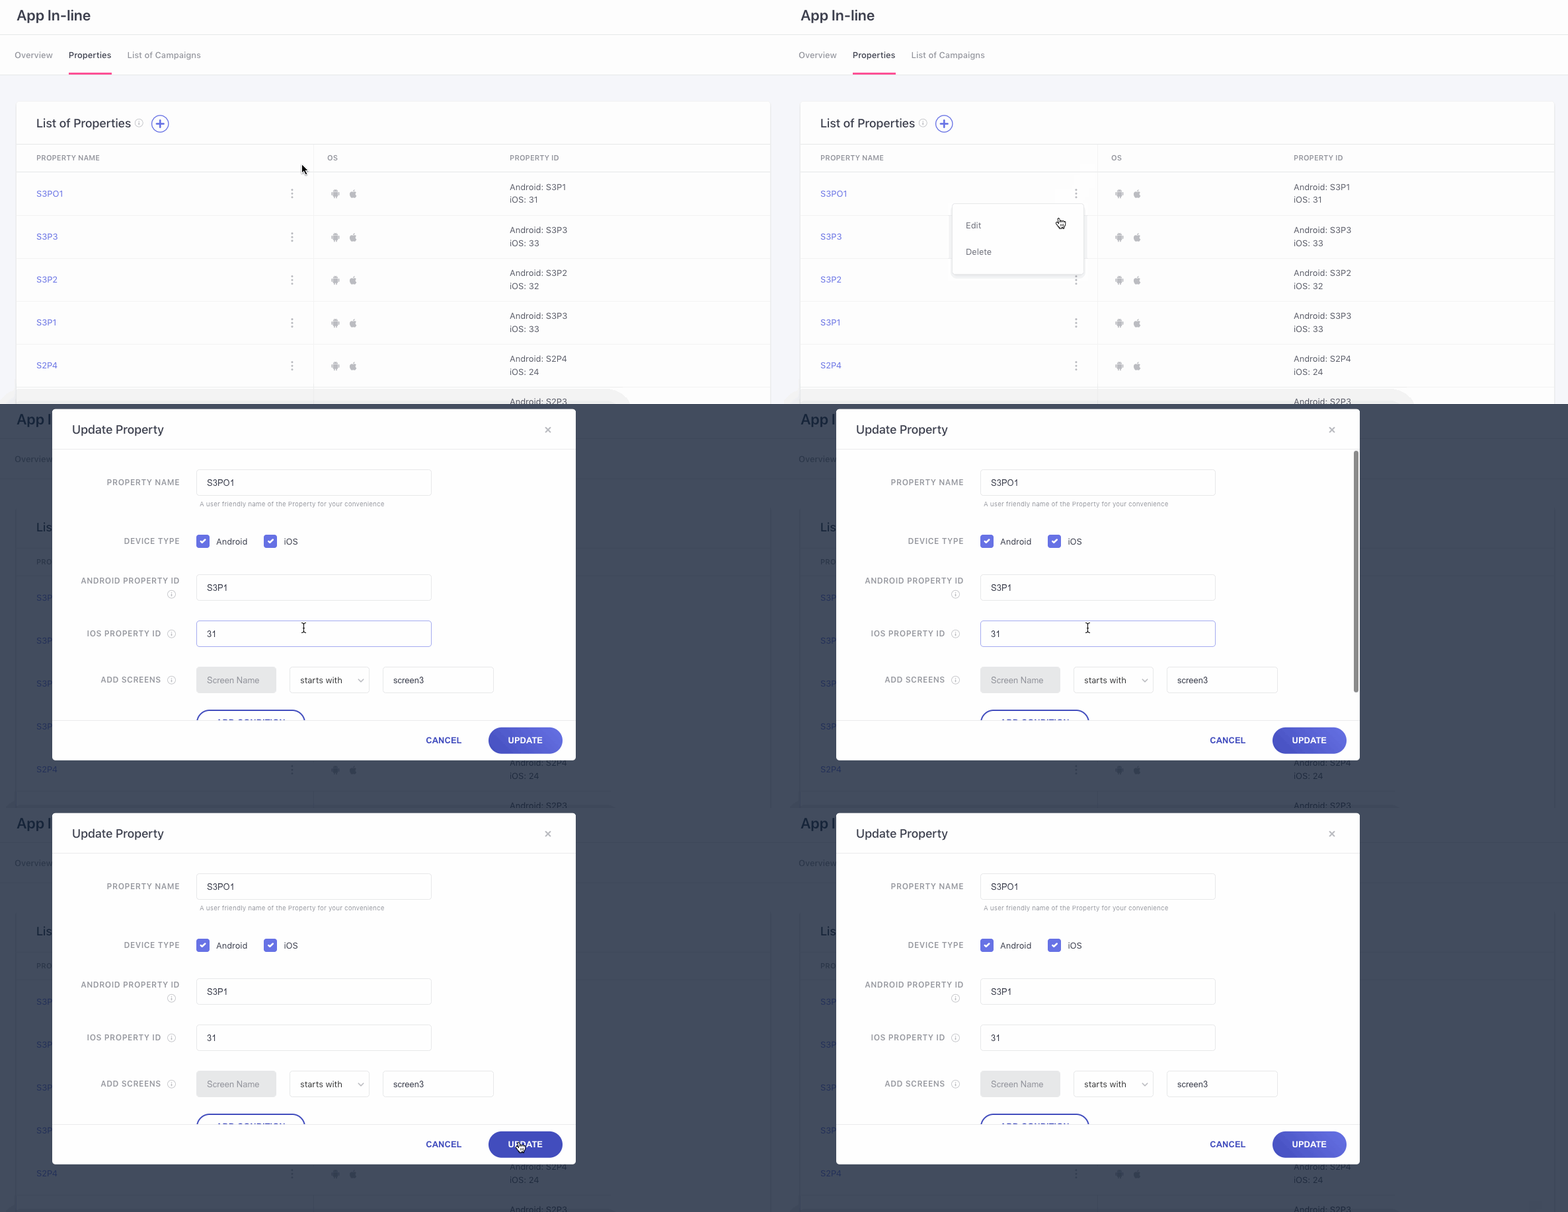
Editing Property
You can edit the Property details by clicking on the overflow menu next to the Property Name, as shown below:

Click to enlarge
Please NoteProperty can only be edited if it's not linked with any campaign.
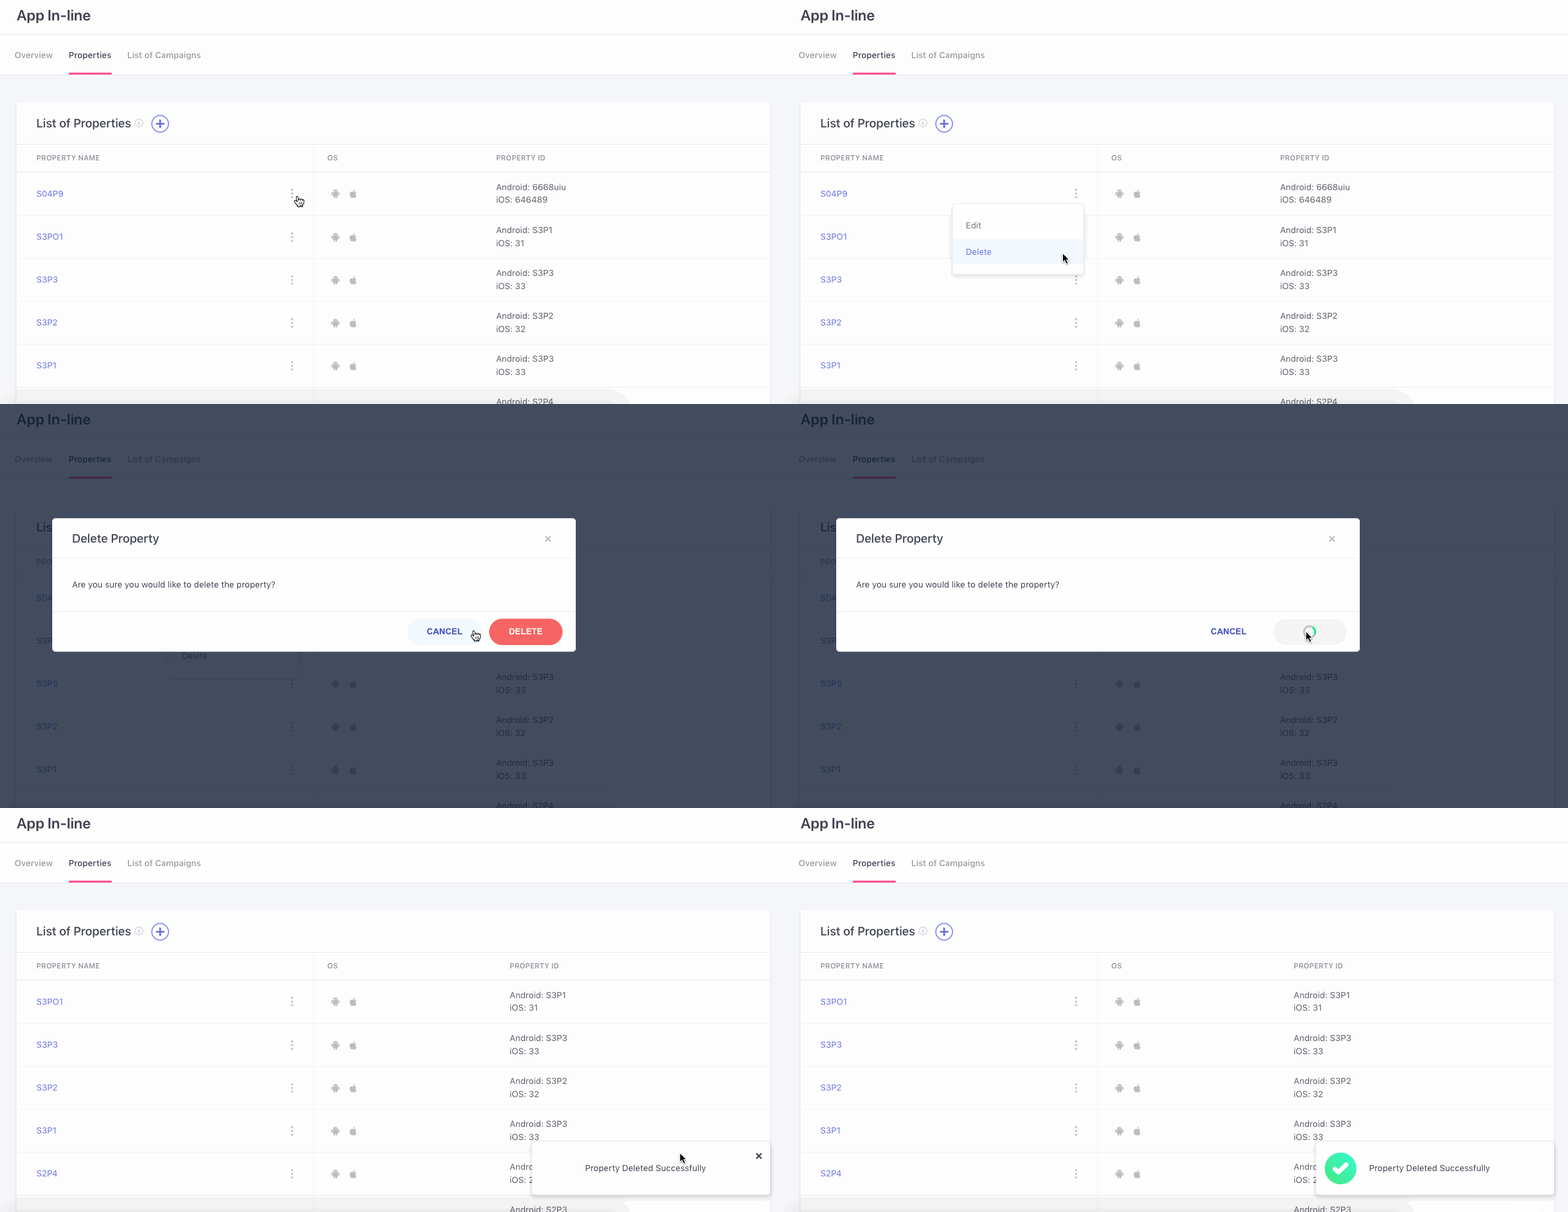
Deleting a Property
You can delete a Property by clicking on the overflow menu next to the Property Name. Deleting the property is an irreversible action.

Click to enlarge
Please NoteA Property can only be deleted if it is not associated with any campaign.
Updated 4 months ago