Creating Dynamic Push Experiences Using Key-Value Pairs
A beginner's guide to leveraging Key-Value pairs to customize your Push Notifications, app experience & much more!
Please NoteThis document is an extension of Step 3: Message of Push campaign creation. It elaborates on how one can leverage the feature of Key-Value Pairs to create highly customized app experiences through Push Notifications.
Before we deep-dive into how you can leverage Key-Value pairs to create highly personalized Push Notifications and app experiences, let’s get you acquainted with how it works, starting with the basics, payload.
What is Payload?
When you launch a Push campaign, its message is sent as a payload to the user’s device. You can think of a payload as a package of information that is transferred from your WebEngage account through FCM (Firebase Cloud Messaging) or APNs (Apple Push Notification service) to the Android or iOS app installed by your users.
The payload includes key details like the actual message, button links, and information about how the system should notify the user. Whenever the payload is received by your users’ device, it’s recorded as the campaign event, Push (Mobile) Received in your dashboard.
With WebEngage, you can send extra payloads or custom data to your app with each Push campaign by adding Key-Value pairs. As shown below, this can be done at Step 3: Message while creating the Push Notification.

Sending custom data by adding Key-Value pairs to a Push campaign
Understanding Key-Value Pairs
You can think of Key-Value pairs as a set of linked data points in which the Key acts as a unique identifier and the Value either represents the data or points to the location of the data that is identified by the Key.
For example, when browsing through a dictionary, if you're looking up the meaning of the word 'Conspire' then as per convention, you will go to the page that lists all the words beginning with 'Con' and hunt down 'Conspire'. Thus, here 'Conspire' is the Key and its definition is the Value.
Similarly, in the context of a mobile app, if the Key is Sound, and you have specified its Value as ping.caf, then the app will play the respective sound file as the Push Notification's alert tone!
Exciting isn't it?
However, in order to play a custom sound when your Push Notification gets delivered, you will need to build the Key-Value pairs of 'Sound' and 'Sound file name' into your app's code. This means that each time your app received the pair in the payload, it must know that it needs to access the sound library to fetch the file name specified as the Value.
Don't worry, accomplishing such use-cases is not as daunting as you think. Trust your Engineering team to take care of this :)
The best part -Key-Value pairs are not visible to your users. All this data is sent as an extra payload to your app, causing its code to perform the specified action and render the Push Notification accordingly.
Thus, building Key-Value pairs in your app's code is one of the most scalable ways to dynamically control the way each user experiences your Push Notification and app. Here's how it works:

Approach to Defining Key-Value Pairs for your App
Key-Value pairs work only if your app recognizes the Key and knows how to respond with the right Value. Hence, you will need to work closely with the Engineering team to think of the use-cases you’d like to solve for, plan and build the same into the app’s architecture.
Here’s how you can go about it:
Step 1: Identify gaps that you’d like to fix in your user’s lifecycle and app experience
Step 2: Come up with Push campaign ideas that can help you achieve your goals
Step 3: Bring in the Engineering team to work backward from these ideas and understand what your app will need to accomplish to execute the campaigns
Step 4: Allow them to build the Key-Value pairs into your app’s code and request a log of the pairs and the use-cases they solve. This is a great way to ensure that the correct Key-Value pairs are added while creating the campaign.
Here's a sample Key-Value log to help you get started:
| Use-case | Key | Value Sample |
|---|---|---|
| Sending notification's heading to your app for internal reporting | title | Copy the exact heading of the campaign as the Value |
| Sending notification's message to your app for internal reporting | body | Copy the exact message of the campaign as the Value |
Sending campaign details to your app for internal reporting (the same details can also be passed on to_Google Analytics as a part of your app stats)_ | utm |
(all the utm parameters and their corresponding values must in a format that is understood by your app) |
| Setting an expiry date on an on-going offer being promoted through the Push Notification | expiry_date | 11/06/2019 23:59:00 (as per the date-time format accepted by your app) |
| Sending ID of the Product / Course / Movie / Show / Collection being promoted through the Push Notification, to your app for internal reporting | id | 12345 (add the exact product id, as listed in your app's product catalogue) |
| Sending details of the category of the Product / Course / Movie / Show / Collection being promoted through the Push Notification, to your app for internal reporting | category | 67890 (add the exact product category, as listed in your app's product catalogue) |
| Deep linking Push Notification to a particular app screen that has been built specifically for an offer | appurl |
(all the paths such as id, category, pagetype and their corresponding values, separated by:, will need to be defined in your app) |
| Deep linking to a particular offer or section listed in the app's home screen | appurl |
(banner in the app's homepage must be tagged as the value specified against it) |
| Adding a custom image from your app to the Push Notification's banner | image | Add the name of the image file that should be displayed in the notification like: (image must be a part of the app's image library) |
| Customising the notification's font style (define separate Keys for the title, message & CTA text) | font_style_title | font_style_body |font_style_cta | Add the name of the font file that exists in your app's font library against the respective Keys, like: {"Roboto-Black.ttf"} |
| Customising the notification's font color & button color (define separate Keys for the title, message, CTA text & button background) | font_color_title | font_color_body |font_color_cta| button_bg | Add the name of the color that exists in your app's font library against the respective Keys, like: {"#49ffd1"} |
| Customising the alert notification sound when a user receives the Push Notification | sound | Add the name of the sound file that exists in your app's sound library, like: {"pulses.wav"} |
- Creating Fallbacks When Directing Users to a Link
When customizing on-click links to render specific app screens, you and your tech team will need to plan for fallbacks that allow default behavior to prevail if faulty Key-Value data is entered while creating the campaign. It could be as simple as directing users to the home screen, or an equivalent of the same.
- Predefined iOS Keys
Apple Push Notification Service (APNs) supports setting alert preferences and sending specific predefined data points to your iOS app using these Key-Value pairs.
Step 5: Test with internal team members and start engaging users with tailored app experiences!
Please NoteLearn more about Customizing Android Push Notifications and Customizing iOS Push Notifications.
Implementing Key-Value Pairs (Use-cases)
The most common use-cases for Key-Value pairs are personalizing your messages, app screens, building deep links, and transmitting additional data to your app. Let's walk you through a few scenarios to help you get started:
1. Collapse Key to update Push Notification
A collapse key is a unique identifier for a push notification that allows newer messages with the same key to replace older ones. This ensures users receive only the most relevant notifications without redundancy..
To use a collapse key, follow these steps:
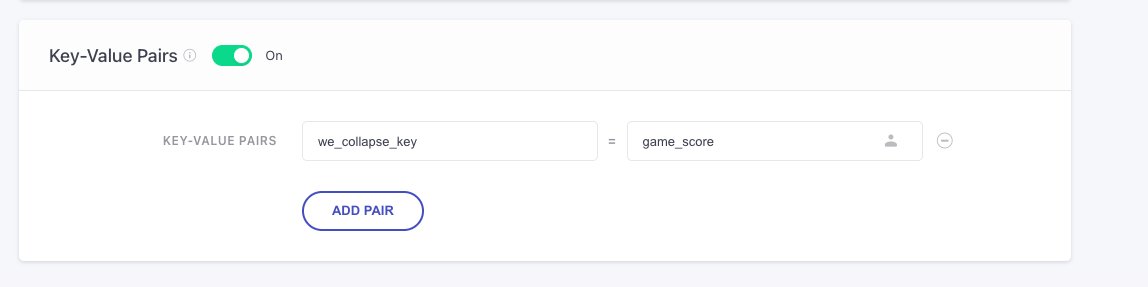
- Enable Key-Value Pairs: In the campaign settings, enable the option to add custom key-value pairs.
- Define the Collapse Key:
- Set the key as
we_collapse_key. - Assign a unique value that represents the notifications (e.g., "game_score" for live score updates).
- Launch the First Push Notification (Push-1)
- Set the key as
- Update the Notification (Push-2):
- If you need to replace Push-1 with an updated message, create a new push notification.
- Use collapse key (
we_collapse_key = game_score) as Push-1. WebEngage will automatically replace the older notification with the new one instead of showing both.
Supported from Android version 4.18.1 and iOS version 6.15.0 onwards.
- Use-case: Managing Multiple Push Campaigns for Order Updates:
- Sending multiple push notifications for an order, such as Order Confirmed, Order Shipped, and Order Delivered, may clutter the notification tray. Using a collapse key ensures only the latest update is visible.
- Should use
we_collapse_key = order_updateas the collapse key across all campaigns.
Few more Usecases🔹Flash Sales🔹
An e-commerce app runs a flash sale. Instead of sending multiple notifications:
- "Only 50 left"
- "Hurry, just 10 left"
- "Sold Out"
They use
we_collapse_key = flash_sale, so users see only the latest stock update- keeping them informed without flooding their notification tray.🔹 Live Class Reminders🔹
A student signs up for a webinar series. The app sends:
- "Class starts in 24 hours"
- "Class starts in 1 hour"
- "Class is live now"
With
we_collapse_key = live_class, only the most relevant reminder stays visible, ensuring a cleaner and more effective user experience.
2. Customizing Push Notification's Colors, Fonts & Alert Sound
One of the best strategies to fight Push blindness and have your notification stand out is by making it look and sound unique. Yes, we lay particular emphasis on 'sound unique' because that's the first step in letting a user know that a valuable message awaits them from your app!
These customizations can easily be implemented by:
Step 1: Building them into your app's code. (Getting started)
Step 2: Invoking them through Key-Value Pairs each time you create a Push campaign.
Let's go over a short use-case to show you how you can go about it:
Customising Push Notification's Title & Message Color & Alert Sound for X'Mas SaleLet's take the example of an e-commerce app that deals with home decor. They're hosting a special Christmas Sale to boost year-end revenue and have planned a series of Push Notifications as a part of their engagement strategy.
Marketers of the app decided to customize their Push Campaign's colors and alert notifications in a bid to stand in the average user's festive season notification stream (which can be pretty overwhelming, right?)
Here's how they executed the plan:
Step 1: They teamed up with their tech team to build the following Key-Value Pairs in their app's code:
-
Key: font_color_title | Value:
{“notif_custom”:”#9c010f”}(customizes Notification's Title color) -
Key: font_color_msg | Value:
{“notif_custom”:”#00ada5”}(customized Notification's Message color) -
Key: sound | Value:
{"alert":"alert message", "sound":"jingle.wav"}(customizes Notification Alert Tune)
Step 2: As shown below, they added the Key-Value Pairs to the Push campaign at Step 3: Message while creating it.

Click to enlarge
Thus, users will experience the Christmas Sale Notification, as per the below visual:

Click to enlarge
Related Reads
3. Personalizing App Screen Content to a User's Attributes
Must ReadPlease ensure that you have a robust understanding of User Attributes and related concepts before proceeding. Doing so will help you understand the steps discussed below, better.
Wouldn't it be amazing if you could create one-on-one app experiences tailored to each user's behavior and preferences? With Key-Value pairs, you can easily customize the contents of an app screen to each user's membership status, reward points, player level, subscription status, LTV (lifetime value) and much more!
As you know, such details can be tracked as Custom Attributes for all your users in your WebEngage account. Thus, you can leverage this data to build Key-Value pairs in your app's code and plug the corresponding Value into a screen's content to dynamically personalize it.
Let's go over a use-case to demonstrate how you can go about it:
Personalizing Screen Content Using Key-Value PairsLet's take the example of an e-commerce app that exclusively sells clothing and accessories. The app occasionally hosts flash sales to drive platform engagement and offers cashback on each transaction to incentivize conversion.
In a bid to make their flash sale more lucrative, marketers of the app decided to add a Cashback Credit section to the offer page, highlighting the credit amount a user can redeem if they make a purchase today.
Here's how they executed the plan:
-
Cashback credits received by each user are tracked as the custom user attribute, cashback_refund_amount_received in their WebEngage account.
-
Thus, they used this attribute to build the following pair into the app's code:
- Key: attribute | Value: cashback_refund_amount_received
-
Then, they added the attribute as a placeholder under the Cashback Credit section in the app screen. This way, each time a user lands on the page, the section will get populated with the value (amount) tracked for their attribute.
Now, let's show you how they added theKey-Value pair to the Push Notification:

Click to enlarge
Step 1: As shown above, scroll down to Key-Value pairs nested under Message and click the Add Pair button.
Step 2: Click on the personalization icon and select the Custom User Attribute to which you'd like to personalize the Value. For example, in the above visual we have added the following Key-Value Pairs to the campaign:
-
Key: appurl (helps your app identify the app screen on which the cashback amount needs to be shown) | Value:
{"cpid": "50","page_type":"flash_sale"} -
Key: expiry date(to stop showing the cashback amount once the offer ends)_ | Value:
09/06/2019 05:59:00 -
Key: attribute | Value:
cashback_refund_amount_received
4. Deep Linking to App Screens and Customizing Screen View
Deep linking is a technique that allows you to direct users to a particular screen or resource in your app. Here, the term 'deep' refers to the depth of the page in your app's hierarchical structure of pages. Thus, instead of launching the app when a user clicks on your Push Notification, you can direct the users to contextually relevant screens, creating delightful user experiences.
All apps are built differently, and depending on your app's architecture; you can create deep links in any of the following ways:
Method 1: Create a specificURI (Universal Resource Identifier) for each screen in your app & directly add it as the link
For example, let's say that you have launched a new collection in your e-commerce app and would like to promote it through a Push Notification. Your app engineers created the following URI for the collection's page:
myapp://collection/248
-
In this URI, 248 is the path that helps the app identify the app screen that must be launched when users click on the Push Notification.
-
The same URI structure can be altered to direct users to other collections like collection 350, 400, 520, and so on. All you need to do is:
- Step 1: Add the URI as the On-click actionStep 3: Message while creating the Push campaign
- Step 2: Personalize path name to the collection viewed by the user. (How to execute this)
Method 2: Create deep links usingKey-Value pairs to define the path parameters which will help direct users to the respective app screen
While it may come across as tedious (at first), this method opens up various possibilities of customizing the screen you're deep linking! Let's go over a use-case to show you how you can implement it:
Deep Linking Push Notification to a Screen & Customizing Its Content Through Key-Value PairsLet's assume that you want to run a season-end sale for your e-commerce app, offering 40% Festive Off on Top 10 Brands. However, in a bid to optimize the shopping experience, you want users to land on a specific view of the app screen when they click on the Push Notification.
The screen should:
Be a Search Result screen in which Brand is selected as the Search criteria
It should list only the 10 Brands that are participating in the sale
The products should be Sorted by Popularity
The products should be listed in order of Lowest Price to the Highest Price
In order to achieve this, you and your engineering team come up with the following solution:
Step 1: Create the following Key-Value pairs to help your app understand deep links:
-
Key: appurl | Value: predefined path parameters that help direct users to a specific screen
-
Value could include path parameters like: "BrandId", "PageType", "ProductCategory" and so on.
-
While these Values will help you direct users to a specific app screen, you will need to define additional parameters to customize the screen's content. This can be achieved by defining search filters like, search by, sort by, view by as Values that can be added to the deep link as path parameters. We have defined these filters in the following manner:
-
search by = "searchstring" which can have any one of the following values like, "category", "brand", "deals", separated by :
-
sort by = "sort" which can have any one of the following values like, "popularity", "reviews", separated by :
-
view by = "view" which can have any one of the following values like, "low_high_price", "high_low_price", separated by :
-
(you can define these in a similar manner for your app as per the terms used in it)
Step 2: While creating the campaign, add the Key-Value pairs at Step 3: Message, as shown below.

Click to enlarge
As shown above, we have added the following pairs to deep-link the Push Notification promoting 40% Festive Off:
-
Key: appurl
-
Value:
{"BrandId":"1,2,3,4,5,6,7,8,9,10","pagetype":"searchresult","searchstring":"brand","sort":"popularity", "view":"low_high_price"}(add the exact brand id, as listed in your product catalogue) -
This means that on click, users will be directed to the app's search results page in which the 10 defined brands are shown and the search results are sorted by popularity and listed in order of lowest price to highest price.
Similarly, you can create contextual app experiences by working closely with your tech team.
5. Directing App Users to Web Pages (Youtube channel, Blog)
Given that we live in a multi-screen world, most user-brand interactions are not limited to your app anymore. These interactions spill over to your website and various social platforms like Youtube, Instagram, Twitter and so on. Hence, driving cross-platform engagement has become a crucial aspect of user retention for app marketers.
You can easily connect app users to that amazing video on your Youtube channel by sending them a Push Notification.
Yes! Push Notifications.
This can easily be achieved by building Key-Value pairs into your app's code that allows it to fetch a specific URL and render it as a WebView for app users. For example, let's say that you want to direct your app users to a video hosted on your blog. Here's how you go about it:
Step 1: Build the following Key-Value pairs into your app (with your tech team of course)
Key: appurl
Value: {"pagetype":"blog_webview","WebViewUrl":"https://dummy.website.com/videos/video-name"}
(Please refer to Method 2 discussed in the use-case above for a detailed explanation of how you can define the value)
Step 2: Add this pair under Key-Value Pairs, at Step 3: Message, while creating the campaign
Thus, users will experience a WebView or a view of the specified webpage that is optimized for mobile screens.
Fancy learning basics of JSON to add Key-Value pairs to your campaign?As marketers, coding has always been our Achilles heel. But you can change that by taking this DIY course on JSON. It's a great way to ensure that you don't find yourself lost in a world of technical jargon when creating deep links using Key-Value pairs.
Happy learning!
6. Syncing App Offers with PoS System to Build Consistent O2O Experiences
For Online-to-Offline retail apps, Push Notifications are a convenient way to promote products, deals and engage users with customized offers. However, maintaining consistency in the offers conveyed to an app user when they transact offline can be a bit tricky.
An easy way to build a consistent cross-platform experience for all your users is to sync all your app offers (like same-day shipping) with your PoS (Point of Sale) system. You can achieve this by sending details of the offer as Key-Value pairs along with the Push Notification to your app, which will then sync the details with a common server, accessible to your PoS system. This ensures that your users have access to the offer, no matter where they check out.

Let's go over a use-case to demonstrate how you can go about it:
Leveraging Key-Value pairs to Bridge Online-Offline Customer ExperienceLet's take the example of a retail platform, that allows users to purchase products through their app and brick-mortar stores. Each day, they engage millions of app users with offers personalized to their search or purchase history like 20% off on home appliances, free shipping on home decor, 10% off on hardware tools, and so on.
All these offers can be cataloged as Key-Value pairs in the app's code, allowing seamless data syncing with the server:
Key: offer | Value:
{"user_offer":"hd_free_shipping"}(free shipping on home decor)Key: offer | Value:
{"user_offer":"hma_20"}(20% off on home appliances)Key: offer | Value:
{"user_offer":"hdw_tool_10"}(10% off on hardware tools)All you need to do is add the correct Key-Value pair to each Push campaign while creating the message :)
This will ensure that if an app user decides to purchase hardware tools from your retail store, then at checkout, you can ask for the user's details (phone number/email address) to identify them and help them avail 10% off!
7. Sending Campaign Details to Your App for Internal Reporting
One of the biggest tasks on a marketer's plate is to track and analyze their campaigns' impact on driving customer retention, platform engagement, and revenue. Hence, most businesses invest in an internal reporting system early-on in their journey.
For example, let's say that you engage newly acquired users with a Push Notification, nudging them to complete the signup process. Then, by sending its details to your internal reporting system, you will be able to assess the campaign's impact against the number of newly acquired users activated within a day, analyze the collective impact of running such campaigns and so on.
- Here, activation implies users who complete the signup process.
- For the same reason, the campaign's end goal can be tagged as onboarding in your code.
Tagging Each Campaign's End Goal for Internal Reporting & Analysis with Key-Value PairsYou can build the following Key-Value pairs in your app to track each Push campaign's end goal and tie it back to your customer retention, platform engagement and revenue goals, respectively:
Key: goal | Value:
{"is_retargeting":"true"}Key: goal | Value:
{"is_platform_engagement":"true"}Key: goal | Value:
{"is_promotion":"true"}Key: goal | Value:
{"is_community_building":"true"}Key: goal | Value:
{"is_onboarding":"true"}Once you build these pairs, you can simply enter the Value corresponding to your Push campaign's end goal here, and send these details to your app along with the message.
We hope this has equipped you with a robust understanding of how you can leverage Key-Value pairs to send additional data to your app, customize your message, and sync data with your sever to create rich omnichannel experiences. Please feel free to drop in a few lines at [email protected] in case you have any queries or feedback. We're always just an email away!
Updated 8 months ago