Getting Started
Learn about Business Events, how to trigger them, and creating Relays
Businesses use Relays to broadcast information to its users in response to business events. These business events can be mapped to your users by linking business event attributes with either user attributes or event attributes. This enables you to send out the messages to relevant users.
Just like a journey, you can create a relay in WebEngage within minutes. The process of creating a relay involves the following steps:
- Step 1: A one-off process of creating a list of business events relevant to your business in WebEngage
- Step 2: Creating a relay
- Step 3: Triggering the relay by triggering the business event through API, CSV uploads or manually through the dashboard
Let’s look at each of the steps above in more detail.
Step 1: Create Business Events
You have to first define a list of business events that are relevant to your business. You also have to define the attributes (and their data types) for each of these events. Please remember that this is a one-off process that you need to do for all the business events you would like to track. Therefore, we recommend that you first create this list and get the necessary approvals internally before proceeding further.
At this stage, you probably have an Excel sheet or some such document where you’ve defined a list of these business events and their attributes. For each of the business events, the list of your attributes will look something like this:
| Attribute Name | Attribute Data Type |
|---|---|
| Attribute 1 | String |
| Attribute 2 | Number |
| Attribute 3 | Date |
Once you have the necessary internal approvals for the list of business events above, please visit the Data Platform > Data Management > Business Events section in your WebEngage dashboard, to create a list of these events in your account in WebEngage. Instead of doing this manually, you can also choose to create the list of events through REST API as covered below.

Click to enlarge
Using REST API to Create Business Events
Instead of manually creating events through the dashboard, you can also do so through our API. The following endpoint is available to create business events.
curl 'https://api.webengage.com/v2/accounts/<YOUR_WEBENGAGE_LICENSE_CODE>/business/events/definition'
-H 'authorization: Bearer <YOUR_API_KEY>' \
-H 'Accept: application/json, text/plain, */*'
-H 'Referer: https://dashboard.webengage.com/accounts/<YOUR_WEBENGAGE_LICENSE_CODE>/data-management/business-events/'
-H 'Origin: https://dashboard.webengage.com'
-H 'User-Agent: Mozilla/5.0 (Macintosh; Intel Mac OS X 10_14_1) AppleWebKit/537.36 (KHTML, like Gecko) Chrome/74.0.3729.157 Safari/537.36'
-H 'Content-Type: application/json;charset=UTF-8'
--data-binary '{
    "eventName":"<NAME_OF_BUSINESS_EVENT>",
    "attributes":
       [
       	{"attributeName":"<ATTRIBUTE 1 (STRING) NAME>","dataType":"string"},
        {"attributeName":"<ATTRIBUTE 2 (NUMBER) NAME>","dataType":"number"},
        {"attributeName":"<ATTRIBUTE 3 (BOOLEAN) NAME>","dataType":"boolean"},
        {"attributeName":"<ATTRIBUTE 4 (DATE) NAME>","dataType":"date"},
        {"attributeName":"<ATTRIBUTE 5 (ARRAY) NAME>","dataType":"array"},
        {"attributeName":"<ATTRIBUTE 6 (MAP) NAME>","dataType":"map"}],
    "eventCategory":"BUSINESS"}' --compressed
After you have added all your business events in WebEngage, the Business Events section in WebEngage will look as follows.

Click to enlarge
You will now be able to trigger relays whenever any of these business events occur.
Please Note: Unlike Custom Events such as Added to cart etc., you don’t have to integrate the code for triggering these events in your mobile or web SDKs.
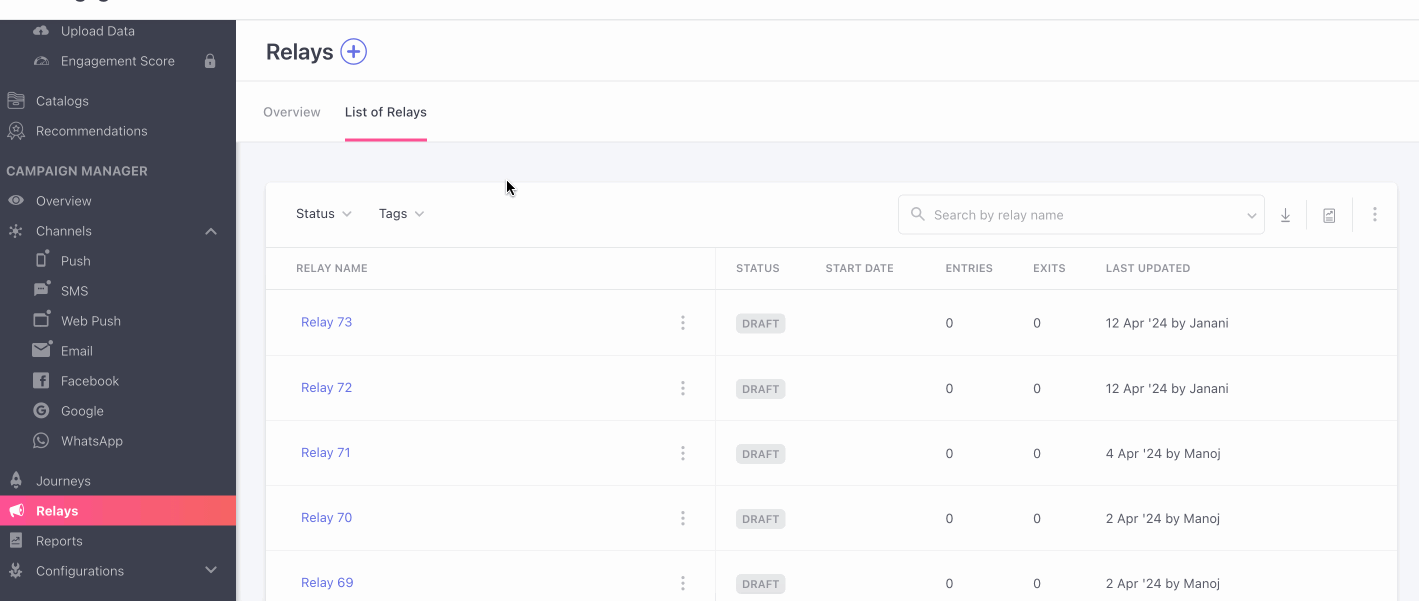
Step 2: Create a Relay
To set up your relays, locate the Relays tab on the left Navigation tab of your dashboard. Follow the below instructions to create your relays.
- Once you’re here click on the ➕ on the top of the page,
- You’re then presented with a configuration tab, where you can fill in the required fields, to create your relays.
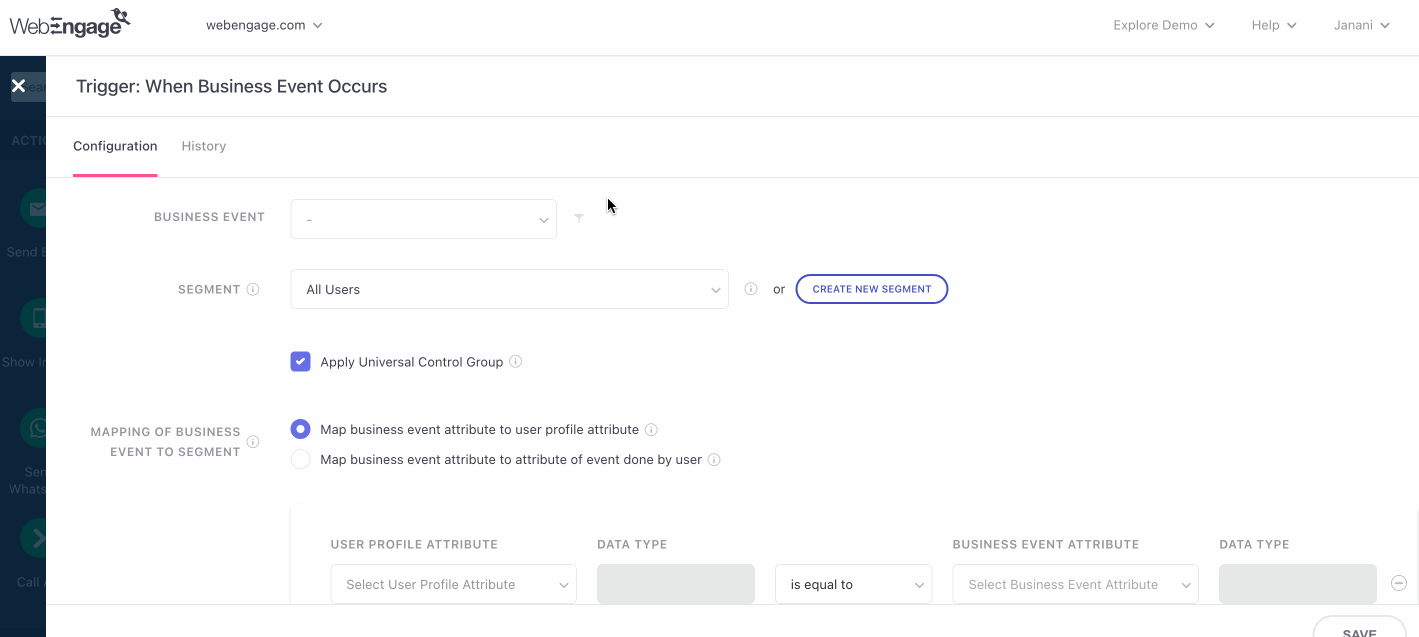
- Business Event: Choose the business event you want to create a relay for from the dropdown menu.
- Segment: This allows you to choose whether the relay should get triggered for all your users or only a segment of your users.
- Mapping of business events to segment: Mapping helps you contextualize your relays so that a user receives only that communication that is relevant to them. You have two choices to choose from this field i.e.
- Map business event attribute to user profile attribute: This involves connecting business event details with user profile characteristics, enhancing the analysis of user behavior and profile alignment.
On choosing this option, you will be presented with the following fields for mapping.
In this case, you’re matching an attribute of a business event (e.g., Genre attribute of business event New Series Added) to an attribute of an event done by a user (e.g., Genre Type attribute of an event done by a user called Episode Watched). This will ensure that the relay gets triggered only when the value of the business event attribute is equal to (or starts with, ends with and so on) the value of the attribute of the event done by the user.
- Map business event attribute to user profile attribute: This involves connecting business event details with user profile characteristics, enhancing the analysis of user behavior and profile alignment.
Example: If a business event New Series Added occurs where the value of the Genre attribute is Comedy, then the relay will get triggered for only those users who have done an event called Episode Watched where the value of the Genre Type attribute of this event is Comedy.
-
User profile attribute:
Map business event attribute to attribute of event done by user: Link business action details with user event characteristics for deeper insights into user behavior and business activity correlation. -
Trigger frequency: Relays are triggered at the specified time of day you've configured. Relay will batch all the business events that were triggered between 2 Relay triggers. Then it will assess all business events for the campaign and send them out collectively in a single campaign.
You have three options to batch your relays: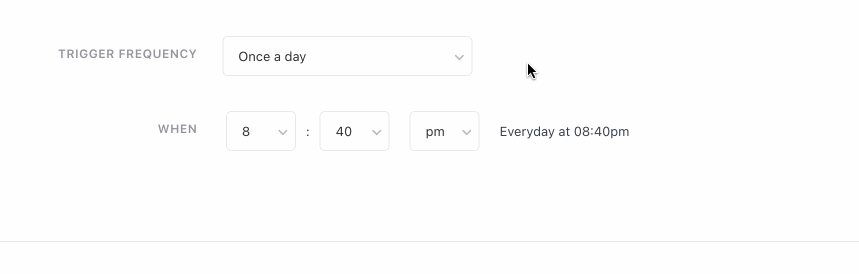
- Daily
- Every 12 hours (twice daily)
- Every 6 hours (four times daily)
- For hourly relays, please contact our support team to increase the relay frequency if no business events have been triggered for a relay yet.
Let’s proceed and configure this trigger by clicking on the trigger block.

Click to enlarge
Example: If a business event New Series Added occurs where the value of the Genre attribute is Comedy, then the relay will get triggered for only those users whose Interest is Comedy. Please remember that matching these attributes requires the data type of the business event attribute and the user profile attribute to be the same. This means that you can’t compare a String data type attribute of a business event with a Number data type user profile attribute.
Kindly remember that matching these attributes requires that the data type of the business event attribute and the event done by the user are the same. This means that you can’t compare a String data type attribute of a business event with a Number data type attribute of an event done by a user.
Let’s think of a back-in-stock alert scenario for an e-commerce business. In this case, you would map the Item Code attribute of the Back in Stock business event with the Item Code attribute of an event done by the user called Product Viewed. The relay would get triggered automatically whenever an item that the user viewed that was out of stock is added back in stock. In addition, as a result of this mapping, each user will get only those relevant notifications. Now, imagine the scale of this. Hundreds of millions of users are searching for products and viewing products multiple times a day! Relays help you automatically contextualize your communication for each user so that they only get relevant communication.
Click the Save button to save your configuration and return to the canvas. You can now proceed to build your workflows in the same manner as you do in journeys. Once you’re done, click the Publish Relay button to activate your relay.
Now, whenever the business event occurs, the relay will get triggered automatically!
Please NoteMapping: Please note that Mapping can be done for attributes of the following data types only: Number, String, Date and Boolean. You will not be able to do Mapping based on Array or Map data types attributes.
Lookback Period: The Lookback period refers to the period of user events WebEngage will process to find out applicable users corresponding to every business event. The default lookback period for Relays is 1 month.
For example: when the Price Drop business event is fired, WebEngage will process the Added to Cart user event for the last 1 month.
You can reduce the Lookback period duration by adding a filter on Event Time. If you want to increase the duration of the lookback period, kindly drop an email to [email protected].
Step 3: Trigger the Business Event
A business event can be triggered through any of the following methods:
- Manually through the WebEngage dashboard
- REST API
- CSV Uploads (yet to be released)
Manually Through the WebEngage Dashboard
Visit the Data Platform > Data Management > Business Events to trigger your business event manually.
Click on the Actions for any business events and then click the Trigger Event action to trigger the business event.
Once you click the Trigger Event action, you will see a modal where you have to enter the values of the various attributes of the business event before you can trigger it. Kindly enter all the relevant values (you can choose to fill the values of one or more attributes and leave values as blanks for one or more attributes) and then click the Trigger Business Event button.

REST API
The following endpoint is available to trigger business events.
curl -X POST \
 'https://api.webengage.com/v2/accounts/<YOUR_WEBENGAGE_LICENSE_CODE>/business/save-event' \
 -H 'authorization: Bearer <YOUR_API_KEY>' \
 -H 'cache-control: no-cache' \
 -H 'content-type: application/json' \
 -d '{
 "eventName":"<NAME_OF_BUSINESS_EVENT>",
 "eventTime":"2019-01-05T13:06:56+0530",
 "eventData":{
   "<ATTRIBUTE 1 (STRING) NAME>":"Abc Xyz",
   "<ATTRIBUTE 2 (NUMBER) NAME>":1,
   "<ATTRIBUTE 3 (BOOLEAN) NAME>":True
   "<ATTRIBUTE 4 (DATE) NAME>":2019-02-07T12:07:50+0530
   "<ATTRIBUTE 5 (ARRAY) NAME>":[1,2,3...]
   "<ATTRIBUTE 6 (MAP) NAME>": <Map>
 }
}'Please Note: The eventTime field above is optional and you can choose to not include it in your API call.
CSV Uploads
You will also be able to trigger business events by uploading CSV files. This functionality is not currently available and will be made available soon.
How are Relays triggered ?
Relays are triggered based on the schedule you set, ensuring that all business events occurring within the specified time range are grouped together. By batching related business events, you can efficiently send a unified communication to your users. And it is not limited to one business event per minute.
For example : If you have multiple products back in stock on a given day. You'd want to notify users who were previously interested, but couldn't purchase due to stock unavailability. Some users may have been interested in purchasing multiple products that were out of stock. Instead of bombarding them with separate notifications for each item, you can now send a single communication listing all the back-in-stock items they're interested in.
This not only reduces the number of communications you need to send but also prevents user frustration from receiving multiple notifications.
Rate LimitWe need to specify the rate limit for triggering business event API is now 500 by default.
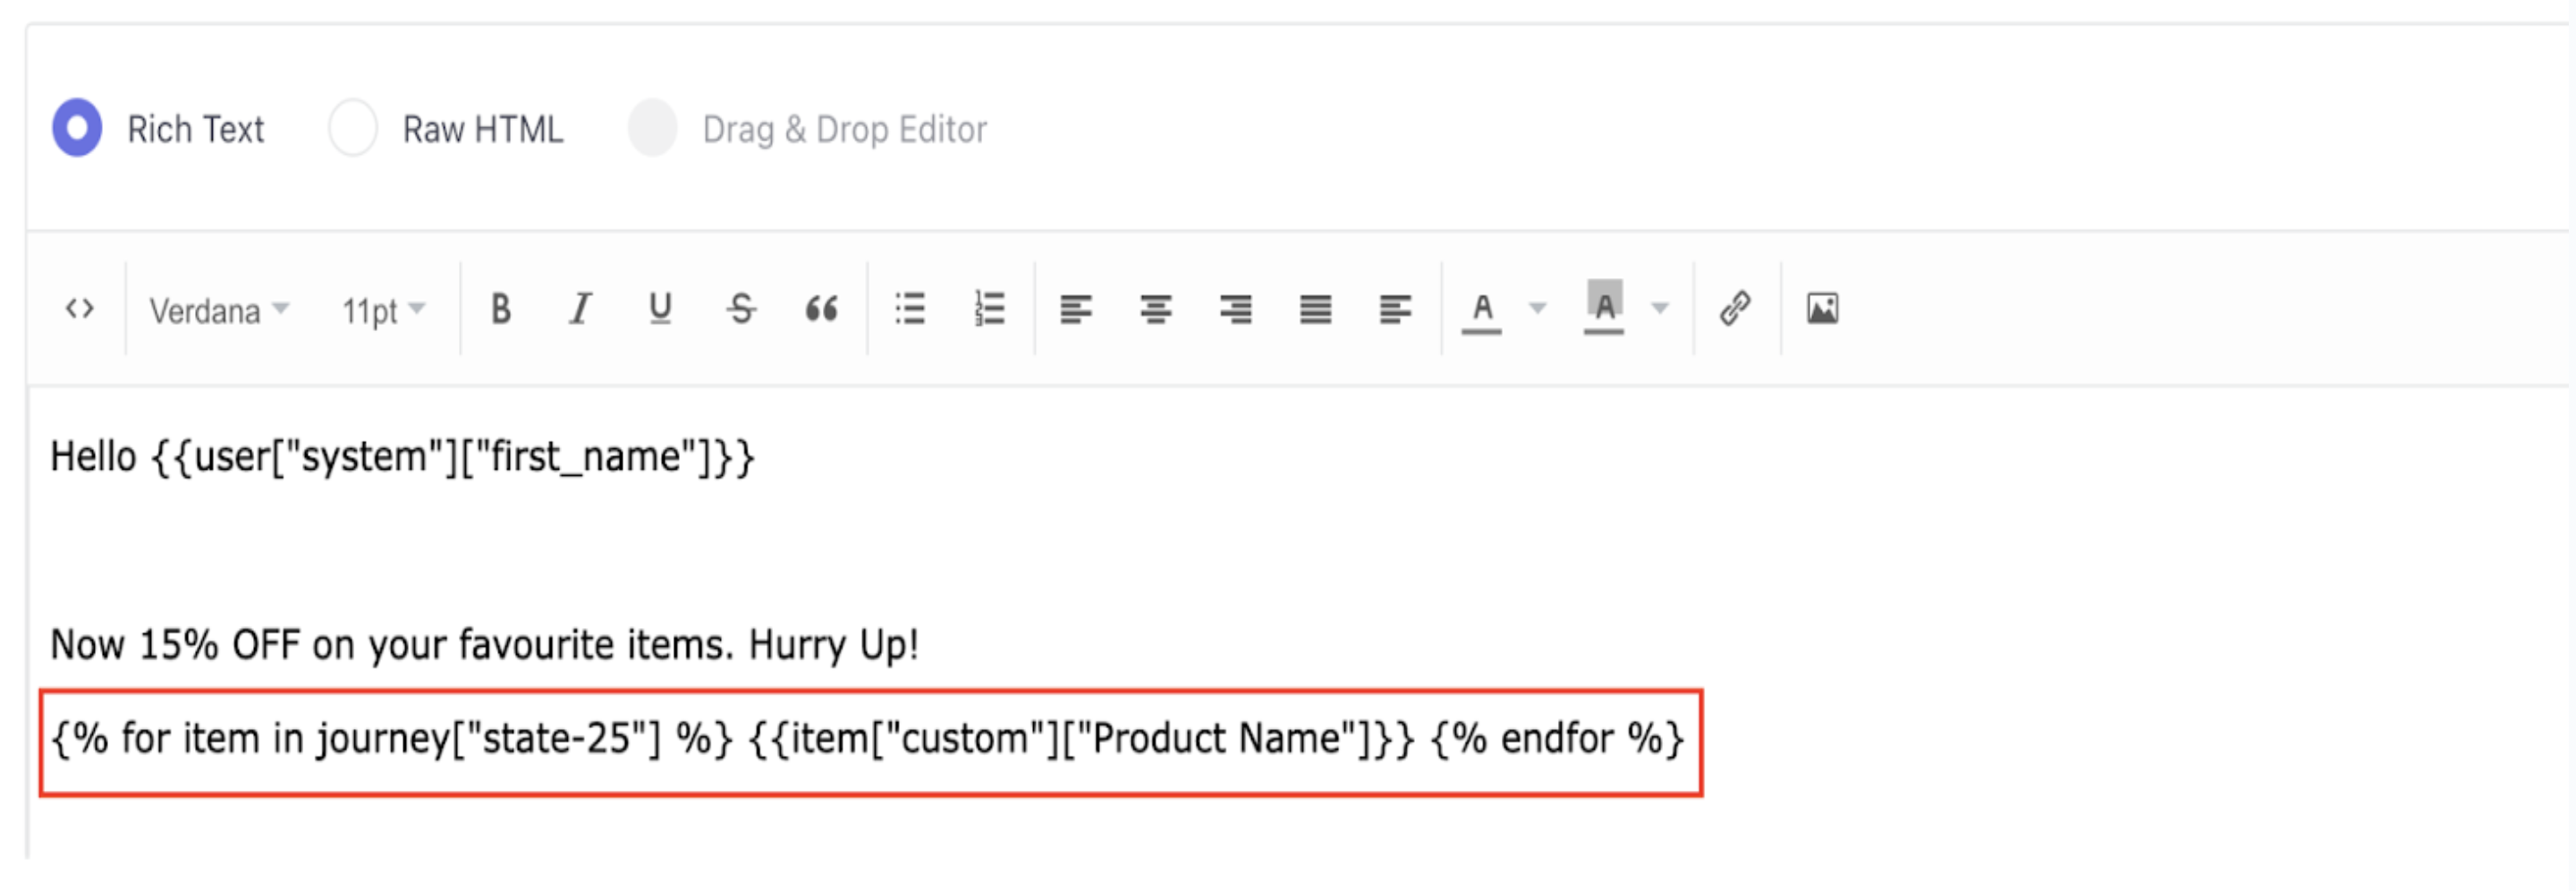
Personalisation
In addition to a token, you receive Nunjuck code capable of looping through all qualifying business events for a specific user.
Consider a scenario where a user browses through multiple products on your website/app, and five of those products experience a price drop. Instead of receiving separate notifications for each, the user will receive a consolidated campaign highlighting the price drops for those five products. This method simplifies communication and improves the user experience by delivering all pertinent updates in a single, concise message.
Updated 8 months ago