Creating Transactional Push Campaigns
Step-by-step guide on setting up transactional campaigns in your dashboard
Be it a fintech app, a travel app, a food delivery app, or an e-commerce app. They all share something in common - a heavy reliance on Push Notifications to convey contextual updates and time-sensitive information.
So no matter the app you're marketing, your ability to deliver timely communication in a highly personalized manner is one of the biggest drivers of customer retention.
This is why we bring to you - Transactional Campaigns, your one-stop solution to communicating critical messages instantly!
Simply launch your campaign and set up the Transactional Campaign API for the Campaign ID - we'll personalize the message and send it as soon as the API is triggered. You can sit back and watch the retention metrics go up :)
Must ReadBefore you begin creating your campaign, we recommend that you get yourself acquainted with how Transactional Campaigns work in WebEngage. Doing so will help you better understand the steps of campaign creation.
Here's a quick summary of all the exciting possibilities offered by the campaign creation interface:
-
Leverage ready-to-use templates to communicate with visually enriched Push Notifications (skip to Step 2: Message)
-
Automate multivariate testing for your campaign - we'll automatically identify a winner and send it to your users (skip to Step 3: Conversion Tracking & Variation Distribution)
-
Test the notification with internal team members before sending it to your users (skip to Step 4: Test Campaign)
Let's get you started!
How to Access
Click to enlarge
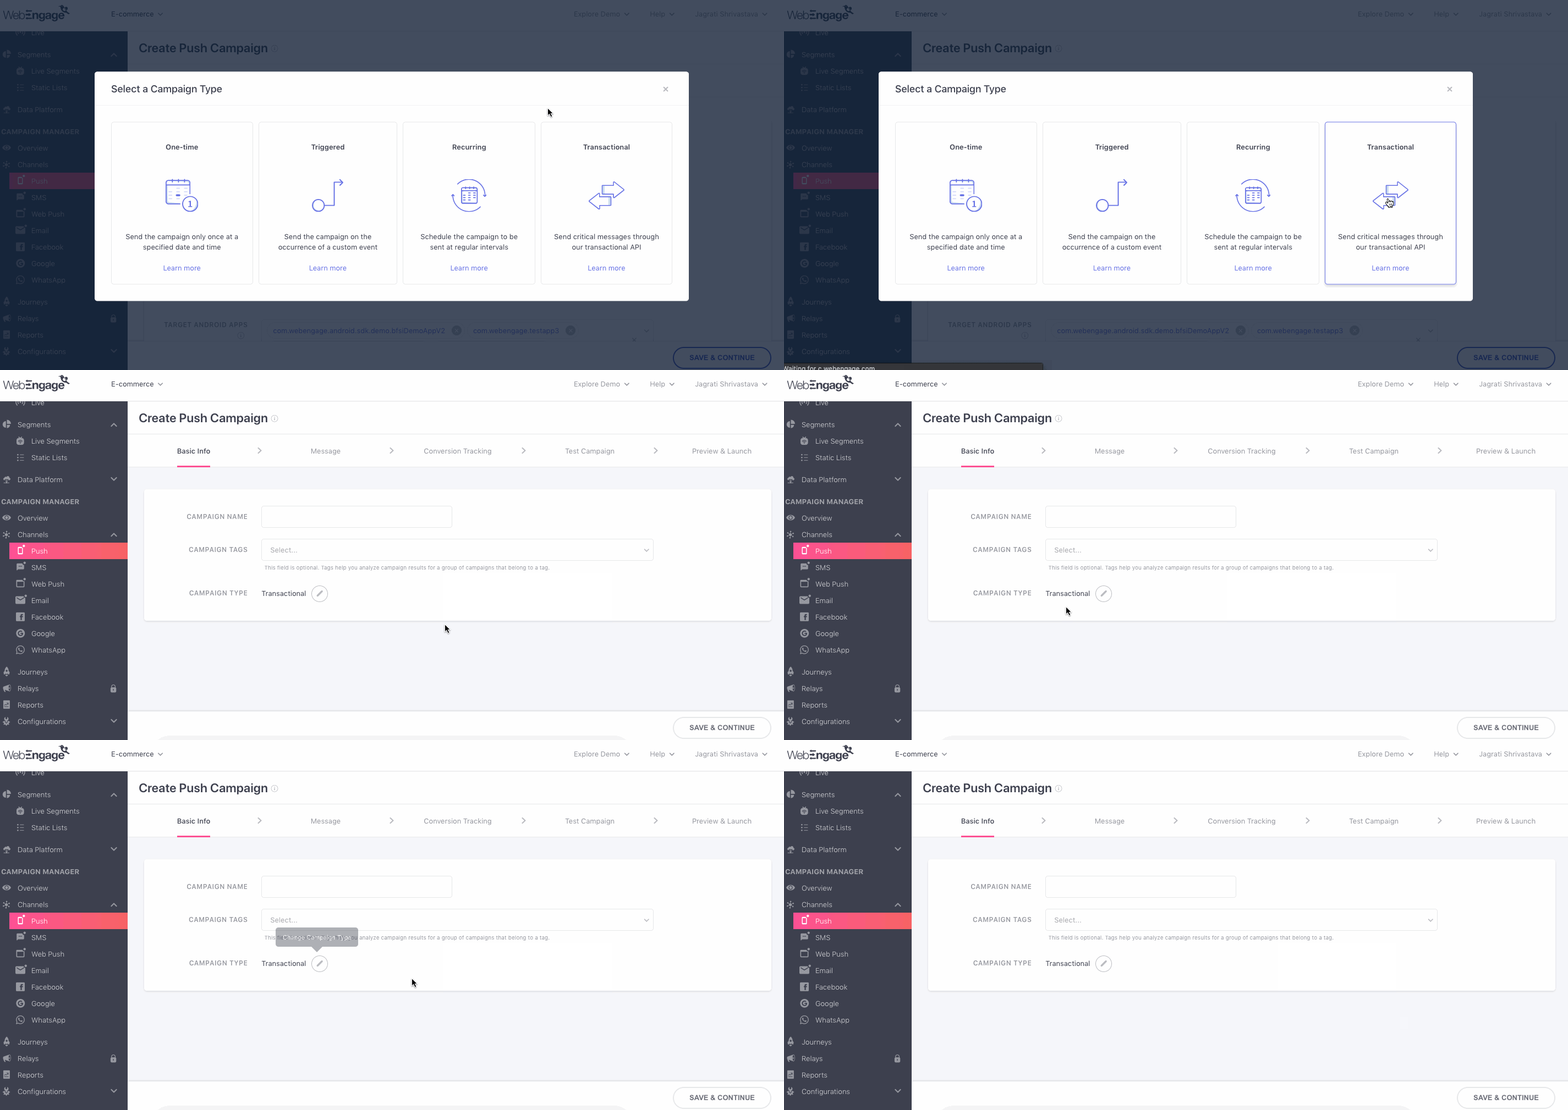
As shown above, click the Plus icon placed on the top left in the central hub of Push.
- In doing so, you will be prompted by a pop-up, allowing you to select the type of campaign you'd like to create.
- Select Transactional to begin.
Now, let's walk you through all the steps of campaign creation.
ImportantPlease ensure that you have integrated FCM (Firebase Cloud Messaging) and APNS (Apple Push Notification Services) with your account before proceeding as these platforms enable campaign delivery to all your Android and iOS users, respectively. Here's the integration guide.
Step 1: Configure Basic Info
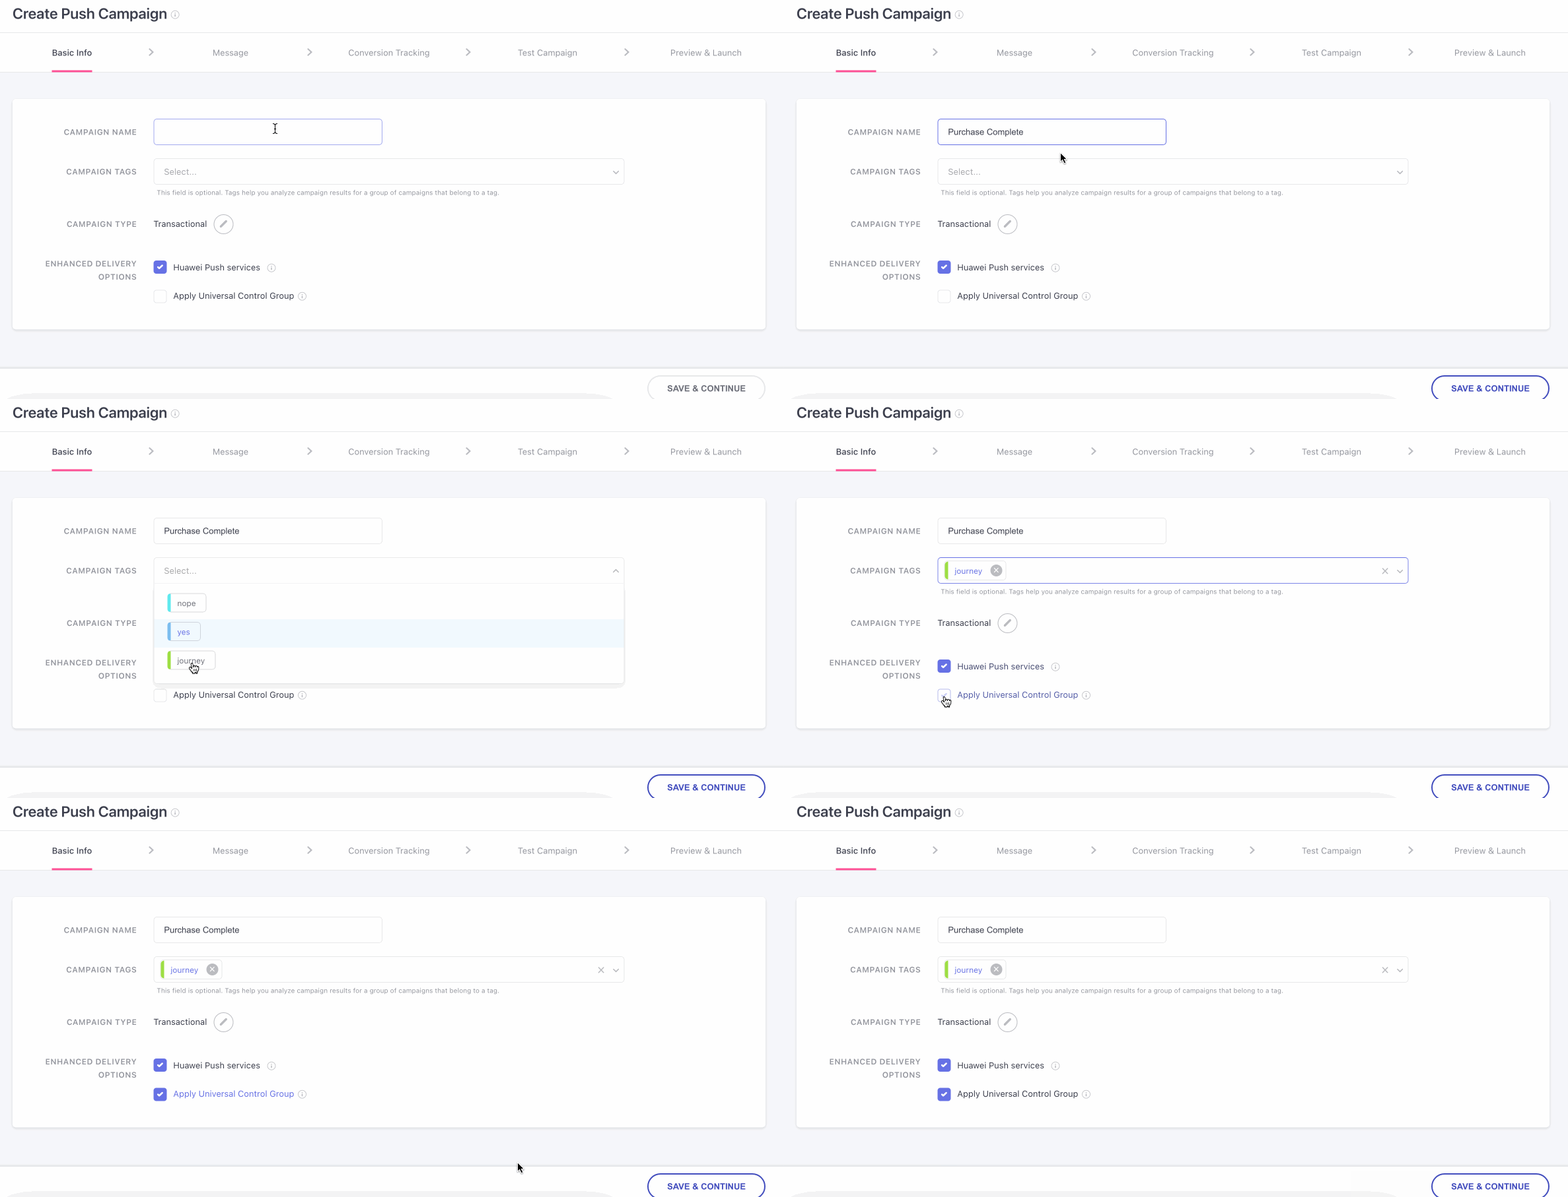
The first step is to give your campaign a unique name that helps you identify its purpose.
- As shown below, you can click the Edit icon to alter the campaign type selected by you (in case you change your mind!)
Click to enlarge
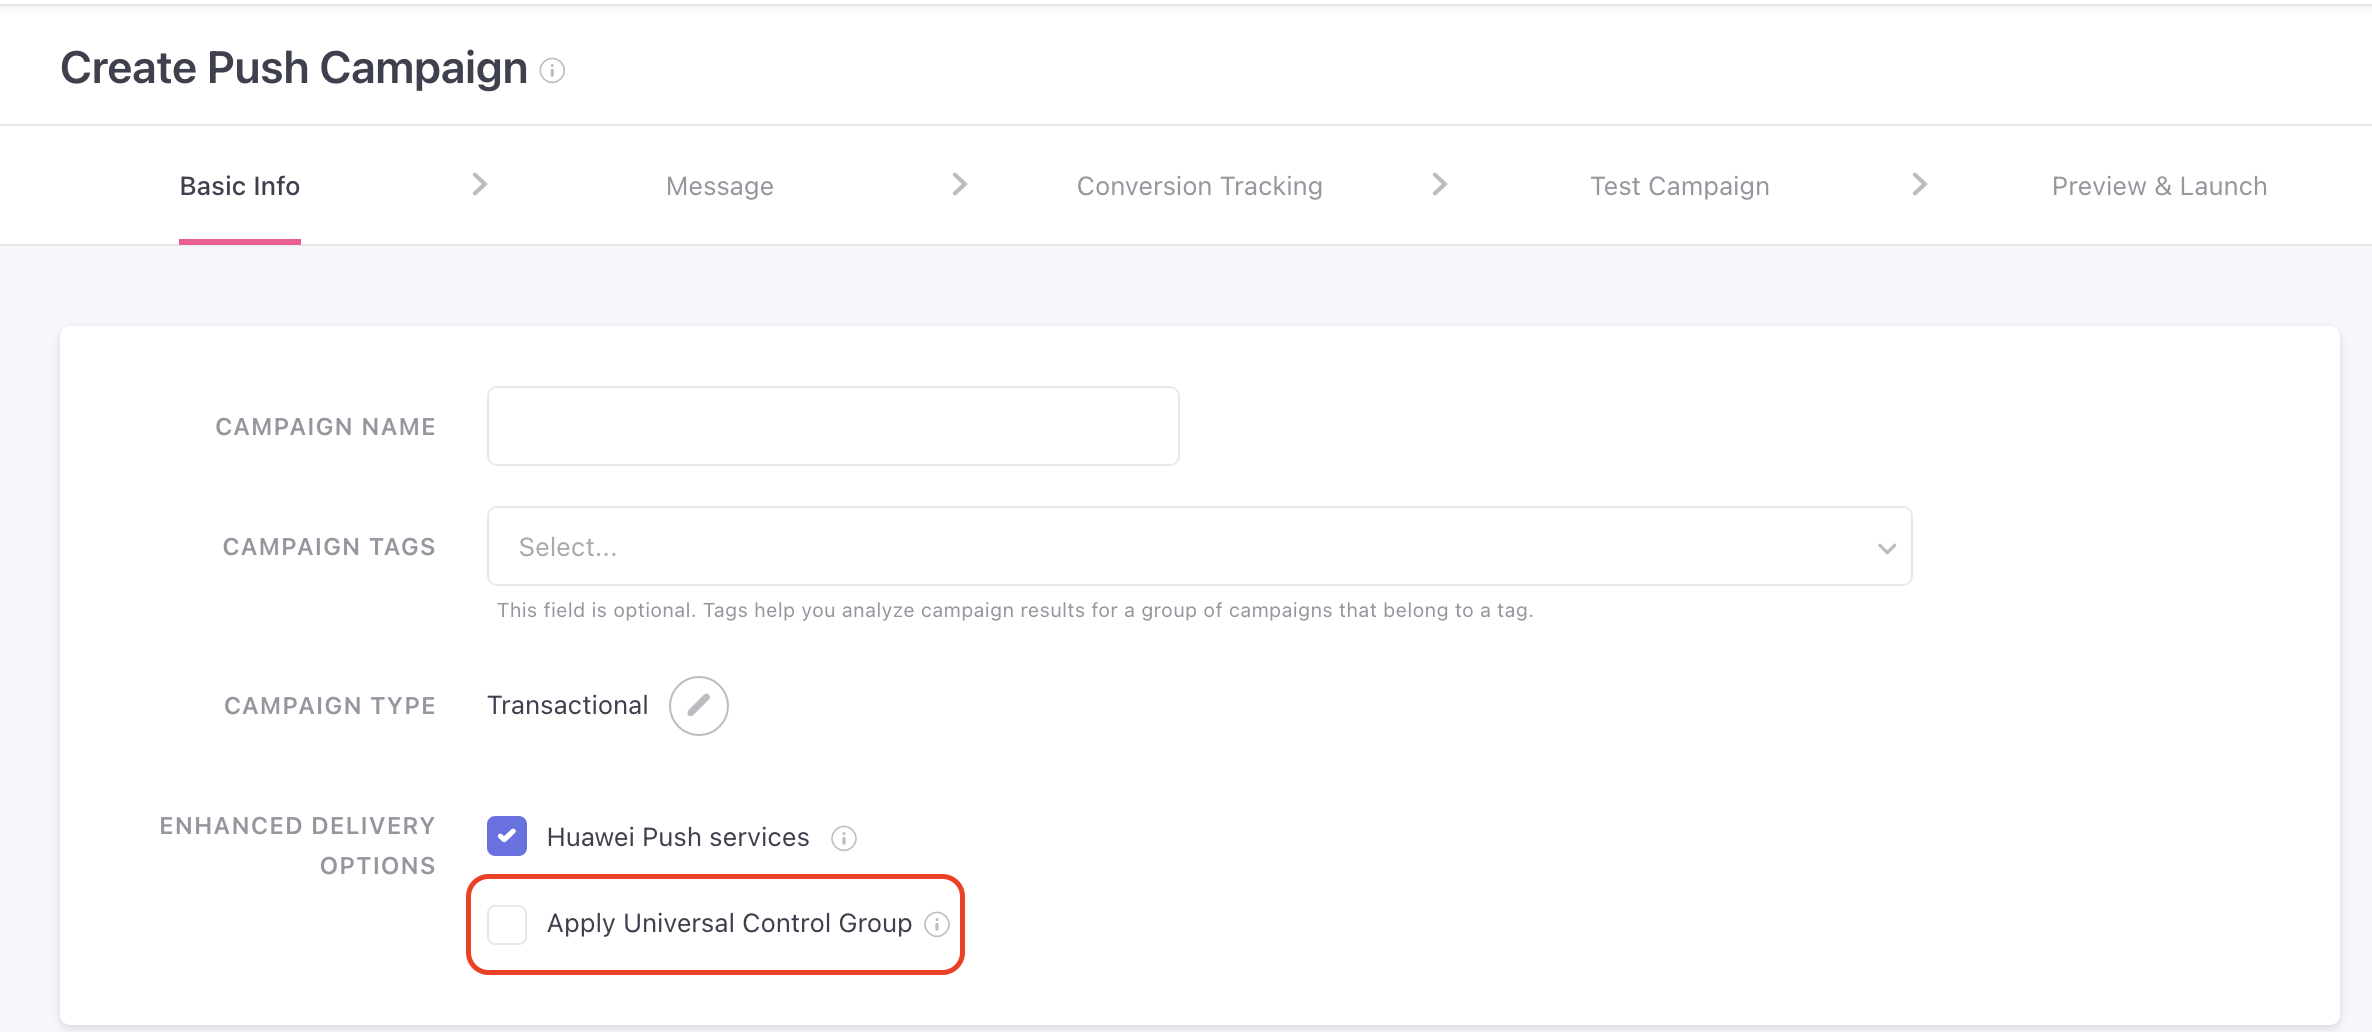
Apply Universal Control Group
Conditional OptionThis is a conditional option which will be shown only if you have created a Universal control group in your account. Click here to know how to create a Universal control group.
- When the box is checked, the campaign will not be sent to users who are part of the Universal Control Group in the segment that is selected.
- When the box is unchecked, the campaign will be sent to all users that are part of the segment inclusive of the Universal Control Group users.
Click to enlarge
As shown above, this section also allows you to change the campaign type selected by you.
Step 2: Create the Message
Now let's walk you through the most exciting part of campaign creation - building the message!
Click to enlarge
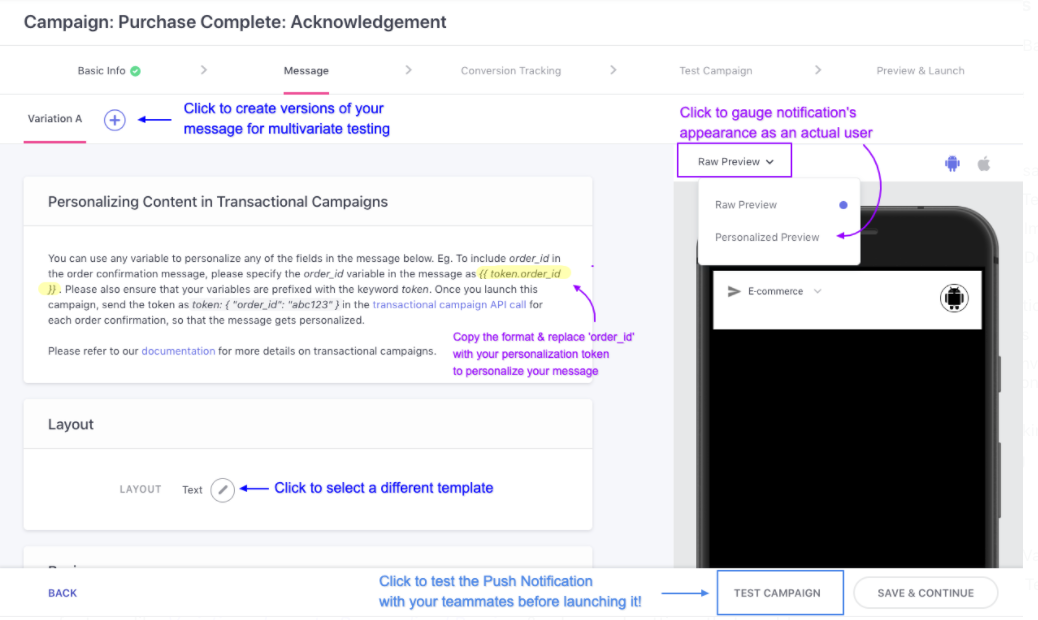
As highlighted above, the message creation interface comes loaded with intuitive features like Variations, Layouts, Personalized Preview & advanced settings that enable you to create impactful Transactional Push Notifications in minutes.
Select a Layout
As highlight below, the first step is to select a Layout for building your message.
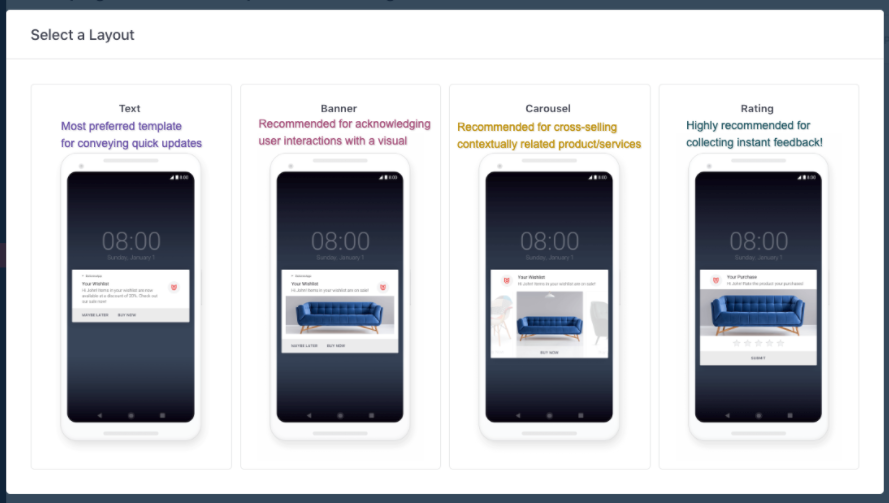
Click to enlarge
Related ReadImage & Text Guidelines for all Push Layouts available in your dashboard
As shown below, you can always change the selected template by clicking the Edit icon and rebuild the message from scratch.
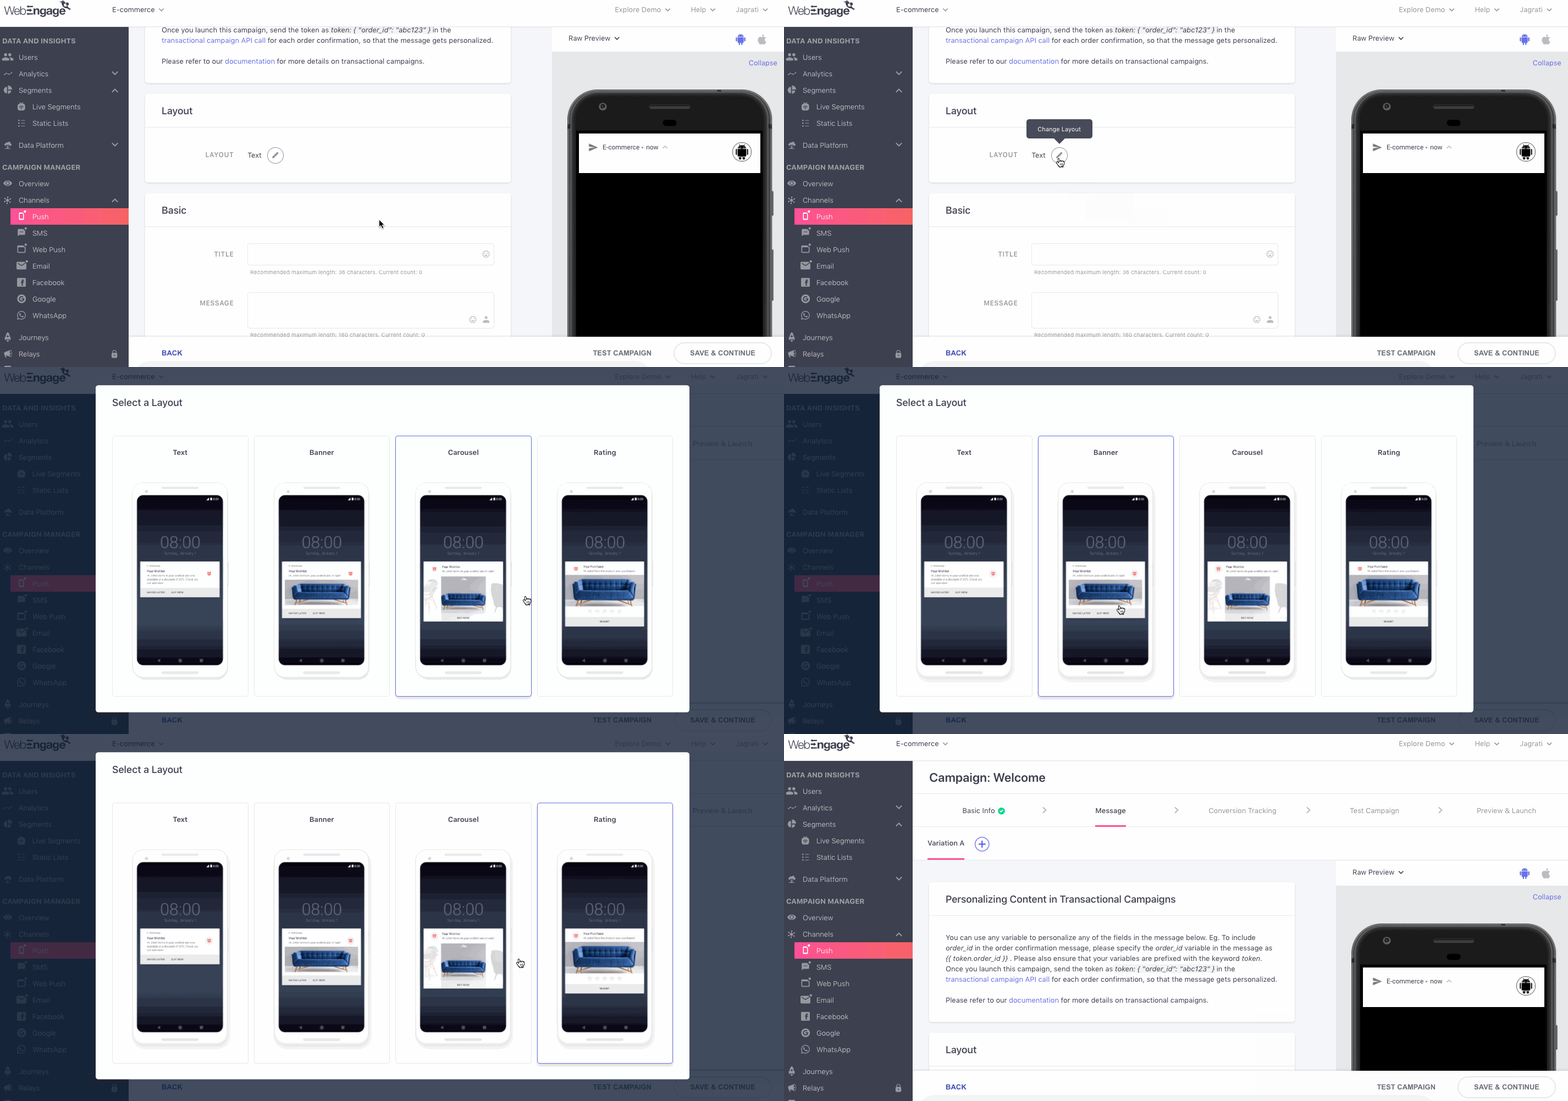
Click to enlarge
Personalize Message
Transactional Campaigns can be personalized only through the personalization tokens that have been created in your backend. This is applicable to all aspects of the message like text, images and links.
Thus, each time the Transactional Campaign API is triggered for a user, your tech team will need to ensure that values of all the personalization tokens are passed along to your dashboard. This way we'll know which token needs to be replaced with which value, facilitating one-on-one personalization at scale.
Here's how you can go about it:
1. Personalizing Text
Simply add your personalization tokens in the fields, Title and Message in the format, {{token.your_personalization_token}} to personalize the text for each user. Let's demonstrate a short use-case to show you how it works:
Personalizing Payment Confirmation NotificationLet's take the example of a music app that offers monthly, half-yearly and yearly subscriptions. Each time a user purchases a subscription, they acknowledge the purchase with a Transactional Push Notification that conveys the following details:
- Amount paid
- Duration of the subscription
- Value proposition of the subscription
Prerequisite: Marketers of the app teamed up with the developers to create and track values of the following personalization tokens:
- Amount paid:
sub_value- Duration of the subscription:
sub_duration- Value proposition:
sub_highlight
Here's how they created the message:

Click to enlarge
As you can see above, we have personalized the message by adding:
{{token.sub_value}}to the Title.{{token.sub_highlight}}and{{token.sub_duration}}to the Message.
Hence, each time a user purchases a subscription, they will receive a message, similar to the one shown below in personalized preview:
2. Personalizing Images
While most marketers prefer to use generic images for Transactional Push Notifications, you can always personalize the banner image to the scenario in your user's lifecycle. This can be achieved in any of the following ways:
- Track Image URL as a personalization token
- Build the Image URL in your dashboard by adding personalization token as the path
Method 1: Track Image URL as a personalization token each time the scenario occurs for a user
Let's demonstrate a use case to show you how it works.
Travel App: Personalizing Ratings Background to Hotel Booked by a UserLet's take the example of a travel booking app that facilitates hotel bookings. In a bid to build trust in their brand, marketers of the app decided to collect feedback from users as soon as their stay ended.
Hence, they set up a Transactional Push Campaign that was triggered for a user as soon as their booking duration ended. It included the following details:
- Image of the hotel booked by the user
- Name of the hotel
- User's first name
Prerequisite: Marketers of the app teamed up with the developers to create and track values of the following personalization tokens:
- Image of the hotel:
banner_url- Name of the hotel:
hotel_name- User's first name:
first_name
Here's how they created the message:
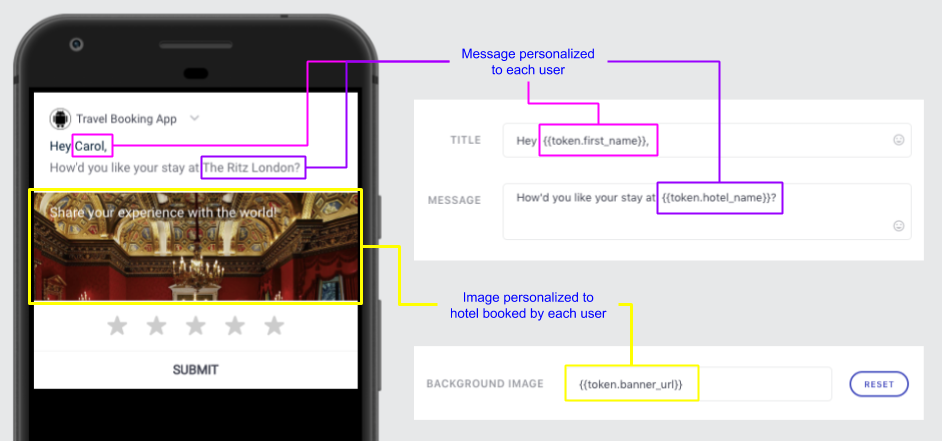
Personalized notification received by a user, Carol as soon as her stay ended at The Ritz London (click to enlarge)
As you can see above, we have personalized the message by adding:
{{token.first_name}}to the Title.{{token.hotel_name}}to the Message.{{token.banner_url}}to the field, Background Image.
Hence, each time a user books a hotel through the app, they will be nudged to rate their experience through a similar Push Notification.
Method 2: Build the Image URL by adding a personalization token as the path
This method relies on creating a personalization token in your backend that captures the same value as the file name of the image hosted on your server/cloud.
Quick ReadRevisit the basics of a URL structure to understand how the value gleaned against a personalization token can help you replicate the actual image URL in your dashboard.
Let's take the example of the Travel App discussed above to demonstrate how this method works.
Let's assume that the travel booking app hosts images related to all its listings on their domain:
[www.example.com/images]
in the format: .pngSo, to personalize the image for each user, they will need to ensure that the value gleaned for the personalization token -
hotel_idis identical to the name of the file hosted on the above link.
-
Assume that the value gleaned for The Ritz London against
hotel_idis "246-ritz-ldn" -
This means that the actual image link should be:
[www.example.com/images/246-ritz-ldn.png] -
Hence, all you need to do is - replicate the above link structure in your dashboard. Here's how you can go about it:
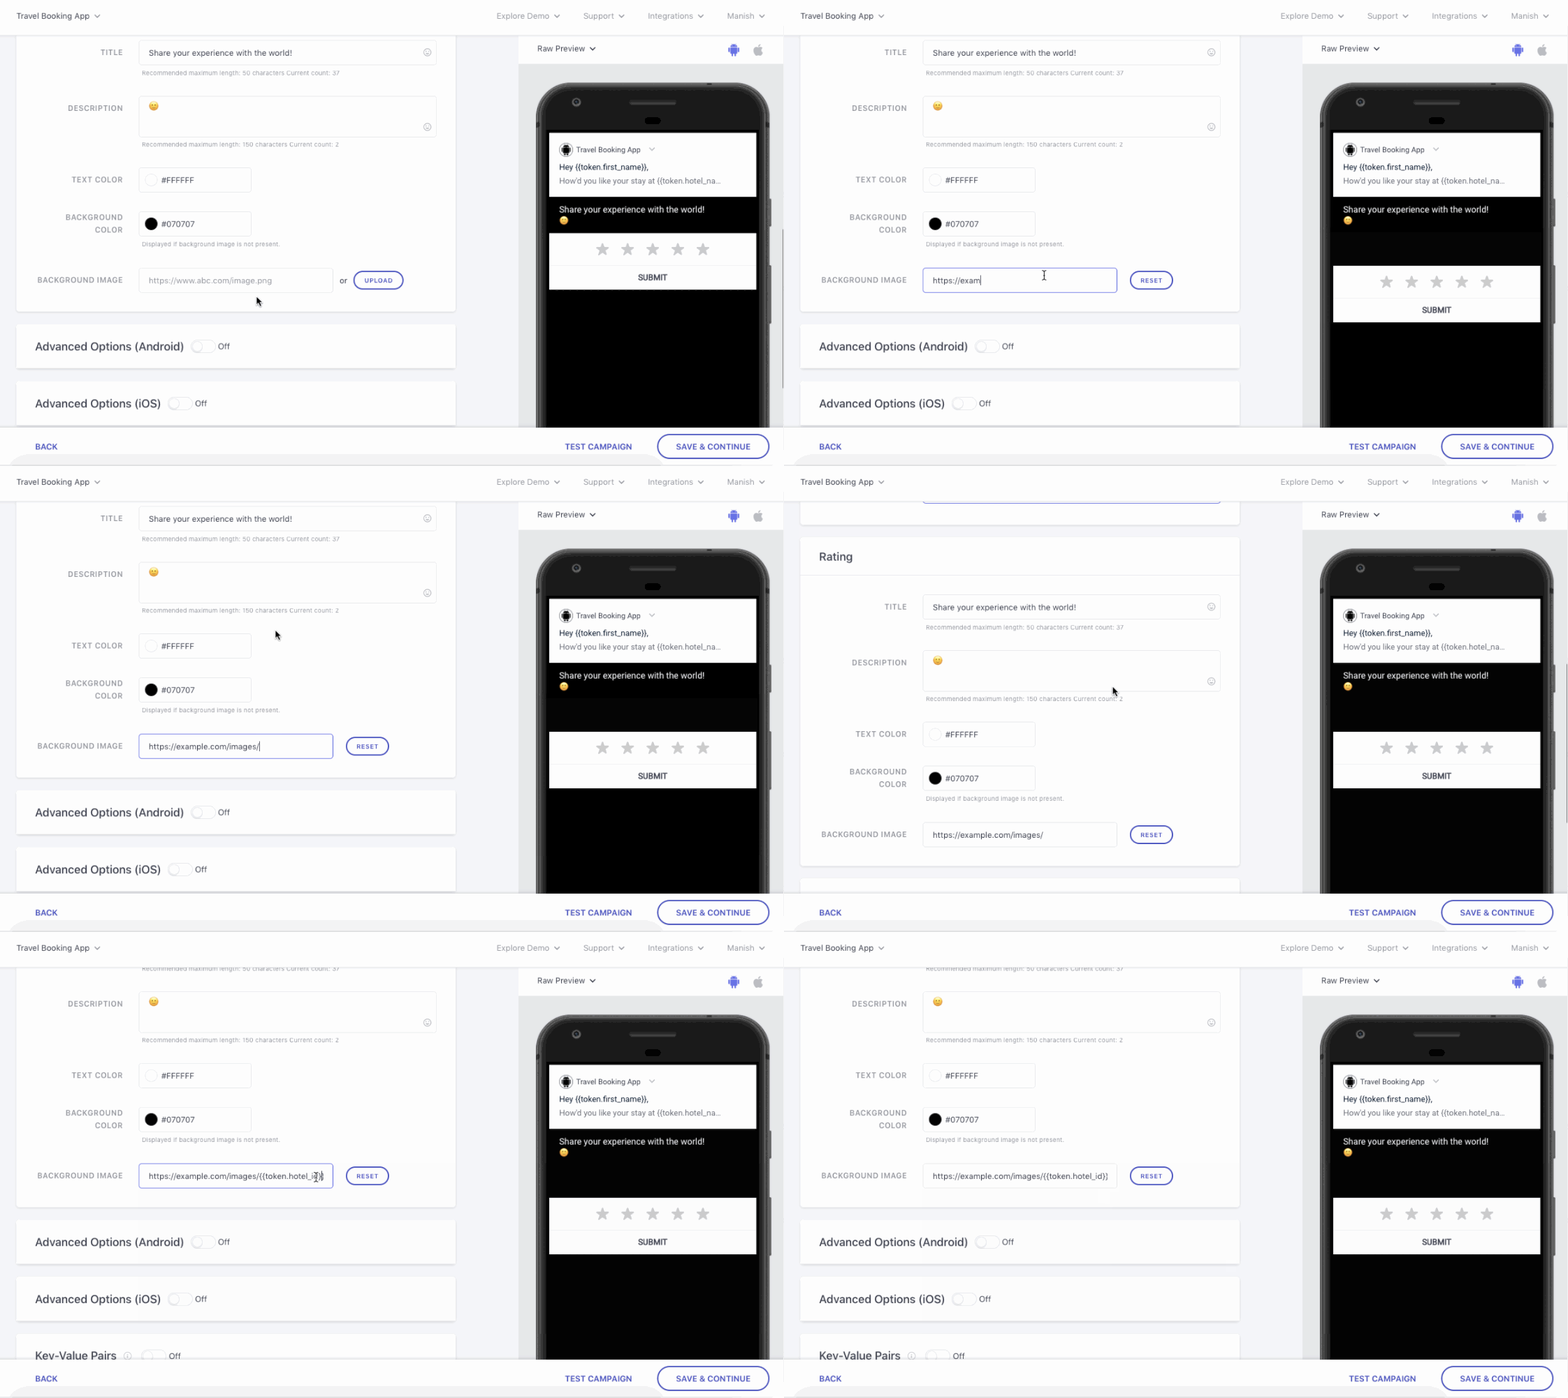
Click to enlarge
As shown above:
Step 1: Add the parent link - [www.example.com/images/] to the field, Background Image.
Step 2: Add the personalization token, hotel_id as {{token.hotel_id}} to the link to replicate the file name.
Step 3: Complete the link structure by adding the file format, .png towards the end.
Thus,[www.example.com/images/{{token.hotel_id}}.png]
will be personalized to the link,
[www.example.com/images/246-ritz-ldn.png]
for a user who books a stay at The Ritz London, and so on.
Similarly, you too can personalize the banner image of your Transactional Push Notification for each user :)
3. Personalizing Deep Links
You can easily personalize Button links and the On-click Action link for your Android and iOS apps in any of the following ways:
- Track app screen link as a personalization token
- Build the app screen link in your dashboard by adding the personalization token as the path
Method 1: Track Screen Link as a Personalization Token each time the scenario occurs for a user
Let's go over a use-case to show you how it works.
Food Delivery App: Personalizing Tracking Link to Each Order Placed by a UserLet's take the example of a food delivery app. Once a user places an order, they are updated about the delivery status through a series of Transactional Push Notifications like:
- Order received by the restaurant.
- Restaurant's preparing your meal.
- Delivery person's on their way to pick up your meal.
- Delivery person's on their way to you!
- Knock Knock! Your food has arrived.
However, marketers of the app soon learned that sending multiple notifications in quick succession did not always create the best experiences.
Thus, they collaborated with the tech team to build personalized tracking links for each order. This solved for 2 use-cases:
Allowing users to track orders from multiple restaurants simultaneously.
Clubbing all delivery updates into just one Push Notification that contains the personalized tracking link.
Prerequisite: Each time an order is placed, a unique app screen link is generated, that facilitates live tracking. The link is also tracked as the value for the personalization token,
del_track_link.
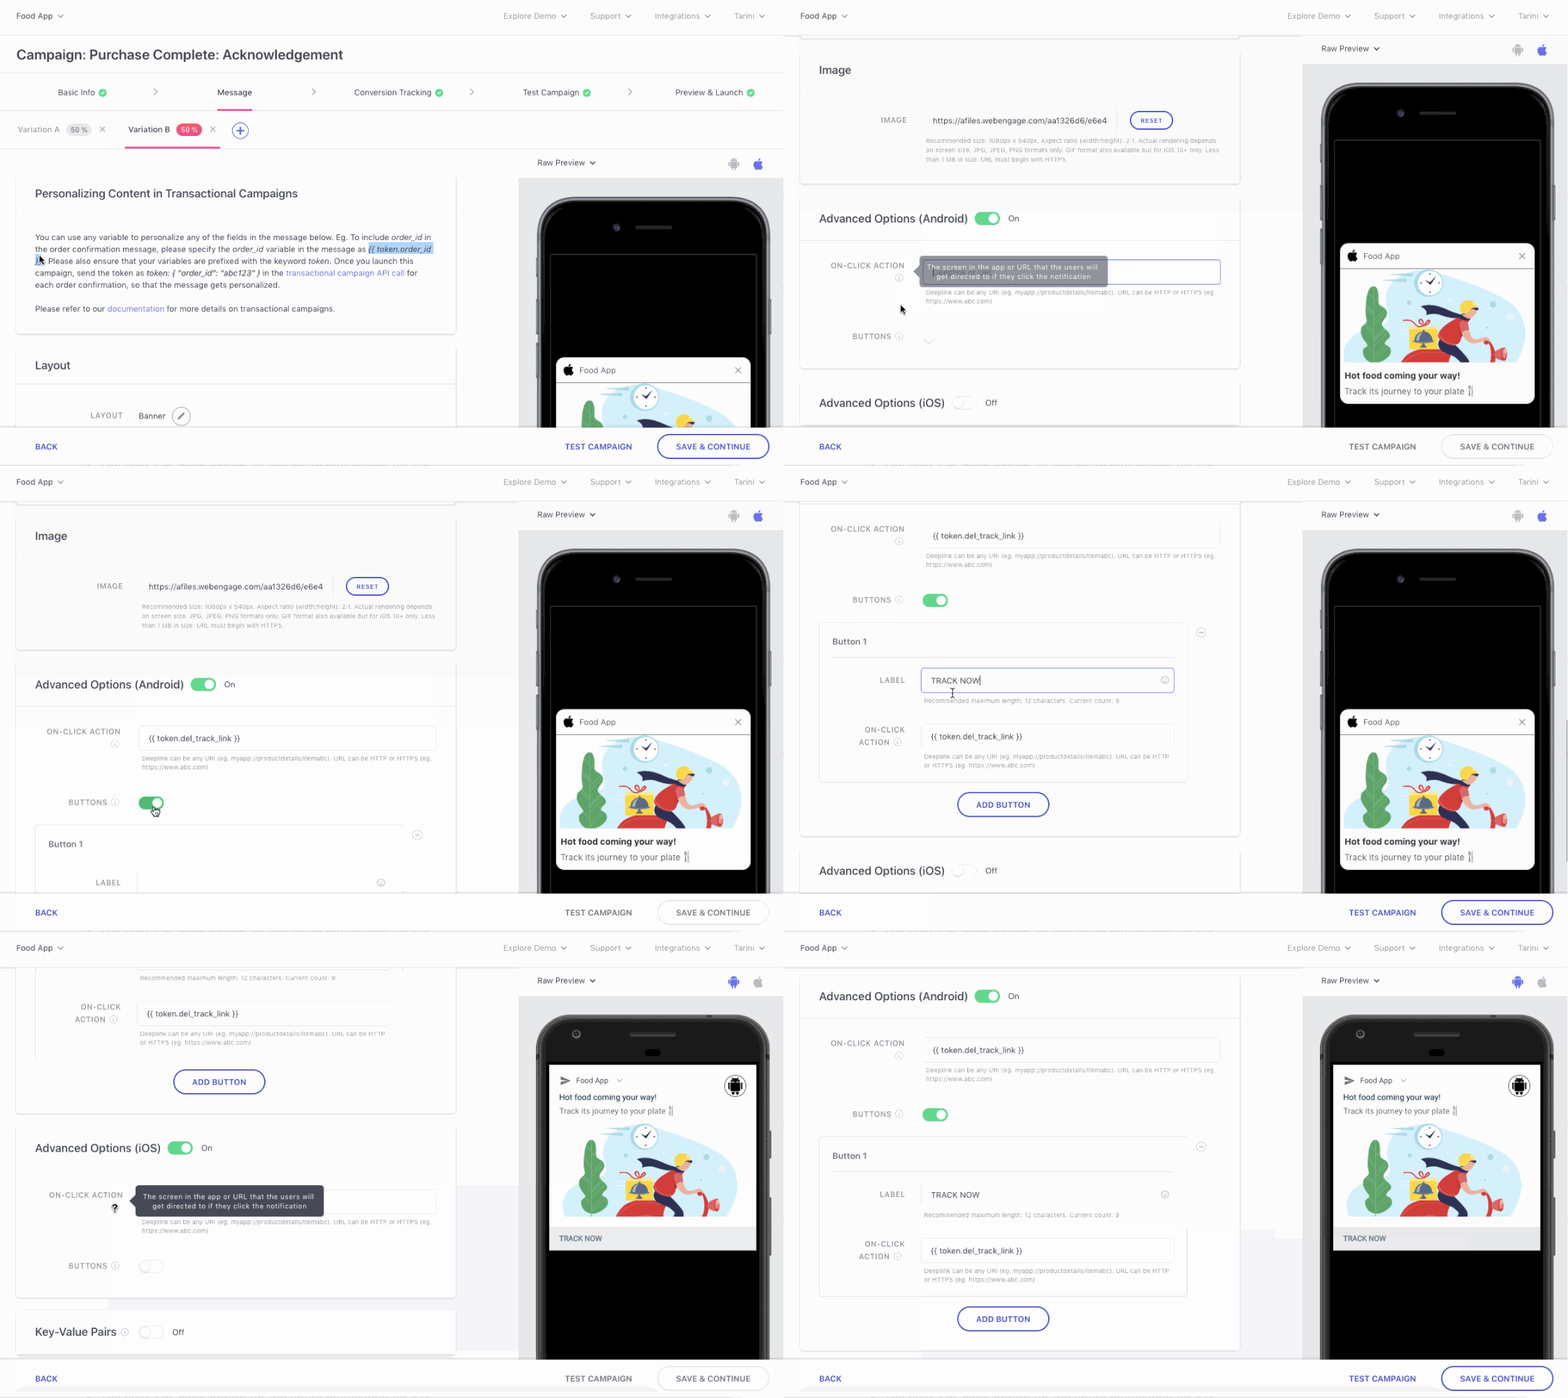
Here's how they personalized the Transactional Push Notification's CTA:
Click to enlarge
As you can see above, simply add the personalization token, del_track_link as {{token.del_track_link}} to:
- The field, On-click Action for the entire notification and the 'Track Now' button for Android
- The field, On-click Action for the entire notification for iOS
Thus, each time a user received this notification and clicks on it, they will be directed to the unique app screen that allows them to track the status of their food order in real-time.
Method 2: Build the Screen Link by adding a Personalization Token as the Path
This method relies on creating a personalization token in your backend that captures the same value as the app screen's name. The idea is to replicate the actual deep link in your dashboard by adding the personalization token as the path.
Quick ReadRevisit the basics of a URL structure to understand how the value gleaned against a personalization token can help you replicate the actual app screen link in your dashboard.
Let's take the example of the Food Delivery App discussed above to demonstrate how this method works.
Let's assume that each time users place an order, a unique tracking link and Order ID is generated.
The Order ID is tracked as the personalization token, 'order_id' which also doubles up as the deep link's path.
This means that makers of the app can simply use the Order ID to create the unique tracking link for each order!
So, if the Order ID were 345xyz, then the deep link would look something like this:
myapp://live-tracking/345xyz, and so on.
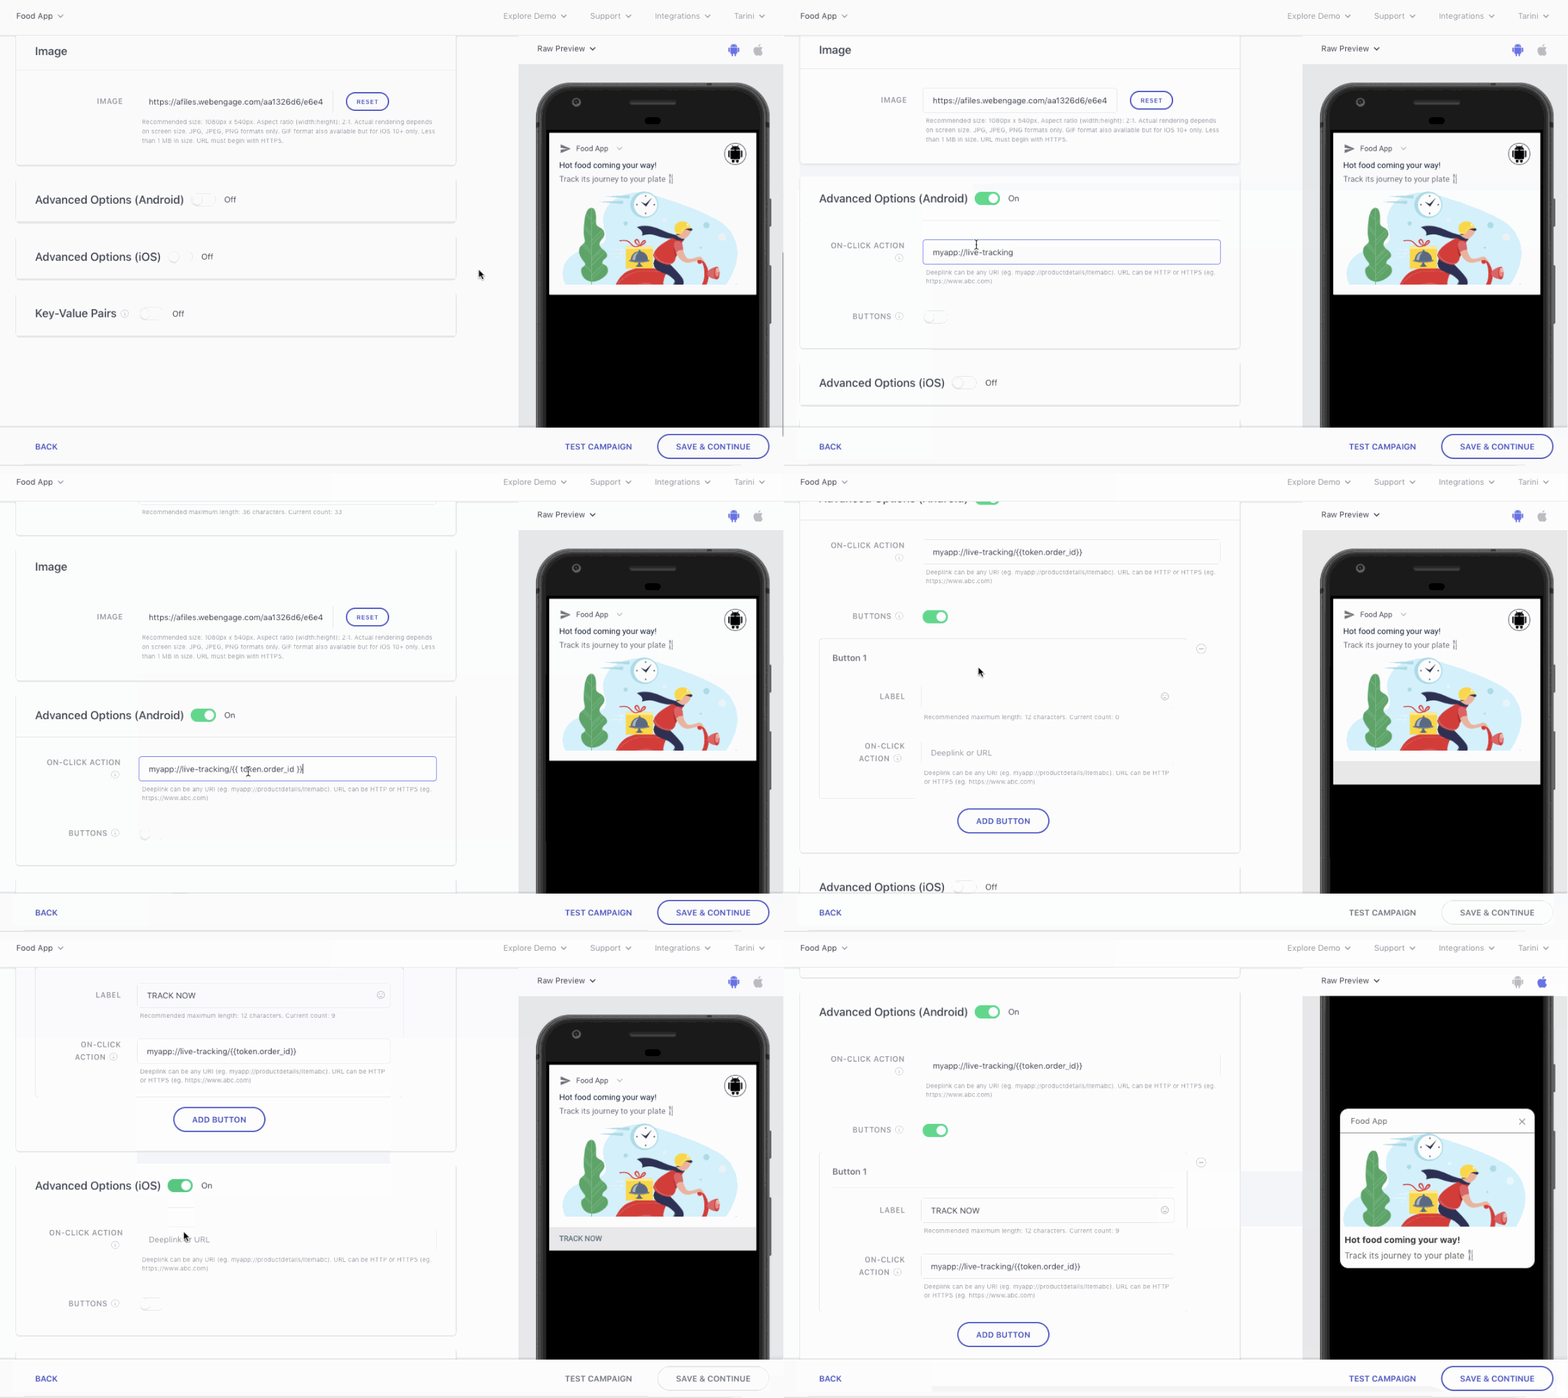
Hence, all you need to do is - replicate the above link structure in your dashboard. Here's how you can go about it:
Click to enlarge
As shown above:
Step 1: Add the parent link - myapp://live-tracking/ to the field, On-click Action.
Step 2: Add the personalization token, order_id as {{token.order_id}} to the link to replicate the screen name.
Thus,myapp://live-tracking/{{token.order_id}}
will be personalized to the deep-link,
myapp://live-tracking/23dgh
for a user who's food order ID is 23dgh.
Similarly, you too can personalize the CTA of your Transactional Push Notification and deliver highly contextual experiences at scale. :)
Continue Building the MessageNow that you have a robust understanding of how you can personalize transactional notifications, please navigate to these sections to continue building the message:
Preview Notification
Click to enlarge
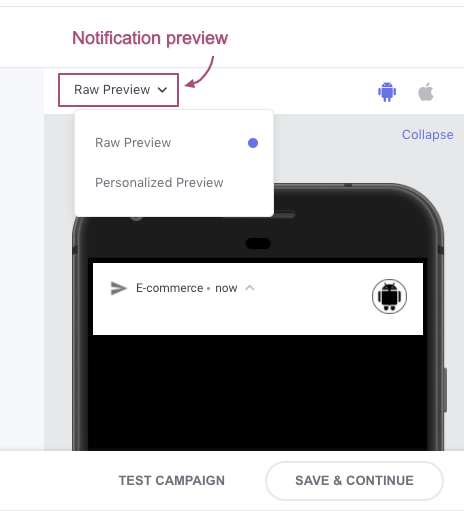
As shown above, the left half of the campaign creation interface provides a real-time preview of the Push Notification being created by you. At any given point, you can toggle between Raw Preview and Personalized Preview to gauge the notification's appearance for both iOS and Android users.
Raw Preview
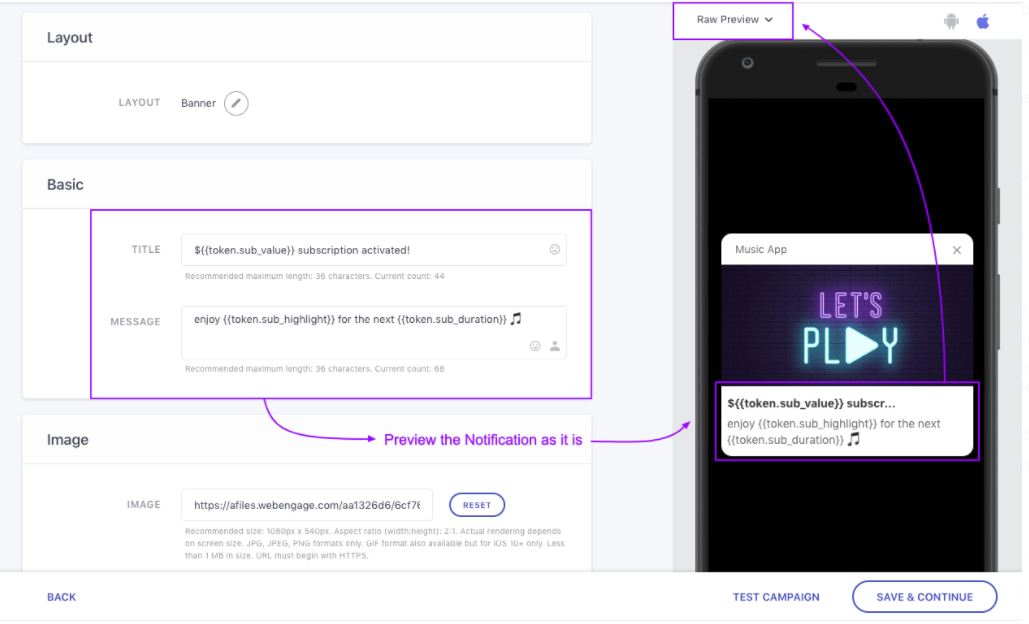
As the name suggests, it renders the Push Notification with the raw message and personalization tokens, as added by you to the Title & Message.
Click to enlarge
Personalized Preview
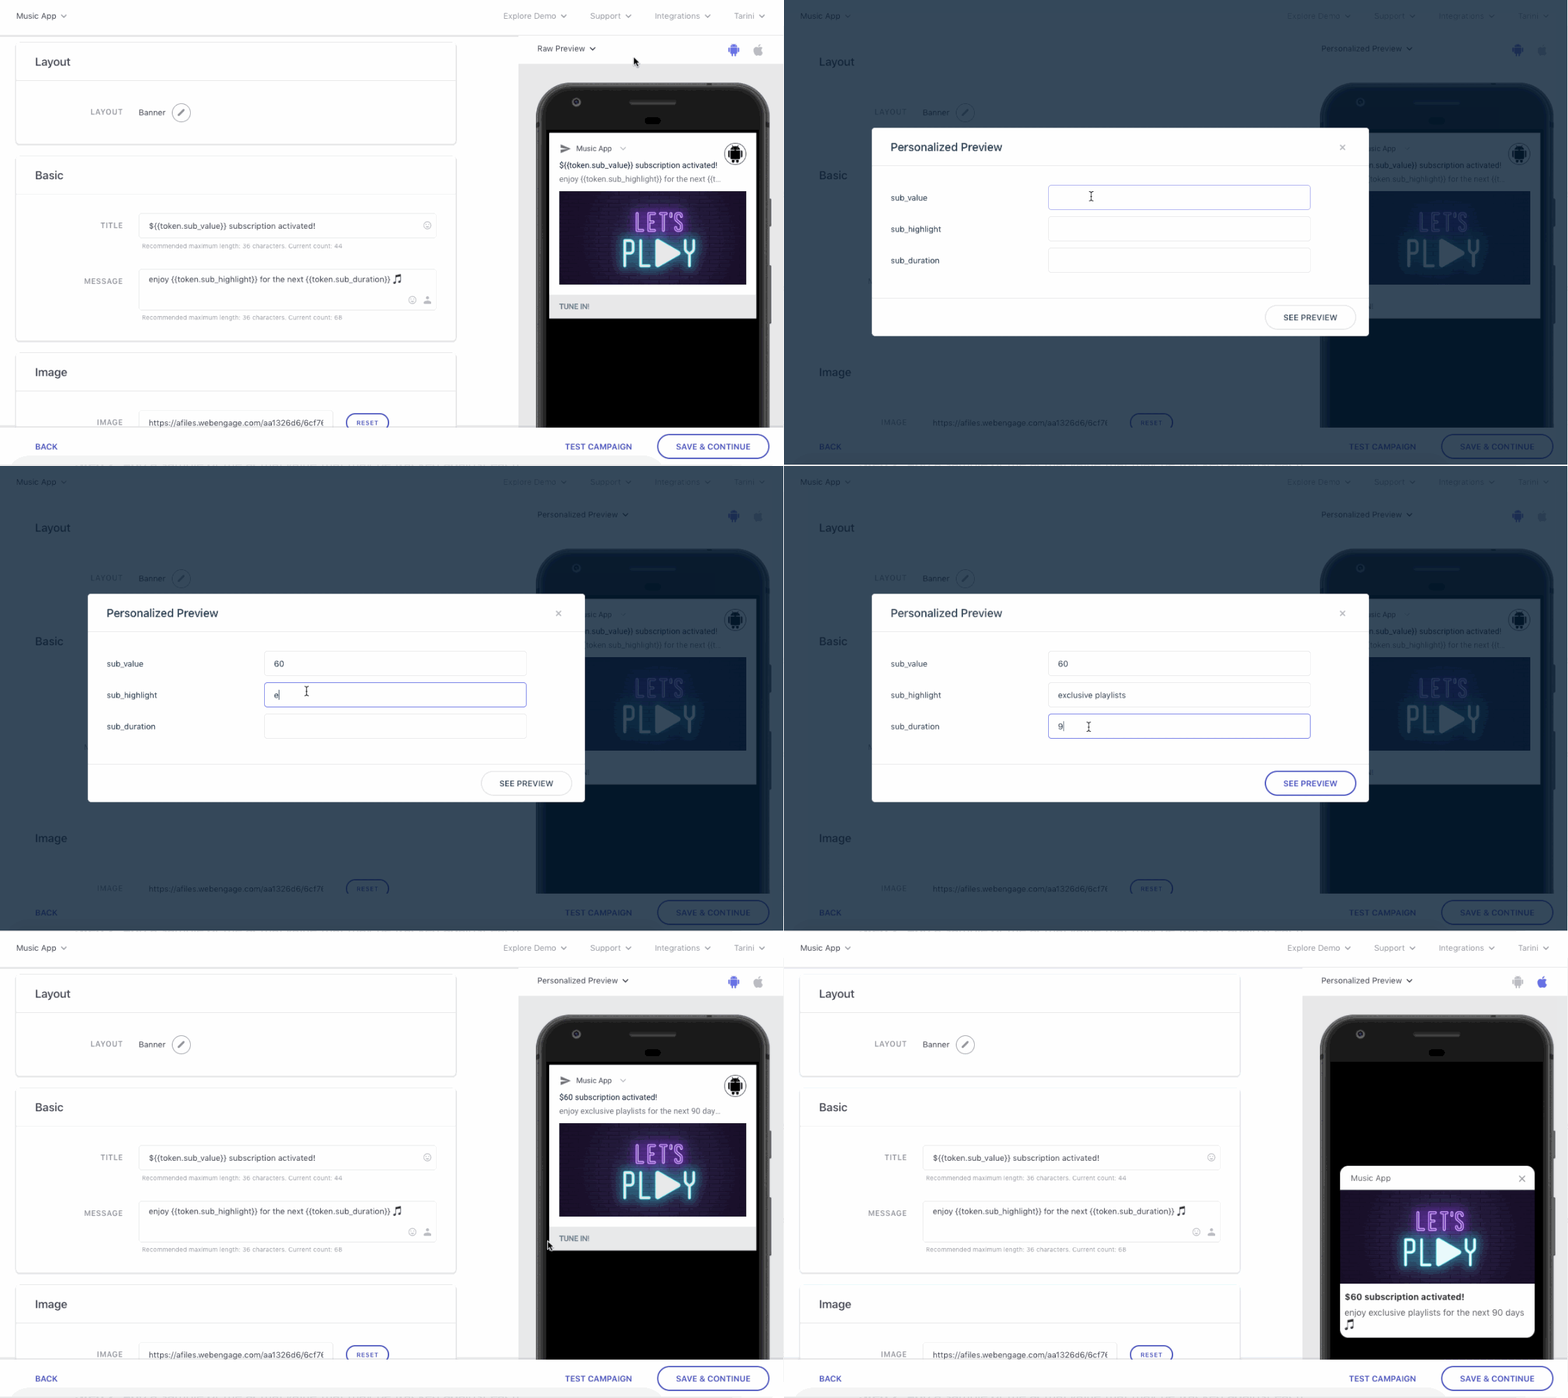
As shown below, it allows you to visualize the message for an ideal user by replacing the personalization tokens with placeholder values. This is a great way to gauge the notification's actual appearance and optimize the text's length.
Click to enlarge
Here's how you can go about it:
Step 1: Select Personalized Preview from the dropdown placed on the top left.
- In doing so, you will be prompted to add values against all the personalization tokens added to the Title & Message.
Step 2: Add a sample of the actual value that may be tracked against each personalization token for an ideal user.
Step 3: Click See Preview to visualize the notification as an Android and iOS user.
However, we highly recommend that you test the notification with internal team members before launch to ensure it looks stunning across various OS and devices!
Create Variations
Variations are just different versions of the campaign's message that facilitate multivariate testing and are referred to in the following manner in your dashboard:
Variation A: The first version of the message.
Variation B: The second version of the message.
Variation C, D, E: Subsequent versions of the message created for testing.
Pro Tip: Why You Must Always Test Multiple Variations of a Transactional CampaignMost marketers like you and I would agree that A/B testing marketing campaigns is the best way to determine the exact message that resonates with the target audience. This inherently leads to higher platform engagement, conversions, and revenue.
But can A/B testing the way you 'confirm a purchase' or 'convey a delivery update' help you drive your business goals?
YES!
Why? Because most users expect to receive a transactional message each time they interact with your app/website/store or when certain scenarios occur in their lifecycle.
This makes transactional campaigns the perfect opportunity to:
build trust in your brand
Reinforce the value proposition of your brand in their lives
Motivate users to continue their association with you, aka. drive retention
Thus, we highly recommend that you create multipleVariations of your transactional campaign to test and identify a winning version that helps you achieve your business goals.
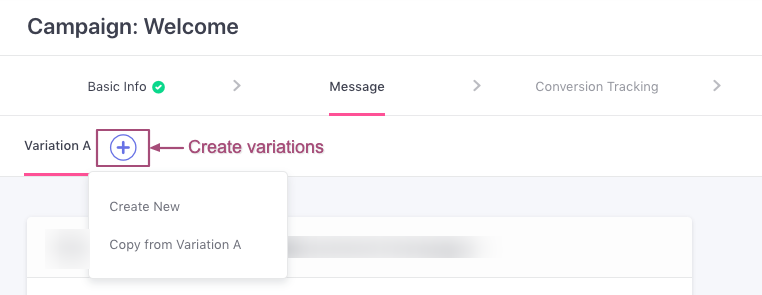
As shown below, click on the Plus icon to create up to 5 versions of the message.
- SelectCreate New to start building the new Variation from scratch
- SelectCopy from Variation A (or any of the previous versions) to make minor edits to the new Variation
Click to enlarge
-
Each Variation can be created independent of the other, allowing you to test multiple aspects like its layout, body copy, buttons, links and colors to identify a mix that resonates with your entire target audience. (How to automate Variation testing)
-
The percentage value indicates the share of users that will receive a Variation and can be customized at Step 4: Conversion Tracking.
Step 3: Set up Conversion Tracking & Variation Testing
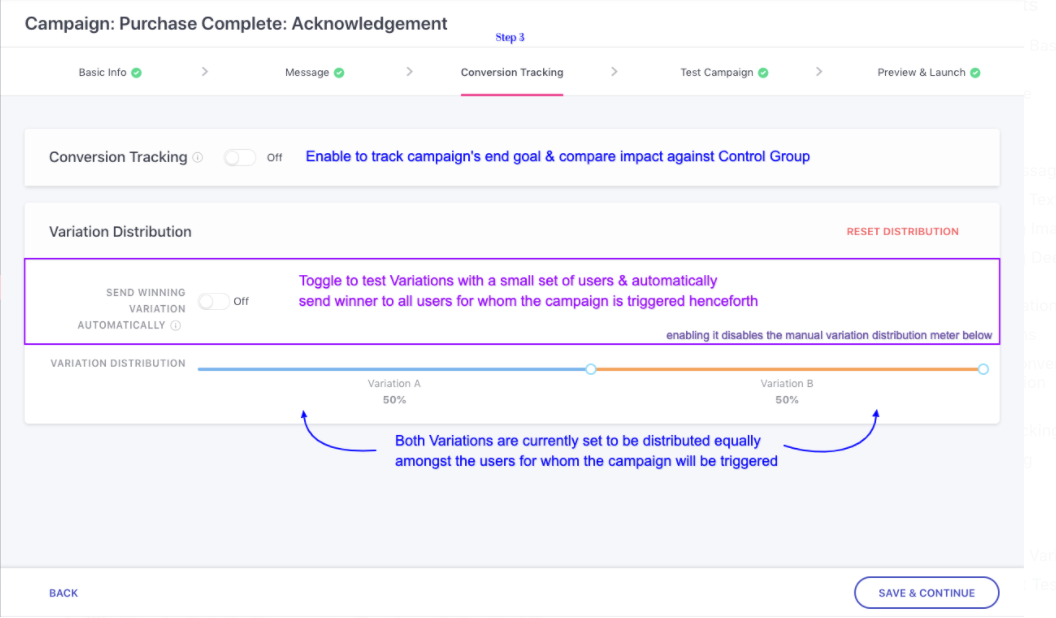
The third step of campaign creation allows you to measure the effectiveness of your transactional campaign in various ways like:
- Tracking conversions for a specific goal
- Comparing performance against a control group
- Testing multiple variations of the message to identify the most effective copy/layout
Hence, it has been divided into two sections: Conversion Tracking and Variation Distribution.
Click to enlarge
Conversion Tracking
How to Set Up Conversion Tracking & Control GroupHey there,
Please refer to this Step-by-step guide on setting up Conversion Tracking for your campaign. Since the setting works in the same manner for Transactional Campaigns, as it does for other the campaign types, the guide will get you going in no time at all!
Variation Testing
If you have created multiple Variations at Step 2: Message, then you can easily automate testing by configuring Send Winning Variation Automatically.
Doing so will allow you to test all the Variations (and Control Group if enabled) with a small test audience. We'll automatically identify a winner and send it to all the subsequent users for whom the Transactional Campaign is triggered.
Here's how you can set it up:
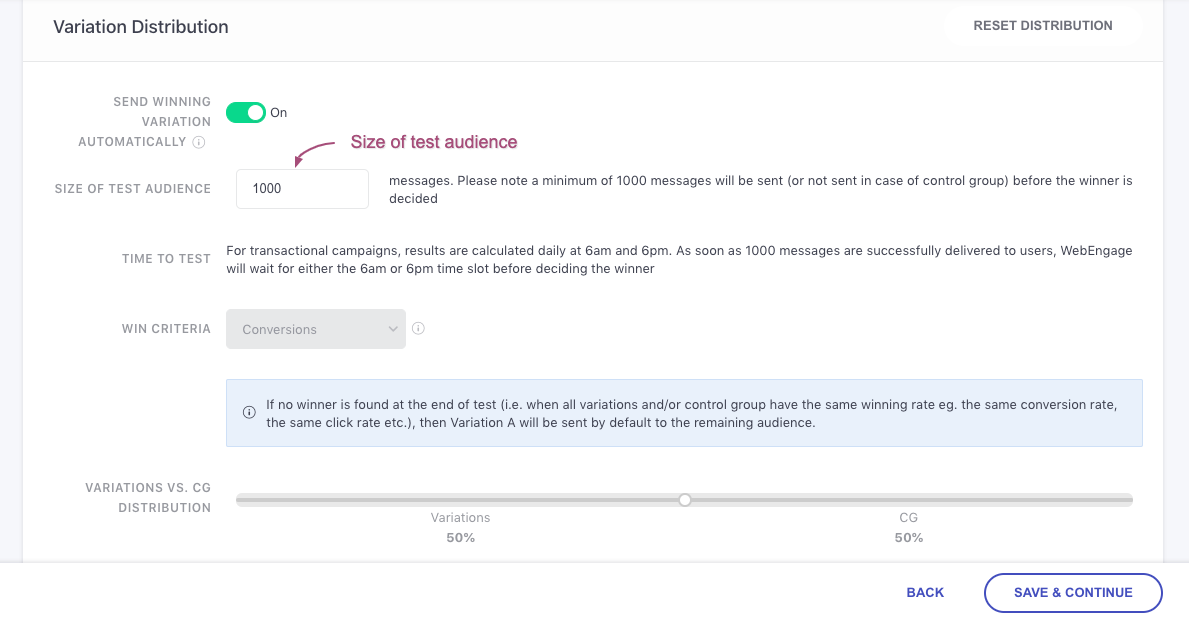
Step 1: Specify Size of the Test Audience
All Transactional Campaigns are triggered for a user on the occurrence of a specific scenario in their lifecycle. Thus, the most scientific method to test its Variations is by ensuring that a significant number of messages are delivered before we draw a comparison.
This is why, the test audience can be defined in terms of the number of messages that must be delivered to your users.
Click to enlarge
For example, in the above visual, we have specified a test audience of 1000 messages. This means that all the Variations will be equally divided amongst the specified number and testing will continue until a total of 1000 messages have been successfully delivered.
Step 2: Select Win Criteria
The Win Criteria is a performance indicator, (Clicks or Conversions), _that helps us determine a winning _Variation.
For example, in the above visual we have selected Clicks as the Win Criteria.
- This means that once 1000 messages have been successfully delivered to the users, we will determine a winner based on the number of clicks tracked for each Variation.
Prefer Manual Variation Testing?Follow this guide to test the Variations and Control Group (if enabled) manually.
Step 4: Test Your Campaign (Recommended)
Iron out all the creases in your notification by testing it with internal team members for maximum impact! While this is an optional step, we recommend that you test your Transactional Campaign to ensure that everything's in order. Here's how you can go about it:
Step 4.1: Select Variation
As shown below, by default, Variation A is selected against the field - Variation To Test. However, if you have created multiple Variations then you can test each one by sending them consecutively to a Test Segment. For example, we have chosen to test Variation B.
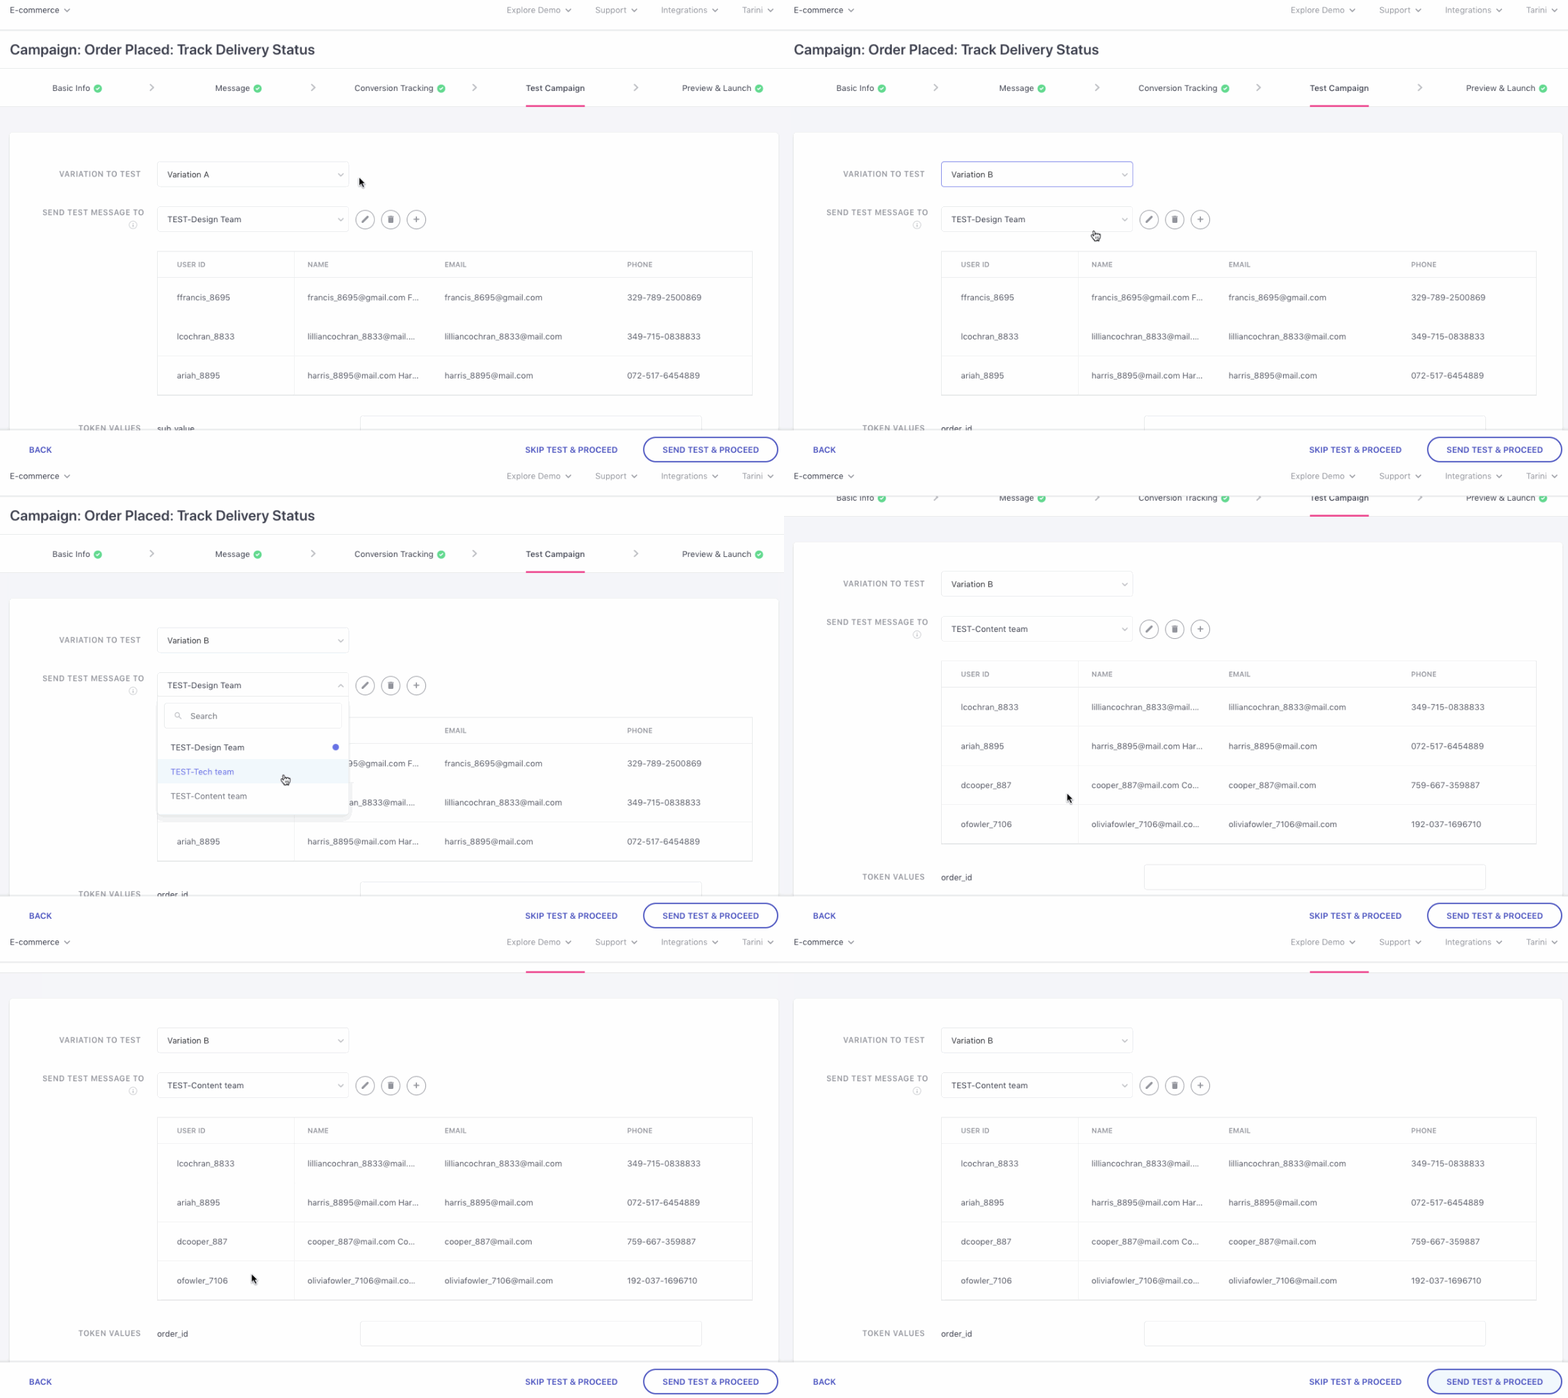
Click to enlarge
Step 4.2: Select Test Segment
All the test segments created while testing a campaign for any channel (Push, SMS, Web Push, Email), can be found under the dropdown, Send Test Message To.
- As shown above, click the dropdown to select a relevant test segment for the Transactional Push Notification and preview user details before proceeding.
Haven't created a test segment yet?
Step 4.3: Enter Token Values
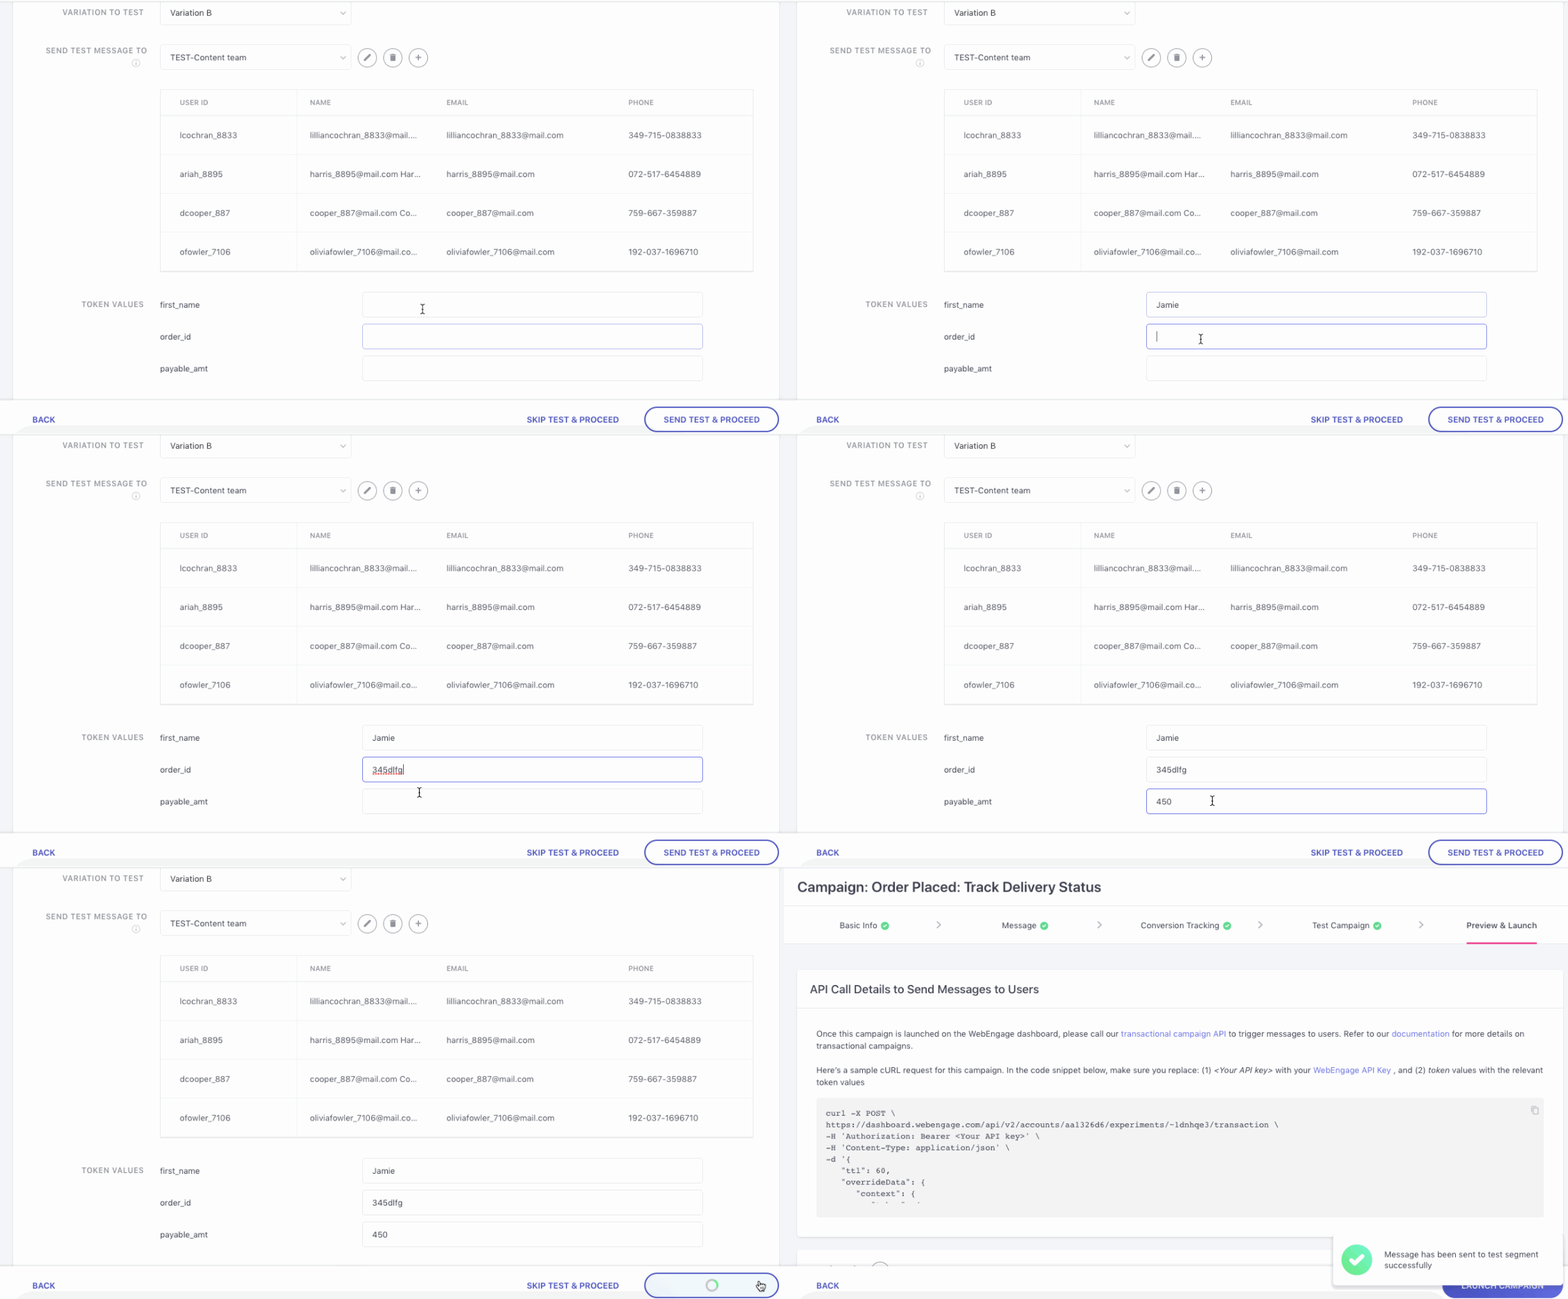
Click to enlarge
As shown above, you will find a list of all the personalization tokens added at Step 2: Message against the field, Token Values.
- Add a sample of the actual value that may be tracked against each personalization token for an ideal user. This is the most recommended way to gauge the Transactional Push Notification's appearance as an actual user.
- Next, launch the test campaign by clicking the Send Test & Proceed button.
ImportantAfter the Test Message has been sent, you will be able to see whether it has been Delivered, Queued, or Failed.
The Delivery details include Device details, Browser Name, and so on.
If the Test Message has Failed to deliver, then you will be able to see the reason for failure.
Pro TipIf users included within the test segment don't receive the test campaign within a maximum duration of 10 minutes, then we suggest that you look into the following aspects to debug:
Is your app still installed on their device?
Did you use the correct personalization tokens (as created by your tech team)?
Has FCM (for Android)/ APNS (for iOS) been integrated correctly with your WebEngage account?
Please feel free to drop in a few lines at[email protected] in case you need assistance. We're just an email away!
Step 5: Preview & Launch
Once you are satisfied with the test results, it's time to launch the Transactional Push Campaign! But before that, we recommend that you conduct a quick preview of its settings.
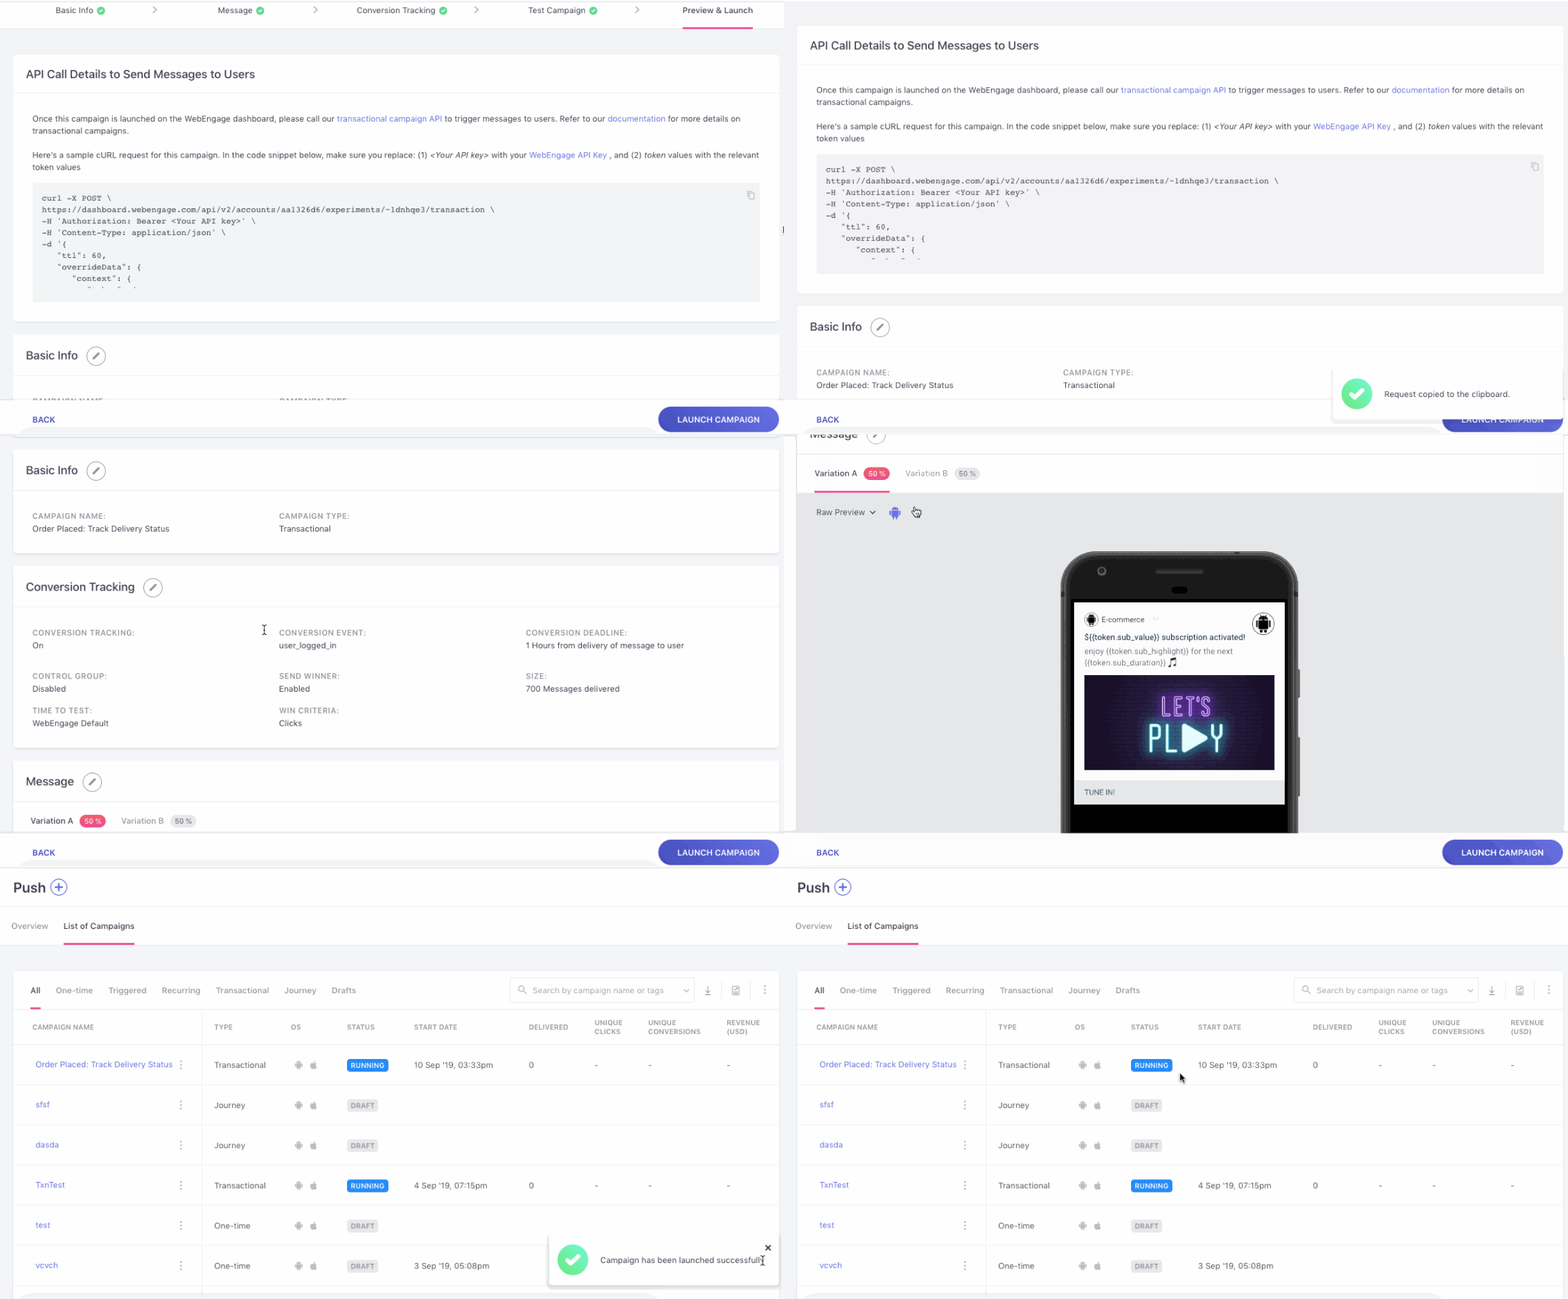
Click to enlarge
As shown above, the last step of the campaign creation interface presents a snapshot of its:
- Sample API Call containing the Personalization Tokens added at Step 2: Message (copy code & edit to test with a service like Postman)
- Variations with an OS-wise preview (Step 2: Message)
- Conversion Tracking and Multivariate Test settings (Step 3: Conversion Tracking)
Edit Campaign Before Launch
You can always choose to edit a step by clicking the Pencil icon, placed next to each header. In doing so, you will be directed back to the step, as shown below.
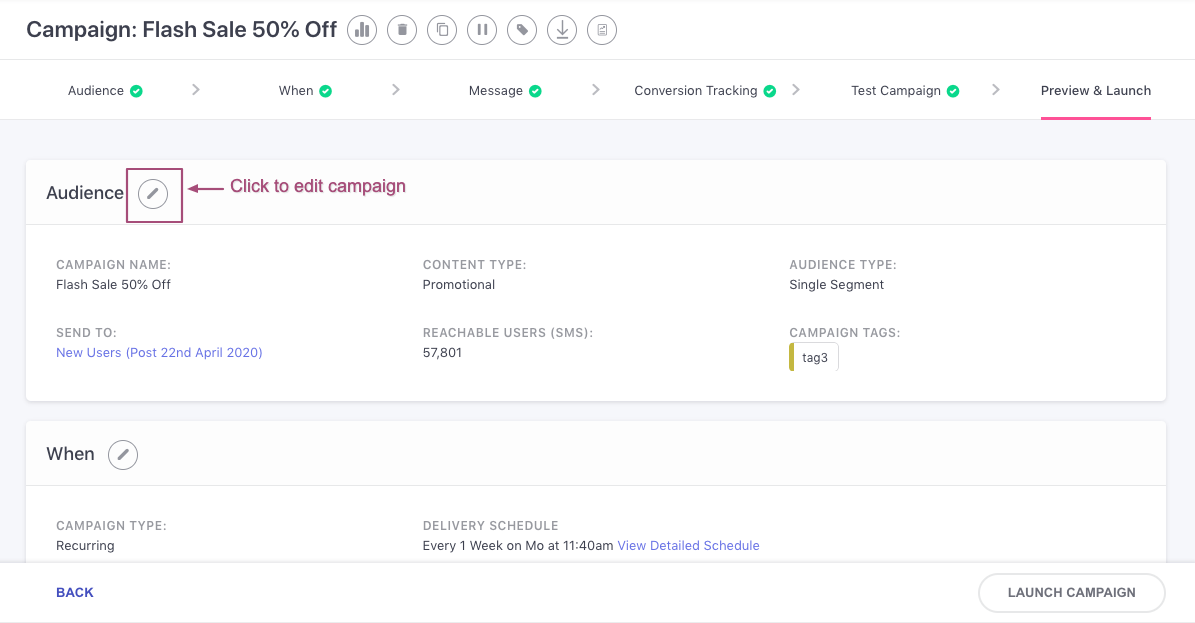
Click to enlarge
As shown above, simply make your edits, save them and toggle back to Step 5: Preview & Launch to continue.
What Happens After the Campaign is Launched?
- Once the transactional campaign is launched, no messages will be sent to your users until the Transactional Messaging API is called through your backend.
- Each time the trigger event occurs in your backend, a POST call must be made through the API, sending details of the user for whom the event has occurred (User ID), along with the values gleaned for the personalization tokens added to the message.
- The campaign's message will be personalized with the exact values gleaned for each user through the Transactional Messaging API
- WebEngage will then sent the notification to FCM and APNS for Android and iOS users, respectively.
Detailed ReadHow Transactional Campaigns work in your dashboard
We hope this has equipped you with a robust understanding of how you can automate transactional Push messages for all your users. Please feel free to drop in a few lines at [email protected] in case you have any queries or feedback. We're always just an email away!
Updated 3 months ago
Now let's show you how you can analyze the impact of your Push Notification!