Creating Transactional SMS Campaigns
Step-by-step guide on setting up transactional campaigns in your dashboard
Worldwide, there are nearly 7 million mobile users. That means more than 95% of the world's population is capable of receiving an SMS. And if done correctly, SMS campaigns can achieve a staggering open rate of 98%! This makes SMS one of the most effective channels to communicate time-sensitive messages.
So irrespective of the product/service you're marketing, text messages have the potential to drastically amplify your user experience by opening up a reliable and direct channel of communication. This is why we bring to you - Transactional Campaigns, your one-stop solution to communicating critical messages instantly!
Simply launch your campaign and set up the Transactional Campaign API for the Campaign ID - we'll personalize the message and send it as soon as the API is triggered. You can sit back and watch the retention metrics go up :)
Must ReadBefore you begin creating your campaign, we recommend that you get yourself acquainted with how Transactional Campaigns work in WebEngage. Doing so will help you better understand the steps of campaign creation.
How to Access
As shown below, click the Plus icon placed on the top left in the List of Campaigns or the central hub of SMS.
- In doing so, you will be prompted by a pop-up, allowing you to select the type of campaign you'd like to create.
- Select Transactional to begin creating your campaign.
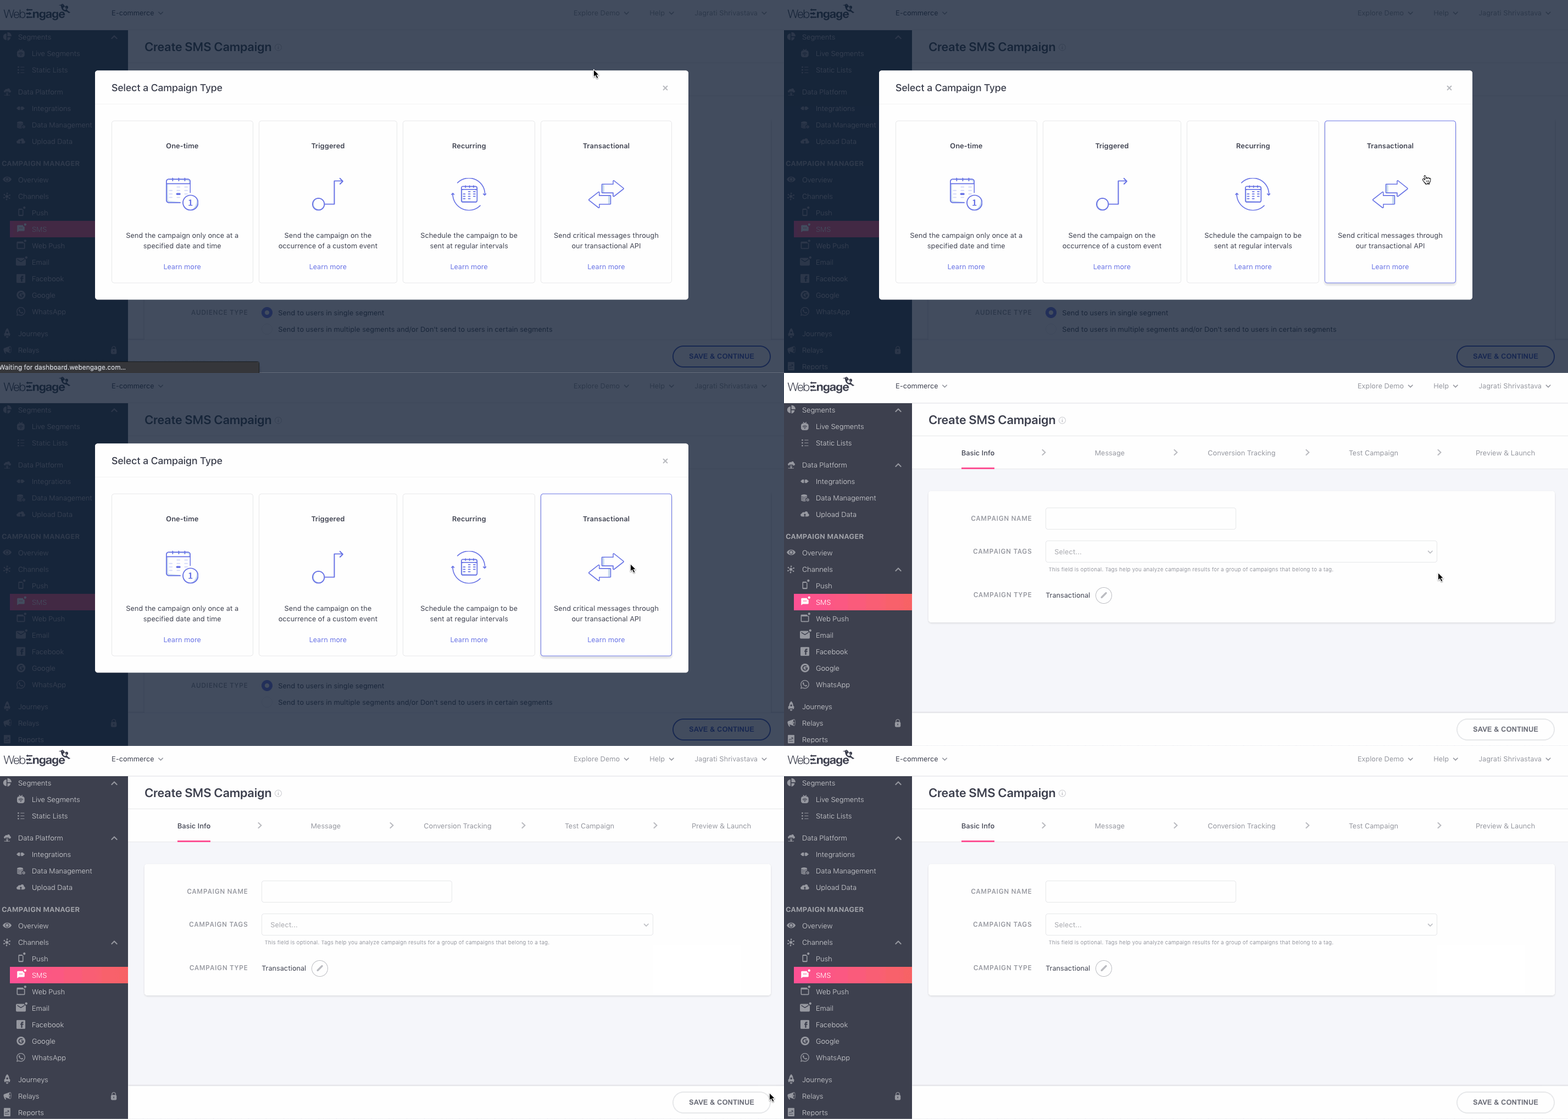
Click to enlarge
Now, let's walk you through all the steps of campaign creation.
Please ensure that you have integrated an SMS Service Provider (SSP) with your account before proceeding as it enables message delivery to all your users. Here's the integration guide.
Step 1: Configure Basic Info
- The first step is to give your campaign a unique name that helps you identify its purpose.
- As shown below, you can click the Edit icon to alter the campaign type selected by you (in case you change your mind!)
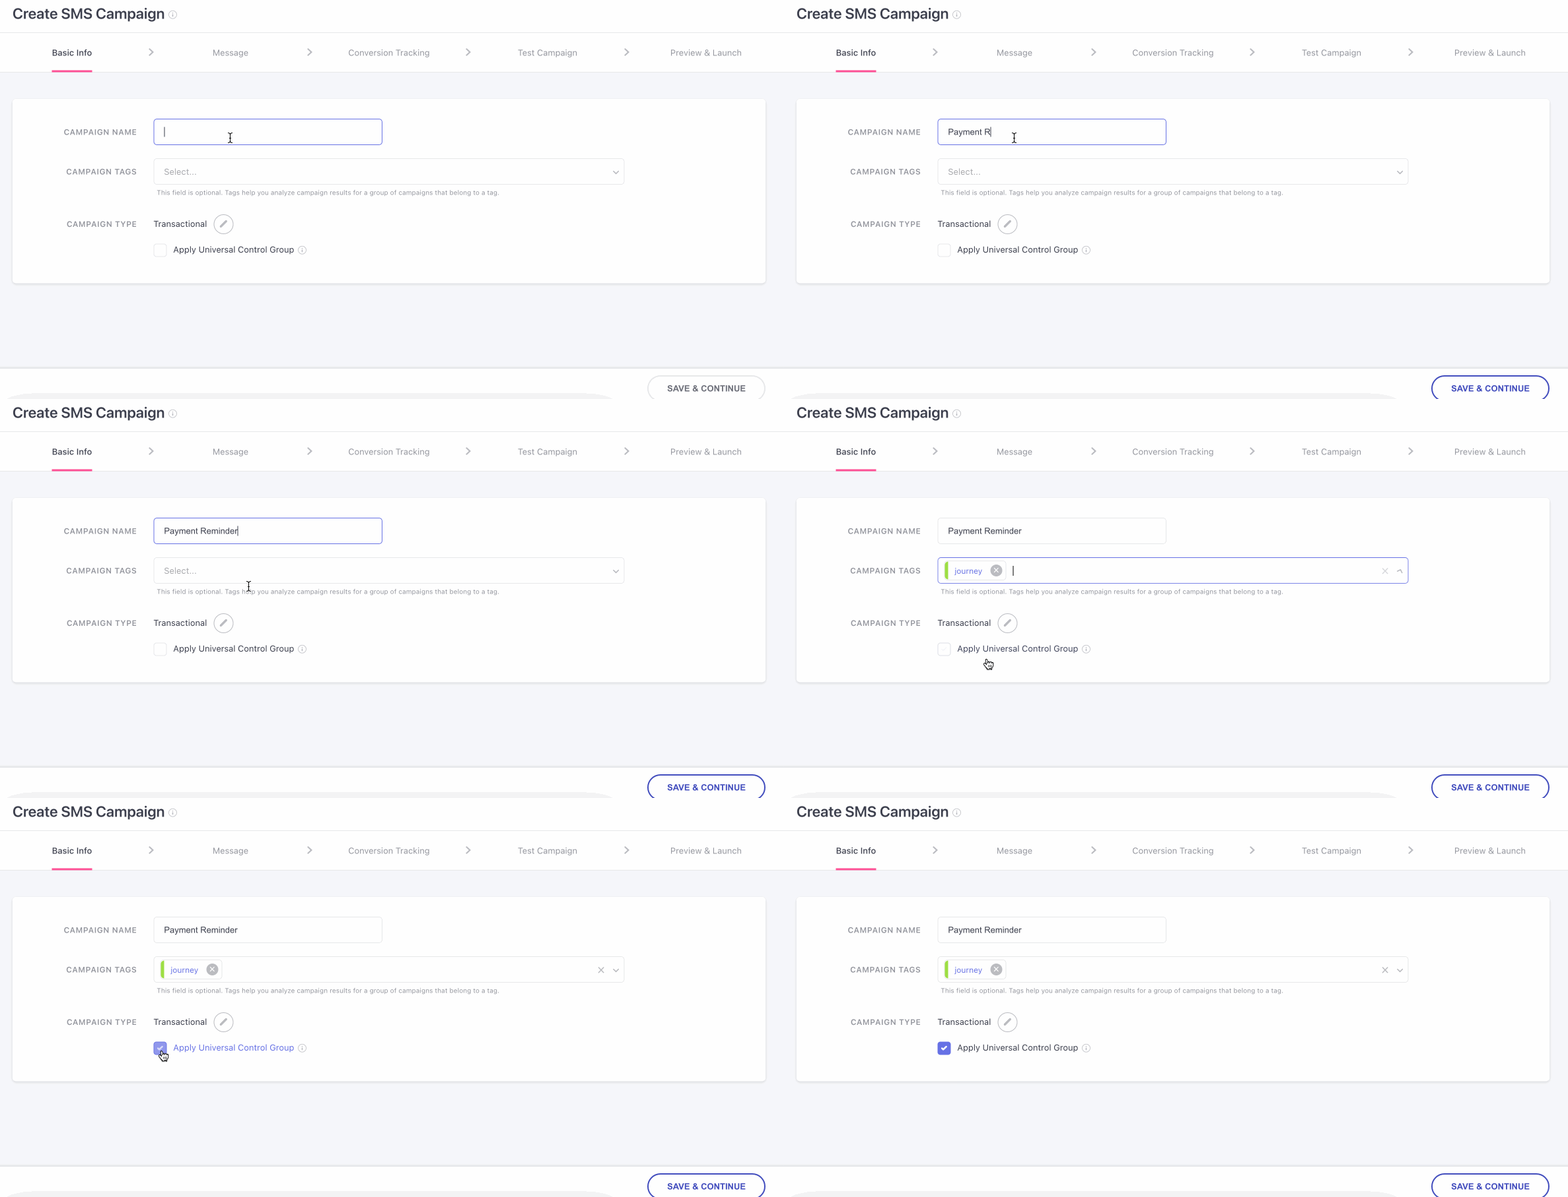
Click to enlarge
Apply Universal Control Group
Conditional OptionThis is a conditional option which will be shown only if you have created a Universal control group in your account. Click here to know how to create a Universal control group.
- When the box is checked, the campaign will not be sent to users who are part of the Universal Control Group in the segment that is selected.
- When the box is unchecked, the campaign will be sent to all users that are part of the segment inclusive of the Universal Control Group users.
Step 2: Create the Message
The most exciting part of campaign creation - building the message!
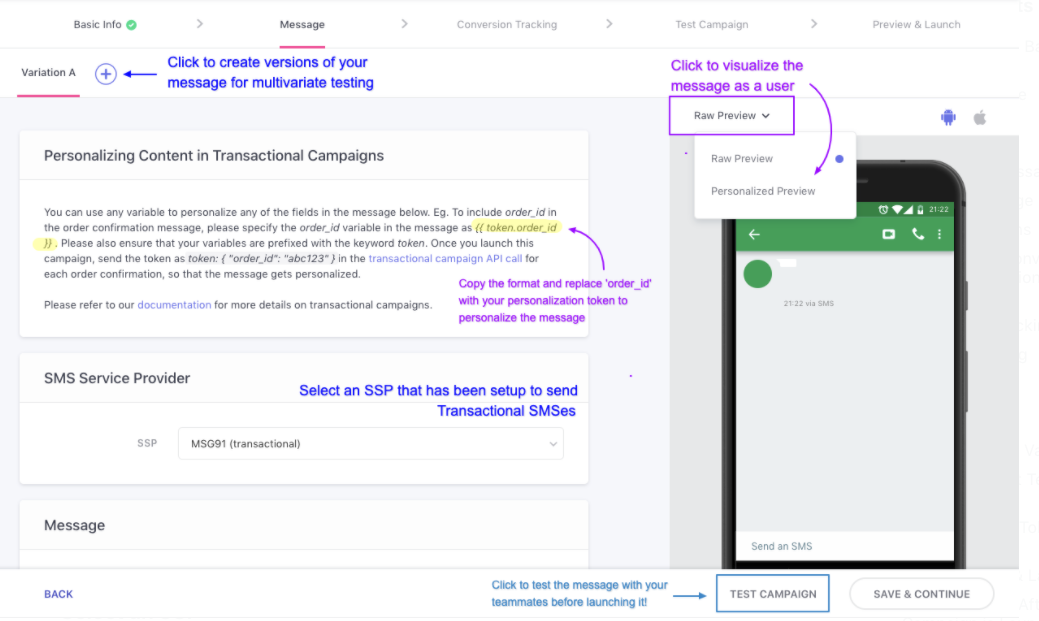
Click to enlarge
As highlighted above, the message creation interface comes loaded with intuitive features like Variations and Personalized Preview, enabling you to create impactful Transactional SMS Campaigns* in minutes.
Let's get you acquainted with each feature:
Select an SSP
While the SMS campaign is created and personalized through your dashboard, the actual message is delivered to by an SMS Service Provider (SSP). We have partnered with several global SSPs to enable 2-click integration with your WebEngage account. (How to configure an SSP)
As shown below, use the dropdown to select an SSP that has been configured to deliver Transactional SMSes through a Transactional Messaging Pipeline.
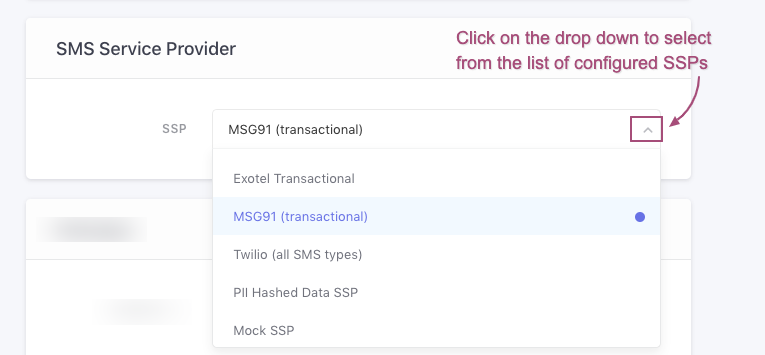
Click to enlarge
Fact CheckDepending on the SSP you’re using, you may need to purchase separate licenses/Sender IDs for sending Transactional Messages and whitelist the content for authentication.
Personalize Message
Transactional Campaigns can be personalized only through the personalization tokens that have been created in your backend. Thus, each time the Transactional Campaign API is triggered for a user, your tech team will need to ensure that values of all the personalization tokens are passed along to your dashboard. This way we'll know which token needs to be replaced with which value, facilitating one-on-one personalization at scale.
Simply add your personalization tokens in the format,{{token.your_personalization_token}} and you're good to go!
Let's demonstrate a short use-case to show you how it works:
Investment App: Personalizing Transaction Confirmation SMSLet's take the example of an investment app that allows users to manage multiple investment portfolios. Each time a user credits money in a plan, the transaction is acknowledged through an SMS.
The message conveys several critical details of the transaction like the name of the fund, date of investment, the amount invested, the net value of the asset (NAV) and includes a link to the user's portfolio evaluation section.
Thus, marketers of the app collaborated with their tech team to track these details as the following personalization tokens:
Name of the fund:
fund_nameDate of investment:
doiAmount invested:
fund_amountNet value of the asset:
navLink to user's portfolio evaluation section (in the app):
eval_link
Here's how they created the Transactional Message:
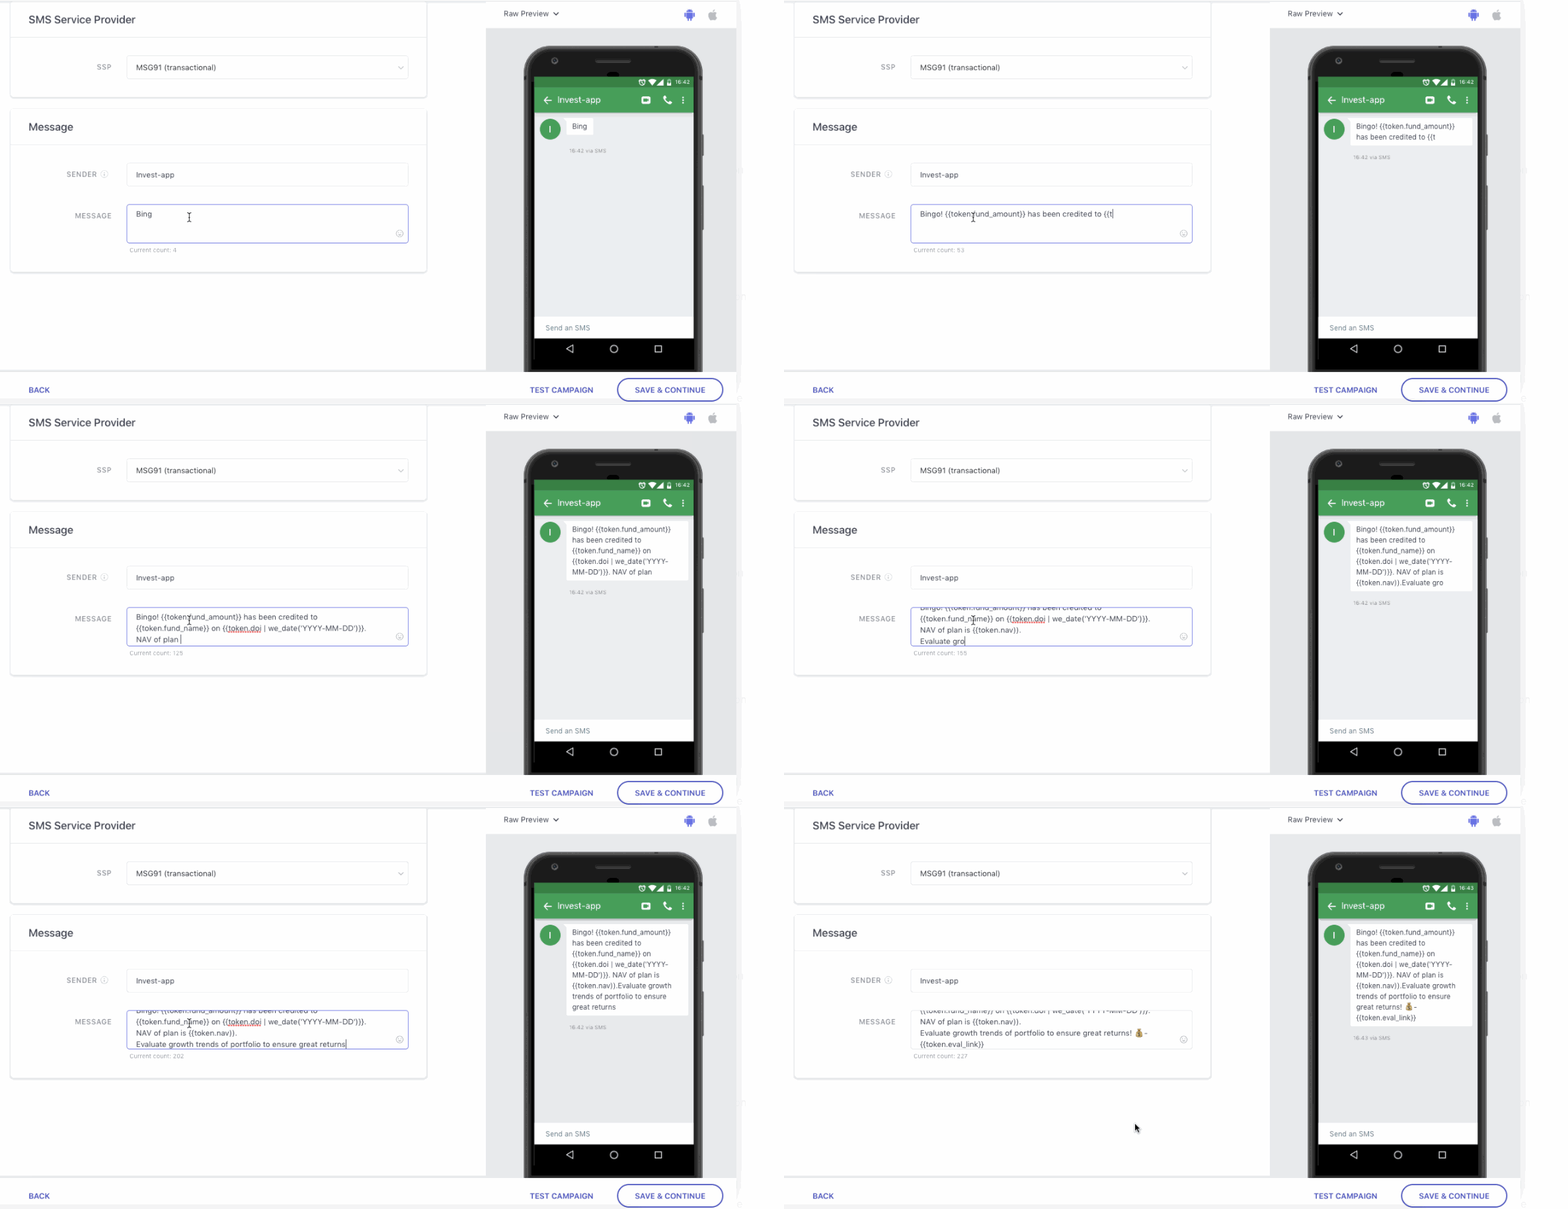
Click to enlarge
As you can see above:
-
We have added $ before
{{token.fund_amount}}(amount credited by the user) and{{token.nav}}(net asset value of the fund) for conveying the exact monetary value -
We have added a nunjucks code for displaying the date of investment in a specific format along with the personalization token -
{{token.doi | we_date('YYYY-MM-DD')}}
Hence, each time a user invests in a portfolio, they will receive a message, similar to the one shown below in personalized preview:
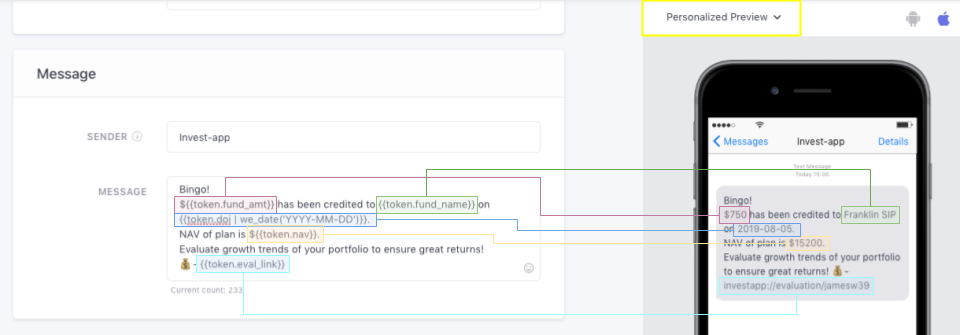
Click to enlarge
Personalizing Links
As demonstrated in the use-case discussed above, you can easily personalize app deep links and web links in any of the following ways:
-
Method 1: Track the link as a personalization token (discussed above)
-
Method 2: Build the link in your dashboard by adding the personalization token as the path
- The second method relies on creating a personalization token in your backend that captures the same value as the link's pathname. The idea is to replicate the link structure in your dashboard by adding the personalization token as the path (detailed read).
Let's take the example of the investment app discussed above to show you how it works.
Let's assume that makers of the investment app assign a unique ID to each user.
The user ID doubles up as the pathname for the deep link that tracks the app's portfolio evaluation section.
Assume that a user, John Webster is assigned the ID, webster31J by the app
And the deep link's parent structure is investapp://evaluation/
This means that the link to John's portfolio evaluation screen in the app will be: investmentapp://portfolio-evaluation/webster31J
Hence, all you need to do is - replicate the above link structure in your dashboard. This can easily be done by tracking User ID as the personalization token, user_id.
Here's how you can personalize the transactional campaign's link:
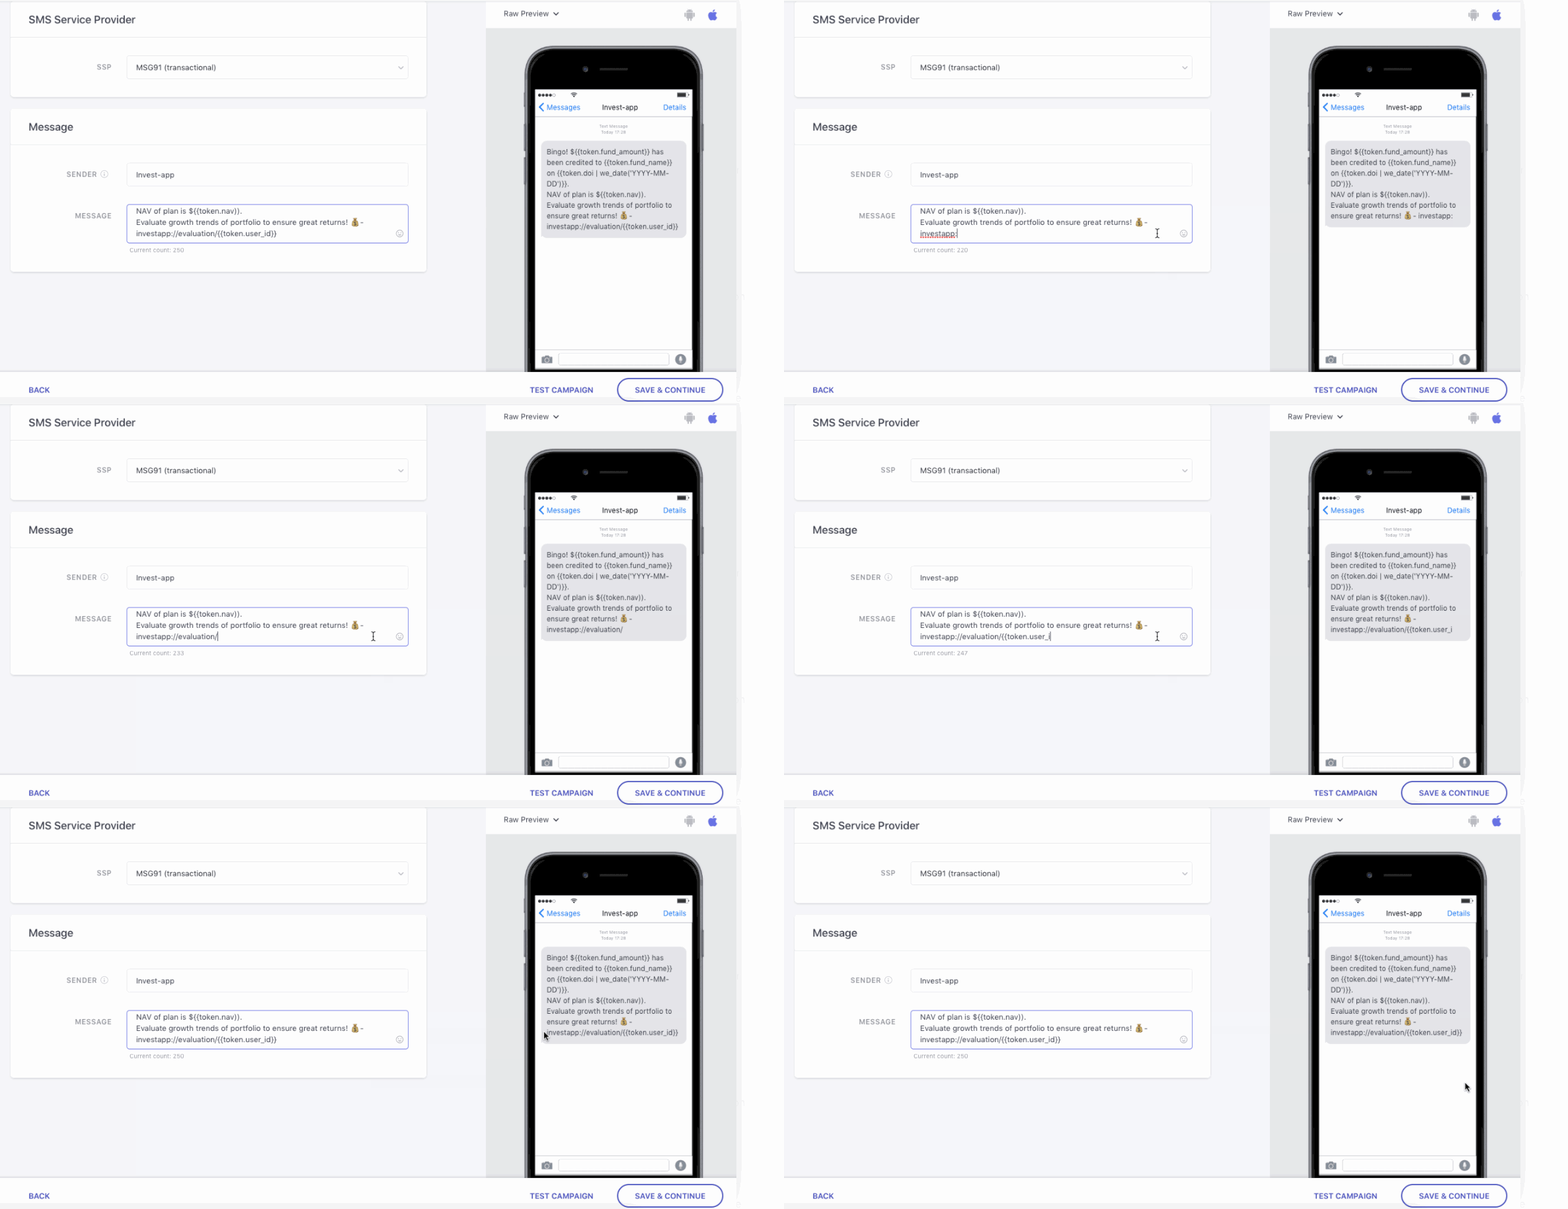
Click to enlarge
As shown above:
Step 1: Add the parent link - *investapp://evaluation/ in the field, Message
Step 2: Add the personalization token, user_id as {{token.user_id}} to the link to replicate the pathname.
Thus, each time a user invests in a plan, they will be directed to their portfolio evaluation section through the personalized deep link - investapp://evaluation/{{token.user_id}}.
Tracking Clicks for an SMS CampaignsEach time a user clicks on a link included with the SMS, it's tracked as the performance indicators, Total Clicks and Unique Clicks under the Campaign's Overview section.
How?
Whenever you add a link in the field, Message, we automatically append it to a WebEngage domain (weurl.co), allowing us to track users who click on it.
Hence, if you have not added a link, then no Clicks will be tracked for your campaign.
Preview Message
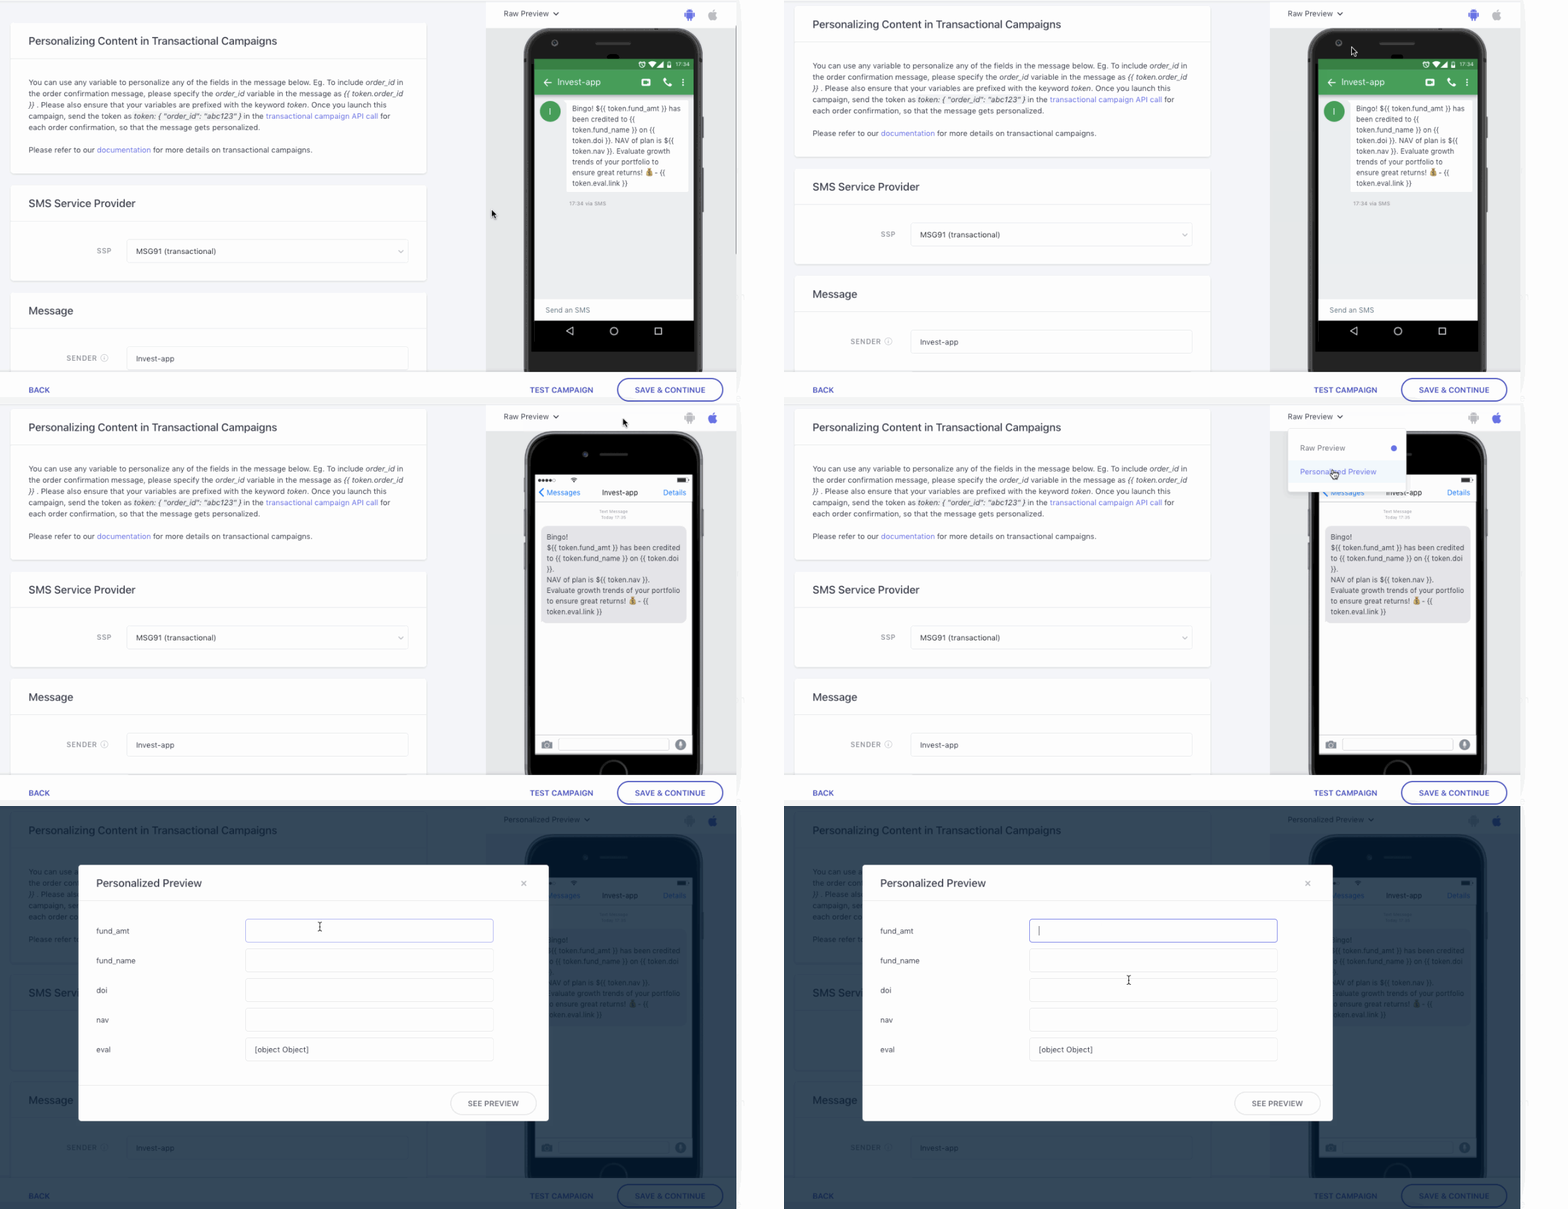
Click to enlarge
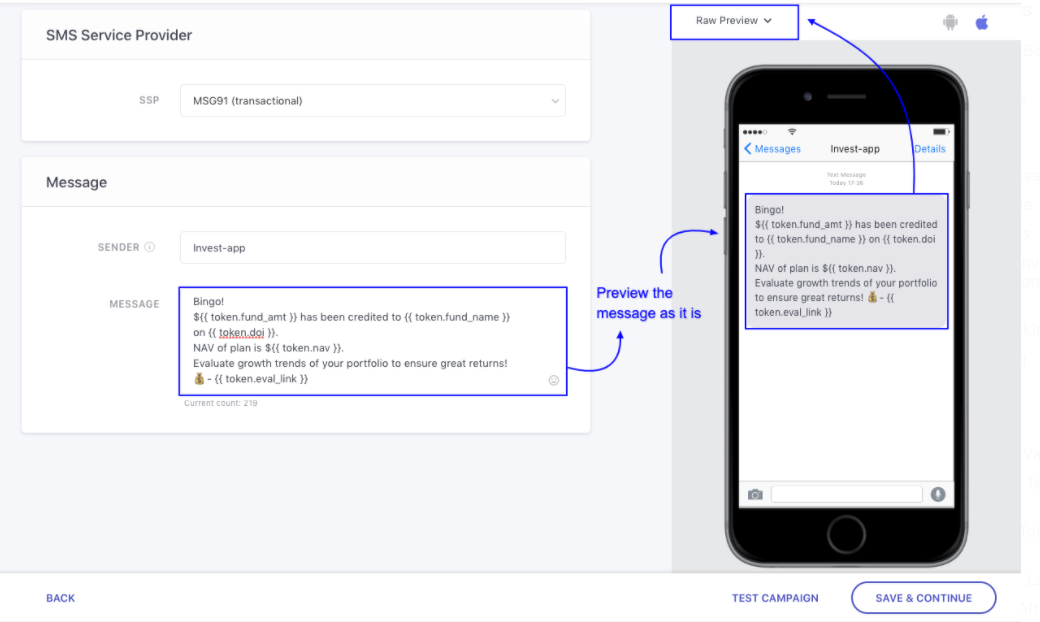
As shown above, the left half of the campaign creation interface provides a real-time preview of the SMS being created by you. At any given point, you can toggle between Raw Preview and Personalized Preview to gauge the message's appearance.
Raw Preview
As the name suggests, it renders the SMS with the raw personalization tokens added to the Message.
Click to enlarge
Personalized Preview
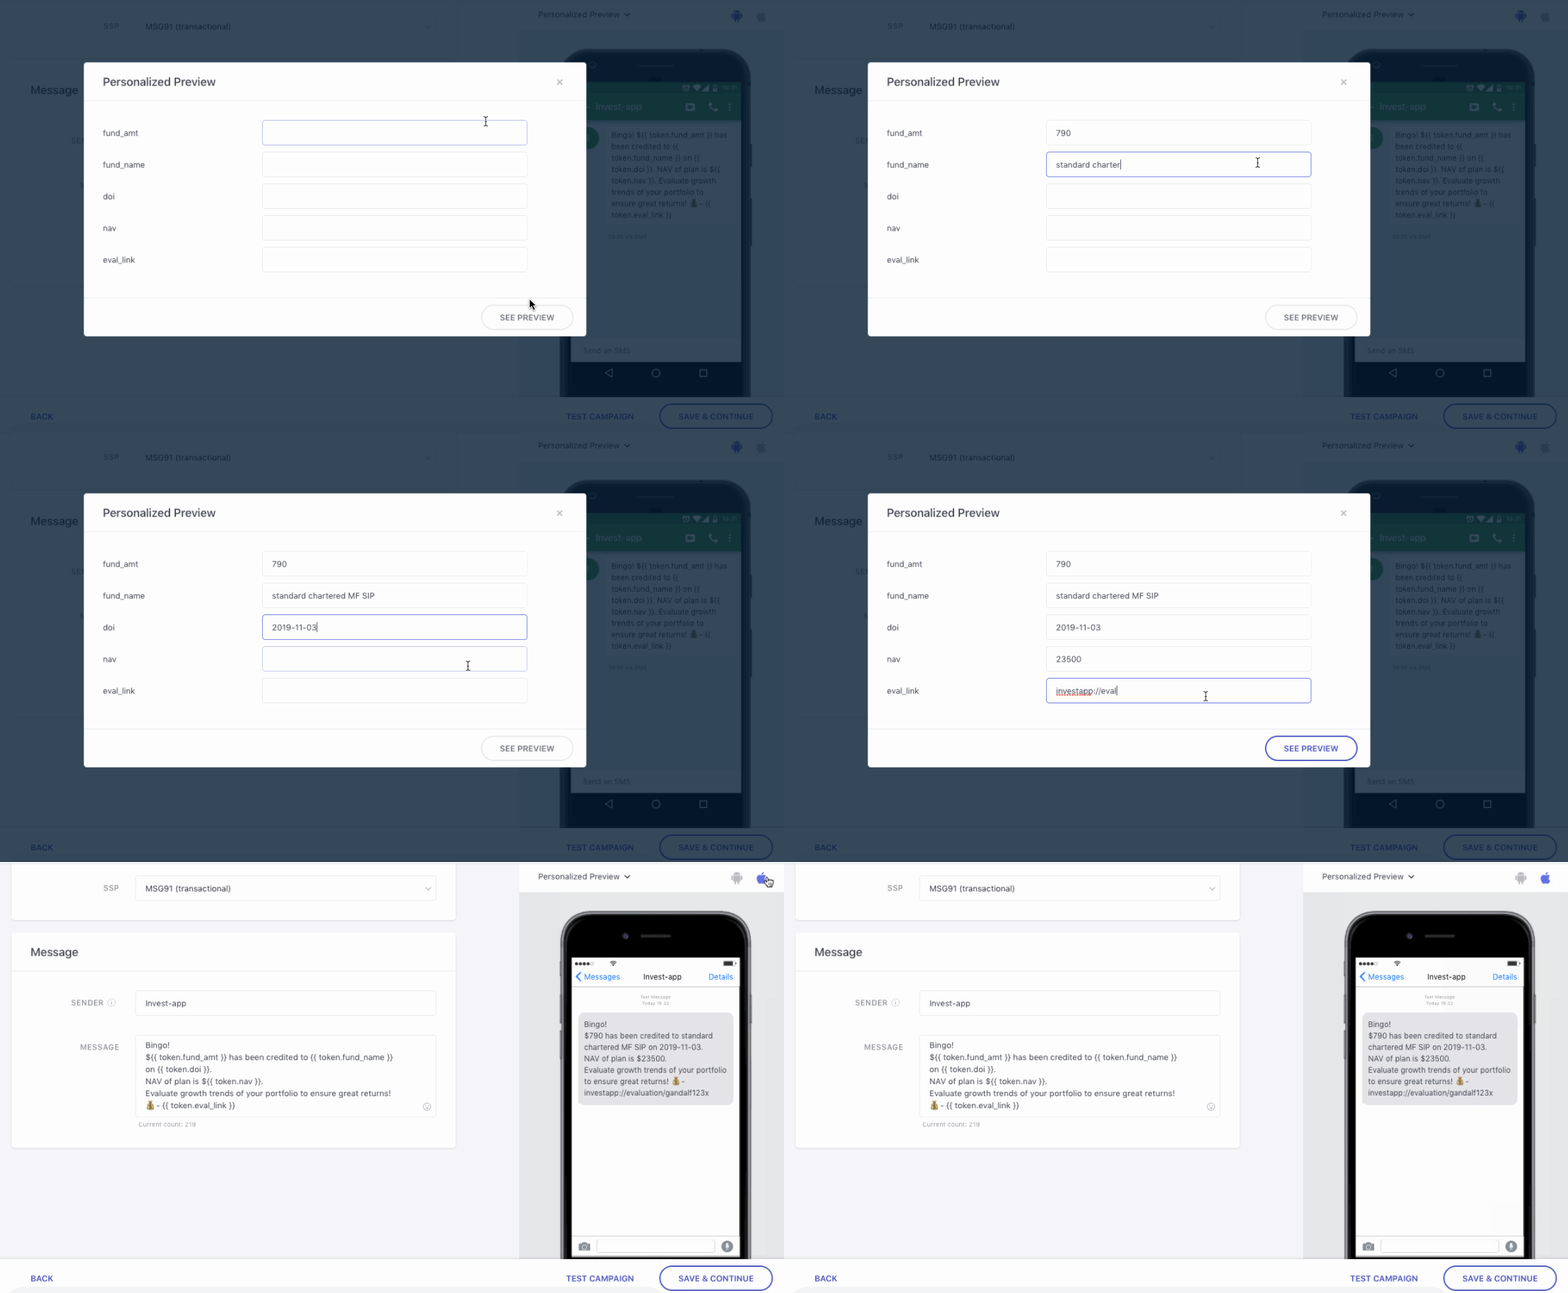
As shown below, it allows you to visualize the message for an ideal user by replacing the personalization tokens with placeholder values. This is a great way to gauge the message's actual appearance and optimize it.
Click to enlarge
Here's how you can go about it:
Step 1: Select Personalized Preview from the dropdown placed on the top left.
- In doing so, you will be prompted to add values against all the personalization tokens added to the Message.
Step 2: Add a sample of the actual value that may be tracked against each personalization token for an ideal user.
Step 3: Click See Preview to visualize!
Create Variations
Variations are just different versions of the campaign's message that facilitate multivariate testing and are referred to in the following manner in your dashboard:
Variation A: The first version of the message.
Variation B: The second version of the message.
Variation C, D, E: Subsequent versions of the message created for testing.
Pro Tip: Why You Must Always Test Multiple Variations of a Transactional CampaignMost marketers like you and I would agree that A/B testing campaigns is the best way to determine the exact message that resonates with the target audience. This inherently leads to higher platform engagement, conversions, and revenue.
But can A/B testing the way you 'confirm a purchase' or 'convey a delivery update' help you drive your business goals?
YES!
Why? Because most users expect to receive a transactional message each time they interact with your app/website/store or when certain scenarios occur in their lifecycle.
This makes transactional campaigns the perfect opportunity to:
build trust in your brand
Reinforce the value proposition of your brand in their lives
Motivate users to continue their association with you, aka. drive retention
Thus, we highly recommend that you create multipleVariations of your transactional campaign to test and identify a winning version that helps you achieve your business goals.
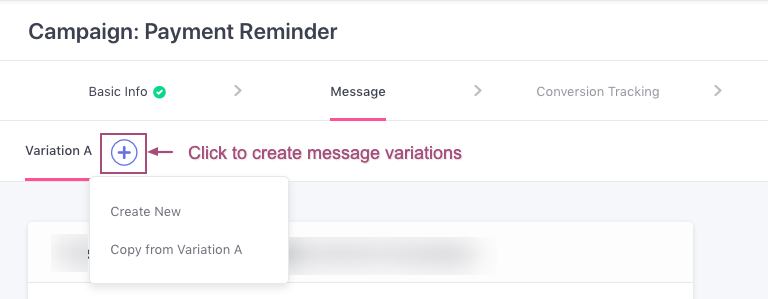
As shown below, click on the Plus icon to create up to 5 versions of the message.
- SelectCreate New to start building the new Variation from scratch
- SelectCopy from Variation A (or any of the previous versions) to make minor edits to the new Variation
Click to enlarge
-
Each Variation can be created independent of the other, allowing you to test multiple aspects like its layout, body copy, buttons, links and colors to identify a mix that resonates with your entire target audience. (How to automate Variation testing)
-
The percentage value indicates the share of users that will receive a Variation and can be customized at Step 4: Conversion Tracking.
Step 3: Set up Conversion Tracking & Variation Testing
The third step of campaign creation allows you to measure the effectiveness of your transactional campaign in various ways like:
- Tracking conversions for a specific goal
- Comparing performance against a control group
- Testing multiple variations of the message to identify the most effective copy/layout
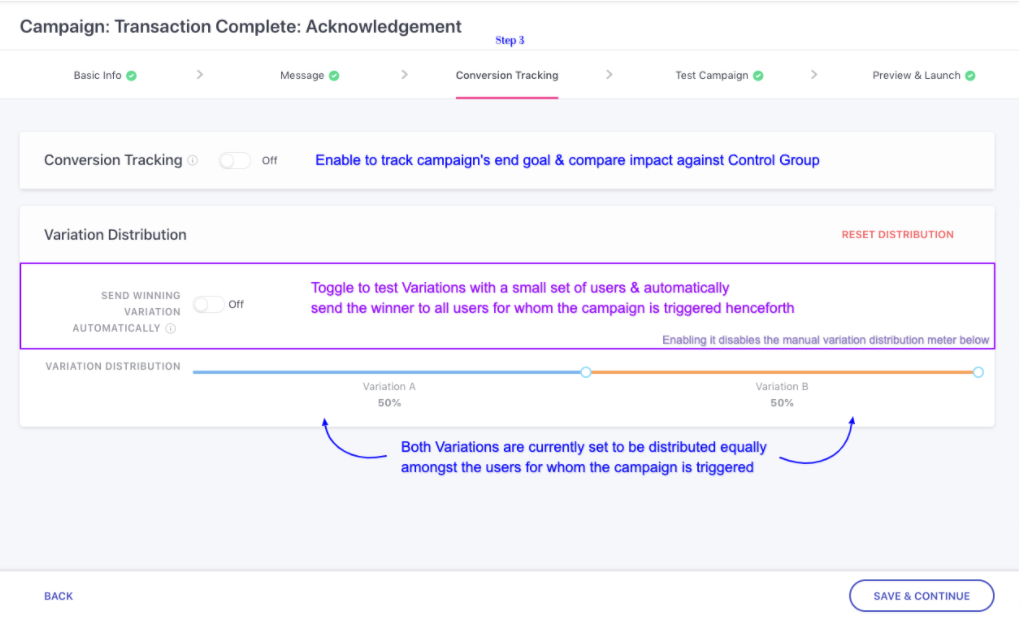
Hence, it has been divided into two sections: Conversion Tracking and Variation Distribution.
Click to enlarge
Conversion Tracking
How to Set Up Conversion Tracking & Control GroupHey there,
Please refer to this Step-by-step guide on setting up Conversion Tracking for your campaign.
Since the setting works in the same manner for Transactional Campaigns, as it does for other the campaign types, the guide will get you going in no time at all!
Variation Testing
If you have created multiple Variations at Step 2: Message, then you can easily automate testing by configuring Send Winning Variation Automatically.
Doing so will allow you to test all the Variations (and Control Group if enabled) with a small test audience. We'll automatically identify a winner and send it to all the subsequent users for whom the Transactional Campaign is triggered.
Here's how you can set it up:
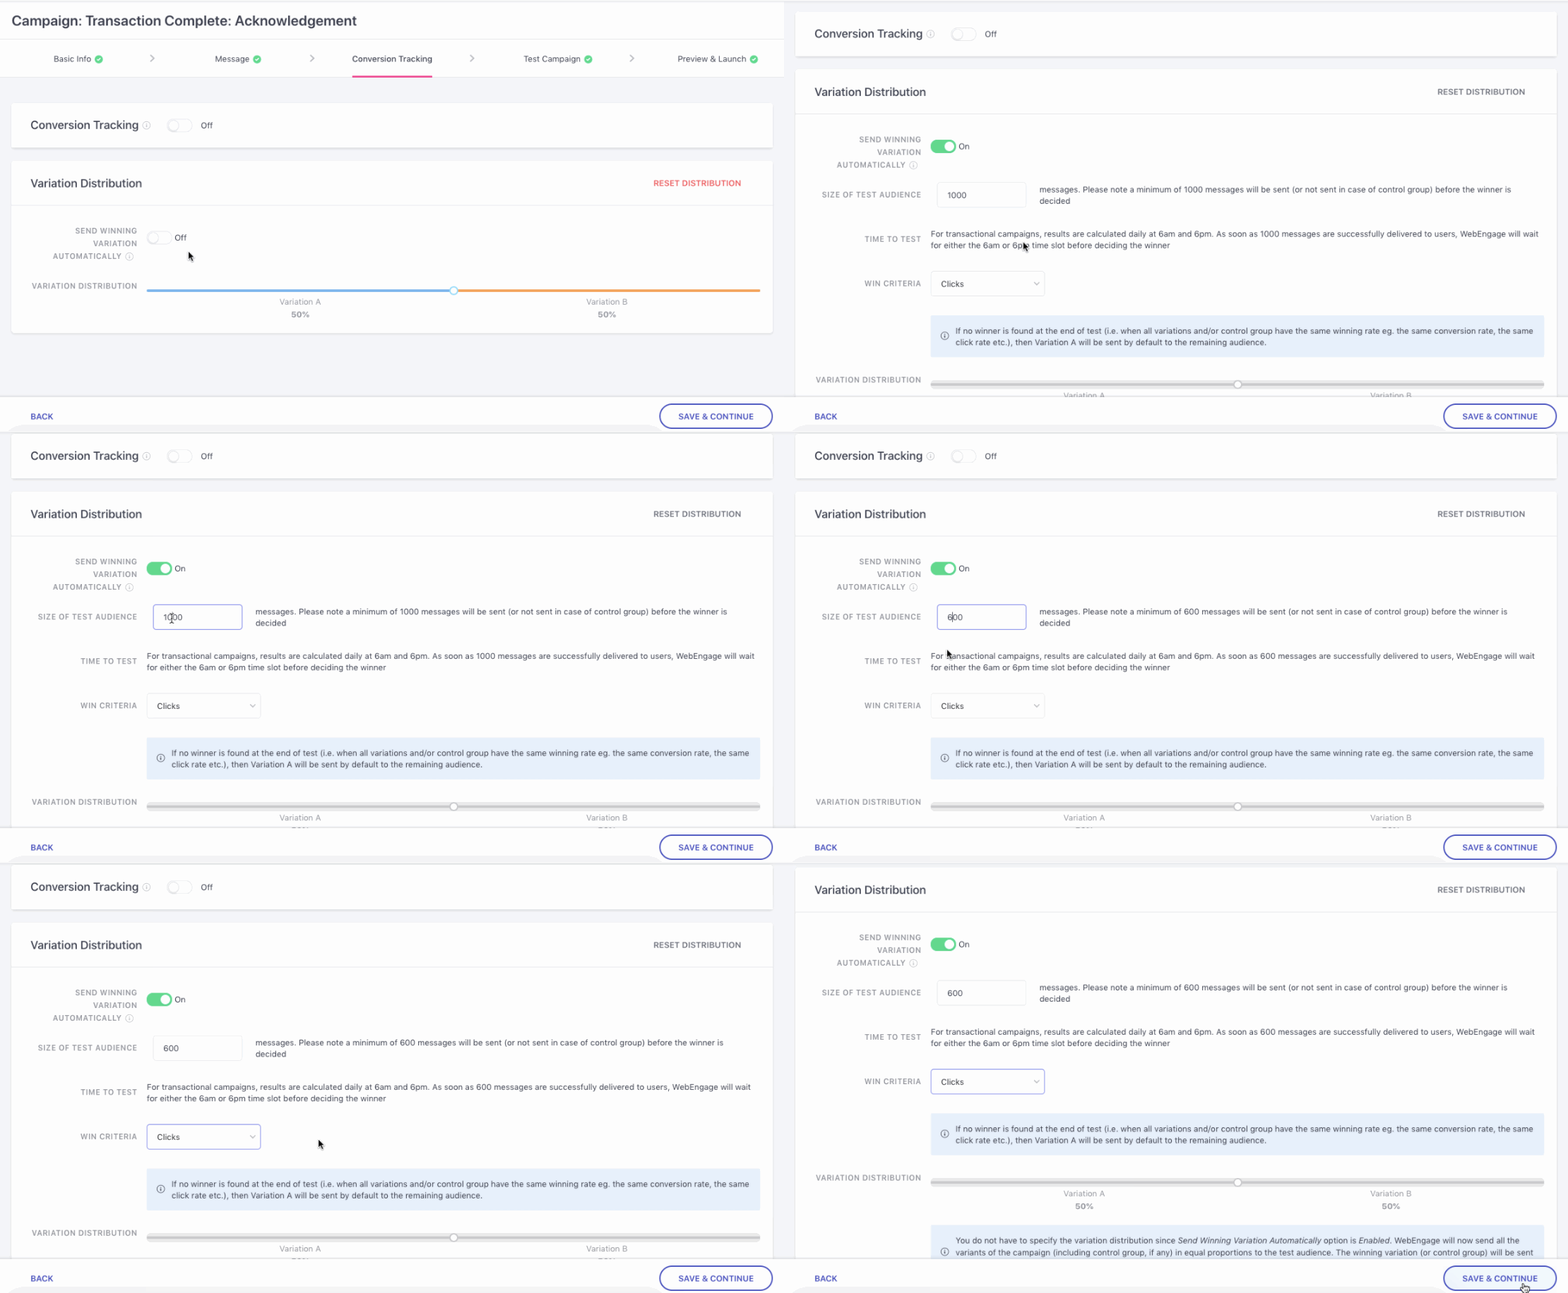
Step 1: Specify Size of the Test Audience
All Transactional Campaigns are triggered for a user on the occurrence of a specific scenario in their lifecycle. Thus, the most scientific method to test its Variations is by ensuring that a significant number of messages are delivered before we draw a comparison.
This is why, the test audience can be defined in terms of the number of messages that must be delivered to your users.
Click to enlarge
For example, in the above visual, we have specified a test audience of 600 messages. This means that all the Variations will be equally divided amongst the specified number and testing will continue until a total of 600 messages have been successfully delivered.
Step 2: Select Win Criteria
The Win Criteria is a performance indicator (Clicks or Conversions) that helps us determine a winning Variation.
For example, in the above visual we have selected Clicks as the Win Criteria.
- This means that once 600 messages have been successfully delivered to the users, we will determine a winner based on the number of clicks tracked for each Variation.
Prefer Manual Variation Testing?Follow this guide to test the Variations and Control Group (if enabled) manually.
Step 4: Test Your Campaign (Recommended)
Iron out all the creases in your SMS by testing it with internal team members for maximum impact! While this is an optional step, we recommend that you test your Transactional Campaign to ensure that everything's in order. Here's how you can go about it:
Step 4.1: Select Variation
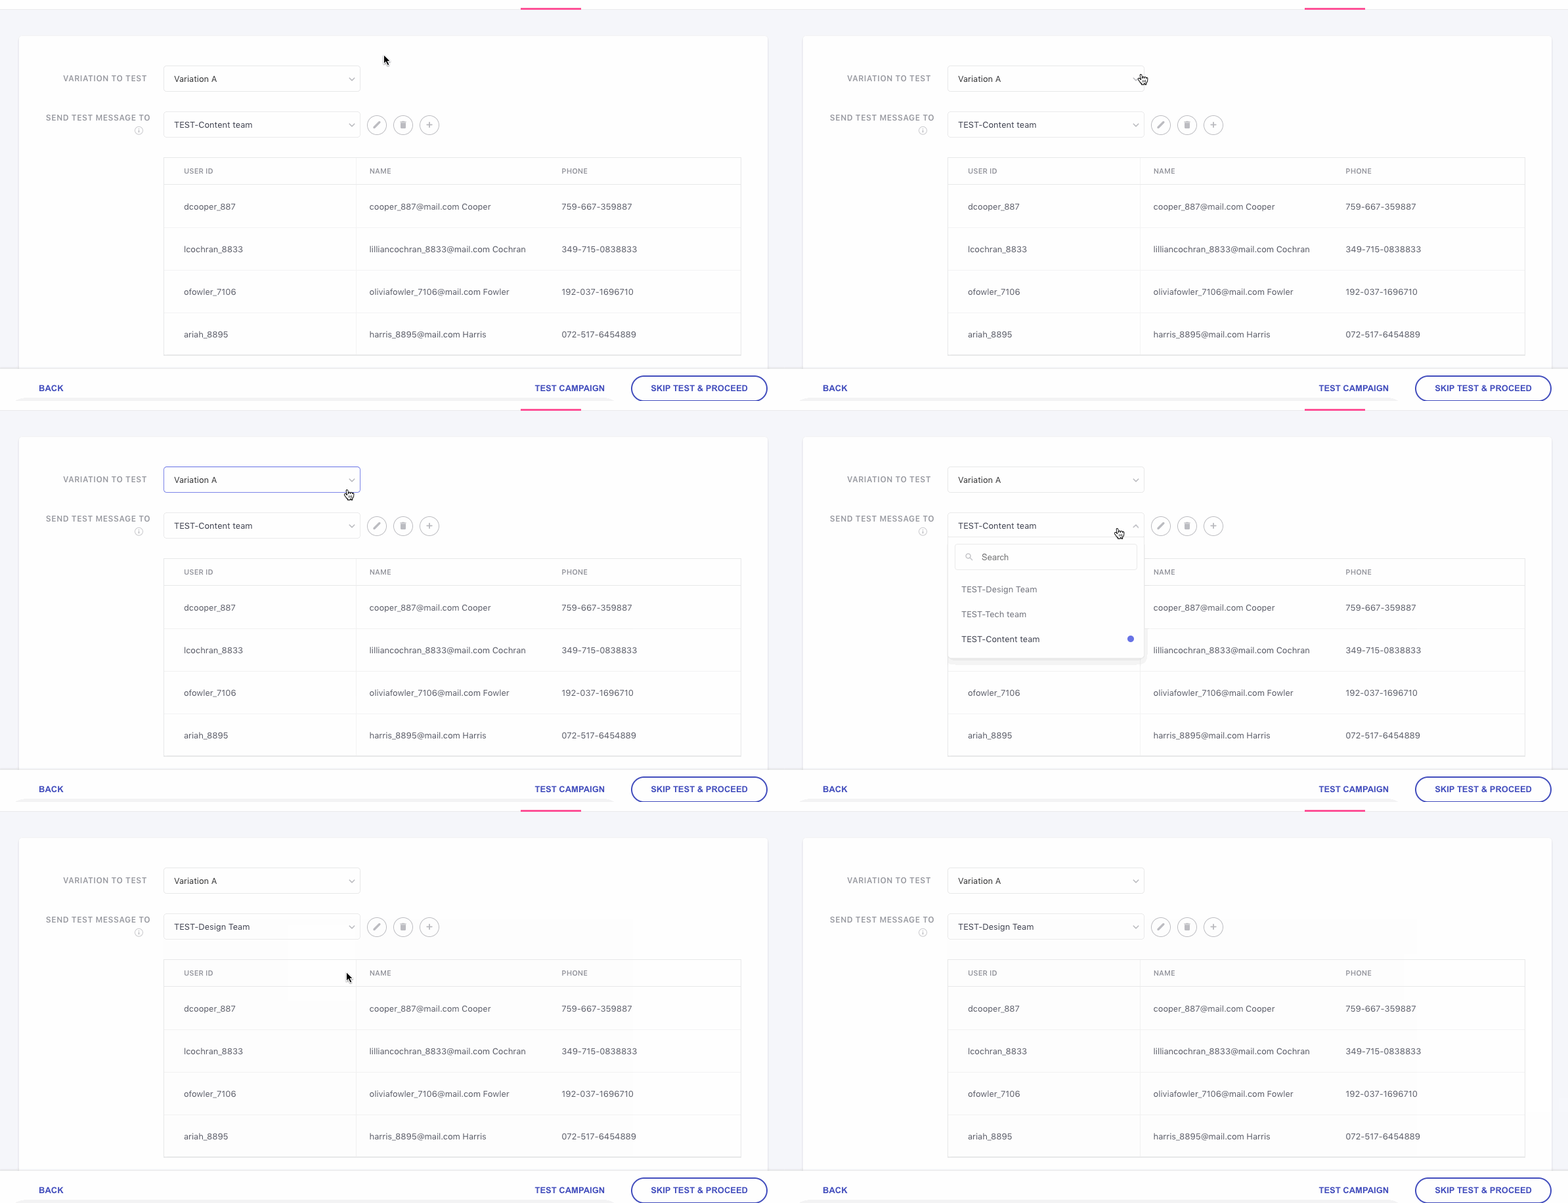
As shown below, by default, Variation A is selected against the field - Variation To Test. However, if you have created multiple Variations then you can test each one by sending them consecutively to a Test Segment. For example, we have chosen to test Variation B.
Click to enlarge
Step 4.2: Select Test Segment
All the test segments created while testing a campaign for any channel (Push, SMS, Web Push, Email), can be found under the dropdown, Send Test Message To.
- As shown above, click the dropdown to select a relevant test segment and preview user details before proceeding.
Haven't created a test segment yet?
Step 4.3: Enter Token Values
Click to enlarge
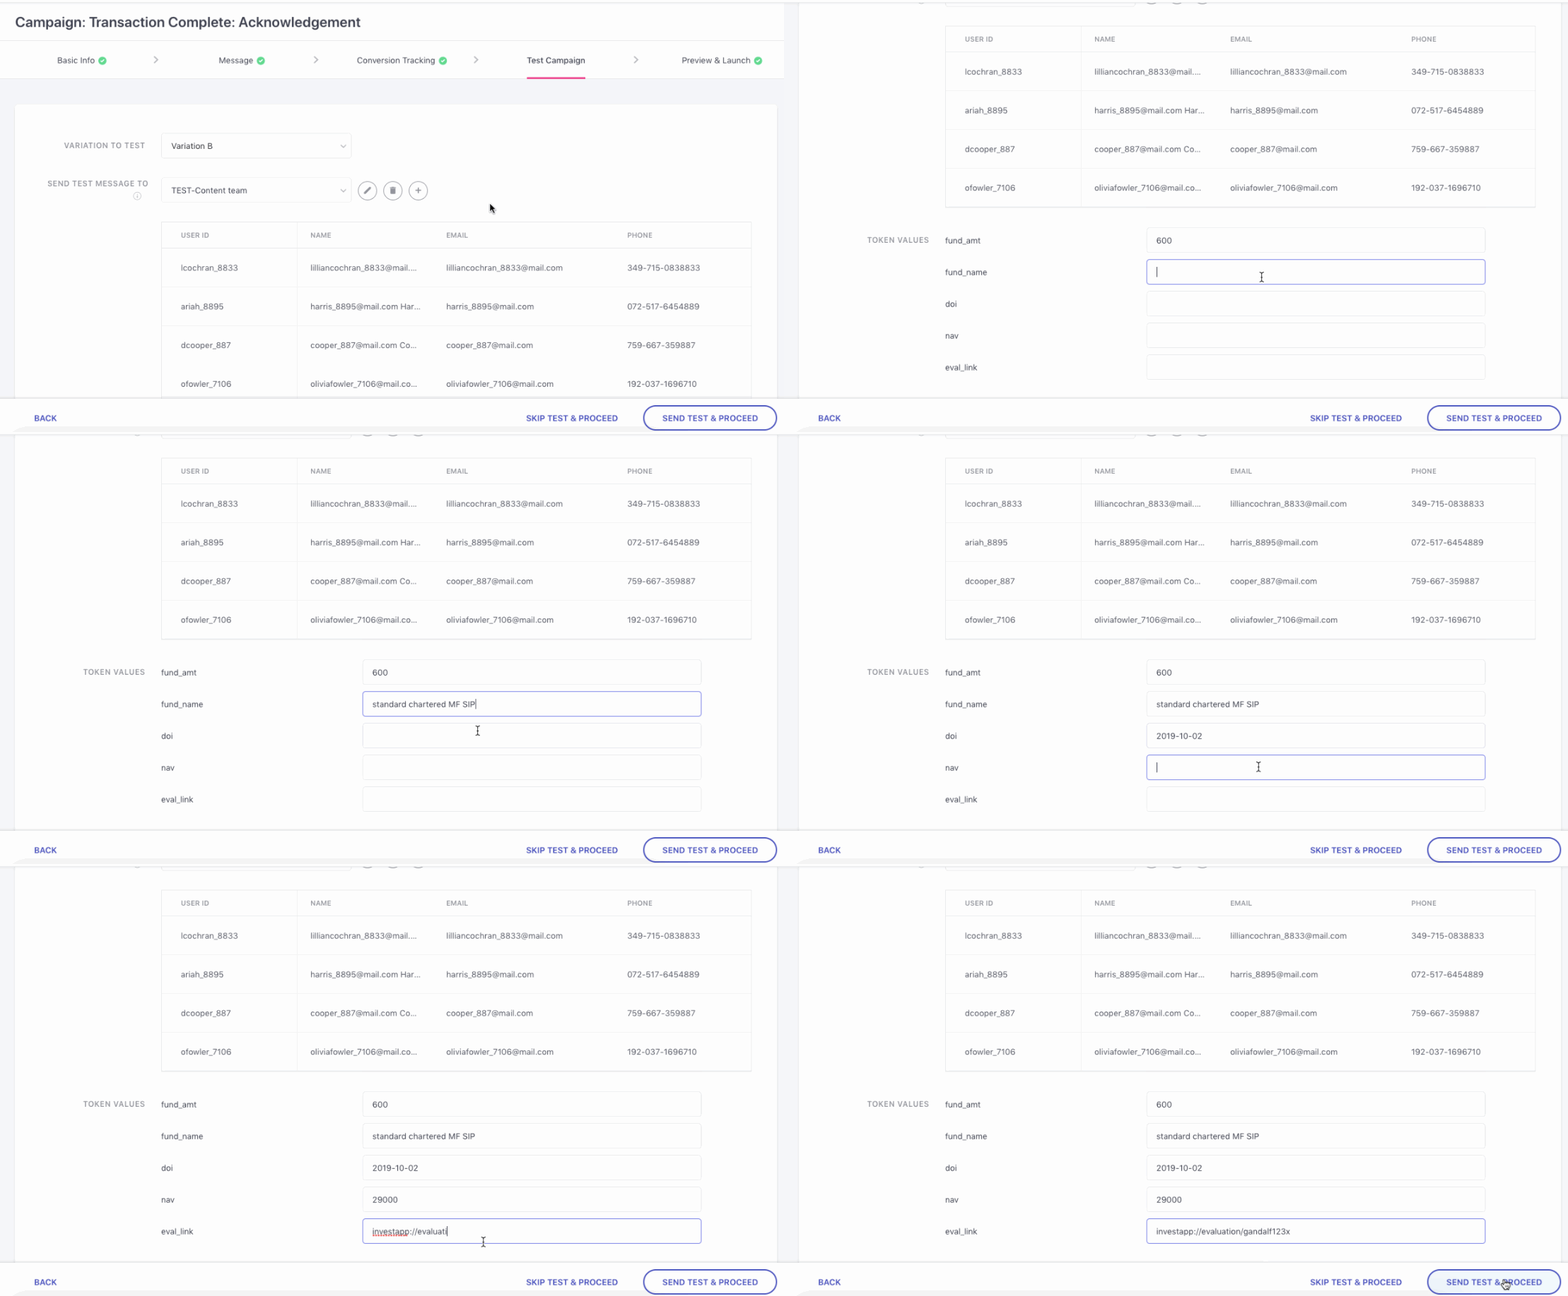
As shown above, you will find a list of all the personalization tokens added at Step 2: Message against the field, Token Values.
- Add a sample of the actual value that may be tracked against each personalization token for an ideal user.
- Next, launch the test campaign by clicking the Send Test & Proceed button.
Click to enlarge
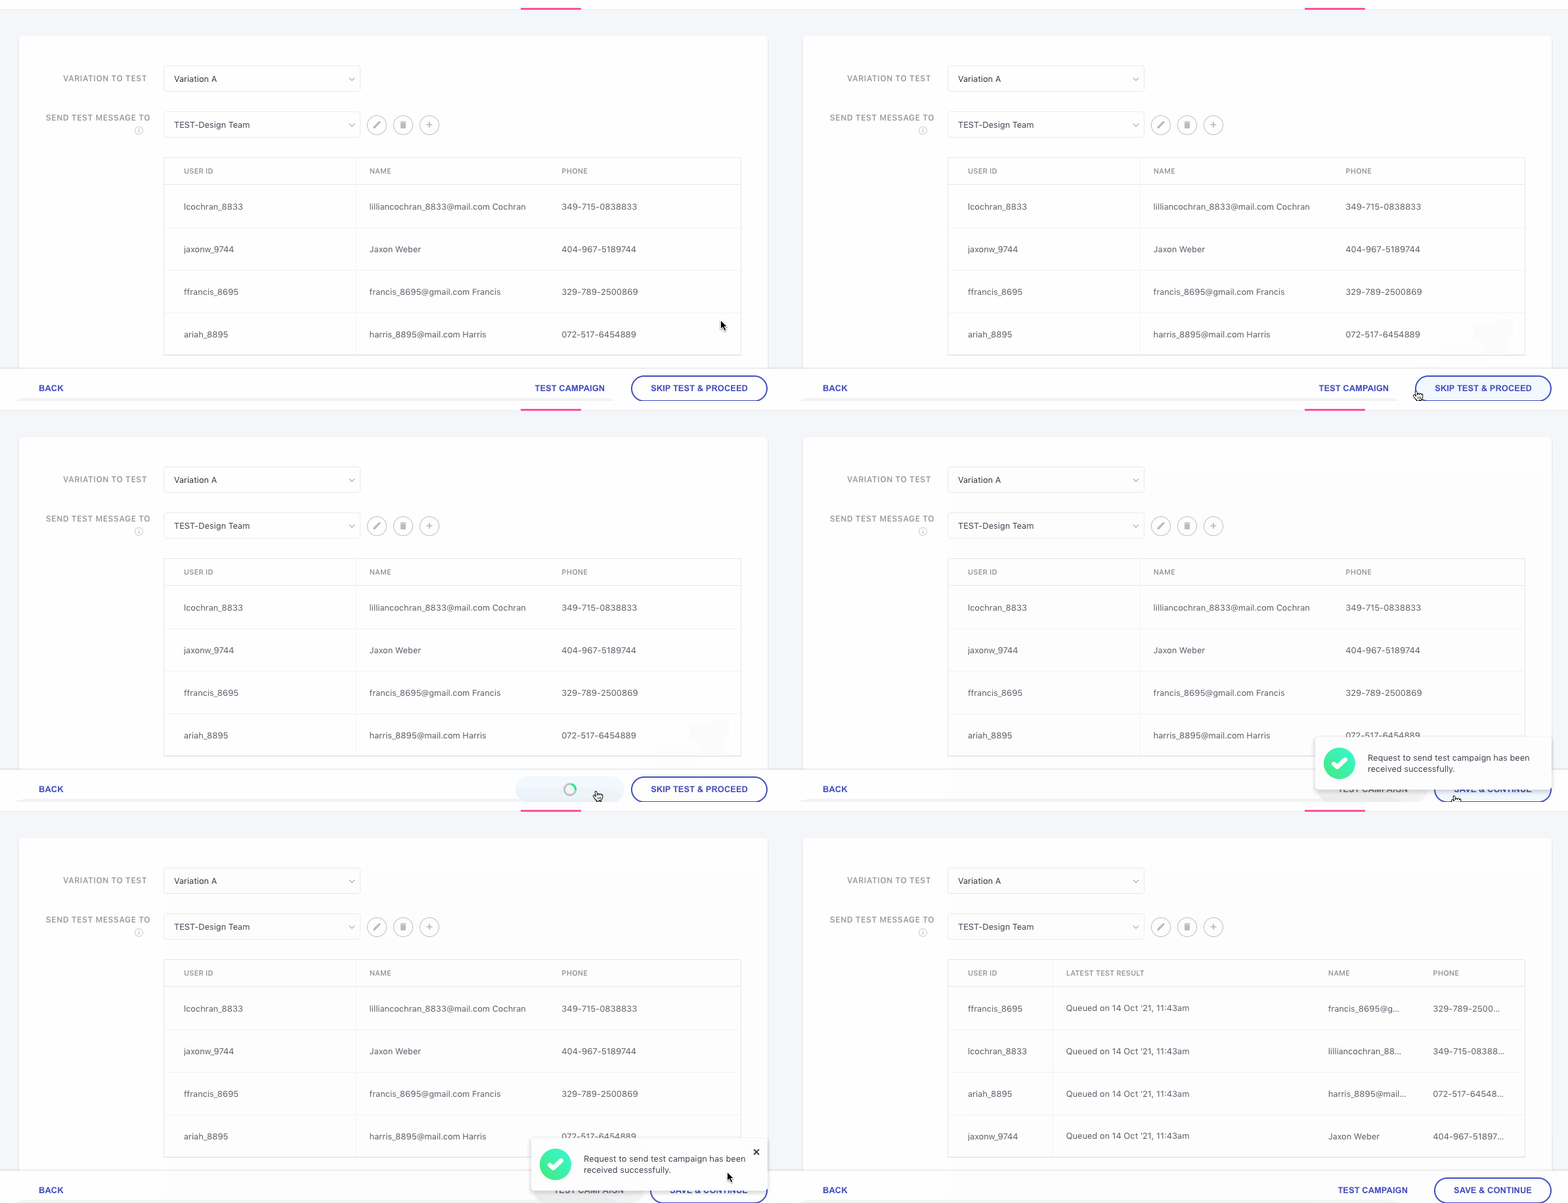
Please NoteAfter the Test Message has been sent, you will see that it is in Queue. After some time you will be able to see the delivery status of the test message as Delivered or Failed.
The Delivery details include Device details, Browser Name, and so on.
If the Test Message has Failed to deliver, then you will be able to see the reason for failure.
Pro TipIf users included within the test segment don't receive the test campaign within a maximum duration of 10 minutes, then we suggest that you look into the following aspects to debug:
Did you use the correct personalization tokens (as created by your tech team)?
Has the SSP been integrated correctly with your WebEngage account?
Please feel free to drop in a few lines at[email protected] in case you need assistance. We're just an email away!
Step 5: Preview & Launch
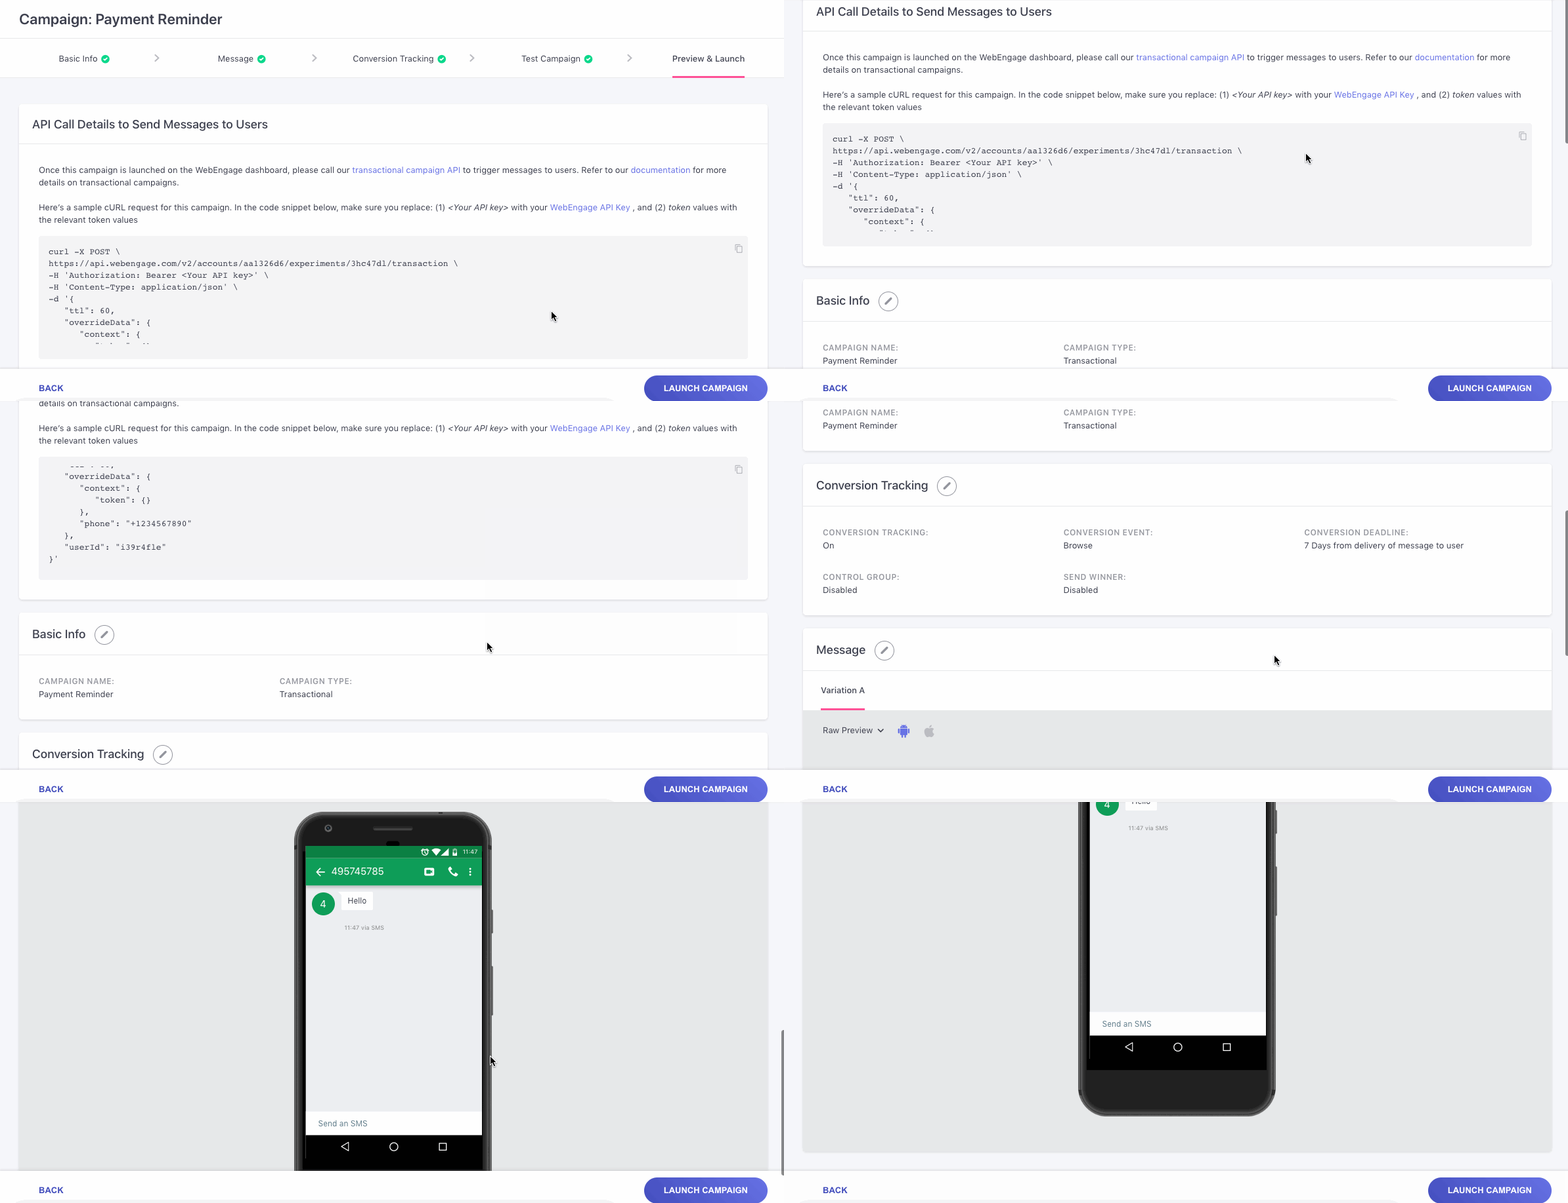
Once you are satisfied with the test results, it's time to launch the Transactional SMS Campaign! But before that, we recommend that you conduct a quick preview of its settings.
Click to enlarge
As shown above, the last step of the campaign creation interface presents a snapshot of its:
- Sample API Call containing the Personalization Tokens added at Step 2: Message (copy code & edit to test with a service like Postman)
- Variations with an OS-wise preview (Step 2: Message)
- Conversion Tracking and Multivariate Test settings (Step 3: Conversion Tracking)
Edit Before Campaign Launch
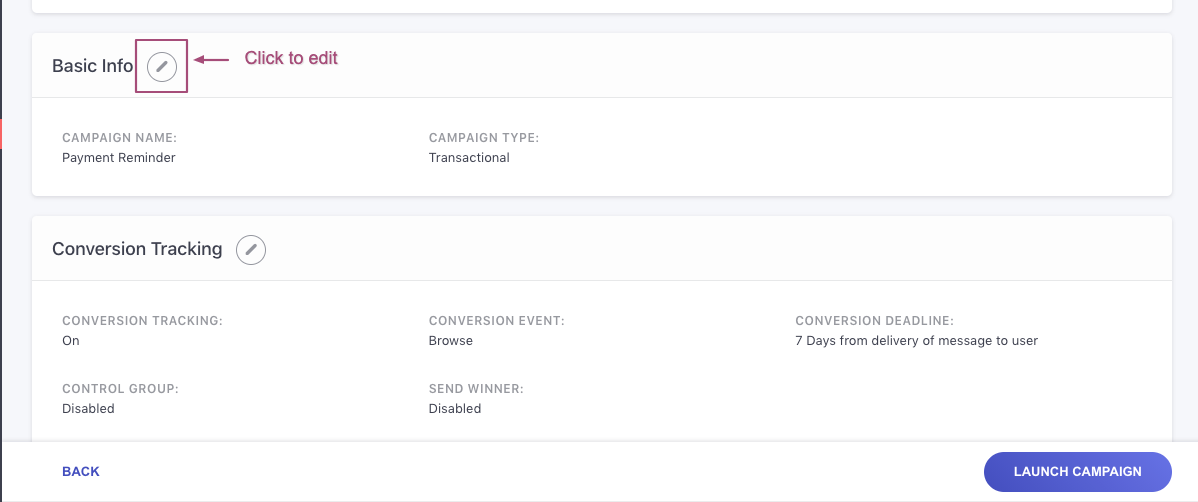
You can always choose to edit a step by clicking the Pencil icon, placed next to each header. In doing so, you will be directed back to the step, as shown below.
Click to enlarge
As shown above, simply make your edits, save them and toggle back to Step 5: Preview & Launch to continue.
What Happens After the Campaign is Launched?
- Once the transactional campaign is launched, no messages will be sent to your users until the Transactional Messaging API is called through your backend.
- Each time the trigger event occurs in your backend, a POST call must be made through the API, sending details of the user for whom the event has occurred (User ID), along with the values gleaned for the personalization tokens added to the message.
- The campaign's message will be personalized with the exact values gleaned for each user through the Transactional Messaging API
- WebEngage will then send the SMS to the SSP integrated with your account for delivering it to the user.
Detailed ReadHow Transactional Campaigns work in your dashboard
1. Analyzing Campaign's Performance
You can analyze each campaign's real-time impact on user engagement, conversions, and revenue by accessing its Overview section through SMS, List of Campaigns, as shown below.
2. Pausing the Campaign
You can always choose to Pause a Running) transactional campaign through the top panel in its Overview section.
3. Scheduling Campaign Reports
Once you have launched a campaign, you can easily monitor its performance through scheduled reports, delivered straight to your (& your teammate's) inbox! This can be configured through the campaign's analysis section. Here's how you can go about it.
Further, you can also schedule Channel-wise reports to monitor the overall performance of Push through the Settings section of your account. Here's how you can go about it.
We hope this has equipped you with a robust understanding of how you can automate Transactional SMS Campaigns for all your users. Please feel free to drop in a few lines at [email protected] in case you have any queries or feedback. We're always just an email away!
Updated 3 months ago
Now let's show you how you can analyze the impact of your SMS campaign.