Creating App In-line Campaigns
App In-line Content enables you to wow users by delivering contextual platform experiences with zero coding skills! Be it the first-fold of your homepage, a tailored welcome message, or a small section of your app - personalized app in-line content is a massive growth driver that can help you to skyrocket conversions and forge lasting brand relationships. All you need to do is:
-
Step 1: Group users into highly differentiated segments and identify their key motivators.
-
Step 2: Map app elements that you'd like to personalize for different types of users.
-
Step 3: Add contextually personalized content on the app screen
-
Step 4: Experience the magic of app in-line personalization, see your revenue & retention stats go up!
So, let's get you started.
Must ReadAt WebEngage, we are obsessed with enabling consumer businesses, like yours, to create personalized and contextual experiences that facilitate retention-led growth. This is why user data (User Attributes), behavioural data (Events & Event Attributes) and Segments play an integral role in campaign creation. We recommend that you get yourself acquainted with the respective concepts before proceeding.
Your dashboard comes with a highly intuitive 5-step campaign creation interface that makes it easy to execute customized campaigns in minutes! Here's a quick summary of the exciting possibilities offered by the campaign creation interface:
-
Personalize your app to each user's preferences and behavior, across the various stages of their lifecycle by configuring basic information of the campaign (skip to Step 1: Basic Info)
-
Moderate your app experience by controlling the page on which the personalized elements are displayed and creating daily/hourly visibility schedules (skip to Step 2: When and Where)
-
Automate multivariate testing to identify the most effective app in-line experience - we'll automatically send the winning variant to the entire audience (skip to Step 4: Conversion Tracking)
How to Access
As shown below, you can initiate campaign creation by clicking the Plus icon placed on the top right of List of Campaigns or the central hub of App In-line.

Click to enlarge
Basic Info

Click to enlarge
1. Campaign Name
The first step is to give your campaign a unique name that helps you identify its purpose.
2. Tag Your Campaign
Tags is a handy feature that helps you categorize your campaigns as per their end-goal, target audience, frequency, engagement strategy, and so on. While tagging is optional, we highly recommend that you do so as:
- It becomes easier to locate the campaign in your dashboard you can simply filter List of Campaigns by Tags.
- It enables you to group similar campaigns and analyze their collective impact on driving user engagement, conversions, and revenue.
- It enables you to compare the performance of campaigns categorized under each Tag and identify the most effective category.
3. Select Property
Select a property from the drop-down menu or create a new Property by clicking on the plus sign.
Creating New Property
Property IDs are the predefined placeholders or positions on an app screen where you will be running the In-line campaigns. You can either select from the existing Property IDs or create a new Property ID for the campaign.
Selecting Property IDs
You can select the predefined Property IDs by clicking on the drop-down.

Click to enlarge
Creating Property IDs
Yoou can create your own Property ID as per your campaign requirements as shown below:

Click to enlarge
Step 1: Click on the Plus icon to create a new Property ID.
Step 2: In the new modal, enter the name you want to give the new Property.
Step 3: Choose the device that you are creating the property for. You can choose either Android or iOS or both.
Step 4: Enter the Property ID of the app (Android/ iOS/ or both) where the campaign has to be targeted. The property ID should exactly be the same as the one added on the app.
Step 5: Choose the screen where the campaign has to be added. You can add multiple screens by using the AND/ OR Condition.
Step 6: Click Save to save the Property.
4. Define Target Device
Based on the Property you have selected, you can choose to create campaigns exclusively for your Android or iOS users by specifying a Target Device. The following options can be selected here:
- Both Android & iOS
- Android only
- iOS only
4A. Specify Target Android Apps
If you have added multiple app credentials while configuring App In-line for Android, then by default, all the apps will be targeted. You can alter this by removing Android Package Names to target specific apps with the message. You will see the following two options:
- Send to all apps send the App In-line Content to all the configured apps.
- Send to specific apps will send the notification to the particular apps of your choice. You can select which apps the notification will be sent to by clicking on the Pencil icon. A new modal will open with the list of apps, letting you choose them by selecting or deselecting them. You can also search the Package Name through the search bar. Click Save to save the changes as shown below.

Click to enlarge
This field is hidden if you have selected iOS only under Target Devices.
Please Note
- You can choose up to 20 apps at a time.
- You can choose multiple apps in the search bar by separating them by a comma.
4B. Specify Target iOS Apps
If you have added multiple app credentials while configuring App In-line for iOS, then by default all the apps will be selected here as target apps. You can choose to remove the respective iOS Bundle Identifiers to target select apps with the message. You will see the following two options:
- Send to all apps send the App In-line Content to all the configured apps.
- Send to specific apps will send the notification to the particular apps of your choice. You can select which apps the notification will be sent to by clicking on the Pencil icon. A new modal will open with the list of apps, letting you choose the apps by selecting or deselecting them. You can also search the Package Name through the search bar. Click Save to save the changes as shown below.

Click to enlarge
This field is hidden if you have selected Android only under Target Devices.
Please Note
- You can choose up to 20 apps at a time.
- You can choose multiple apps in the search bar by separating them by a comma.
5. Define Target Audience (Send To)
One of the key differentiators of successful campaigns is that they're tailored to the behavior and preferences of a specific group of users. Thus, you can create highly contextual App In-line Content for a specific segment of users by selecting the Segment and _Lists_from the dropdown placed beside,Send To, as shown below.
Please NoteTo use Lists as Target Audience you have to ensure that the SDKs are updated to:
- Android: 4.17.0 or later
- iOS: 6.13.0 or later

Click to enlarge
On selecting a segment, you will be able to preview a snapshot of the Rules of Segmentation. Let's quickly walk you through Segment Preview:
Rules Of Segmentation: You can choose to segment your entire user base by three broad parameters - User (attributes), Behavior (events), and Technology. Thus, Segment Preview presents a snapshot of all parameters based on which the users have been grouped.
Edit Segment
Click the Edit icon, placed next to the dropdown, Send To, to edit the selected Segment. In doing so, you will be prompted by a pop-up, pre-populated with the existing rules of segmentation, as shown below.

Click to enlarge
Simply make your edits and click Save to proceed. In doing so, you will be able to preview the number of reachable users as per your edits.
Create a New Segment
You can choose to create a new Segment of users from the campaign creation interface by clicking the Plus Icon. In doing so, you will be prompted by a pop-up, allowing you to build a new segment, as shown below.

Click to enlarge
Once created, you will be able to access the Segment through the List of Segments in your dashboard.
Related Read: Rules of SegmentationPlease refer to Creating Segments for step-by-step guidance on how you can segment your users by their preferences (user attributes), behavior (events), and technological preferences.
Creating a New, Single-Use Segment
You can also choose to create disposable segments or segment users specifically for the campaign and avoid adding it to the List of Segments in your dashboard.

Click to enlarge
As shown above, this can be achieved by leaving the field Name blank while creating the segment. In doing so, it will become an Ad hoc segment in your dashboard, which will be available only for sending the campaign you're currently creating.
Where and When
Given the highly targeted nature of App In-line Content, they have been categorized as Triggered campaigns across your dashboard. These are ongoing cycles of communication that are triggered for a specific user only when they:
-
Perform a certain action or a combination of several actions (Custom Events) in your app.
-
Spend a certain amount of time browsing through your app or a specific screen in a session.
-
Visit a specific screen in your app.
-
Visit a specific number of screens (2, 3, 4...) in a session.
-
Perform a combination of a few/all the conditions listed above.
This makes App In-line an ideal channel to create contextual app experiences that enable users to move along their lifecycle and stay engaged for longer durations.

Click to enlarge
As highlighted above, we have divided Step 2: When into two sections:
- Campaign Schedule (helps you determine the lifespan of the campaign)
- Where and When to Show (helps you define the targeting rules, where, when & how many times to show the message in your app)
Here's how you can configure these settings:
Campaign Schedule
Since all App In-line Contents are ongoing cycles of communication, you can choose to run these for specific periods of time by defining a Start Date and End Date.
Step 1: Specify the Start Date or the date-time on which the campaign should start getting shown to the target audience. As highlighted below:
- SelectNow to activate the campaign immediately
- SelectLater to activate the campaign at a later date-time

Click to enlarge
Step 2: Specify the End Date or the date-time on which the campaign should cease getting shown to the target audience. As highlighted above:
- SelectNever to run the campaign indefinitely (you can always Pause the campaign through its Campaign Overview
- SelectLater to end the campaign at a specific date and time in the near future.

Click to enlarge
Step 3: Specify the Schedule
- Select Always Show to run the campaign always.
- Select Specified Hours to run the campaign a the specified time.

Click to enlarge
Where & When
These settings allow you to specify the app screens on which the message must be shown and the context in which users will receive it.
Pages
Here you can define exactly where you'd like to show the App In-line Content by specifying names of app screens and/or data points (tracked across your app) that indicate specific user-app interactions.
Show on All Screens linked to Property ID
You can choose to selectively engage users who visit a specific screen or a combination of related screens, in an on-going session. Here's how you can configure this targeting rule:

Click to enlarge
Show on Specific Screen
Depending on the end goal of your campaign, you can choose to engage only those users who interact with your app in a specific manner, no matter which screen they're on. This can be achieved by tracking app-user interactions as Screen Data Attributes. Here's how you can configure this targeting rule:

Click to enlarge
Step 1: Click the radio button to select the option, On screens that meet certain_Screen Data_ conditions against Where to Show.
Step 2: As shown above, add the Screen Data Attribute(s), as tracked in your app's code
- Please check in with your tech team to ensure that the values entered here match the values in the code. Any discrepancy between the two can cause your campaign to fail or randomly appear across your app, leading to confusing user experiences.
Step 3: Select the appropriate data type, as conveyed by your tech team (so that your app understands the value of the specified Screen Data Attribute).
Any one of the following data types can be selected here:
Number: Indicates that the value of the specified data attribute contains only numbers.
String: Indicates that the value of the specified data attribute contains text, numbers, special characters, spaces or a combination of these.
Boolean: Indicates that the specified data attribute has one of two possible values denoted by
trueorfalse.Date: Indicates that the value of the specified data attribute contains a date/date-time.
Step 4 (Optional): Click the Add Condition button to add more Screen Data Attributes to the targeting rules
- In doing so, a new row will be added to the interface. Repeat Steps 2 & 3 to proceed.
- Further, you can choose to club multiple Screen Data Attributes by the AND/OR logic to define the scope of App In-line targeting.
How It Works: Clubbing Screen Data Attributes by AND/OR Logic
AND: Clubbing Screen Data Attributes by the AND logic helps you narrow down the number of users who receive the App In-line Content. It implies that a user will have to meet all the specified Screen Data conditions to receive the campaign.
OR: Clubbing Screen Data Attributes by the OR logic helps you increase the number of users who receive the App In-line Content. It implies that a user will receive the campaign only if they meet any one of the specified Screen Data conditions.
As highlighted above:
-
Select On Screen that meets certain On-Screen Data Conditions to display the message only once the specified duration is exceeded.
-
Select Number of screens viewed in a session by a user is<select value>,
<enter number>to display the message only once the specified criteria is met. -
Select User does one or more events to display the message only if the user performs an action (Custom Event) or a combination of several actions (in any order), in the context of the added Event Attribute filter(s), during a session (How it works).
-
Select all or multiple options to display the message when a user's actions match any one of the configured rules.
Triggering App In-line When User Performs an Event or Multiple Events
Selecting the option, User does one or more events against When to Show, allows you to engage only those users of the target audience that perform specific actions in your app, in a session. These actions (Custom Events) could be anything like Browse, Search, Page_Viewed, Product_Viewed, Checkout_Started, Wishlist_Viewed and so on.
Here's how you can configure this rule:

Click to enlarge
Step 1: Click the dropdown nested under the option to select a Custom Events (in the context of which users will receive the message)
Step 2 (Optional): Click the Filter icon to add Custom Attribute filters to the selected Event
- Further, you can choose to club multiple event attributes by the AND/OR logic to define the scope of occurrence of the event. Doing so ensures that the App In-line Content is triggered for a user only when they perform the event in the context of the applied attribute filters.
How It Works: Clubbing Custom Event Attributes by AND/OR LogicAND: Clubbing attribute filters by the AND logic helps you narrow down the number of users who receive the message. It implies that the App In-line Content will be shown to only those users who perform the Custom Event in the context of all the event attributes added to it.
OR: Clubbing attribute filters by the OR logic helps you increase the number of users who receive the message. It implies that a user will receive the campaign if they perform the Custom Event in the context of any one of the specified event attributes.
Step 3 (Optional): Click the Add Event button to specify more actions
- In doing so, a dropdown will be added to the screen, allowing you to select from a list of all the Custom Events being tracked for your account. Repeat Step 2 & 3 to proceed.
- Further, you can club multiple Custom Events by the AND/OR logic to define the context in which the occurrence of all specified events should be understood by us.
Set Time out
It is the time limit for the campaign to render. If campaign rendering takes more than the set time, the campaign will not be shown.

Click to enlarge
Message
The message creation interface comes loaded with intuitive features like _Variations, Layouts, and Deep linking - enabling you to create high impact _App In-line Content* in minutes.
Let's get you acquainted with each feature:
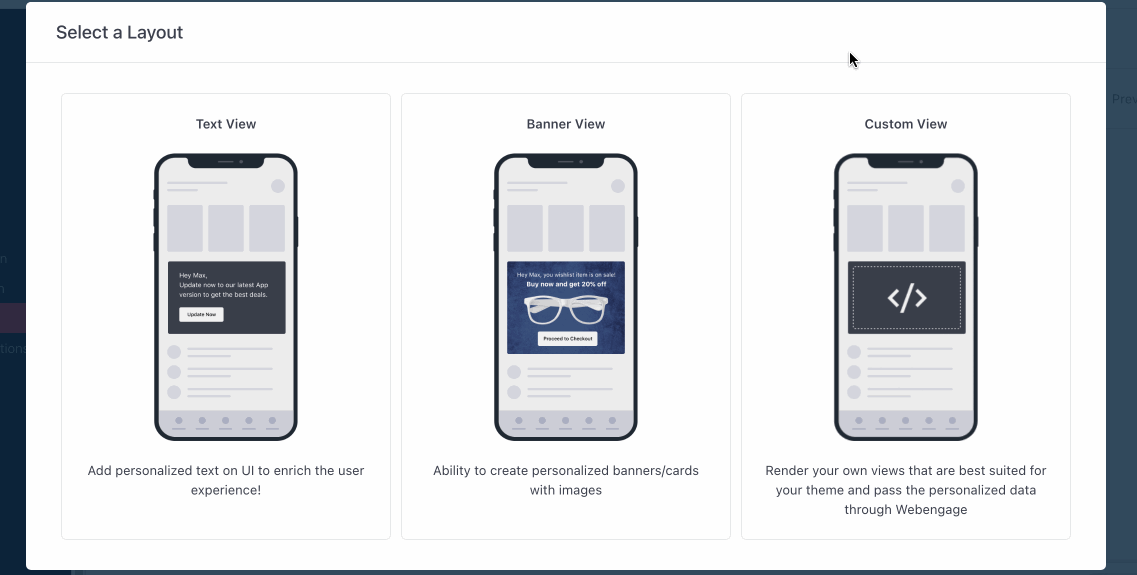
Select a Layout
You can choose from the following ready-to-use templates to create a Variation.

Click to enlarge
Let's quickly walk you through each layout:
Text view
A comprehensive template, the Text View is ideal for prompting users with a prominent message and CTA.

Click to enlarge
As highlighted above, you can easily customize the template's button, image, links, message, and theme to create highly contextual experiences. All you need to do is:
- Step 1: Create a Personalized Message
- Step 2: Configure the Button
- Step 3: Personalize further with Advanced and you're good to go!
Banner View
A rich media template, the Banner View is ideal for engaging users with brief, yet visually enticing messages.

Personalizing Classic Modal to each user's preferences & behavioral history
As highlighted above, you can easily customize the template's buttons, image, links, message, and theme to create highly contextual experiences. All you need to do is:
- Step 1: Create a Personalized Message
- Step 2: Add a Background Image
- Step 3: Configure the Buttons
Depending on the layout selected by you, the steps of message creation may vary. Here's a generic guide to help you create dynamically personalized_App In-line content_:
Fact CheckIf your message is in a language that incorporates right-to-left alignment, then it will automatically be oriented that way when users receive the App In-line Content!
Image
For Banner View, a generic Icon/Image can be added in two ways:
1. Insert Icon/Image Link: The image must be hosted on a crawlable/publicly accessible domain to ensure that it renders for all users receiving the message.
2. Upload Icon/Image: Click the Upload button placed next to the field, image, and select a file from your desktop. In doing so, the image will get hosted on WebEngage's domain: https://afiles.webengage.com.
You can always click the Reset button to link/upload a new image.

Click to enlarge
Personalizing Notification's Icon/Image to Each User's InterestsYou can easily personalize images to the preferences & behavioral history of your app users in any of the following ways:
Method 1: Pass image_url as a custom event attribute, attached to a custom event gleaned for your app (Step-by-step guide on how to execute this)
Method 2: Build the image URL by specifying a parent link and adding a custom event attribute/custom user attribute as the path parameter. Then manually add the image format like, .png, .jpeg, .jpg, .gif, at the end of the link structure (Step-by-step guide on how to execute this)
Text and Action
Using the personalization icon nested in the fields, Title and Description, you can easily create dynamically personalized content. Simply select a value from a list of all the Custom User attributesandCustom Events being tracked for your app and place them appropriately within the text. We'll add the exact value tracked for each user, helping you deliver one-on-one messages at scale :)

Click to enlarge
For example, in the above visual, we have personalized the message with: User attribute, First Name - {{user['system']['first_name']}}
Thus, whenever the message is sent to a user, we will populate the First Name with the respective values gleaned for their user profile.
On- Click Action (Android/ iOS)
Using the options nested under this field, you can customize the experience for your Android users by linking the entire App In-line Content to a particular app screen and adding CTAs/Buttons to it, as shown below.

Click to enlarge
Advanced
For further personalization, just toggle the button and get started by choosing the font of the title and description. You can also choose the position of the title and description along with the distance from the margins.

Click to enlarge
Font information
Please NoteIf no font file added then text will appear in system default font.
Things to keep in mind while adding fonts:
For Android
- Enter the exact font file name found in your application, excluding the file extension. For example: Font is available in the res > font > Sanserif.ttf, you will need to put only the file name Sanserif.
- The Font location should be either in:
- res > font
- res > raw
For iOS
While adding iOS font, please use PostScript name of the fontHow to find PostScript name?
- Open Font Book application
- Find your font
- Select and switch to font info preview mode (i icon on the topbar)
- Use the PostScript name of the font.
Configure Buttons (CTA)
You can add customized buttons to all the App In-line Layouts being created by you. As shown below, you can also choose to disable the Buttons for all Layouts if the end goal of the campaign is to simply convey information.

Click to enlarge
Here's how you can configure CTAs:
Setting up Call-to-Action Buttons
Step 1: Add Label (Text): Label refers to the button text, motivating users to perform a certain action. As shown above, we have added a custom label, BUY NOW nudging active users to start shopping before the sale ends!
Step 2: Insert Deep Link (On-click Action): You can deep link buttons to specific screens in your Android and iOS apps, as shown above.
Step 3: Button Background Color: you can customize the notification's background color by selecting a hue from the Color Selector or by specifying a custom CMYK Hex(#) code as per your brand colors.
Further, you will notice that the deep link specified for the Android app is in a different format compared to the iOS link. This is because we have created a unique URI for our Android app screens while we are leveraging Universal Links for the iOS app (the same link is also used for our website).
Personalizing On-click Action to a User's Preferences or Behavioral HistoryYou can easily personalize the On-click Action to your users based on the Custom User Attributes and Custom Events gleaned for them. This can be achieved in any of the following ways:
Method 1: Pass screen_url as a custom event attribute, attached to a custom event gleaned for your app (Step-by-step guide on how to execute this)
Method 2: Build the deep link by specifying a parent link and adding a custom event attribute/custom user attribute as the path parameter (Step-by-step guide on how to execute this)
Advanced
For further personalization, just toggle the button and get started by choosing the font of the button. You can also choose to add the border to the button and adjust the margin along with its position.

Click to enlarge
Font information
Please NoteIf no font file added then text will appear in system default font.
Things to keep in mind while adding fonts:
For Android
Add the exact font file name present in your app.For iOS
While adding iOS font, please use PostScript name of the fontHow to find PostScript name?
- Open Font Book application
- Find your font
- Select and switch to font info preview mode (i icon on the topbar)
- Use the PostScript name of the font.
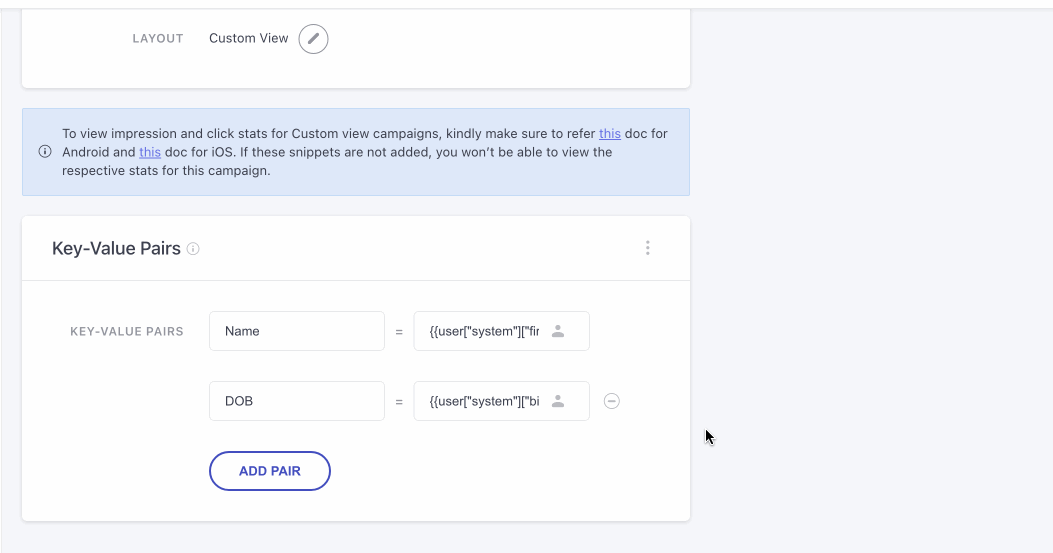
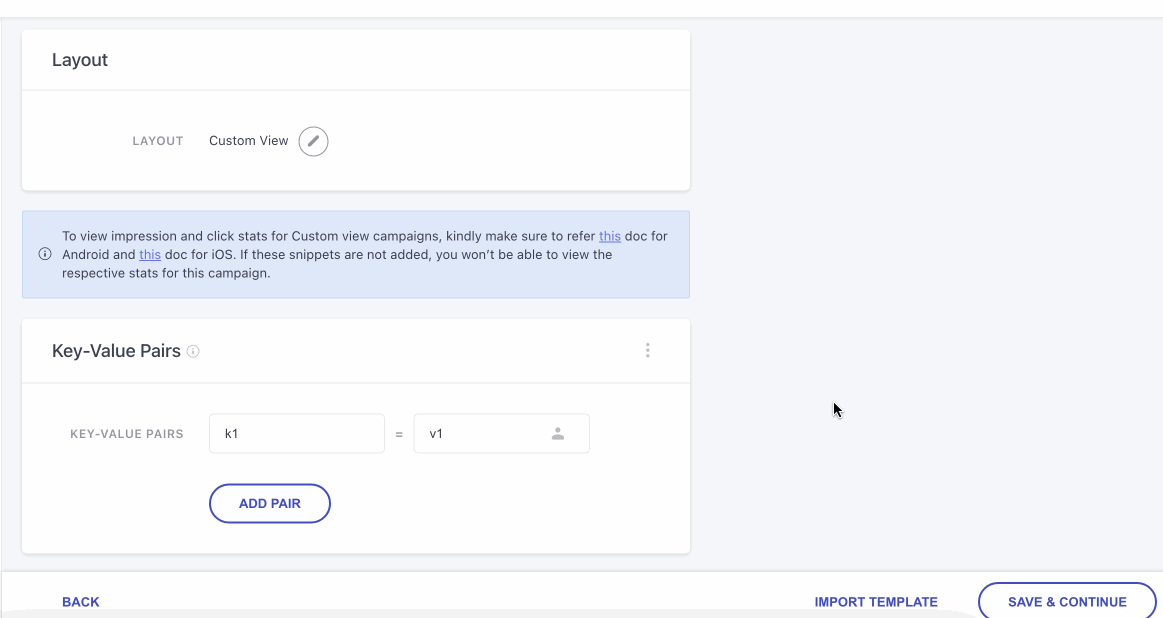
Key-Value Pairs (Deep Linking, Personalization)
With Key-Value pairs, you can easily customize the contents of an app screen, personalize your App In-line Content, deep-link the notification to a specific app screen, web page, and much more!
You can think of Key-Value pairs as a set of linked data points in which the Key acts as a unique identifier and the Value either represents the data or points to the location of the data that is identified by the Key.
The best part - these are not visible to your users. All this data is sent as an extra payload to your app, causing its code to perform the specified action and render the App In-line Content accordingly.
Here's how you can go about it:

Click to enlarge
Step 1: Enable Key-Value pairs by clicking the toggle button, as shown above.
Step 2: Add a Key and it's corresponding Value, as understood by your app.
Step 3: Click the Add Pair button to specify additional pairs.
Must ReadHow Key-Value pairs work & how you can leverage this feature to deliver contextually personalized app experiences (with use-cases)
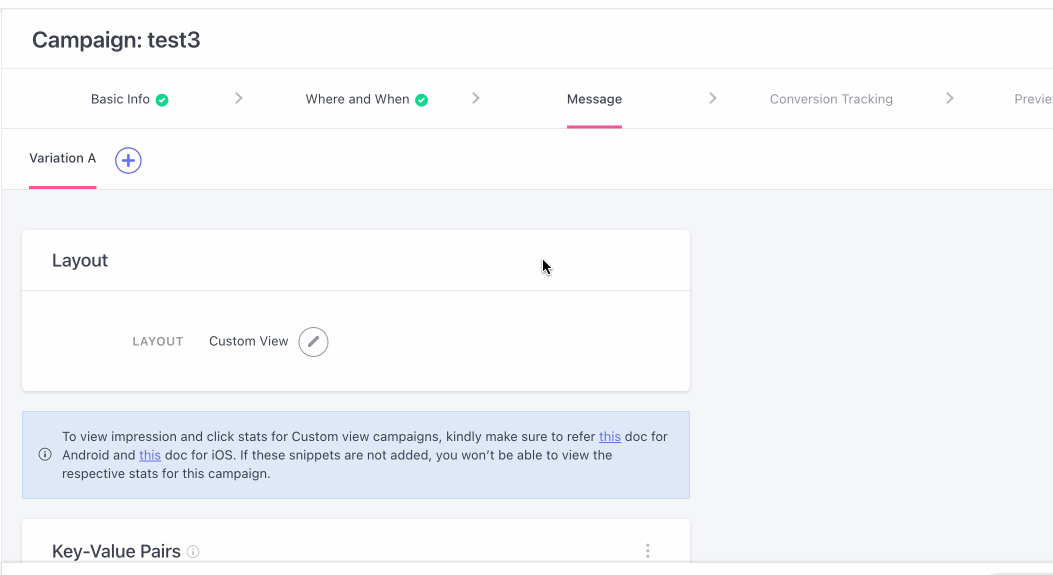
Custom View
Custom View allows you to customize the message at your convenience using the Key-Value Pairs.
With Key-Value pairs, you can easily customize the contents of an app screen, personalize your App In-line Content, deep-link the notification to a specific app screen, web page, and much more!
You can think of Key-Value pairs as a set of linked data points in which the Key acts as a unique identifier and the Value either represents the data or points to the location of the data that is identified by the Key.
The best part - these are not visible to your users. All this data is sent as an extra payload to your app, causing its code to perform the specified action and render the App In-line Content accordingly.
Here's how you can go about it:

Click to enlarge
Step 1: Enable Key-Value pairs by clicking the toggle button, as shown above.
Step 2: Add a Key and it's corresponding Value, as understood by your app.
Step 3: Click the Add Pair button to specify additional pairs.
Must ReadHow Key-Value pairs work & how you can leverage this feature to deliver contextually personalized app experiences (with use-cases)
Save Custom View Templates
You can now save the templates you use while creating your campaign using Custom View layout. By following the steps provided below, you can save templates for campaigns on your app.
- Step 1: On the message tab, while creating your campaign, click on ‘Custom View’ option.
- Step 2: Proceed to adding key value pairs for your campaign.
Keep in MindAt least 1 pair of Key Values need to be added to enable the ‘Save Template’ feature.
- Step 3: Now, in case you would like to save this template, you can do so by clicking on the three dots adjacent to the key value pairs and proceeding to click on the ‘Save Template’ button.
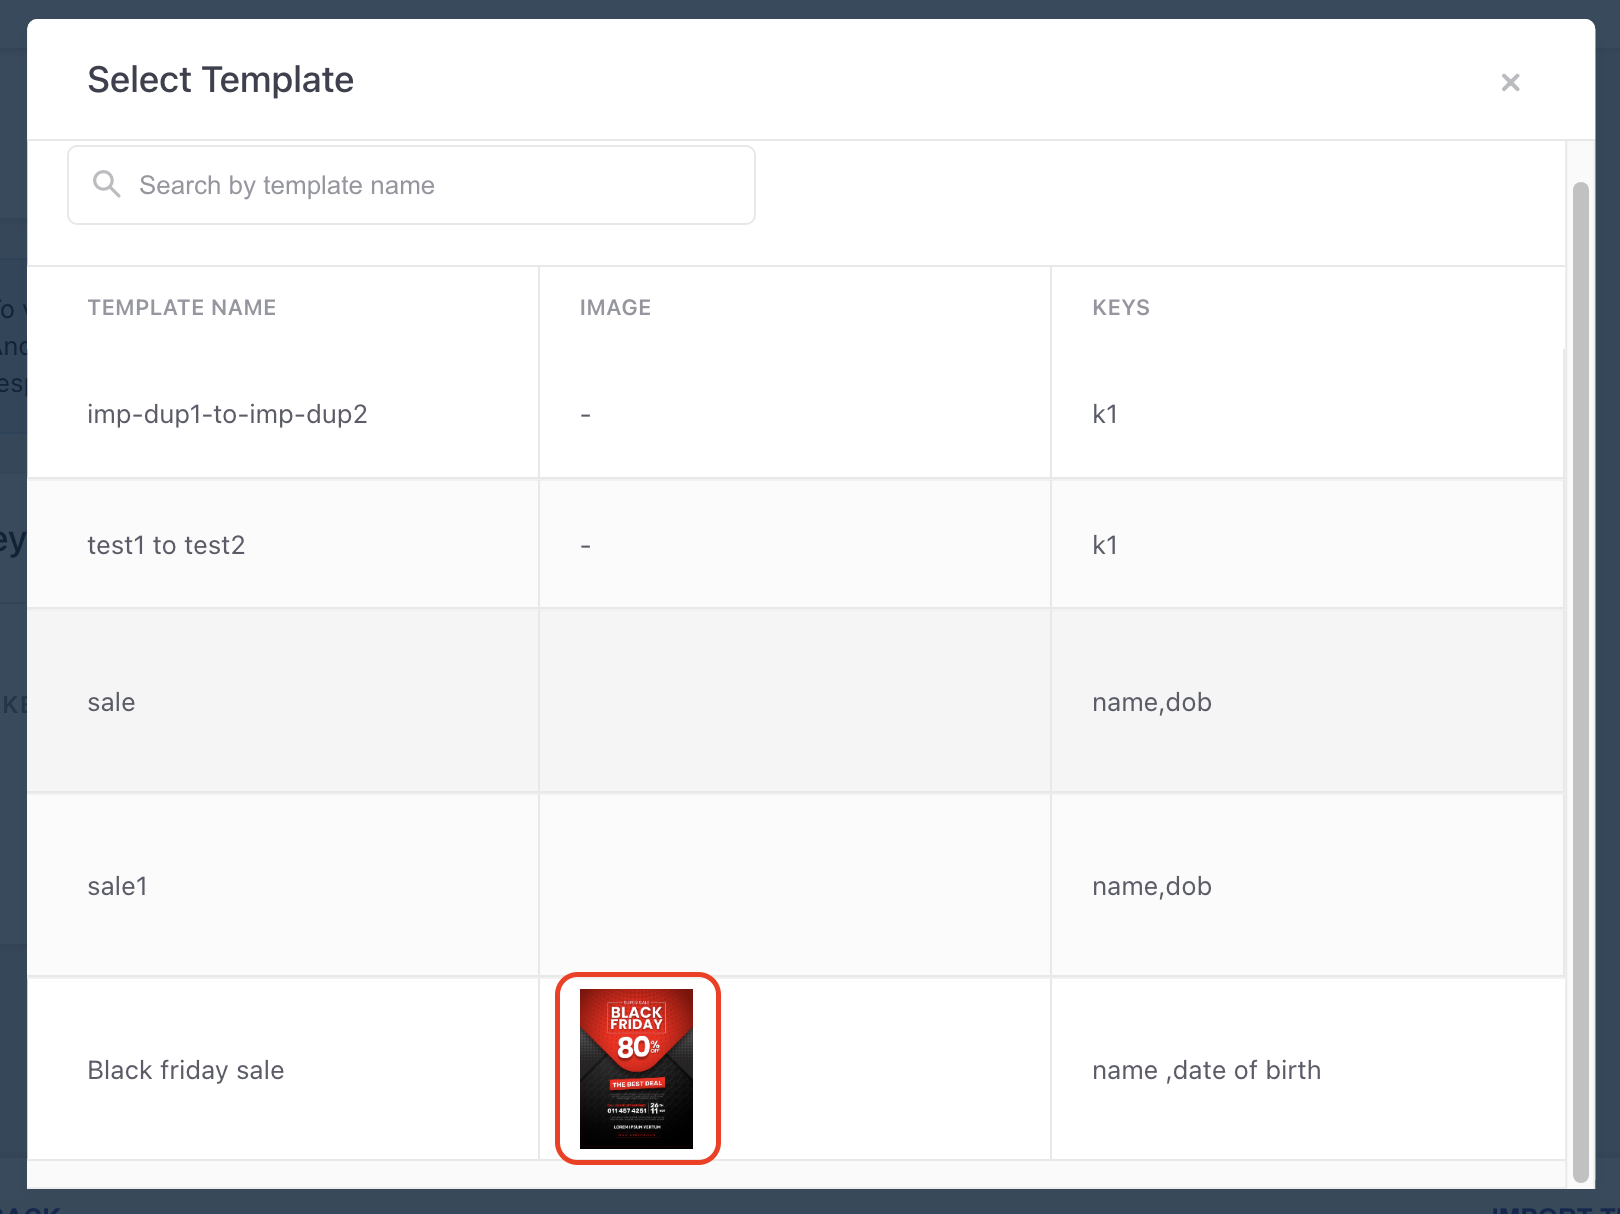
- Step 4: Once that is done, a new window opens, where you need to provide a Template Name that you want to save and a Template Image which is optional.
- Step 5: Continue saving the template by clicking on the ‘Save Template’ button. Once all of these steps are done, your custom view templates are saved to your dashboard, which will be editable and accessible to you on the Integration page.
You can also add custom images to your templates.
RememberYou can still edit your templates even after it is imported.
Create Variations
Variations are just different versions of the campaign's message that facilitate easy multivariate testing and are referred to in the following manner in your dashboard:
Variation A: The first version of the message.
Variation B: The second version of the message.
Variation C, D, E: Subsequent versions of the message created for testing.

Click to enlarge
As shown above, by default the message creation interface consists of a single Variation A.
-
You can click on the Plus icon to create up to 5 versions of the message.
- SelectCreate New to start building the new Variation from scratch
- SelectCopy from Variation A (or any of the previous versions) to make minor edits to the new Variation
-
Each Variation can be created independent of the other, allowing you to test multiple aspects like its layout, body copy, buttons, and links to identify a mix that resonates with your entire target audience.
-
The percentage values indicate the share of users, that will receive a Variation and can be customized at Conversion Tracking.
Conversion Tracking
The fourth step of campaign creation allows you to measure the effectiveness of your campaign in various ways like:
-
Tracking conversions for a specific goal.
-
Comparing performance against a Control Group.
-
Testing multiple variations of the message to identify a winning version.
Hence, it has been divided into two sections: Conversion Tracking and Variation Distribution. However, depending on the number of message Variations created by you, the view of Conversion Tracking varies:
When only 1 Variation Exists
As shown below, on proceeding to this step from *Message you will be welcomed by an interface on which Conversion Tracking is disabled.
- Click the toggle button to enable the setting and configure it.
Click to enlarge
When Multiple Variations Exist
As shown below, on proceeding to this step from Message you will be welcomed by an interface on which:
- Conversion Tracking is disabled
- Variation Distribution meter indicates the share of the audience that will receive each Variation
Click the toggle button to enable the respective settings and configure them.

Click to enlarge
Now, let's get you acquainted with the workings of Conversion Tracking:
Conversion Tracking
Must ReadWe recommend that you gain a broad understanding of how Conversion Tracking works in your dashboard before proceeding. Doing so will lay a strong foundation for understanding whether or not you need to enable Conversion Tracking for the campaign and its impact on Revenue Tracking.
By default, Conversion Tracking is disabled for all App In-line Content. As shown below, you can use the toggle switch to enable it.
Step 1: Select a Conversion Event
The term, Conversion Event is an alias that helps you identify the event you expect users to perform after receiving the App In-line
Message.

Click to enlarge
As shown above, you can choose from a list of all the Custom Events being tracked for your account to specify the campaign's conversion goal.
The following options can be selected here:
Custom (All the custom events being tracked for your account).
System (Session Started, User Login).
Pro TipWe recommend that you map all the Custom Events, that record the occurrence of a monetary transaction in your app, as Revenue Events in your dashboard. This will help ensure that selecting the respective events as the Conversion Event of a campaign helps you track Conversions and Revenue for the campaign and its channel :)
Step 2: Add Attributes to the Conversion Event
Depending on the end goal of the campaign, you can choose to narrow down the scope of conversion to a specific action like Jimmy Choo Pumps Purchased, Episode 3 Streamed, Chapter 7 Started, MF Investment Done, Game Credits Purchased and so on.
This can be done by adding attribute filters to the selected Conversion Event. Here's how you can go about it:

Click to enlarge
Step 1: As shown above, click on the filter icon placed next to the drop-down. In doing so, you will be prompted by a pop-up allowing you to select an attribute and specify its value.
The following options can be selected here:
Custom (all thecustom attributes attached to the custom event selected as the conversion event)
Time (Event Time)
Location (City, Country)
Step 2: As shown below, click Add Filter to add more attributes to the event
-
You can club multiple event attributes by the AND/OR logic
-
This way only those users who perform the Conversion Event in the context of All/Either attribute filters will be considered towards the Conversion numbers of the campaign.
How It Works: Clubbing Event Attributes by AND/OR LogicAND: Clubbing multiple event attribute filters by the AND logic helps you narrow down the scope of occurrence of the Conversion Event. This means that only those users will be counted towards the campaign's Conversions who perform the Conversion Event in the context of all the event attributes.
OR: Clubbing multiple event attribute filter by the OR logic helps you widen the scope of occurrence of the Conversion Event. This means that users who perform the Conversion Event in the context of any of the specified event attributes* will be counted towards the campaign's conversions.
Step 3: Set Conversion Deadline
The Conversion Deadline is a duration defined by you that tells us when to stop tracking conversions for a campaign.
- This means that once your campaign is delivered, we will track users who perform the Conversion Event in the context of its attribute filters (if any), only till the specified Conversion Deadline.

Click to enlarge
As shown above, by default, a Conversion Deadline of 10 hours is set for all campaigns. You can choose to specify a custom duration in Hours or Days, as per the campaign's end goal.
Related ReadList of all the Conversion metrics and Performance Indicators tracked for App In-line Content.
Step 4: Enable Control Group (Optional)

Click to enlarge
A Control Group is a small portion of the target audience of a campaign that is randomly selected, representing the behavior and preferences of the entire segment, and does not receive the campaign.
An optional but recommended step, adding a Control Group to the target audience allows you to compare the campaign's performance against the organic behavior of Control Group users. This makes for the perfect benchmark to assess the true impact of the campaign on influencing user behavior.
Must ReadWhy you should (almost) always use Control Group to measure the effectiveness of your campaign and how it works in your dashboard
1. When Send Winning Variation is Enabled
We will automatically divide the Test Audience equally amongst all the Variations and Control Group.

Click to enlarge
-
The winning version will be identified only on the basis of the Conversion rate achieved by each. This is because users of a Control Group do not receive any messages, deeming Conversions the only criteria that can help us compare the impact of each Variation and organic user behavior.
-
If the Control Group achieves a higher Unique Conversion rate within the Test Time then it will be determined as the winner. As a result, the campaign will not be sent to its target audience.
Skip to: How to set up Send Winning Variation Automatically for testing App In-line (triggered) campaigns
2. When Send Winning Variation is Disabled
You can manually specify the share of users that will receive each Variation and those that will be included in the Control Group.
Step 1: Click on the checkbox to carve out a Control Group from the campaign's target segment.
- In doing so, a Control Group of 5% (users) is added to the Variation Distribution meter, as shown below.

Click to enlarge
Step 2: Specify the share of Control Group
- As shown above, using the slider you can increase or decrease the percentage distribution as per your test goals (we recommend aminimum Control Group of 10% to ensure a fair representation of the campaign's target audience).
Variation Distribution (Multivariate Testing)
Suppose you have created multiple versions of the App In-line Content at Message. In that case, you can opt to test the Variations and Control Group if you are unwilling to test the campaign with a minimum test audience of 500 messages.

Click to enlarge
As shown above, all the Variations created in Message are equally divided amongst the entire target audience. Using the slider, you can choose to specify a custom share for each Variation and Control Group, if enabled.
Quick Read: How manual Variation Distribution works
- Automatic Variation Distribution is not supported at the moment. It will be rolled out soon.
Here's how each setting works:
Send Winning Variation Automatically
Must Read
Basics of setting up Send Winning Variation Automatically for a campaign
How Send Winning Variation Automatically enables intuitive multivariate testing for your campaign
Please NoteGiven the highly targeted nature of App In-line, they are treated as Triggered campaigns across your dashboard. These are ongoing cycles of communication that are sent to users only when they perform a certain action or Event. Thus, the most scientific way to test Variations of an App In-line Content is by ensuring that a significant number of messages are delivered before we draw a comparison.
Step 1: Specify Size of Test Audience
The Test Audience can be defined only in terms of the number of messages delivered. This means that Variation testing will continue until the specified number of messages have been successfully delivered.
As shown below, we have specified that a minimum of 1000 messages must be triggered to users to identify a winning version. This means that all the Variations ( & Control Group, if enabled) will be equally divided amongst the specified number.

Click to enlarge
Step 2: Select Win Criteria
The Win Criteria is a performance indicator that helps us determine a winning Variation according to the campaign's end goal. As shown above, it can be defined as any of the following:
Once we identify a winning Variation, it will be sent as the only campaign to all the subsequent users who perform the trigger event.
Manual Distribution
If you are unwilling to test the App In-line with a minimum test audience of 500 messages, then you can choose to test the Variations manually.

Click to enlarge
As shown above, all the Variations created in Message are equally divided amongst the entire target audience. Using the slider, you can choose to specify a custom share for each Variation and Control Group, if enabled.
Quick Read: How manual Variation Distribution works
Preview & Launch
Once you've set up the campaign it's time to start impressing users with your highly personalized app in-line content!
But before that, we recommend that you conduct a quick preview of the campaign's message and settings to ensure that it's in line with your end goal.

Click to enlarge
As shown above, the last step of campaign creation presents a snapshot of its:
-
Target apps and segment.
-
Target screens, message frequency and trigger settings.
-
Message Variations and Preview.
-
Conversion Tracking and multivariate test settings.
Edit Campaign Before Launch
You can always choose to edit a step by clicking on the Edit icon, placed next to each step's header. In doing so, you will be directed back to the step, as shown below.

Click to enlarge
Simply make your edits, save them, toggle back to Preview & Launch to continue your review, as shown above.
Saving Campaign as a Draft
If you're unsure or are awaiting approval of the campaign's contents, then you can simply go back to the central hub of App In-line after saving your settings, as shown below. Doing so will automatically save the campaign as a Draft, allowing you to edit or launch it anytime you like.
Launching Scheduled Campaigns
If you have chosen to schedule/ start the campaign at a later date-time, then on launching it, its status will indicate Upcoming in App In-line, List of Campaigns, as shown below.

Click to enlarge
What Happens After a Campaign is Launched?
Once launched, messages are sent to users included in the target audience as per the campaign's settings. Throughout its run time, the campaign's status will indicate Running (in App In-line Personalization, List of Campaigns) until it ends or is manually paused by you.
1. Analyzing Campaign's Performance
You can analyze each campaign's real-time impact on user engagement, conversions, and revenue by accessing its Overview section through the List of Campaigns of App In-line.
2. Modifying the Campaign
Further, you can always choose to Edit or Pause an Upcoming or Running) campaign if you feel the need to. You can also prioritize the campaigns of multiple active campaigns on the same trigger action for the same user within each Property.
3. Scheduling Campaign Reports
Once you have launched a campaign, you easily monitor its performance through scheduled reports, delivered straight to your (& your teammate's) inbox! This can be configured through the campaign's analysis section. Here's how you can go about it..
Further, you can also schedule Channel-wise reports to monitor the overall performance of App In-line Content through the Settings section of your account. Here's how you can go about it.
We hope this has equipped you with a robust understanding of how you can deliver highly tailored app in-line experiences at scale. Please feel free to drop in a few lines at [email protected] in case you have any related queries or feedback. We're always just an email away!
Updated about 1 month ago