Modifying Live Segments
A step-by-step guide to modifying segments in your dashboard
You can easily Edit, Delete, or Duplicate a Live Segment through:
1. TheActions menu nested in the List of Live Segments
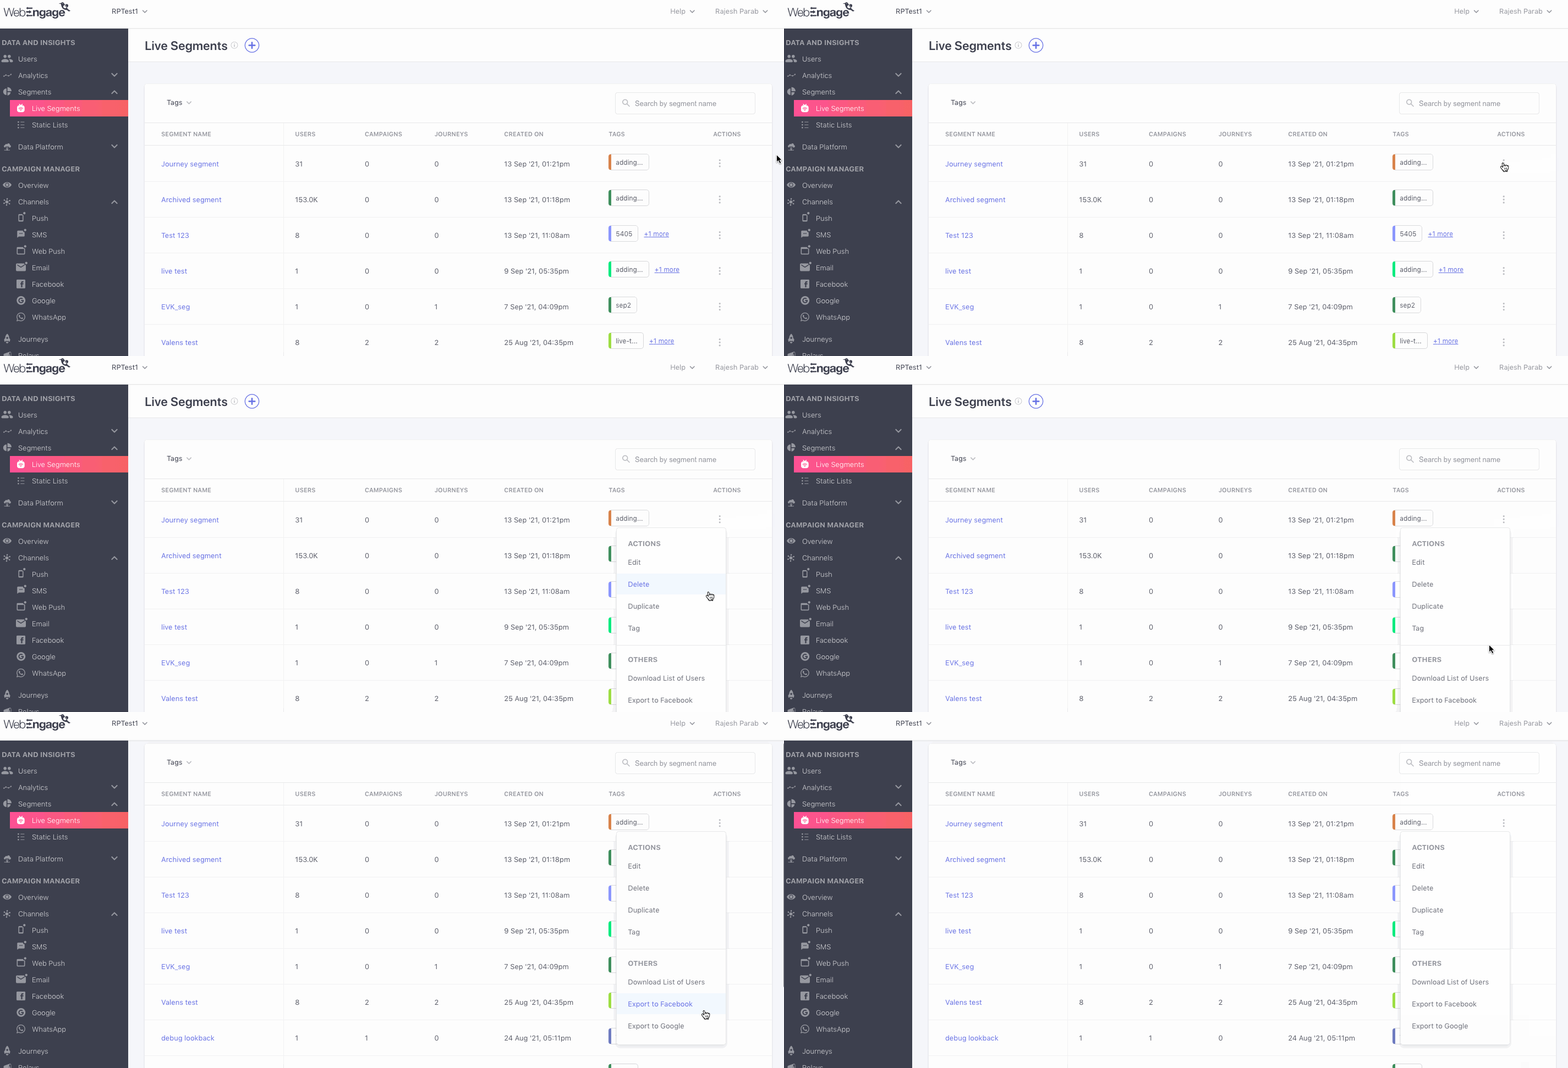
List of Segments is the central hub that shows up when Live Segments is selected from the navigation panel. As shown below, you can modify your segment by selecting an appropriate option from its corresponding Actions menu.

The menu nested under Actions on List of Segments (click to enlarge)
2. TheAction icons nested in the Top Panel of Segment Overview
Segment details refers to the top panel of a segment's analysis section. As shown below, you can use the icons placed next to the Segment's Name for modifying it.

Icons placed next to the segment title in Segment Details (click to enlarge)
Now, let’s walk you through the steps involved in making each modification and its implications, starting with Editing:
Edit a Segment
Segments that are not linked to a Running Journey can be edited anytime you like. Here’s how you can go about it:
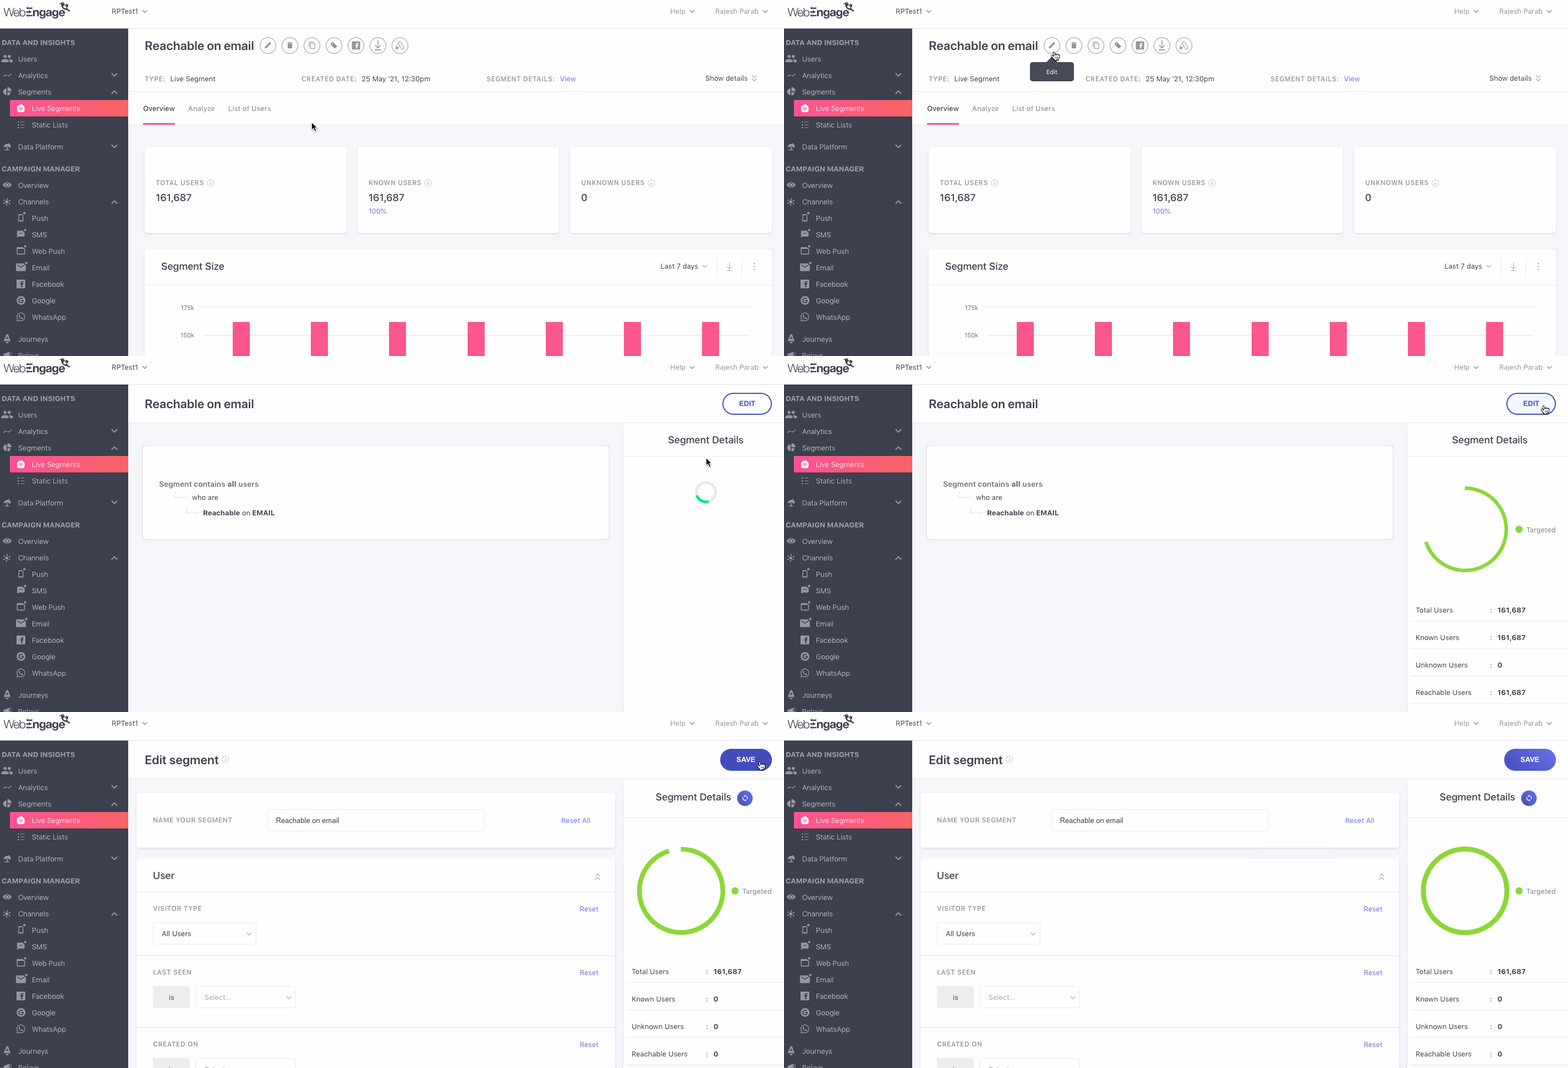
Step 1: Select Edit from the Actions menu in List of Live Segments / Click the Edit icon placed in the Top Panel of Segment Overview
- On performing either action, you will be directed to a recap of the rules of segmentation.

Click to enlarge
Step 2: As shown above, click the Edit button placed on the top right of the recap section.
- You will be directed to the segment creation interface, where you can modify or delete any of the parameters set previously.* (Understanding all the Rule of Segmentation)
Step 3: Make your edits and click the Save button placed on the top right. (Changes will be confirmed by a pop-up on the bottom right)
The best part about editing segments in WebEngage?
All changes are reflected in real-time! The pool of users is updated immediately as per the new rules defined by you. However, depending on the parameters and number of users, it may take up to a few minutes to re-populate your segment. In such cases, the segment's status will indicate In Progress.
Delete a Segment
You can choose to delete segments that have become redundant and are not linked to any campaigns. If the segment has been used to send a campaign, then you will need to delete the campaign before you can proceed with deleting the segment. This process has been put in place to preserve the sanctity of your campaign’s engagement and conversion metrics, which are tied to the segment’s user base.
Please NoteOnce deleted, the segment cannot be retrieved.
Step 1: Select Delete from the Actions menu in List of Live Segments / Click the Bin icon placed in the Top Panel of Segment Overview
If no campaigns have been sent to the segment: You will be prompted to confirm your decision. As shown below.

Click to enlarge
Step 2: Click Delete Segment on the pop-up to proceed. (Deletion will be confirmed by a pop-up on the bottom right)
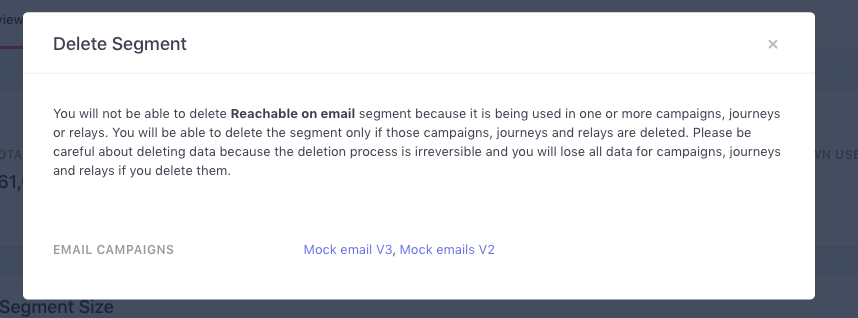
If a campaign has been sent/scheduled for the segment: You will be prompted with a pop-up warning you of the loss of data potentially caused by deleting the segment, with links to the campaign overview, as shown below.

When a segment cannot be deleted because of attached campaigns (Click to enlarge)
Step 2: Click the hyperlinked campaign titles to access Campaign Overview.
Step 3: Click the Bin icon placed second from the campaign title to delete it.
Step 4: Go back to List of Live Segments, select Delete from the Actions menu. (Deletion will be confirmed by a pop-up on the bottom right)
Duplicate a Segment
This feature comes in handy when you want to create a bunch of similar segments, with just a few differentiators.
This may sound a bit counter-intuitive to everything we have discussed so far. So let’s help you understand this better with an example.
Use-case: Duplicating segments to create similar, yet differentiated segmentsLet’s say that you have an e-commerce app and want to run a targeted campaign for promoting new additions to the women’s fashion collection. For this, you create a segment which includes;
Segment: Women’s Fashion New Collection 1
- All users who are females
- Are between the age group of 18 - 25
- Have made at least one purchase in their lifetime
Now you can duplicate this segment and edit it to include a different age group;
Segment: Copy of Women’s Fashion New Collection 1
the edited segment can be renamed to, Women’s Fashion New Collection 2, and the rules of segmentation can be edited to include a different age group, retaining the other parameters;
All users who are females
Are between the age group of 26 - 35
Have made at least one purchase in their lifetime
So you see, duplicating segments helps you create multiple, differentiated segments in half the time :) Here’s how you can go about it:
Step 1: Select Duplicate from the Actions menu in List of Live Segments / Click the Duplicate icon placed in the Top Panel of Segment Overview
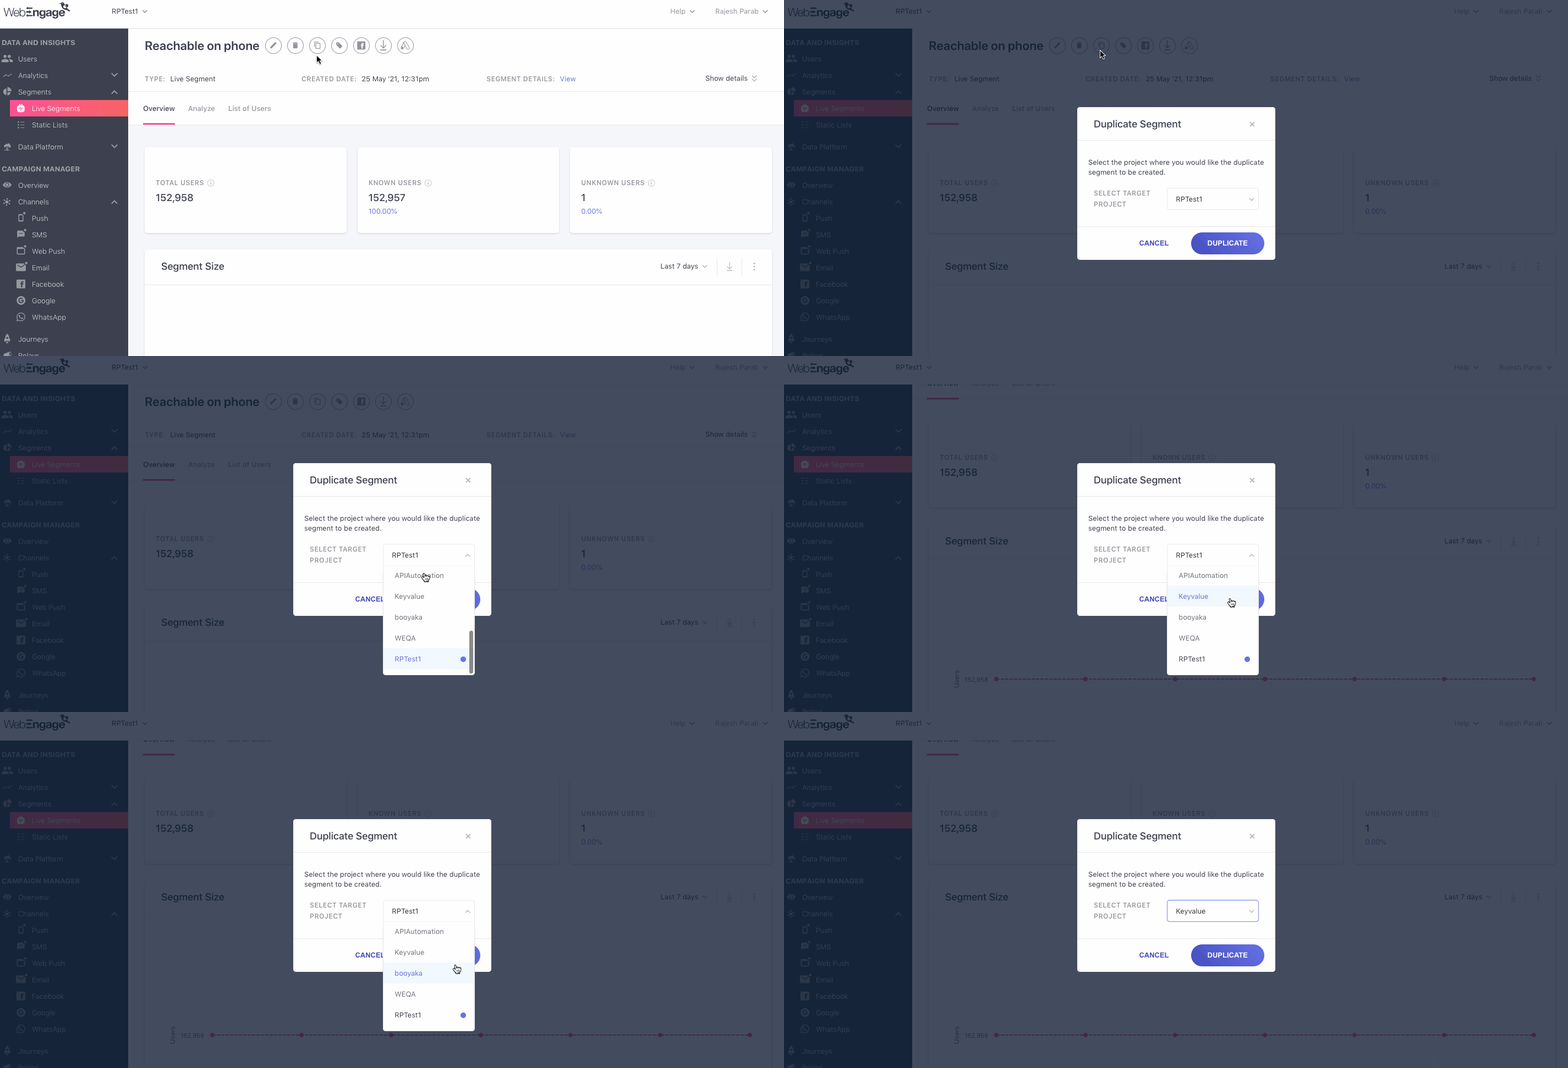
- On performing either action, you will be prompted to select the Project for which you’d like to duplicate the segment.

Click to enlarge
Step 2: Select the Project from the drop-down and hit the Duplicate button, as shown above.
- A notification will pop-up on the bottom right corner of the page, confirming that the segment has been duplicated.
- The duplicated segment's title will be in the following format: Copy of Original Segment's Title
You can now proceed with editing the duplicated segment, as described under How to Edit a Segment.
We hope this has given you a good idea of how you can modify and update all your existing segments. Please feel free to drop in a few lines at [email protected] in case you'd like some expert assistance, we're always just an email away!
Updated 3 months ago
Please proceed to the Help Center in case you have any queries related to creating, analyzing, or modifying segments in your dashboard,