Campaigns & Its Types
A deep-dive into all the campaign types listed across your dashboard and how they work
Campaigns
Any message sent to your users through the various channels of engagement is called a Campaign.
Depending on their frequency, context, and medium, messages have been categorized into the following types of campaigns in your dashboard:
- One-time
- Triggered
- Recurring
- Transactional
- Journey
- Relay
As highlighted below, we have categorized the campaigns created through each channel under the List of Campaigns section, making it easier for you to browse.
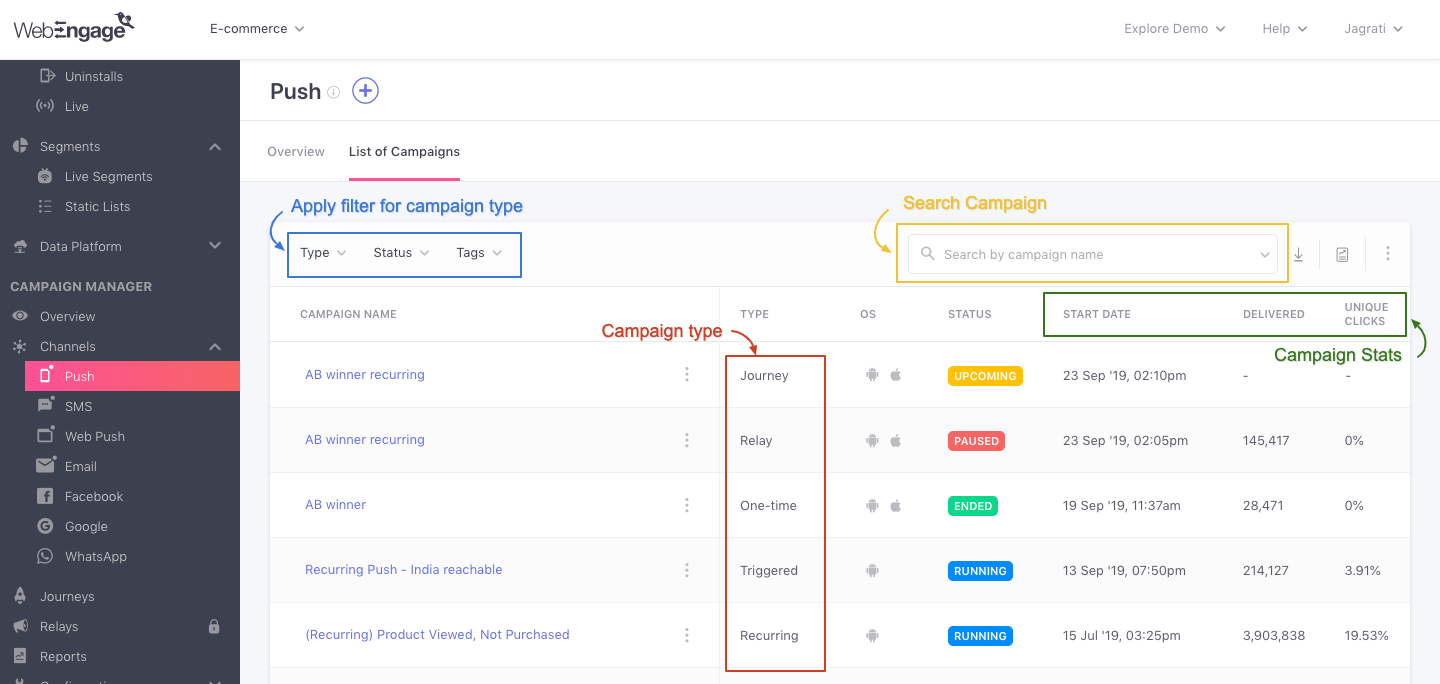
Understanding Campaign Type, as listed under each Channel's List of Campaigns
Let's go over the nuances of each campaign type and how they can help you execute your engagement strategy.
One-time Campaigns
These are stand-alone messages that are sent to your users only once and generally comprise of time-bound offers, festive deals, product updates, and so on. Such campaigns end as soon as they're delivered to the target audience.
Please NoteOne-time Campaigns cannot be sent through the channels of In-app and On-site (Notification, Survey).
Delivery Time (Scheduling)
By default, all one-time campaigns are delivered to the target audience as soon you hit the Launch button. However, you can choose to schedule these campaigns for a specific Date and Time, as per your business needs. This can be done by specifying the campaign's Delivery Time as Later.
The best part - all one-time campaigns can be scheduled for delivery in your user's timezone! Here's how it works:
- Time is detected at two levels in WebEngage - for your account (project) and each user. The following terms are used in your dashboard to indicate the same;
In Project's Timezone
This is determined as per the timezone selected by you while setting up your account and can be modified anytime you like. All scheduled campaigns are set to be delivered in your project's timezone by default.
In User's Timezone
The timezone of all your users is determined as per their current location and is updated by us in real-time. Using this information, we deliver the campaign as and when the specified delivery time occurs in the target user's timezone.
As shown below, all you need to do is select 'In User's Timezone' from the dropdown placed alongside Delivery Time and we'll take care of the rest!
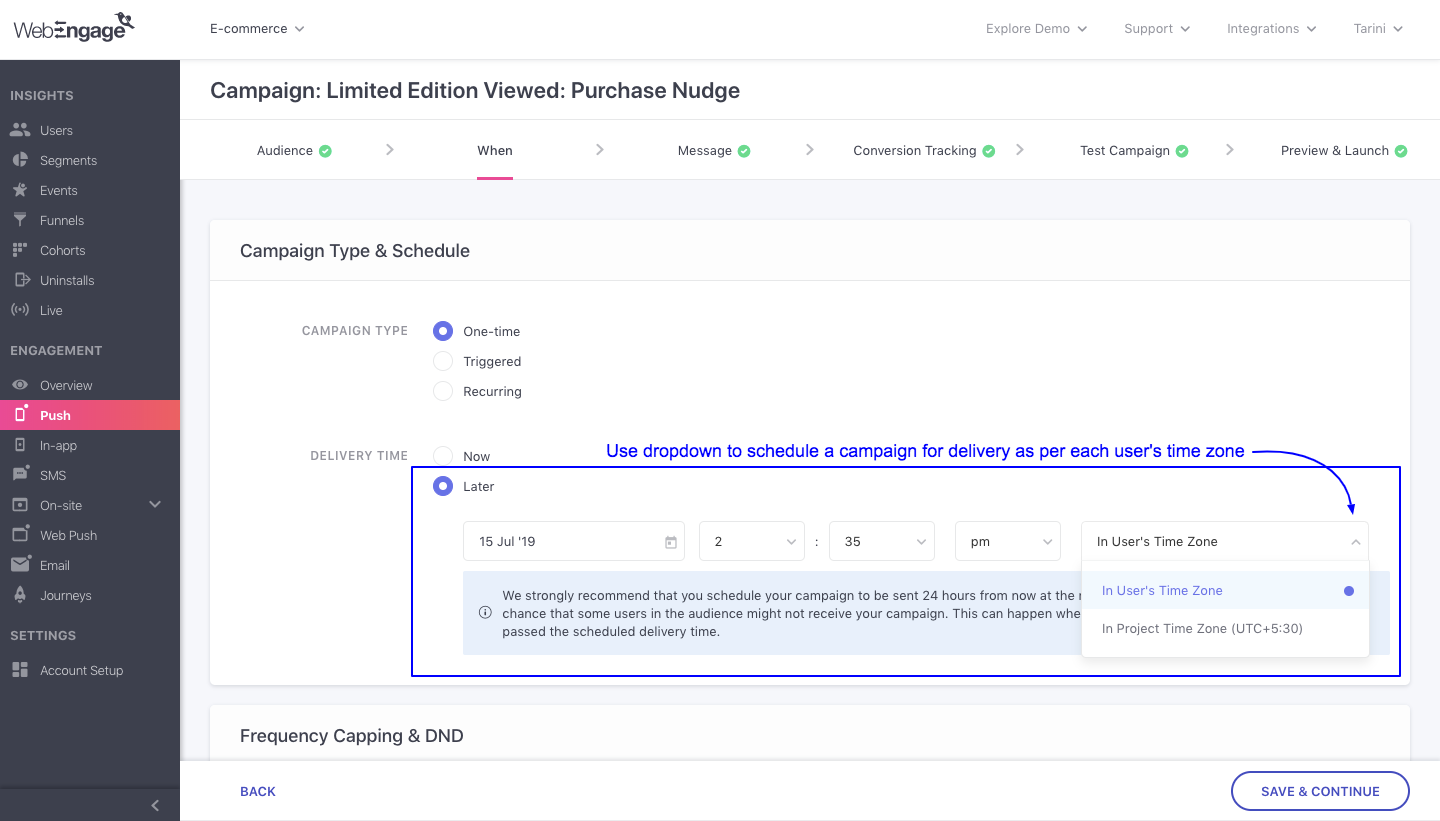
Click to enlarge
We strongly recommend that you schedule such campaigns a minimum of 24 hours before the intended delivery time. Doing so will help ensure that there is no conflict between the specified date-time and the local date-time of a users' timezone (at the time of scheduling the campaign).
Let's go over a use-case to demonstrate how you can leverage scheduling to execute your marketing strategies:
Use-case: Scheduling Black Friday Deals in User's TimezoneLet's take the example of an international e-commerce app that offers exclusive Black Friday deals to its customers across the globe. Marketers of the app decided to schedule several promotions, throughout the day to drive app engagement and sales.
As their user base is spread across several countries, they decided to schedule all related campaigns for delivery in the user's timezone. This is a great way to ensure that all users have a consistent Black Friday shopping experience, no matter where they're located :)
Here's how they scheduled campaigns for various target audiences:
Campaign 1: Announcing Black Friday Sale
- Target Audience: All users
- Delivery Time: Nov 29, 6 am, In User's Timezone
Campaign 2: Exclusive deals
- Target Audience: High-value customers
- Delivery Time: Nov 29, 11 am, In User's Timezone
Campaign 3: Deals on products related to search history
- Target Audience: In-active customers
- Delivery Time: Nov 29, 11 am, In User's Timezone
Campaign 4: Last few hours to go!
- Target Audience: All users
- Delivery Time: Nov 29, 9 pm, In User's Timezone
Thus, all users will receive a maximum of 3 campaigns throughout the day, depending on the segment they're included in. And delivery in their time zone will ensure that all campaigns remain relevant in the context of the sale timings for their location.
Impact of Frequency Capping and DND Settings on Delivery TimeIf you are sending a one-time campaign with Frequency Capping or DND Hours enabled, then its actual Delivery Time may vary for each user, detailed read.
Triggered Campaigns
Must ReadPlease ensure that you have a robust understanding of the concepts of Events, Event Attributes before proceeding. Doing so will help you understand the workings of Triggered Campaigns, better.
Triggered Campaigns are highly contextual messages that are targeted at only those users of your target audience who have performed a particular Event on your app/website. These actions could be anything like product added to cart, flight search, policy details viewed and so on.
Here's how it works:
Occurrence of Event
Triggered campaigns can be sent through all the channels of engagement, for all the events being tracked for your account. All you need to do is define an event, upon the occurrence of which the campaign must be sent to the users who perform it.
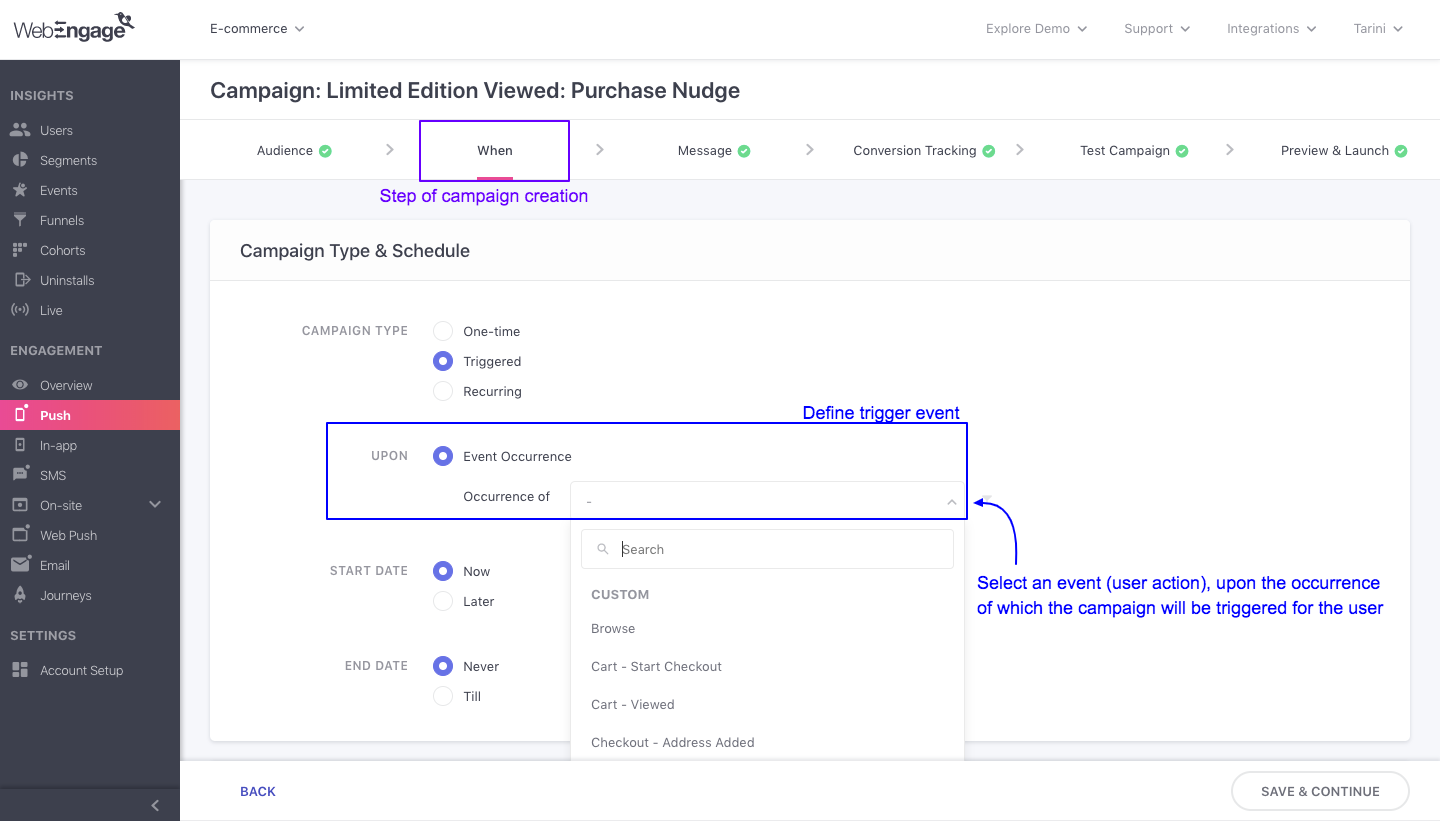
Specifying the Trigger Event for a campaign
As highlighted above, this can be configured at Step 2: When, while creating a campaign. Let's go over a use-case to show you how it works:
Understanding How Campaigns are Triggered for Each UserLet's take the example of an online store that tracks purchase on their mobile app and website as a custom event- Checkout-Complete.
Each time a user makes a purchase, they receive an email confirming their transaction. The email is triggered whenever users perform the event, Checkout-Complete.
Now let's assume;
User A makes Purchase 1 on Day 1
User A makes Purchase 2, a few hours later on Day 1
User A makes Purchase 3 on Day 25 and so on...
Hence, User A will receive the triggered email 2 times on Day 1 and once on Day 25.
Applying Attribute Filters to the Event
You can further narrow down the scope of occurrence of the event by applying one or a combination of attribute filters to it. By doing so, you can choose to trigger a campaign only when users perform the event in the context of the attribute filter(s) applied to it.
Let's go over a use-case to demonstrate how this can help you engage users with contextual messages:
Creating Contextually Triggered Campaigns by Adding Attribute Filters to the EventGoing back to the use-case discussed above - Let's assume that the online cosmetics store offers the following modes of payment;
Option 1: Online Payment
Option 2: Payment on Delivery (COD)
Hence, along with tracking purchase as a custom event - Checkout-Completed, you will also need to track each user's preferred mode of payment as the custom event attribute, Payment Method, which has the following values.
- Value 1 of the attribute: Online-Payment
- Value 2 of the attribute: COD
Here's how you can use attribute filters to trigger email campaigns for both the payment options:
Campaign For Option 1: Online Payment
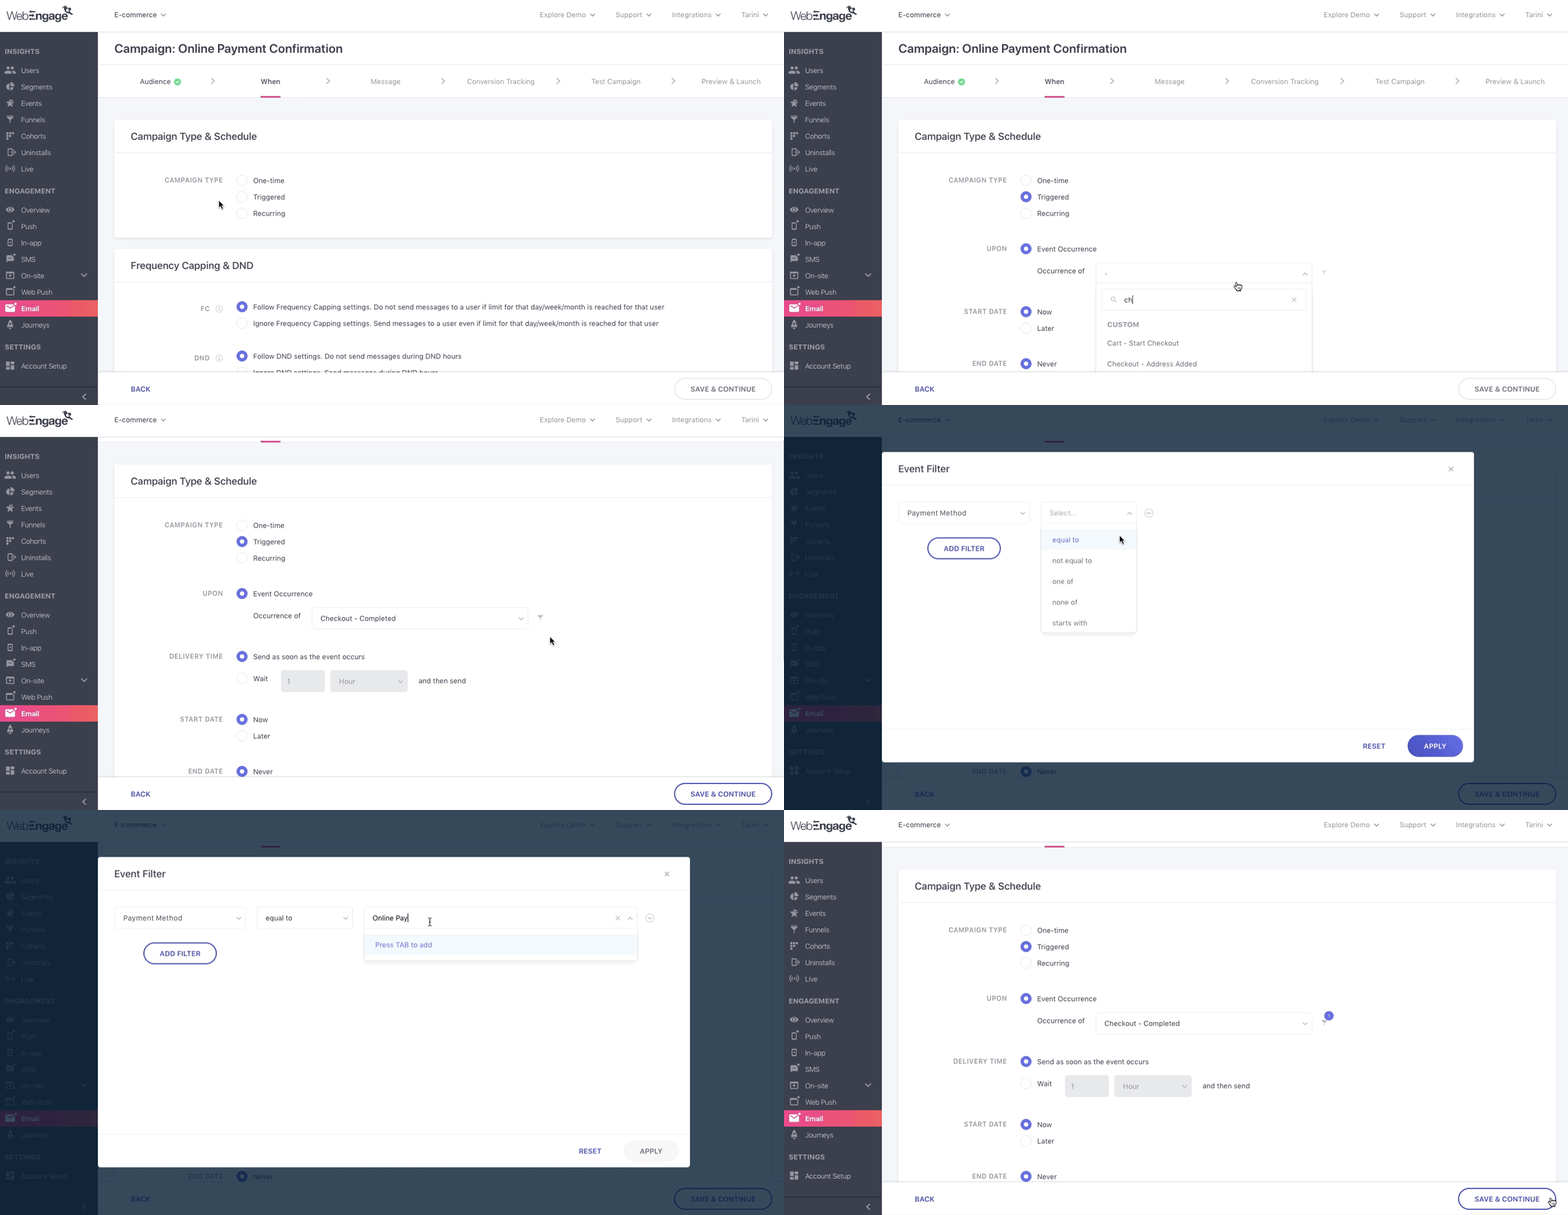
Click to enlarge
-
Step 1: Select Checkout-Completed, as the event, upon the occurrence of which the campaign should be triggered
-
Step 2: As shown above, apply Payment Method equal to Online-Payment as an attribute filter to the event
-
Doing so will ensure that the email is triggered only for those users who select Online Payment as their preferred mode of payment, during the checkout process.
-
Step 3: Create a contextual message and launch the campaign!
Campaign For Option 2: Payment on Delivery
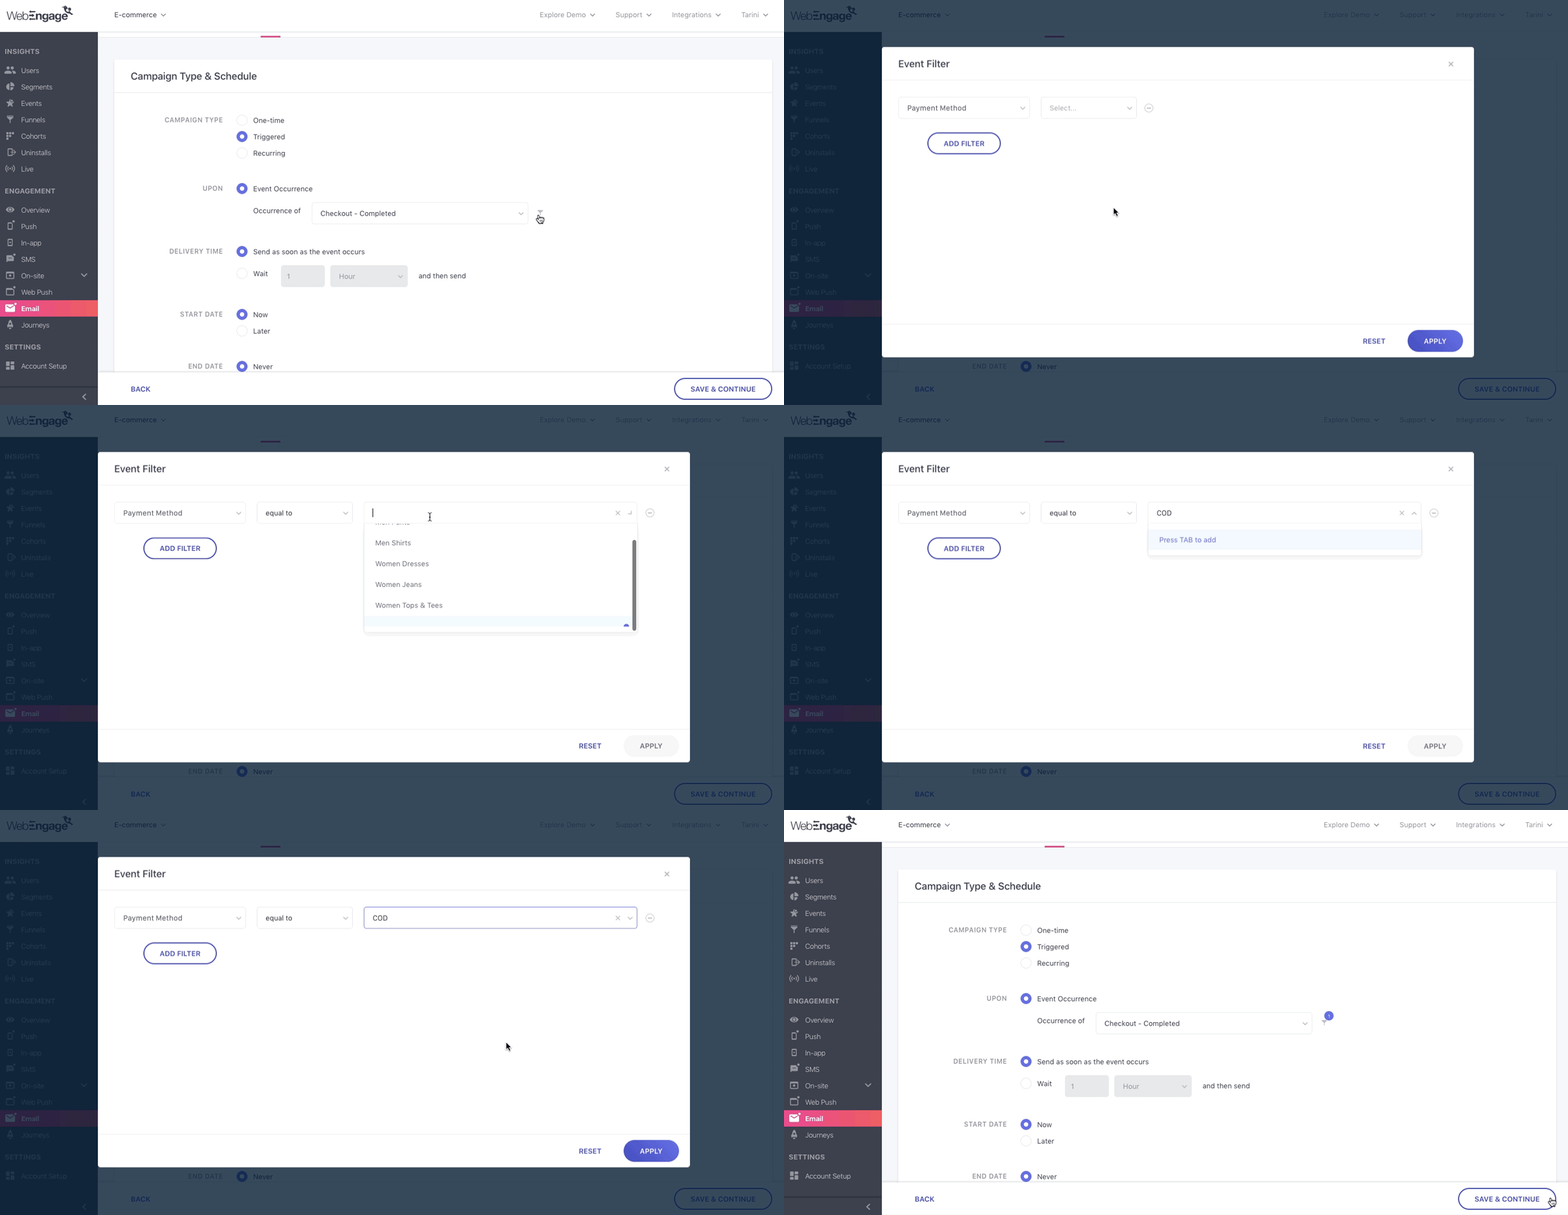
Click to enlarge
-
Step 1: Select Checkout-Completed as the trigger event
-
Step 2: As shown above, apply Payment Method equal to COD as an attribute filter to the event
-
Step 3: Create a contextual message and launch the campaign!
Delivery Time
By default, all triggered campaigns are delivered to a user as soon as they perform the specified event. However, you can choose to delay its delivery by a few Minutes, Hours, Days or Weeks, after the specified event has occurred, by adding a Wait Duration under the campaign's Delivery Time, as highlighted below.
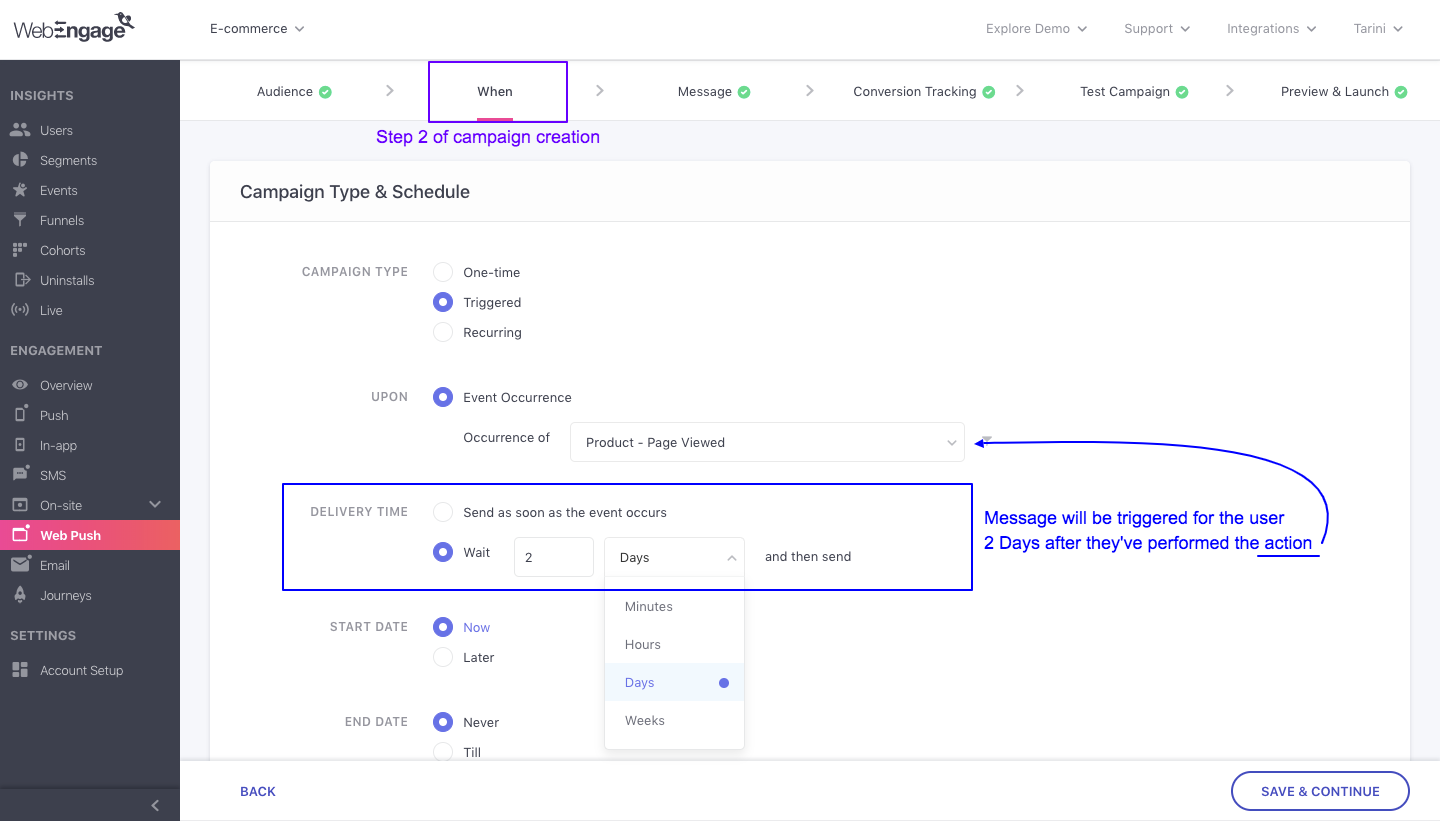
Click to enlarge
Delayed delivery makes it possible for you to solve for various situations like reminding users about upcoming webinars and tests, onboarding users for an online course and so on. Let's show you how it works:
Use-case: Setting up Reminders for Upcoming Tests Related to a CourseLet's take the example of an ed-tech platform that offers several professional and educational courses. Each course is designed to test the students before proceeding to the next stage of the course.
Let's assume that Course A comes with two tests.
Test 1 is conducted 14 days after enrollment
Test 2 is conducted 30 days after enrollment
Each time a student enrolls for a course, their action is tracked as a custom event - Course-Purchased. The course they opt-in for is tracked as the event's attribute - Course A, Course B and so on.
To ensure that students are well prepared for the tests, the ed-tech platform decided to remind them with an email 2 days in advance.
Solution: Create 2 triggered email campaigns with delayed delivery - Test 1 Reminder and Test 2 Reminder
Step 1: Define the trigger event of both the campaigns as - Course-Purchased and apply Course A as an attribute filter.
Step 2: Add a Wait Duration of;
- 12 Days for Test 1 Reminder
- 28 Days for Test 2 Reminder
Step 3: Create a contextual message for each reminder and launch!
Thus, all students that enroll for Course A will receive reminders about the upcoming tests 2 days before each test.
Impact of Frequency Capping and DND Settings on Delivery TimeIf you are sending a triggered campaign with Frequency Capping or DND Hours enabled, then its actual Delivery Time may vary for each user, detailed read.
Start Date (Activation)
The Start Date helps you determine when the campaign needs to be activated. By default, all triggered campaigns are activated as soon you hit the Launch button.
However, you can choose to activate a campaign at a later date-time by specifying its Start Date as Later, at Step 2: When while creating it, as highlighted below. This will ensure that the campaign is activated only once the defined date and time arrive. Once activated, users included within the target audience, who have performed the trigger event will start receiving the campaign, as per your Delivery Time settings.
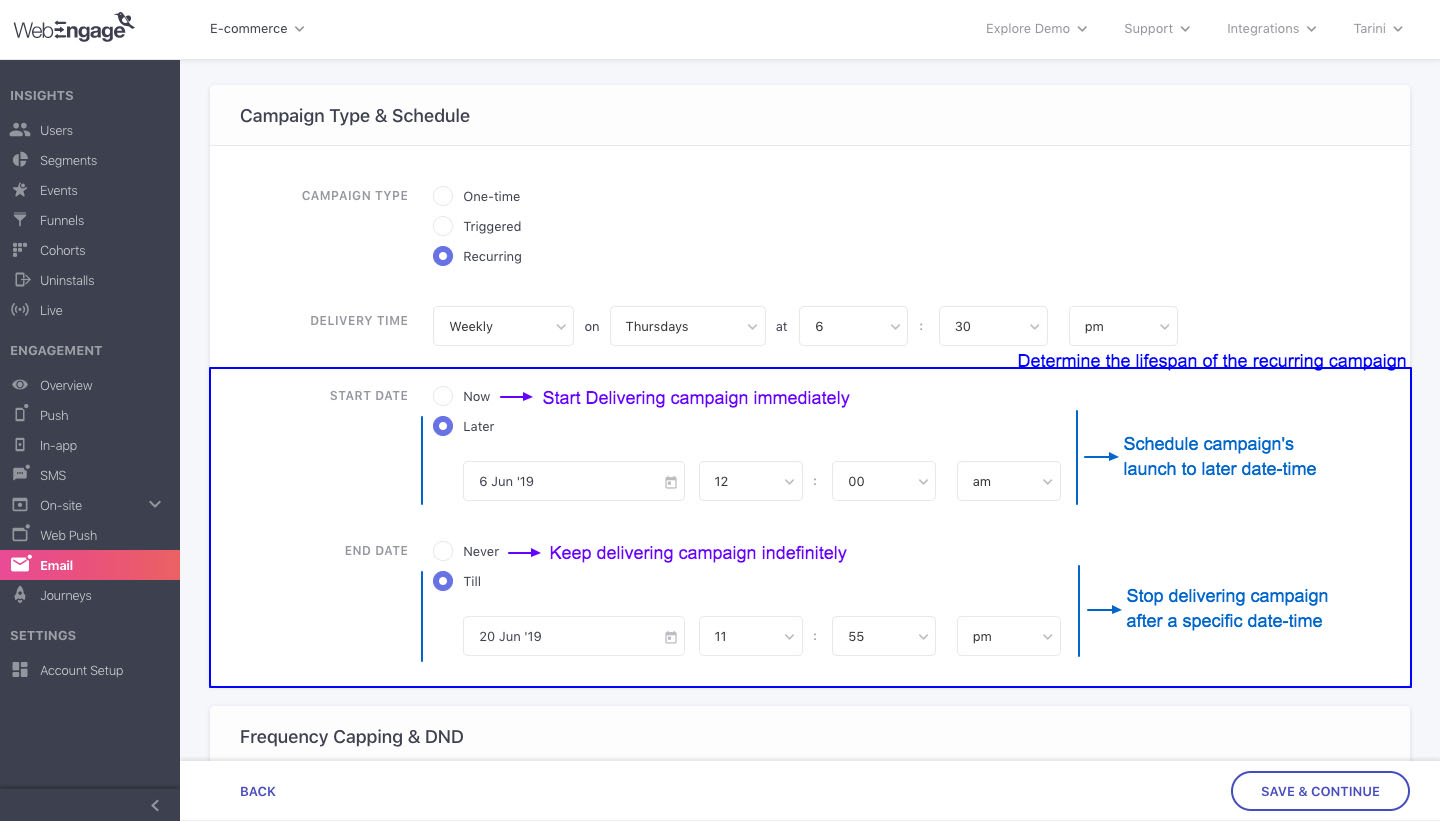
Understanding a Triggered Campaign's Start Date & End Date
End Date (Deactivation)
The End Date helps you determine when the campaign needs to be deactivated. By default, all triggered campaigns are continuously delivered to the target users, as per your delivery time settings, over the entire lifetime of your account.
However, you can choose to deactivate a campaign after a specific period by specifying an End Date-Time at_Step 2: When while creating it, as highlighted above._ This comes in handy especially when the campaign is tied to a short-term goal. Let's go over a use-case to help you understand this better:
Use-case: Ending Triggered Campaigns After Course ExpiresGoing back to the ed-tech platform discussed above - Let's assume that Course A helps students prepare for IELTS exams.
So, if the last date to give an IELTS exam is 31 March 2019, then you can specify it as the End Date of all triggered campaigns related to Course A.
This will ensure that even if students perform the trigger event after the specified date, they will not receive any redundant communication from you.
Recurring Campaigns
Recurring campaigns are ongoing cycles of communication that are scheduled to be sent periodically to its target audience. Such campaigns help you automate communication for several recurring events in your user's lifecycle like subscription renewals, policy renewals, bill payments, recurring investments and so on.
Please NoteRecurring Campaigns cannot be sent through the channels of In-app and On-site (Notification, Survey).
Delivery Time (Frequency)
A recurring campaign can be scheduled to be delivered Daily, Weekly or Monthly to your target audience. As shown below, all you need to do is select a frequency and specify a day and time at which you would like your users to receive the campaign, at Step 2: When, while creating it.
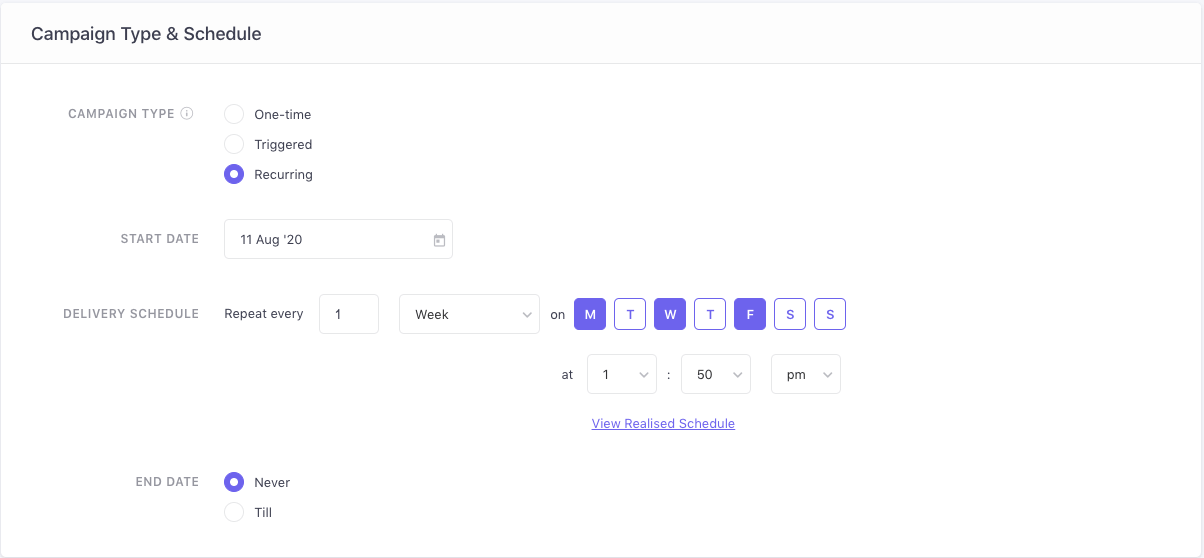
Configuring Frequency & Delivery Time of a Recurring Campaign (Click to enlarge)
Let's go over a short use-case to show you how Recurring Campaigns work:
Use-case: Engaging Website Visitors with a Recurring Web Push CampaignLet's take the example of an architectural design firm that showcases its portfolio through a website. Each day, several clients visit their site to browse through their work and book a consultation.
Marketers of the firm recently noticed a drop in the booking rate, even though their site's traffic was consistent. Hence, they decided to engage all these users with a web push notification, prompting them to book a free first-time consultation.
- All bookings done through their website are tracked as a custom event, Booking-Done.
Here's how they created the campaign:
Step 1: Create a target segment including users who have visited the website at least once within the previous week, but have not booked a consultation.
- They chose to target only recent visitors to ensure a greater recall value when the user sees the notification.
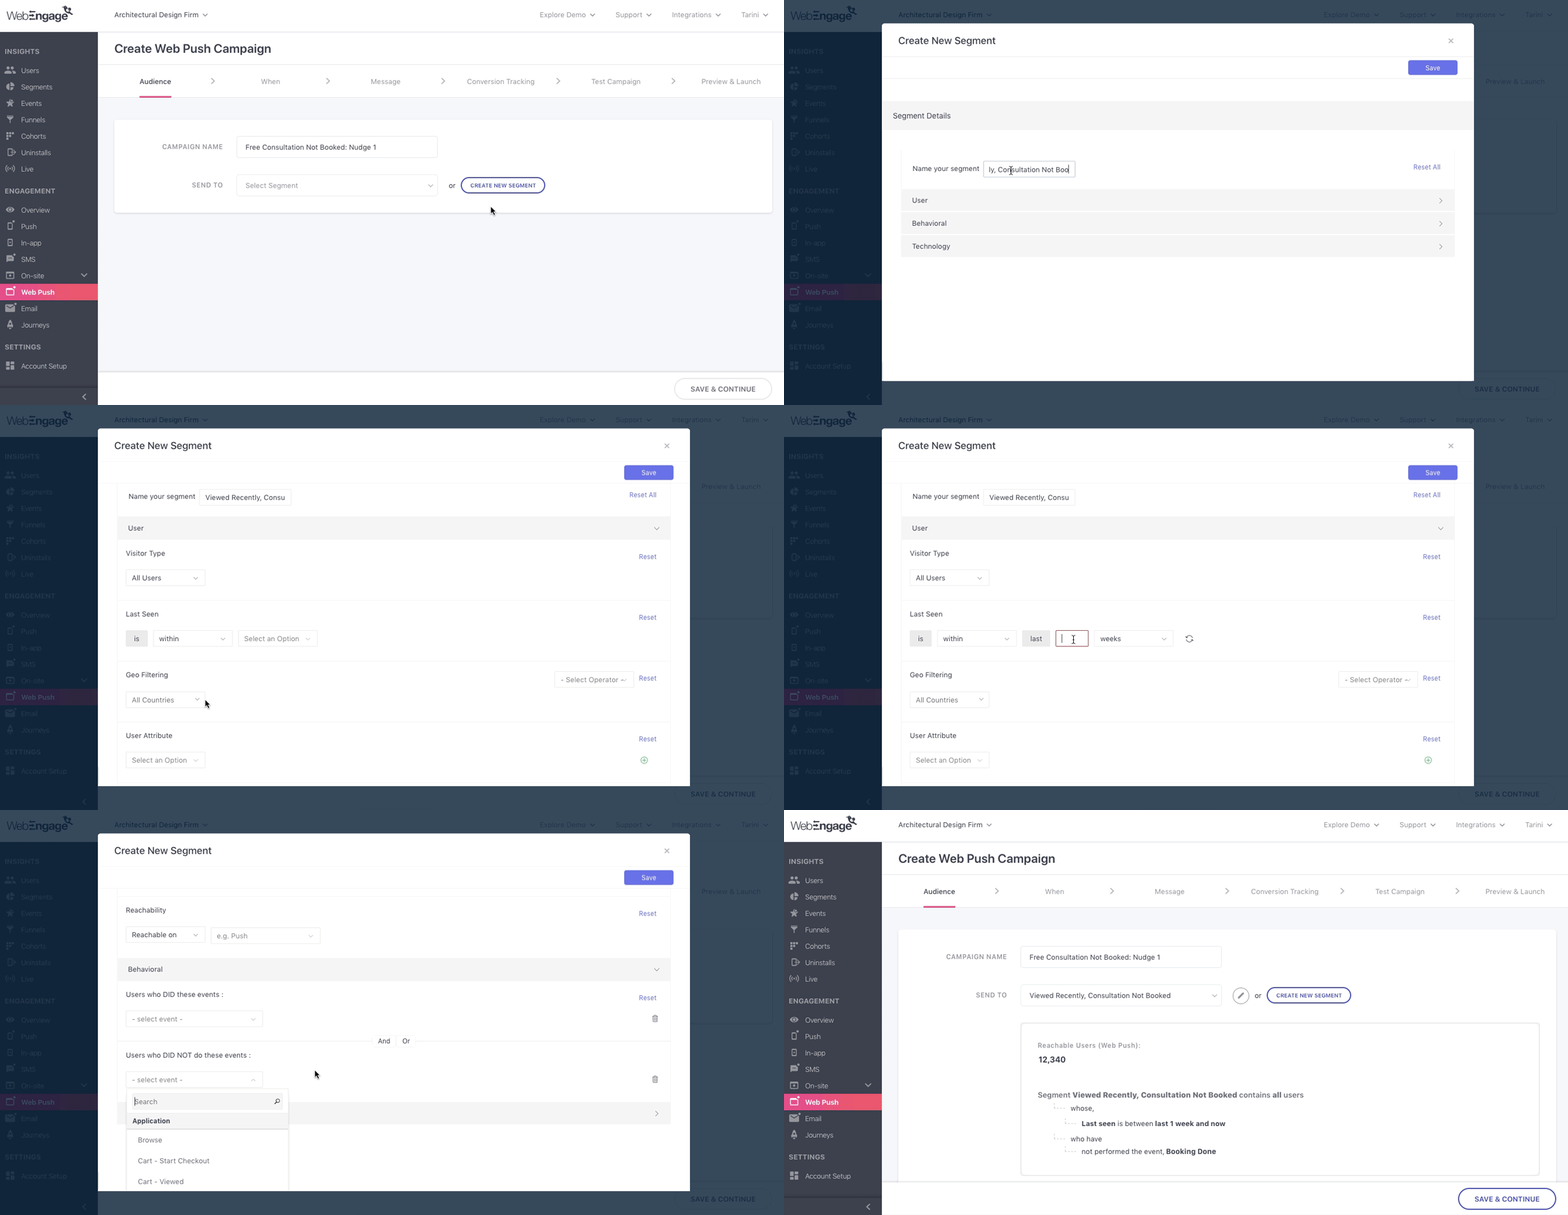
Creating a segment of recent site visitors who have not booked a consultation (Click to enlarge)
-
Rules of segmentation (as shown above): Visitor Type - All Users whose Last Seen is Within Last 1 Week and Did not perform the event - Booking-Done
-
All segments in WebEngage are updated in real-time to include and remove users from the segment as per their latest attributes. This means:
- The web push notification will be shown only to those users who have been active over the previous week. As soon as the duration of their inactivity increases, they will be moved out of the segment.
- Any user that books a consultation will also be removed from the segment - as they have performed the event, Booking-Done and no longer meet the rules of segmentation. Detailed read on segment creation.
Step 2: Create a recurring web push campaign for the target segment.
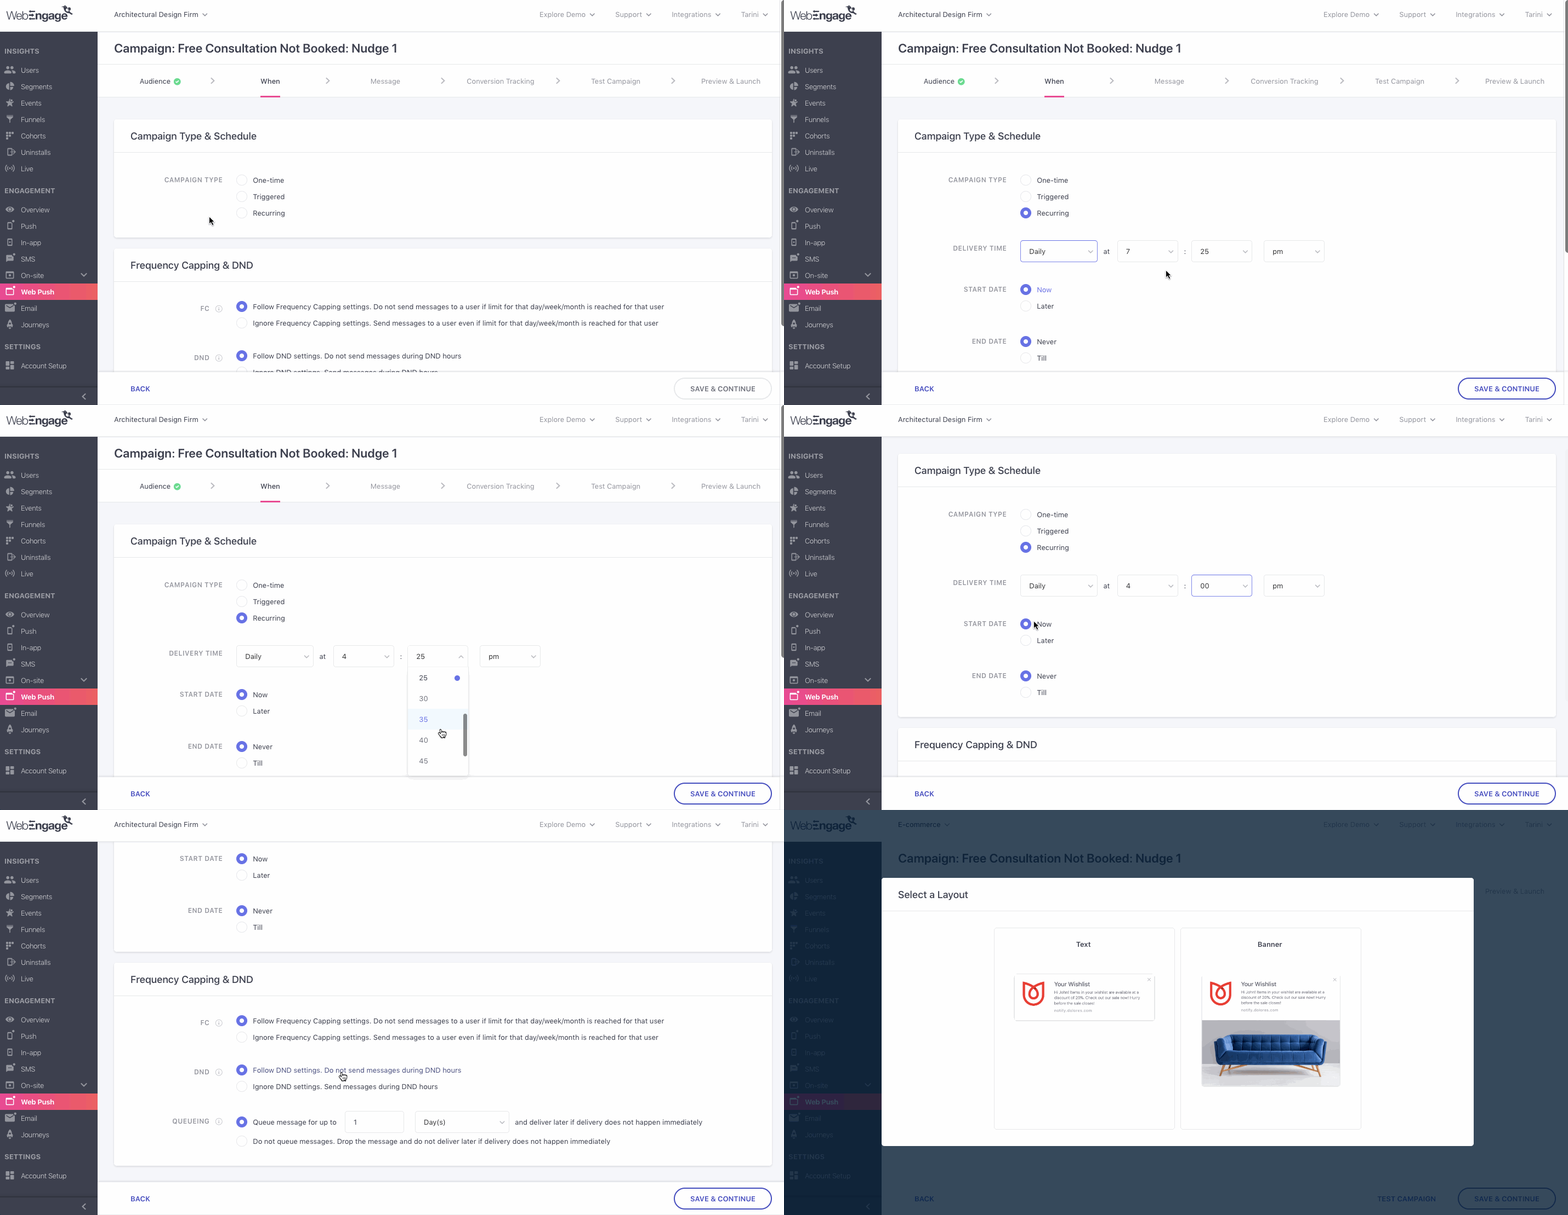
Configuring campaign's delivery time & frequency (Click to enlarge)
-
As shown above, set its Delivery Time as Daily at 4 pm.
-
Selecting the frequency as Daily ensures that the campaign is delivered to all the new users added to the target segment, at the earliest possible delivery window.
-
For example, let's say that a user's subscription expires at 11 pm, 48 hours from now. This means that the user will be added to the target segment at 11 pm today. But they will not receive the recurring campaign immediately as they have been added to the segment after 4 pm. Hence, the user will receive the Web Push Notification at the earliest possible delivery window - at 4 pm, tomorrow.
Step 3: Create a compelling message with a link to the booking page and a recognizable icon (for brand recall), as shown below.
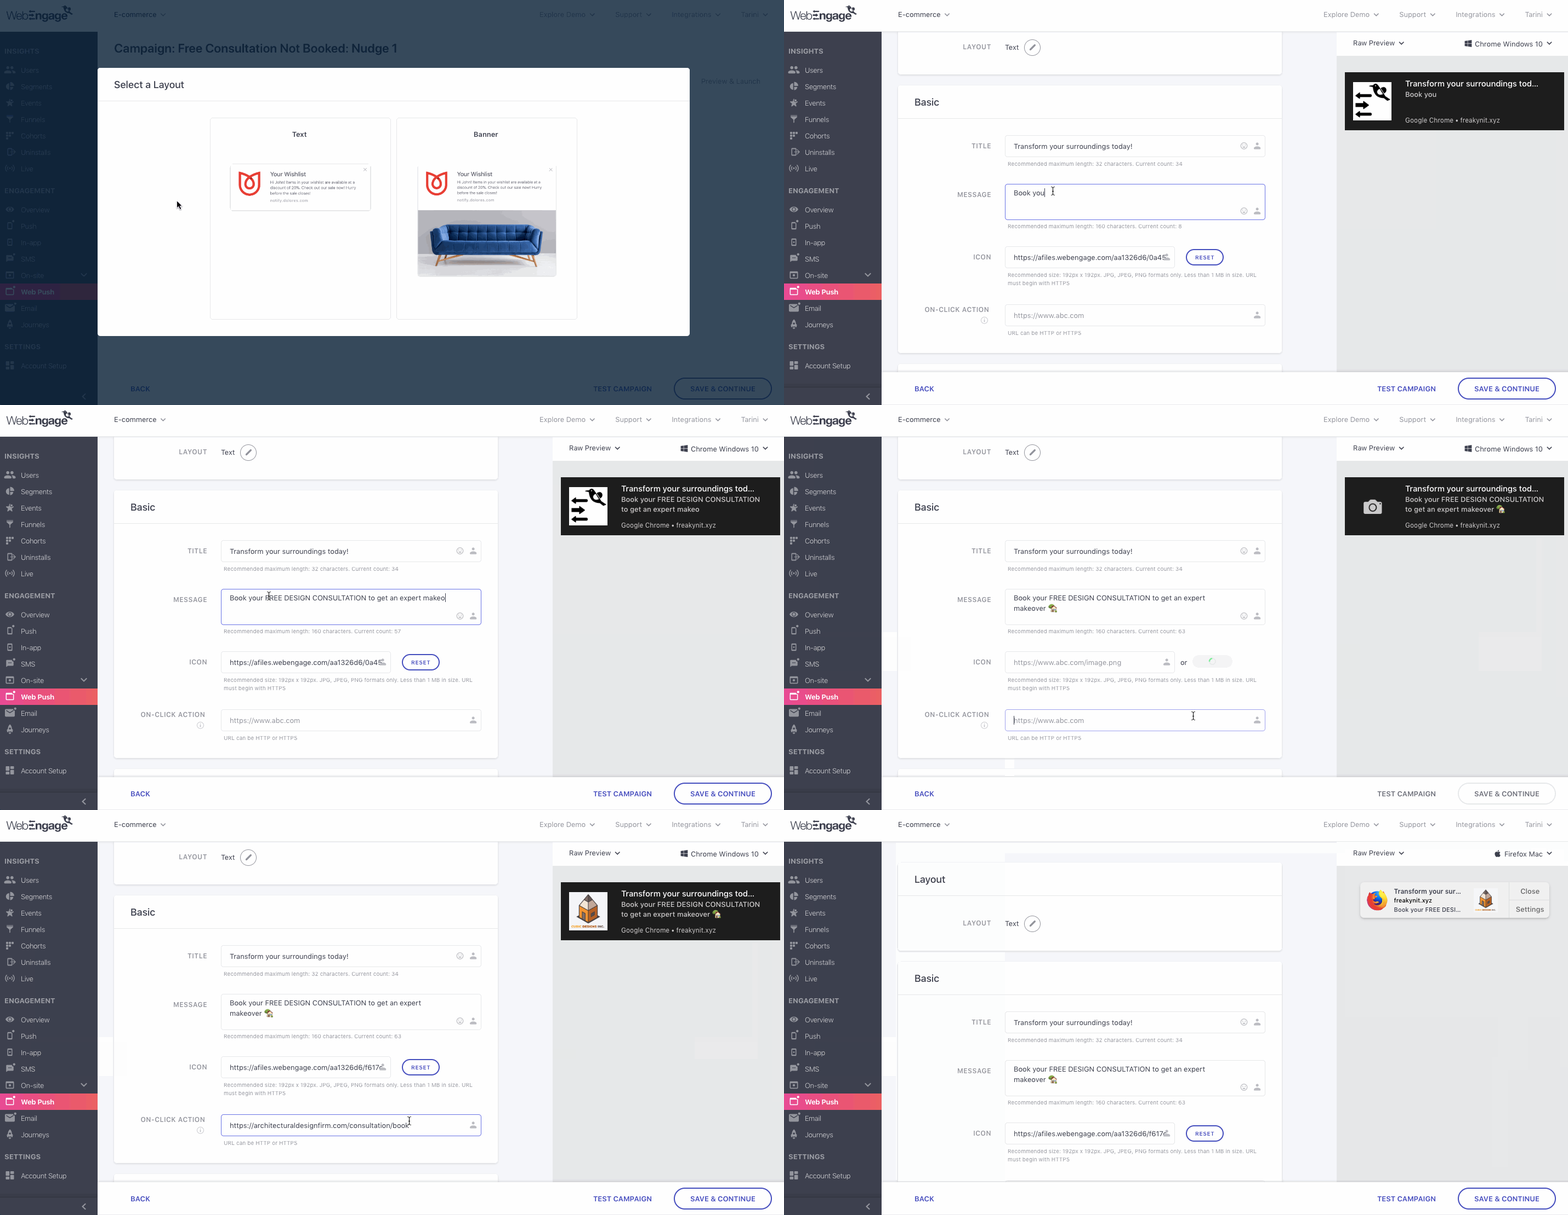
Creating the Web Push campaign (Click to enlarge)
Step 4: Launch campaign and see bookings go up!
Impact of Frequency Capping and DND Settings on Delivery TimeIf you are sending a recurring campaign with Frequency Capping or DND Hours enabled, then its actual Delivery Time may vary for each user, detailed read.
Start Date
The Start Date helps you determine when the campaign needs to be activated. By default, all recurring campaigns are activated as soon as you hit the Launch button.
However, as highlighted below, you can choose to activate a campaign at a future date-time by specifying its Start Date as Later at Step 2: When, while creating it. Once activated, all users included within the target audience will start receiving the campaign as per your Delivery Time settings.
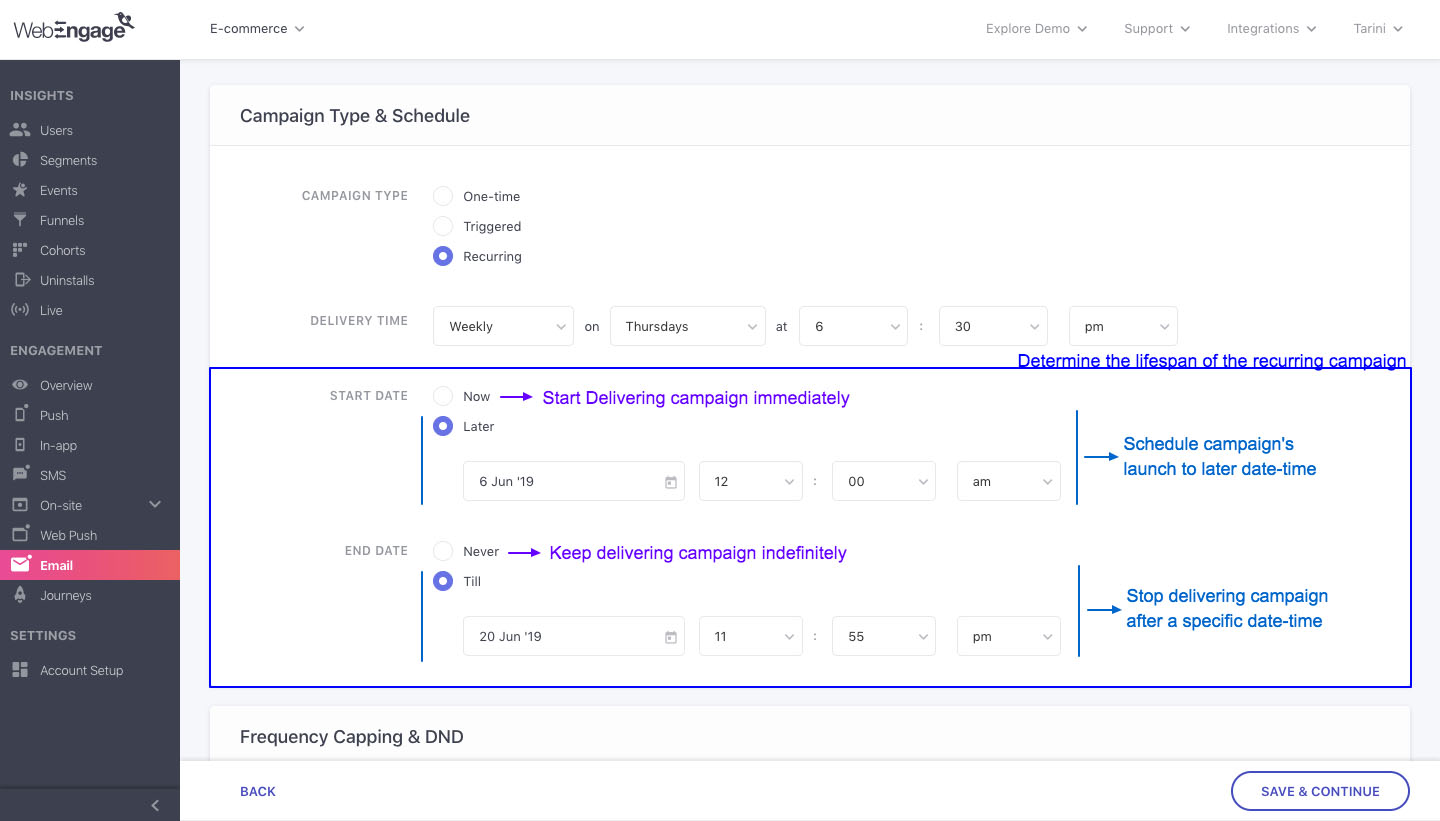
Understanding Start Date & End Date of a Recurring Campaign (Click to enlarge)
End Date
The End Date helps you determine when the campaign needs to be deactivated. By default, all recurring campaigns are continuously delivered to the target users, as per your delivery time settings, over the entire lifetime of your account.
However, you can choose to deactivate a campaign after a specific period by specifying an End Date and Time, at Step 2: When, as highlighted above. This comes in handy especially when the campaign is tied to a short-term goal.
Transactional Campaigns
Please refer to Transactional Campaign API for developer documentation.
These are highly contextual messages that your users expect to receive while interacting with your brand through your app, website or offline. Such messages are usually triggered when a specific milestone or scenario occurs in a user’s lifecycle.
This could be messages that acknowledge a particular user interaction like - welcome newsletter (after sign up), password reset, payment confirmation (invoice), order confirmation and so on. Or messages that convey contextually personalized information like - payment reminders, account statements and so on.
Since users expect to see such updates from you, they're more likely to engage with transactional messages compared to promotional campaigns. This makes transactional campaigns a great opportunity to reinforce your value proposition for a user, fostering long-term retention.
Fact Check: Difference between Marketing & Transactional CampaignsWhile marketing campaigns aim to elicit a particular action or behavior from your users, transactional campaigns acknowledge the occurrence of a user-brand interaction or a scenario that has occurred in their lifecycle.
This inherently makes users more receptive to receiving and engaging with transactional messages.
How to Set It Up
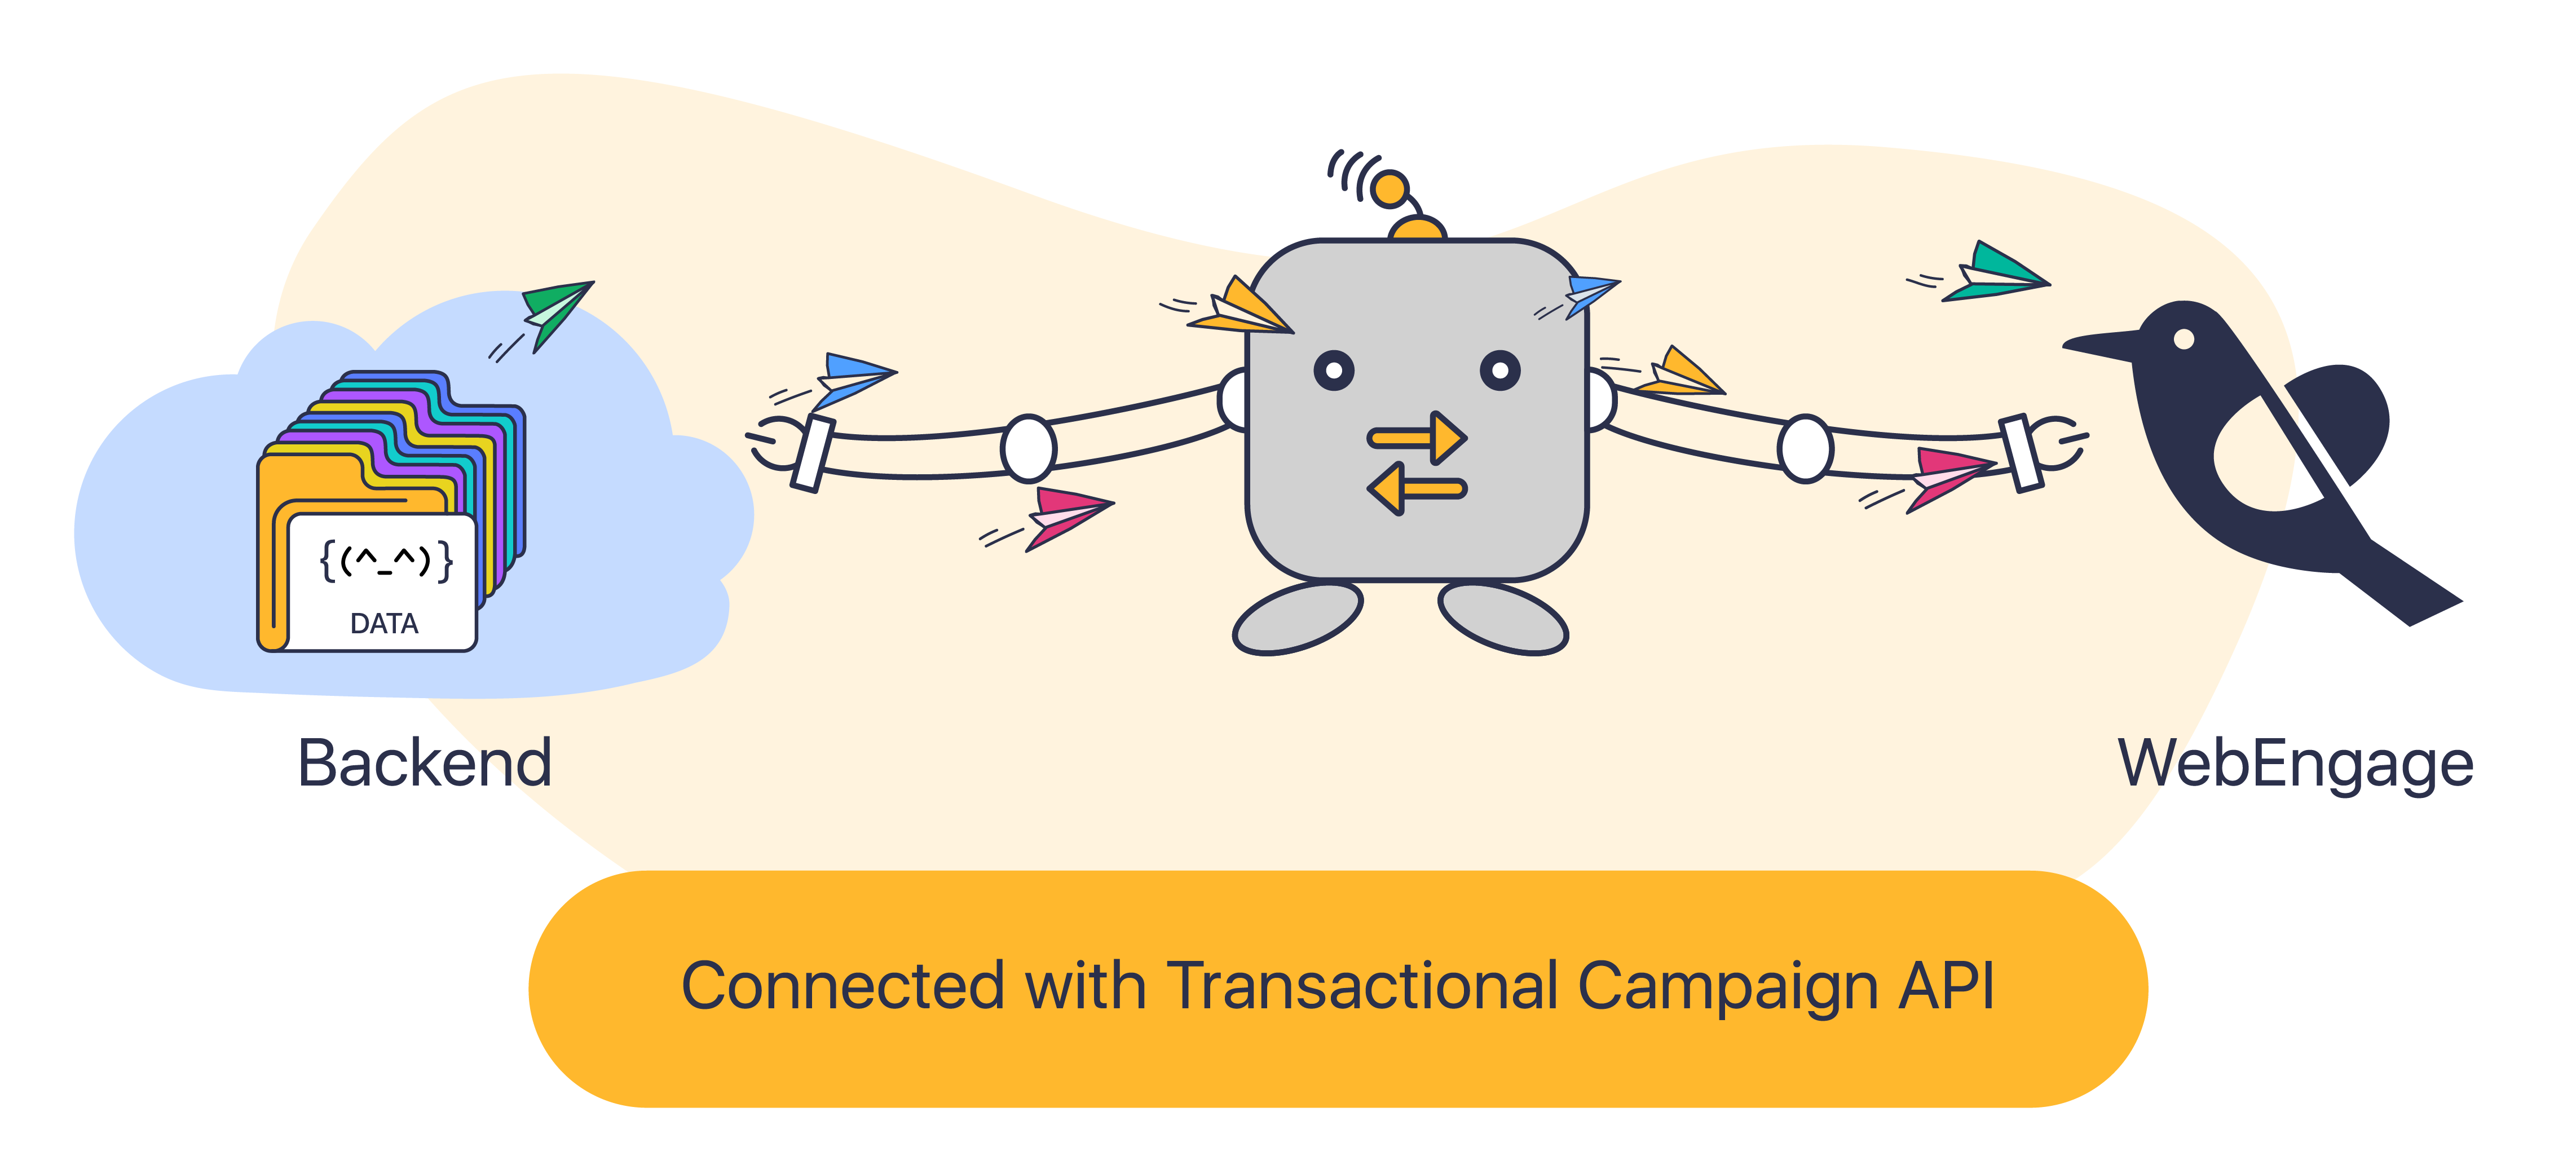
Using our Transactional Campaign API, you can trigger a campaign whenever users perform a specific action on your app/website or when a user lifecycle update is recorded in your backend (server, CRM, PoS).
Please NoteTransactional campaigns can be sent only through the channels of Push, SMS WhatsApp & Email.
Here's how you can go about it:

Click to enlarge
Step 1: Identify the Triggers
The first step is to identify all the scenarios in your user's lifecycle that warrant acknowledgment or notification via a message. Depending on your business, your definition of 'transactional' may vary. For example, transactional messages could mean:
- Acknowledging monetary transactions for a fin-tech app.
- Profile view and message alerts for a dating app.
- Notifications related to new questions/answers posted on the forum for an online community.
- Product shared on social media from e-commerce app.
- Gift voucher purchased from a brick and mortar store.
Hence, create a list of all the scenarios in which transactional messages can help you effectively
close the communication loop and build trust. This will help you:
- Identify the appropriate channel of communication.
- Identify the number of transactional campaigns you will need to create through each channel.
- Identify the scenarios, on the occurrence of which the transactional campaign API will need to be triggered in your backend.
Step 2: Create Personalization Tokens
The next step is to create a draft of the message that will be sent to your users in the context of the triggers identified in Step 1. Doing so is a great way to identify the personalization variables that will be used in the transactional message. This could be anything that helps you contextually personalize your communication like first name, the amount paid, next renewal date, delivery date, coupon code, and so on.
Once identified, you will need to collaborate with your tech team to create a personalization token for each variable.
Why is this important?
Unlike marketing campaigns that are personalized using the User Attributes and Events tracked in your WebEngage dashboard, Transactional Campaigns can be personalized only through personalization tokens that are passed through the Transactional Campaign API.
Hence, by creating a personalization token for each variable in your backend, you can pass the respective details for each user through the API whenever it's triggered.
Let's go over a use-case to show you how it works.
Use-case: Identifying Personalization Variables for Order Confirmation MessageLet's take the example of a grocery delivery app. Each time users place an order, they confirm the purchase through an email.
Over a period of time, marketers of the app learned that simply confirming the order was not enough. Providing additional details like tracking ID, total savings, delivery date and promoting related offers helped them build trust in their brand and motivated users to make their next purchase.
Contextual personalization was key
Hence, they redesigned their order confirmation email to include the following personalization variables:
- User's first name
- User's Order ID
- Number of Items Purchased
- Total Amount Paid by the user
- Total Savings made by the user on their entire order
- Membership Points earned with the order
- Expected Date of Order Delivery
- Delivery Time Slot Selected by User
- Primary Category of items purchased in Order
- Offer Related to the Primary Category of the order placed by the user
- Value of the offer
Next, they collaborated with their tech team to map each variable as a personalization token in their backend.
Here's a sample of the personalization tokens created by their tech team:
| Personalization Variable | Token (Created in your backend) | Sample Value of Token (Passed through API) |
|---|---|---|
| First Name | first_name | "Stephan" |
| Order ID | order_id | "23678sy" |
| Items Purchased | items_purchased | 12 |
| Amount Paid by User | order_value | 300 |
| Total Savings | value_saved | 50 |
| Membership Points Earned | value_points | 150 |
| Expected Date of Delivery | delivery_date | "2019-08-19 16:00:00+0000" |
| Delivery Time Slot selected by user | delivery_slot_start | "2019-08-19 16:00:00+0000" |
delivery_slot_end | "2019-08-19 18:00:00+0000" | |
| Shipping Address | address | "345, Mary Lane, Baltimore, Maryland, USA" |
| Primary Product Category of Order | primary_category | "Fresh Veggies" |
| Offer Relate to Primary Category | coupon_code | "FRESHVEGGIE20%" |
| Value of Coupon Code | coupon_code_value | 20 |
Step 3: Create & Launch Campaign
Once the team had a log of all the personalization tokens, they created the transactional email campaign by adding the tokens in the format, {{token.first_name}}.
Adding Personalization Tokens to Transactional Campaign's MessageHi {{token.first_name}},
Your order ID - {{token.order_id}} has been shipped! And it's a wonderful feeling to know that we helped you save ${{token.value_saved}} on your groceries.
You can expect delivery by {{token.delivery_date | we_date('YYYY-MM-DD')}} between {{token.delivery_slot_start | we_date('HH:mm:ss')}} hrs and {{token.delivery_slot_end | we_date('HH:mm:ss')}} hrs. Here's a quick summary of your purchase:
Shipping Address: {{token.address}}
Number of items Shipped: {{token.items_purchased}}
Amount Paid: ${{token.order_value}}
Membership Points Earned: {{token.value_points}}
We noticed that your order includes several items from our {{token.primary_category}} section. So the next time you're grocery shopping, don't forget to avail our special discount of {{token.coupon_code_value}}% :)
Apply the code, &#xNAN;{{token.coupon_code}}while checking out.
See you soon!
Pro TipYou can choose to display certain values like date and time in several formats in your message using Nunjucks. For example, in the above message, we have added the Nunjucks filters:
we_date('YYYY-MM-DD')alongside the tokendelivery_date
we_date('HH:mm:ss')alongside the tokensdelivery_slot_startanddelivery_slot_endto define the format in which these details should be shown to the user.
Please refer to this library to display such details in a format that works best for you :)
Once created, they tested personalization with an internal test audience and launched the campaign!
Step 4: Trigger Transactional Campaign API
Click to enlarge
As discussed under Step 1, once you have identified the scenarios, you will need to collaborate with the tech team to trigger the Transactional Campaign API each time a scenario occurs for a user.
For example, with reference to the grocery app discussed above, each time a user places an order, the Transactional Campaign API will need to be triggered for the Transactional Email Campaign launched by them at Step 3.
Each time the API is triggered, values of all the personalization tokens gleaned for the user are passed along. This way, we know which personalization token needs to be replaced with which user detail, helping you automate personalization at scale :)
For example, when a user, Stephan placed an order for groceries, the following POST Call was triggered from the app's server. 👇
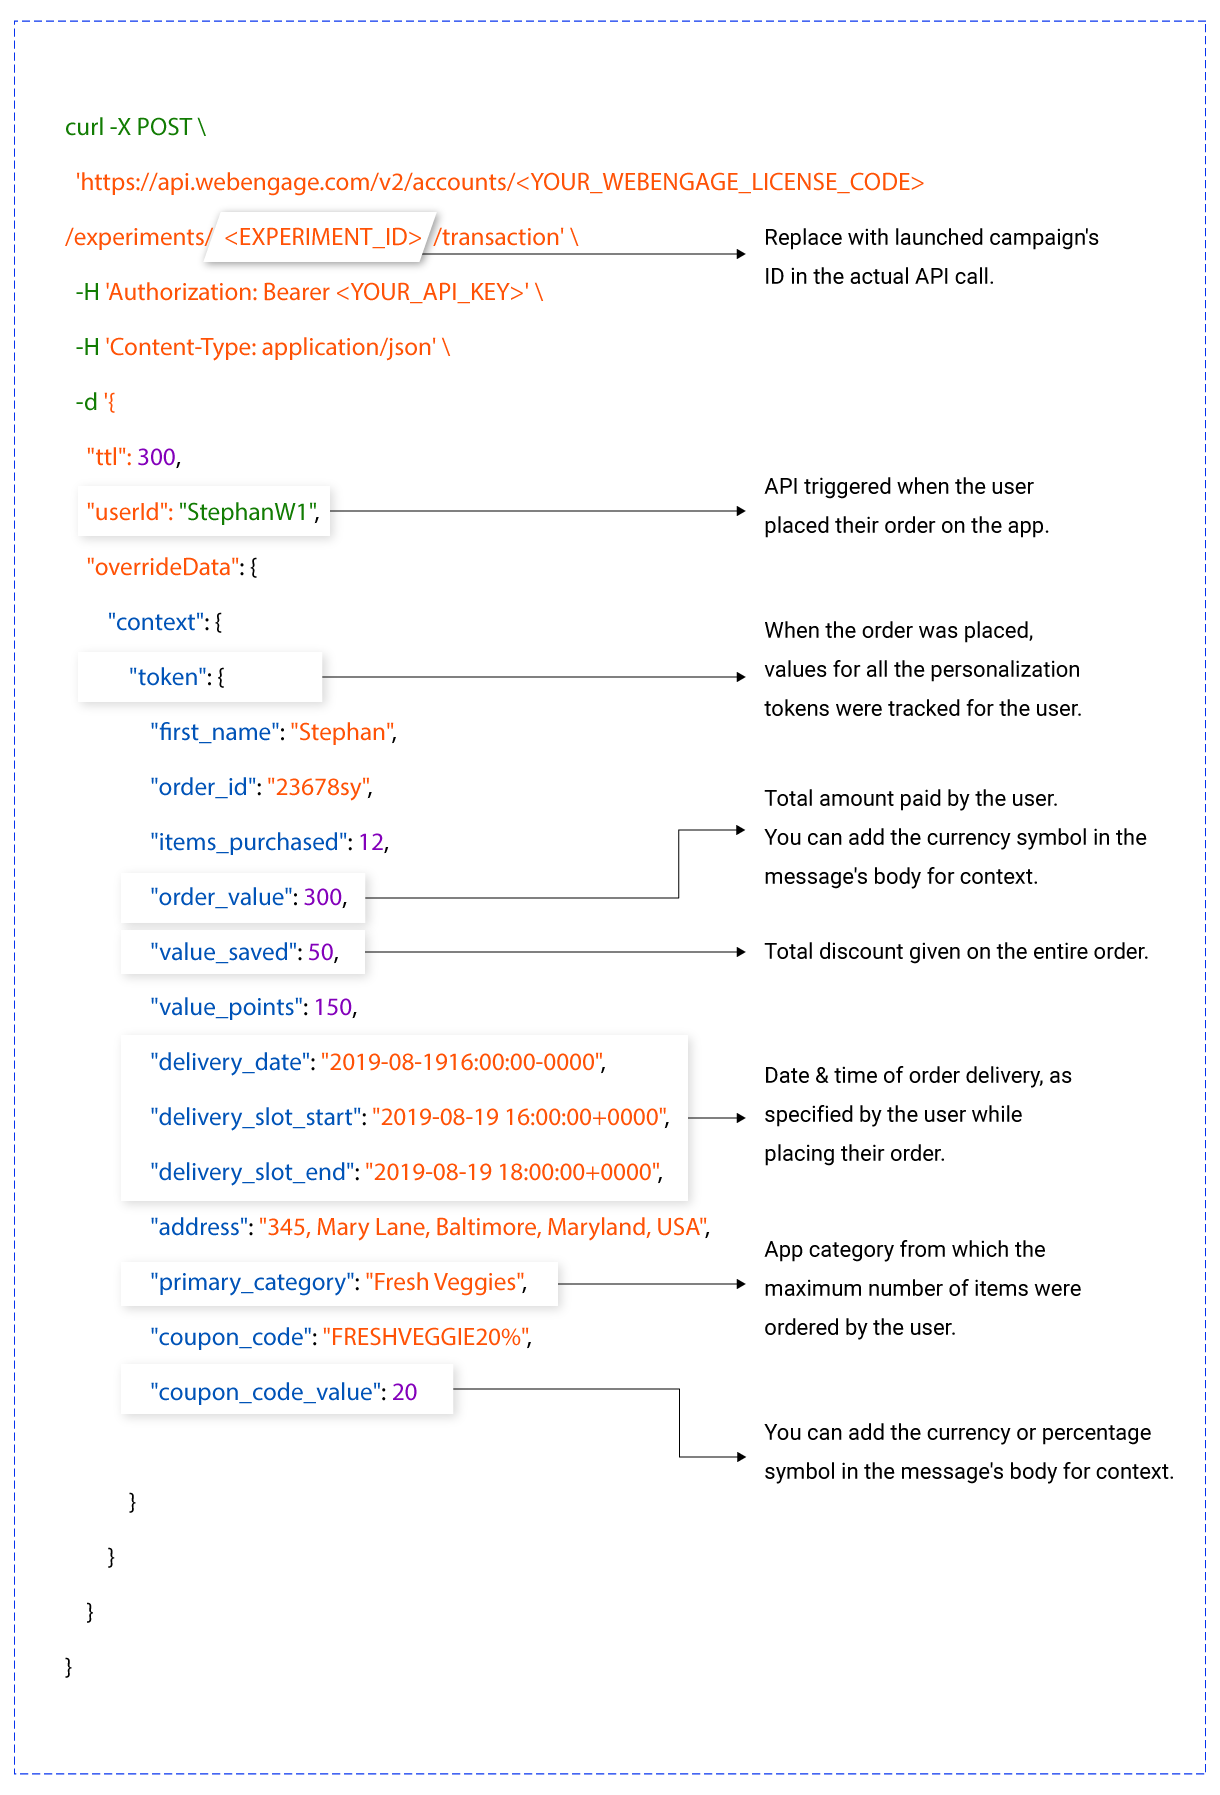
Sample of the API call made when a user places their order on the grocery app
Then we personalized the Email campaign for Stephan and sent him the following message.👇
Contextually Personalized Order Confirmation Email Received by StephanHi Stephan,
Your order ID - 23678sy has been shipped! And it's a wonderful feeling to know that we helped you save $50 on your groceries.
You can expect delivery by 2019-08-19 between 16:00 hrs and 18:00 hrs. Here's a quick summary of your purchase:
Shipping Address: 345, Mary Lane, Baltimore, Maryland, USA
Number of Items Shipped: 12
Amount Paid: $300
Membership Points Earned: 150
We noticed that your order includes several items from our Fresh Veggies section. So the next time you're grocery shopping, don't forget to avail our special discount of 20% :)
Apply the code, FRESHVEGGIE20%while checking out.
See you soon!
Thus, each time a user places an order, they'll receive a highly personalized order confirmation Email just like Stephan. Similarly, you can follow the steps listed above to automate Transactional Campaigns through Push, SMS, and Email for all your users!
Please NoteSince Transactional Campaigns convey time-sensitive messages that acknowledge the occurrence of a scenario in a user's lifecycle, the following settings cannot be configured for them:
Journey Campaigns
Campaigns triggered through a Journey are referred to as Journey Campaigns and can be sent through all the channels of engagement - Push, In-app, SMS, On-site, Web Push and Email.
Before we deep-dive into the workings of Journey Campaigns, it's imperative to have a broad understanding of the concept of Journey in WebEngage.
What is a Journey?
When a first-time user starts exploring your app or website, they follow a pre-defined path designed by you. Along this path, they perform several actions before reaching the final destination.
For example, if you consider the behavior of a first-time user of an e-commerce app, then you will notice that a majority of them spend their first session exploring its various categories. A few users may browse through products and add them to their cart or wishlist. And after a few sessions, a small percentage of users come back to purchase their shortlisted products.
All these actions collectively form your users' Journey, with the final destination being purchase.
A Journey refers to all the experiences your users have while interacting with your app, website, and channels, as they travel through a pre-defined path and perform specific actions to proceed from one stage to the next.
If we break the journey described above, into stages, then it would look something like this: Discovery, Evaluation & Purchase.
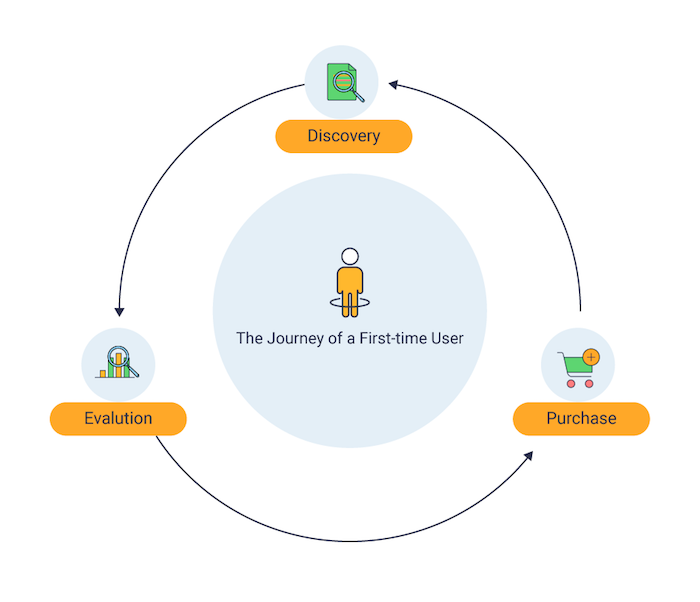
Stages experienced by a first-time e-commerce app user
At each stage, a user needs to be guided with information, and often, needs to be motivated with rewards or offers to keep moving towards the destination. This job is done by marketers, like you, through several channels like push notifications, in-app messages, emails, web push notifications and so on.
To help you unify your messaging across all your channels, app and website, we created the Journey Designer. It's a visual interface that helps you manage experiences throughout your user's journey with highly contextual campaigns and can be accessed through the Journey section of your dashboard.
How It Works
Using the Journey section of your dashboard, you can create hundreds of Journeys that cater to the needs and behavior of various segments of users, at each stage of a journey. Each Journey branches into several campaigns called Journey Campaigns.
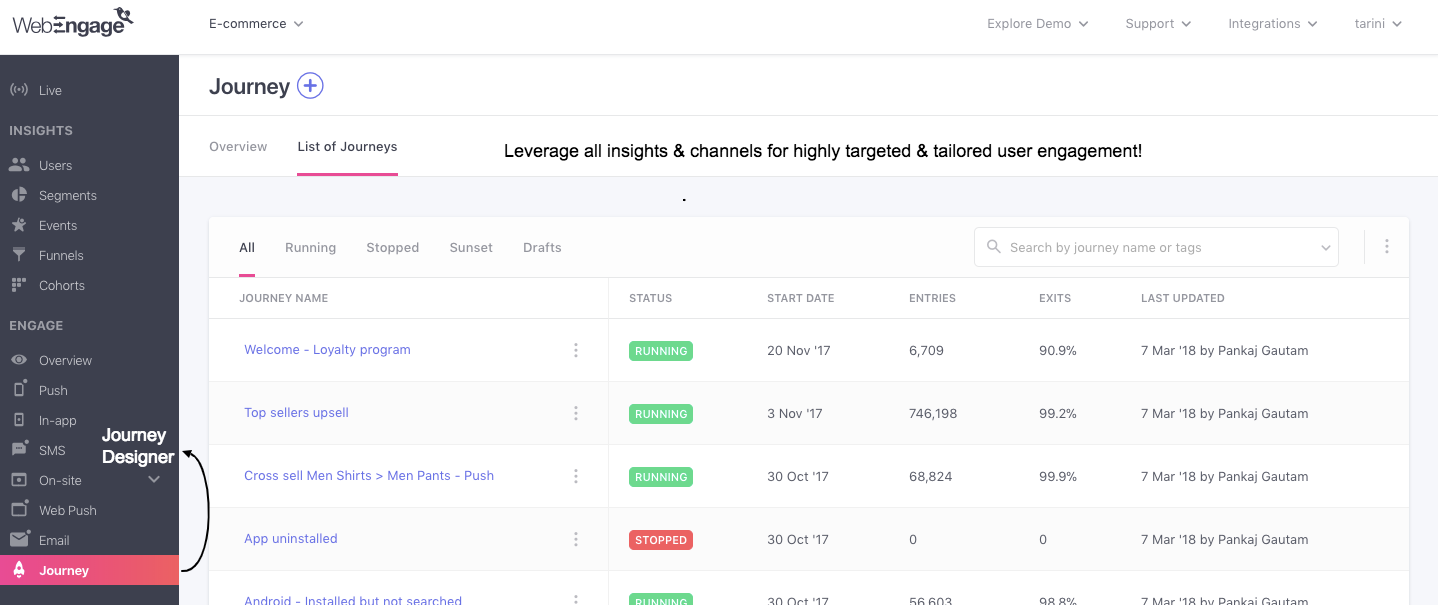
Standalone campaigns are great, but tailored journeys are even better! Try journeys sometime, we have a feeling you'll love it :)
Let's go over a quick use-case to show you how journey campaigns can help you create unified cross-channel experiences:
Use-case: Driving Purchases by First-time Users with a Cross-channel StrategyGoing back to the e-commerce app users discussed above - Let's take a common use-case wherein a majority of first-time users add products to their cart but fail to go through with the purchase.
This is behavior is commonly referred to as 'cart abandonment' and can easily be curbed with an effective engagement strategy.
Solution: Create a journey with personalized and targeted journey campaigns
To motivate these users, you decide to offer them a discount of 10% on their first purchase. You choose to engage these users through Push and Email and create the following Journey to execute your strategy:
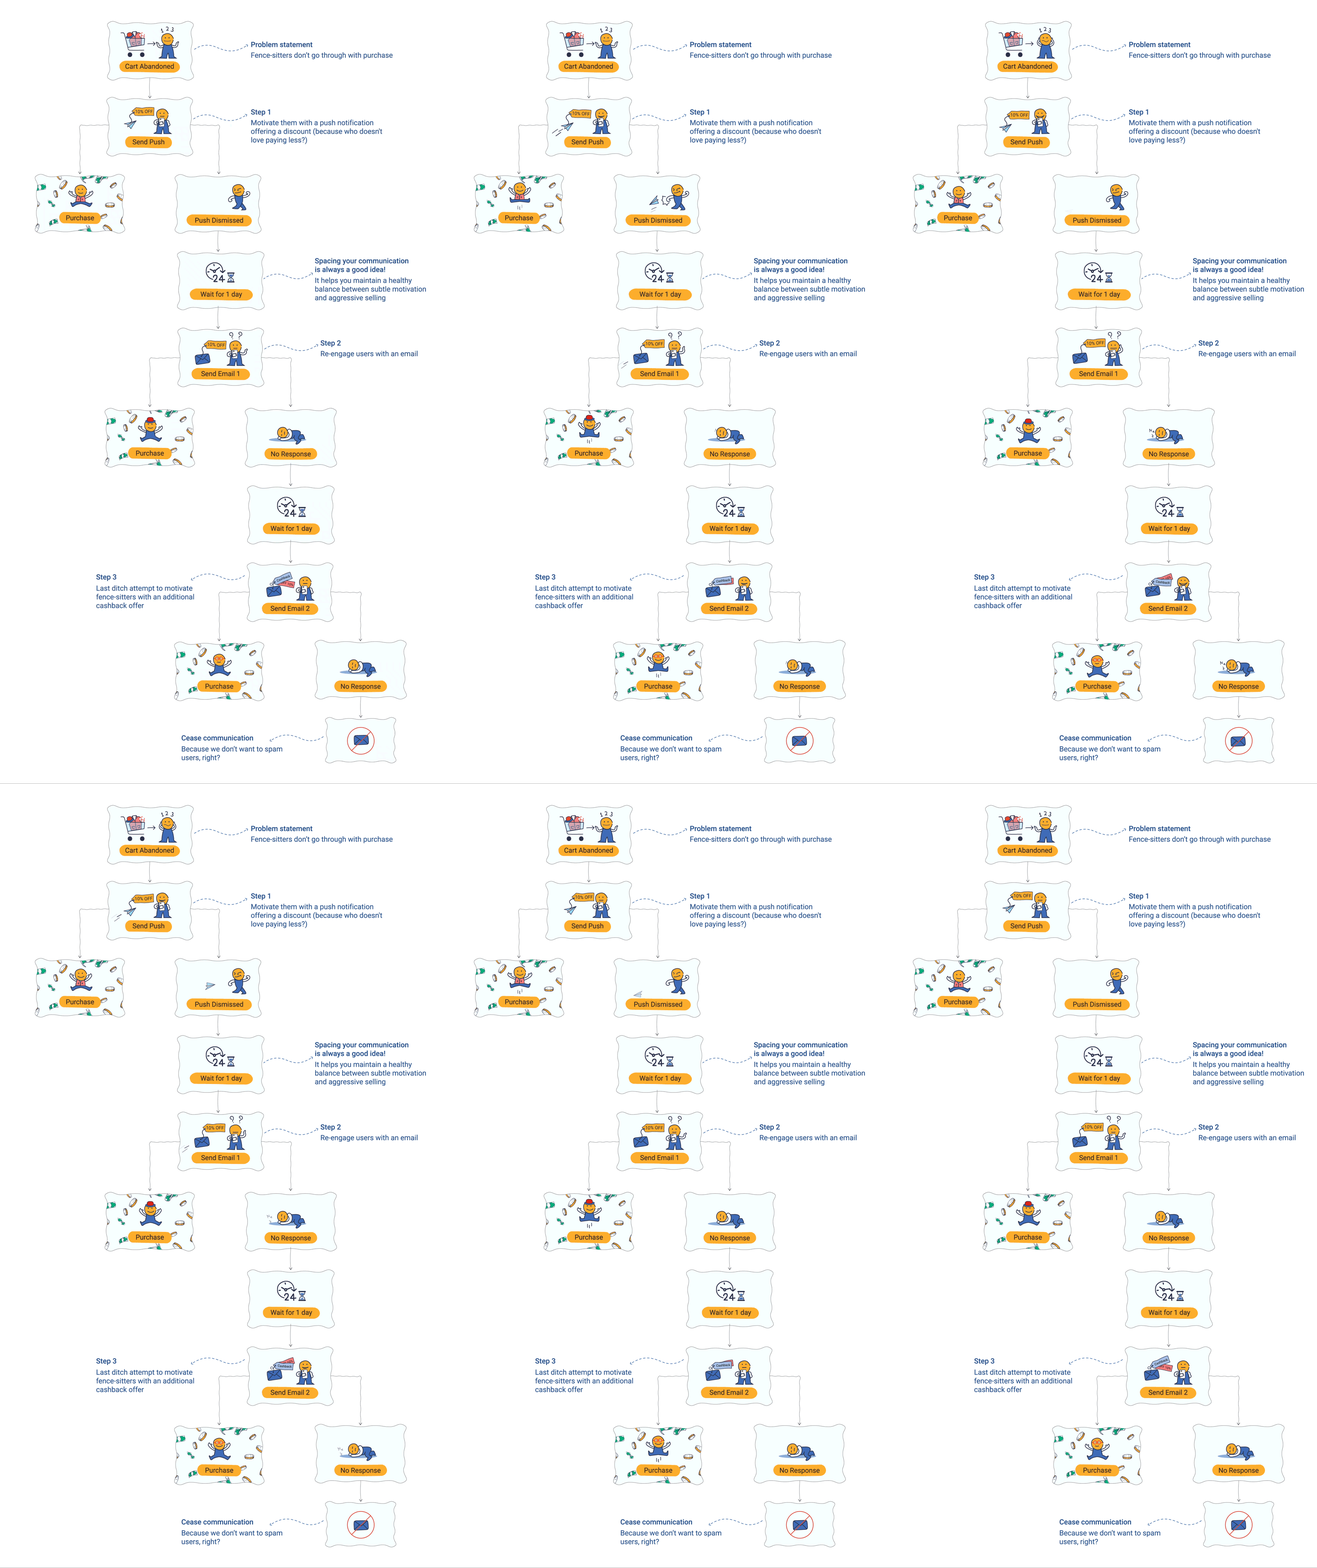
Setting up a Journey with 3 Journey Campaigns sent through 2 Channels
Step 1: Create a Push Journey Campaign, which will be sent to these users only a day after they shortlisted products on your app.
-
Contextual personalization: In your message, you list all the products added to each user's cart and offer a discount of 10%.
-
Targeted engagement: The notification is sent only to users who added something to their cart the previous day but haven't purchased anything yet.
-
The offer immediately pushes a few users to make a purchase! However, others simply dismiss your notification. So you decide to engage these users through another channel after a gap of 1 Day.
Step 2: Create Email Journey Campaign 1 for users who dismissed the push notification. containing personalized recommendations and offering a discount of 10%.
- The email pushes a few more fence-sitters to make their first purchase :) However, it doesn't elicit a response from the rest. So you decide to send the remaining users one-last email before ceasing communication in this regard.
Step 3: Create Email Journey Campaign 2 with a compelling message, an additional cashback offer and set it up for delivery after a gap of 1 day.
- And just like that, you have implemented a cross-channel engagement strategy to engage all first-time users over a period of 3 days (and drive sales!)
The best part - alljourney campaigns are ongoing cycles of communication. This means that all new users entering the journey will have the same experience as the first batch of users - as per the rules defined while creating it.
Please NoteGiven the dependent nature of journey campaigns on the journey they're created through, the following settings can be configured only for the journey and are automatically applied to all its campaigns:
Relay Campaigns
Campaigns triggered through a Relay are referred to as Relay Campaigns and can be sent through all the channels of engagement - Push, In-app, SMS, On-site, Web Push and Email. Detailed read.
Campaign Status
The status of each campaign created through a channel or journey can be checked through the channel's List of Campaigns section, as highlighted below.
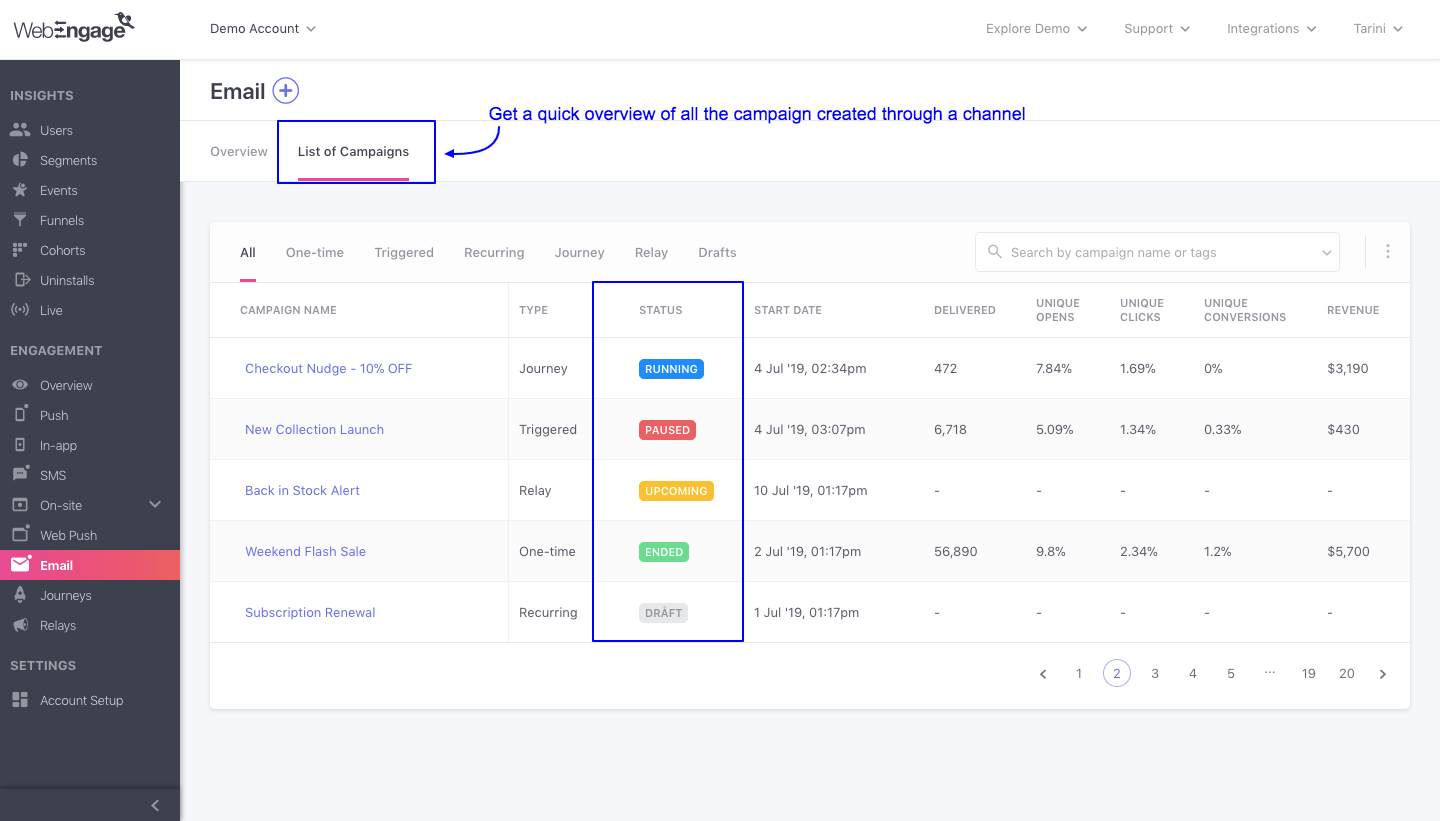
Understanding Campaign Status shown under each Channel's List of Campaigns
Let's get you acquainted with what each status denotes:
Draft
Indicates that the campaign has been saved as a draft in your account. All campaigns automatically get saved as a draft if you don't click the Launch button while creating it. This allows you to pick up exactly where you left, whenever you get back!
Upcoming
Indicates that a campaign is currently scheduled for delivery at an upcoming date and time. All Upcoming campaigns can be Paused and resumed for delivery at the specified date and time, as per your needs.
Running
Indicates that a campaign is currently active and being delivered to its target audience as per its settings.
Paused
Indicates that you have paused a running campaign. This can be done for recurring and triggered campaigns by editing them through their Overview, or the respective channel's List of Campaigns section.
Ended
Indicates that the campaign has stopped and will no longer be delivered to its target audience.
- All one-time campaigns end automatically once they run their course.
- You can choose to end recurring and triggered campaigns by specifying an End Date while creating them or stop them manually.
We hope this has equipped you with a robust understanding of how you can leverage various types of campaigns to engage users with tailored messages across their lifecycle. Please feel free to drop in a few lines at support(AT)webengage.com in case you have any further queries, we're always just an email away!
Updated 3 months ago