Creating Funnels
A detailed walkthrough of how to create funnels in WebEngage
Must ReadPlease ensure that you have a robust understanding of, Events and Event Attributes before proceeding as events are the build blocks of funnels.
Concepts that Guide the Creation of Funnels
Now that we understand the basics of funnel analysis let’s walk you through a few core concepts related to funnels in WebEngage.
Steps of a Funnel
All funnels created in WebEngage comprise of steps which guide how users flow through the funnel. Thus, each step will need to be defined as an event that users need to perform on your app/ website to reach the end goal.
Use-case: Understanding steps of a funnelLet's take the example of a video blog where readers are motivated to purchase a yearly subscription after they have watched a video.
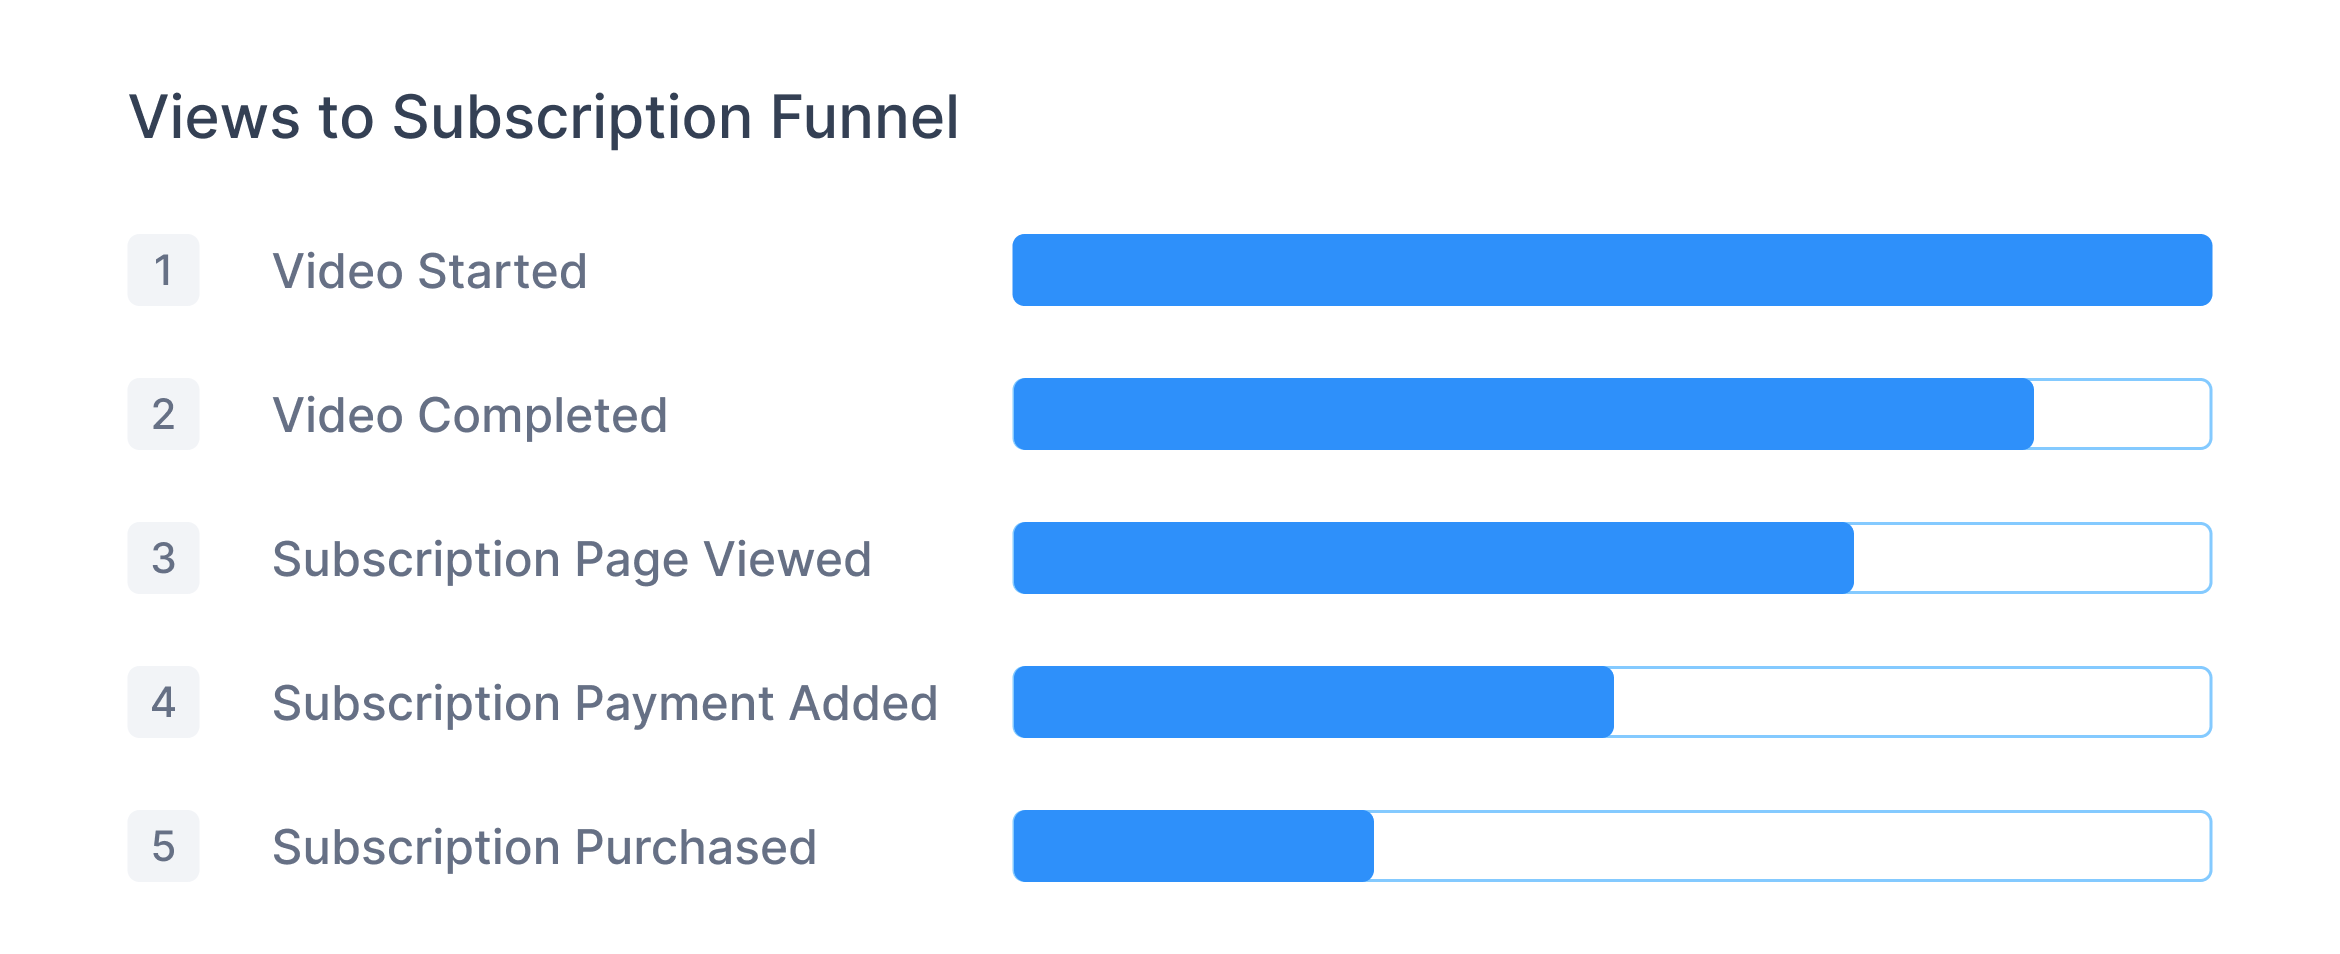
So, if we were to map out the journey of a user based on the events they will need to perform, then the steps of our Video Viewed - Subscription funnel would include;
Step 1: Video Started
Step 2: Video Completed
Step 3: Subscription Page Viewed
Step 4: Subscription Payment Added
Step 5: Subscription Purchased
Here's an illustration to help you visualize this funnel better:
Click to enlarge
Exact Funnels
The term exact funnel refers to the fact that all funnels created in WebEngage are sequential in nature.
As discussed above, each step of a funnel consists of an event (action) that a user needs to perform to progress in their lifecycle. This means that if a user performs Step 2 without performing Step 1, then their actions will not be accounted for in the overall conversion rate.
Hence, when creating funnels, we advise you to add all the steps in a sequential order.
Use-case: Understanding the sequential nature of funnelsGoing back to the use-case discussed above, if a user directly purchases a subscription, without watching a video, then their actions will not be taken into account in the Video Viewed - Subscription funnel.
The overall conversion rate of this funnel will take into account only those users who have entered the funnel via Step 1 and have exited via Step 5.
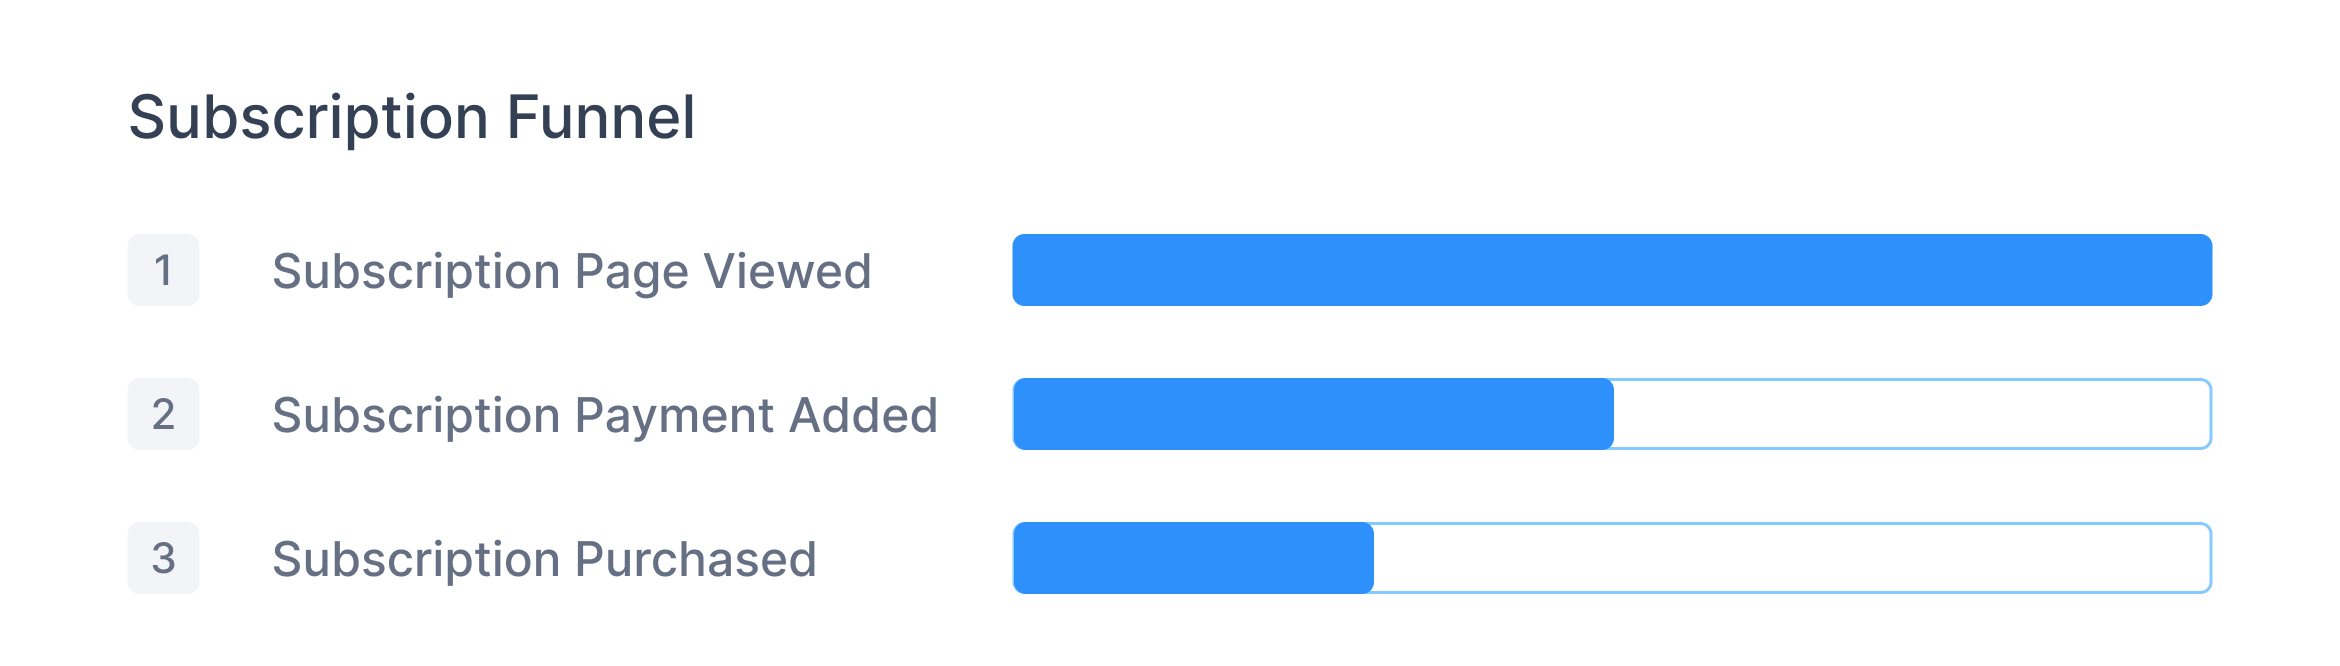
Thus, to analyse the behaviour of users who have purchased a subscription without watching a video, we will need to create a separate Subscription funnel. Its steps would include;
Step 1: Subscription Page Viewed
Step 2: Subscription Payment Added
Step 3: Subscription Purchased
Here's an illustration to help you visualize this funnel better:
Click to enlarge
Funnels Creation
How to Access: To create a new funnel, you can click the Create Funnel button, placed on the right side corner of your page, on the Funnels, homepage, as shown below.
Click to enlarge
First Impression
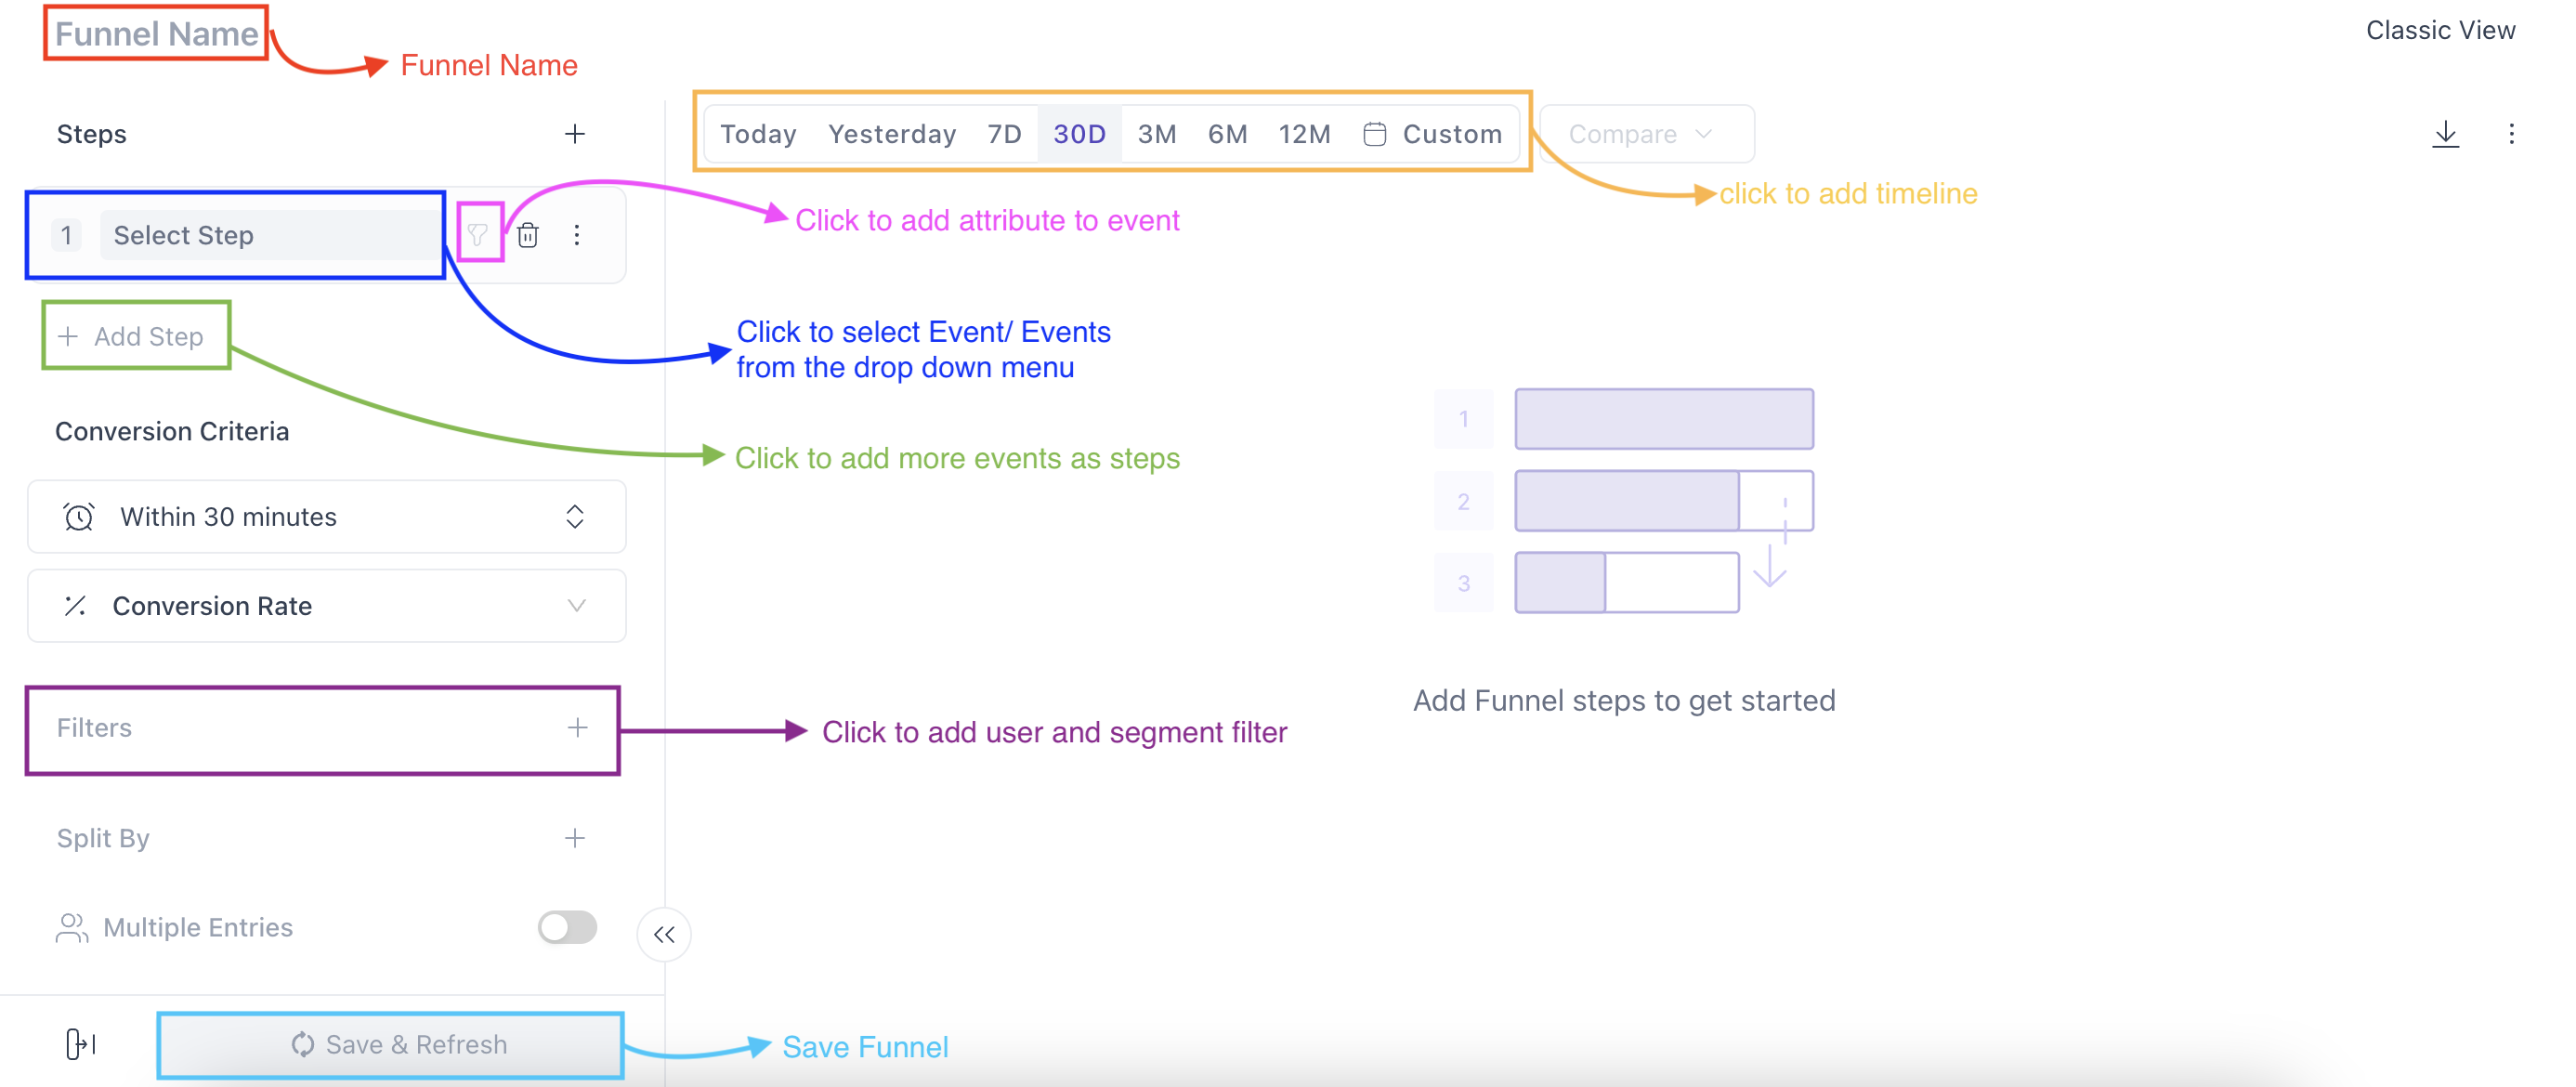
Click to enlarge
This section has a simple interface, loaded with everything you need to create a funnel instantly including;
- Option to add unlimited steps to your funnel - define as many events as you like to analyse user behaviour in detail.
- Option to define the scope of an event by adding multiple attribute filters to events selected under each step.
A Hands-on Demonstration
Let's demonstrate a use-case to help you get acquainted with the workings of this section.
Use-case: Creating a funnel to analyze behavior of users purchasing from wishlistLet's say that you are a Marketing Manager at an online e-commerce business and would like to do a quick analysis of how many users, across your app and website, have purchased a product after adding it to their wishlist.
To build this funnel, one will need to ensure that they're tracking all the steps a user needs to perform when purchasing an item from their wishlist. We will use the following custom events and add them as steps:
Step 1: Wishlist Added
Step 2: Wishlist Viewed
Step 3: Product Added to Cart
Step 4: Checkout Started
Step 5: Checkout Completed
All you need to do is;
- Add a name to your Funnel
- Add each step/event listed above in a sequential order to build the funnel
- Add Conversion Criteria either by adding a
- Time to Convert, i.e. The window of time a user has to complete all steps once they enter the funnel; or
- Conversion Rate i.e. the percentage of users who complete a desired action at a specific stage of the funnel or;
- Time to Convert, which refers to the total number of users who complete a desired action in a marketing funnel, without considering the percentage relative to total visitors.
- You can also add filters based on User Attributes or List/ Segments.
- And add Split By parameters, allows you to segment or break down data based on specific parameters, such as Custom Event or User Attributes, Time, Location, Segments, Control Groups, etc.
- By switching on the Multiple Entries toggle button, means that multiple entries of a user in the funnel will be taken into consideration as a new entry each time.
- And click the Refresh button
Click to enlarge
And in less than a minute, you have a Wishlist to Purchase funnel ready to be analysed by your entire team!
Now let’s deep dive into the entire process.
Step 1: Name Your Funnel
The first step is to give your funnel a unique name which will help you identify its purpose or properties. This can be edited anytime you like.
Step 2: Add User and Segment Filters
You can add User attribute and Segment Filters while creating a funnel, to strain out users of a particular attribute such as first name, email ID, gender, campaign ID, etc.
You also have the option of adding a segment filter to your funnels to filter out users in a particular segment to analyze your data with ease.

Step 3: Add Events as Steps to Build Funnel
Click to enlarge
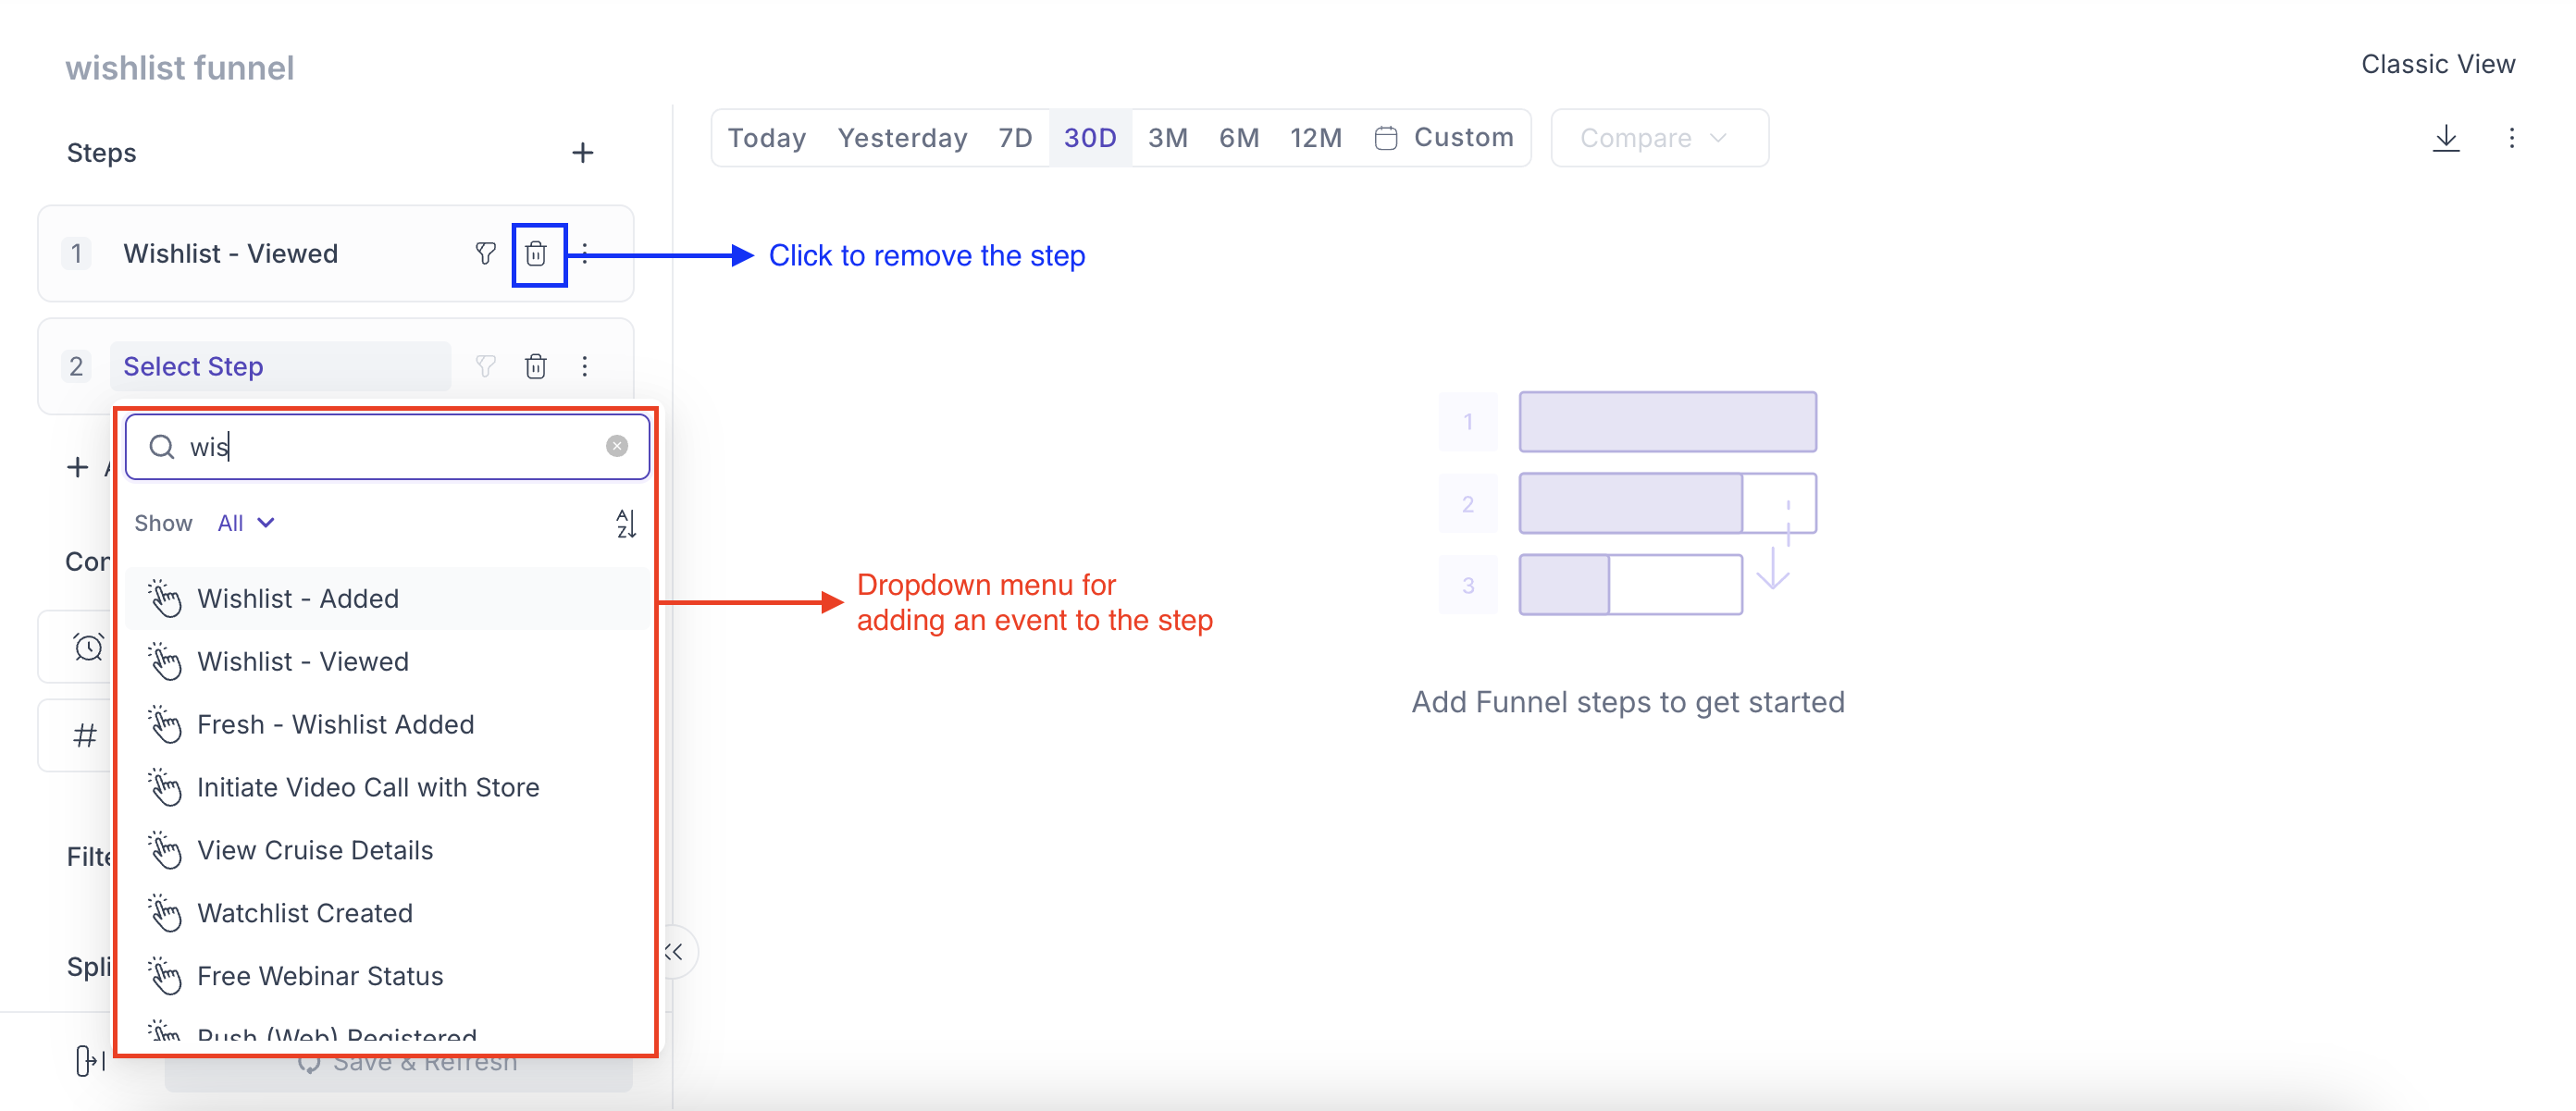
Using the drop-down nested under each step, you can select from a list of all the system events, campaign events and custom events being tracked for your account. All the system event and campaign events (pre-defined by us) have been listed here for reference.
How to add and remove steps

Click to enlarge
As shown above, you can click the Add Step button to add a step to the funnel and click the delete icon, placed towards the right of each field, to remove it.
Please Note
There is no upper limit on the number of steps you can add to your funnel.
Steps added to a funnel can be removed, edited or duplicated to build another funnel, anytime you like. This has been discussed in detail under, Modifying Funnels.
Step 4: Add Event Attributes to the Event(s)
You can further narrow down the scope of each event by adding attribute filters to it. This can be done through the filter icon placed towards the right of each field, as shown below.

Click to enlarge
On clicking the filter icon, you will be prompted with a modal, allowing you to apply several attribute filters. Each field comes with a drop-down, including only those attributes which can be applied to the selected event.
Multi-Event within steps
You can also add multiple events within a single step in a funnel. It helps analyze complex user journeys where different actions can lead to the same step. Events within a step are linked with an OR condition, meaning any of the added events can complete that step.
You can manage events with options to add, remove, rename, and duplicate them. Filters now apply at the event level rather than the step level. A maximum of 10 events can be added per step. If a funnel is already split by an attribute, adding multiple events to the first step is restricted.
The following attributes are included in the dropdown menu:
Custom (Custom attributes included as per the selected custom event)
Time (Event Time)
Location (City, State, Country)
Technology (OS, Device, Browser Name, App Version)
Marketing (Channel, Campaign Source, Campaign Medium, Campaign Name)
Screen (Page URL, Screen Name)
Engagement (Journey ID, Campaign ID)
Now, let's walk you through this in detail.
Use-case 1: Applying One Attribute FilterLet’s say that you are a marketing manager at an e-commerce business and would like to analyse the step-by-step conversion rate along the journey of users who have specifically shown interest in one of your top categories, Women Dresses.
To create this funnel, we add the following events and attributes in the order they have been listed in:
Custom Event 1: Product Page Viewed
- Custom Attribute 1: Product Category is equal to Women Dresses
Custom Event 2: Product Quantity Selected
Custom Event 3: Product Added to Cart
Custom Event 4: Cart Checkout Initiated
Custom Event 5: Cart Checkout Complete
Now, let's show you how to add an event attribute to the first event, Product Page Viewed.
Click to enlarge
Step 1: Click the filter icon placed next to the first step, Product Page Viewed
Step 2: Select Product Category as an attribute filter from the drop-down menu nested under the field
Step 3: Further define the attribute as; equal to Women Dresses
It's as simple as that :)
Now let's narrow down the use-case discussed above to demonstrate how you can add multiple attribute filters to a step in your funnel.
Use-case 2: Applying Multiple Attribute FiltersLet's say that you want to analyze the behavior of users who have specifically viewed a few top products from the popular category, Women Dresses. For this, we will need to add the following attribute filters to the event, Product Page Viewed:
Custom Attribute 1: Product Category is equal to Women Dresses
Custom Attribute 2: Product Name is one of AllSaints, Calvin Klein, Elliatt
Since we have already added Product Category as an attribute filter, we will club the second attribute with it using the AND / OR logic. Here's how you can go about it:
Click to enlarge
Step 1: Click the filter icon placed next to the first step, Product Page Viewed
Step 2: Click the Add Filter button to add the second attribute
Step 3: Select the AND logic to combine the attributes
Implications of using AND/OR to combine multiple attributesUsing the AND logic to combine the attributes narrows the scope of the event to include only those customers who have; visited the Product Category - Women Dresses AND have viewed any one of the products with the name; AllSaints, Calvin Klein, Elliatt, etc.
On the contrary, if we used the OR logic to combine these attributes, then it would widen the scope by including users who have; EITHER visited the Product Category; Women Dresses OR have viewed any of the products with the name; AllSaints, Calvin Klein, Elliatt etc.
Step 4: Select Product Name from the drop-down menu
Step 5: Further define Product Name as; one of AllSaints, Calvin Klein, Elliatt etc.
And you're done!
Similarly, you can add multiple attribute filters to any step in your funnel to analyze specific user behavior.
Conversion Criteria
Conversion Window
You can set the time to complete the funnel from the date of occurrence of event in Step 1, by typing in number and choosing from the drop down i.e. minutes, hours, and days.
Conversion Rate or Absolute Conversion
The Conversion Rate is the percentage of users who complete a desired action at a specific stage of the funnel. Whereas, Absolute Conversion refers to the total number of users who complete a desired action in a marketing funnel, without considering the percentage relative to total visitors.
Conversion Metrics
Conversion metrics help you understand how users progress through your funnel—how many convert, how fast they do it, and how efficiently each step performs.
-
Absolute Conversion
This metric represents the total number of users who entered the funnel and successfully completed the final step, irrespective of how many dropped off in between. It helps you understand the raw count of conversions from the top of the funnel to the bottom. -
Conversion Rate
Conversion Rate is the percentage of users who moved from the first step to the final step of the funnel. It is calculated as:
(Users who completed the final step / Users who entered the first step) × 100This metric gives a quick view of funnel efficiency. -
Time to Convert
View the time users take to move between funnel steps. This helps uncover patterns in conversion speed, identify outliers, and segment users based on how quickly or slowly they convert. Ideal for understanding behavioral differences and optimizing drop-off points.
Hold Property Constant Across Steps
The Hold Property Constant option lets you ensure that the same attribute value is maintained throughout every step of the funnel.
This is useful when tracking journeys that should belong to the same entity, such as the same product, category, order ID, campaign, or any other event attribute.
For example, if a user adds two different products to their cart, the funnel should only count a conversion when the purchase corresponds to the same product (or other selected property).
Configuration
Users can configure up to three hold properties for a funnel.
When enabling this feature:
-
At least one attribute must be selected for every funnel step.
-
The list of selectable attributes is the union of attributes across all funnel steps.
-
If a step contains multiple events, only attributes common to all those events are available.
-
If no common attributes exist, the following validation is shown:
No common attribute among events used at this step.
Only attributes having the same data type across all selected steps can be mapped.
- If more than one hold property is selected, the UI displays the following recommendation:
To improve speed, limit the number of selected attributes.
Mapping Different Attribute Names
The same logical property may have different attribute names across events.
For example:
| Step | Attribute |
|---|---|
| Product Viewed | product_category |
| Added to Cart | category |
| Purchase | item_category |
The feature allows mapping these different attribute names so they are treated as the same hold property throughout the funnel.
Validation Rules
A user exits the funnel when:
- The configured hold property is missing for a step.
- The mapped attribute values do not match across steps.
When multiple hold properties are configured, all mapped attributes must match (logical AND condition).
Occurrence-based Funnel Behaviour
When Hold Property is enabled, the funnel is evaluated separately for every unique property value.
Each unique property value creates an independent funnel trip within the conversion window.
Example 1
User performs:
Add to Cart (Category = Shirt)

Add to Cart (Category = T-shirt)

Purchase (Category = Shirt)

Purchase (Category = T-shirt)
Result:
- 2 conversions
- Shirt → 1 conversion
- T-shirt → 1 conversion
Example 2
User performs:
Add to Cart (Shirt)

Add to Cart (Shirt)

Add to Cart (T-shirt)

Purchase (Shirt)

Purchase (T-shirt)
Result:
- 2 conversions
The number of conversions is based on unique property values, not the number of occurrences.
Unique User Behaviour
Occurrence-based funnel trips are calculated first.
For Unique Users, only the earliest instance of the deepest completed funnel is counted.
This ensures that:
- each user is counted only once
- the deepest completed journey is reported
- duplicate journeys for different property values do not inflate unique counts
Why Hold Property?Without Hold Property, it may be difficult to associate the correct conversion event with the appropriate preceding events when multiple similar journeys occur simultaneously.
Holding a property constant ensures:
- Accurate attribution
- Independent evaluation of parallel journeys
- Reduced ambiguity in occurrence calculations
Split-by for Funnel
You can split your funnel based on various factors such as time, time block, location, technology, UTM, screen, engagement etc. For example, analyzing performance by time of day or week can reveal when users are most active, while location-based segmentation can highlight top-performing regions.
With split by you can also toggle Multiple Entries. This allows users to enter the funnel more than once if they meet the entry criteria multiple times. This is particularly useful for tracking repeat conversions or re-engagement loops—such as tracking how often a user adds to cart and purchases again over a period of time.
What happens after you have built a funnel?
Once you have mapped a user's journey by adding events (and their attributes) as steps of the funnel, hit the Save and Refresh button placed below the all the attributes you set for your funnel, as shown in the image below.
Click to enlarge
Doing so will take you to the Funnel Analysis section. Here you will be able to analyse the performance of your funnel against several parameters to gain in-depth insights. The workings of this section have been covered in details under Analysing Funnels.
So, what will be the first funnel you create in your account?
Updated 1 day ago