Role-Based Access Control
Introduction
WebEngage’s Role-Based Access Control (RBAC) helps you manage the list of team members who have access to your WebEngage project as well as their level of access within that project.
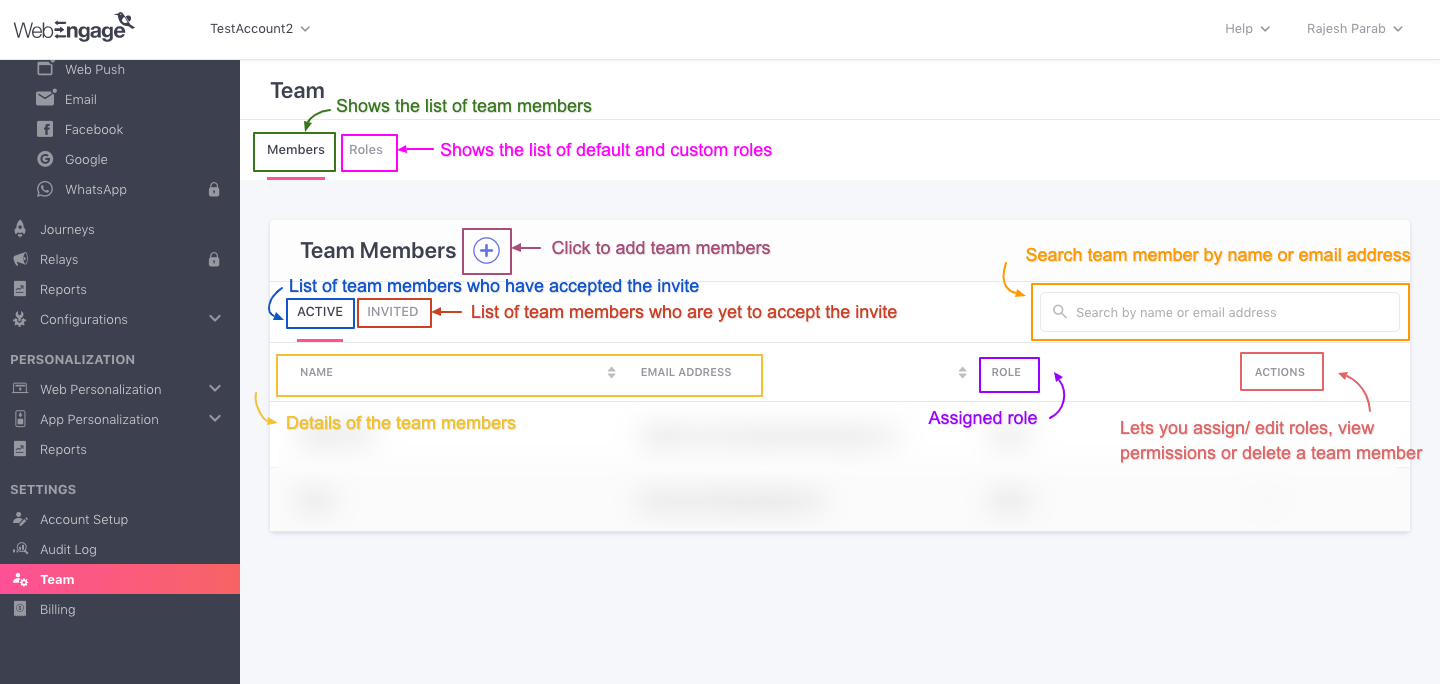
The Team section of the dashboard lets you view the list of team members with their names and current roles. We understand that every team member requires a different set of permissions for enhanced data security and day-to-day operations. Hence, this section lets you perform critical actions like editing the role of an existing team member or sending an invite to a new member.
Click to enlarge
NoteActions taken by team members are logged under the Audit Log section
Permissions
Permissions ensure that team members access information and perform actions they need according to their roles and responsibilities in your organization.
Here’s a list of the supported permissions:
Permissions | Description |
|---|---|
View Dashboard | Read-only access to all sections of the dashboard except the Billing section, individual user profiles, and any data marked as PII (Personally Identifiable Information). |
Export List of Users | Download the list of users as a CSV file from various sections of the dashboard. Can also export the list of users in a segment to Facebook and Google. |
Create Segment | Allow team members to create and modify segments. |
Campaign Maker | Create campaigns, journeys, and relays but cannot activate them. Modify campaigns, journeys, and relays only if they are in a draft or inactive state. |
Campaign Checker | Create and modify all campaigns, journeys, and relays. |
Update Integrations | Add and modify SDK integrations, Channel integrations, and Webhooks. |
Update Data Management | Perform all actions in the Data Management section such as Stop/Start Attribute Tracking, Change Data Type, Mark Attribute as PII, Revenue Mapping, Upload/Download CSV Files. Can also update user and event data points through REST API. |
Update Settings | Update account-level settings related to Project info, Frequency Capping, Do Not Disturb, and so on. |
Update Team Members | Add and modify team members and roles. |
View/Update Billing | View and modify billing details. |
View User Profile | View the detailed profile of an individual user. |
View PII | View actual values of attributes marked as PII (Personally Identifiable Information). |
Feedback Management | Ability to manage feedback inbox, read and reply to feedback, and access feedback stats and reports. |
Roles
Roles are a group of permissions. All new team members in WebEngage must be assigned a role. We provide four Default Roles to help you get started as well as the flexibility to create your own Custom Roles depending on the needs of your organization.
Default Roles
The WebEngage dashboard comes with four roles by default - Admin, Manager, Editor, and Viewer. Each role has a different set of permissions, and since these are default roles, you will not be able to edit the permissions of these roles. However, you can create custom roles (explained in the next section) to suit your organization’s requirements.
To help you select which role is right for each WebEngage team member in your project, here is an overview of each role:
-
Admin: Grants the team member all the permissions.
-
Manager: Grants the team member all permissions except “View/Update Billing” and “Update Team Members”.
-
Editor: Grants the team member permission to:
i) view all sections of the dashboard, except the following - Billing section, individual user profiles, and any data marked as PII (Personally Identifiable Information)
ii) create and modify segments
iii) create and modify campaigns, journeys, and relays in draft or inactive state. -
Viewer: Grants the team member permission to view all sections of the dashboard, except the following - Billing section, individual user profiles, and any data marked as PII (Personally Identifiable Information).
Permissions | Admin | Manager | Editor | Viewer |
|---|---|---|---|---|
View Dashboard | ✅ | ✅ | ✅ | ✅ |
Export List of Users | ✅ | ✅ | ❌ | ❌ |
Create Segment | ✅ | ✅ | ✅ | ❌ |
Campaign Maker | ✅ | ✅ | ✅ | ❌ |
Campaign Checker | ✅ | ✅ | ❌ | ❌ |
Update Integrations | ✅ | ✅ | ❌ | ❌ |
Update Data Management | ✅ | ✅ | ❌ | ❌ |
Update Settings | ✅ | ✅ | ❌ | ❌ |
Update Team Members | ✅ | ❌ | ❌ | ❌ |
View/Update Billing | ✅ | ❌ | ❌ | ❌ |
View User Profile | ✅ | ✅ | ✅ | ❌ |
View PII | ✅ | ✅ | ✅ | ❌ |
Feedback Management | ✅ | ✅ | ❌ | ❌ |
Custom Roles
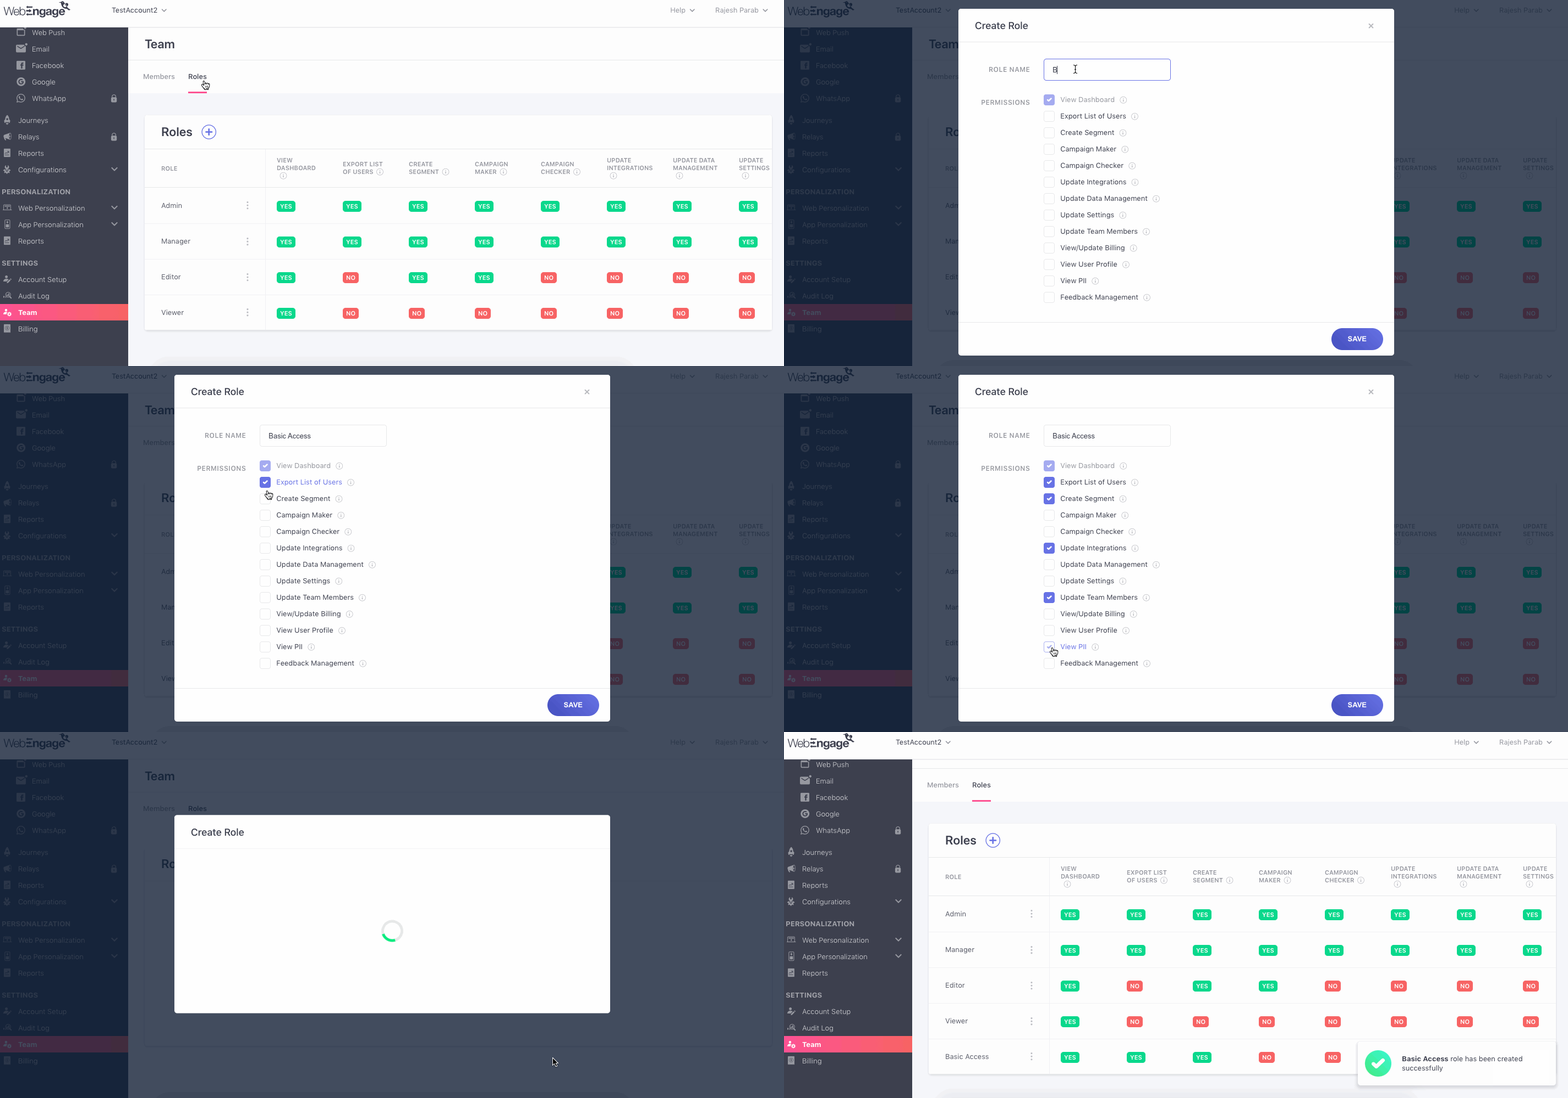
Depending on the needs of your organization, you can create Custom Roles which will grant access to the team members correspondingly. You can Create New Roles or Edit the Custom Roles the role of the existing team member.
Create New Custom Role
-
Step 1: Go to the Roles tab and click on the Plus (+) icon.
-
Step 2: Enter the name of the new role.
-
Step 3: Select all the permissions you want to provide in the new role.
-
Step 4: Click the Save button to save the new role.
Click to enlarge
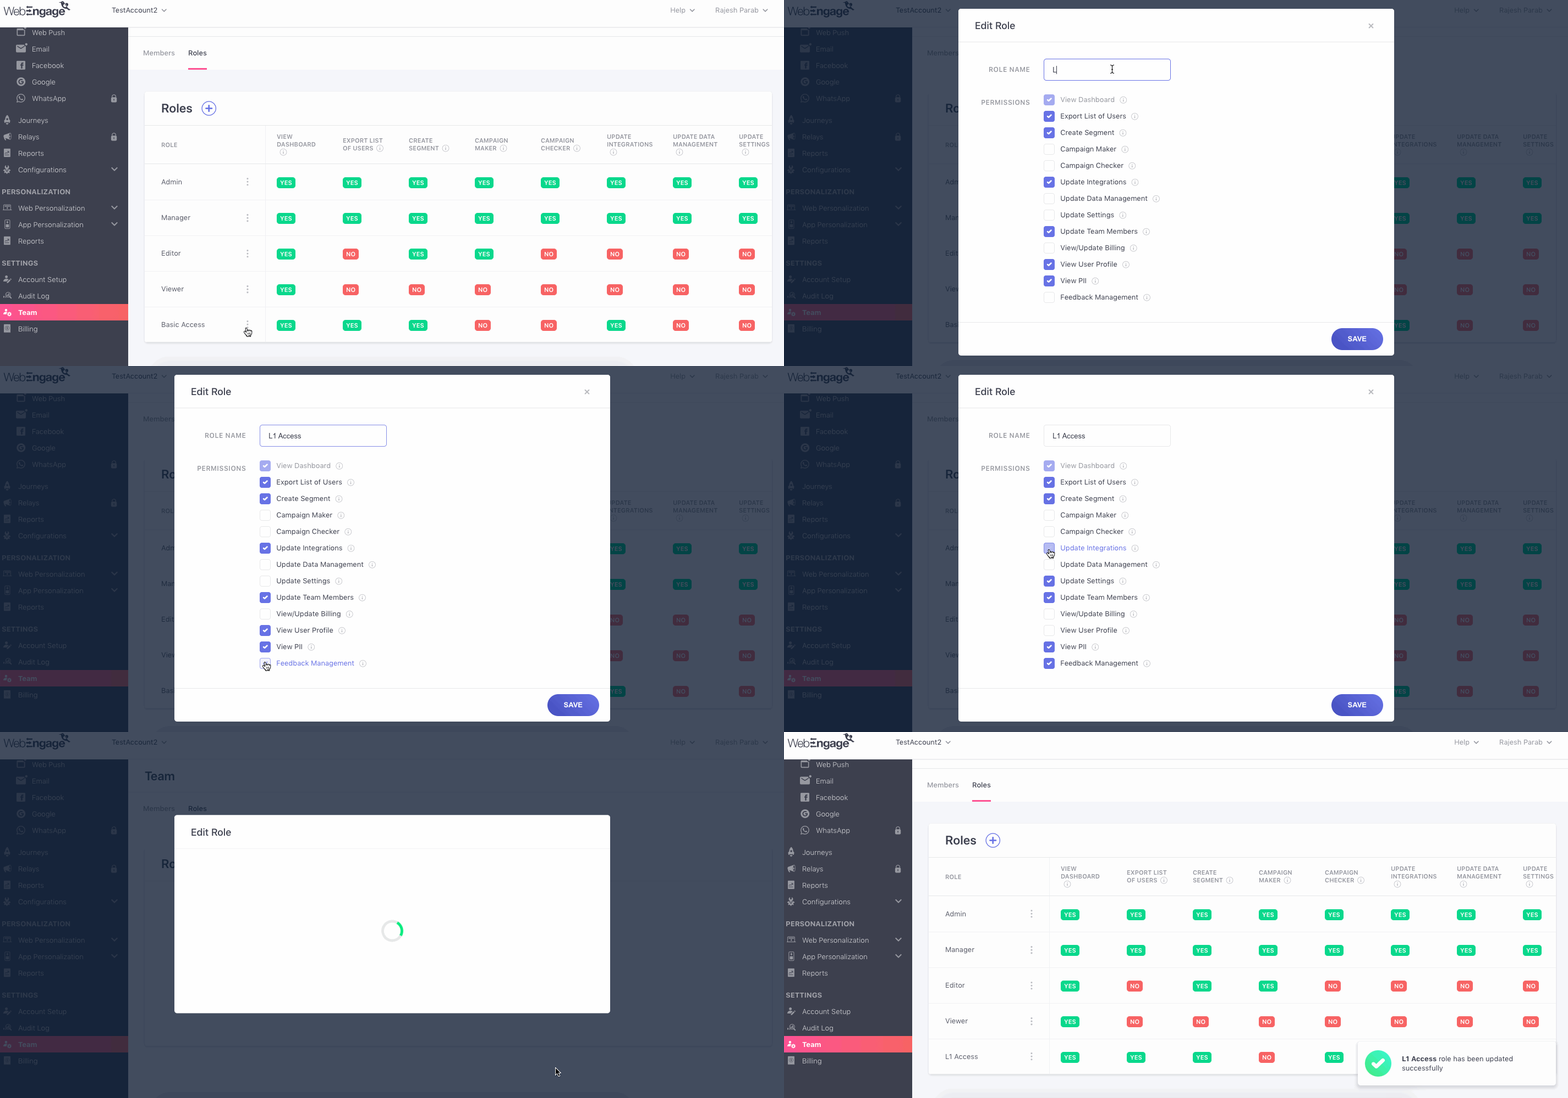
Edit Custom Role
-
Step 1: Go to the Roles tab and click on the Action icon (three dots icon) corresponding to the role that you want to edit.
-
Step 2: Select the Edit action.
-
Step 3: Specify the new role name and permissions.
-
Step 4: Click the Save button to edit the existing custom role.
NoteDefault roles (Admin, Manager, Editor, and Viewer) cannot be edited. Only Custom Roles can be edited.
Click to enlarge
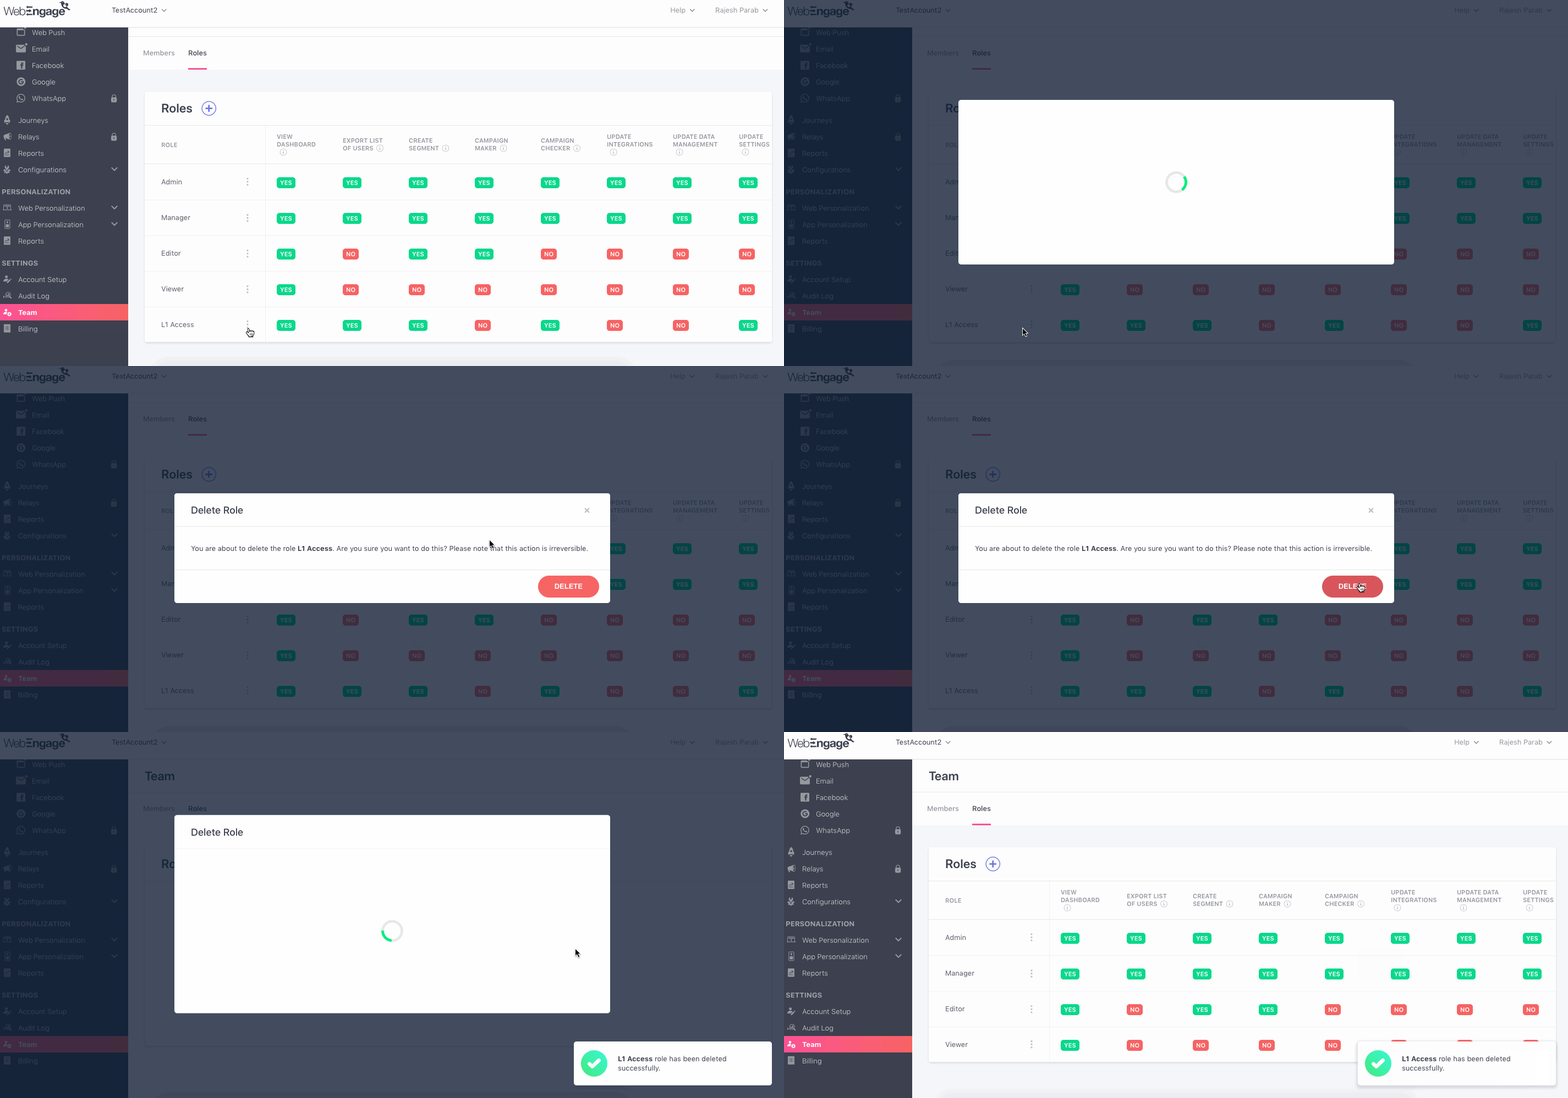
Delete Custom Role
-
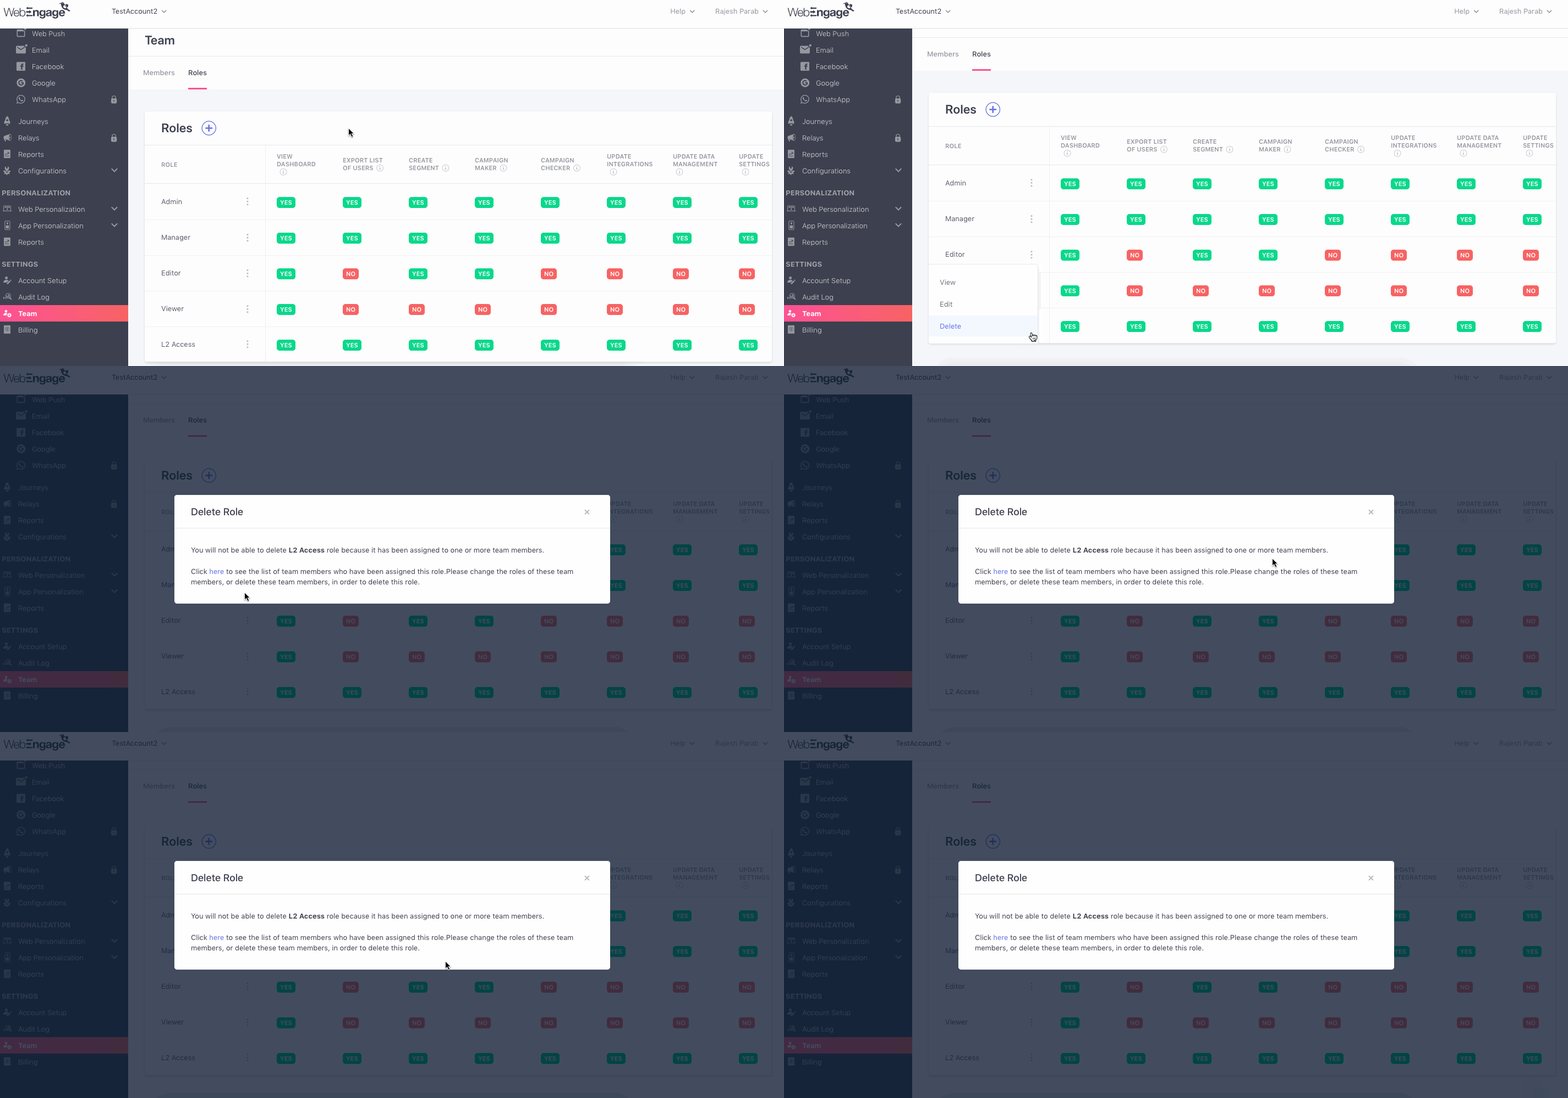
Step 1: Go to the Roles tab and click on the Action icon (three dots icon) corresponding to the role that you want to delete.
-
Step 2: Select the Delete action.
-
Step 3: Click the Delete button in the confirmation modal. Do note that this action is irreversible.
NoteDefault roles (Admin, Manager, Editor, and Viewer) cannot be deleted. Only Custom Roles can be deleted.
Click to enlarge
You will not be able to delete a custom role if it has been assigned to one or more team members. In such cases - please change the roles of these team members, or delete these team members, in order to delete the role.
Click to enlarge
Manage Team Member Access
Managing the team members is a crucial part of project administration. This section explains how you can perform critical actions like viewing, adding, editing, and deleting team members in your project. All team members can view the list of other team members, but only the team member(s) having the Update Team Members permission can add/edit/delete other team members.
View Team Members
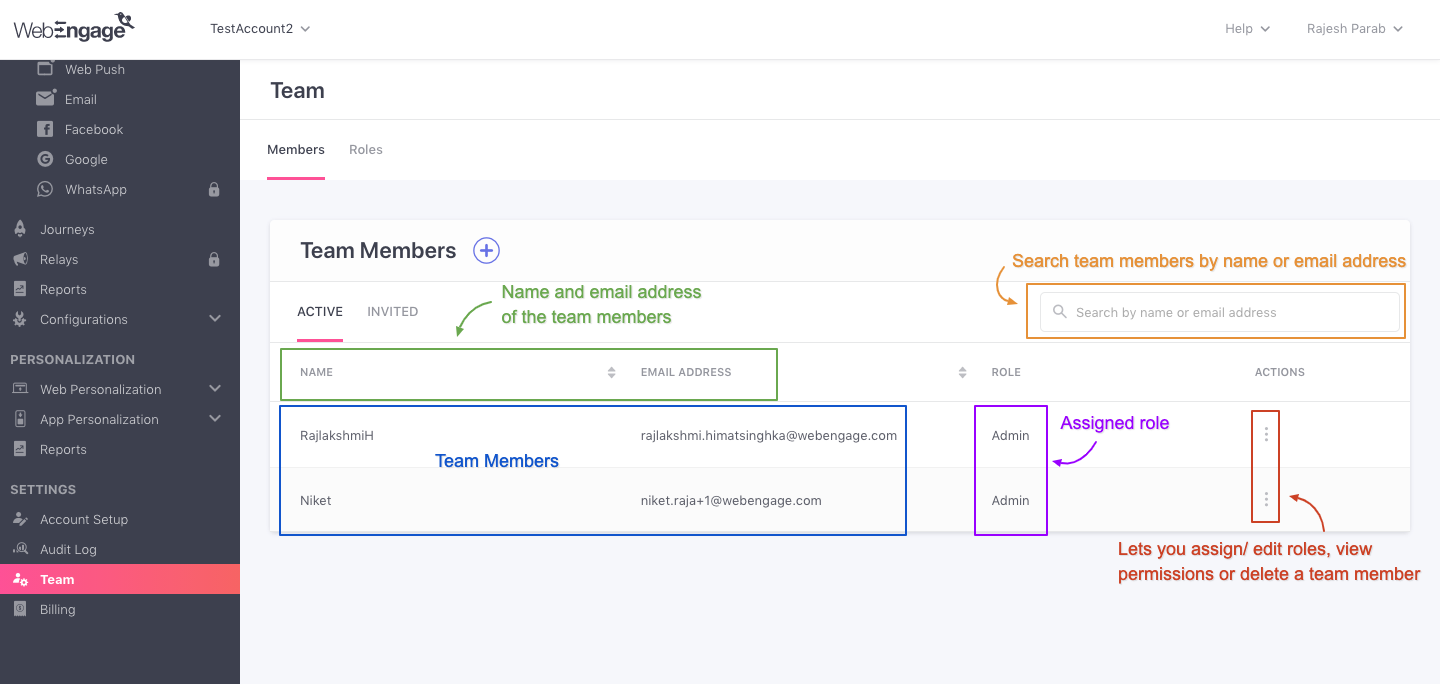
Shows the list of team members who have access to the project. The role of the team member is mentioned next to their name.
Click to enlarge
The list of team members shows the following information:
-
Name: Displays the name of the team member.
-
Email Address: Displays the email address of the team member.
-
Role: Displays the role of the team member. You would see a
No Role Assignedlabel for team members who were added before Role-Based Access Control (RBAC) was launched by WebEngage. Navigate to this section to learn more about the behavior for such team members. -
Actions: The following actions can be performed for a given team member if you have the Update Team Members permission:
-
Edit: Edit the role of a particular team member.
-
Delete: Delete a particular team member. This action is irreversible and will revoke the team member’s access to your WebEngage project.
-
Send Invite Again: Resend an invite to a particular team member in case they have not received the invite or if they’re facing problems in accepting the invite. This option is only available for team members who are yet to accept the invite (such team members would be shown under the Invited tab).
-
Assign a role: Assign a role for a particular team member. This action would show up for team members who were added before Role-Based Access Control (RBAC) was launched by WebEngage. Navigate to this section to learn more about the behavior of such team members.
-
-
Search: Lets you search for the team members via name or email address.
Invite Team Member
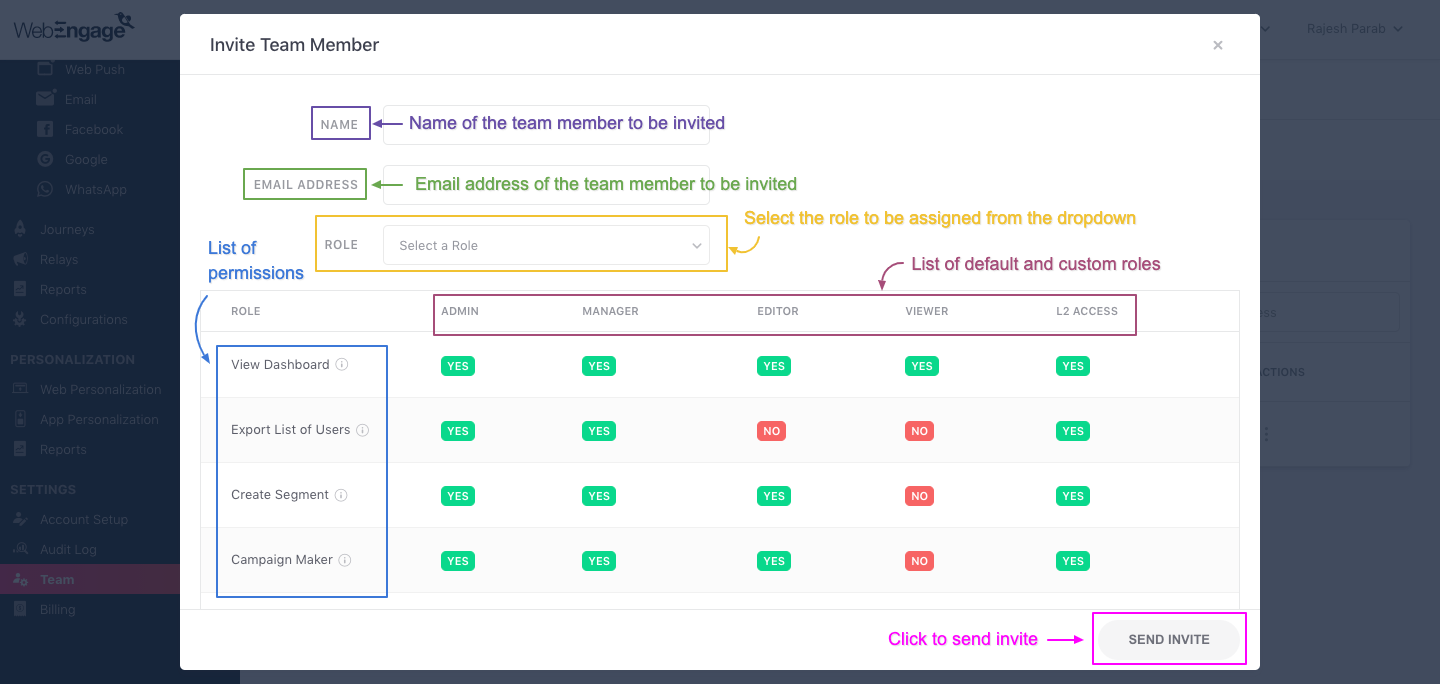
The Invite Team Member section on the dashboard lets you send invites to the team members.
Click to enlarge
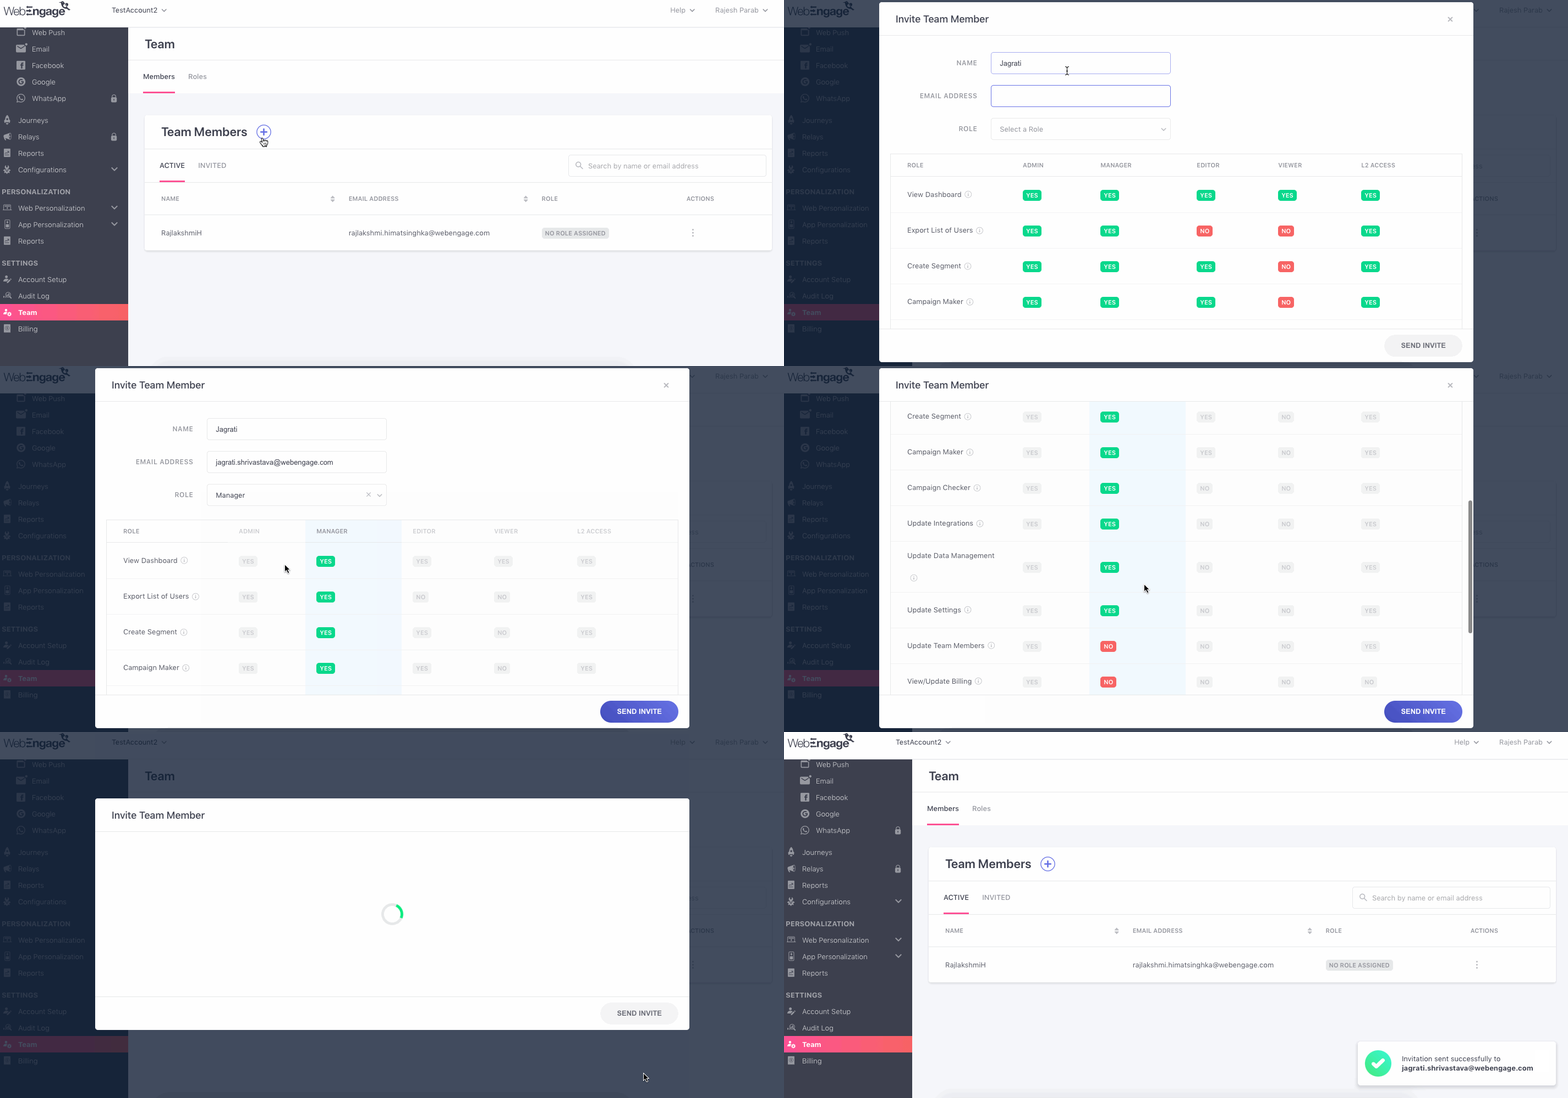
Invitations can be sent to new team members to get access to the project. To send the invite:
-
Step 1: Go to the Members tab and click on the Plus (+) icon.
-
Step 2: Enter the name and email address of the team member you want to invite.
-
Step 3: Select a role from the dropdown.
-
Step 4: Click the Send Invite button to send an invite to the team member.
Click to enlarge
Invitation Email
The invitation email received by the team member contains the link to accept the invitation. The user must accept the invitation to access the project.
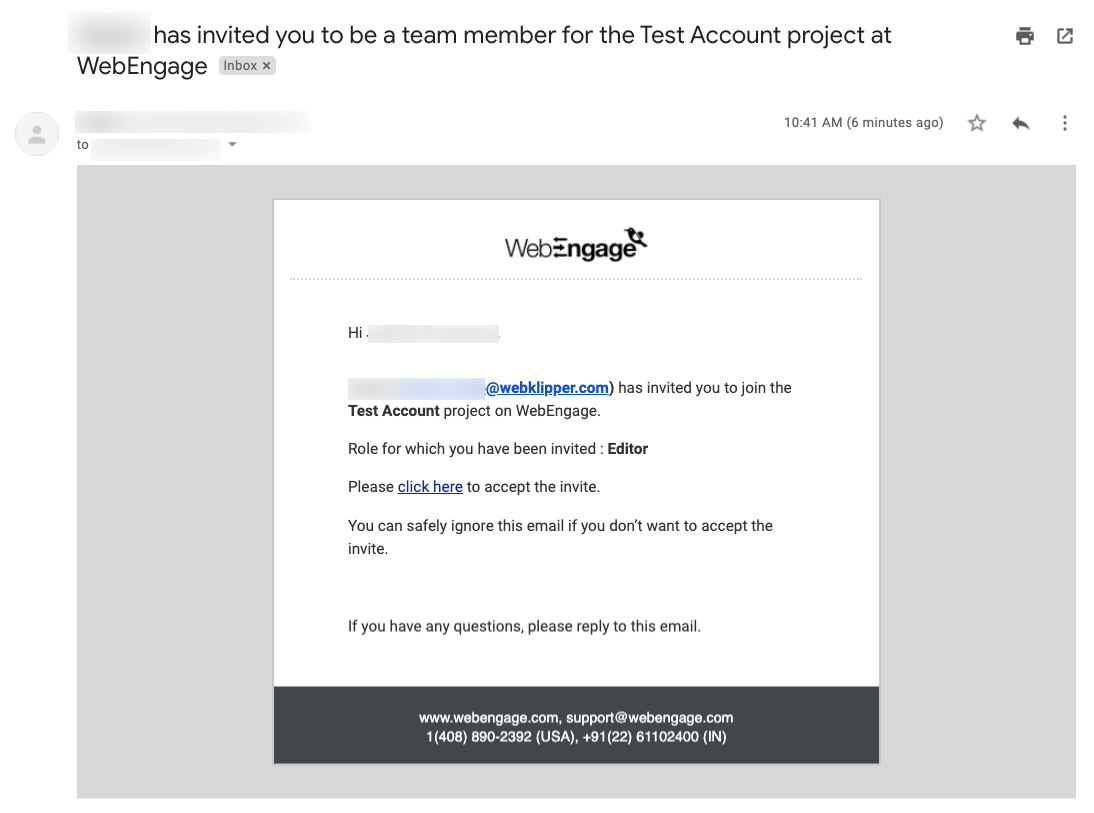
Click to enlarge
Accepting the Invite
After the team member accepts the invite they will be directed to the WebEngage dashboard, depending on the following scenarios:
-
Team member does not have an existing WebEngage account: The team member is redirected to the set password section. Once the password has been set, they are redirected to the Users section of the project to which they were invited and will be given access to the applicable role.
-
Team member has an existing WebEngage account with the same email address and is logged in: The team member is redirected to the Users section of the project to which they were invited and will be given access to the applicable role.
-
Team member has an existing WebEngage account with the same email address but is logged out: The team member is directed to the login page, and after successful login, they are redirected to the Users section of the project to which they were invited and will be given access to the applicable role.
-
Team member signs up/logs in/is already logged in using a different email address: To access the WebEngage project, the team member is required to sign up or log in with the same email to which the invitation has been sent. If the team member tries to log in or sign up with a different email, they will be redirected to the webengage.com home page.
Send Invite Again
Under the Invited tab, details of the team members who are yet to accept the invite are shown. Follow these steps to resend an invite to a particular team member in case they have not received the invite or if they’re facing problems in accepting the invite:
-
Step 1: Go to the Invited tab and click on the Action icon (three dots icon) corresponding to the team member to whom you want to send the invite again.
-
Step 2: Select the Send Invite Again action.
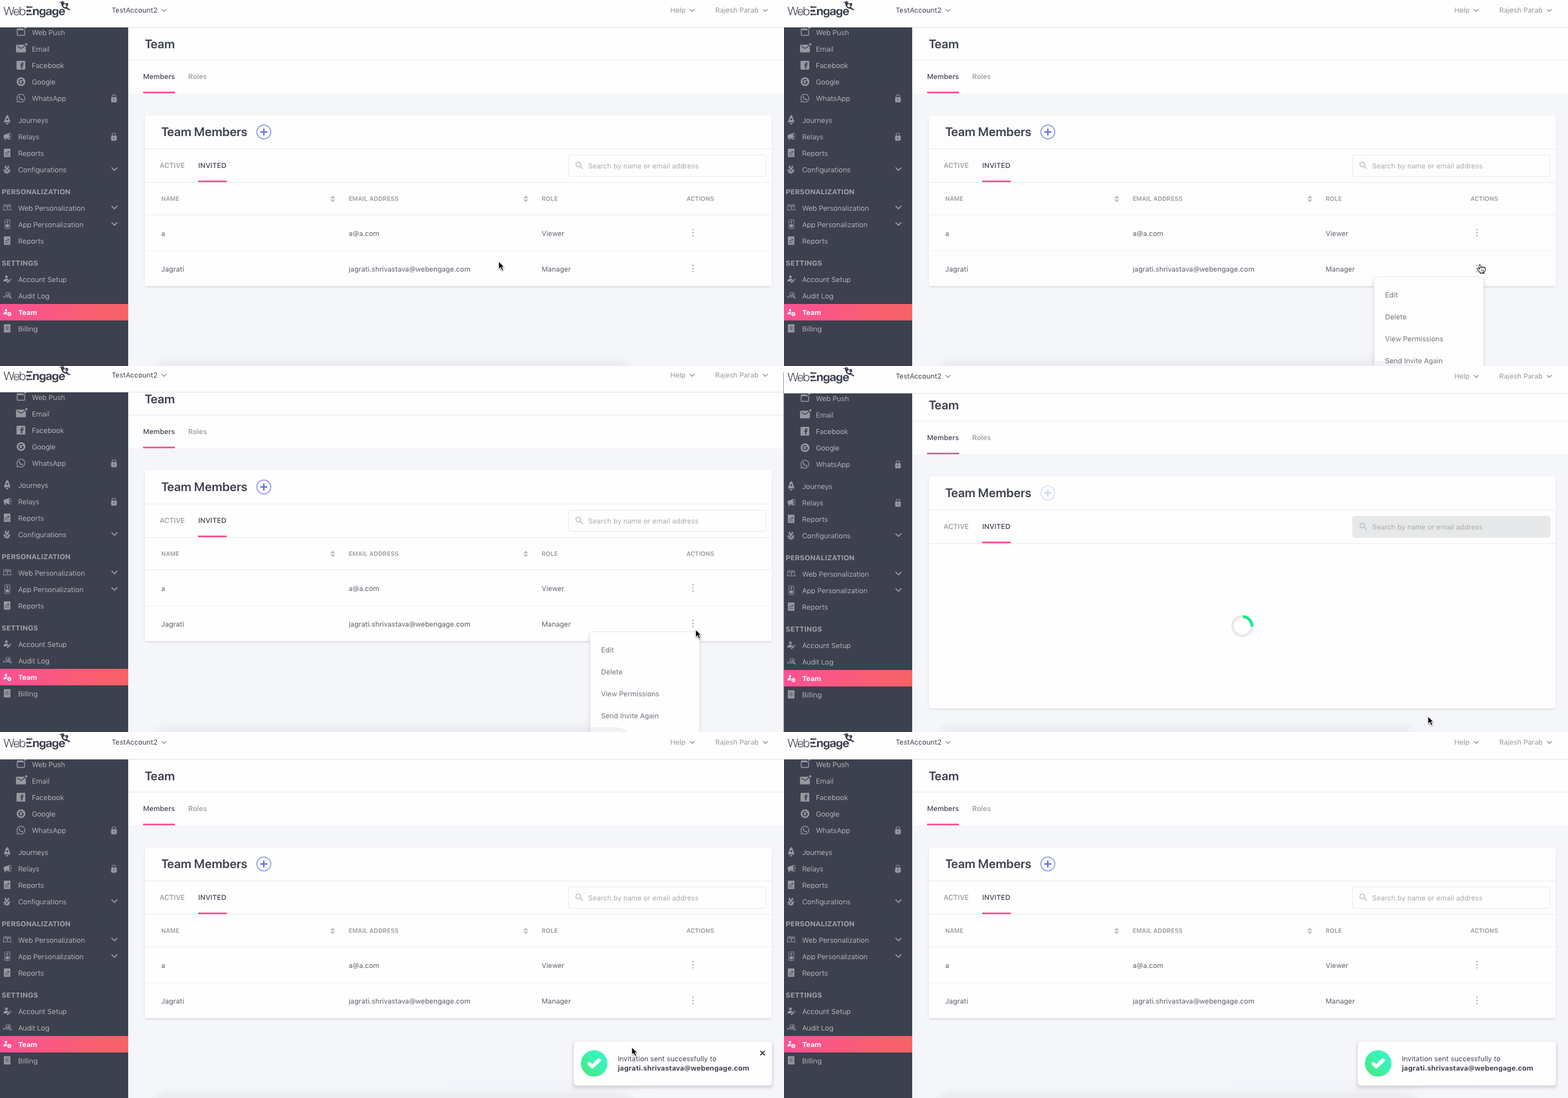
Click to enlarge
Edit Team Members
The Role of a team member can be edited by following the below steps:
-
Step 1: Go to the Members tab and click on the Action icon (three dots icon) corresponding to that team member whose role you want to change.
-
Step 2: Select the Edit action.
-
Step 3: Select a new role for this team member from the Roles dropdown.
-
Step 4: Click the Save button to save the changes.
The team member can be given any existing roles. Details like Email Address and Name cannot be edited.
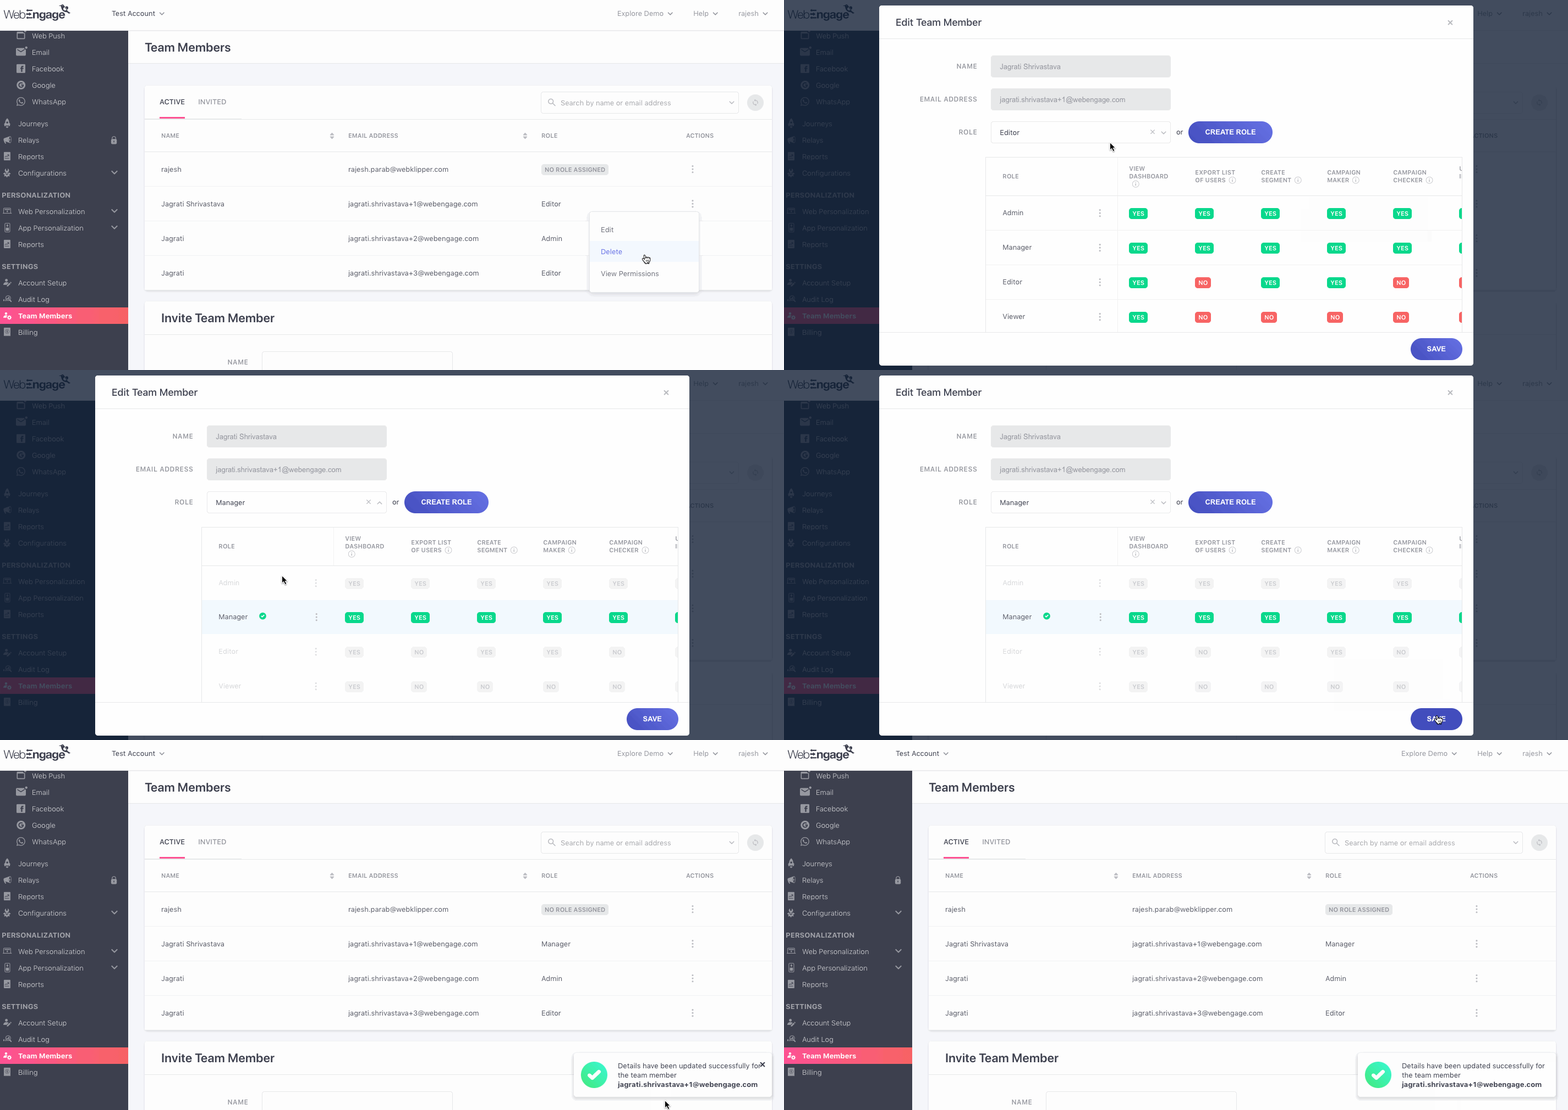
Click to enlarge
Delete Team Member
A team member can be deleted by following the below steps:
-
Step 1: Go to the Members tab and click on the Action icon (three dots icon) corresponding to that team member that you want to delete.
-
Step 2: Select the Delete action.
-
Step 3: Click the Delete button in the confirmation modal. Do note that this action is irreversible.
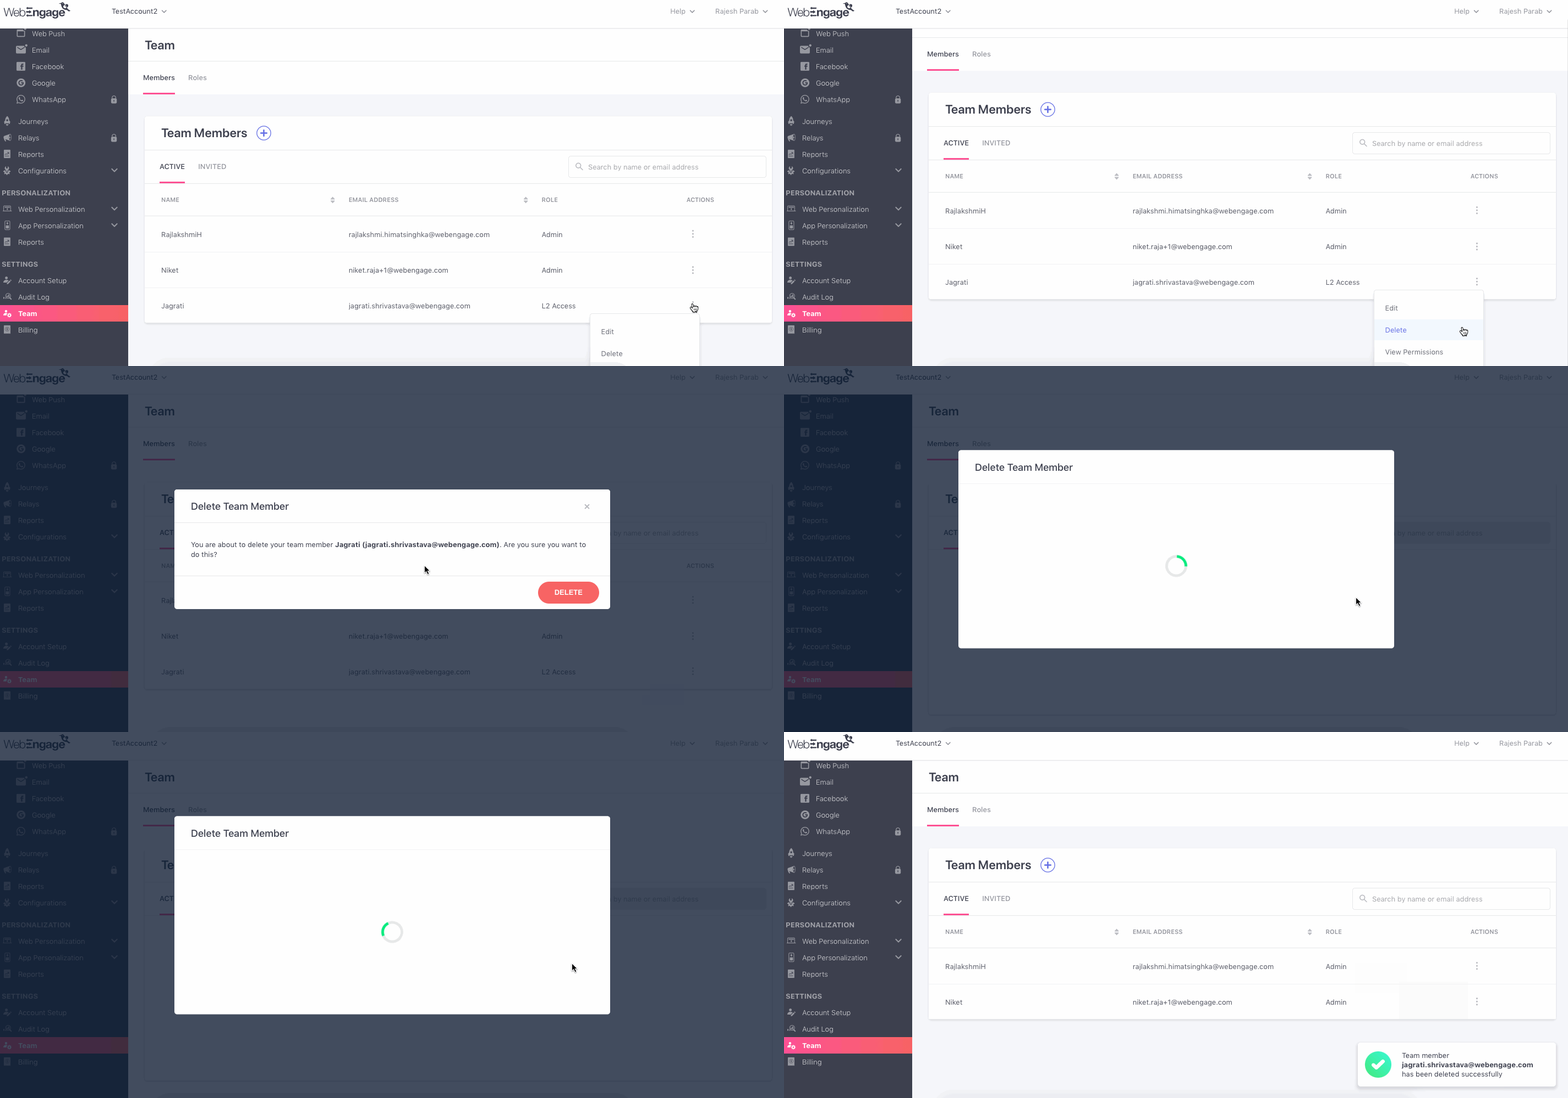
Click to enlarge
NoteWhen a team member is deleted, details like Name and Email Address will be deleted from the system, and the team member will not be able to log in.
Segments, journeys, campaigns, etc. that they created will still exist.
Team members added before RBAC
- If you’re an existing customer and have already added team members as per the older permission set (shown below), please note that our entire product stack will continue to work the same way for such team members, and there would be no breaking change.
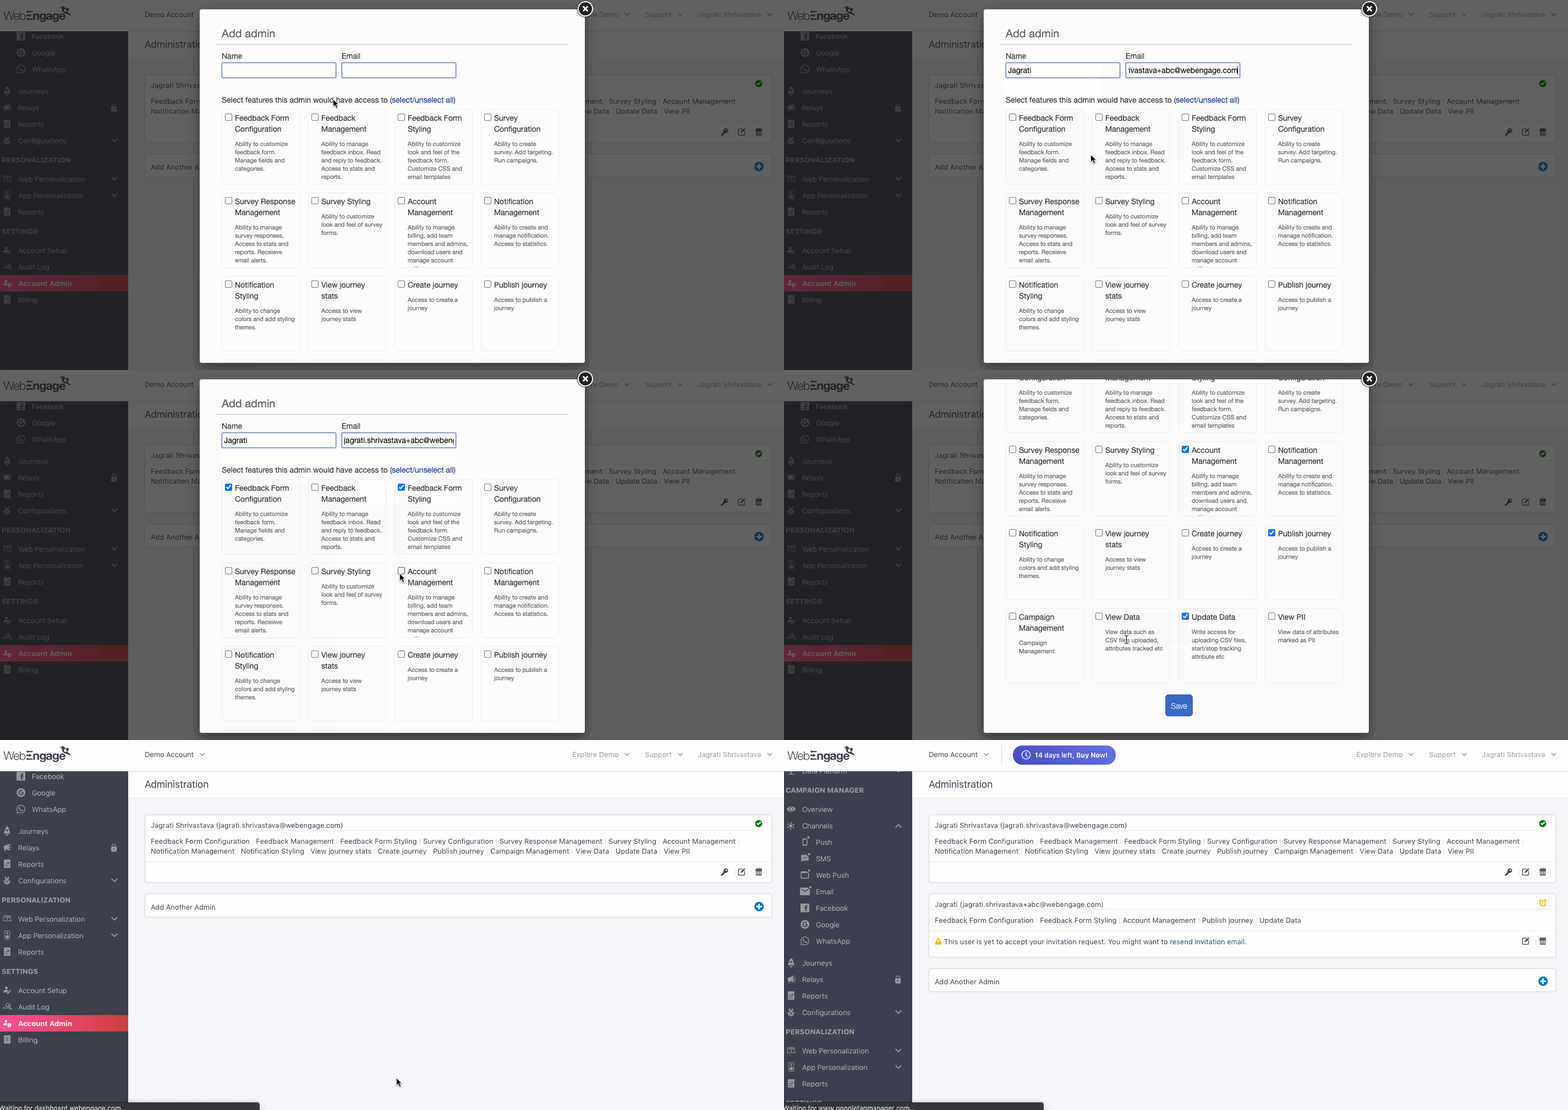
Click to enlarge
-
You would see a
No Role Assignedlabel for team members who were added before Role-Based Access Control (RBAC) was launched by WebEngage. -
If you want to modify the permissions of any team member who was added as per the older permission set, you will have to assign them a role as per the new permission set. You can do this by clicking on the Action icon (three dots icon) corresponding to that team member and selecting the Assign a role action.
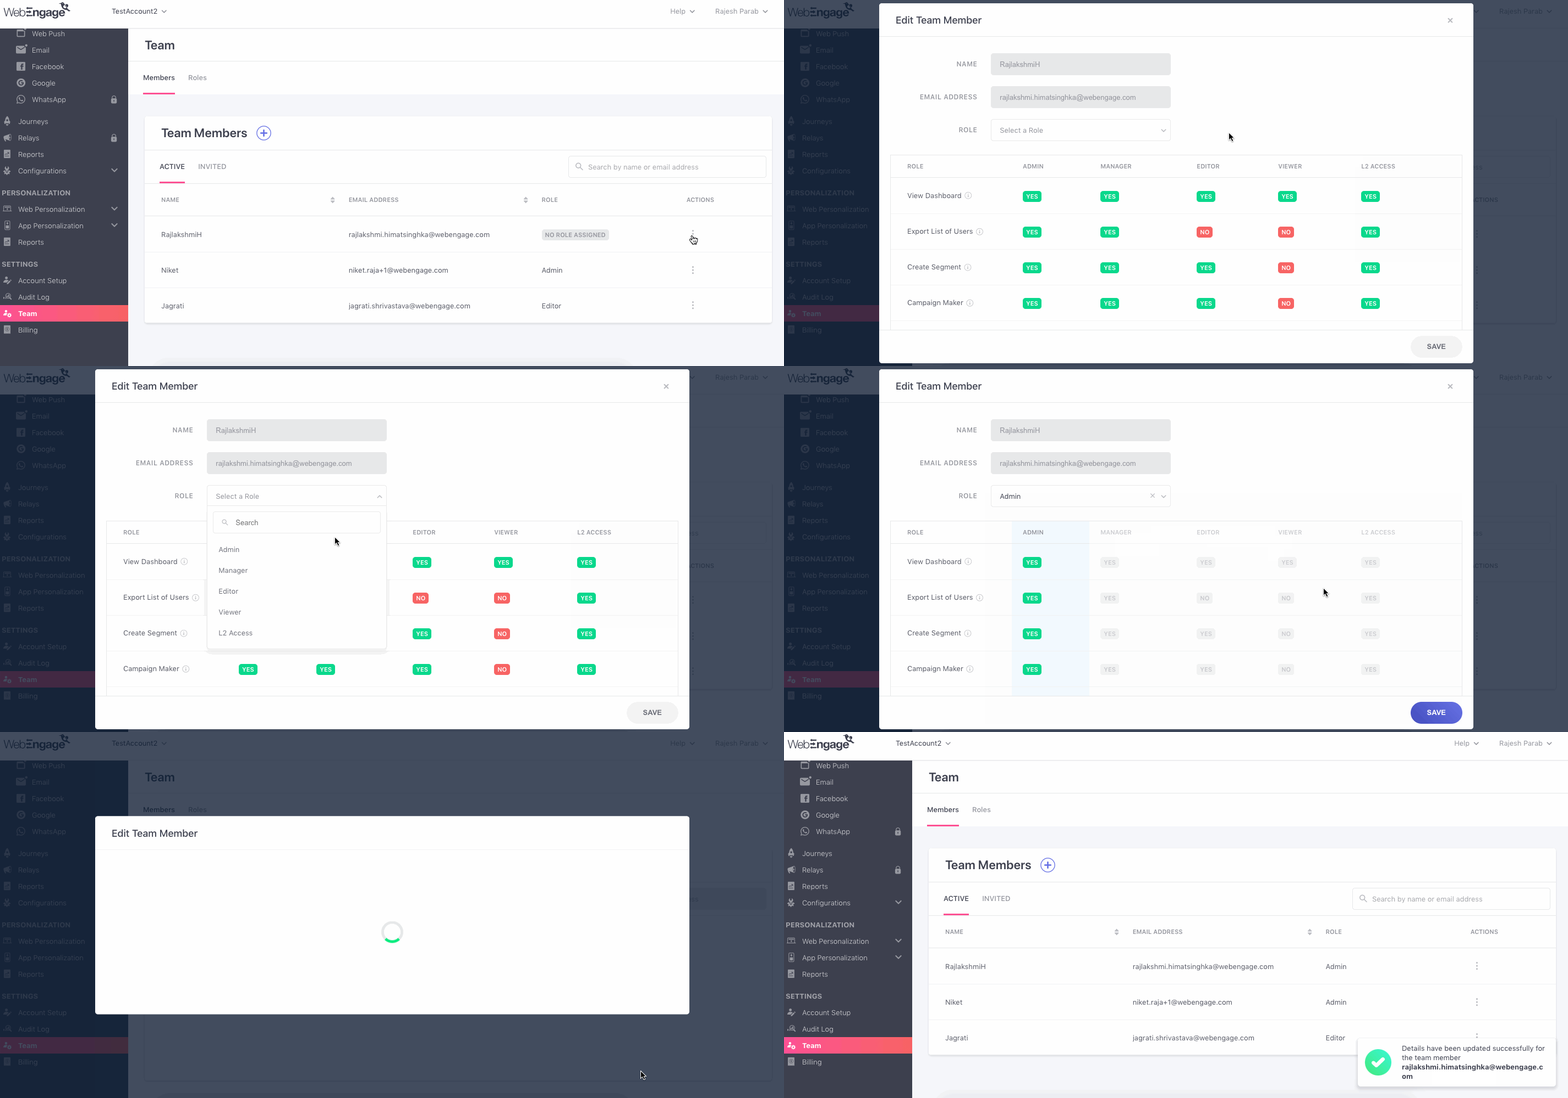
Click to enlarge
Please feel free to drop in a few lines at [email protected] in case you have any questions or feedback. We're always just an email away!
Updated 3 months ago