Journey Creation: How It Works
A deep dive into the workings of each block that helps you design the Journey
Must ReadBefore proceeding, we recommend that you get yourself acquainted with Key Journey Concepts. Doing so will enable you to design contextually personalized Journey experiences in no time at all!
A Journey is a wholesome experience that guides each user through the various stages of their lifecycle by engaging them in the right moment, with the most relevant context, through their preferred channel.
For marketers like you and me, it opens up endless opportunities to drive growth (aka💲💲💲) and forge a lasting connection with each user (aka retention ��)!
Each Journey can be designed using an If-this-happens-then-do-that logic. This helps you contextually personalize each user's experience based on their behavioral history, channel preferences, location, and real-time interactions with your app, website, and campaigns.
Such logic-based flexibility and one-on-one personalization are enabled by the various Blocks and their Branches that make up a Journey. These Blocks have been categorized into the following buckets, depending on their functionality:
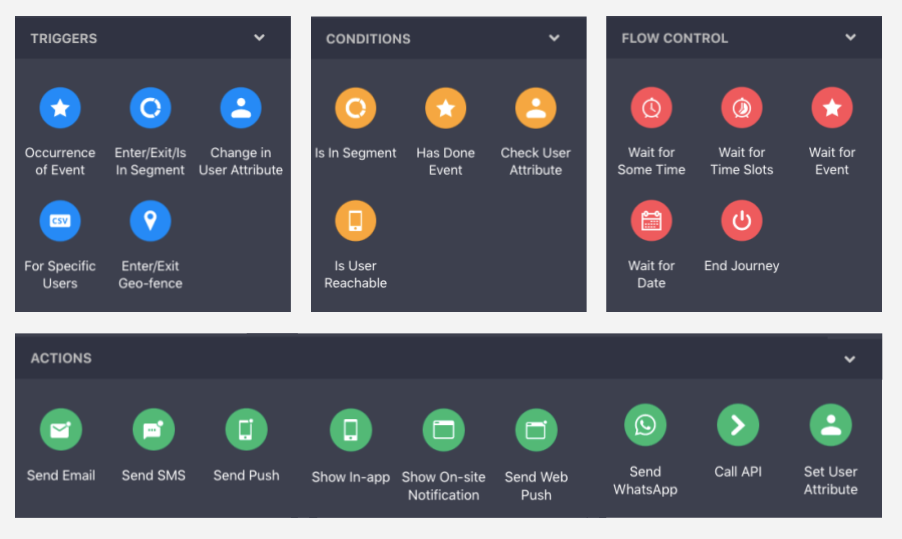
Click to enlarge
-
Triggers: These are entry points that start the Journey experience for a user if their actions or preferences match the Trigger Block's conditions.
-
Actions: These help you deliver contextually personalized experiences to each user at various points, through their preferred channels of engagement - Push, In-app, SMS, On-site Notifications, Web Push, Email.
-
Conditions: These are checkpoints in your Journey that help you determine the most optimal experience for a user at each stage, depending on their changing preferences and real-time interactions with your app, website, campaigns.
-
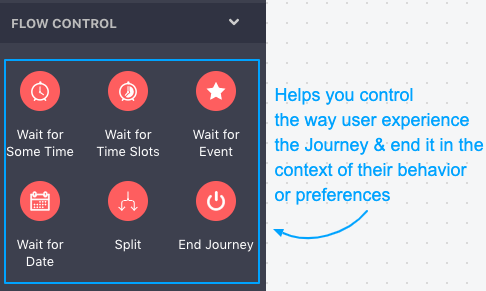
Flow Controls: These help you determine the duration over which users experience the Journey and contextually end the experience for each user.
Managing Journey Blocks
The journey designer comes with intuitive features that enable you to Replicate, Delete, and Align multiple blocks in one go. These hacks are sure to speed up your journey creation process by 2x!
Let's quickly walk you through these:
Replicate Multiple Blocks
Once you've created an experience, you can choose to replicate the entire flow, along with the settings and contents of each block as many times as you like! This comes in handy, especially when building Journey experiences that require you to repeat a specific set of rules across multiple Flows within it.
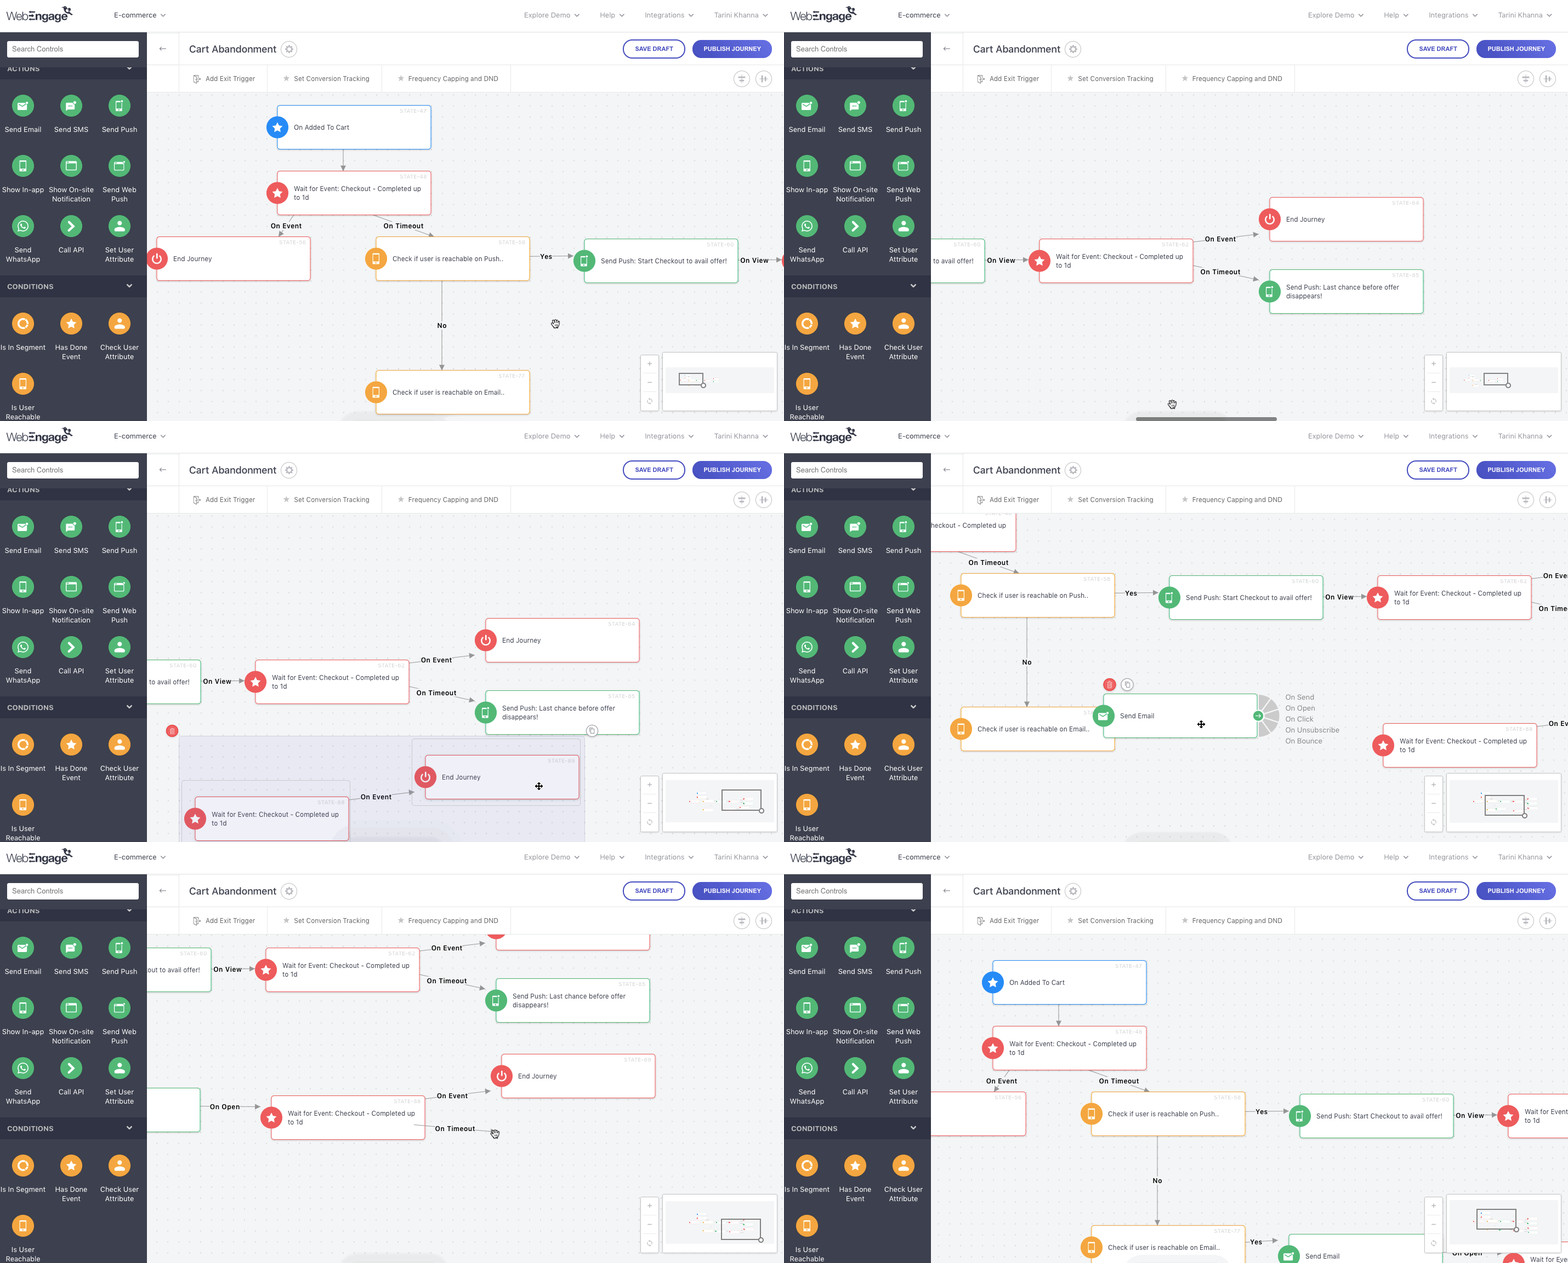
Engaging Users Through Their Preferred Channel to Reduce Cart AbandonmentFor example, in the below visual, we have created a Journey experience aimed at driving purchases. The idea is to engage users through their preferred channels (Push or Email) by sending them 2 consecutive messages if they fail to purchase the product within 1 day of adding it to their cart.
Thus, we have created a Flow that will be experienced by users reachable through Push and have copied it to replicate the same logic for the second channel, Email.
Click to enlarge
As shown above:
Step 1: Press Control/Command & Click on the Blocks you want to replicate.
-
In doing so, you will notice that selected blocks are highlighted by a grey background and clubbed in a bundle.
-
Click on a block twice to de-select it.
Step 2: Click the Copy icon placed on the top right of the bundle of selected blocks.
- In doing so, all the Settings, Message, and Branches of each Block will be replicated in the same order as they were built.
Step 3: Move the replicated bundle to the desired spot on the Journey Canvas and edit the necessary details/settings.
You can repeat the process as many times as you need to!
Replicating a single Block? No problem!
Click to enlarge
As shown above:
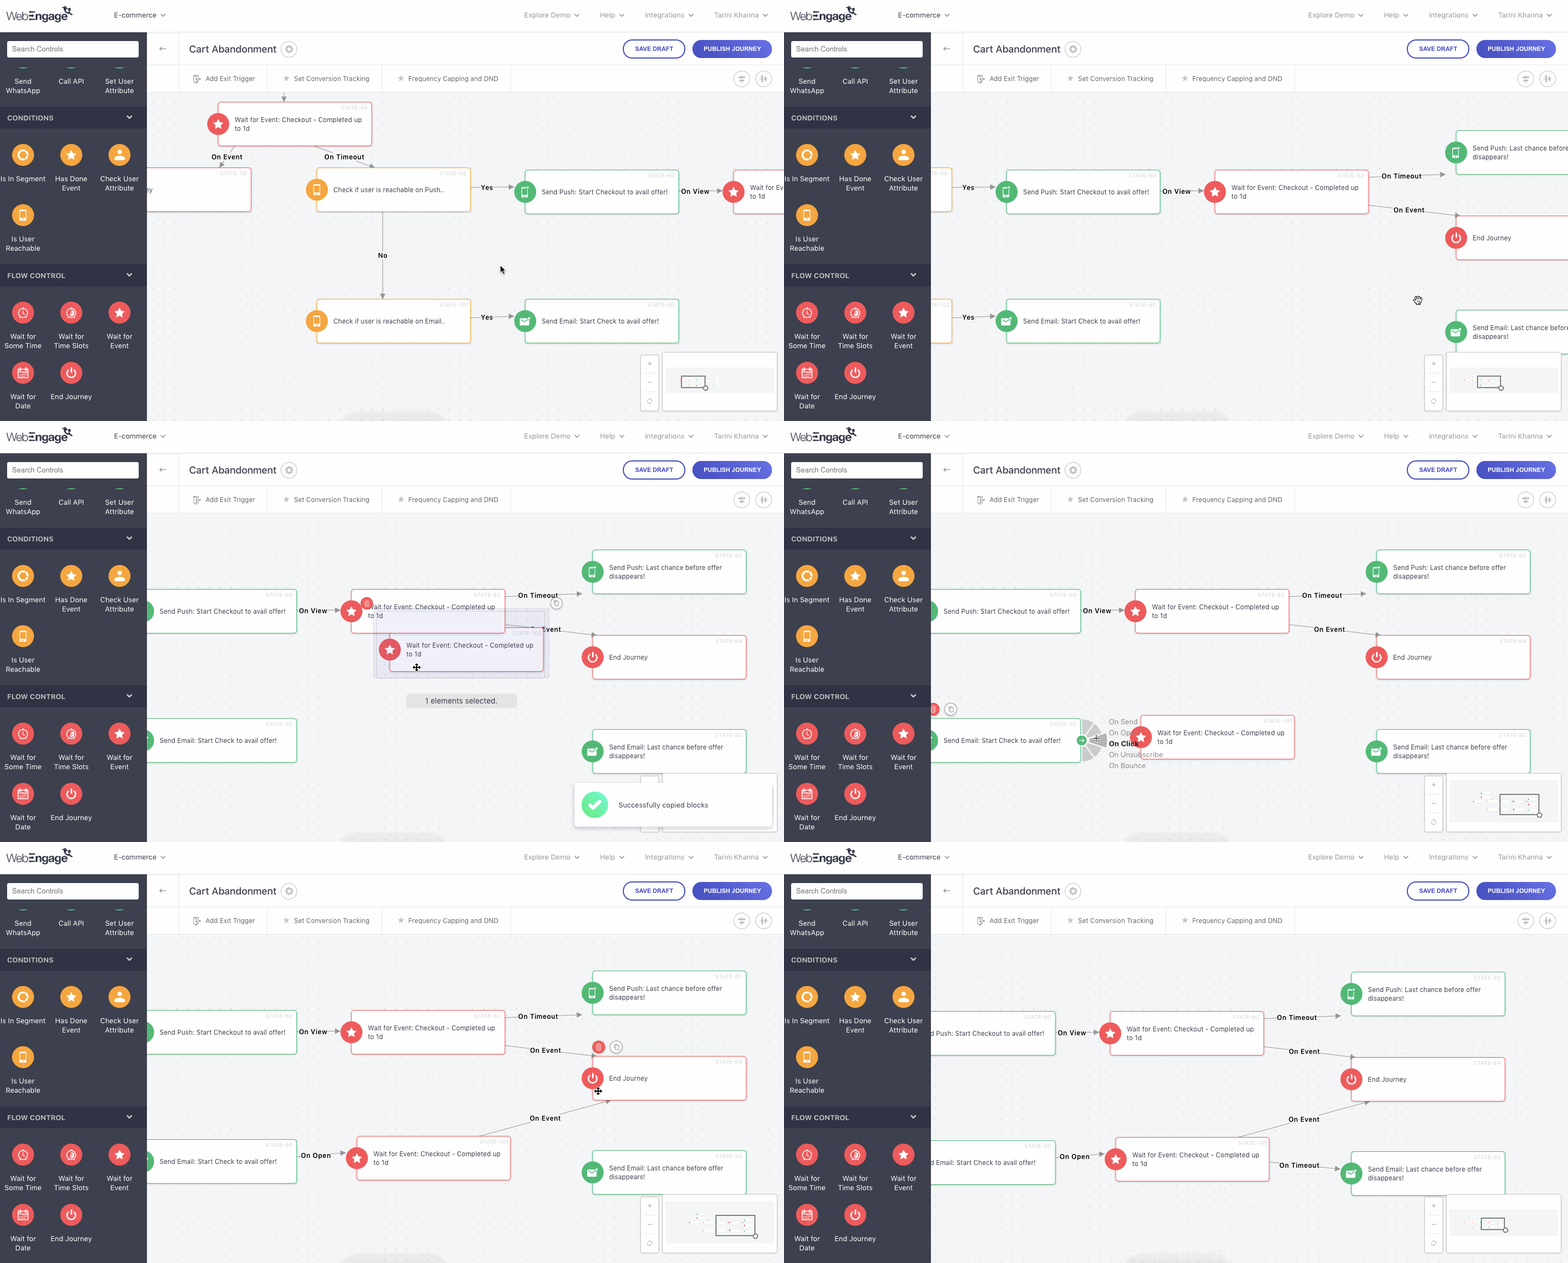
Step 1: Hover over the block you'd like to replicate.
- In doing so, you will see a few icons appear on its top left.
Step 2: Select the Copy icon, move the replicated Block to the desired spot on the Canvas, and you're done!
Delete Multiple Blocks
Building Journeys that can help you deliver optimal platform experiences at pivotal moments is not easy. We understand. This is why we've made it extremely easy for you to delete multiple blocks and start over as many times as you like!
Click to enlarge
As shown above:
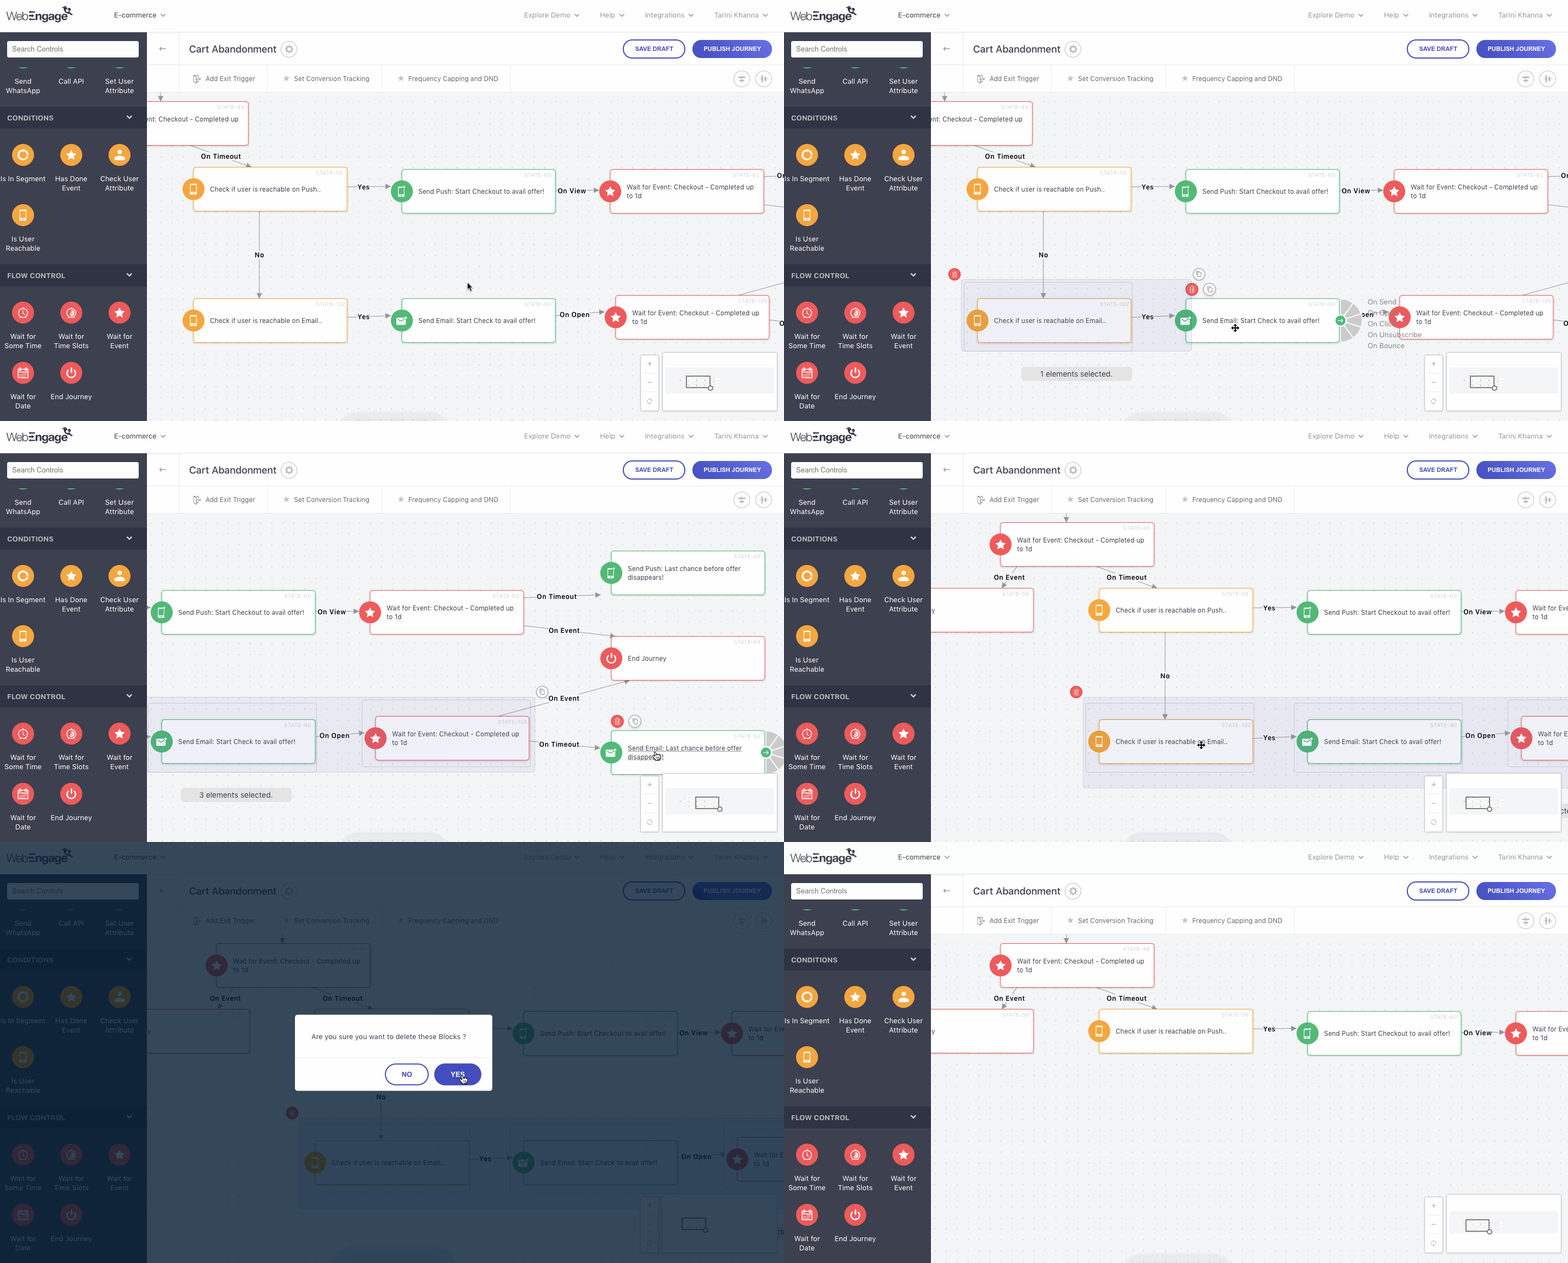
Step 1: Press Control/Command & Click on the Blocks you want to remove.
- In doing so, you will notice that selected blocks are highlighted by a grey background and clubbed in a bundle.
Step 2: Click the Delete icon placed on the top left of the bundle of selected blocks.
- In doing so, you will be prompted by a pop-up asking you to confirm your decision.
Step 3: Click Yes on the pop-up and you're done!
Deleting a single Block? No problem!
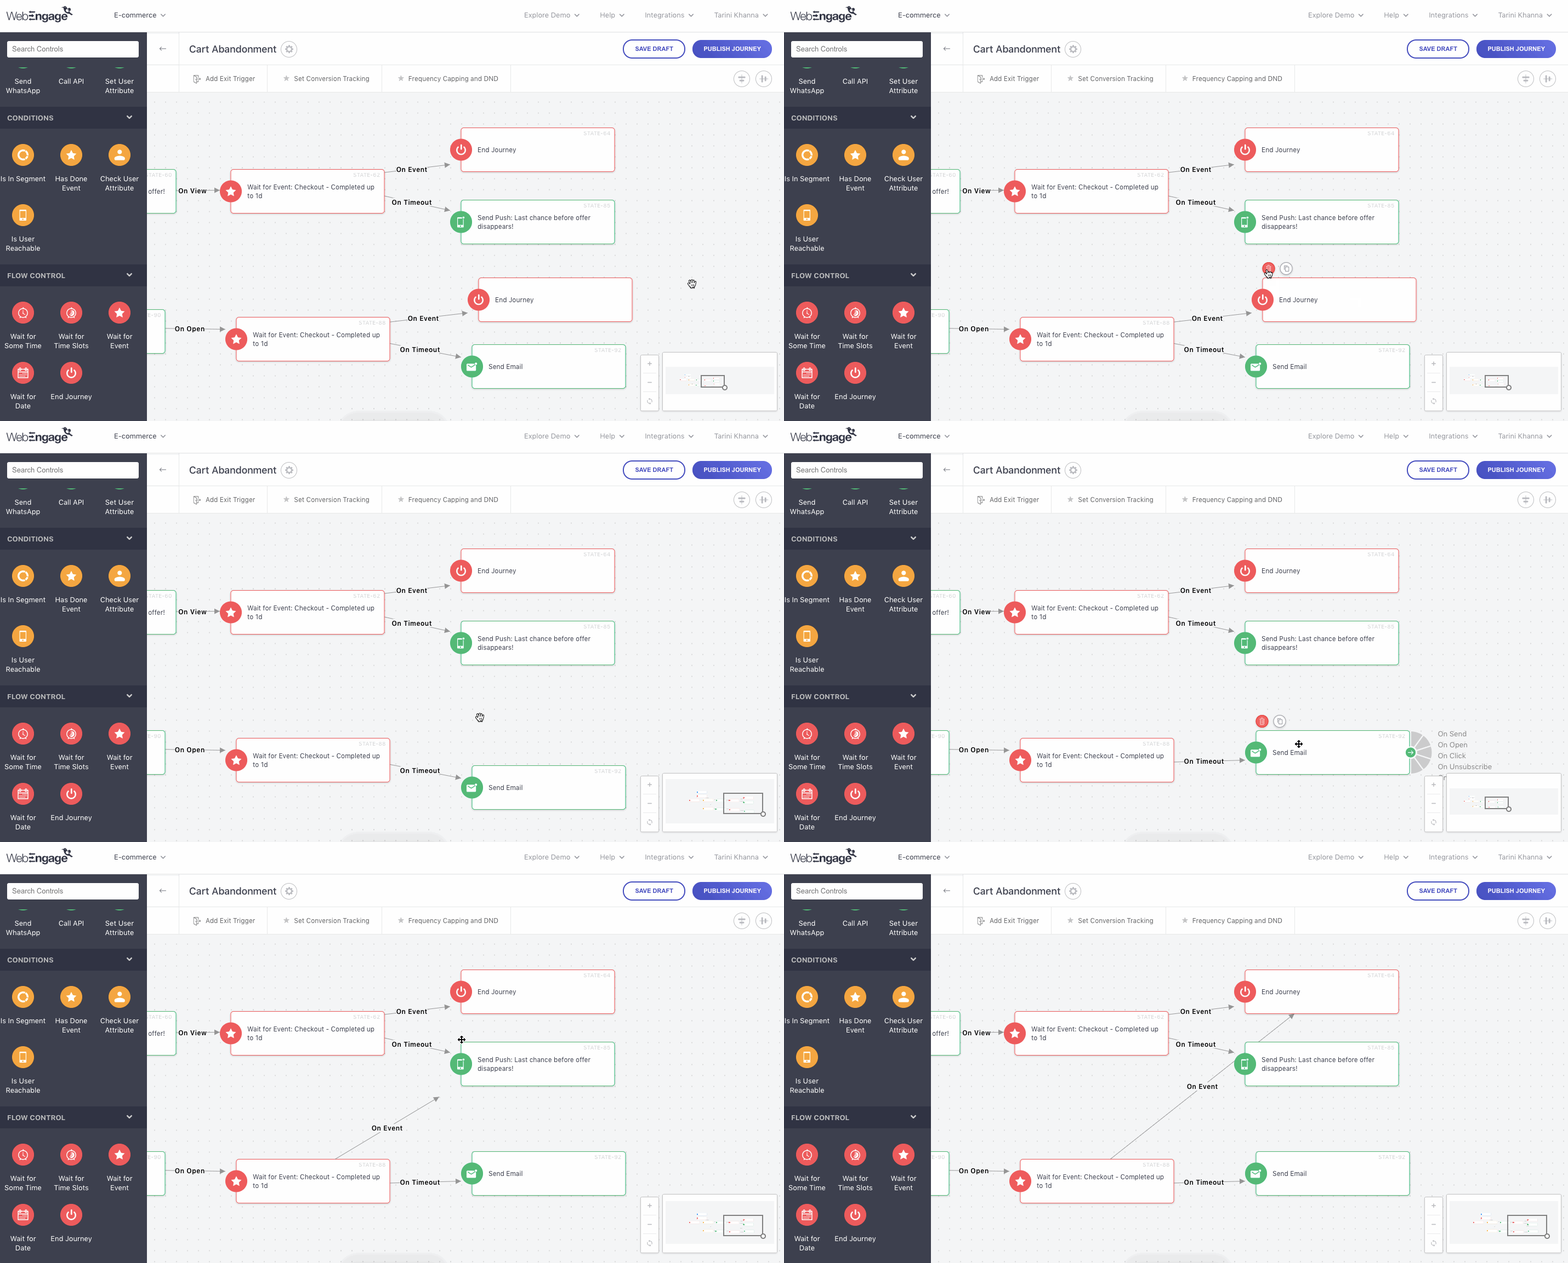
Click to enlarge
As shown above:
Step 1: Hover over the block you'd like to delete.
- In doing so, you will see a few icons appear on its top left.
Step 2: Select the Delete icon, confirm your decision by clicking Yes on the pop-up, and you're done!
Auto-Block Alignment
(Exactly what a perfectionist needs!)
Once you've created a logical flow by adding various blocks to your Journey, you can choose to Align them Horizontally or Vertically by clicking the buttons shown below. Of course, you can still move the blocks around as per your needs once they've been auto-aligned!
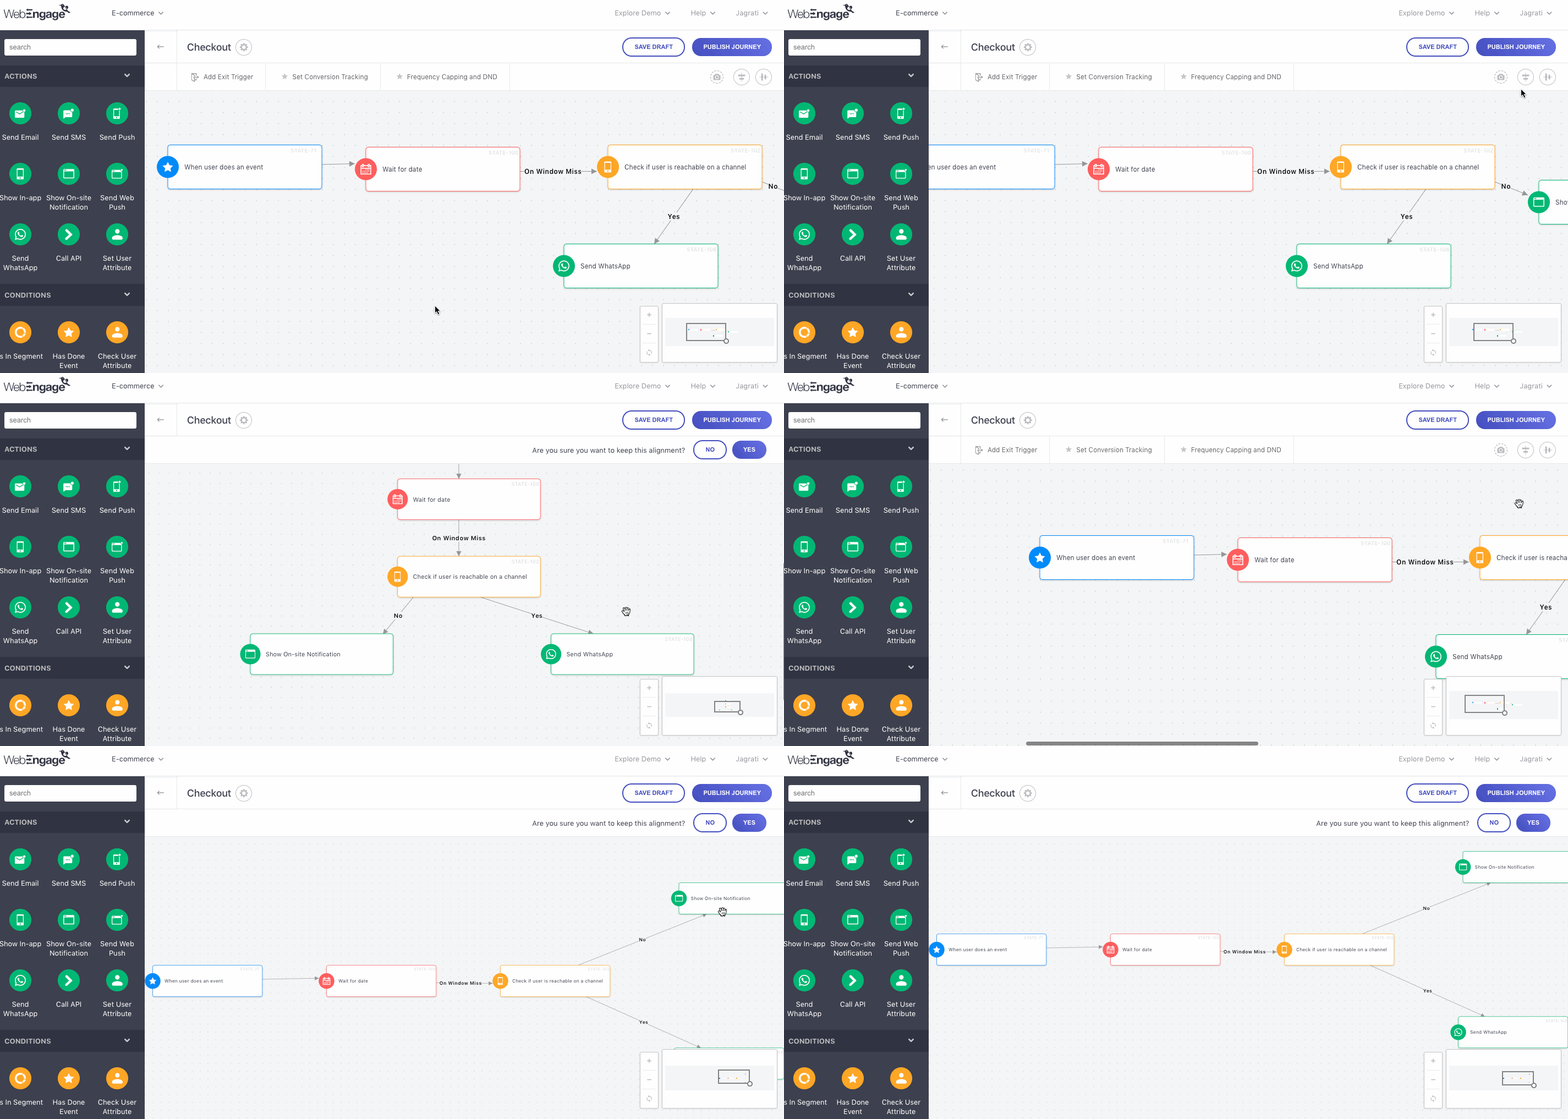
Click to enlarge
Now let's show you how eachBlock works:
Triggers
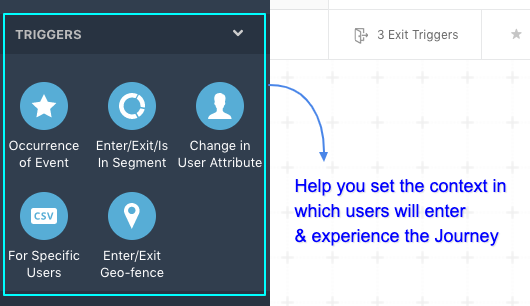
Click to enlarge
Triggers start it all. These are entry points or conditions that set the context of the Journey experience, helping you narrow down the target audience on the basis of:
- An Event performed by the user on your app/website
- A Segment that the user is included in or excluded from (as per the rules of segmentation defined by you)
- A change in a user's profile Attributes
- A list of users uploaded by you to trigger the Journey
- A Geofence that the user enters/exits
Thus, each time a user's actions, preferences, real-time location match the Trigger's conditions, they'll Enter the Journey and experience it as per the rules defined by you.
- Each time a user enters the Journey through a Trigger, they're counted towards the total number ofEntries in the Journey.
Let's get you acquainted with all theEntry Triggers:
Occurrence of Event
Quick Read: Understanding Events, Event Attributes and how you can track them.
This trigger allows you to tailor the Journey experience to users who perform a specific Event on your app/website.
We recommend using the Entry Trigger if the Journey's purpose is to help users get to the next stage in their lifecycle. This could be anything like signup, make a purchase, stream music, stream a show, refer to a friend, start a course, complete an on-going self-learning course, renew a subscription and so on.
Here's how you can set it up:
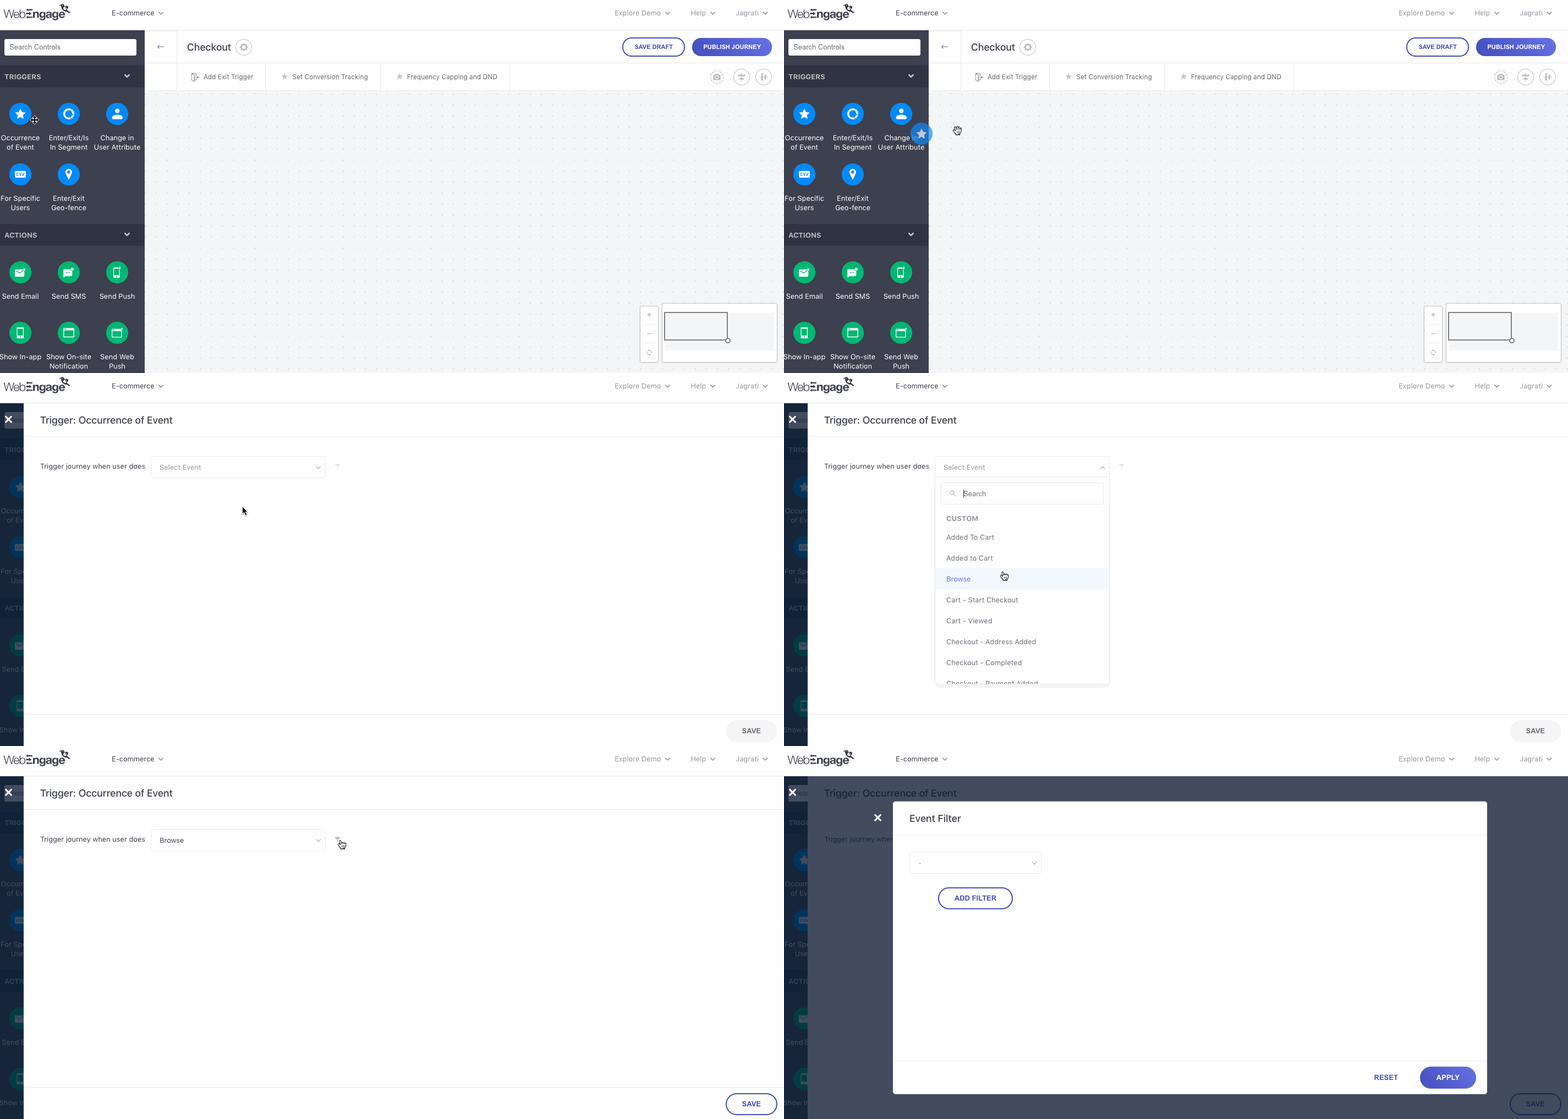
Click to enlarge
Step 1: Drag and drop the Occurrence of Event block onto the canvas
Step 2: Click on the block and select an Event from the dropdown
- For example, in the above visual, we have selected the Custom Event, Browse
Step 3 (Optional): Click on the filter icon to add an Event Attribute to the selected Event
- Doing so will help you narrow down the target audience of the Journey to a specific set of users who perform the Event in the context of the Event Attribute added to it.
Step 4 (Optional): Click Add Filter to add multiple Event Attributes
- You can club Event Attributes by the AND/OR logic to design the Journey experience for a niche set of users.
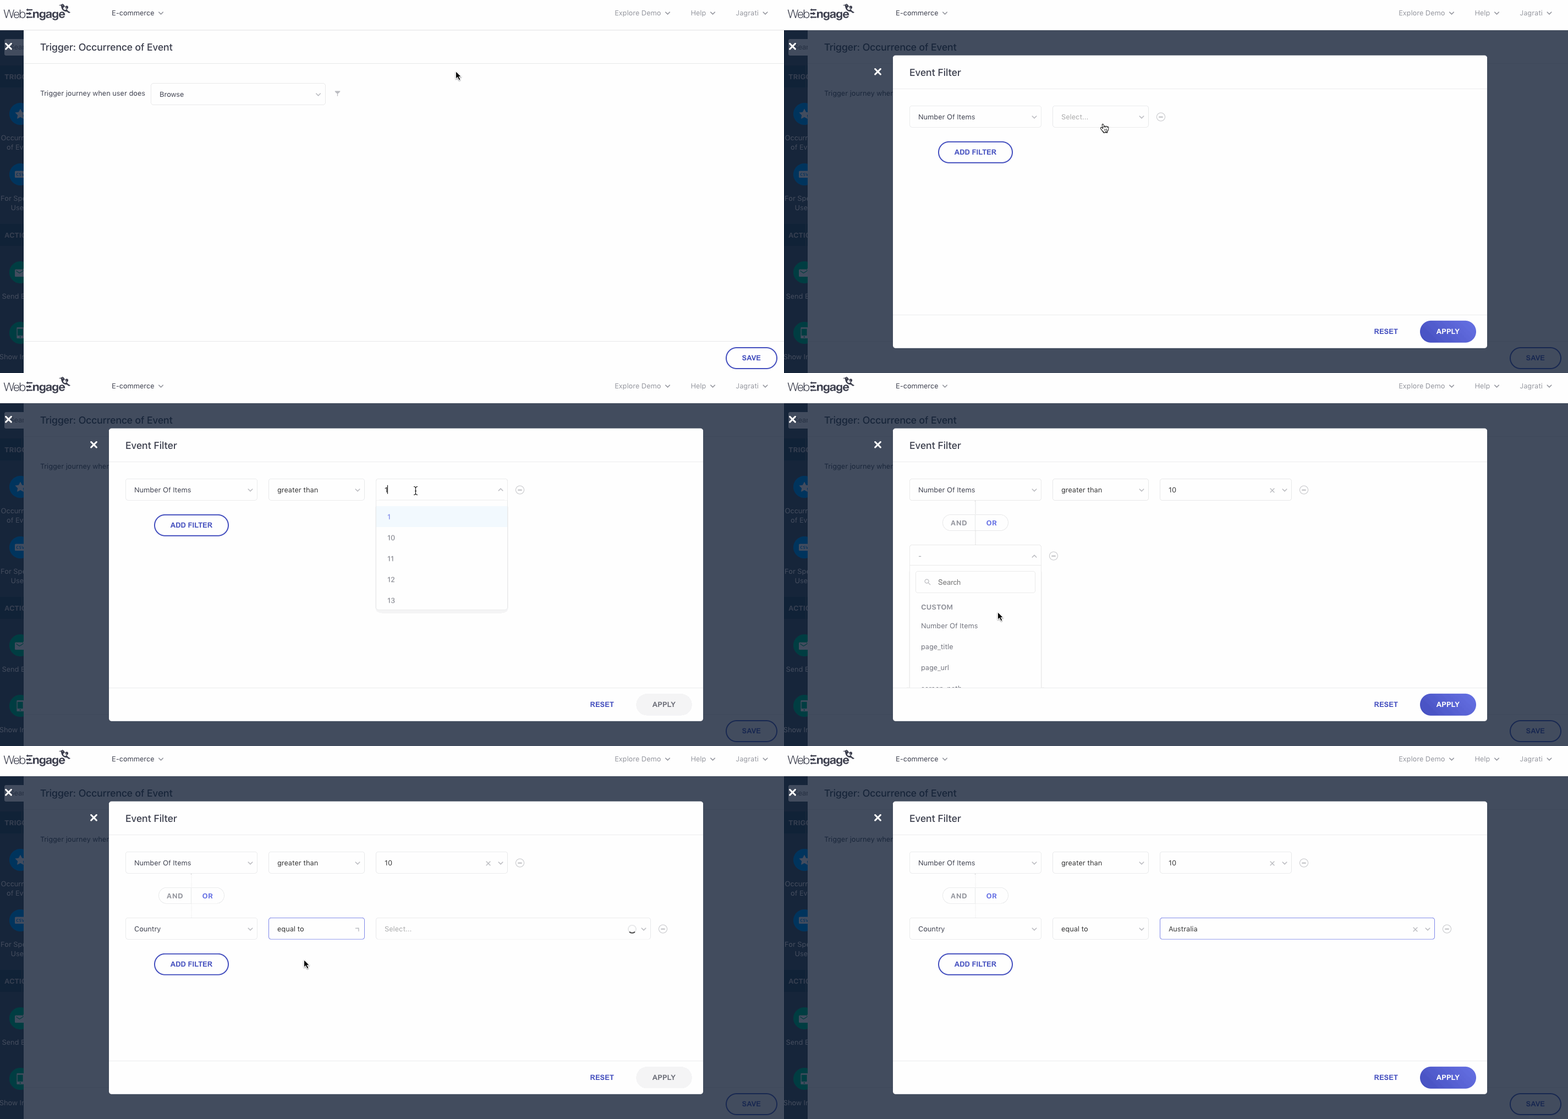
Click to enlarge
-
For example, in the above visual, we have added the following event attribute filters to the event, Browse:
- Number of Items is greater than 10 OR
- Country is equal to Australia
-
This means that only those users who have browsed more than 10 items or are from Australia will
Enter the journey.
How it Works: Clubbing Event Attributes by the AND/OR LogicAND: Helps you start the Journey experience for only those users who perform the event in the context of all the event attribute filters applied to it.
OR: Helps you start the Journey experience for users who perform the event in the context of either of the event attribute filters applied to it.
Enters/ Exits/ Is In Segment
This trigger allows you to tailor the Journey experience to a specific group of users who are a part of a Segment created by you.
We recommend using the Entry Trigger if the Journey's purpose is to onboard, engage, convert, retain or reactivate a particular group of users who share the same interests, spending habits, display similar behavior while interacting with your app/website, belong to the same location and so on.
Here's how you can set it up:
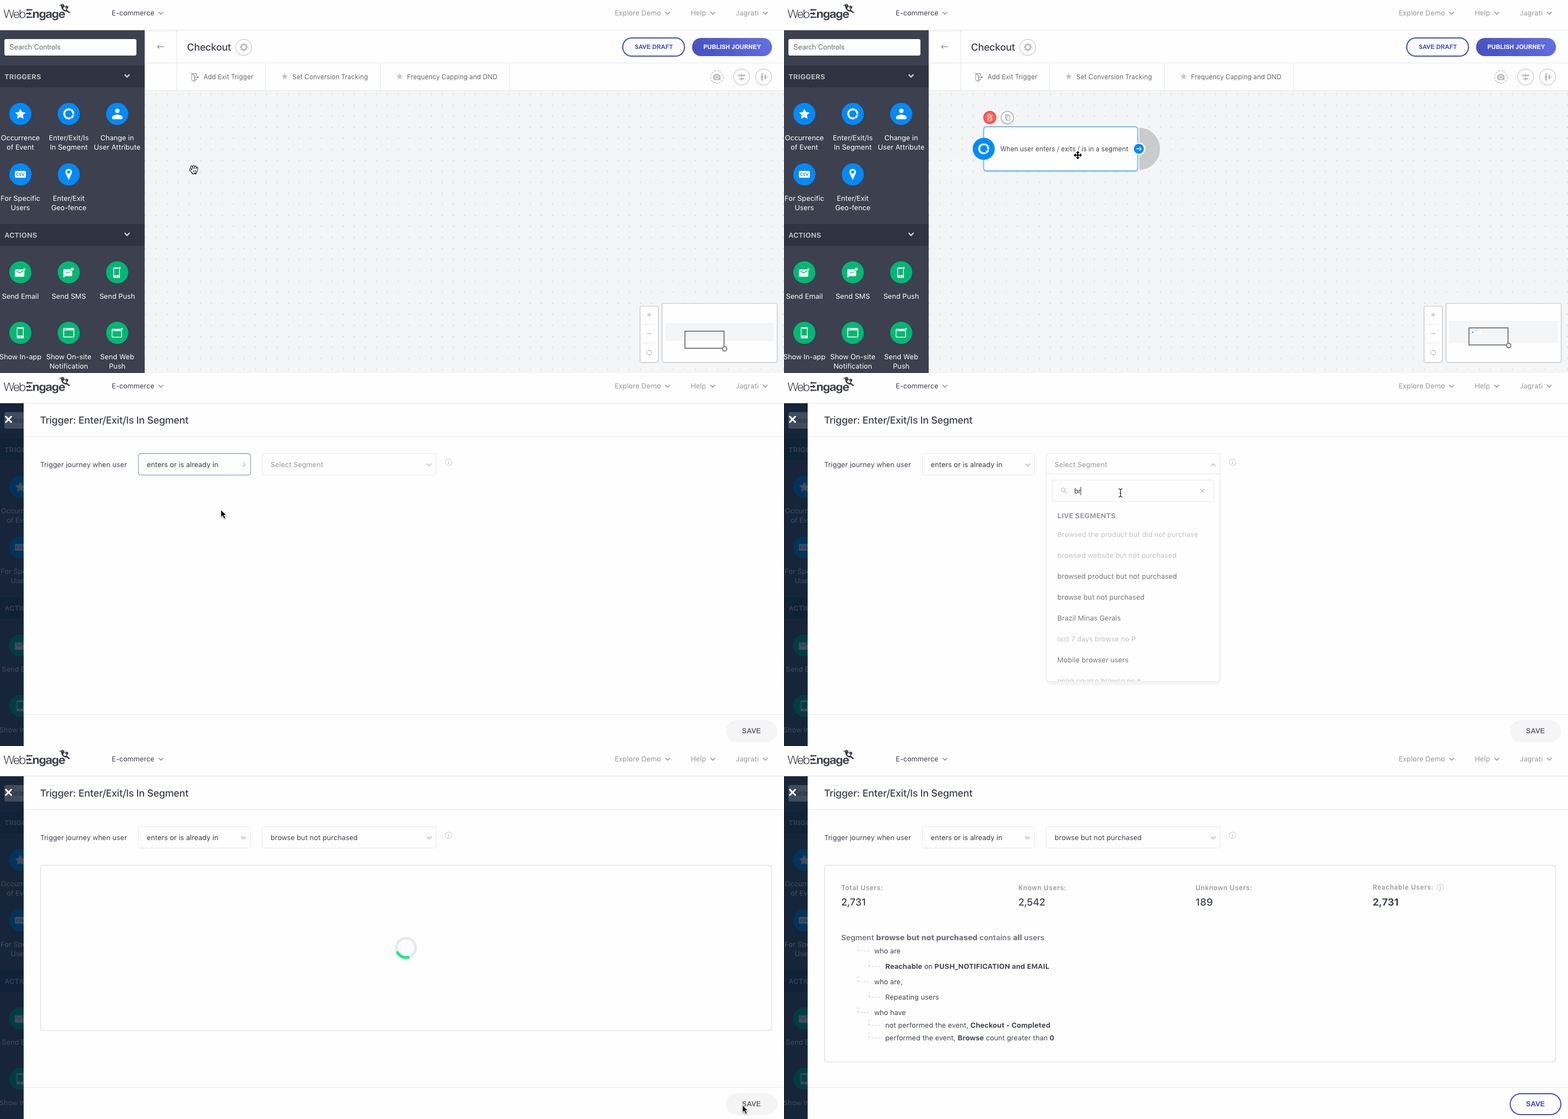
Click to enlarge
Step 1: Drag and drop the Enters/ Exits/ Is In Segment block onto the canvas
- Click on the block to configure it.
Step 2: Click on the first dropdown to define the context in which users should experience the Journey by selecting:
-
Enters: Starts the Journey for a user as soon as they're included within the selected Segment.
-
Enters or Is Already In: Starts the Journey for all users who are currently a part of the selected Segment and all those who are subsequently included in it.
-
Is Already In: Starts the Journey experience for all users who are currently included within the selected Segment.
-
Exits: Starts the Journey experience for a user as soon as they're removed from the selected Segment.
Step 3: Click on the second dropdown to select from a list of all the Active Segments in your account.
-
Click Save to go back to the Canvas.
-
For example, in the above visual, we have specified the Entry Trigger as a user who Enters or Is Already In the Segment, Last 30 Days Browse Time for the Reactivation Journey.
Please Note
If you choose the Is Already In option, only users who are reachable on the channel(s) being used within the journey will enter the journey. This does not apply if Call API blocks or Set User Attribute blocks are used in the journey.
Only Live Segments can be targeted when selecting the conditions - Enters/ Exits the Segment.
You can create a journey experience for users of a Static List by selecting the condition - Is Already In Segment.
You will not be able to select a Live Segment in which the rules of segmentation contain a rolling time frame like:
Last Seen is within/before/after a specific time
User Attribute that tracks date/time is within/before/after a specific time
Event performed where frequency is defined using the prefix - Most Recent Event Time/ Least Recent Event Time
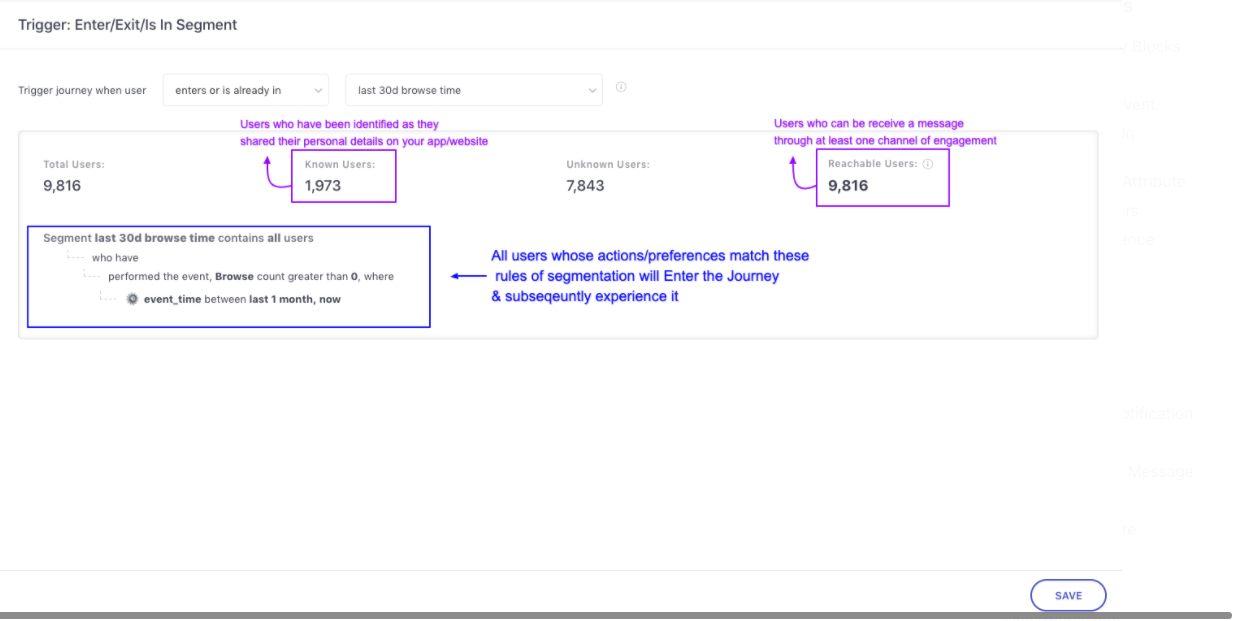
Click to enlarge
As shown above, once you select a Segment, you will be able to preview a snapshot of its users and rules of segmentation. Let's walk you through the details:
Total Users: Indicates the total number of users that are currently a part of the segment.
Known Users: Indicates the number of identified users, out of the total users, that are currently included within the segment.
- All users are identified on the basis of the Unique Identifier specified by you while setting up your WebEngage account.
Unknown Users: Indicates the number of anonymous users, out of the total users, that are currently included within the segment.
Reachable Users: Indicates the total number of users in your segment that can be reached through at least one channel of engagement (Push, In-app, SMS, On-site, Web Push, Email) at present.
Rules of Segmentation: You can choose to segment your entire user base by 3 broad parameters - User (attributes), Behavior and Technology. Hence, here you will find a summary of all the rules based on which the segment's users have been grouped together.
These rules of segmentation help you understand the type of users who will enter the Journey and subsequently experience it.
Change in User Attribute
Quick ReadUnderstanding User Attributes and how they allow you to track each user's preferences, spending habits, birthday, anniversary and so on!
This trigger allows you to tailor the Journey to users who experience similar changes in the value of their User Profile Attribute like their LTV (lifetime value), ARPU value (Average revenue per user), RFM score, membership status, age group and so on.
We recommend using the Entry Trigger if the Journey's purpose is to engage, convert, retain or reactivate a particular group of users who share similar preferences.
Here's how you can set it up:
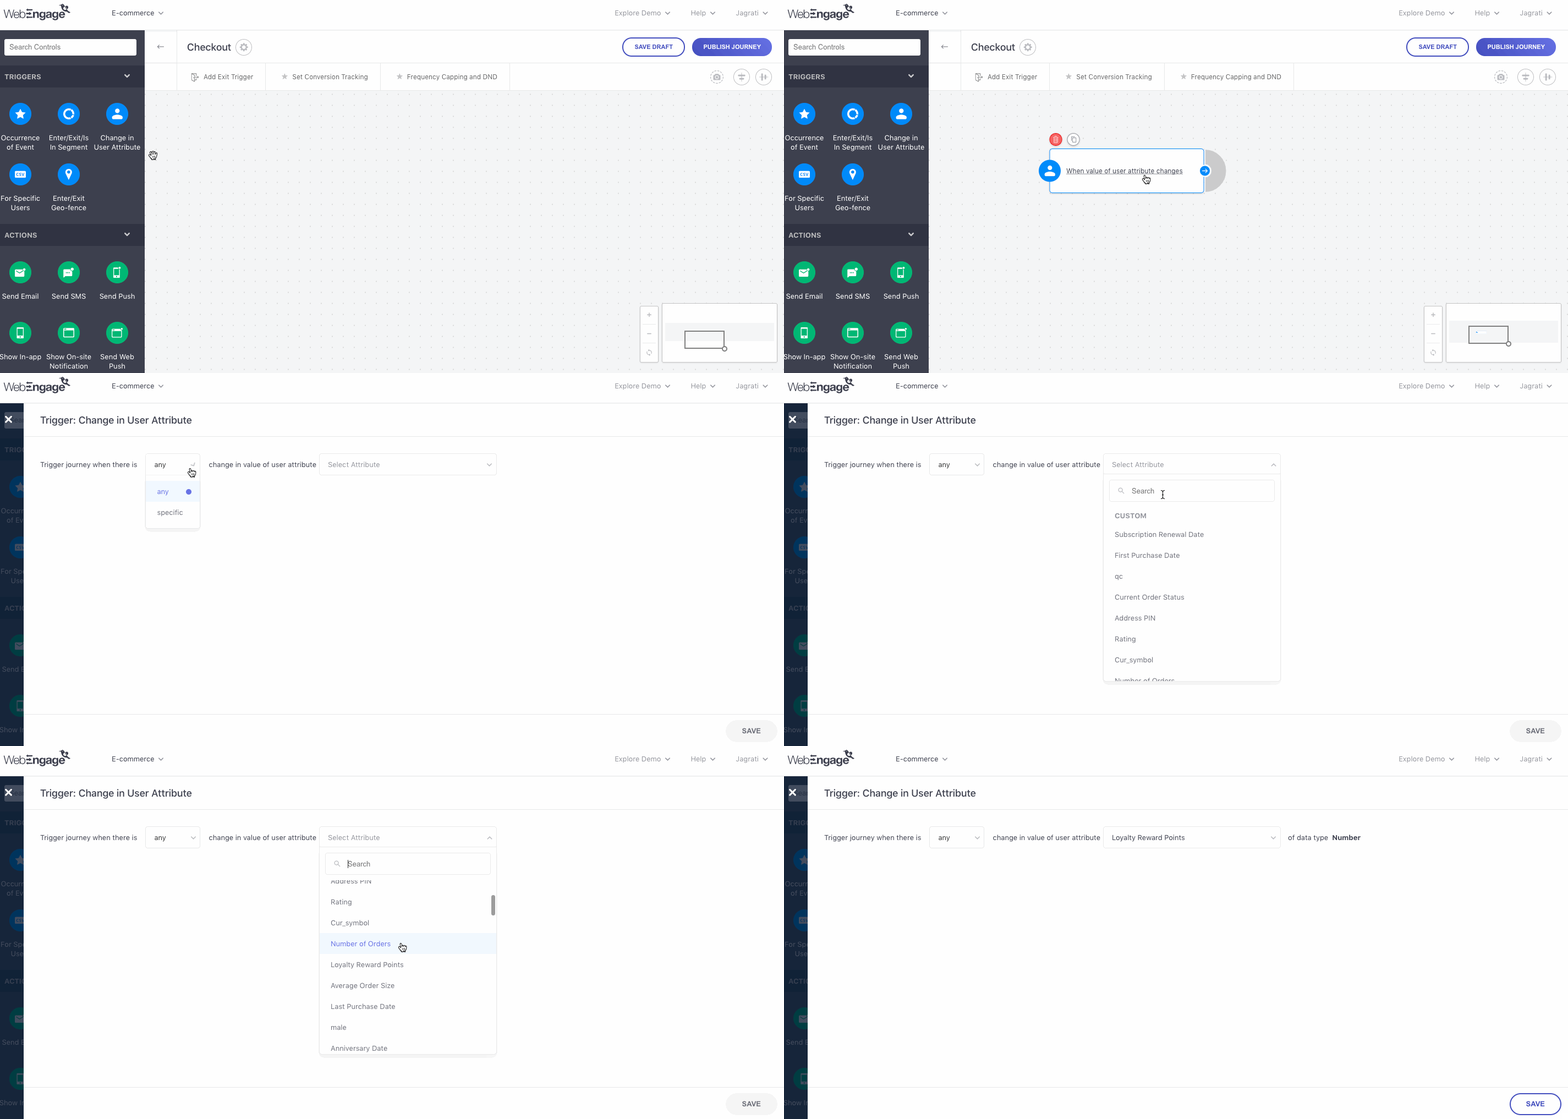
Click to enlarge
Step 1: Drag and drop the Change in User Attribute block onto the Canvas.
Step 2: Click on the block to configure it.
Step 3: Click on the first dropdown to define the type of change in the user attribute's value by selecting - Any (change) or Specific (change)
-
Any: Starts the Journey for a user as soon as the value tracked against the specified User Attribute changes in their User Profile.
-
Specific: Starts the Journey for a user only if the specified change occurs in the value tracked against the specified User Profile Attribute.
- Selecting this option will add another row to the page, allowing you to define the type of change(s).
Step 4: Click on the second dropdown to select from a list of all the User Attributes being tracked for your account.
For example, in the above visual we have specified the Entry Trigger as whenever Any change occurs in the value of the attribute, Loyalty Reward Points for the current Journey.
Step 5: As shown below, if you've selected Specific (change) at Step 3, then you can define the type of change with reference to the User Attribute's Old Value or New Value.

Click to enlarge
-
New Value: The value that is present after the change occurred in the specified User Attribute's value for a particular user.
-
Old Value: The value that was present before the change occurred in the specified User Attribute's value for a particular user.
Let's go over a use-case to show you how it works:
Ed-tech: Creating a Journey Experience to Guide Students Who Change Their Board of EducationLet's take the example of an ed-tech platform that enables school going students to excel at their yearly courses with supplementary learning modules and exams.
Given the vast number of streams and boards of education, students are bound to have different types of syllabi and exams. Hence, makers of the platform crafted different learning experiences for students based on a combination of their:
Board of Education (IB, CBSE, ICSE)
Classes (10, 11, 12)
Educational Stream (Arts, Commerce, Science)
All the combinations resulting from the values listed above are tracked as the Custom User Attribute, Cluster
Since it's common for students to change the board of education on graduating from a class, marketers of the app designed Journey experiences to guide them. Once such Journey experience was created for students who switched to IB from CBSE on graduating to Class 11.
Here's how they configured theEntry Trigger for the CBSE to IB Students, Class 11 Journey:
Step 1: Click on the first dropdown to select Specific (change).
Step 2: Select the Custom User Attribute, Cluster.
Step 3: Define the type of change as New Value equal to IB-11.
Step 4: Click on Add Condition, and combine the conditions by the AND logic.
Step 5: Define the type of change as Old Value equal to CBSE-10.
Thus, all students who changed their board of education from CBSE to IB on graduating to Class 11 will Enter the Journey for guidance on how they can adapt to the new board's syllabus.
For Specific Users
This Entry Trigger allows you to manually curate the Journey's target audience in any of the following ways:
-
Method 1: Upload a CSV file containing user details
-
Method 2: Create a list of User IDs to engage handpicked users
You can continue adding users to the Journey through this block as and when needed.
The status of all CSV uploads and manually entered User IDs can be tracked through the History section.
Here's how it works:
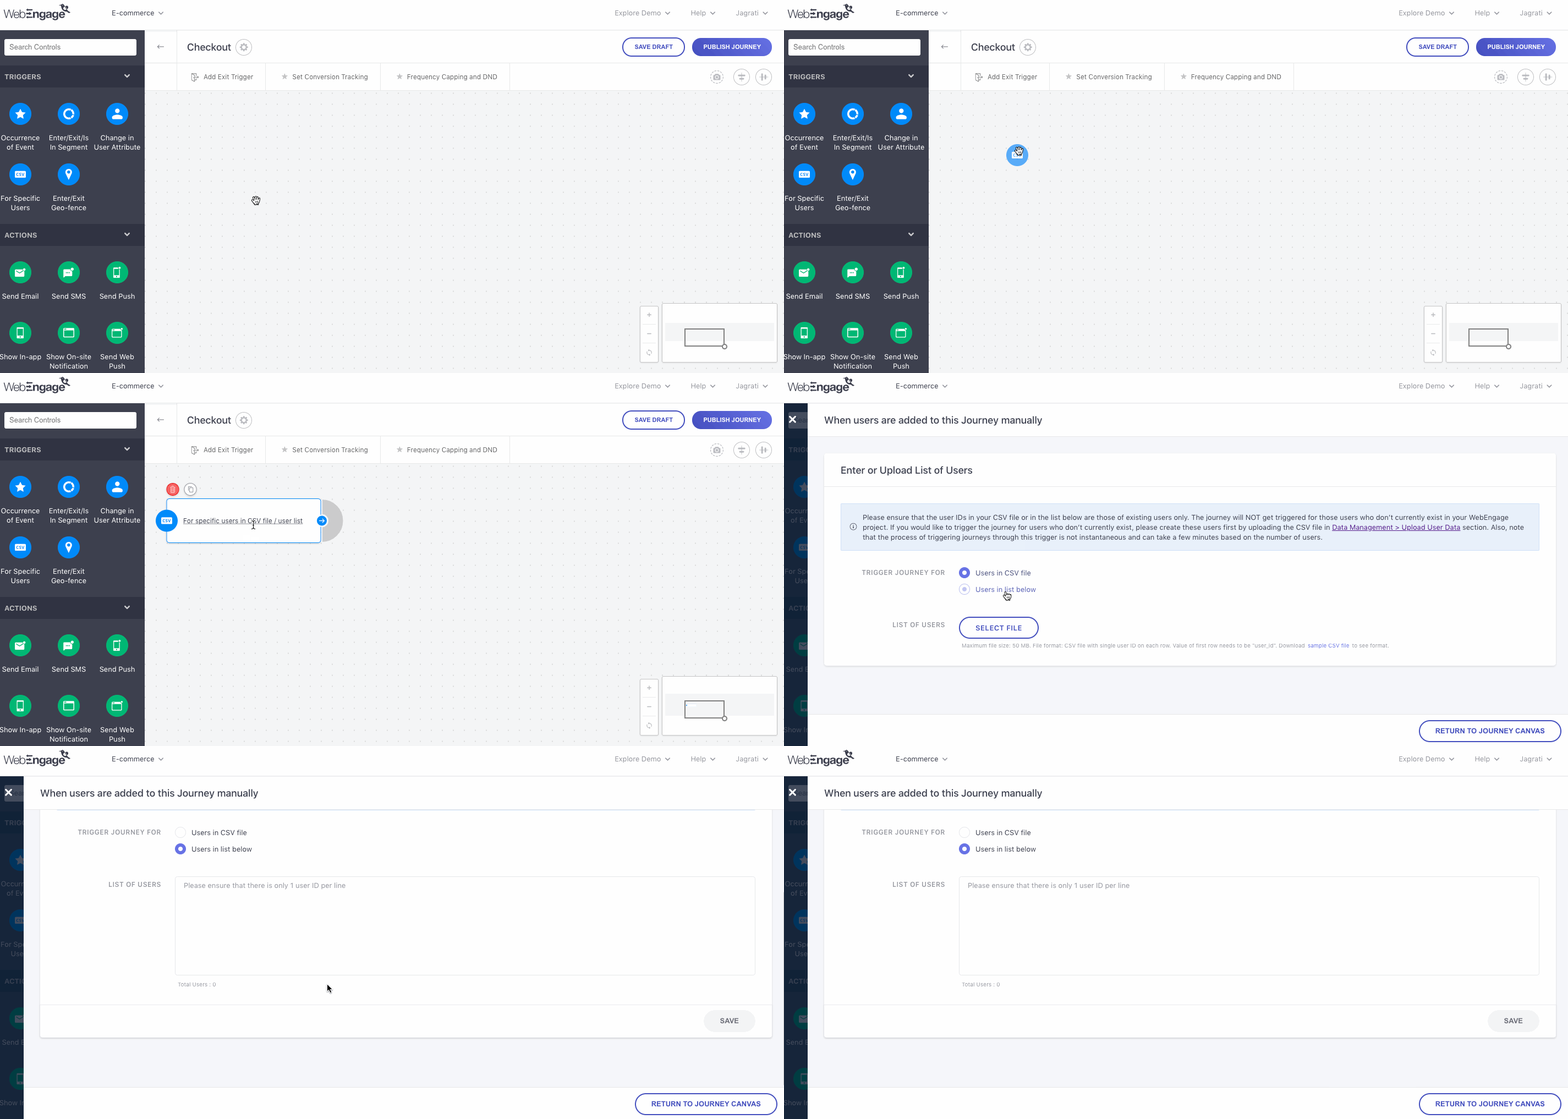
Click to enlarge
Step 1: Drag and drop the For Specific Users block onto the Canvas and click to configure.
Step 2: Select a method to curate the target audience.
-
SelectUsers in CSV file to trigger the Journey for the User IDs mentioned in it (how it works)
-
SelectUsers in the list below to trigger the Journey for the User IDs added manually in the box below (how it works)
Step 3: Click Save to go back to the Canvas.
Guidelines for Uploading a CSV File
-
The file size must not exceed 50 MB.
-
Please ensure that the first column of the file lists all the User IDs with the heading being
user_id, indicating the same value as mentioned under Users< List of Users in your dashboard. -
Each row must contain details of just one user.
-
Each System User Attribute or Custom User Attribute included within the file must be mentioned as a column header in the same format in which it's being tracked in your dashboard. (detailed read)
Entering User IDs Manually
-
You can track down a user's ID by accessing the List of Users section of a Campaign, Segment or the Users section of your dashboard.
-
Once identified, add each User ID_in a separate line and click _Save.
History of User IDs Added to the Block & Identifying Failures
Each time you upload a CSV file or manually add User IDs to the block, we'll count it as a single data entry. You can track the upload status of each data entry through the History section highlighted below.
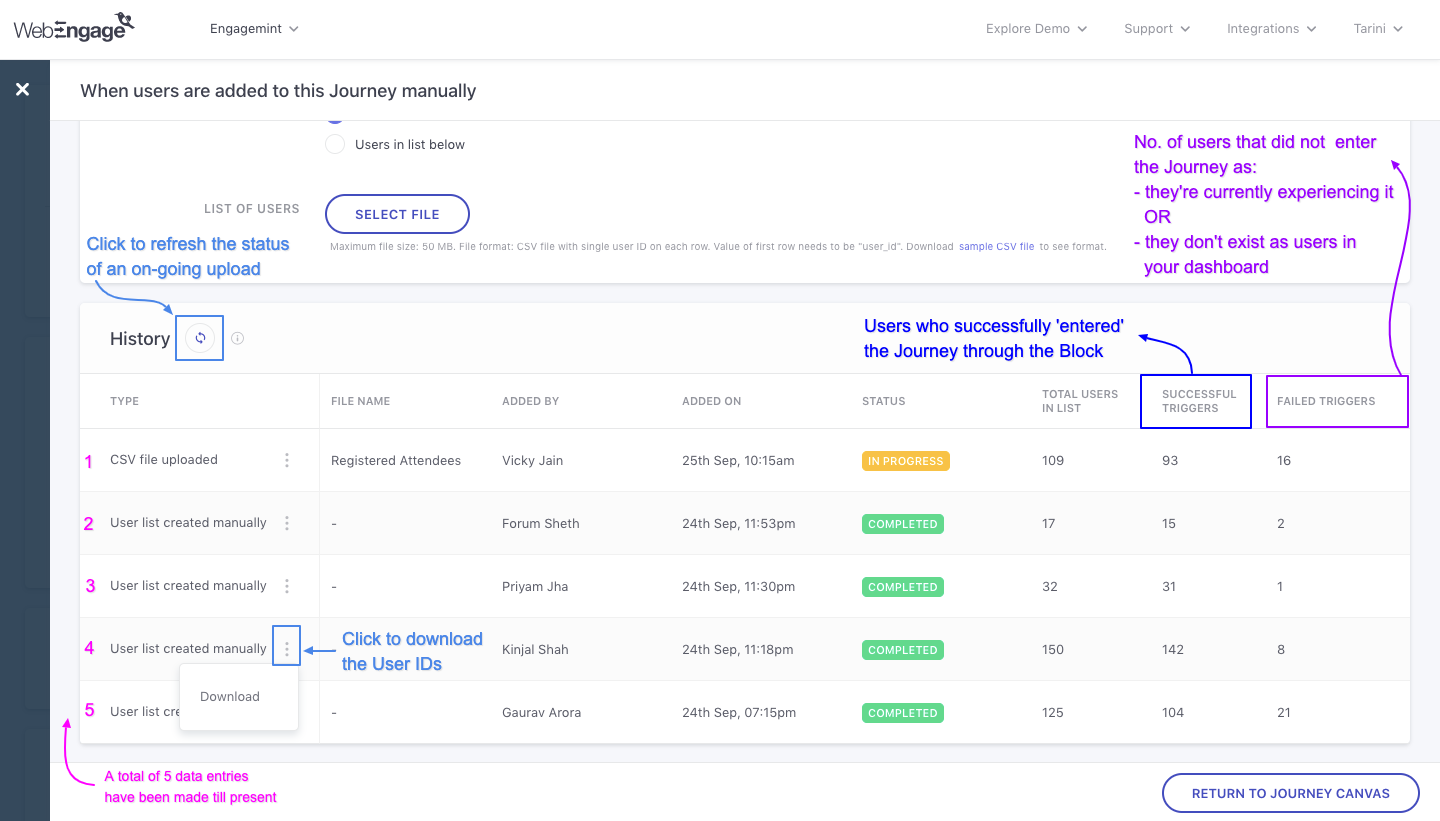
Click to enlarge
Let's walk you through all the details shown here:
-
Type: Indicates the method chosen to add the user details indicated by either term - CSV file uploaded or User list created manually
-
File Name: Indicates the name of the CSV file that was uploaded. (remains blank if Users IDs were entered manually)
-
Added By: Indicates the name of account admin that added the users to the Journey.
-
Added On: Indicates the date and time at which the data entry was made in the For Specific Users Trigger block.
-
Status: Indicates the current status of data entry and can be any of the following - Failed, Completed or In Progress.
-
Total Users in List: Indicates the total number of User IDs that were added in a single data entry.
-
Successful Triggers: Indicates the number of users, out of the total, who Entered the Journey through the block and subsequently experienced it.
-
Failed Triggers: Indicates the number of users, out of the total, who did not Enter the Journey due to any of the following reasons:
-
Case 1: They are currently experiencing the Journey due to which, they cannot re-enter it at the moment.
-
Case 2: These users do not exist in your WebEngage dashboard due to which we will not be able to reach them through either channel of engagement.
- This can happen when the user interacted with you offline and their details have not been synced with your dashboard, yet.
- In such cases, a new user can be created through Rest API or a manual data upload through the Data Management section.
- IF the API call failed/ was not in the correct format then you will need to debug with your tech team to identify the error.
- IF the data upload is still being processed, then it'll take some time for us to reflect the new user's details across your dashboard.
-
Case 3: There was an error in the format in which the User IDs were uploaded in the CSV file/ manually added to the block.
- Please cross-check the User IDs and upload/ add them again.
-
Feel free to drop in a few lines at [email protected] in case you need any further assistance. :)
Enter/ Exit Geofence
Quick Read: What is a Geofence and how you can leverage it to create consistent online-to-offline user experiences.
Geofencing, as we all know it, is a godsend tool that makes location-based engagement feel like child's play. All you need to do is, create a virtual fence around a location on a map. Then each time a user enters or exits the fence, you can engage them with messages, specifically tailored to their location, behavior, and preferences in real-time!
Isn't it an exciting time to be a marketer?
We recommend using this Entry Trigger if the Journey's purpose is to engage users with information or offers contextually relevant to their real-time location. Here's how you can set it up:
Click to enlarge
Step 1: Drag and drop the Enter/ Exit Geofence block onto the canvas
- Click on the block to configure it.
Step 2: Click on the dropdown to define the context in which users should experience the Journey by selecting Enters or Exits
-
Enters: Starts the Journey for a user as soon as they breach the specified geofence by entering it.
-
Exits: Starts the Journey for a user as soon as they breach the specified geofence by exiting it.
Step 3: Search for a location and create the geofence on the map.
-
As shown above, you click on the Dot icon on the top left of the map to create multiple geofences. Doing so will ensure that all users who enter/exit either of the specified geofences will experience the journey.
-
For example, in the above visual, we have defined the Entry Trigger as a user who Enters the Geofence around Trafalgar Square or The National Gallery in London for the journey.
Step 4: Click Save to continue building the Journey experience!
Limitations of Geofencing
No great technology comes without it's own set of limitations. Such is the case with Geofencing too. Let's quickly go over this:
1. Location Tracking
For both Android and iOS devices, users need to explicitly give your app the permission to track their location by selecting the option, Always On for Location Tracking. This setting enables us to track each user's location in real-time, irrespective of whether the app is running in the foreground or background. However, there are a few exceptional cases in which location tracking may fail even if it's set to Always On:
-
Chinese Devices: As you must be aware, most Chinese devices force kill apps in the background as part of their battery optimization functions. This causes the termination of location tracking for these users (which means that geofencing will stop working as the app needs to be running in the foreground or background to keep detecting the location). This is especially applicable to:
- OnePlus devices, when batter optimization is enabled.
- Redmi devices when the autostart option is enables.
- Lenovo, Coolpad, Xiaomi, Oppo, Leco and other devices that do not allows app to launch in the background.
-
iOS: If users choose to disbale Location Tracking as a part of their Batterry Saver settings, then geofencing will not work.
2. Location Accuracy & Minimum Radius
To determine the exact location of a user the OS uses a combination of GPS, Cellular Network Data, WiFi Data and Network Triangulation. This information is then passed on to your app, which then relays the location information to WebEngage.
-
In urban environments, where the cell towers and Wi-Fi routers are more dense, geofencing accuracy can reach 100-200 meters. However, if you live in a skyscraper, then geofencing might not work reliably due to GPS inaccuracies.
-
Wifi gives the best results in terms of location accuracy, whereas GPS is not as reliable. This is why, we recommend that you create a minimum geofence area of 100-150 meters to ensure location accuracy.
3. Real-time Geofencing
Geofencing does not always work in real-time and is dependent on the following factors:
-
Frequency of Location Update from the OS: WebEngage depends on the OS (Android/iOS) to glean the real-time location of a device and does not control the frequency of information exchange between the OS:arrow_right: Your App ➡️ WebEngage.
- Thus, such situations could arise wherein a user has entered/exited a geofence but the information was relayed a few minutes later. This will invariably cause a delay in triggered the Journey experience for a user.
-
Availability of Cellular Network/ Wifi: If a device is not connected to the cellular network or a Wifi connection, then your app will buffer the location-related information and will relay it to WebEngage as soon as the device is back online. This will cause a delay in triggered the Journey experience for a user.
Actions
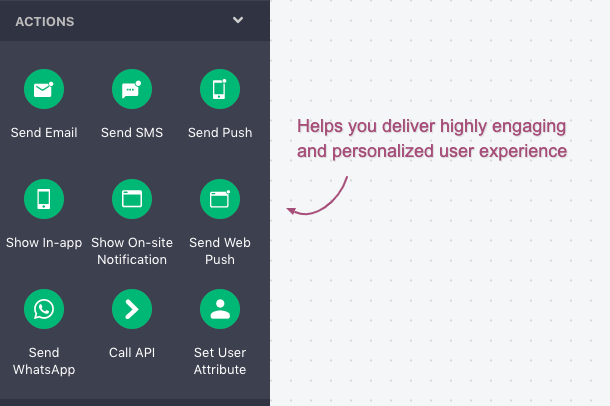
Click to enlarge
Action Blocks enable you to engage users at various points in their Trip, make an API call to your servers to update/request details of a user in the Journey and update User Attributes in your dashboard as per a user's latest Journey interactions.
Thus, you can think of these as points of user engagement that help you deliver contextually personalized experiences in real-time at various stages in the user's lifecycle by:
- Sending an Email
- Sending an SMS
- Sending a Push Notification
- Showing an In-app Message
- Showing an On-site Notification
- Sending a Web Push Notification
- Sending a WhatsApp Message
- Calling an API to personalize the message before sending it or updating your server database with details related to the actions performed by user while experiencing the Journey
- Setting the value tracked against a User Attribute for a user
Let's get you acquainted with how eachBlock works:
Send Email
This block enables you to achieve the Journey's end goal by engaging users with a highly personalized Email campaign. As shown below, users in the Journey enter the block through a preceding branch, causing them to receive an Email in the context of all the blocks they have experienced in their on-going Trip.
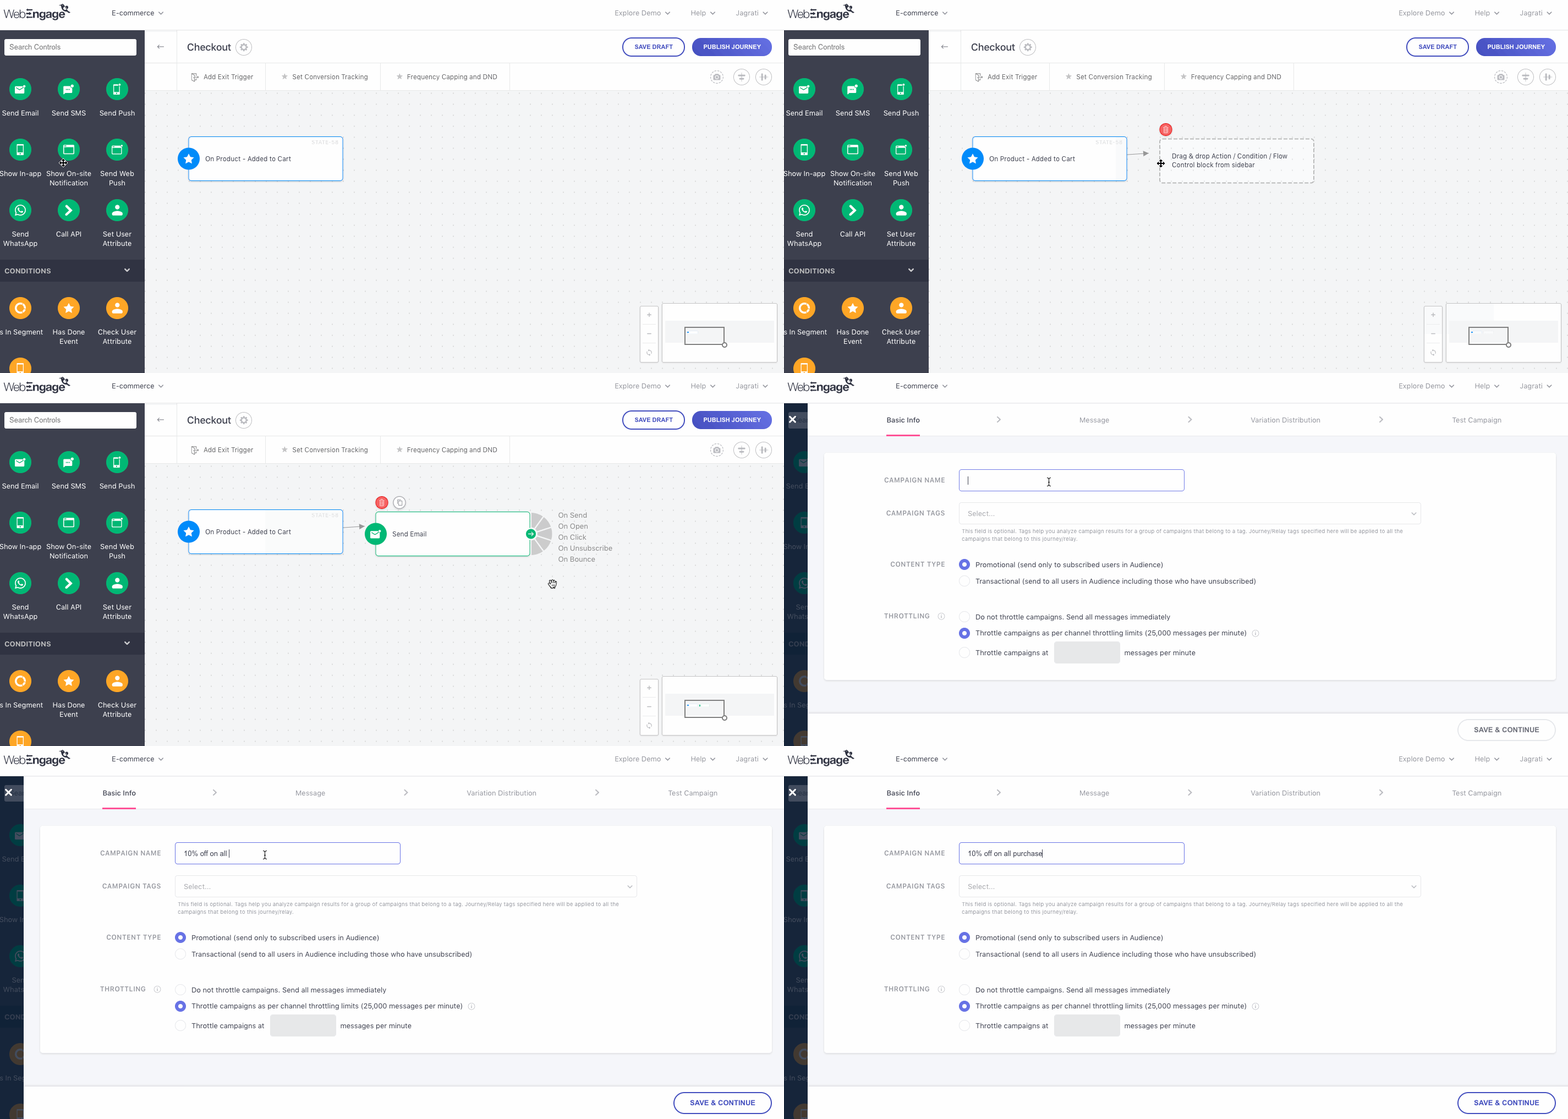
Click to enlarge
Here's how you can configure it:
Step 1: Drag and drop the Send Email block onto the Canvas
- As shown above, connect it to an existing block in the Journey to determine the context in which a user will receive the Email.
Step 2: Click on the block to create the campaign.
- Click Save to go back to the Canvas.
Step 3: Branch out the Journey to continue a user's Trip as per their interactions with the campaign.
Branching the Journey from Send Email Block
Branches are logic-based flows that help you determine the subsequent Journey experience on the basis of all the scenarios that can occur once a user enters the Send Email Block.
- Each scenario is tracked as a Campaign Event in your dashboard, allowing us to track each user's interactions in real-time. These events also help you analyze the campaign's impact against various performance indicators.
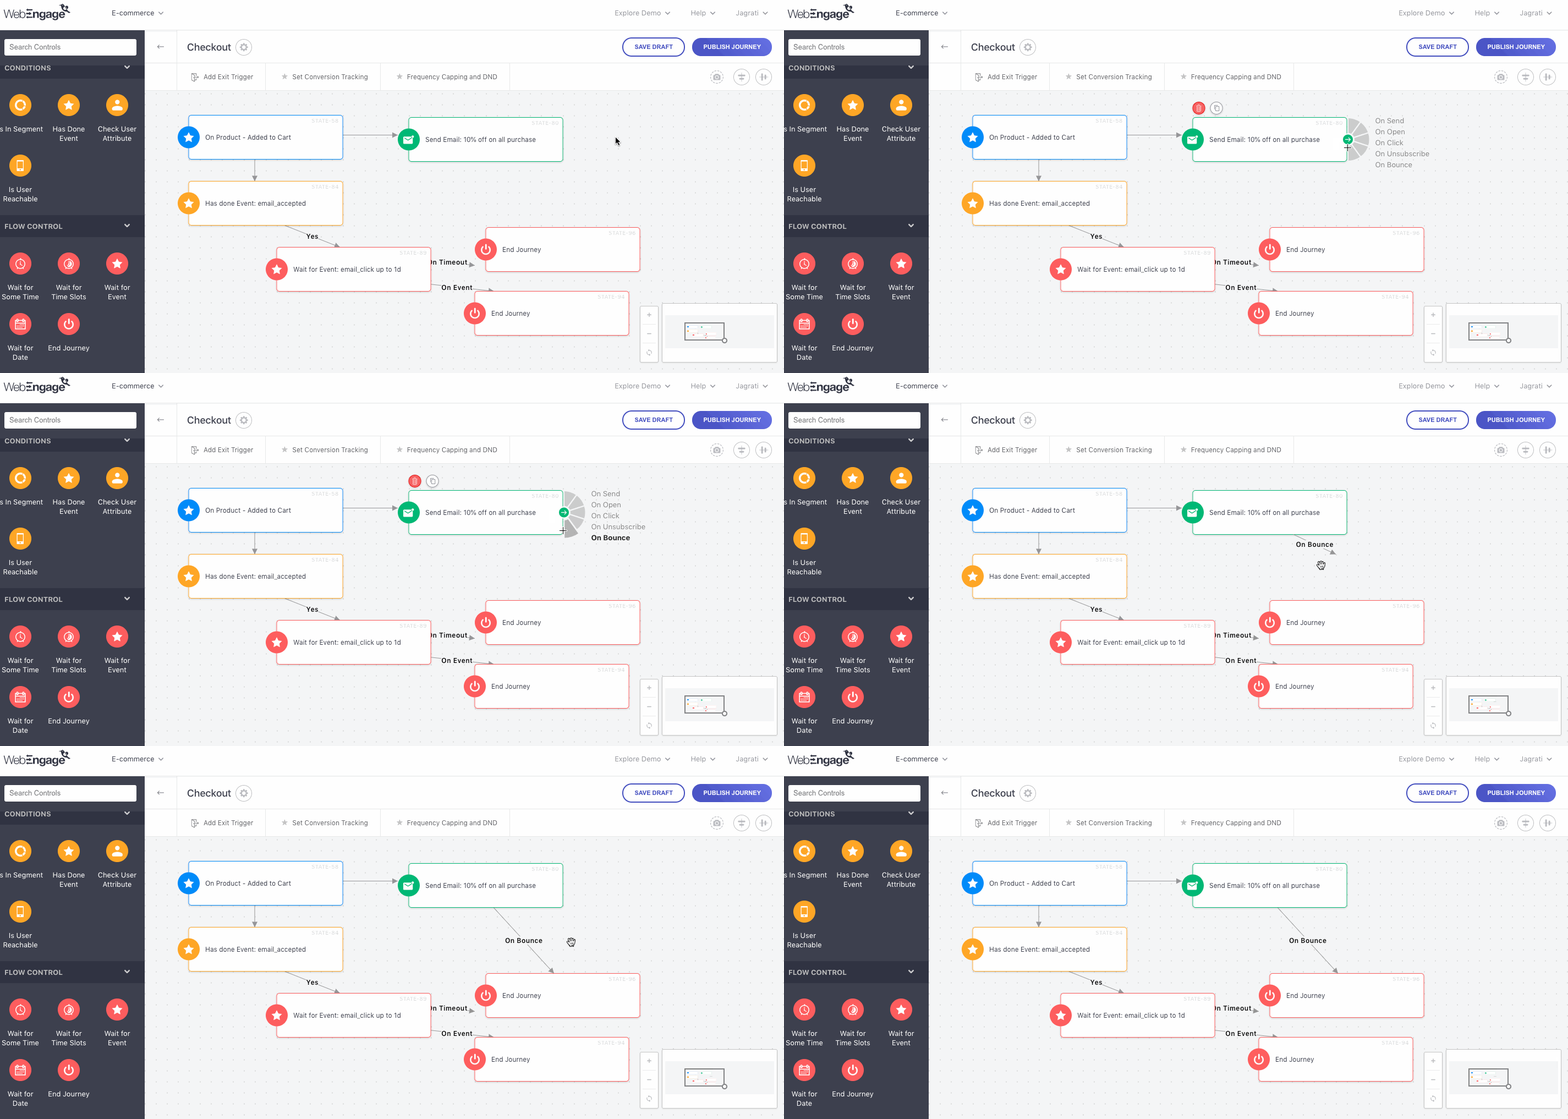
Click to enlarge
As shown above, you can choose to branch out the Journey experience based on all the following scenarios after a user enters the Send Email Block:
-
On Send: As soon as an Email is Sent to a user through the block, their Trip will continue through this branch, leading them to experience the next block it's connected to.
-
On Open: As soon as a user Opens the Email, their Trip will continue through this branch in the Journey.
-
On Click: As soon as a user Clicks on a link included within the Email, their Trip will continue through this branch in the Journey.
-
On Unsubscribe: As soon as a user Clicks on the Unsubscribe link included within the Email, their Trip will continue through this branch in the_Journey.
-
On Bounce: If the Email sent through this block fails to get delivered to a user due to soft or hard bounce, then their Trip will continue through this branch, leading them to experience the next block it's connected to.
So, what happens if anEmail is Sent to a user, they Open it and Click on a link? - Their Trip will continue through all the respective branches, leading them to simultaneously experience the blocks connected to each one.
Send SMS
This block enables you to achieve the Journey's end goal by engaging users with a highly personalized text message. As shown below, users in the Journey enter the block through the preceding branch, causing them to receive an SMS in the context of all the blocks they have experienced in their on-going Trip.
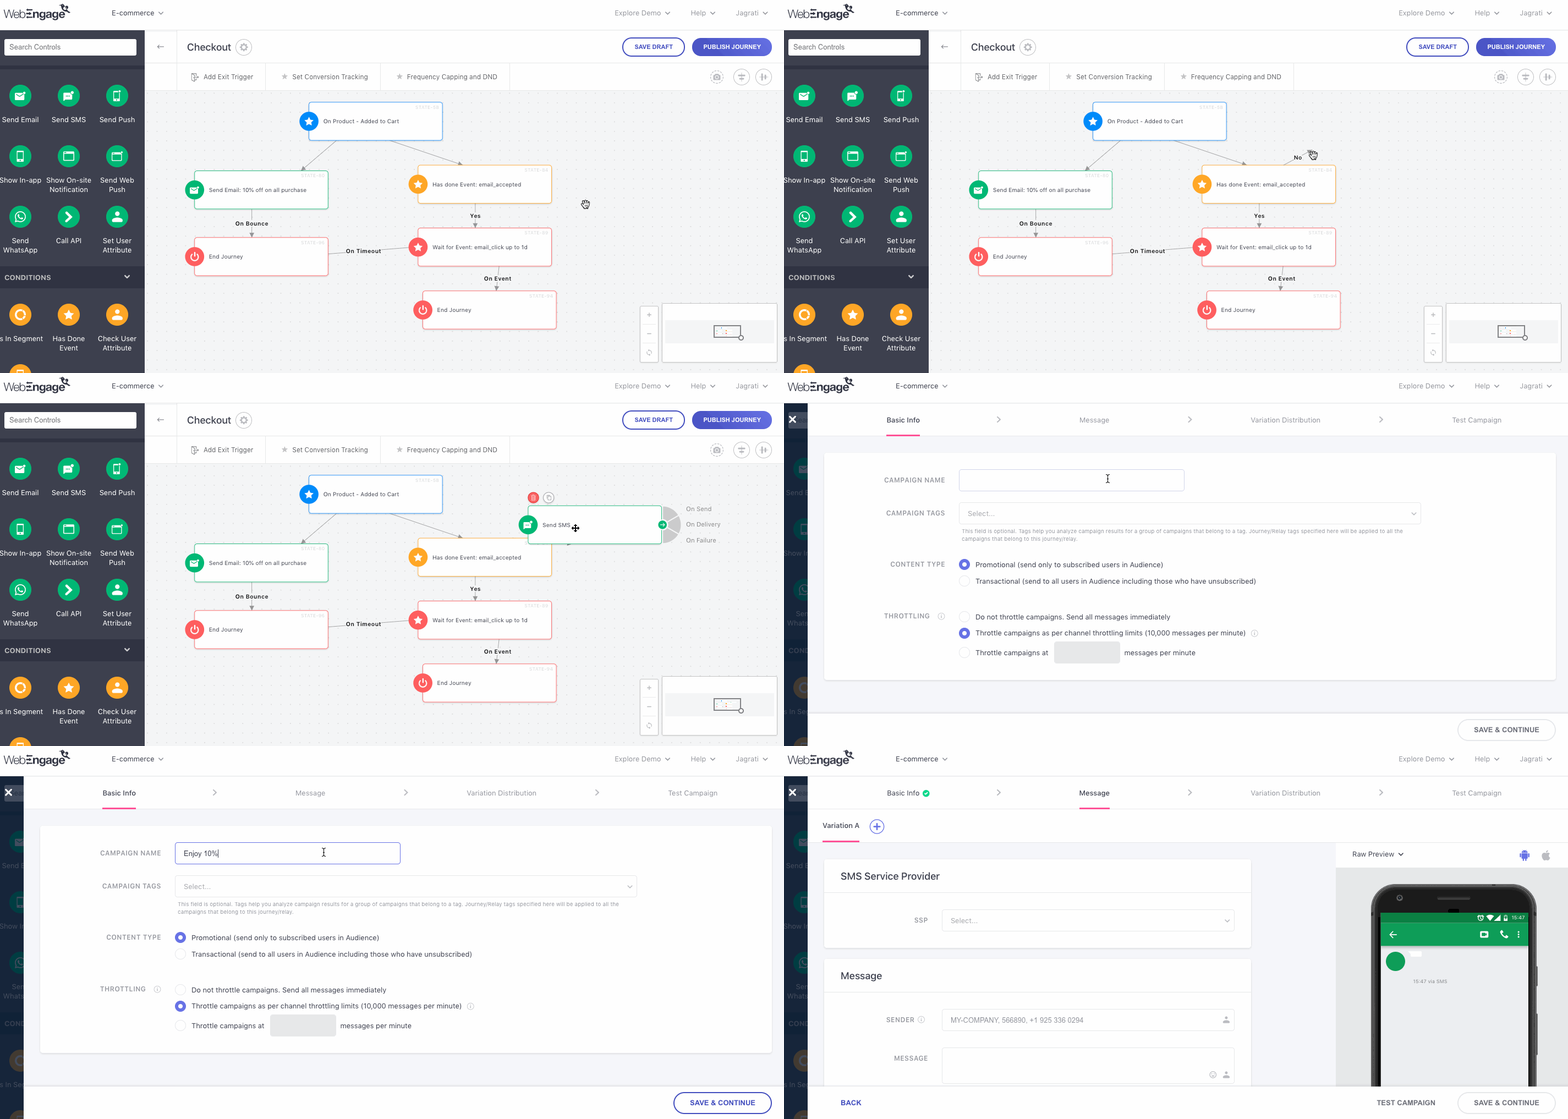
Click to enlarge
Here's how you can configure it:
Step 1: Drag and drop the Send SMS block onto the Canvas
- As shown above, connect it to an existing block in the Journey to determine the context in which a user will receive the SMS.
Step 2: Click on the block to create the campaign.
- Click Save to go back to the Canvas.
Step 3: Branch out the Journey to continue a user's Trip as per their interactions with the campaign.
Branching the Journey from Send SMS Block
Branches are logic-based flows that help you determine the subsequent Journey experience on the basis of all the scenarios that can occur once a user enters the Send SMS Block.
- Each scenario is tracked as a Campaign Event in your dashboard, allowing us to track each user's interactions in real-time. These events also help you analyze the campaign's impact against various performance indicators.
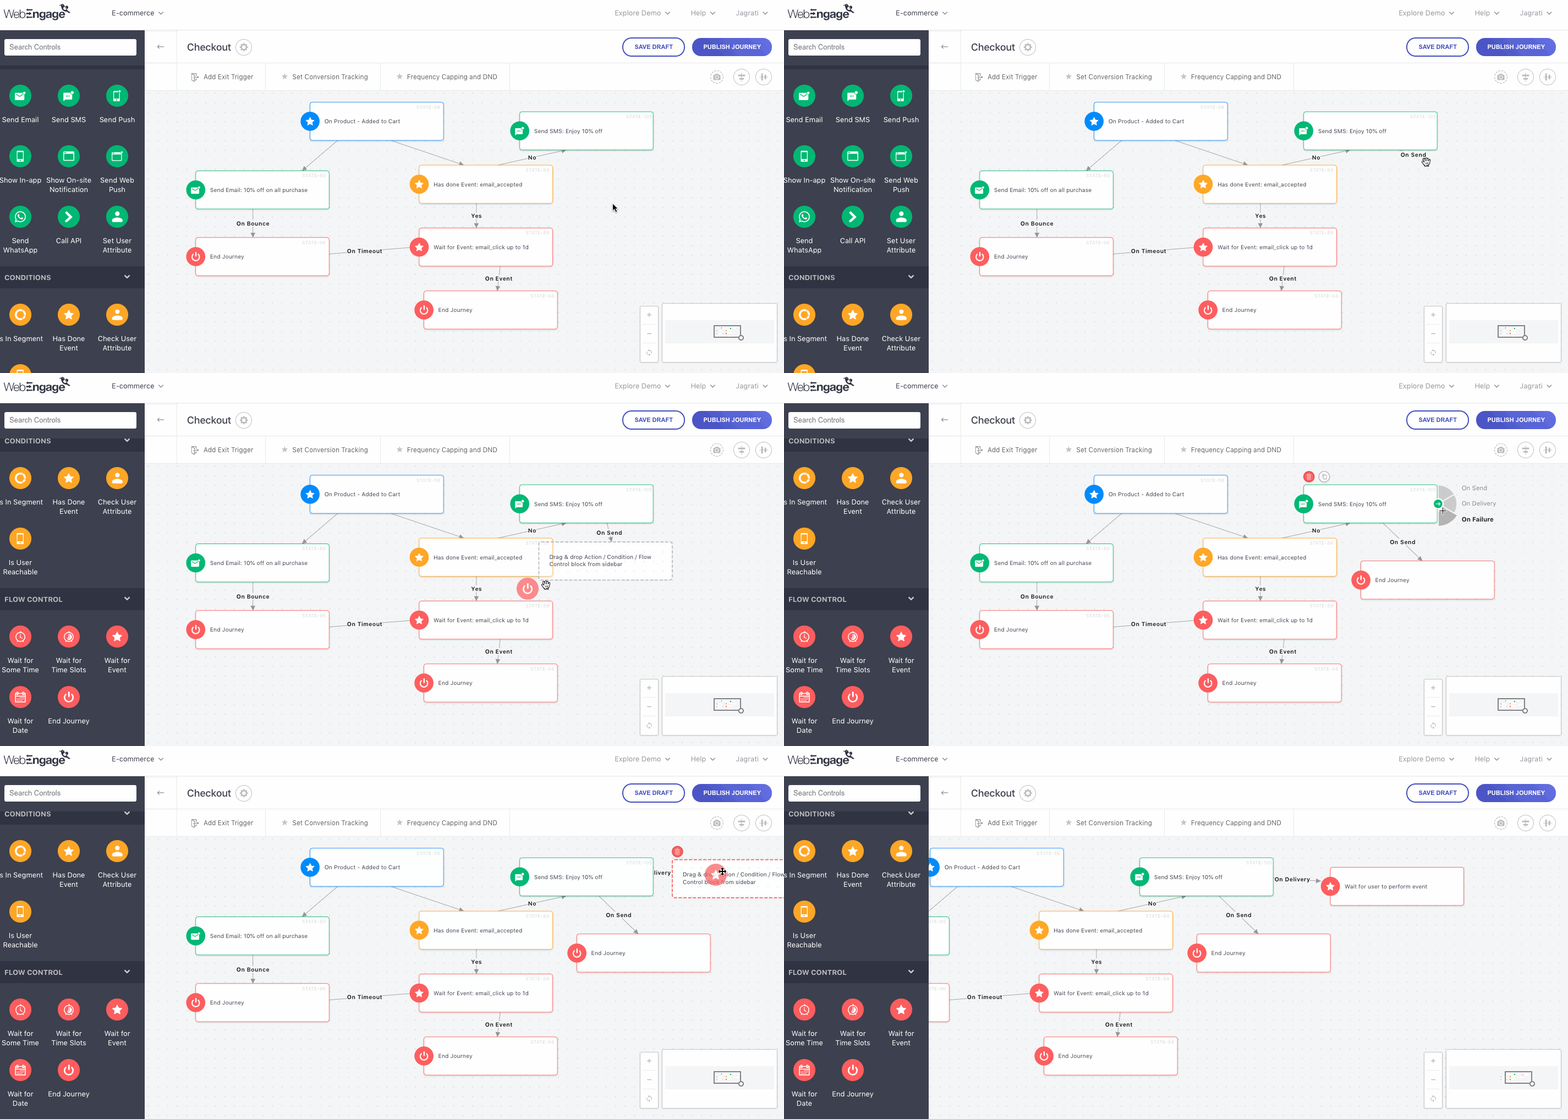
Click to enlarge
As shown above, you can choose to branch out the Journey experience based on all the following scenarios after a user enters the Send SMS Block:
-
On Send: As soon as an SMS is Sent to your SSP for delivery to a particular user through the block, their Trip will continue through this branch, leading them to experience the next block it's connected to.
-
On Delivery: As soon as an SMS is Delivered to a user, their Trip will continue through this branch in the Journey.
-
On Failure: If the SMS sent through this block fails to get delivered to a user, then their Trip will continue through this branch in the Journey.
So, what happens if anSMS is Sent and then Delivered to a user in the Journey? - Their Trip will continue through all the respective branches, leading them to simultaneously experience the blocks connected to each one.
Send Push
This block enables you to achieve the Journey's end goal by engaging users with a highly personalized notification. As shown below, users in the Journey enter the block through the preceding branch it's connected to, causing them to receive a Push Notification in the context of all the blocks they have experienced in their on-going Trip.
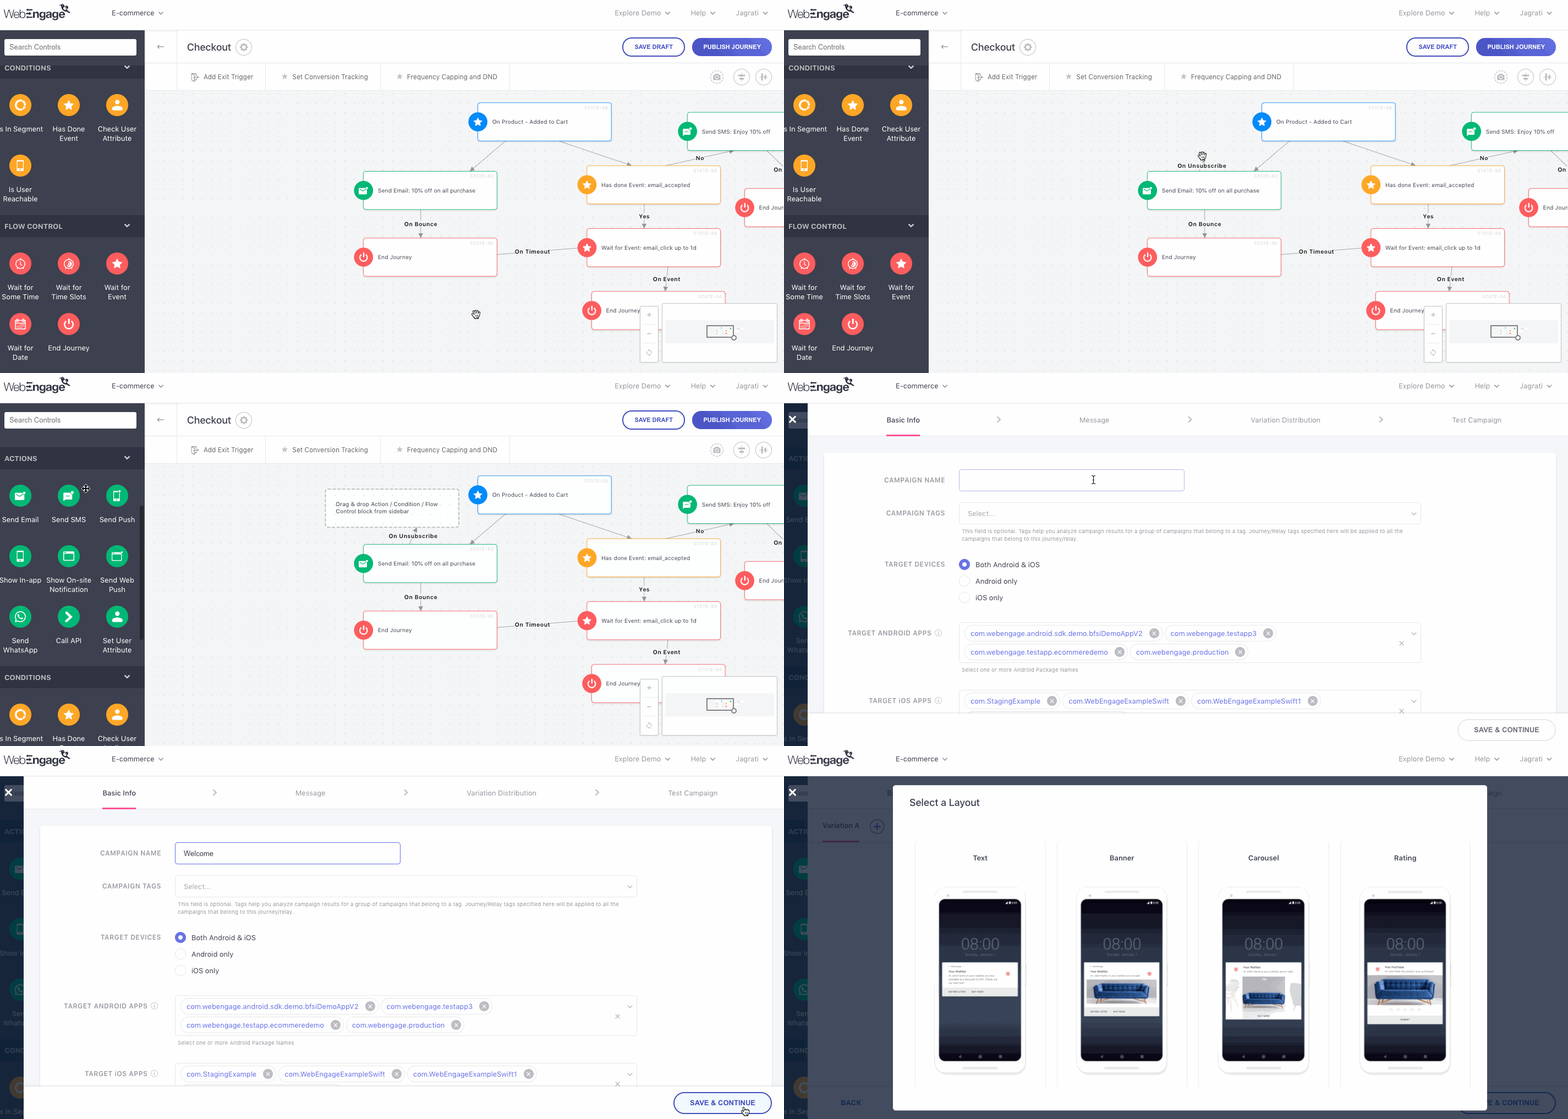
Click to enlarge
Here's how you can configure it:
Step 1: Drag and drop the Send Push block onto the Canvas
- As shown above, connect it to an existing block in the Journey to determine the context in which a user will receive the Push Notification.
Step 2: Click on the block to create the campaign.
- Click Save to go back to the Canvas.
Step 3: Branch out the Journey to continue a user's Trip as per their interactions with the campaign.
Branching the Journey from Send Push Block
Branches are logic-based flows that help you determine the subsequent Journey experience on the basis of all the scenarios that can occur once a user enter the Send Push Block.
- Each scenario is tracked as a Campaign Event in your dashboard, allowing us to track each user's interactions in real-time. These events also help you analyze the campaign's impact against various performance indicators.
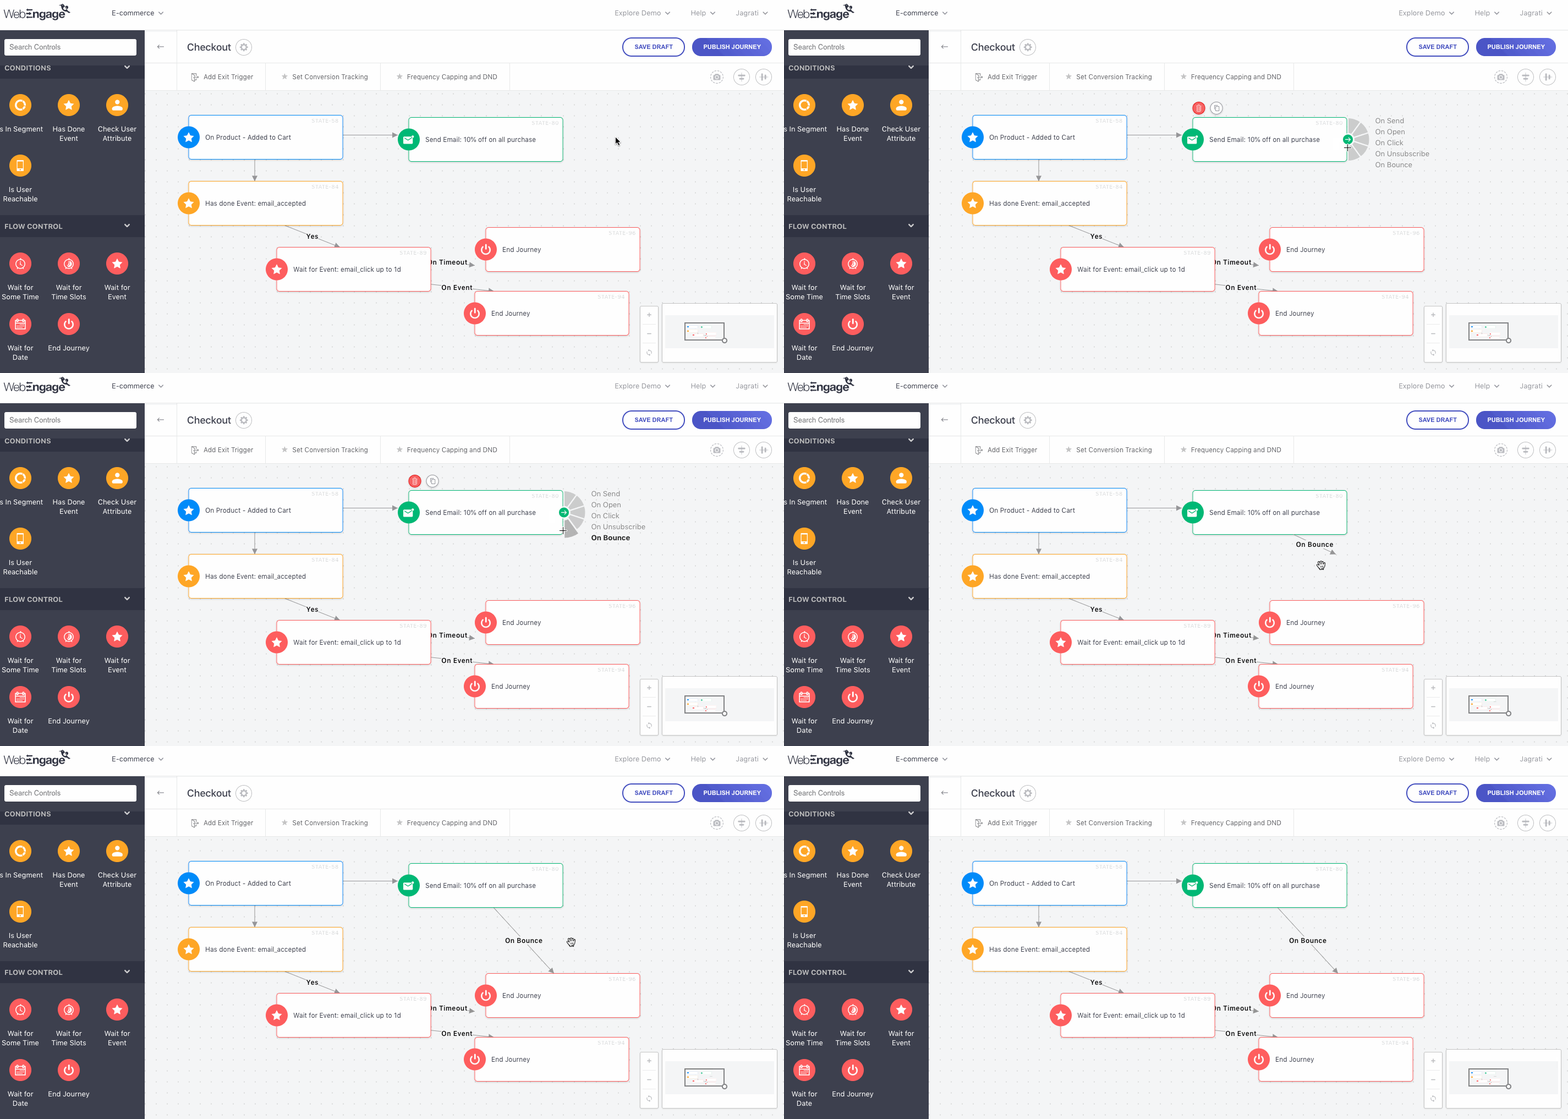
Click to enlarge
As shown above, you can choose to branch out the Journey experience based on all the following scenarios after a user enters the Send Push Block:
-
On Push: As soon as the Push Notification is Sent to FCM (for Android)/ APNs (for iOS) for delivery to a user, their Trip will continue through this branch, leading them to experience the next block it's connected to.
-
On Delivery: As soon as the Push Notification is Delivered to a user, their Trip will continue through this branch in the Journey.
-
On View: As soon as a user Views the notification, their Trip will continue through this branch in the Journey.
-
On Click: As soon as a user Clicks on the notification, their Trip will continue through this branch in the Journey.
-
On Dismiss: As soon as a user Dismisses the notification, their Trip will continue through this branch in the Journey.
So, what happens if a user receives aPush Notification, Views it and then Clicks on it/ Dismisses it? - Their Trip will continue through all the respective branches, leading them to simultaneously experience the blocks connected to each one.
Show In-app
This block enables you to achieve the Journey's end goal by engaging users with a highly personalized In-app Message. As shown below, users in the Journey enter the block through the preceding branch it's connected to, causing them to receive an In-app Notification in the context of all the blocks they have experienced in their on-going Trip.
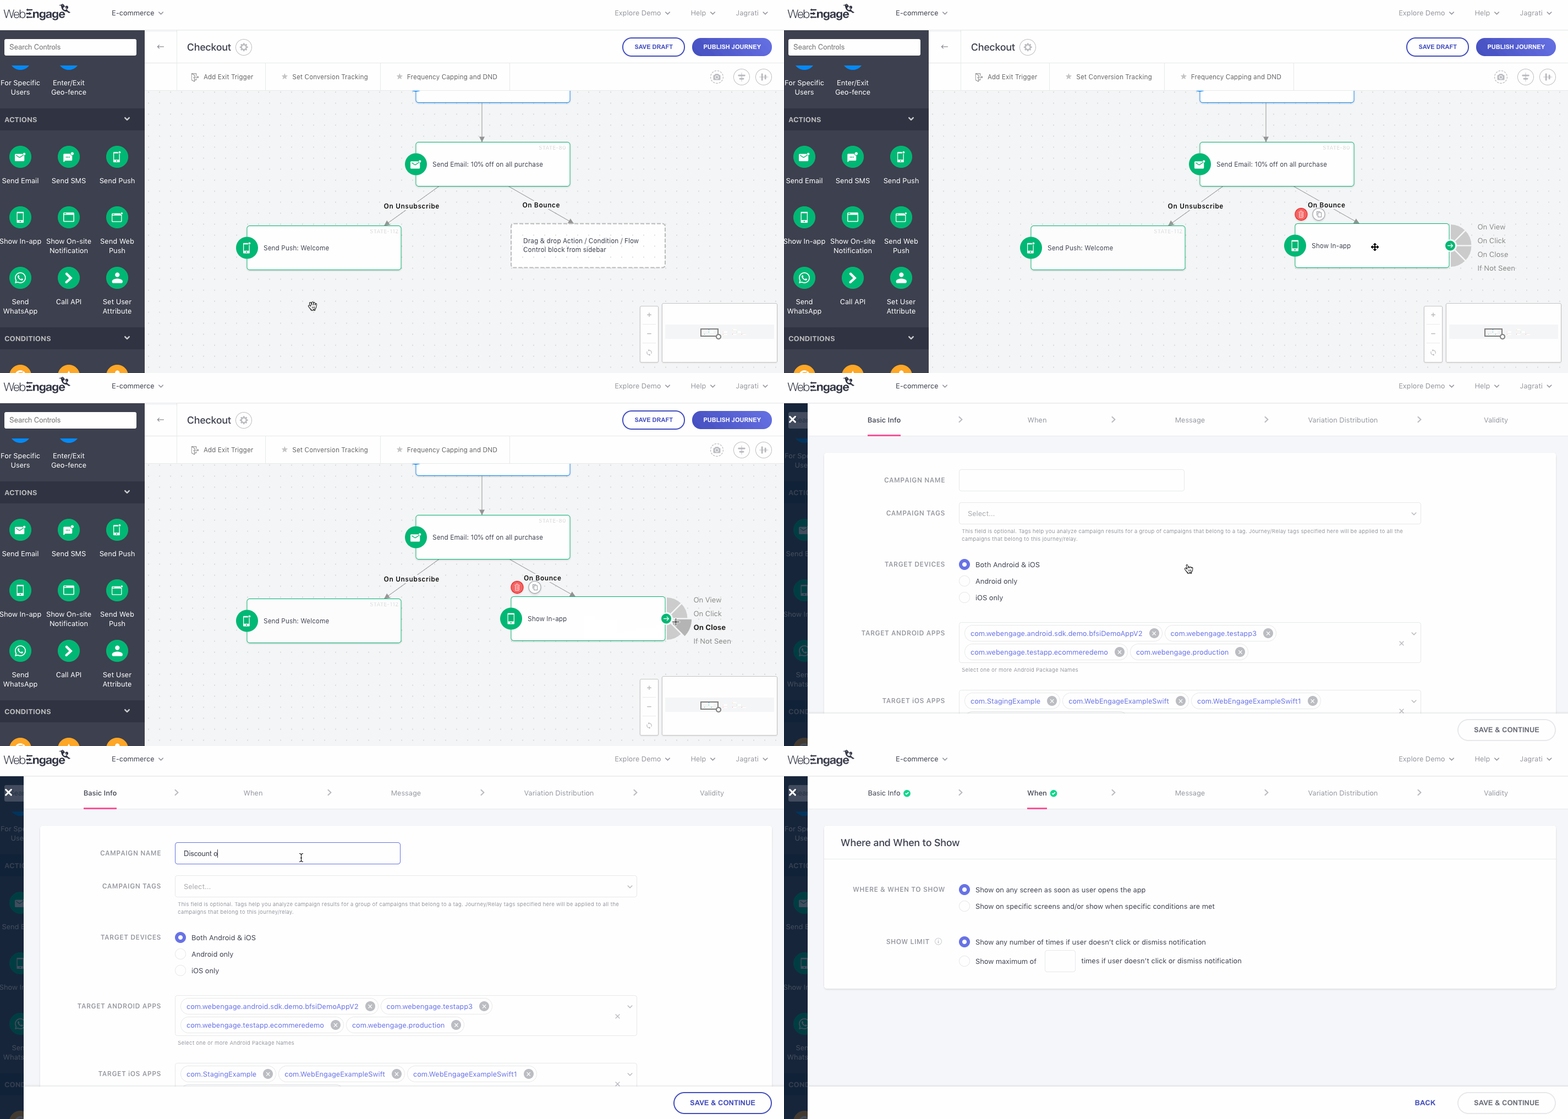
Click to enlarge
Here's how you can configure it:
Step 1: Drag and drop the Show In-app block onto the Canvas
- As shown above, connect it to an existing block in the Journey to determine the context in which a user will receive the In-app Notification.
Step 2: Click on the block to create the campaign.
- Click Save to go back to the Canvas.
Step 3: Branch out the Journey to continue a user's Trip as per their interactions with the campaign.
Branching the Journey from Show In-app Block
Branches are logic-based flows that help you determine the subsequent Journey experience on the basis of all the scenarios that can occur once a user enters the Send In-app Block.
- Each scenario is tracked as a Campaign Event in your dashboard, allowing us to track each user's interactions in real-time. These events also help you analyze the campaign's impact against various performance indicators.
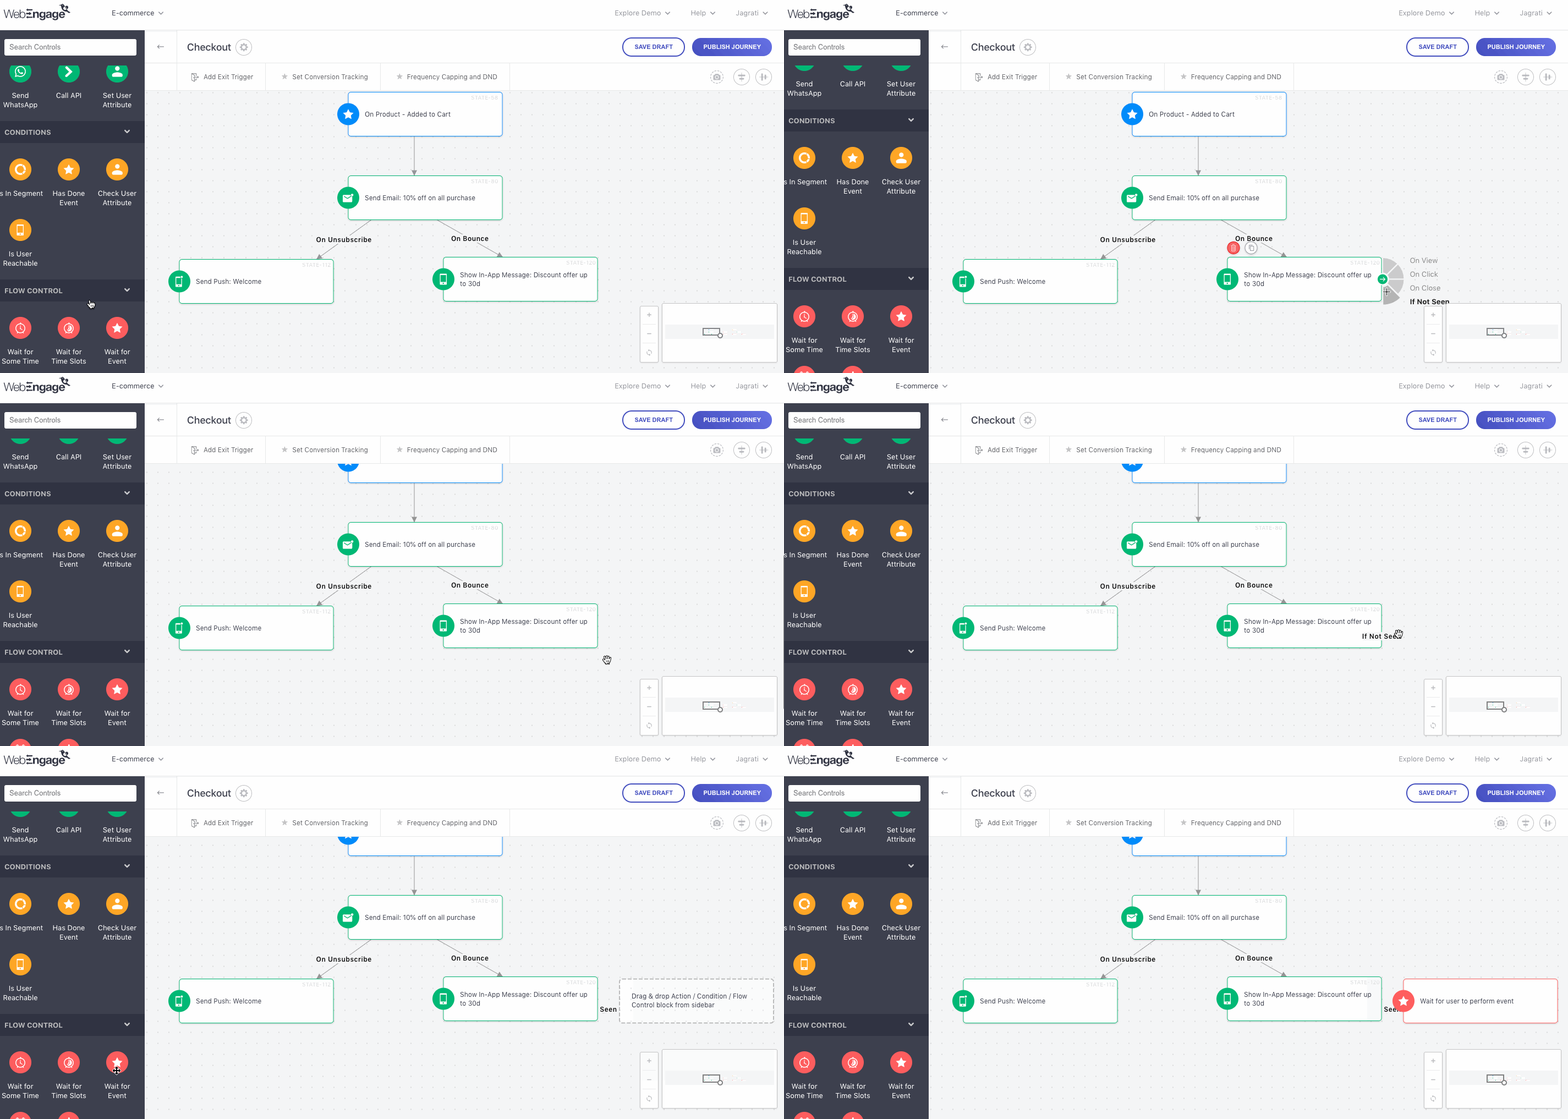
Click to enlarge
As shown above, you can choose to branch out the Journey experience based on all the following scenarios after a user enters the Send In-app Block:
-
On View: As soon as a user Views the In-app message, their Trip will continue through this branch in the Journey, leading them to experience the next block it's connected to.
- Each time a user views an In-app Notification, its tracked as an Impression in your dashboard.
-
On Click: As soon as a user Clicks on the In-app message, their Trip will continue through this branch in the Journey.
-
On Close: As soon as a user dismisses or Closes the In-app message they're viewing, their Trip will continue through this branch in the Journey.
-
If Not Seen: If a user chooses to ignore the In-app message, then their Trip will continue through this branch in the Journey.
So, what happens if a userViews and Clicks or Views and Closes the In-app Notification? - Their Trip will continue through all the respective branches, leading them to simultaneously experience the blocks connected to each one.
Show On-site Notification
This block enables you to achieve the Journey's end goal by engaging users with a highly personalized On-site Notification. As shown below, users in the Journey enter the block through the preceding branch it's connected to, causing them to receive an On-site Notification in the context of all the blocks they have experienced in their on-going Trip.
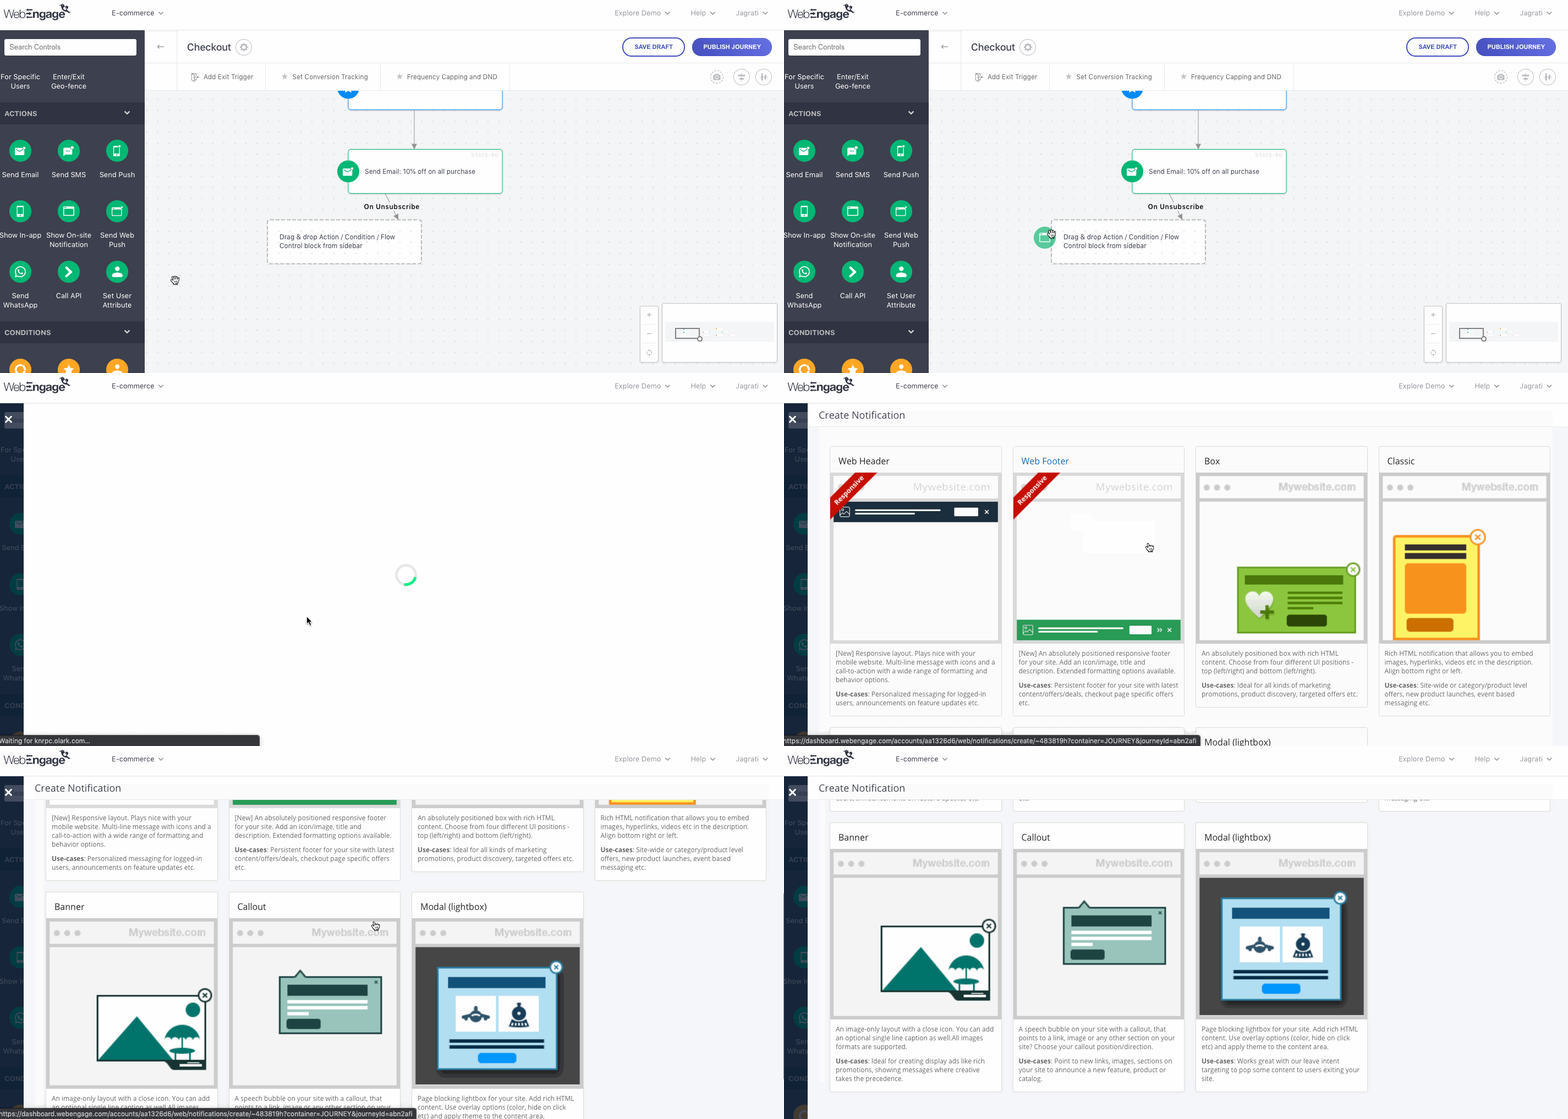
Click to enlarge
Here's how you can configure it:
Step 1: Drag and drop the Show On-site Notification block onto the Canvas
- As shown above, connect it to an existing block in the Journey to determine the context in which a user will receive the On-site Notification.
Step 2: Click on the block to create the campaign.
- As shown above, select a template and configure the message-theme as per your needs.
- Click Save to go back to the Canvas.
Step 3: Branch out the Journey to continue a user's Trip as per their interactions with the campaign.
Branching the Journey from Show On-site Notification Block
Branches are logic-based flows that help you determine the subsequent Journey experience based on all the scenarios that can occur once a user enters the Send On-site Notification Block.
- Each scenario is tracked as a Campaign Event in your dashboard, allowing us to track each user's interactions in real-time.
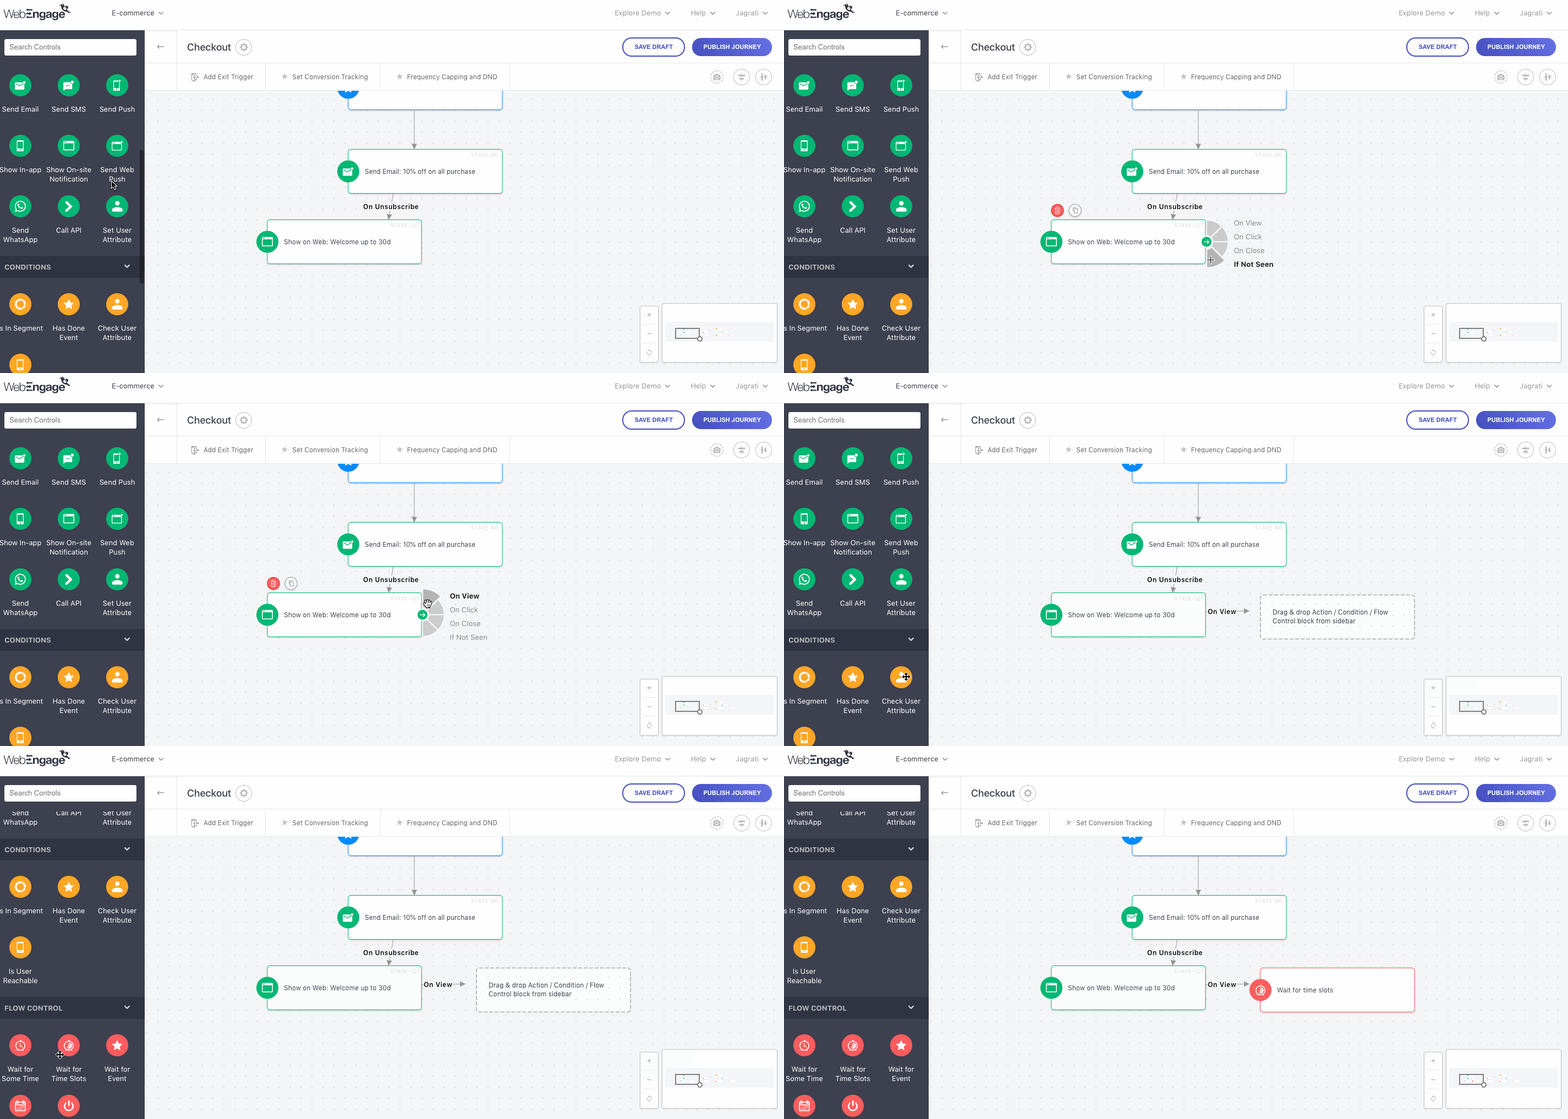
Click to enlarge
As shown above, you can choose to branch out the Journey experience based on all the following scenarios after a user enters the Send On-site Notification Block:
-
On View: As soon as a user Views the notification, their Trip will continue through this branch in the Journey, leading them to experience the next block it's connected to.
- Each time a user views an On-site Notification, it's tracked as an Impression in your dashboard.
-
On Click: As soon as a user Clicks on the notification, their Trip will continue through this branch in the Journey.
-
On Close: As soon as a user dismisses/closes the notification they're viewing, their Trip will continue through this branch in the Journey.
-
If Not Seen: If a user doesn't view the On-site Notification, then their Trip will continue through this branch in the Journey.
So, what happens if a userViews and Clicks or Views and Closes the On-site Notification? - Their Trip will continue through all the respective branches, leading them to simultaneously experience the blocks connected to each one.
Show Web In-line Content
This block enables you to achieve the Journey's end goal by engaging users with highly personalized Web In-line Content. As shown below, users in the Journey enter the block through the preceding branch it's connected to, causing them to receive a Web In-line Content campaign in the context of all the blocks they have experienced in their ongoing Trip.
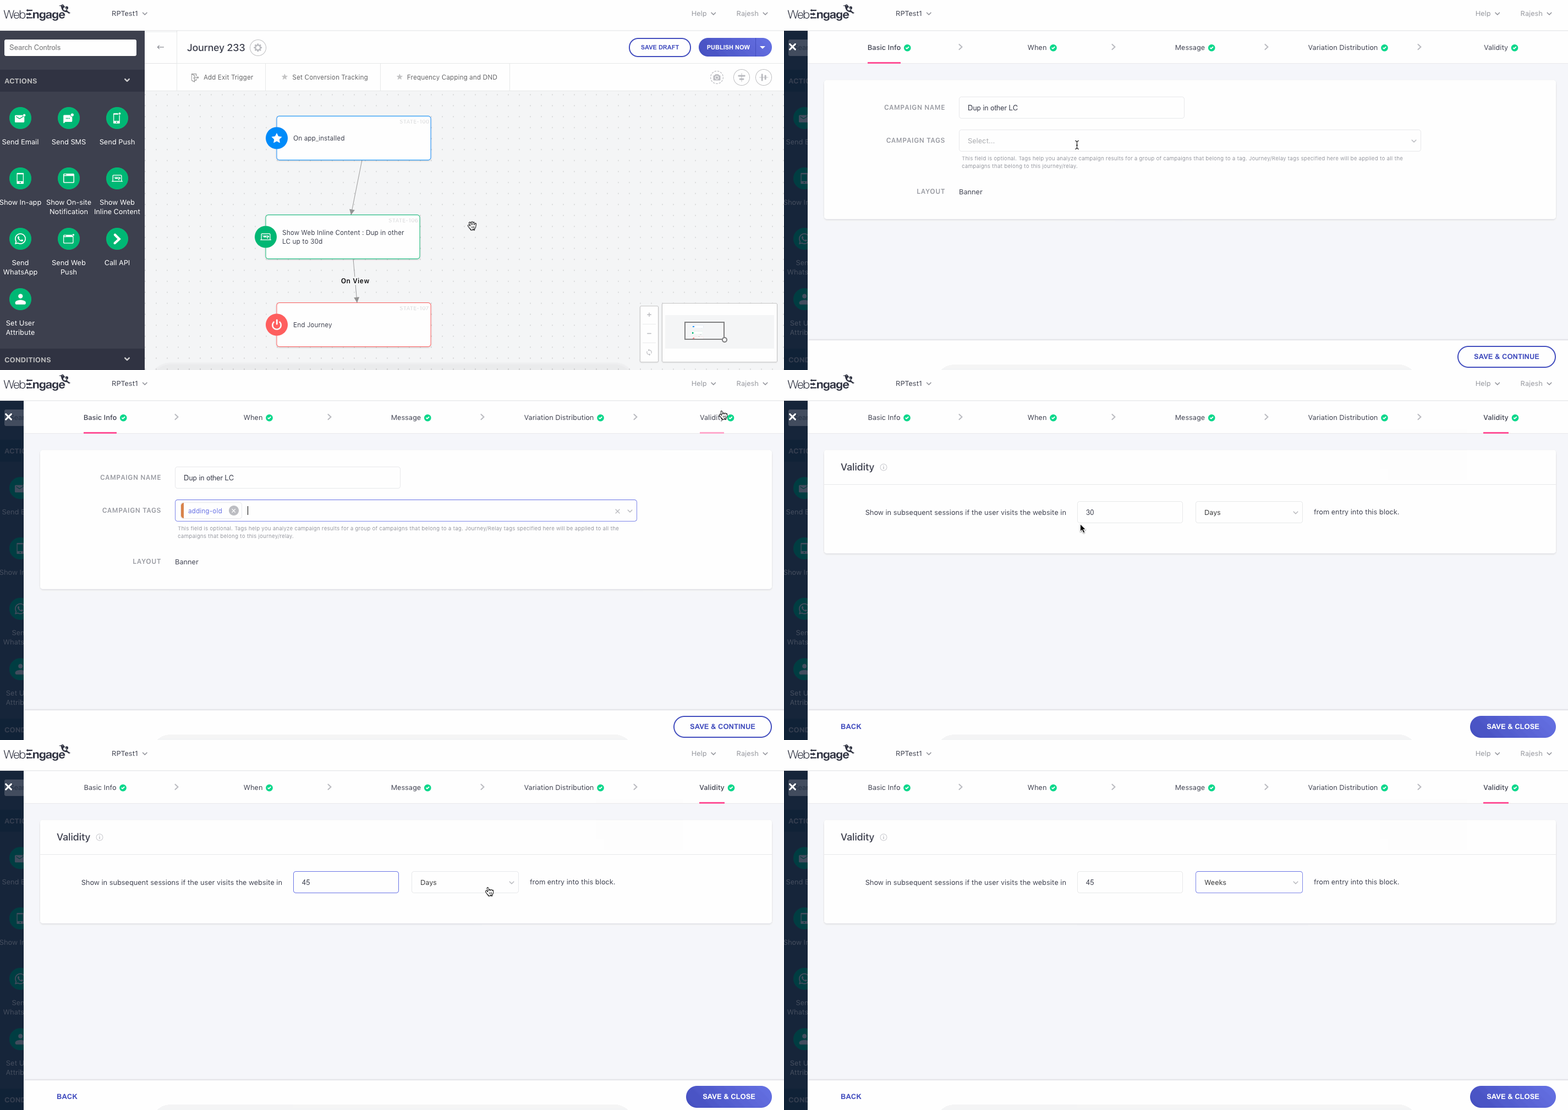
Click to enlarge
Here's how you can configure it:
Step 1: Drag and drop the Show Web In-line Content onto the Canvas
- As shown above, connect it to an existing block in the Journey to determine the context in which a user will receive the personalized Web In-line Content.
Step 2: Click on the block to create the campaign.
-
As shown above, select a template and configure the message as per your needs.
-
The Validity tab helps you set the number of Minutes/ Hours/ Days/ Weeks/ Months the campaign will run.
-
Click Save to go back to the Canvas.
Step 3: Branch out the Journey to continue a user's Trip as per their interactions with the campaign.
Branching the Journey from Show Web In-line Content
Branches are logic-based flows that help you determine the subsequent Journey experience based on all the scenarios that can occur once a user enters the Web In-line Content block.
- Each scenario is tracked as a Campaign Event in your dashboard, allowing us to track each user's interactions in real-time.
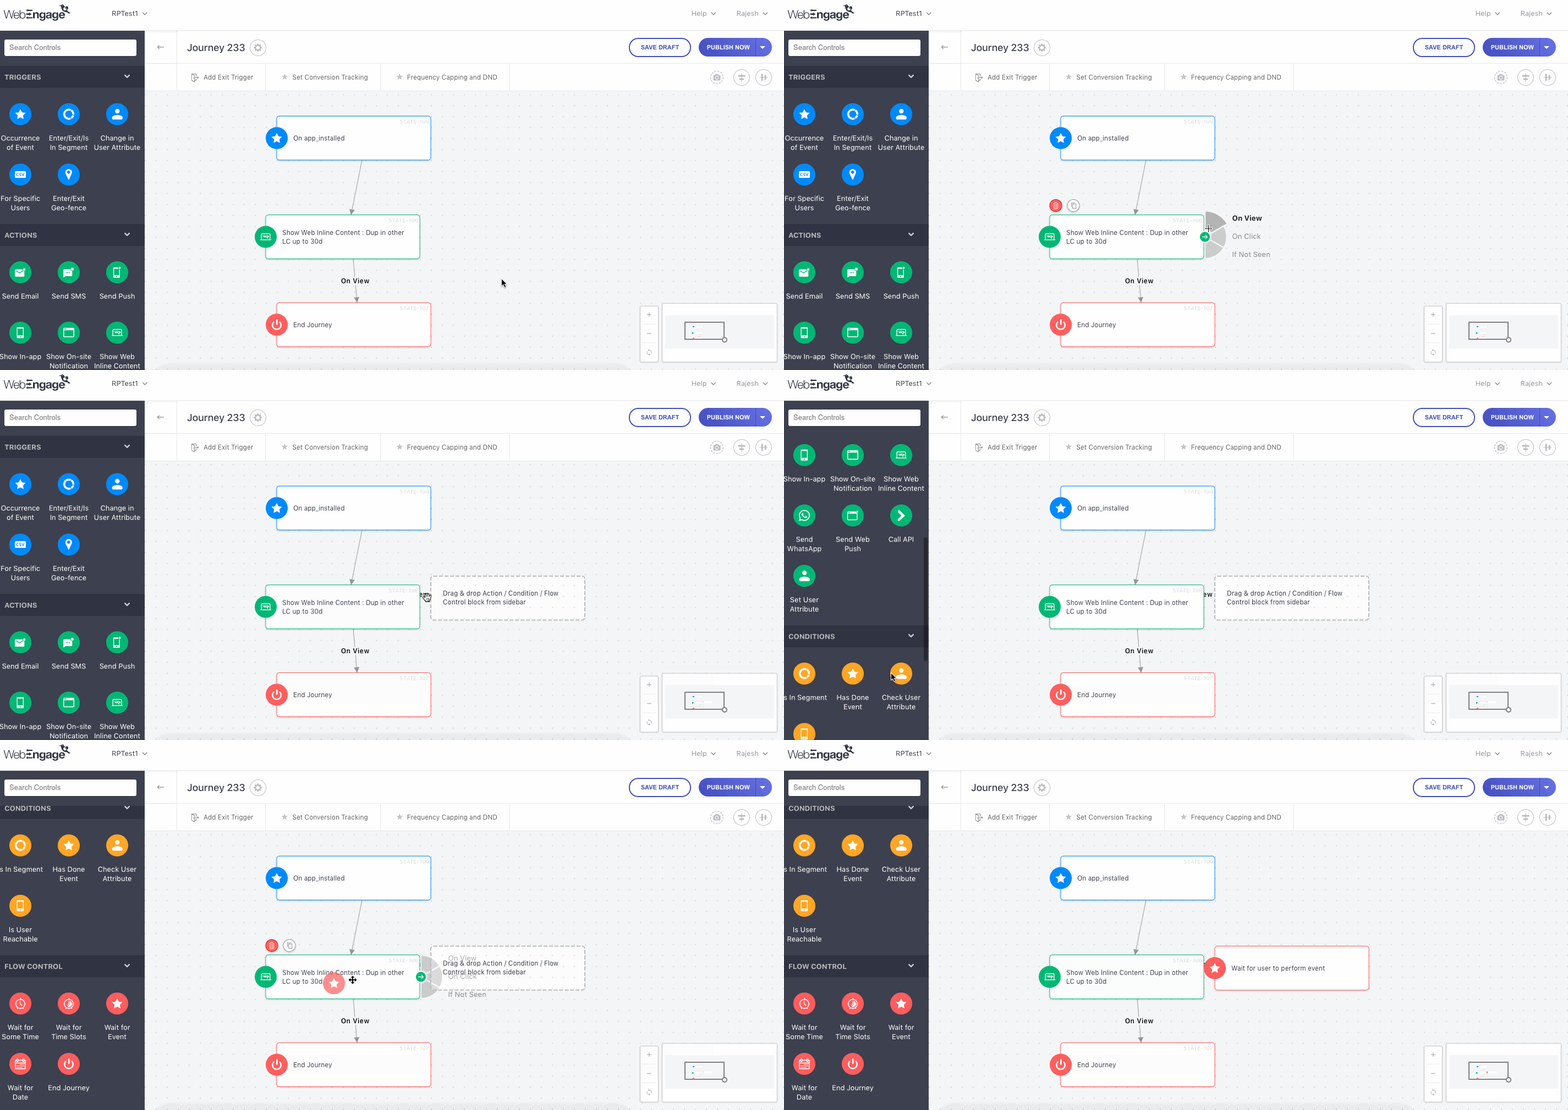
Click to enlarge
As shown above, you can choose to branch out the Journey experience based on all the following scenarios after a user enters the Show Web In-line Content:
-
On View: As soon as a user Views the campaign, their Trip will continue through this branch in the Journey, leading them to experience the next block it's connected to.
- Each time a user views a Web In-line Content campaign, it's tracked as an Impression in your dashboard.
-
On Click: As soon as a user Clicks on the campaign, their Trip will continue through this branch in the Journey.
-
If Not Seen: If a user doesn't view the Web In-line Content campaign, then their Trip will continue through this branch in the Journey.
So, what happens if a userViews and Clicks the Web In-line Content? - Their Trip will continue through all the respective branches, leading them to simultaneously experience the blocks connected to each one.
Send Web Push
This block enables you to achieve the Journey's end goal by engaging users with a highly personalized Web Push Notification. As shown below, users in the Journey enter the block through the preceding branch it's connected to, causing them to receive a Web Push Notification in the context of all the blocks they have experienced in their on-going Trip.
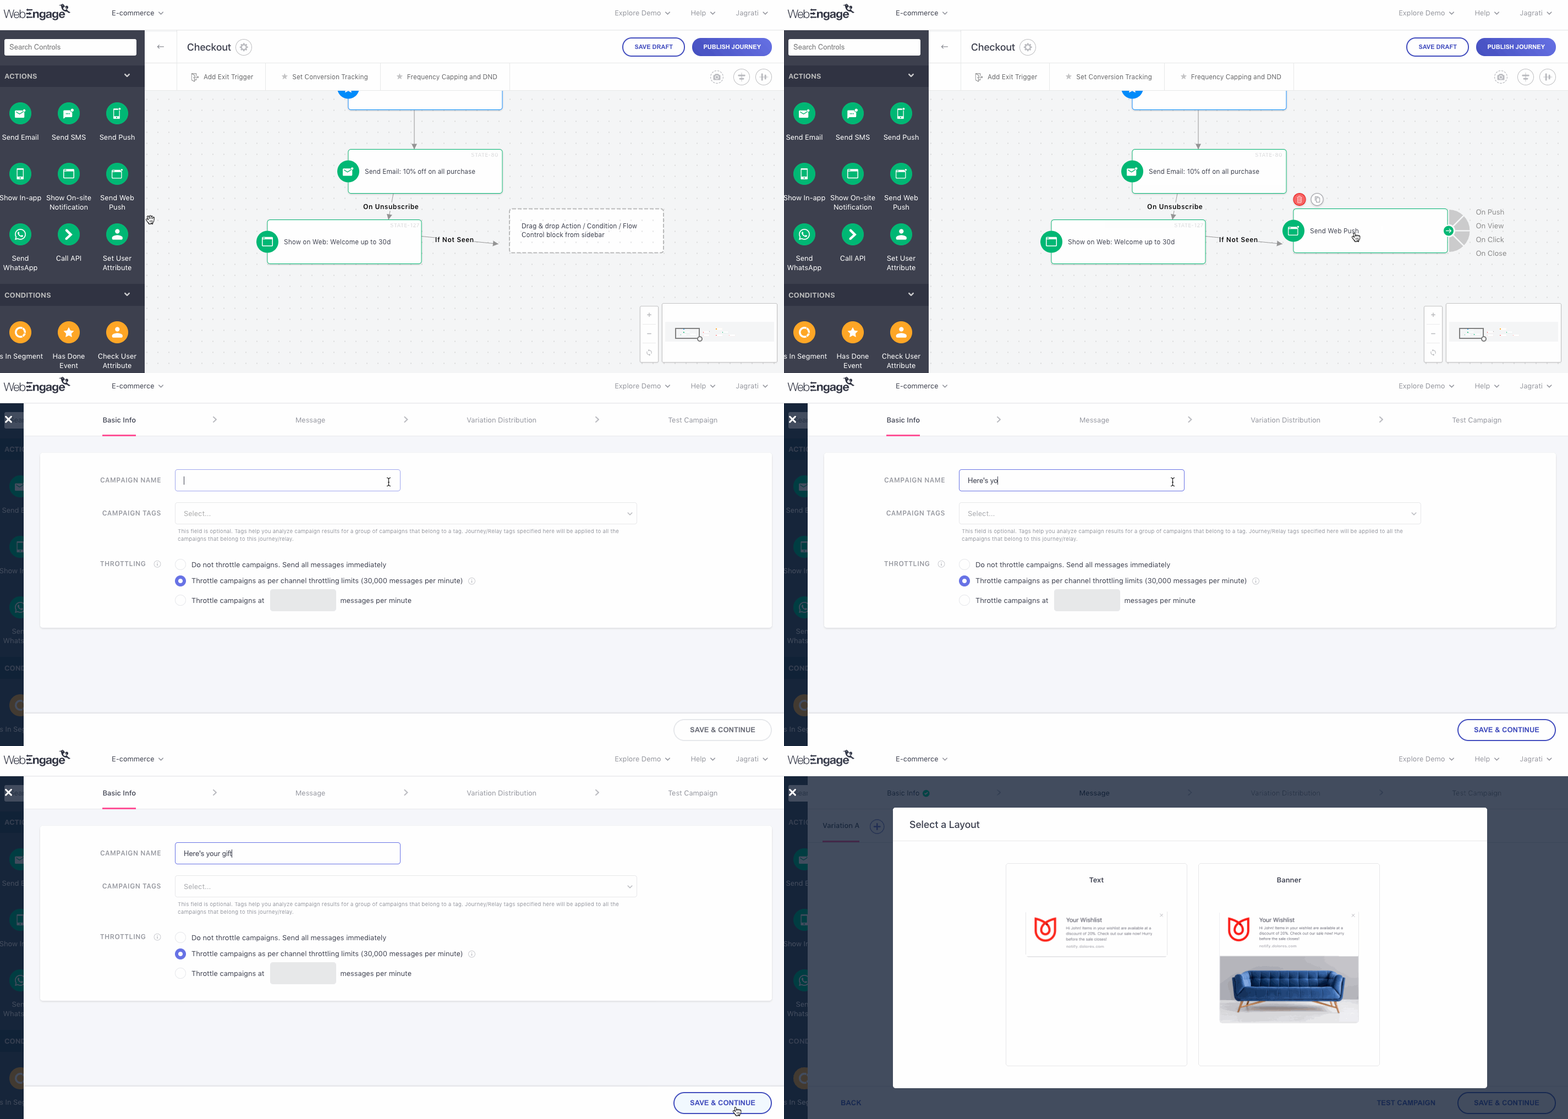
Click to enlarge
Here's how you can configure it:
Step 1: Drag and drop the Send Web Push block onto the Canvas
- As shown above, connect it to an existing block in the Journey to determine the context in which a user will receive the Web Push Notification.
Step 2: Click on the block to create the campaign.
- Click Save to go back to the Canvas.
Step 3: Branch out the Journey to continue a user's Trip as per their interactions with the campaign.
Branching the Journey from Send Web Push Block
Branches are logic-based flows that help you determine the subsequent Journey experience based on all the scenarios that can occur once a user enters the Send Web Push Block.
- Each scenario is tracked as a Campaign Event in your dashboard, allowing us to track each user's interactions in real-time. These events also help you analyze the campaign's impact against various performance indicators.
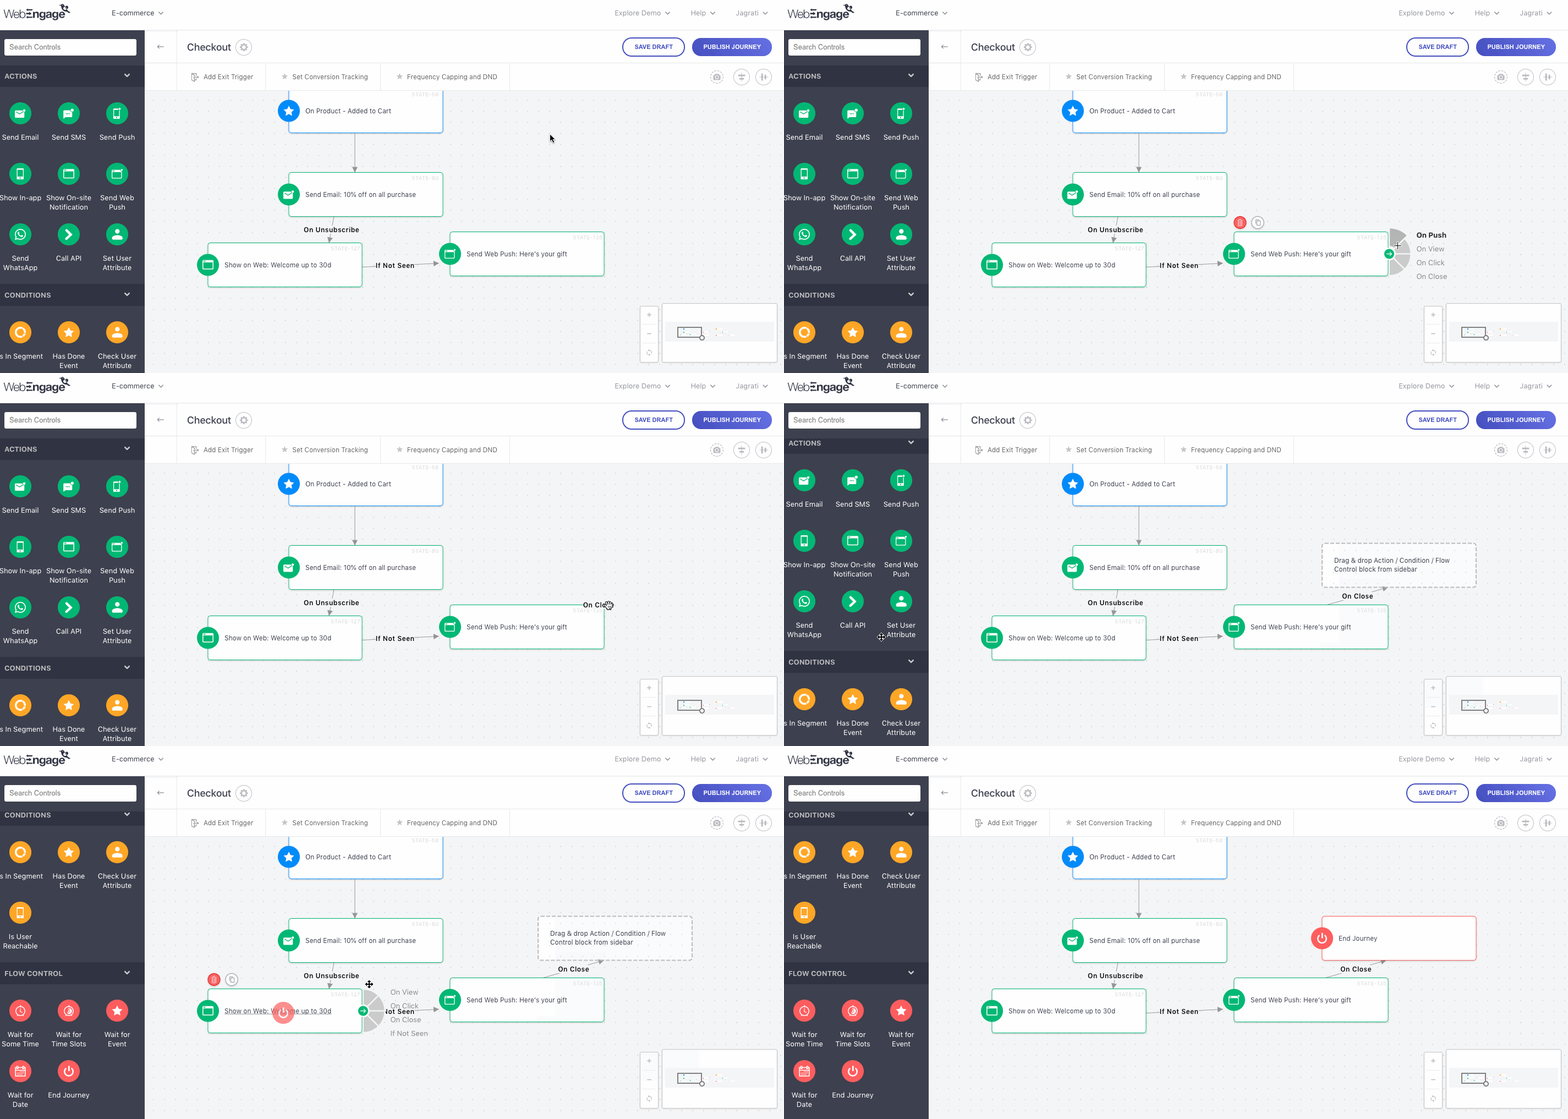
Click to enlarge
-
On Push: As soon as the Web Push Notification is Sent to a user, their Trip will continue through this branch, leading them to experience the next block it's connected to.
-
On View: As soon as a user Views the notification, their Trip will continue through this branch in the Journey.
- Each time a user views a Web Push Notification, it's tracked as an Impression in your dashboard.
-
On Click: As soon as a user Clicks on the notification, their Trip will continue through this branch in the Journey.
-
On Close: As soon as a user Dismisses the notification they're viewing, their Trip will continue through this branch in the Journey.
So, what happens if aWeb Push Notification is Sent to a user and they View & Click or View & Dismiss it?* - Their Trip will continue through all the respective branches, leading them to simultaneously experience the blocks connected to each one.
Send WhatsApp Message
This block enables you to achieve the Journey's end goal by engaging users with a highly personalized WhatsApp Message. As shown below, users in the Journey enter the block through the preceding branch it's connected to, causing them to receive a message in the context of all the blocks they have experienced in their on-going Trip.
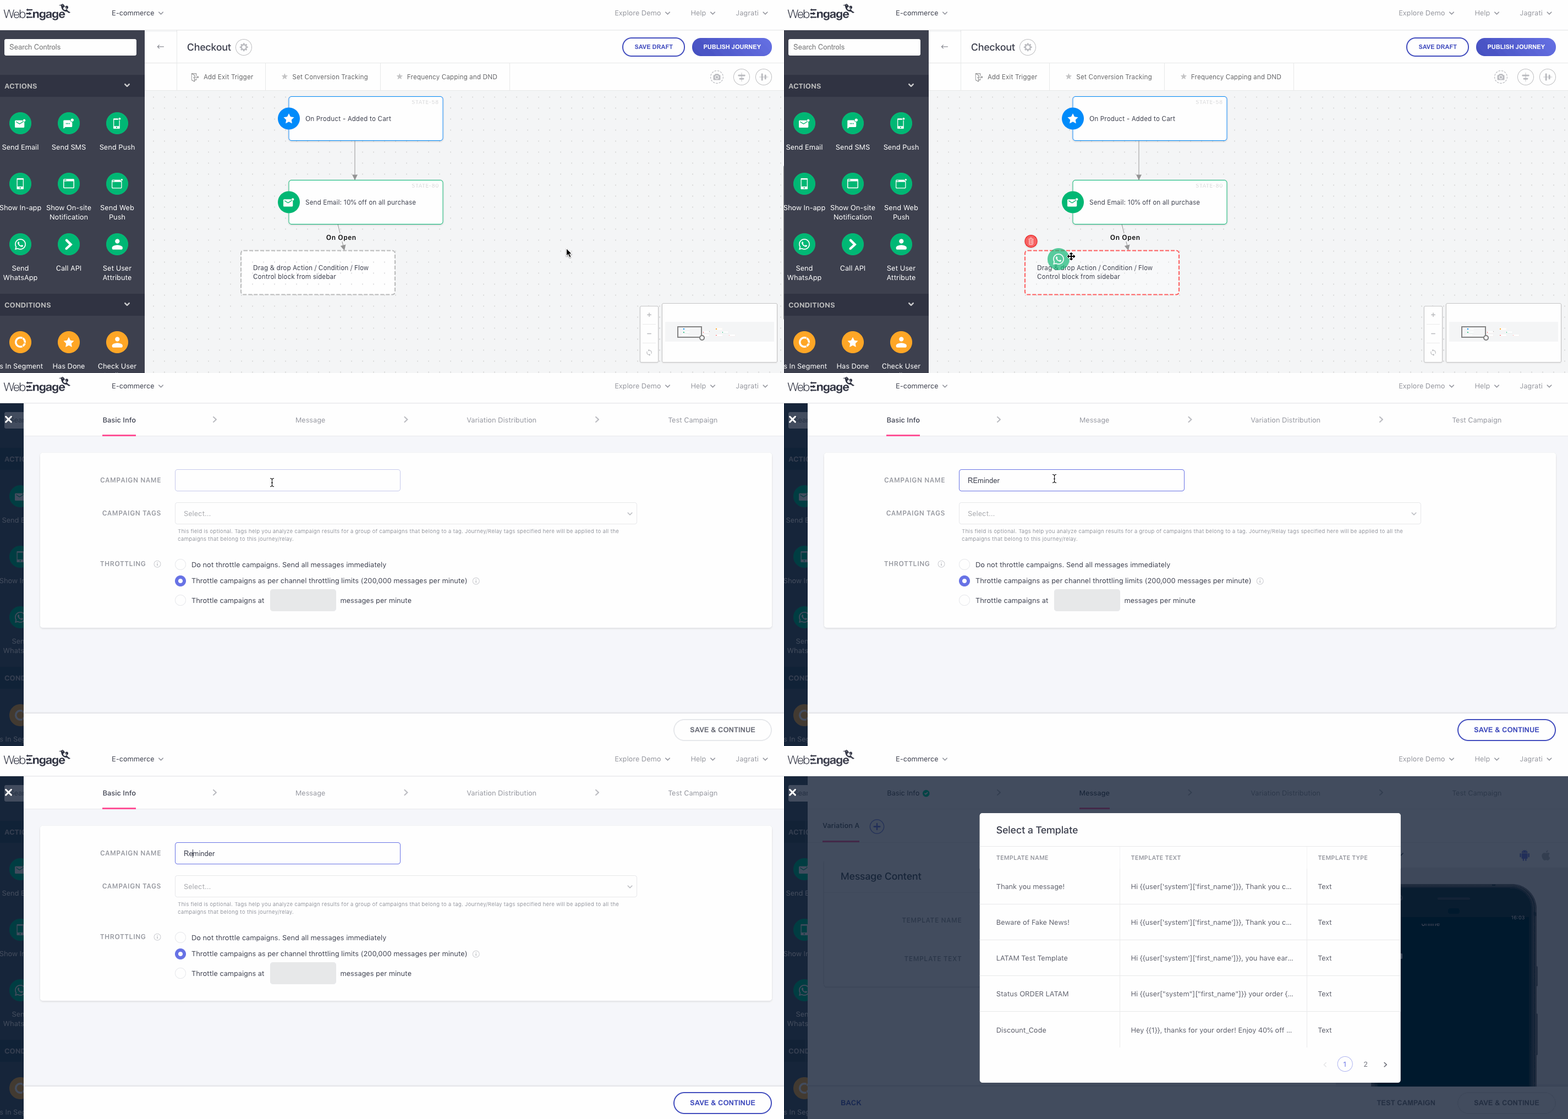
Click to enlarge
Here's how you can configure it:
Step 1: Drag and drop the Send WhatsApp block onto the Canvas
- As shown above, connect it to an existing block in the Journey to determine the context in which a user will receive the WhatsApp Message.
Step 2: Click on the block to create the campaign.
- Click Save to go back to the Canvas.
Step 3: Branch out the Journey to continue a user's Trip as per their interactions with the campaign.
Branching the Journey from Send WhatsApp Block
Branches are logic-based flows that help you determine the subsequent Journey experience based on all the scenarios that can occur once a user enters the Send WhatsApp Block.
- Each scenario is tracked as a Campaign Event in your dashboard, allowing us to track each user's interactions in real-time. These events also help you analyze the campaign's impact against various performance indicators.
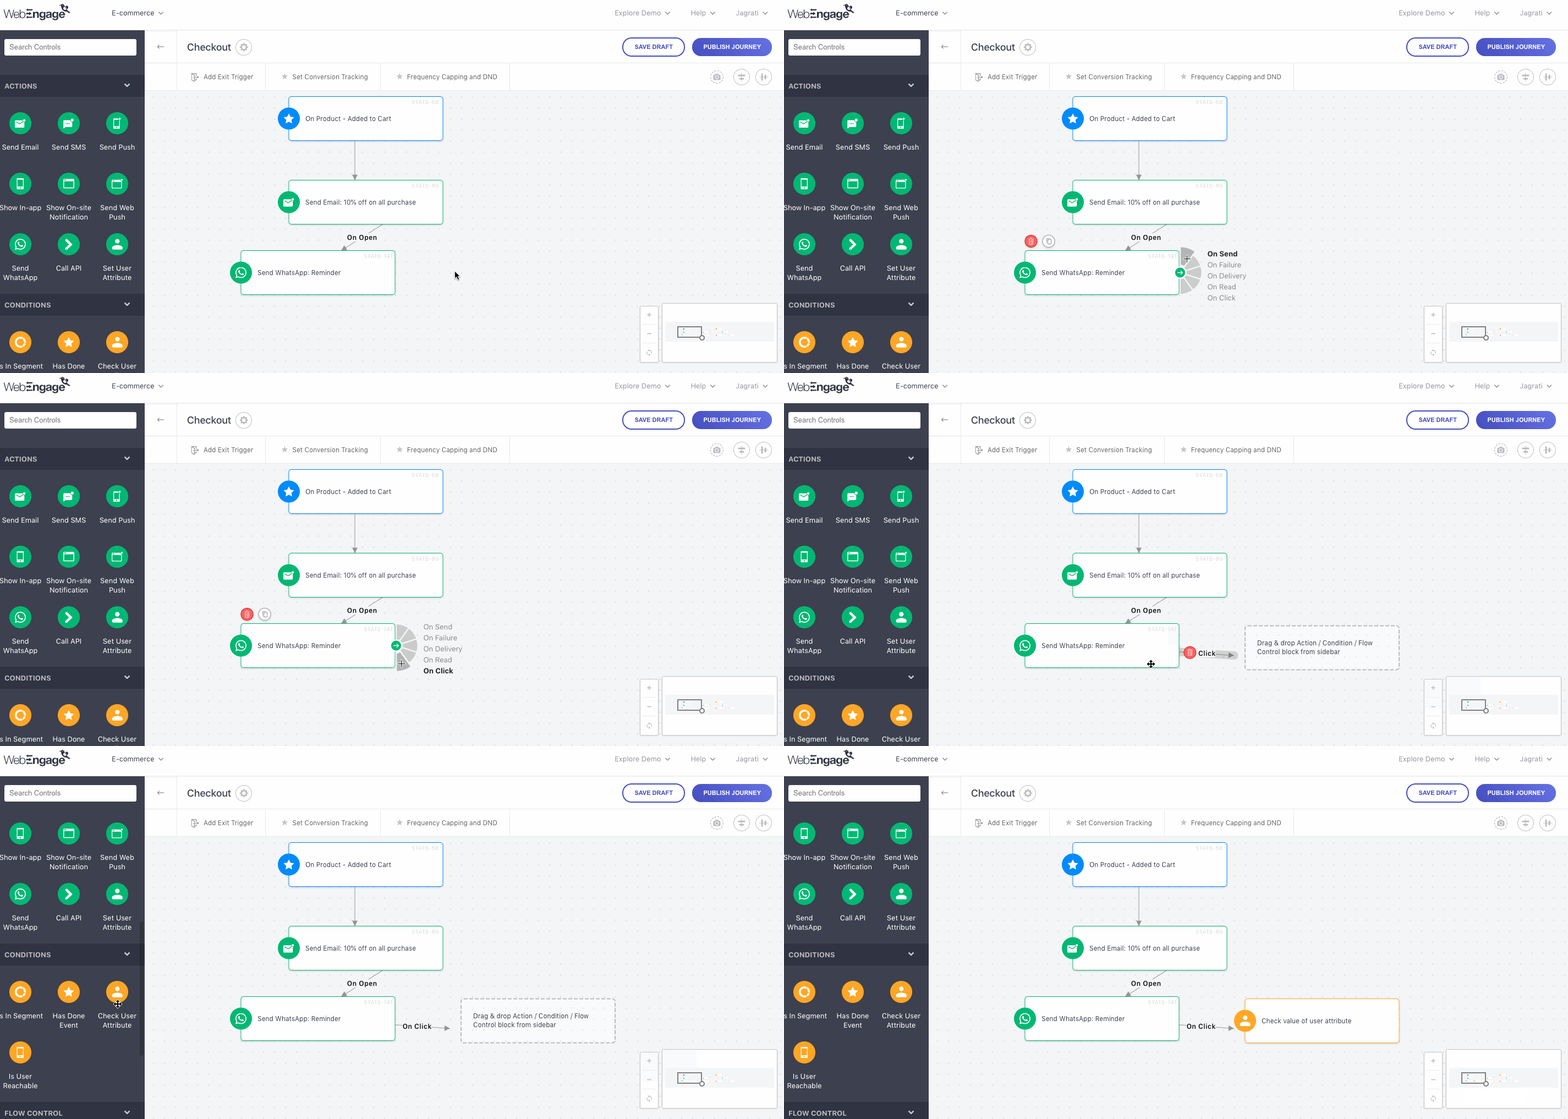
Click to enlarge
-
On Send: As soon as a WhatsApp Message is Sent to a user through the block, their Trip will continue through this branch, leading them to experience the next block it's connecting.
-
On Delivery: As soon as a WhatsApp Message is Delivered to a user, their Trip will continue through this branch in the Journey.
-
On Failure: If the WhatsApp Message sent through this block fails to get delivered to a user, then their Trip will continue through this branch in the Journey.
-
On Read: As soon a user reads the WhatsApp Message, their Trip will continue through this branch in the Journey.
-
On Click: As soon as a user Clicks on a link included within the message, their Trip will continue through this branch in the Journey.
So, what happens if aWhatsApp Message is Sent to a user, they Read it and Click on a link? - Their Trip will continue through all the respective branches, leading them to experience the blocks connected to each one, simultaneously.
Call API
An API is a connection between your WebEngage dashboard and business (Server, CRM system, PoS system, etc.) that enables the two entities to exchange information as and when needed.
Thus, using the Call API Block you can establish a hotline of sorts between your backend systems and dashboard to transfer information on the go! The API enables you to:
-
GET specific details of a user from your server to personalize a campaign sent through the Journey.
-
POST details of a user to your server to create a new user, Event or User Attribute in your database.
-
PUT specific details of a user in your server to update an existing event or a user attribute's value as per the user's latest interactions with your app/website.
-
DELETE a user or their details (User Attributes/ Events) in your server database.
Here's how you can configure it:
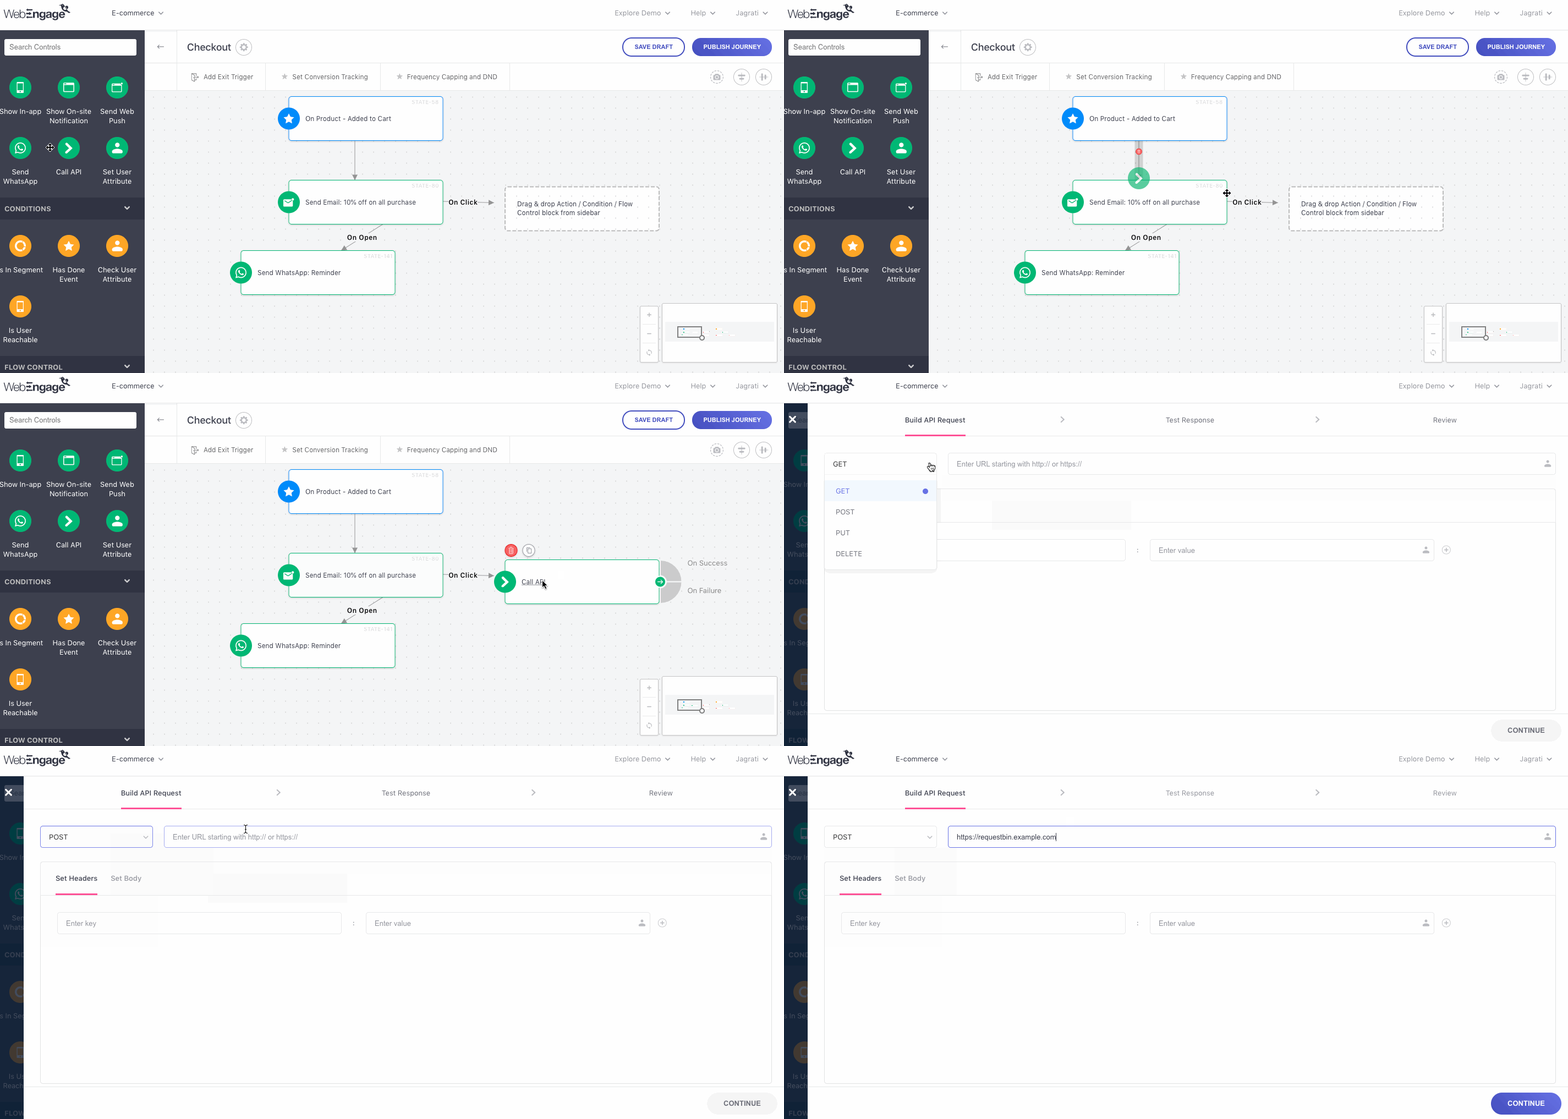
Click to enlarge
Step 1: Drag and drop the Call API Block onto the Canvas
- As shown above, connect it to an existing block in the Journey to determine the context in which users will enter the block.
Step 2: Click on it to build the API request. (How it works)
Step 3: Branch out the Journey from the block to continue the Trip for a user, based on the API call status. (How it works)
Building API Request
The Call an API Block has a simple 3-step interface, enabling you to create and test the API request with great ease. Let's get you started:
Step 1: Build API Request
Click to enlarge
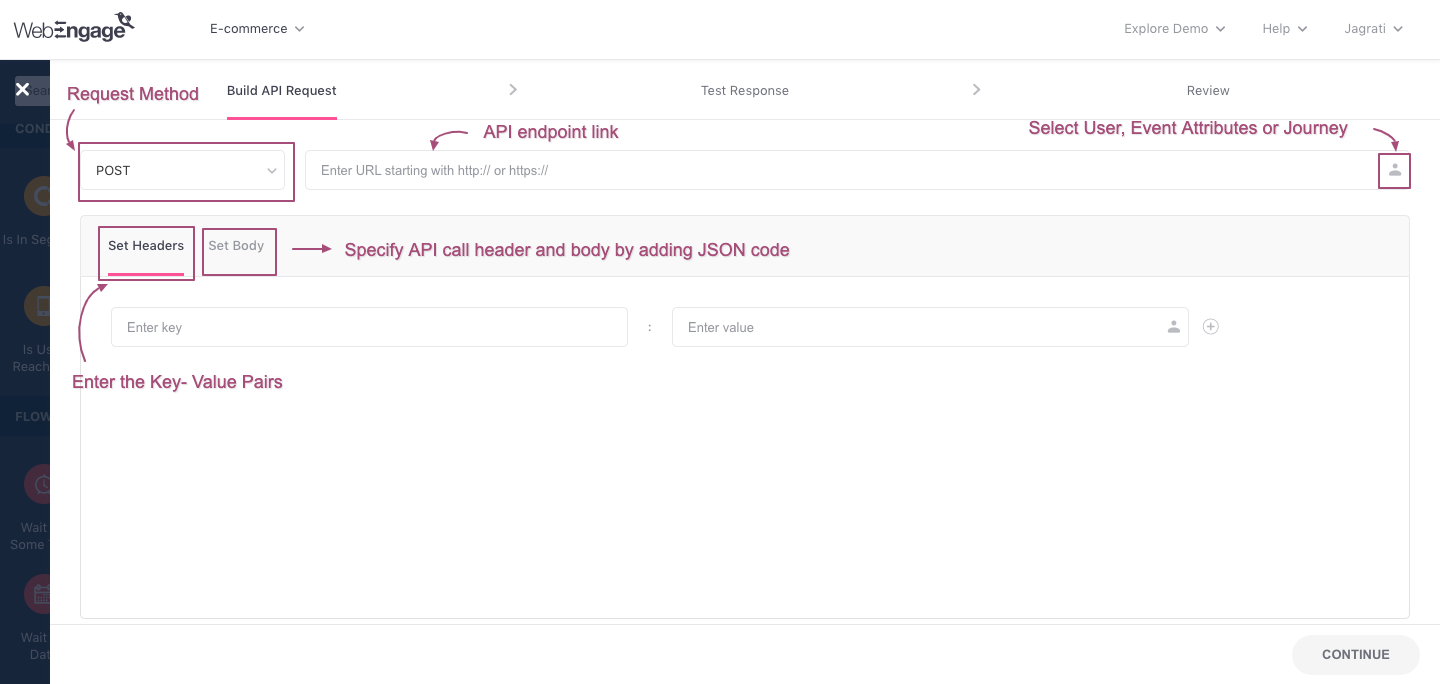
As shown above:
Step 1.1.: Select a Request Method from the first dropdown, as per your use case.
- Select
GETto retrieve specific data from your server, for a user. - Select
POSTto create a new user or a newUser AttributeorEventfor a particular user in your server. - Select
PUTto update specific details of a user in your server. - Select
DELETEto remove pecific details (User Attributes/ Events) from your server database, for a user.
Step 1.2.: Add the API Endpoint link to the field, URL.
-
An Endpoint is a link that starts with http:// or https:// _and indicates the exact location on your server when we can establish a connection and start exchanging information with the WebEngage dashboard. (You'll need to collaborate with your tech team to create it.)_
-
For example, in the above visual we have selected
POSTas the Request Method and have added the endpoint link, www.requestbin.webengage.org/xo1belx, to establish the connection.
Step 1.3.: Click on the Personalization Icon to add Personalization Variables to the URL.
Adding a User Attribute, Custom Event or Journey Event to the endpoint link helps you identify the exact resources in your server, from which you want to retrieve data/ in which you want to update data.
- Please add a front slash '/' at the end of the link to start adding personalization tokens to it.
- All personalization tokens must be separated by a front slash '/'.
For example, in the above visual, we are making a POSTrequest to update the following details for a user in the Journey:
-
Cart Value of Journey Event, Checkout - Completed:**
{{journey['state-177'].custom['Cart Value']}} -
Custom User Attribute, Loyalty Reward Points:
{{user['custom']['Loyalty Reward Points']}} -
Custom User Attribute, Last Purchase Date:
{{user['custom']['Last Purchase Date']}}
Step 1.4.: Specify Request Headers
Request Headers are Key-Value Pairs that are understood by your server and help communicate specific instructions or details for executing the API call like:
- Authorization Key that will enable only your servers to respond to the API request.
- Specify the format (JSON) in which your server must respond to the API request. (Response can betested and is shown under the Body).
Step 1.5.: Specify Request Body by adding JSON code.
- If you're making a
POSTorPUTrequest, then you can specify the exact User Attributes and Events that need to be created/updated in your server, by adding the respective personalization under the Request Body.
API Throttling for Journeys
API Throttling for Journeys prevents system overload and failed requests by controlling how many API calls are made per minute.
What’s New?
- Add or select throttling configurations (1–10,000 calls/min).
- Default: 100 calls/min, throttling off by default.
- Create up to 5 configurations.
- Edit, check usage, and apply across journeys.
Note
If an API throttling rate is configured for a block, users entering that block will continue to be processed at the defined rate limit until the existing pipeline clears; even if the throttling setting is later updated or removed. Backlogs exceeding 4 days will be automatically cleared from the pipeline.
How It Works?
Requests are sent at the configured rate with retries using exponential backoff. Blocks sharing the same endpoint and configuration share the rate limit.
Sample Request Body for POST Call{
"userId": "{{user['cuid']}}","Cart Value" : "{{journey['state-177'].custom['Cart Value']}}",
"Loyalty Reward Points" : "{{user['custom']['Loyalty Reward Points']}}"
}Please replace
personalization_tokenin"{{personalization_token}}"with tokens from your account by clicking on the Personalization icon and selecting from a list of User Attributes, Custom Event and, Journey Events.
Not a JSON expert? That's okay, enlist some help. :)We recommend that you loop in a professional from your tech team if you're not well versed with JSON. This will help ensure that you're requesting data in a format that's understood by your systems.
Step 2.: Test API Response
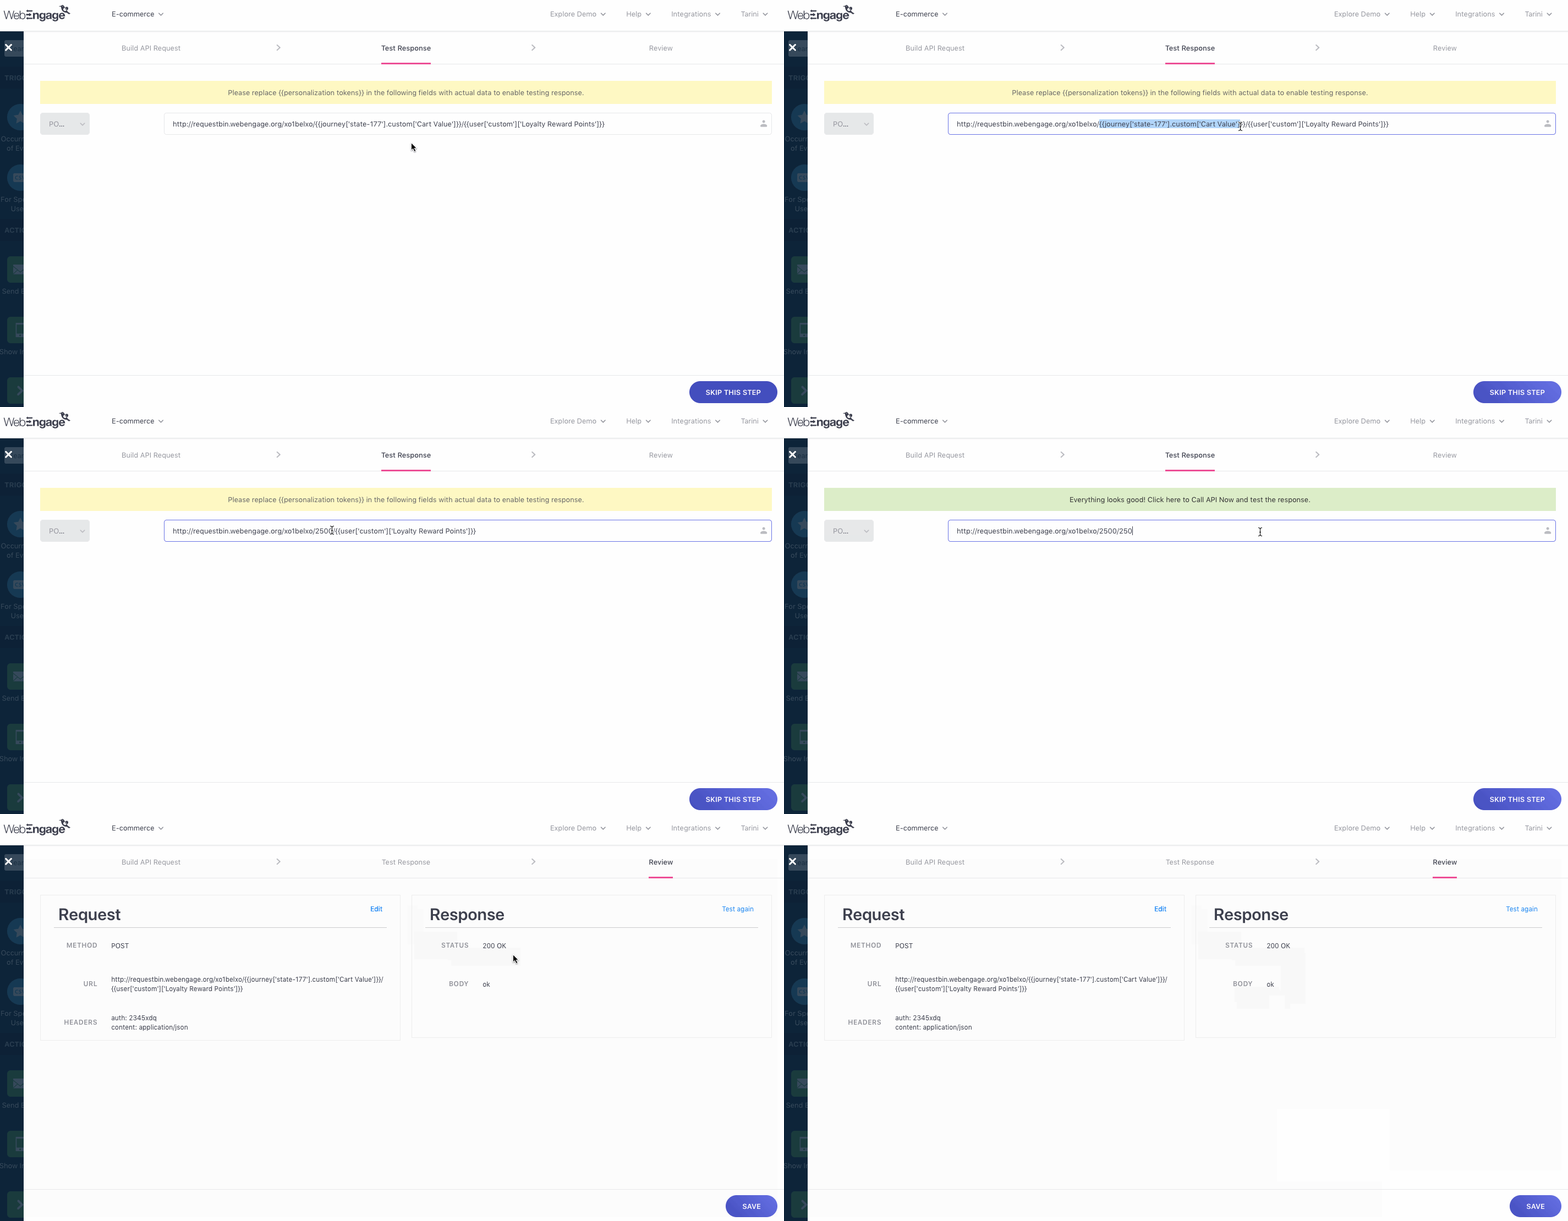
Click to enlarge
As shown above, you can test the API response by replacing all the personalization tokens in the Endpoint URL with placeholder values. Doing so allows us to test the API call by mimicking the values that the API will return for a user against the specified personalization tokens.
-
For example, in the above visual we have replaced:
{{journey['state-177'].custom['Cart Value']}}with 2500 (a numerical value that the field, cart value will contain){{user['custom']['Loyalty Reward Points']}}with 250 (a numerical value that the field, loyalty reward points will contain)
-
Click on 'Call API Now...' (placed above the field) to run the test. In doing so, you will be directed to Step 3, Review.
Step 3: Review Response Status
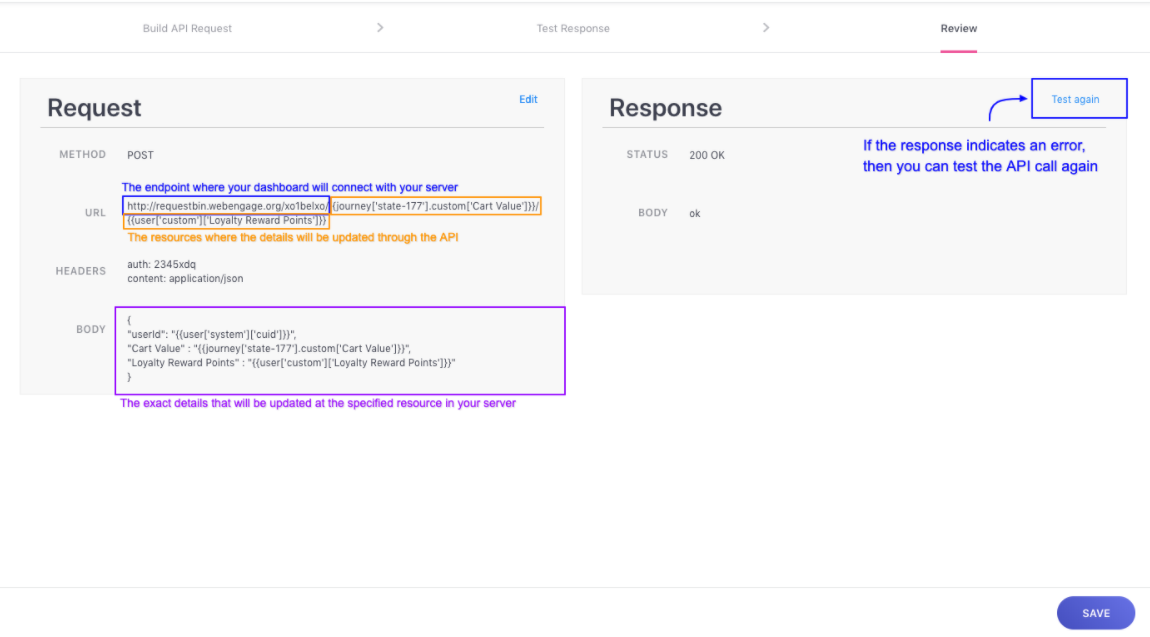
Click to enlarge
As shown above, this step has two sections - Request and Response.
-
Request: Indicates details of API request, as specified at Step 1: Build API Request, like:
- Request Method selected by you.
- API Endpoint URL with any personalization variables that you may have added.
- Request Headers, as specified by you.
- Request Body, as specified by you (only for
POST&PUTrequests).
-
Response: Indicates the API call Status and Body.
- API call Status: Shown as per the status codes defined by your tech team while creating the API.
- Body: Indicates the exact data/response that is fetched each time the API is called for a user.
-
Click Save to go back to the Canvas.
Personalising Journey Campaigns with 'GET' API DataIf you have selected
GETunder Response Method at Step 1, then you can leverage the data gleaned through the API to personalize all the Journey campaigns attached to the respective Journey.Here's how you can go about it:
Branching the Journey from Call API Block
Branches are logic-based flows that help you determine the subsequent Journey experience for a user, based on the Success or Failure of the API call made for them when they enter the Call API Block.
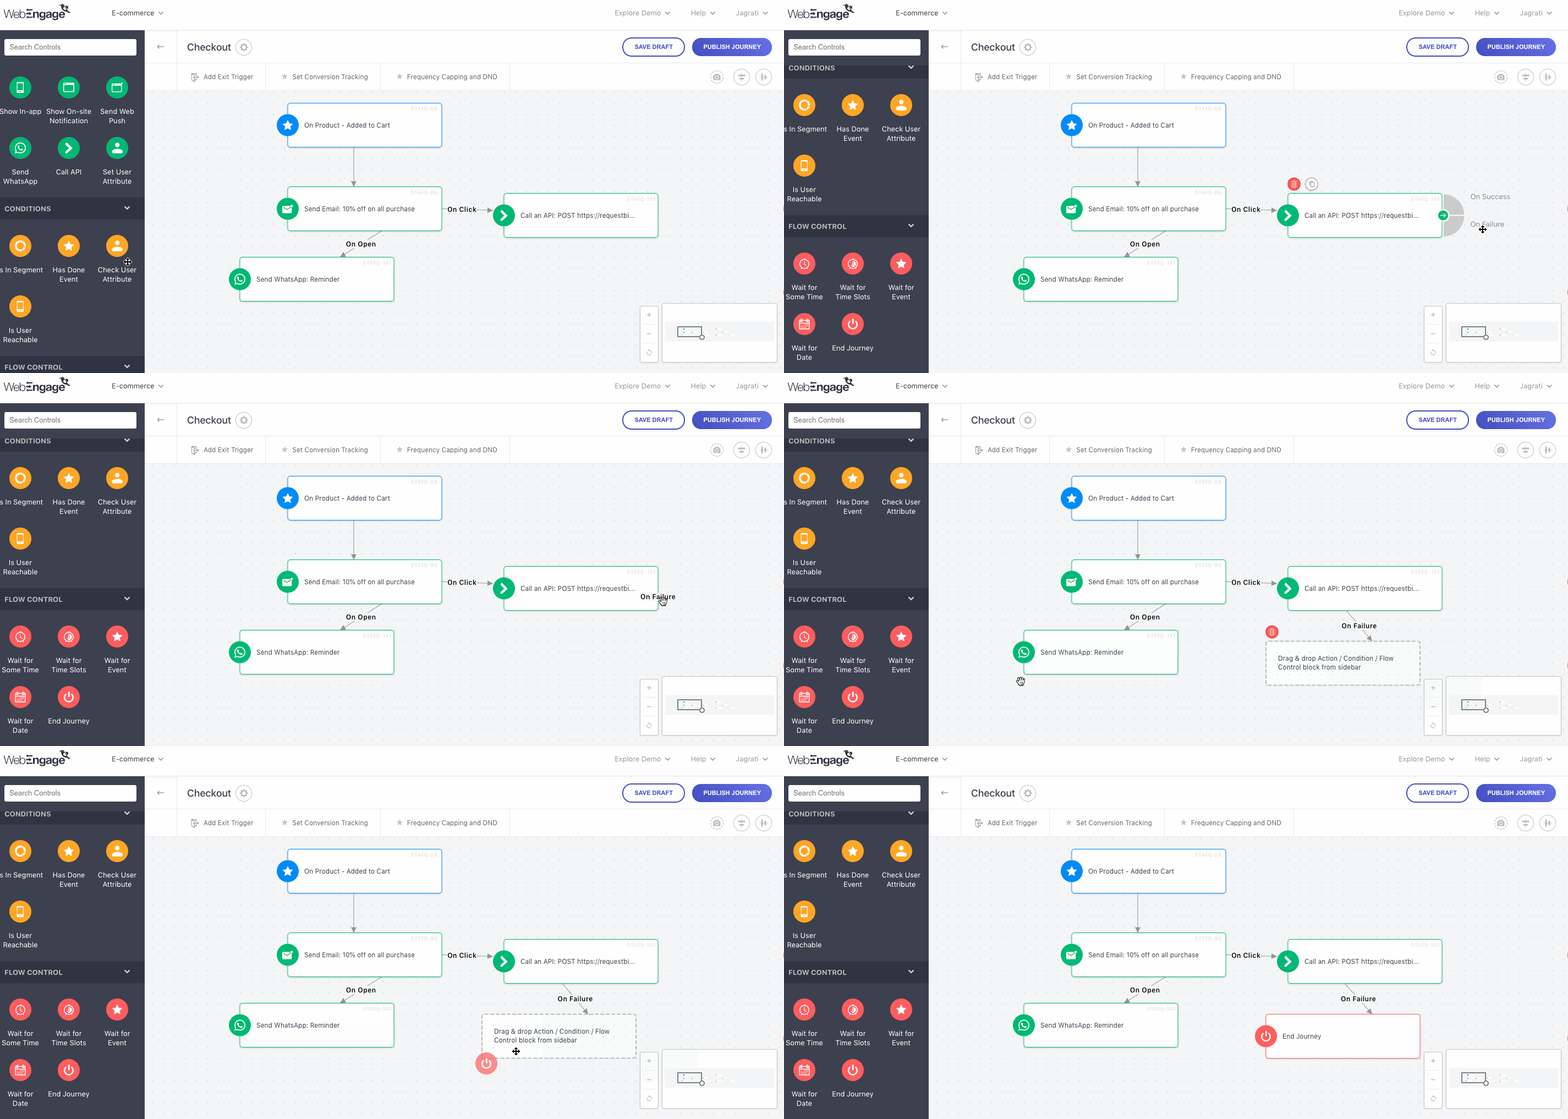
Click to enlarge
As shown above:
-
Select On Success to continue the Trip for those users for whom the API was successfully called, leading them to experience the next block the branch connects in the Journey.
-
Select On Failure to continue the Trip for those users for whom the API call failed, leading them to experience the next block the branch connects in the Journey.
For example, in the Purchase Journey shown above, we have ended the Journey experience for all users for whom the API call fails (as we won't be able to personalize the Email/SMS campaign for them).
Set User Attribute
Quick ReadUnderstanding User Attributes and how they allow you to track each user's preferences, spending habits, birthday, anniversary and so on!
This Action Block enables you to update the value of an existing User Attribute for a user in the Journey and create a new User Attribute in your database, based on the Events.
Let's show you how you can configure the *Set User Attribute Block:
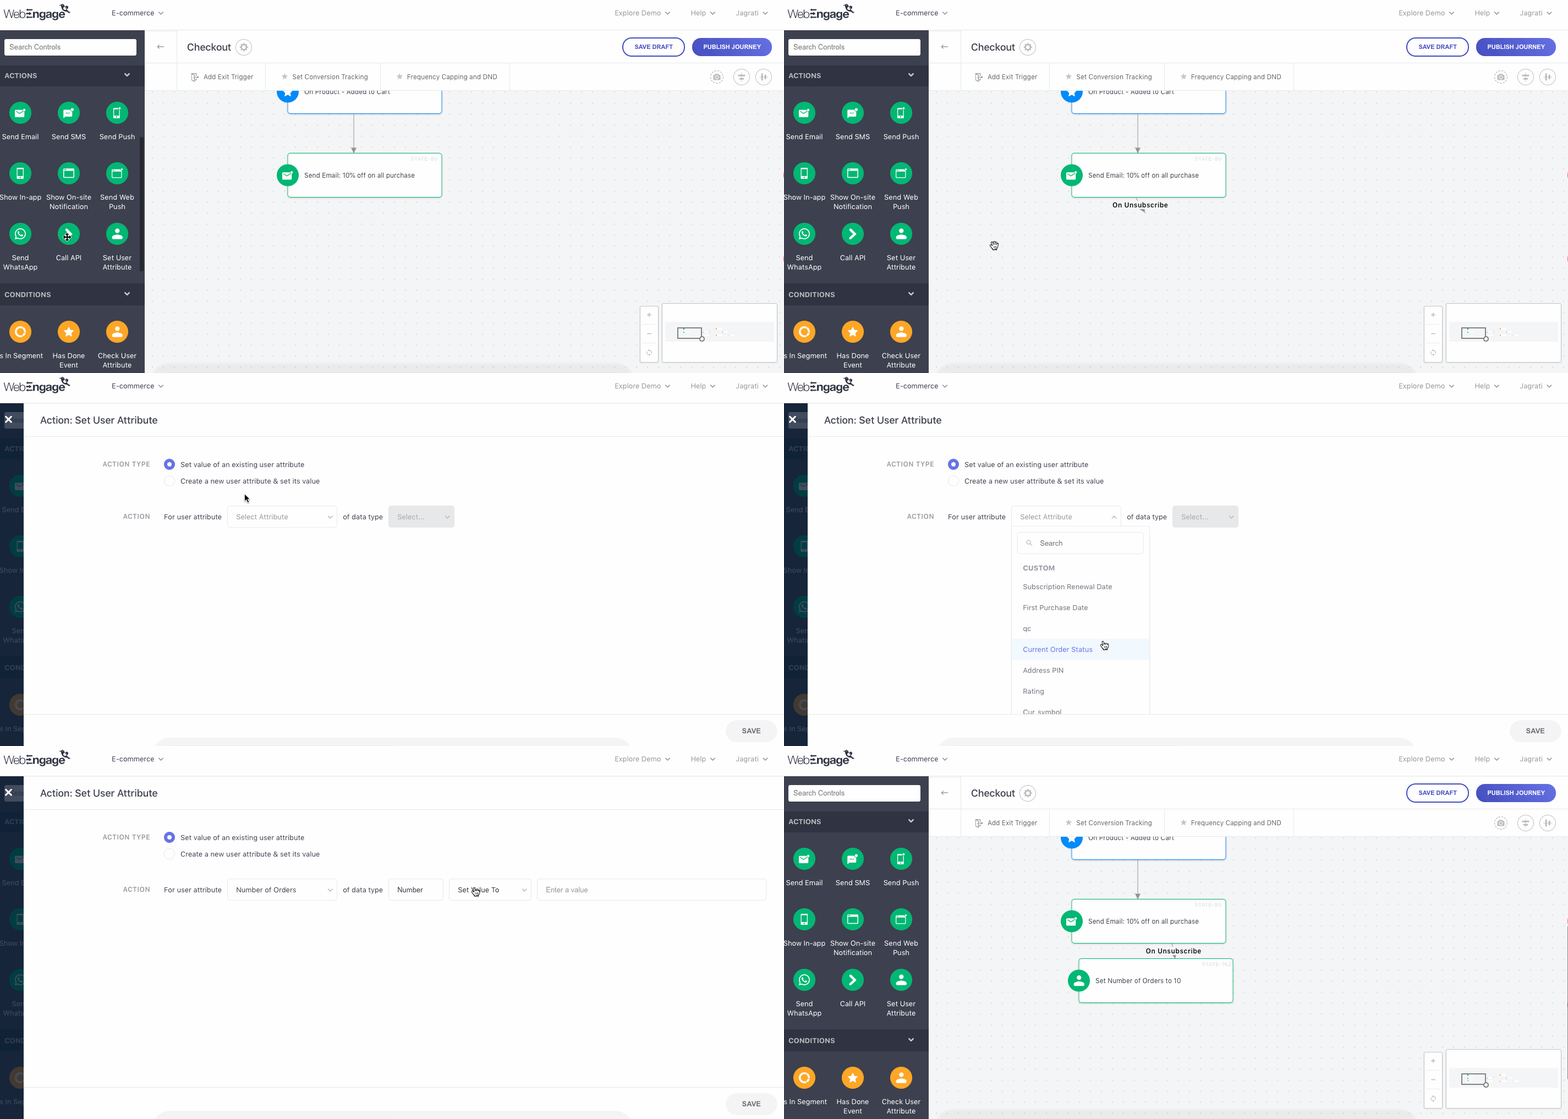
Click to enlarge
As shown above:
Step 1: Drag and drop the Set User Attribute block onto the Canvas.
- Connect it to any of the following blocks in the Journey to determine the context in which we'll be tracking/updating the user attribute:
- On Occurrence of Event (Trigger Block)
- Has Done Event (Condition Block)
Step 2: Click on the block and select an Action Type.
-
SelectSet Value of an Existing User Attribute to update the value tracked for a user, against the specified User Attribute. (how to set up)
-
SelectCreate a New User Attribute & Set Its Value to add a new user attribute to your database. (how to set up)
- In doing so, we will track the new User Attribute for all the users that enter the Set User Attribute block in the Journey. The attribute will not be tracked for any other users in your database.
Here's how you can configure eachAction Type:
Set Value of an Existing User Attribute
Step 1.: Select a User Attribute from the first dropdown.
Step 2: Using the second dropdown, select a type of change:
- Set Value to
- Increase Value by (applicable only if the data type is number or date)
- Decrease Value by (applicable only if the data type is number or date)
Step 3.: Select/add new value in the third field that will be updated for all users that enter the Set User Attribute block_in the _Journey.
Step 4.: Click Save to go back to the Canvas.
Create a New User Attribute & Set Its Value
Please note, the new User Attribute created by you is tracked only for users that enter the Set User Attribute block in the Journey.
Step 1.: Add the name of the new User Attribute in the first field.
Step 2: Using the second dropdown, select the type of data that will be tracked against the attribute. It can be any of:
- Number
- String (allows you to track an alphanumeric value like Class_10)
- Boolean (allows you to track a True/False scenario like Paid User = True or False)
- Date
Step 3.: Enter a value in the third field that will be tracked against the new attribute for all users that enter the Set User Attribute block_in the _Journey.
Step 4.: Click Save to go back to the Canvas.
Conditions
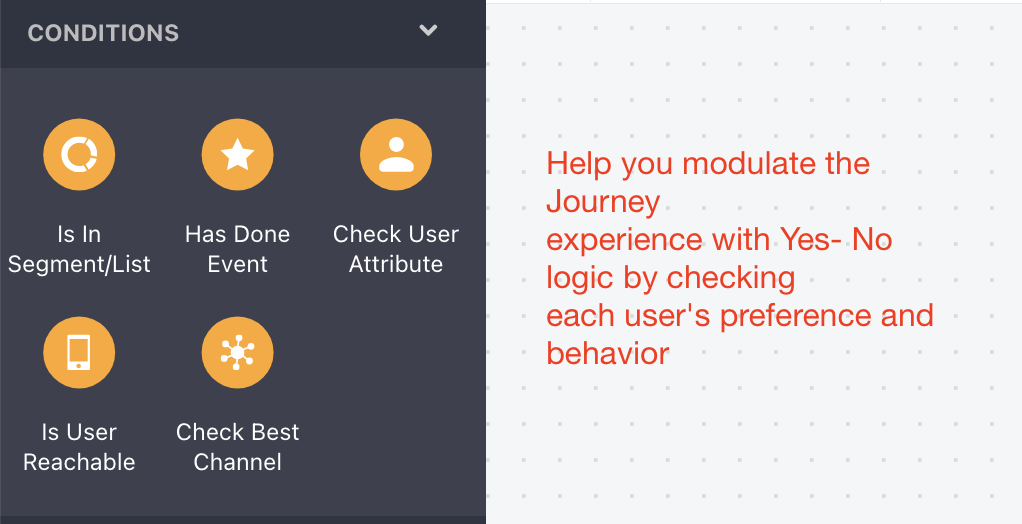
Click to enlarge
You can think of Conditions as checkpoints that help you contextually personalize the Journey experience for each user based on their behavior and preferences, in real-time. These blocks work on a simple Yes-No logic allowing you to create different Flows for users in the Journey who:
- Are included within a specific Segment OR aren't (Is In Segment block)
- Have performed an Event on your app/website OR haven't (Has Done Event block)
- Have a specific User Attribute value OR don't (Check User Attribute block)
- Are reachable on a specific channel OR aren't (Is User Reachable block)
Adding Conditions or Check Blocks to your Journey is a great way to ensure that the experience remains contextually relevant to each user In the Journey, at all times.
Let's show you how you can configure each Condition Block:
Is In Segment/ List
This Condition helps you contextually design the Journey experience for each user by checking whether or not they're included within an Active Segment in your dashboard.
We recommend using this Check Block if:
-
You'd like to end the Journey for a specific type of user.
-
You'd like to engage users in the Journey, differently based on whether or they're in the Segment or List.
Here's how you can configure it:
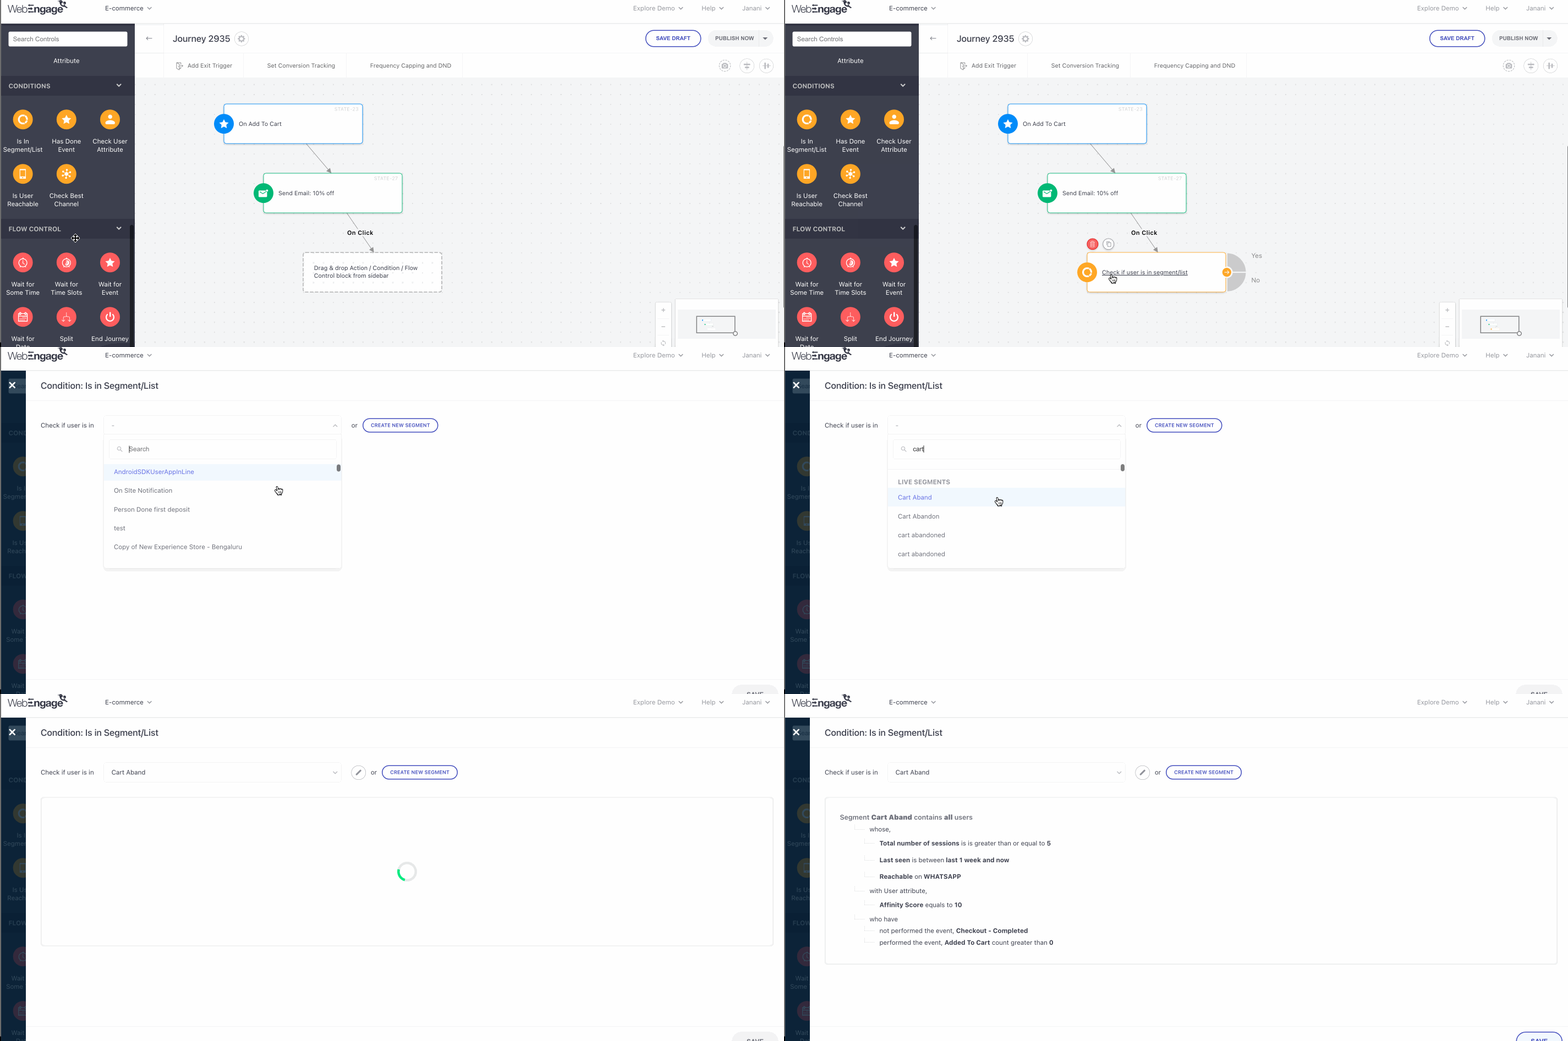
Click to enlarge
Step 1: Drag and drop the Is In Segment/List Block onto the Canvas.
- As shown above, connect it to an existing block in the Journey to determine the exact moment in which we must check whether or not a user is included within the specified Segment or List.
Step 2: Click on the block and select a Segment or List from the dropdown.
- If a user's profile matches the Segment's rule, then they will continue their Trip through the [Is In Segment/ List block's 'Yes' branch.
Step 3: Click Save to go back to the Canvas.
Step 4: Branch out the Journey to continue a user's Trip based on whether or not they're included within the selected Segment or List.
Click to enlarge
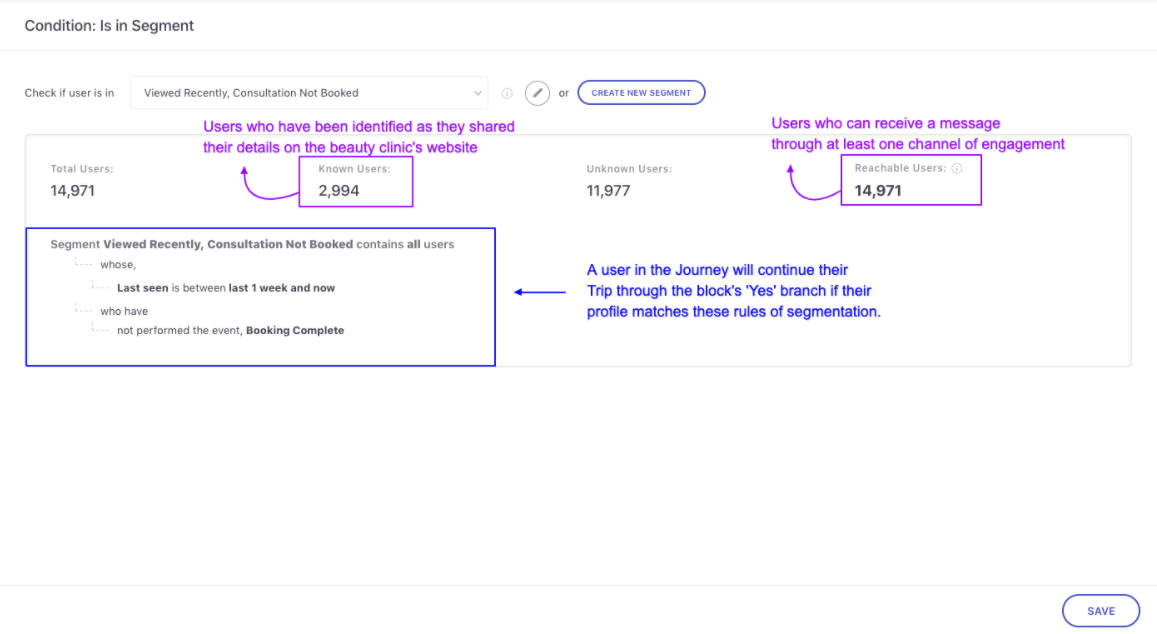
As shown above, once you have selected a Segment or List, you will be able to preview a snapshot of its users and rules of segmentation. Let's walk you through the details:
Total Users: Indicates the total number of users that are currently a part of the segment or list.
Known Users: Indicates the number of identified users, out of the total users, that are currently included within the segment or list.
- All users are identified on the basis of the Unique Identifier specified by you while setting up your WebEngage account.
Unknown Users: Indicates the number of anonymous users, out of the total users, that are currently included within the segment.
Reachable Users: Indicates the total number of users in your segment or list that can be reached through at least one channel of engagement (Push, In-app, SMS, On-site, Web Push, Email) at present.
Rules of Segmentation: You can choose to segment or list your entire user base by 3 broad parameters - User (attributes), Behavior and Technology. Hence, here you will find a summary of all the rules based on which the users have been grouped together.
Related Reads
Branching the Journey from Is In Segment/ List Block
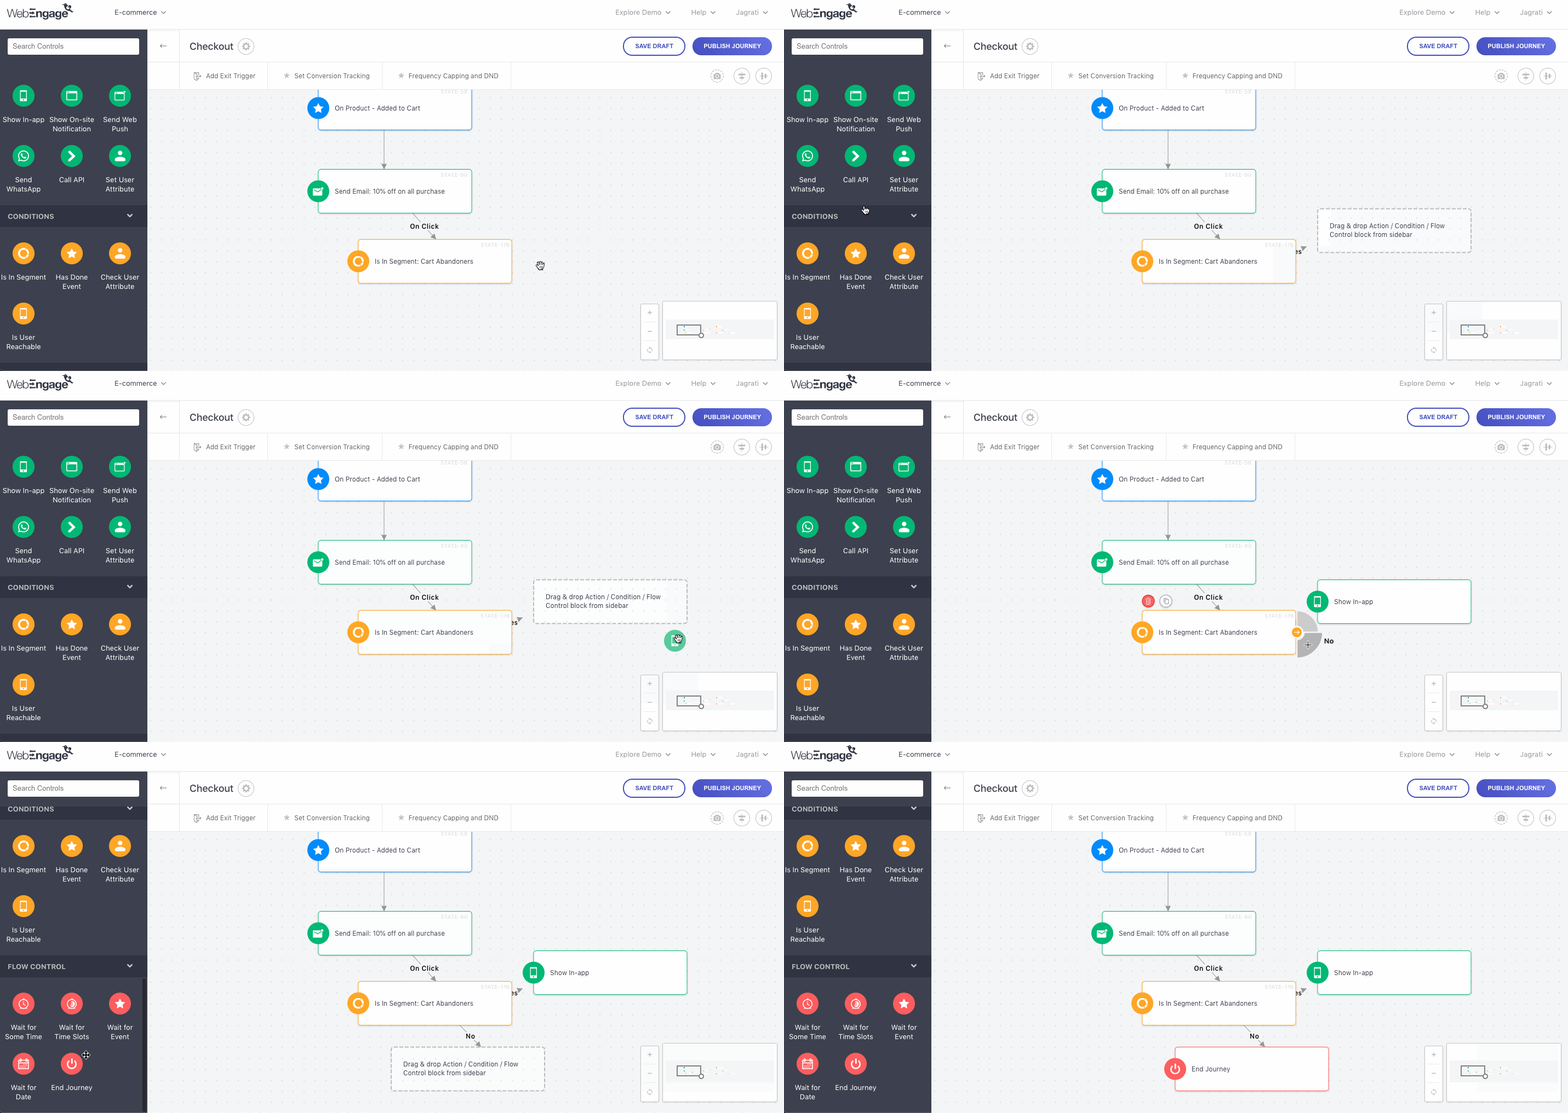
Branches are logic-based flows that help you determine the subsequent Journey experience for a user, as per all the scenarios that can occur once we check whether or not a user is included within a specific Segment.
Click to enlarge
As shown above:
-
SelectYes to continue the Trip for a user who is currently included within the specified Segment, leading them to experience the next block connected by the branch.
-
SelectNo to continue the Trip for a user who is not included within the selected Segment, leading them to experience the next block connected by the branch.
Has Done Event
This Condition helps you contextually personalize the subsequent Journey experience for a user by checking whether or not they have performed a specific Event on your app/website while experiencing the Journey but also based on the event time filter that has been applied.
We recommend using this Check Block if:
-
You'd like to engage users in the Journey in the context of the Event performed/ not performed by them.
-
You'd like to end the Journey for users who have/ haven't performed the Event.
Here's how you can configure it:
Click to enlarge
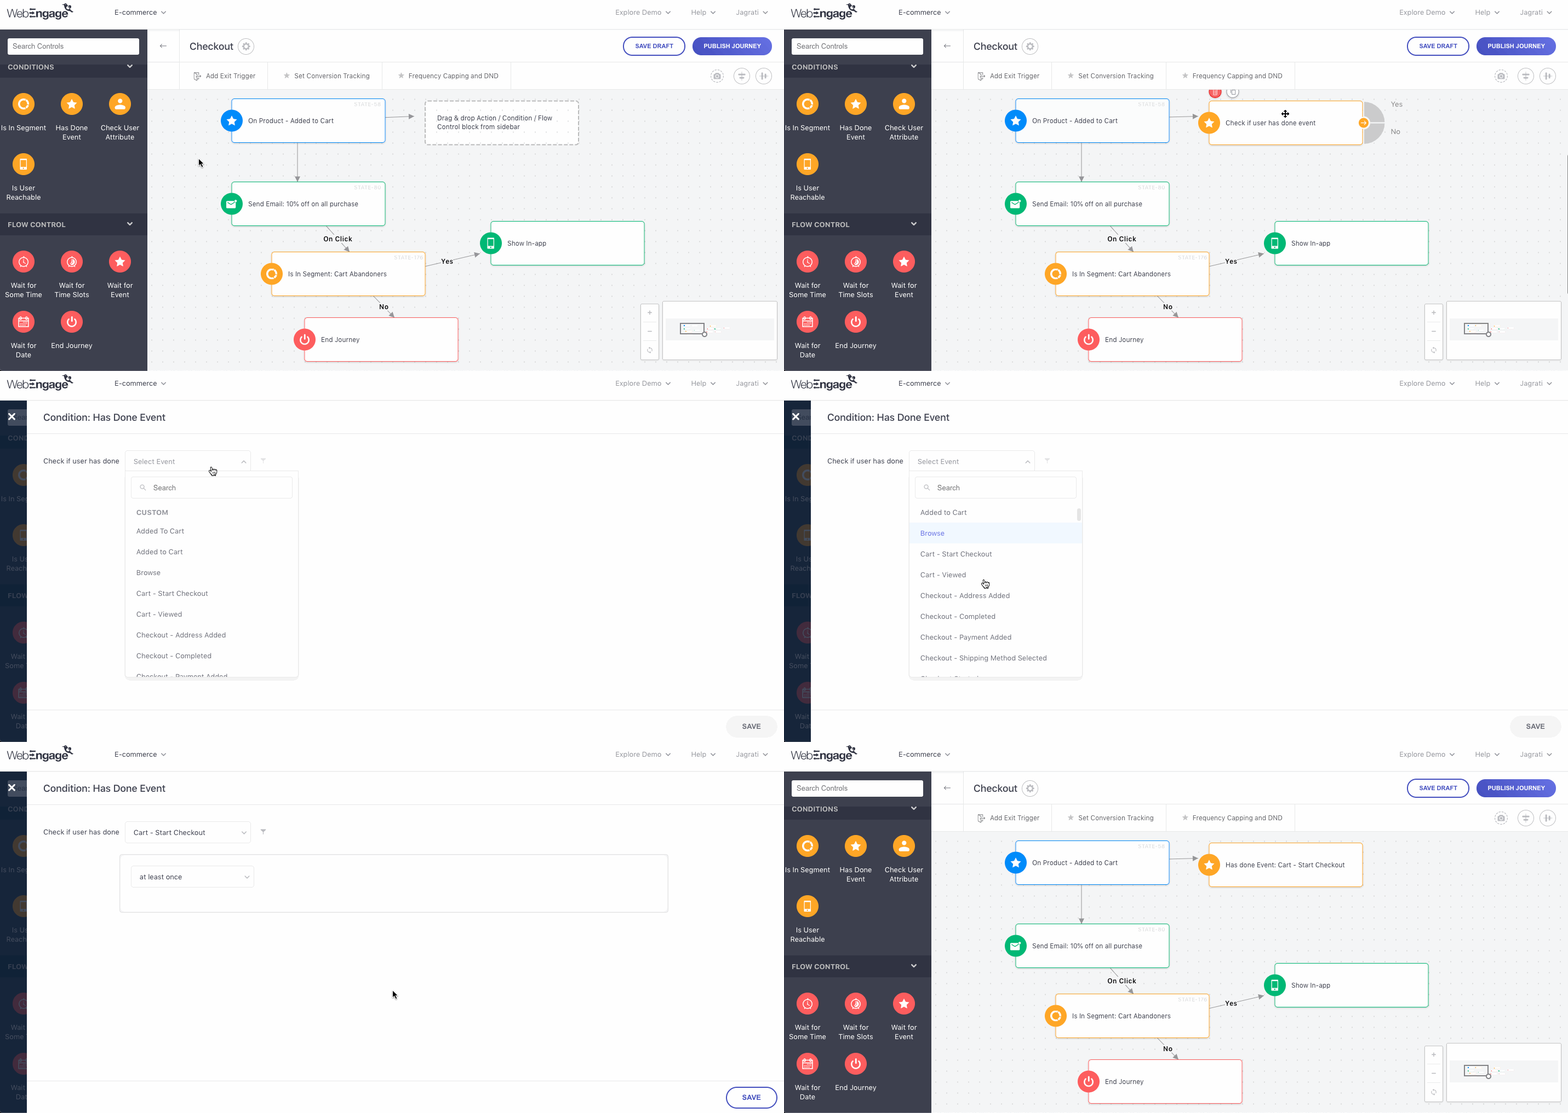
Step 1: Drag and drop the Has Done Event Block onto the Canvas.
- Connect it to an existing block in the Journey to determine the exact moment in which we must check whether or not a user has performed the specified Event.
Step 2: Click on the block, then click on the dropdown to select from a list of all the Events being tracked in your dashboard.
- In doing so, a new row will be added to the screen.
Step 3 (Optional): Define the frequency/ recency/ value of the selected Event in the second row.
- Doing so will help you narrow down the scope of occurrence of the Event to only those users who perform it as per the specified frequency/ recency/ value.
Any one of the following options can be selected here:
- At least once
- Only Once
- No. of occurrence greater than/ less than/ equal to/ is not equal to
- Most recent Event Time
- Least recent Event Time
- Maximum/ Minimum / Average/ Total value of a Custom Attribute
Step 4 (Optional): Click on the filter icon to add an _Event Attribute to the selected _Event*
-
Doing so will help you narrow down the scope of occurrence of the Event to only those users who perform the Event in the context of the Event Attribute added to it.
-
You can club Event Attributes by the AND/OR logic to engage/ end the Journey for a very niche set of users. For example, in the above visual, we have added the following event attributes to the event, Checkout - Completed:
- Cart Value is greater than $500
- Country is one of United States, Mexico or Canada
- This means that only those users who perform the event, Checkout Completed with a Cart Value exceeding $500 AND are located in either Country, US, Mexico, Canada, will continue their Trip through the Has Done Event block's'Yes' branch.
How it Works: Clubbing Event Attributes by the AND/OR LogicAND: Helps you narrow down the scope of occurrence of the event to only those users who perform it in the context of all the event attribute filters added to it.
OR: Helps you widen the scope of occurrence of the event to all users who perform it in the context of either event attribute filter added to it.
Step 5: Click Save to go back to the Canvas.
Step 6: Branch out the Journey to continue a user's Trip based on their current status which can be any of - has/ hasn't performed the Event.
Branching the Journey from Has Done Event Block
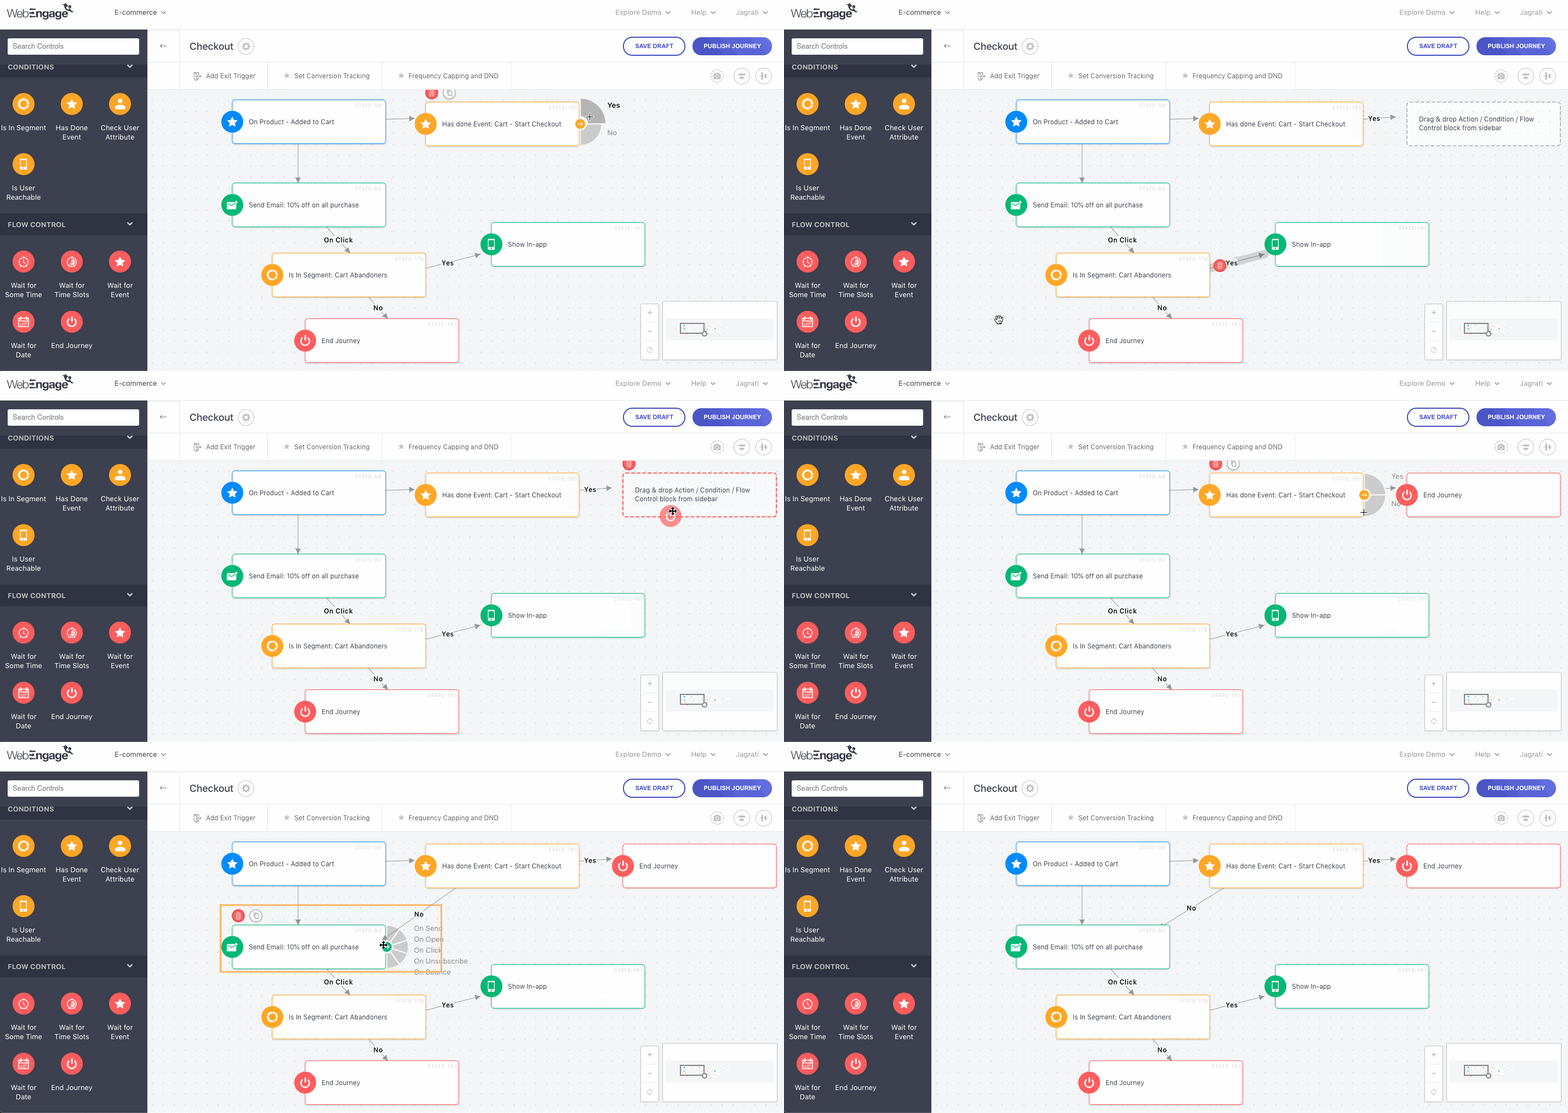
Branches are logic-based flows that help you determine the subsequent Journey experience for a user, as per all the scenarios that can occur once we check whether or not the user has performed a specific Event on your app/website.
Click to enlarge
As shown above:
-
SelectYes to continue the Trip for a user that performs the specified Event, leading them to experience the subsequent block connected through the branch.
- If you have specified the Frequency/ Recency/ Value for the selected Event and have added Event Attribute filters to it, then: Only those users who perform the Event in the context of all/either Event Attributes AND as per the specified Frequency/ Recency/ Value will continue their Trip through the Yes branch.
-
SelectNo to continue the Trip for a user in the Journey that:
- Does not perform the specified Event.
- Has performed the Event, but not as per the defined Frequency/ Recency/ Value OR in the context of the all/either added Event Attribute filter(s).
Check User Attribute
This Condition helps you contextually personalize the subsequent Journey experience for a user based on the value of a particular User Attribute in their User Profile.
We recommend using this Check Block if:
-
You'd like to end the Journey for a user who has experienced a specific change in the value of their User Profile Attribute.
-
You'd like to engage users in the Journey differently, depending upon whether or not their User Profile Attribute contains the specific value.
Here's how you can set it up:
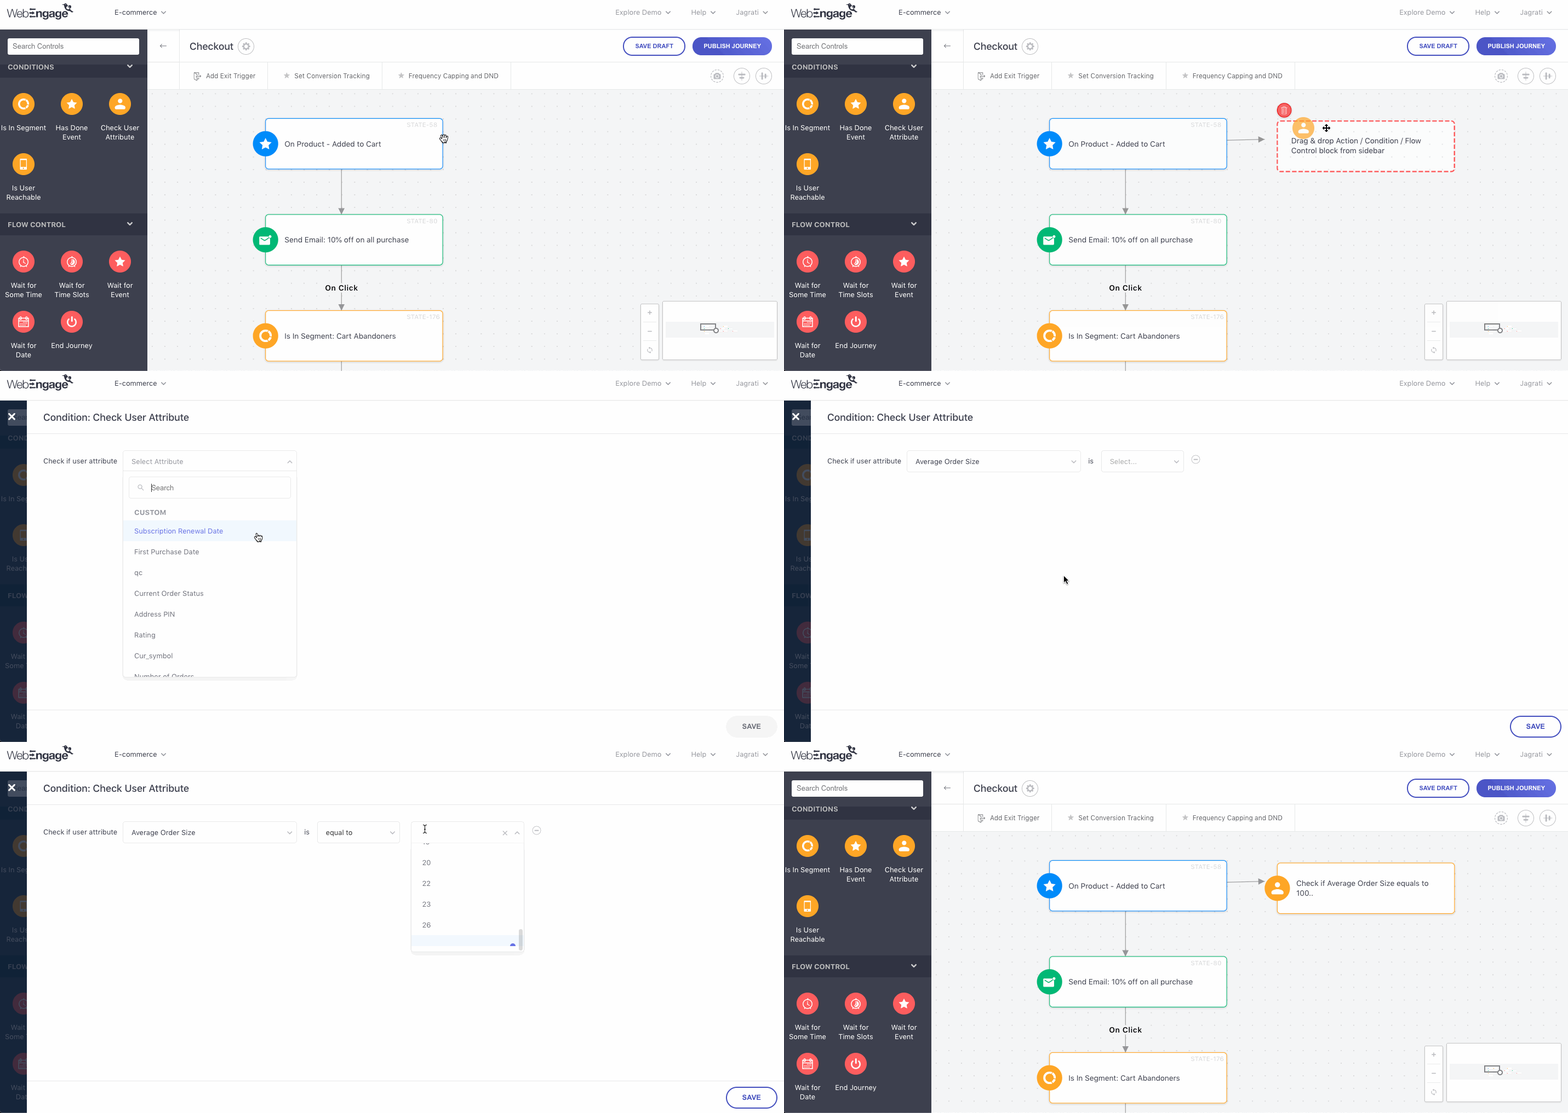
Click to enlarge
Step 1: Drag and drop the Check User Attribute Block onto the Canvas.
- Click on the block to configure.
Step 2: Click on the first dropdown to select from a list of all the User Attributes being tracked in your dashboard.
Step 3: Click on the second dropdown to define the value of the selected User Attribute.
- Select/ add the exact value of the User Attribute in the third dropdown.
- For example, in the above visual, we have specified the value of the User Attribute, Customer Type, as Platinum.
Step 5: Click Save to go back to the Canvas.
Step 6: Branch out the Journey to continue a user's Trip based on their current status which can be any of - user attribute does/ does not match the specified change in value.
Branching the Journey from Check User Attribute Block
Branches are logic-based flows that help you determine the subsequent Journey experience for a user, as per all the scenarios that can occur once we check whether or not the specified change has occurred in the value of the selected User Attribute for a user.
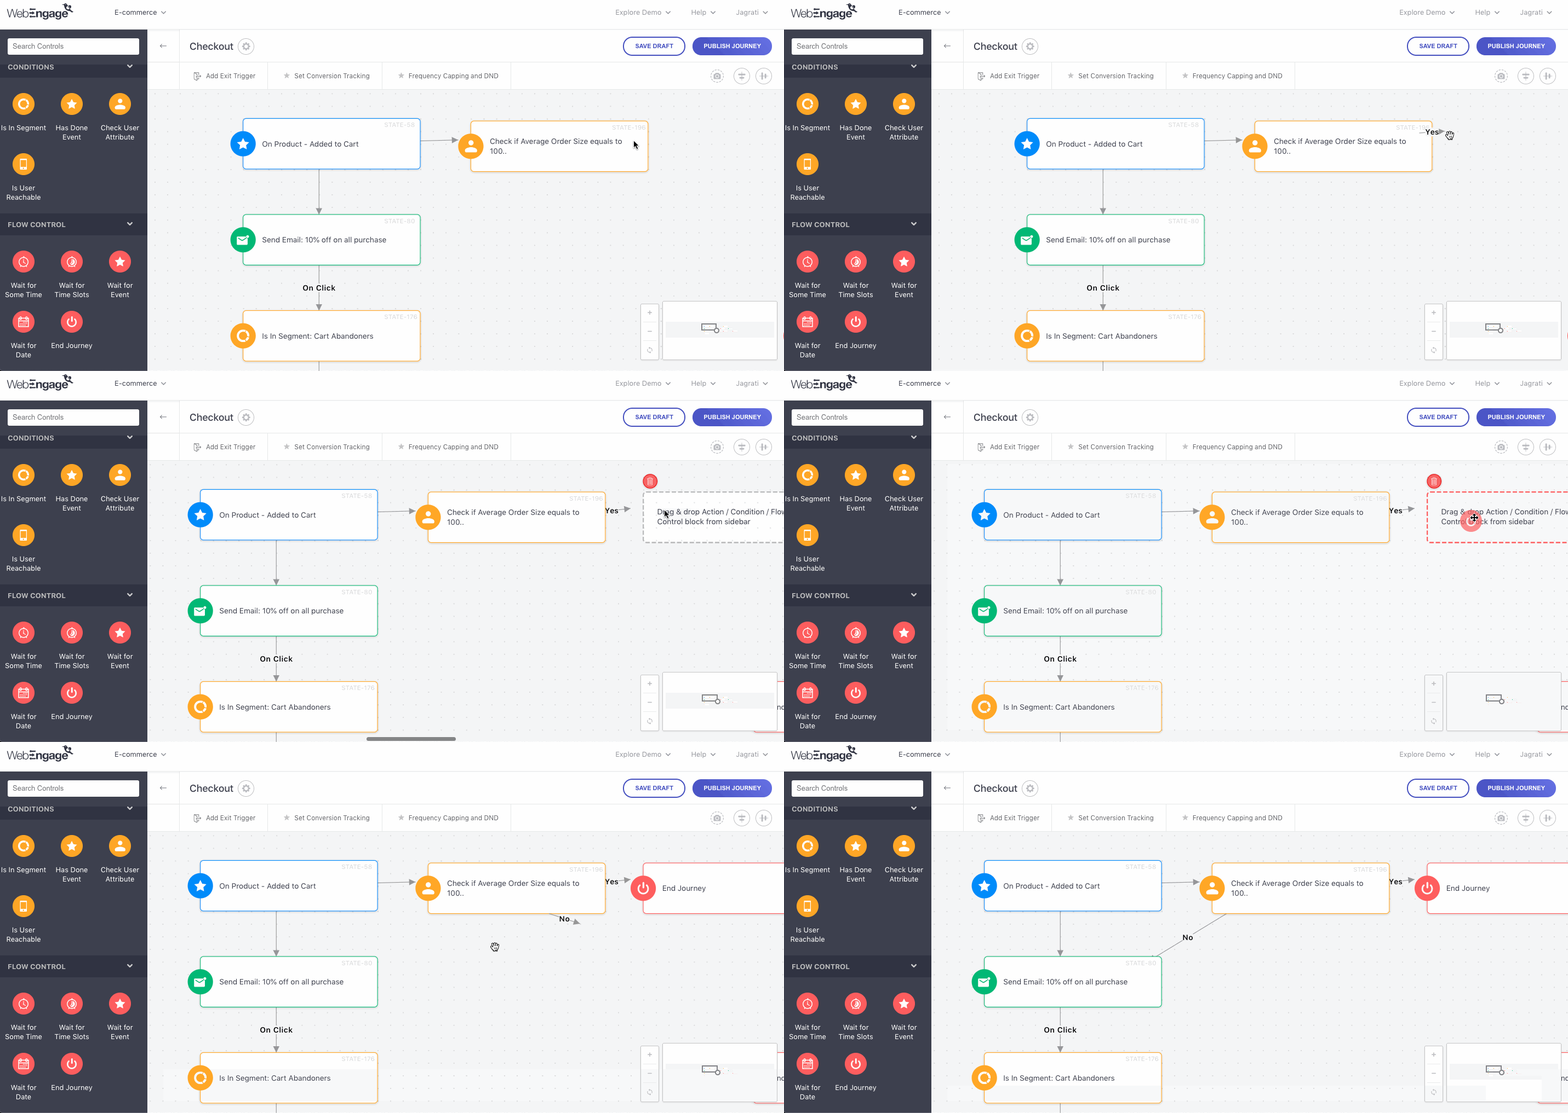
Click to enlarge
As shown above:
-
SelectYes to continue the Trip for a user that has experienced the specified change in the value of the selected User Attribute, leading them to experience the next block connected by the branch.
-
SelectNo to continue the Trip for a user, for whom the specified change hasn't occurred in the value of the selected User Attribute.
Is User Reachable
This Condition helps you effectively engage users through their preferred channels of communication by checking whether or not a user can be reached through a specific channel.
We recommend using the Check Block in your Journey before adding an Action Block that enables you to engage users through a Push, SMS, Web Push or Email campaign. Doing so helps you:
-
Identify users who may not be reachable on the specified channel, and engage them through another channel with a similar message.
-
Maintain the sanctity of data shown under the Campaign's Overview by showing the accurate number of messages that failed to get delivered, due to reasons other than channel reachability.
Here's how you can configure it:
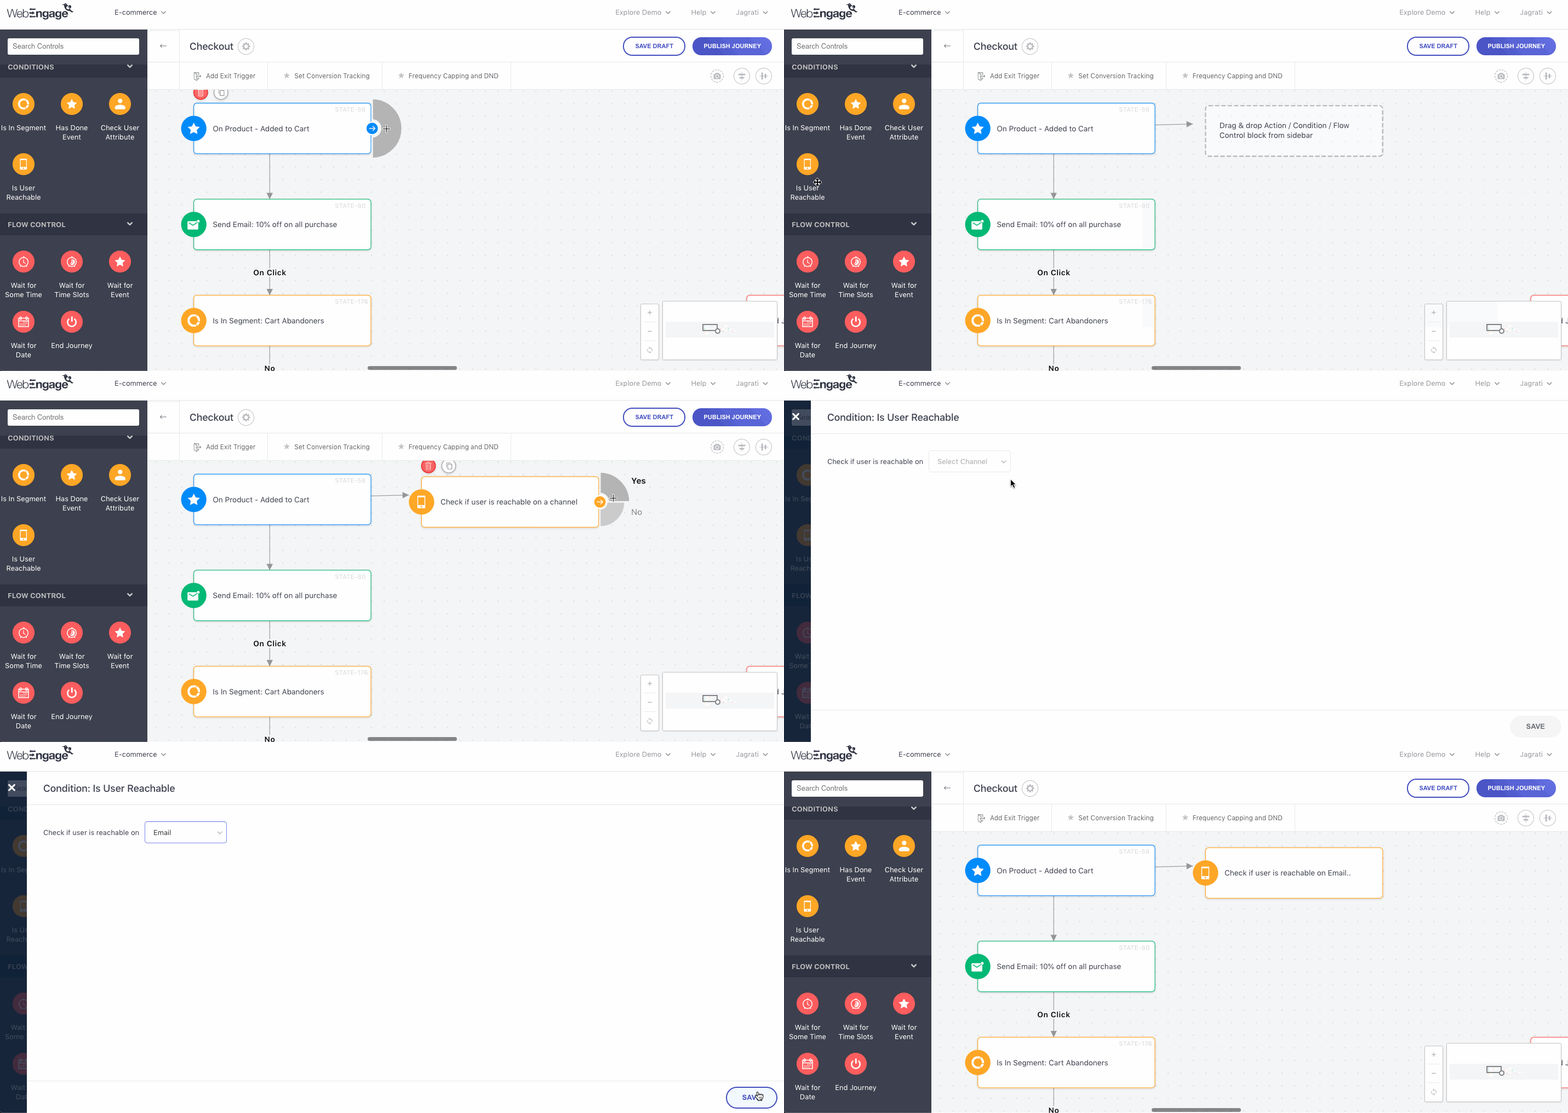
Click to enlarge
Step 1: Drag and drop the Is User Reachable Block onto the Canvas.
Step 2: Click on it to select a channel, for which we must check a user's reachability.
Any of the following options can be selected here:
Web Push (how reachability is determined)
Email (how reachability is determined)
Step 3: Branch out the Journey to continue a user's Trip based on their real-time channel reachability status.
Branching the Journey from Is User Reachable Block
Branches are logic-based flows that help you determine the subsequent Journey experience for a user, as per all the scenarios that can occur once we check whether or not a user can receive messages through the specified channel.
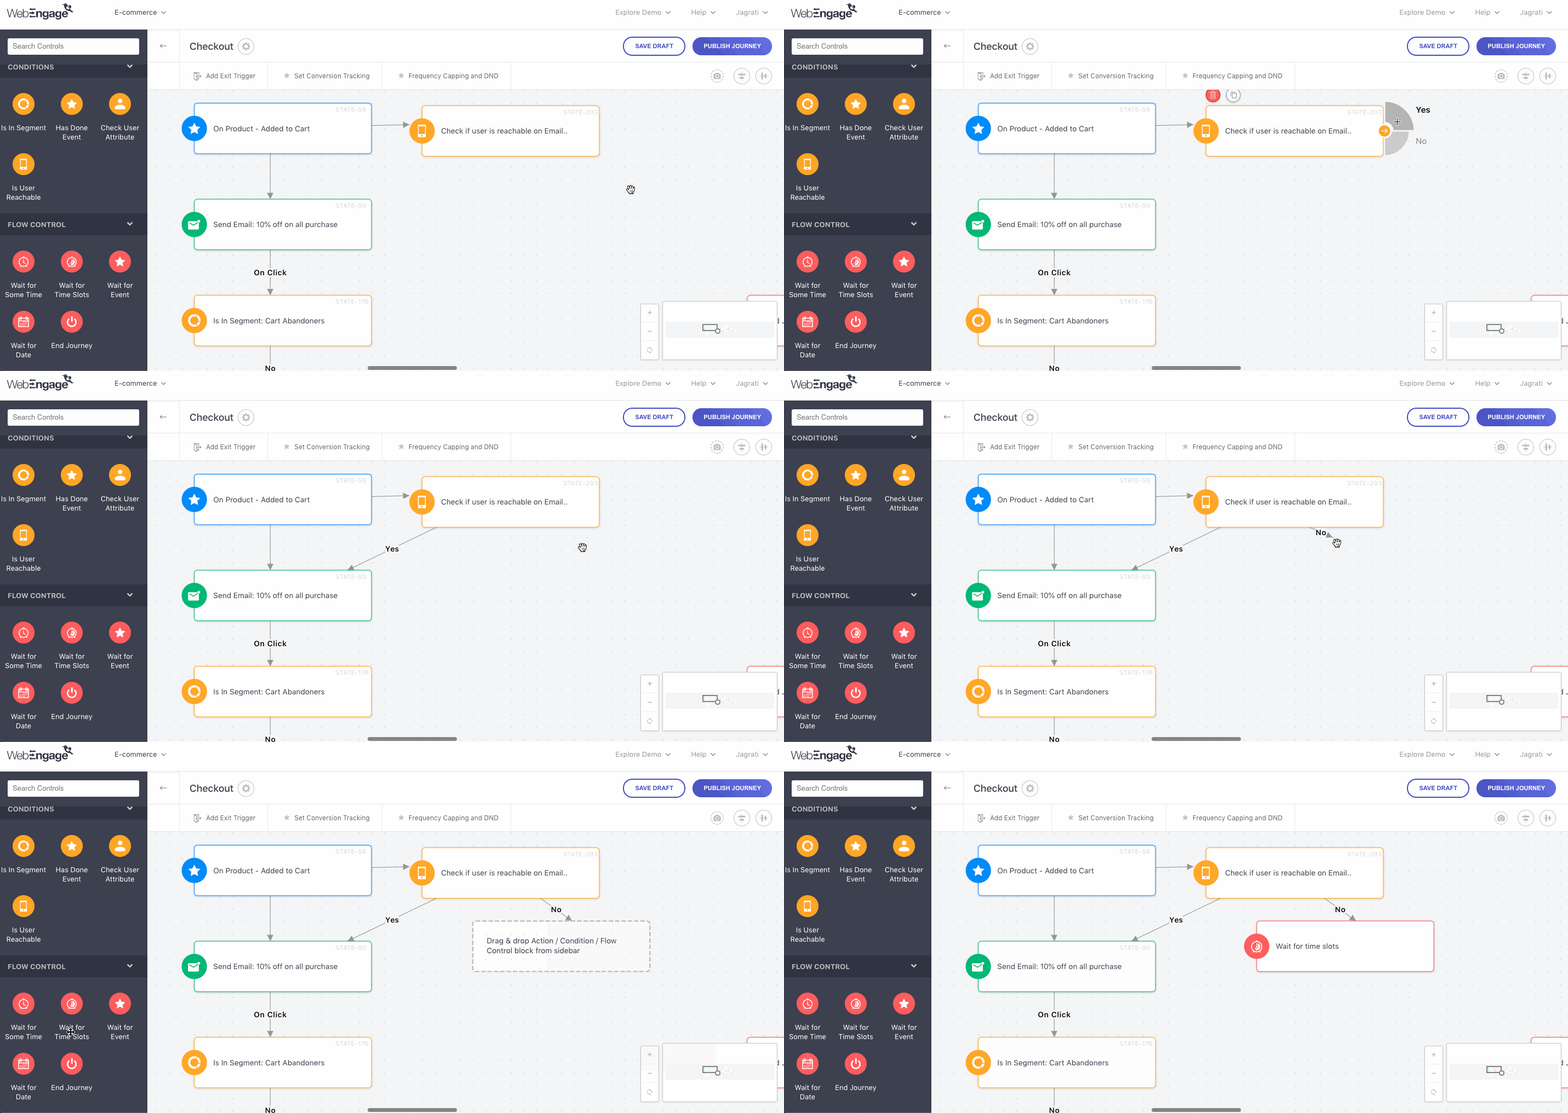
Click to enlarge
As shown above:
-
SelectYes to branch out the Journey for users who are reachable on the specified channel, leading them to experience the next block it's connected to.
-
SelectNo to branch out the Journey for users who cannot be reached through the specified channel, leading them to experience the next block it's connected to.
Flow Controls
Click to enlarge
Flow Controls help you determine the duration over which users experience the Journey and contextually end the Journey for each user.
-
These blocks enable you to design the Journey experience as per the time users organically take to explore your platform and signup, make a purchase, refer to a friend, add wishlist items to their cart, complete a course, stream a show again, invest in a portfolio and so on.
-
Flow Controls also let you control the Journey experience by spacing out communication over a desirable period to avoid coming across as being pushy or spam. This is achieved by allowing each user in the Journey to:
- Wait for a specific duration before continuing their Trip
- Proceed to the next block only during particular time slots in a day
- Proceed to the next block only when a particular Event occurs
- Proceed to the next block only on a specific date
Let's get you acquainted with how each block works:
Wait for Sometime
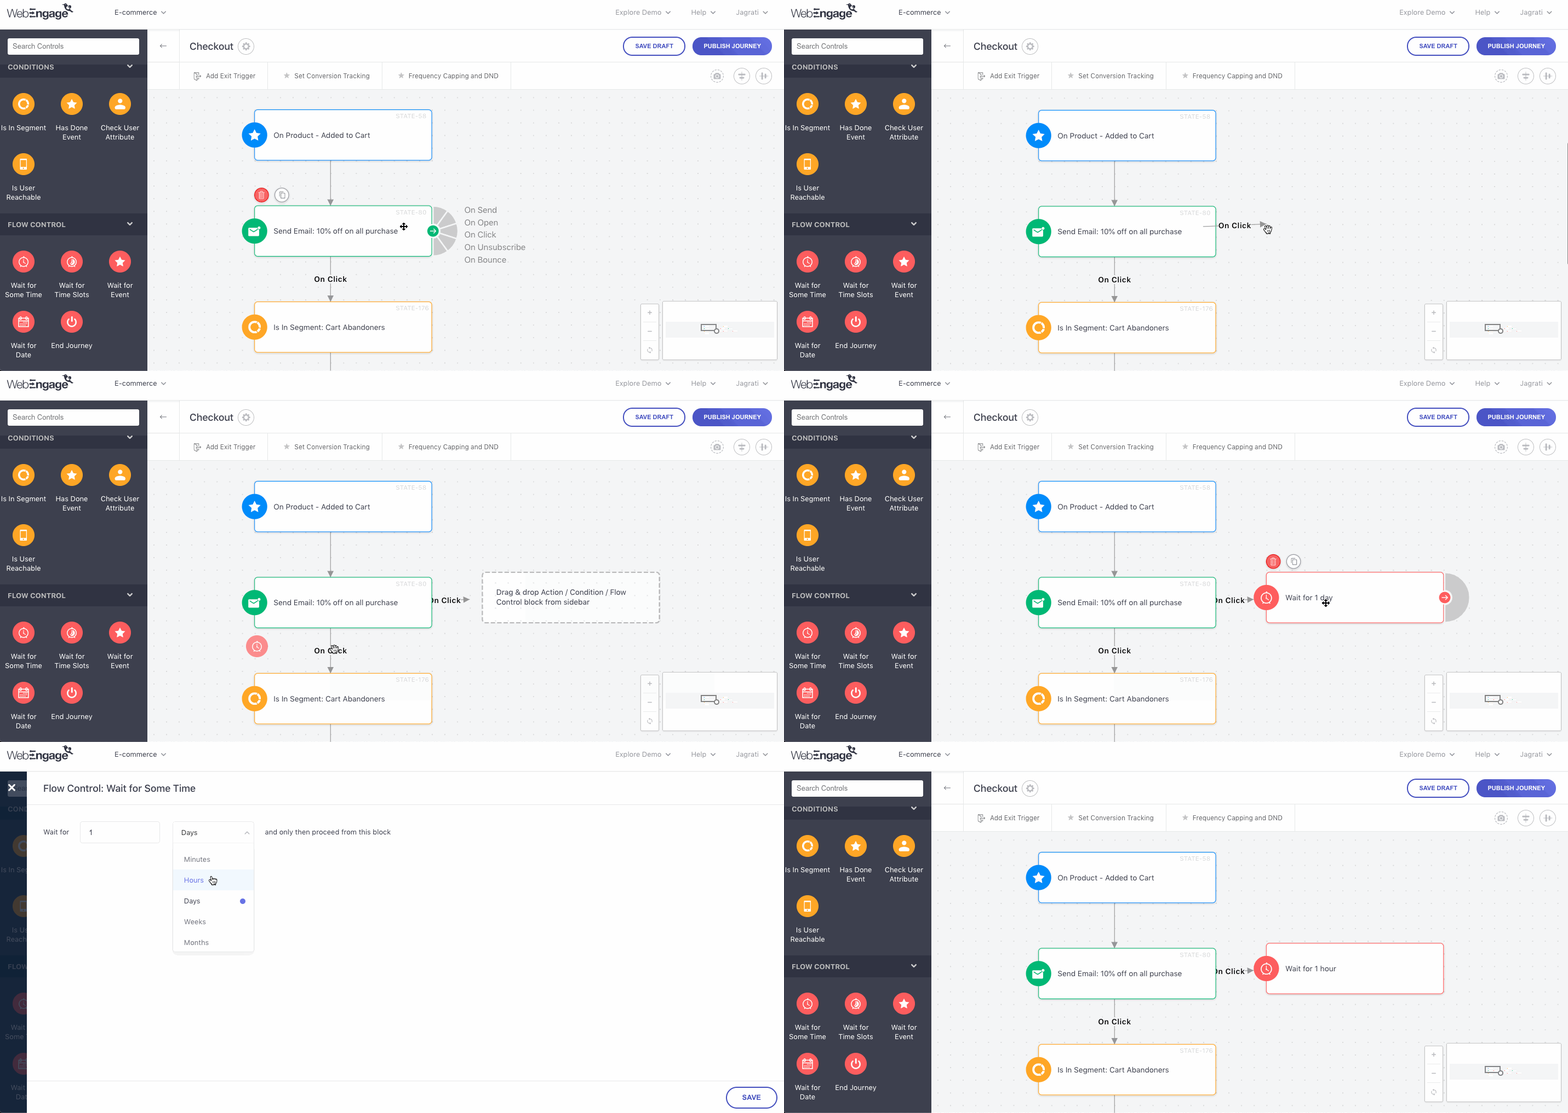
This Flow Control allows you to build time gaps in the Journey by letting users wait for a specific duration before they enter the next block. It comes in handy when designing the Journey experience as per the time users organically take to proceed from one stage to the next, in their lifecycle.
Here's how you can set it up:
Click to enlarge
Step 1: Drag and drop the Wait for Sometime Block onto the Canvas.
- Connect it to an existing block in the Journey to determine the exact moment after which users will be forced to wait, before continuing their Trip
Step 2: Click on the block & specify the wait duration in Minutes/ Hours/ Days/ Weeks/ Months.
- Click Save to go back to the Canvas.
Wait for Time Slots
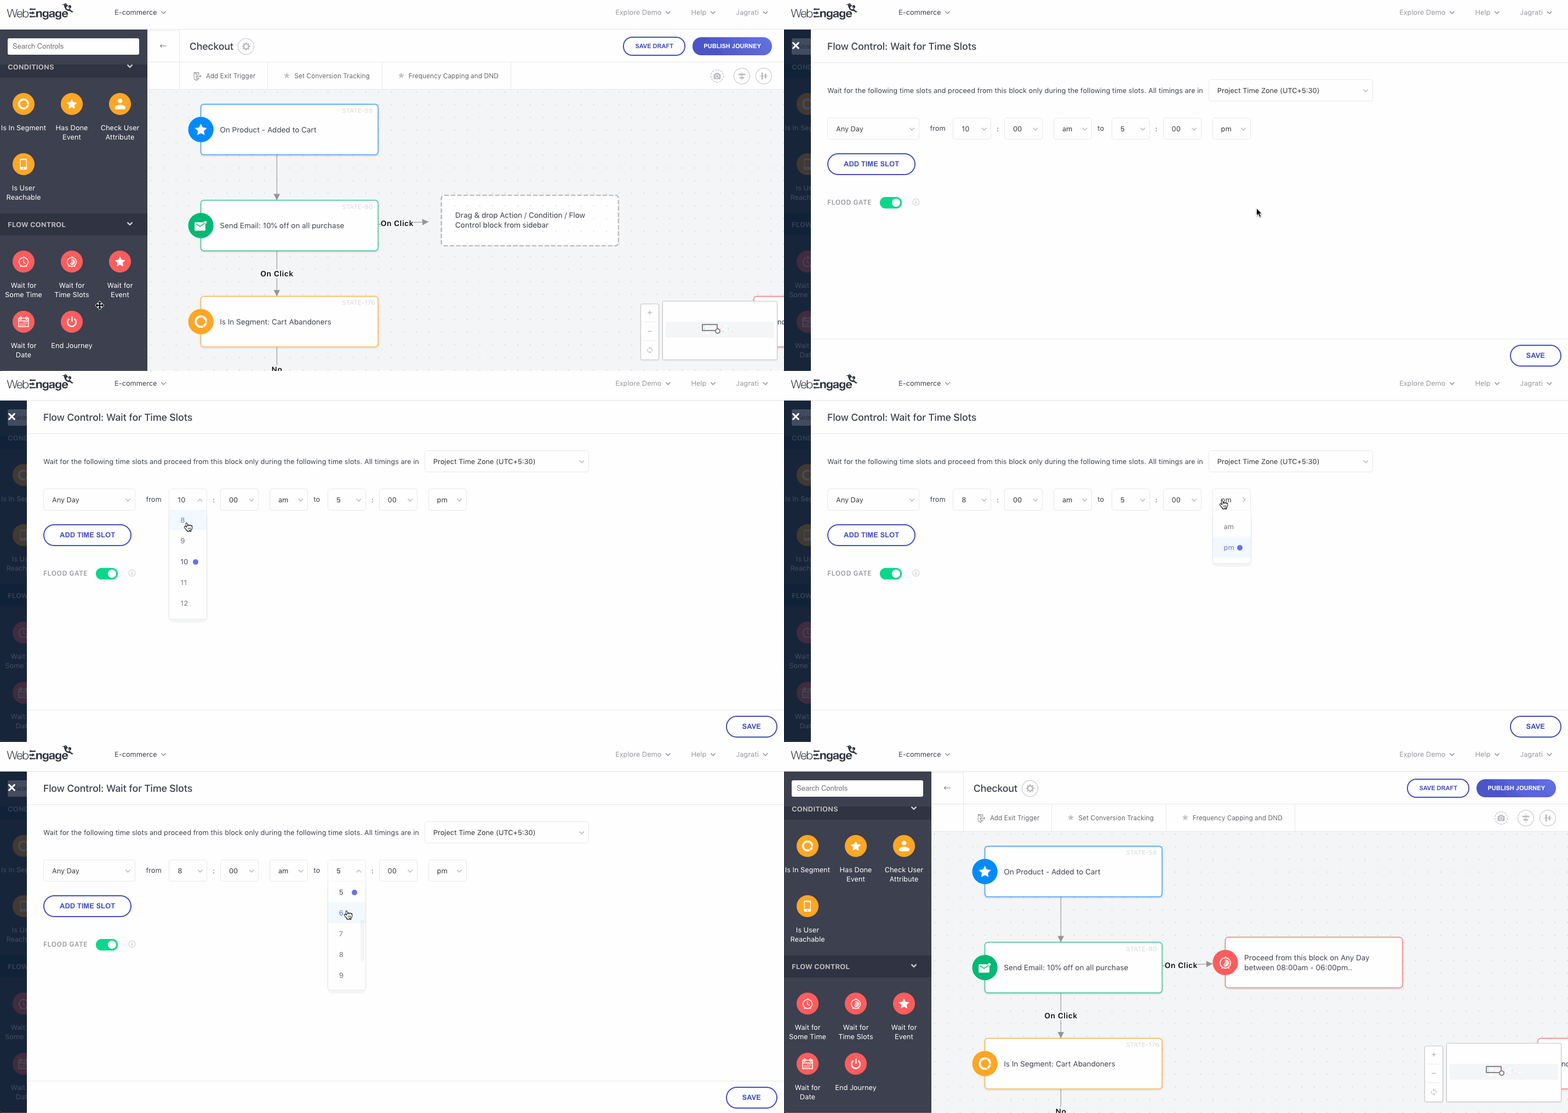
This Flow Control allows you to modulate the Journey experience by pausing a user's Trip and allowing them to proceed only during a specific time slot on particular days.
We recommend using this block if:
-
You'd like to engage users specifically in the context of a scenario that will occur during the specified time slot like a flash sale, global event, test result announcement, airing of a new season/episode and so on.
-
Your data suggests that engaging users during specific time slots, on certain days, through a particular channel leads to better impressions/ clicks/ conversions.
Here's how you can configure it:
Click to enlarge
Step 1: Drag and drop the Wait for Time Slots Block onto the Canvas.
- Connect it to an existing block in the Journey to determine the exact moment after which users will be forced to wait, before continuing their Trip.
Step 2: Click on the block and specify the Timezone as per which the specified time slot must be applied to each user.
-
Time is detected at two levels in WebEngage - for your account (project) and for each user. The following terms are used in your dashboard to indicate these:
-
In Project's Timezone: Determined by the timezone selected by you while setting up your account, selecting this option will apply the specified time slots to all your users as per your timezone. Thus, as and when the time slot occurs in the selected timezone, users will be allowed to proceed from the Wait for Time Slots block.
-
In User's Timezone: The timezone of all your users is determined as per their current location and is updated by us in real-time. Using this information, we'll allow each user to proceed from the Wait for Time Slots block only when the specified slot occurs in their current timezone.
-
Step 2: Specify the days on which users will be allowed to continue their Trip when the specified time slot occurs.
Any of the following options can be selected here:
Any Day (All days of the week)
Weekdays (Monday to Friday)
Weekends (Saturday to Sunday)
Monday
Tuesday
Wednesday
Thursday
Friday
Saturday
Sunday
Step 3: A shown above, you can specify a custom time slot in an AM/PM format.
Step 4 (Optional): Click on Add Time Slot to specify additional slots during which users will be allowed to proceed from the Wait for Some Time Slots block.
- All the time slots specified by you are clubbed by the OR logic. This implies that users who enter the Wait for Some Time Slots block will be allowed to exit it and continue their Trip whenever either of specified time slots occurs (as per the timezone selected by you).
Step 5: Click Save to go back to the Canvas.
Wait for Event
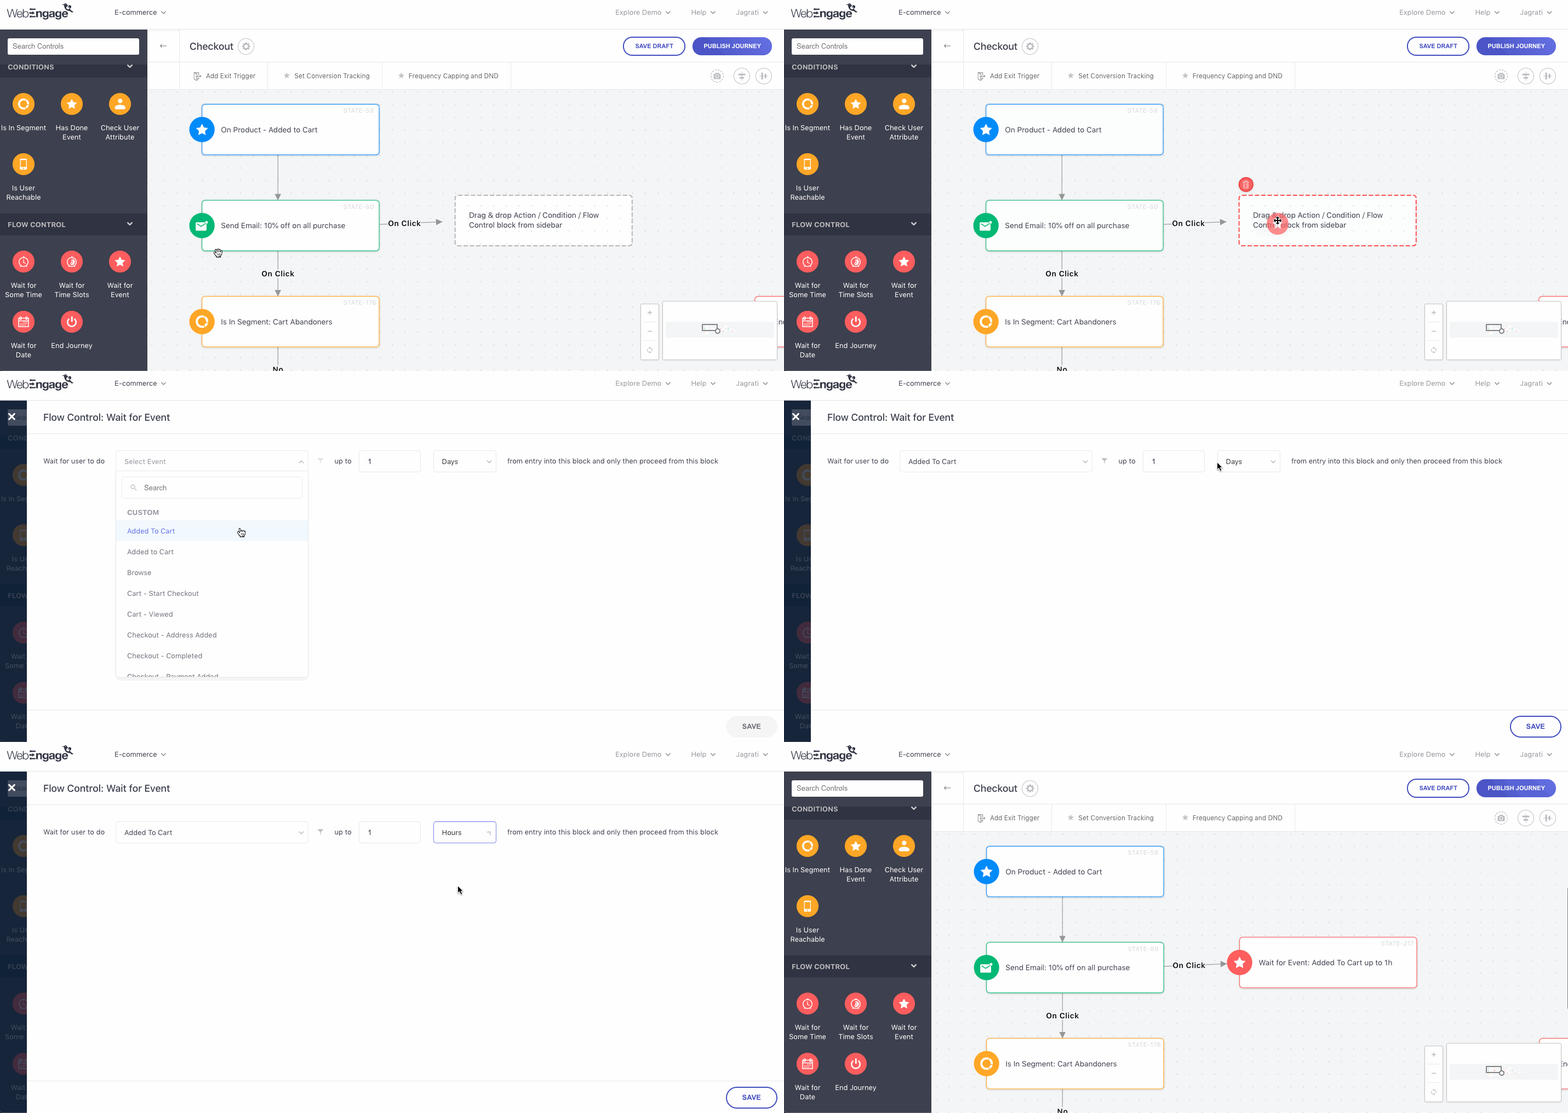
This Flow Control allows you to pause the Journey experience for a user, for a specific duration, and check whether or not they've performed a particular Event on your app/website within the time frame.
Thus, you can think of the Wait for Event block as a cross-over between the Wait for some time block and the Has Done Event check block. :)
We recommend using this block if the end goal of your Journey is to motivate users to perform a specific Event in their lifecycle like signup, purchase, search, make a booking, submitting a test, watch a show and so on.
- In such cases, you can add the Wait for Event block to your Journey to observe user behavior for a specific time frame. Then, branch out the Journey to engage users differently, based on whether or not they have performed the Event.
Here's how you can configure it:
Click to enlarge
Step 1: Drag and drop the Wait for Event block onto the Canvas.
- Connect it to an existing block in the Journey to determine the exact moment after which a user's behavior will be observed for a specific duration.
Step 2: Click on the block and select an Event from the first dropdown.
Step 3 (Optional): As shown below, Click on the filter icon to add an Event Attribute to the selected Event.
-
Doing so helps you narrow down the scope of occurrence of the Event to only those users who perform it in the context of the Event Attribute added to it.
-
You can also choose to add multiple Event Attributes and club them by the AND/OR logic to observe the behavior for a niche set of users.
How It Works: Clubbing Event Attributes by AND/OR LogicAND: Narrows down the scope of occurrence of the event to only those users who perform the event it in the context of all the event attribute filters added to it.
OR: Widens the scope of occurrence of the event to all users who perform the event in the context of any one of the multiple event attributes added to it.
Step 4: Specify the wait duration in Minutes/ Hours/ Days/ Weeks/ Months.
- Click Save to go back to the Canvas.
Step 5: Branch out the Journey from the wait block to continue the Trip for users in the context of whether or not they performed the specified Event within the time frame.
Branching the Journey from Wait for Event Block
Branches are logic-based flows that help you determine the subsequent Journey experience for a user, as per all the scenarios that can occur once we check whether or not the user has performed a specific Event on your app/website, within the wait duration.
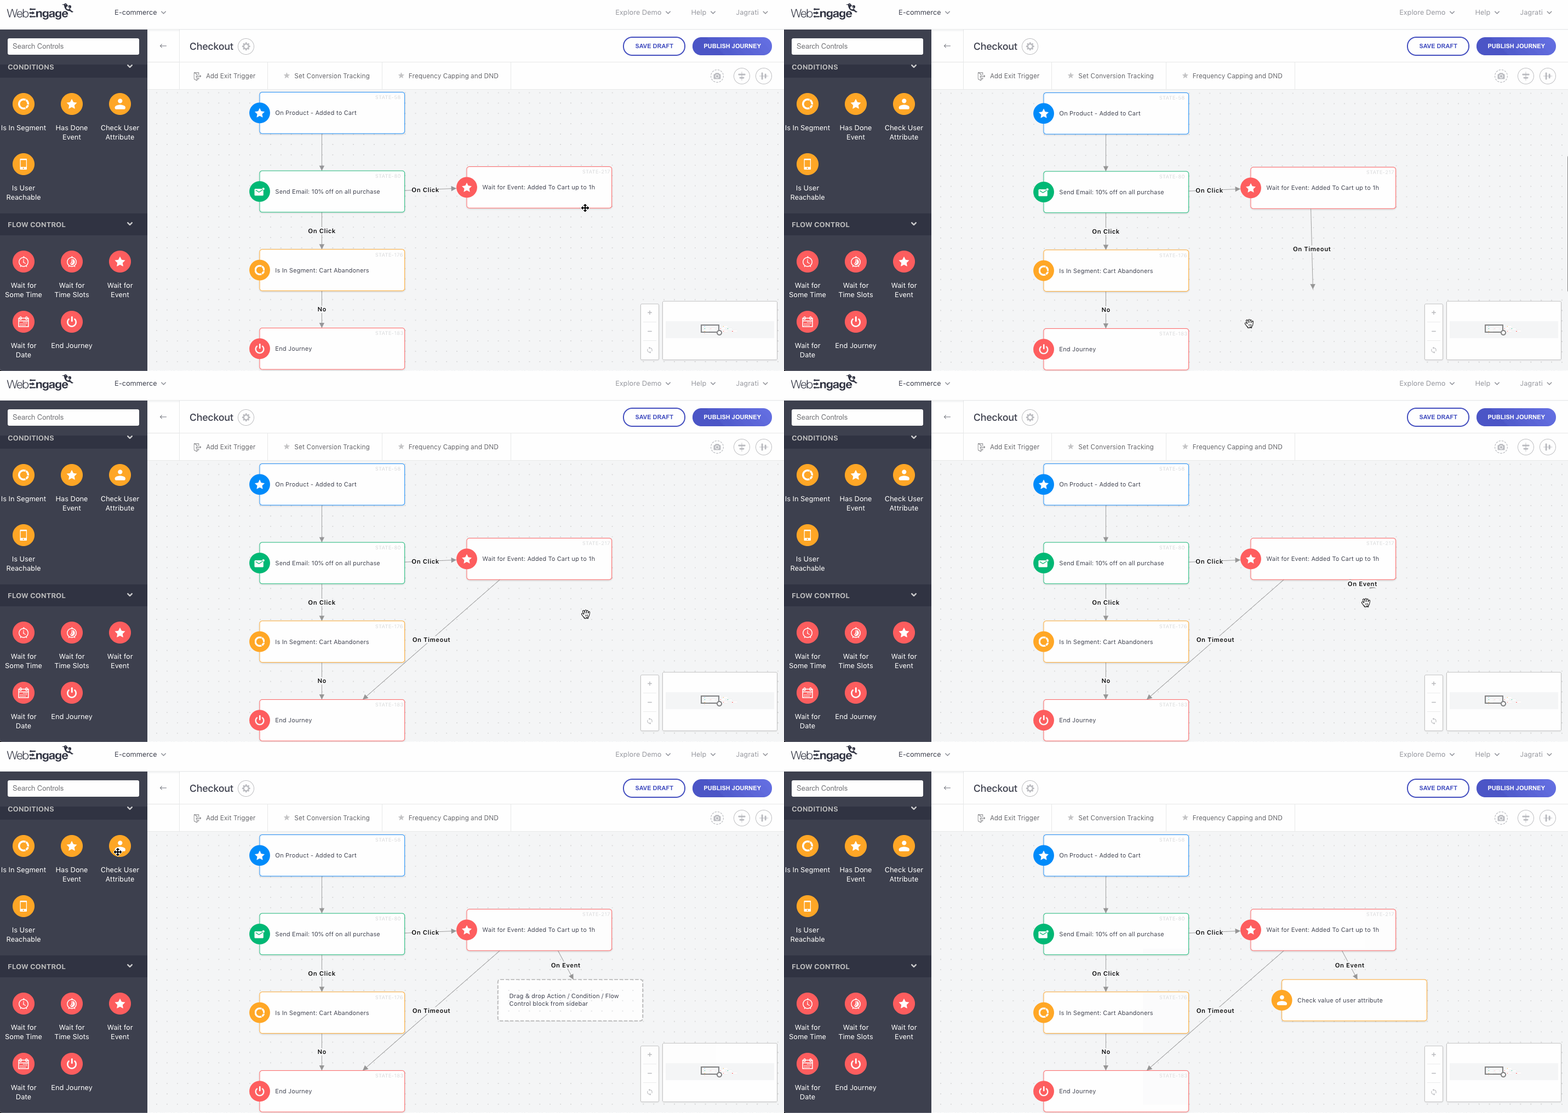
Click to enlarge
As shown above:
-
SelectOn Event to continue the Trip for all users who perform the particular Event within the specified duration.
-
SelectOn timeout to continue the Trip for all users who don't perform the Event within the specified duration.
Wait for Date
This Flow Control allows you to modulate the Journey experience by pausing a user's Trip and allowing them to proceed only on a specific date and time, in the context of their recent interactions with your app and website.
We recommend using this block if you'd like to engage users specifically in the context of a scenario that will occur on a specific date and time like:
- A flight booked through your platform.
- An appointment booked through your platform.
- An upcoming movie for which tickets were booked through your platform.
- A test they're supposed to take on your platform.
- An upcoming pickup from the user's address.
- A user's upcoming birthday or anniversary, and so on.
Let's get you acquainted with how it works:
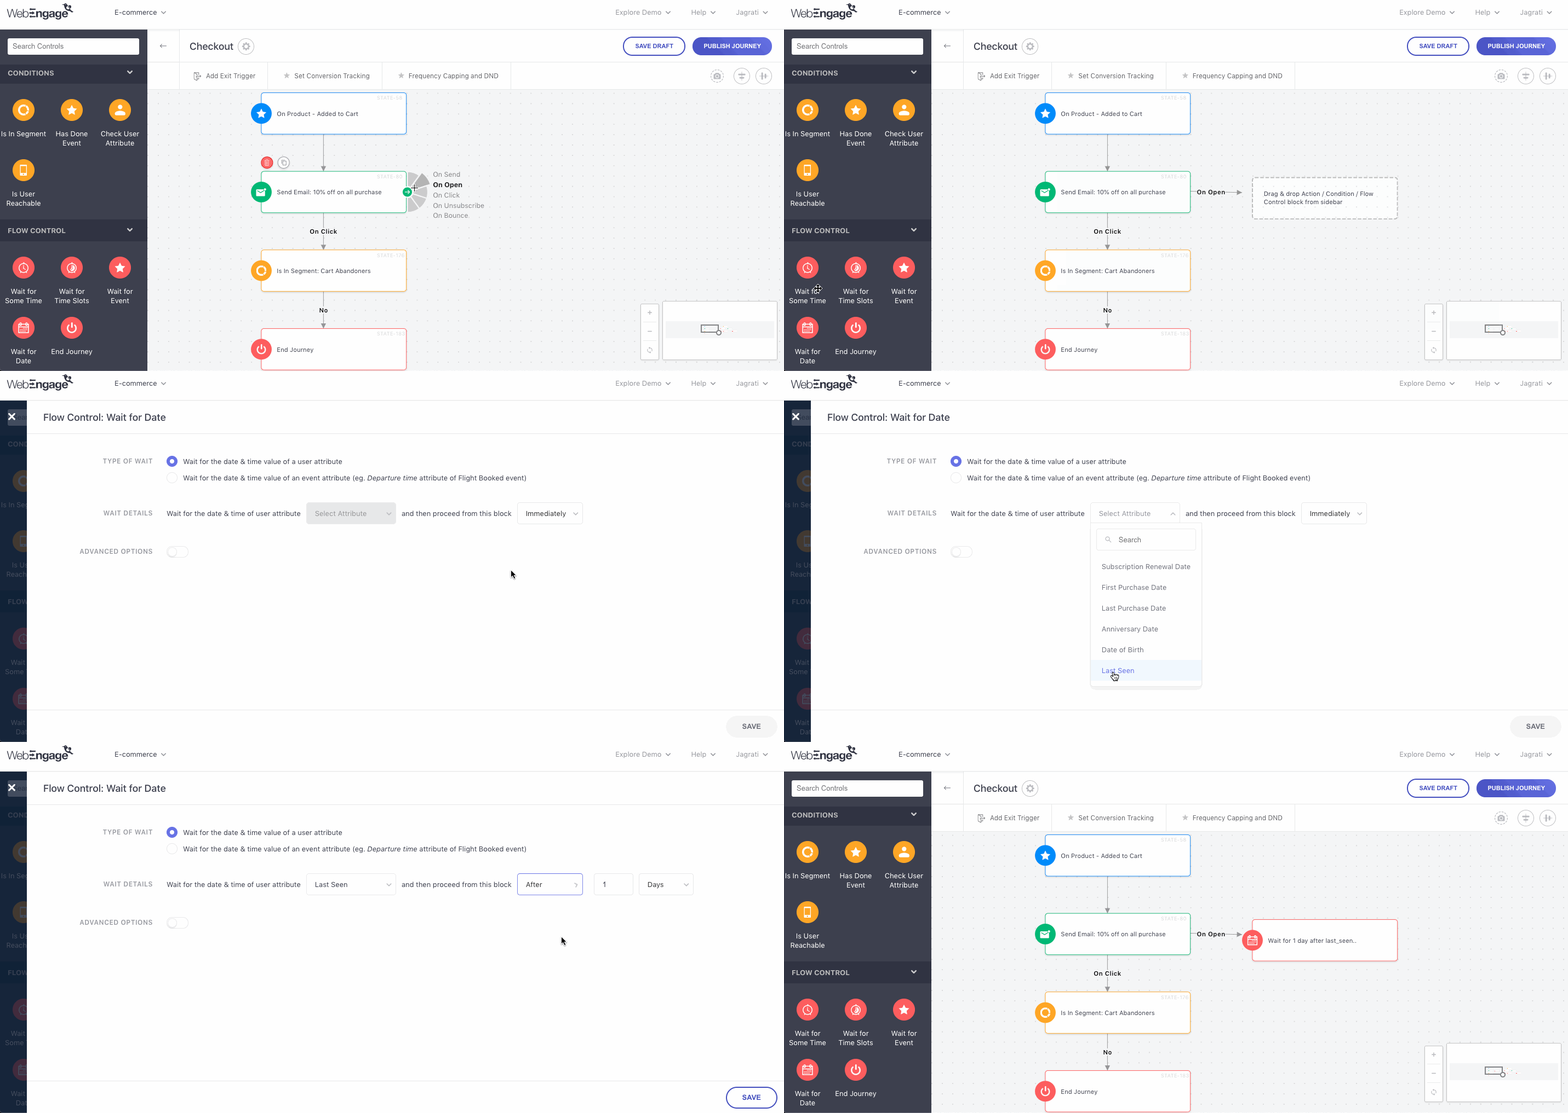
Click to enlarge
Step 1: Drag and drop the Wait for Date block onto the Canvas
- Connect it to an existing block to determine the exact moment after which users will be forced to wait, before continuing their Trip on the specified date.
Step 2: Click on the block and select Type of Wait Time.
-
SelectWait for Date & Time of a User Attribute if you'd like to leverage the date and time tracked as a User Attribute's value as the basis to continue a user's Trip in the Journey. (how to set up)
-
SelectWait for Date & Time of an Event if you'd like to leverage the date and time that's tracked for an Event, as the basis to continue a user's Trip in the Journey. (how to set up)
Wait for Date
Step 3: Configure Wait Details
Step 4: Configure Wait Time Buffer (Advanced Option)
Step 5: Click Save to go back to the Canvas.
Step 6: Branch out the Journey
Wait for Date & Time of an Event
As shown above, in doing so, you will be prompted to select the Wait Event.
Step 3: Configure Wait Details
Step 4: Configure Wait Time Buffer (Advanced Option)
Step 5: Click Save to go back to the Canvas.
Step 6: Branch out the Journey
Branching the Journey from Wait for Date Block
Branches are logic-based flows that help you determine the subsequent Journey experience for a user, as per all the scenarios that can occur once they enter the Wait for Date Block.
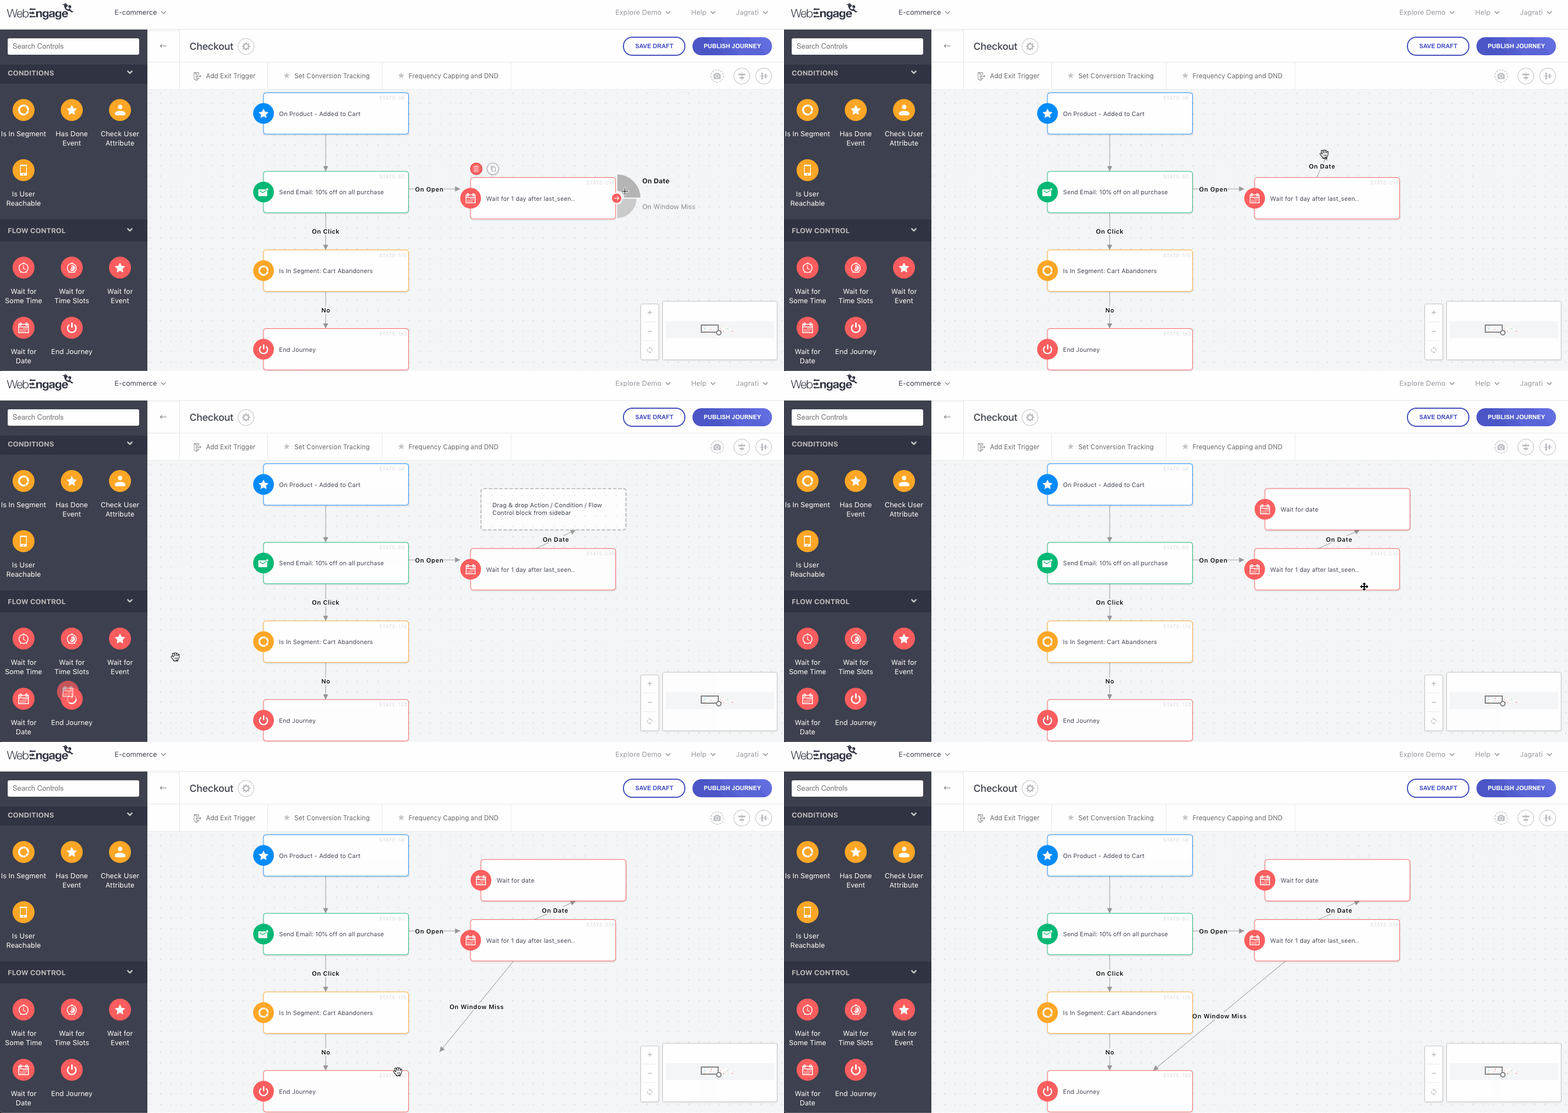
Click to enlarge
As shown above:
-
SelectOn Date to continue the Trip for all users who entered the Wait for Date block before the specified date, allowing them to proceed to the next block only on the particular date.
-
SelectOn Window Miss to continue the Trip for all users who may have entered the Wait for Date block after the specified date, leading them to experience the next block, in the context of the missed window.
Split
This Flow Control allows you to divide users into multiple branches to find out the best-performing branch (example: you can configure 70% of users to follow branch A and the rest 30% to follow branch B in your journey). You can experiment with different channels, different wait block intervals and various other engagement strategies across these branches.
Here's how you can set it up:
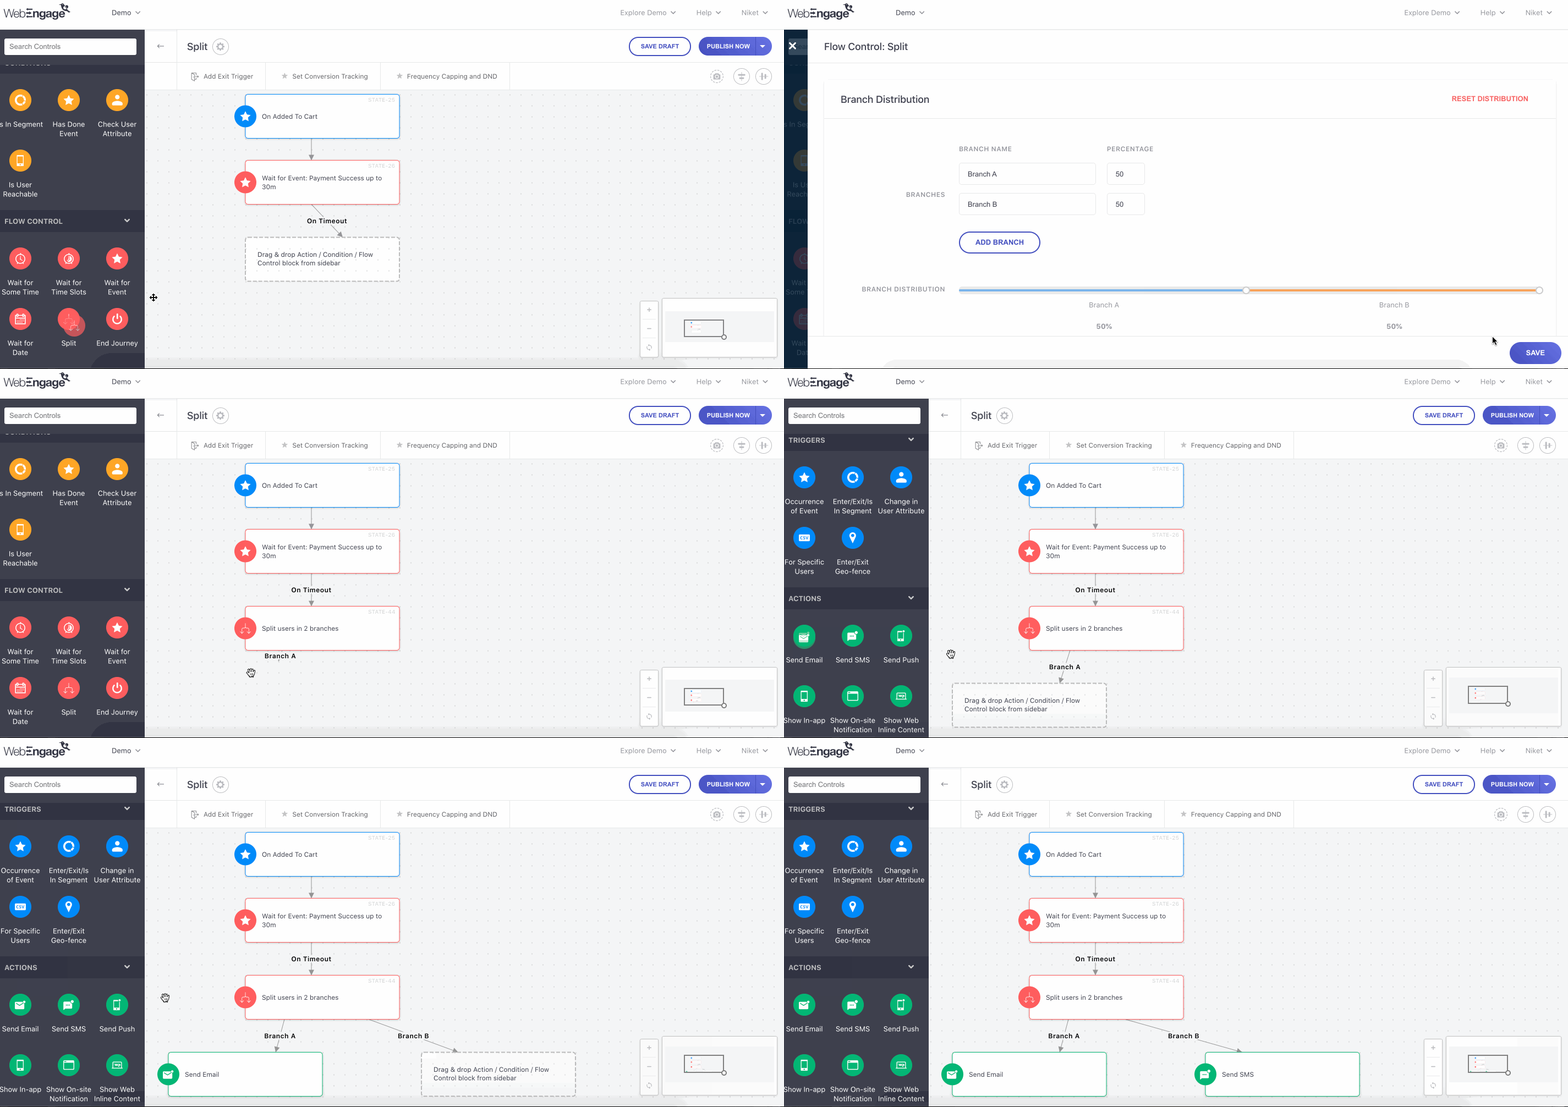
Click to enlarge
Step 1: Drag and drop the Wait for Date block onto the Canvas
- Connect it to an existing block to determine the exact moment after which users will be split into multiple branches, before continuing their Trip.
Step 2: Click on the block and select the number of branches and their distribution.
- By default, 2 branches will be configured with equal distribution (50-50). You can add up to 5 branches and adjust their distribution percentage manually. The distribution percentage of all branches combined should be equal to 100.
Step 3: Click Save to go back to the Canvas.
Please noteThis feature is only available for selected customers in beta mode. Please get in touch with your Customer Success Manager or [email protected] to get access.
End Journey
This Flow Control allows you to contextually end the Journey experience for a user. Simply drag and drop the End Journey Block onto the Canvas and connect it to the relevant blocks in the Journey, after which a user's Trip must end.
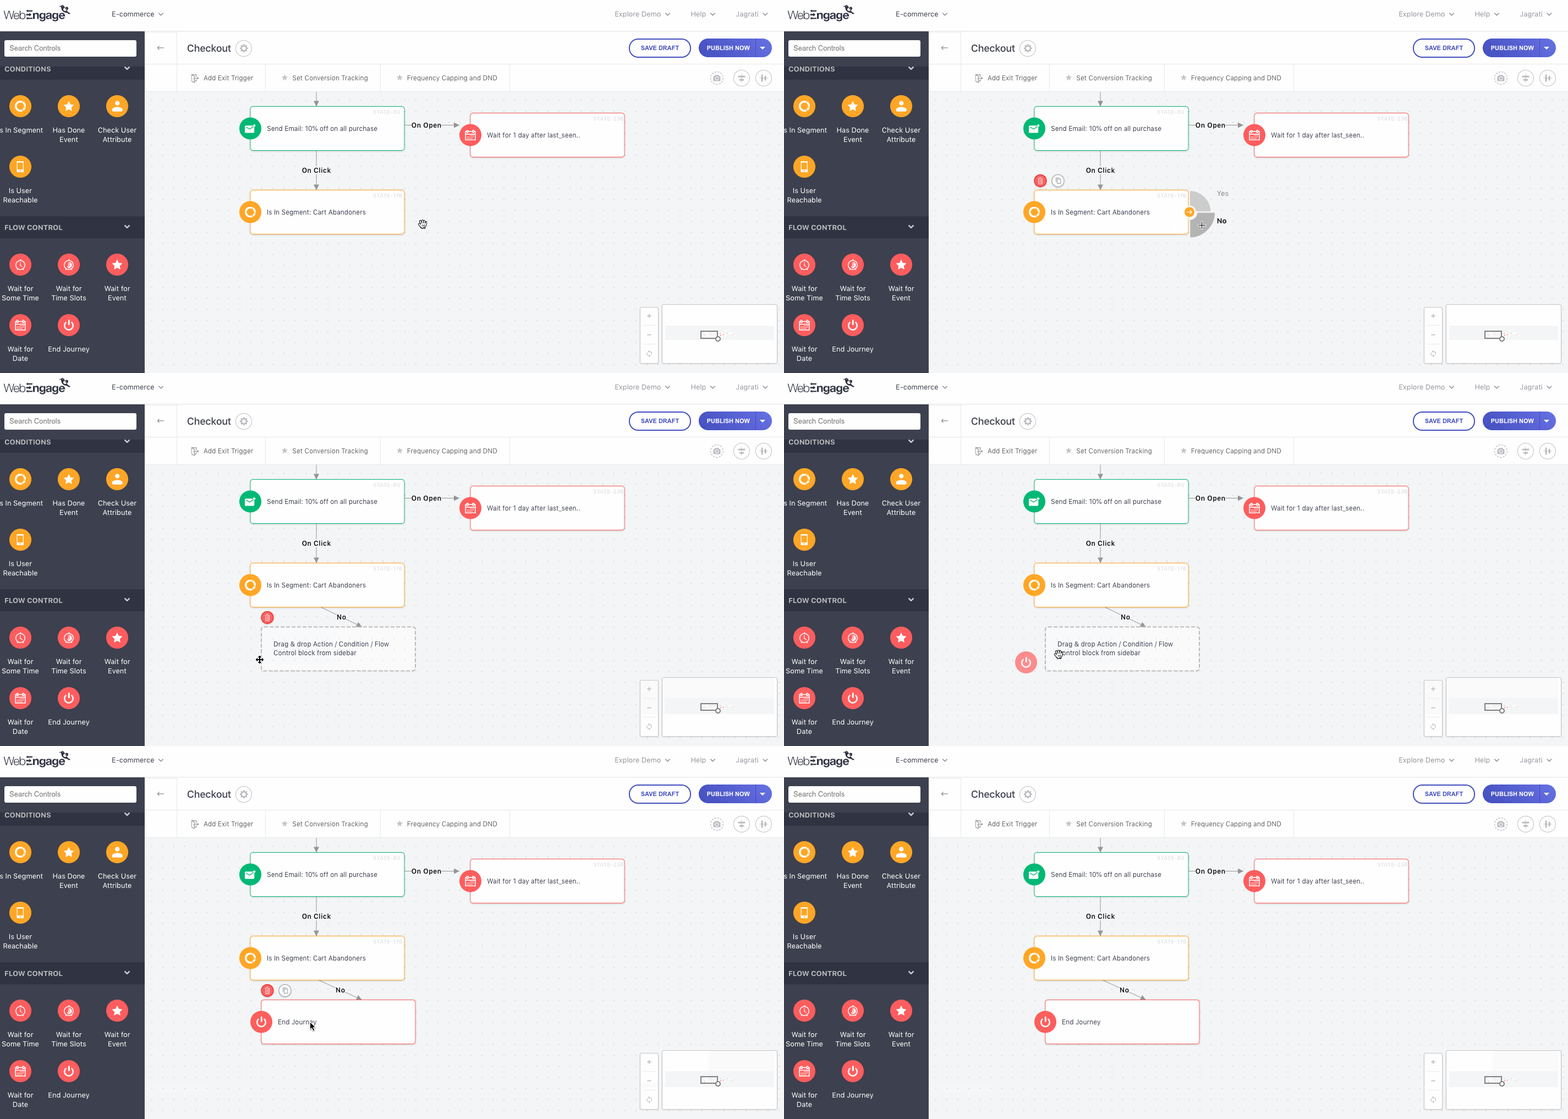
Click to enlarge
We recommend using this block if:
-
The Journey's end goal has been achieved by a user.
-
There is no way for you to engage a user any further through the Journey as:
- User cannot be reached through multiple channels.
- API call failed for a user due to which you couldn't personalize a campaign.
- A change in the value of a User Attribute or entry/exit into a Segment suggests that the user is not the correct target audience for the Journey.
- You'd like to cease communication after engaging the user through a series of campaigns.
Each time the End Journey block causes a user's Trip to end, it's counted towards the total number of Exits of the Journey.
Exit Triggers

Click to enlarge
Exit Triggers are conditions that help you end the Journey prematurely for users who have achieved the Journey's end goal, mid-way through their Trip.
We highly recommend that you configure an Exit Trigger for your Journeys ensure that users don't receive any redundant/ out of context messages. It's a great way to keep each user's Journey experience highly contextual throughout their Trip.
Each time the Exit Trigger causes a user's Trip to end, it's counted towards the number of Exits of the Journey.
Let's go over a use-case to show you how it works:
Ecomm: How Exit Triggers Help Deliver Contextual Experiences by Ending the Journey for Users Who Achieve the End GoalLet's take the example of an e-commerce app. Marketers of the app noticed a spike in the cart abandonment rates over the last 2 weeks and in an effort to drive purchases, they created a Journey mapped to the checkout lifecycle.
Here's how they planned theJourney experience:
Problem Statement: Users add products to cart but leave without making a purchase.
Plan: Drive conversions by luring users with a 15% discount on their entire purchase.
Target Audience: All users who have added at least one product to their cart
End Goal: Purchase
Strategy: Create a sense of FOMO and urgency to purchase through a series of campaigns.
How? - Observe each user's behavior. If they add products to their cart and don't make a purchase within 1 day, then gently nudge them with a reminder.
- Wait for another day and if they still don't purchase, extend the discount offer. Then wait for 2 days to observe purchase behavior and engage all un-converted users with a message conveying urgency.
Where? - Push, SMS and Email (depending on user's channel reachability)
Pre-requisites:
Each time a user adds a product to their shopping cart, it's tracked as the Custom Event, Cart-product-added
All purchases are tracked as the Custom Event, checkout-completed
_Thus, while creating the_Cart Abandonment Journey, marketers of the app defined the Exit Trigger as the _Custom Event, checkout-completed_.
- This way, whenever a user in the Journey performs the Event, checkout-completed, they are immediately removed from it, preventing them from receiving any further messages aimed at driving purchase.
Similarly, you too can leverage Exit Triggers to optimizing the Journey experience for all your users.
How It Works
You can configure multiple Exit Triggers to end the Trip for users in the Journey if their behavior causes:
- The Occurrence of an Event
- The User to Enter/Exit a Segment created by you
- A Change in their User Profile Attributes
Let's walk you through all theExit Triggers:
Exit Trigger 1: When User Does an Event
Quick ReadUnderstanding Events and how they allow you to track each user's behavior on your app and website!
This condition allows you to end the Trip for users in the Journey as soon as they perform the Event specified as the Journey'sExit Trigger.
We recommend using this condition if the end goal of your Journey is to motivate users to perform a particular action like signup, purchase, renew a subscription, complete a self-learning course and so on. Doing so will help ensure that users in the Journey don't receive any redundant messages, nudging them to achieve the end goal.
Here's how you can set it up:
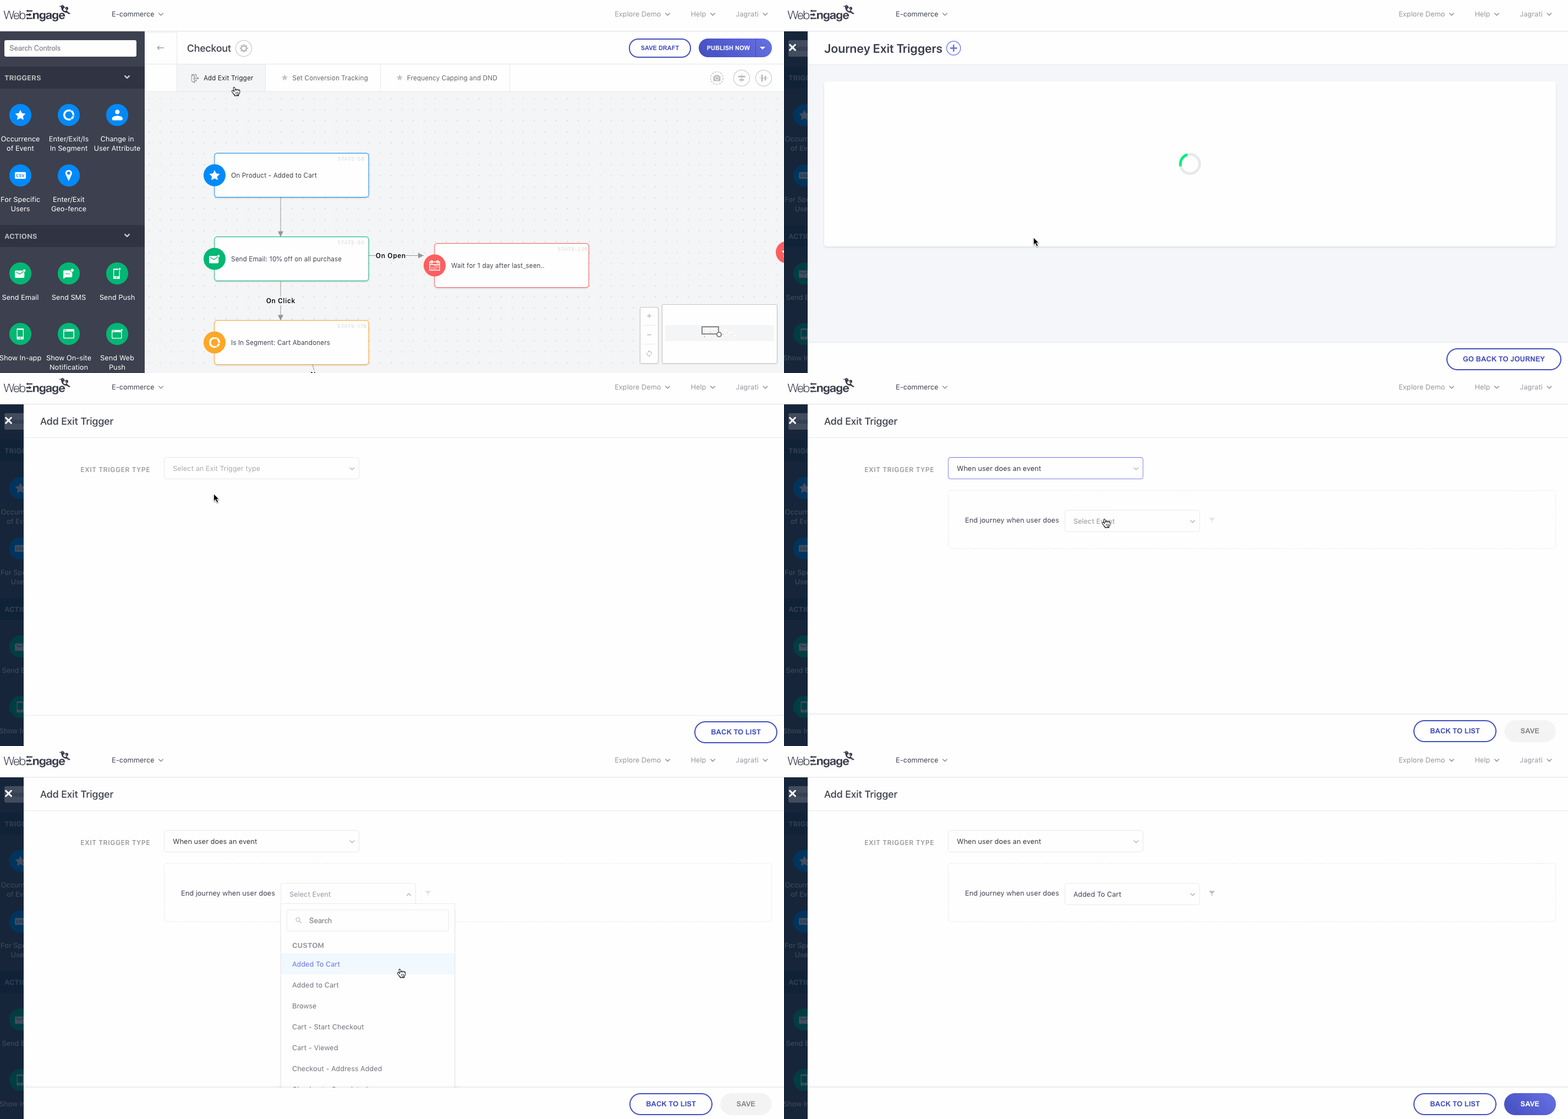
Click to enlarge
Step 1: Click on Add Exit Trigger
Step 2: Click on the Plus Icon placed on the top left
Step 3: Click on the Exit Trigger Type dropdown and select When User Does an Event
- In doing so, a second row will be added to the page
Step 4: Click on the second dropdown to select from a list of all the Events being tracked for your account
- For example, in the above visual, we have selected the event, checkout-completed as the Reactivation Journey's exit trigger.
Step 5 (Optional): Add Event Attribute filters to the selected Event to narrow down the scope of occurrence of the event
- In doing so, the Journey will end for only those users who perform the Event in the context of the Event Attribute added to it.
Step 6 (Optional): Click Add Filter to add multiple Event Attributes
- You can club Event Attributes by the AND/OR logic to end the Journey experience for a niche set of users.
How it Works: Clubbing Event Attributes by the AND/OR LogicAND: Helps you end the Journey for only those users who perform the event in the context of all the event attribute filters applied to it.
For example, let's add the event attribute filters - Cart Value greater than $500 AND Primary Category equals Women Formals to the event, Checkout Completed.
This means: The Journey will end for only those users who have purchased maximum products from the category, Women Formals AND have paid more than $500 at checkout. Users matching either criterion will continue to experience it.
OR: Helps you end the Journey for users who perform the event in the context of any one of the event attribute filters applied to it.
For example, let's add the event attribute filters - Cart Value greater than $500 OR Cart Size greater than 10 Products to the event, Checkout Completed.
This means: The Journey will end for all users who have paid more than $500 at checkout OR have purchased more than 10 products.
Exit Trigger 2: When User Enters/ Exits a Segment
This condition allows you to end the Trip for users in the Journey as soon as their actions and preferences match/differ from the rules of a Segment specified as the Exit Trigger.
We recommend using this condition if your Journey targets a particular group of users who:
- Share the same interests.
- Have similar spending habits.
- Display similar behavior while interacting with your app/website.
- Belong to the same location and so on.
Here's how you can set it up:
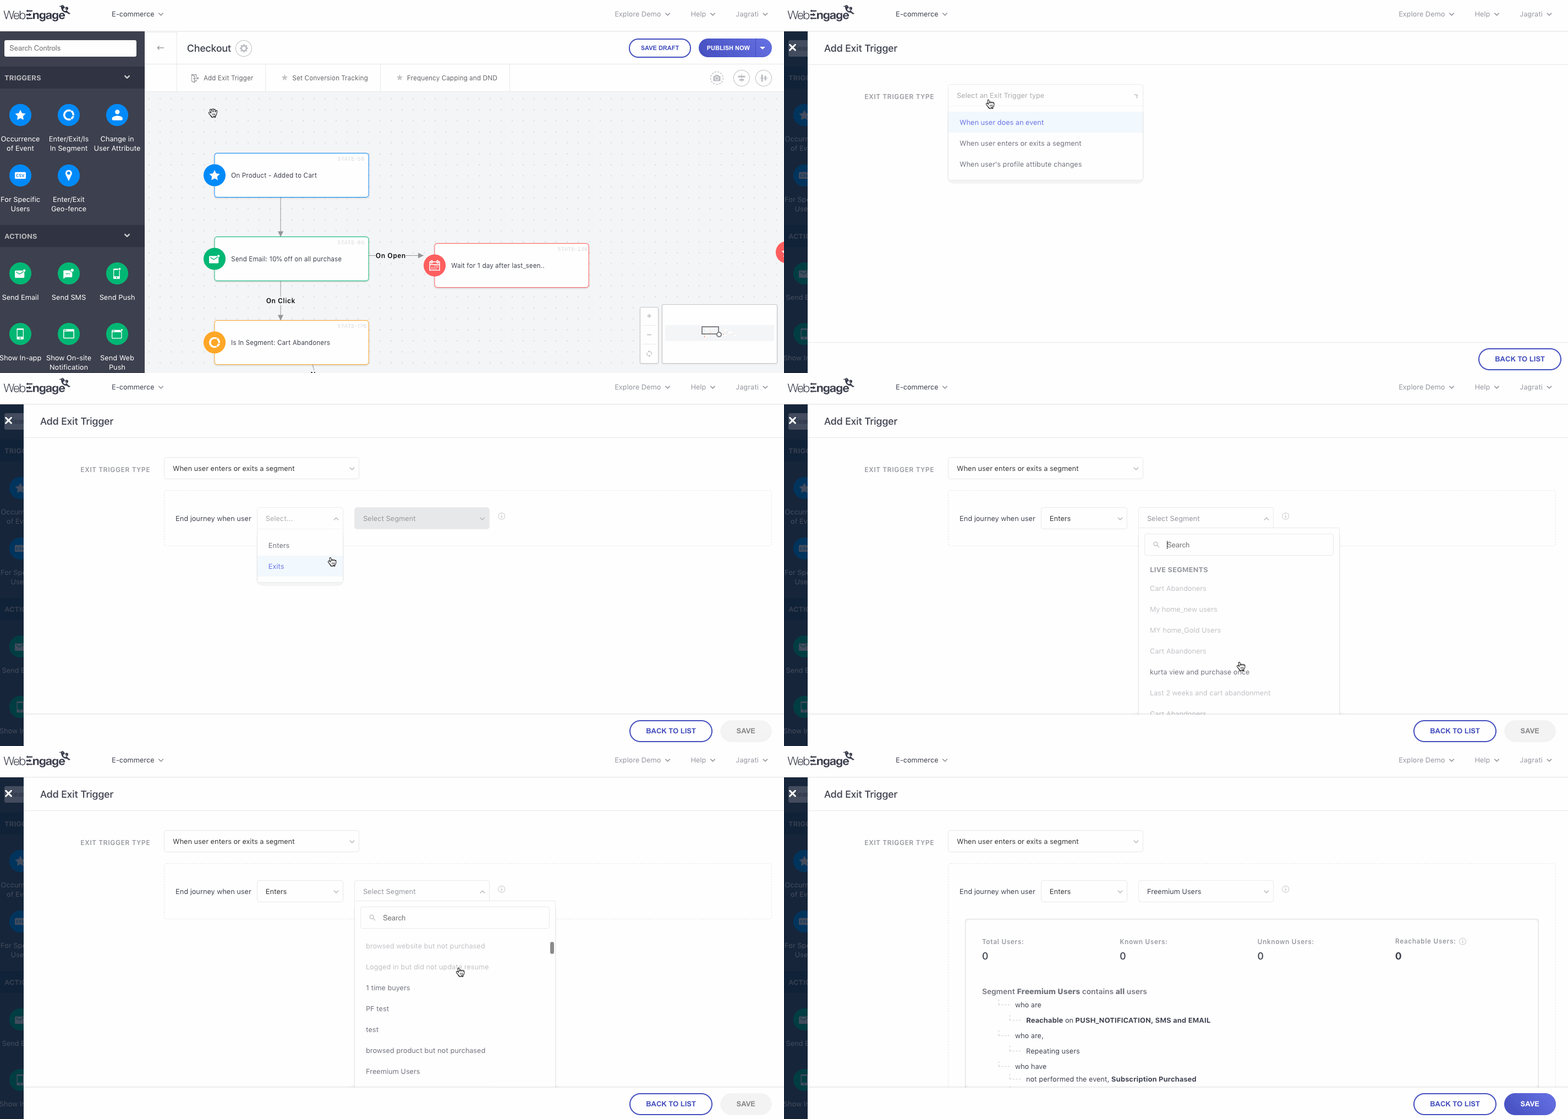
Click to enlarge
Step 1: Click on Add Exit Trigger
Step 2: Click on the Plus Icon placed on the top left
Step 3: Click on the Exit Trigger Type dropdown and select When User Enters or Exits a Segment
- In doing so, a second row will be added to the page
Step 4: Click on the first dropdown to select a logic - Enters or Exits
-
Enters: Ends the Journey for a user as soon as they get added to the selected Segment.
-
Exits: Ends the Journey for a user as soon as they get removed from the selected Segment
Step 5: Click on the second dropdown to select from a list of all the Active Segments in your account.
Please NoteYou will not be able to select a Segment in which the rules of segmentation contain a rolling time frame like:
Last Seen is within/before/after a specific time
User Attribute that tracks date/time is within/before/after a specific time
Event performed where:
frequency is defined using the prefix - Most Recent Event Time/ Least Recent Event Time
Event Attribute filter is added where, Event Time is defined using the prefix - After/ Before/ Within a specific duration
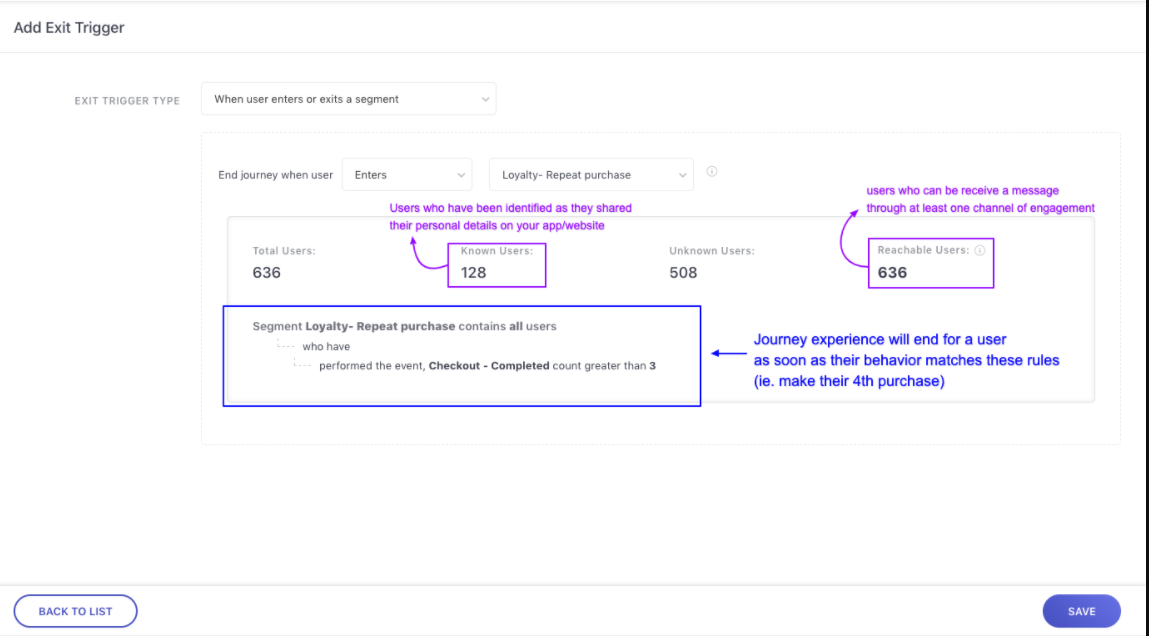
Click to enlarge
As shown above, once you have selected a Segment, you will be able to preview a snapshot of its users and rules of segmentation. Let's quickly walk you through Segment Preview:
Total Users: Indicates the total number of users that are currently a part of the segment.
Known Users: Indicates the number of identified users, out of the total users, that are currently included within the segment.
- All users are identified on the basis of the Unique Identifier specified by you while setting up your WebEngage account.
Unknown Users: Indicates the number of anonymous users, out of the total users, that are currently included within the segment.
Reachable Users: Indicates the total number of users in your segment that can be reached through at least one channel of engagement (Push, In-app, SMS, On-site, Web Push, Email) at present.
Rules of Segmentation: You can choose to segment your entire user base by 3 broad parameters - User (attributes), Behavior and Technology. Hence, here you will find a summary of all the rules based on which the segment's users have been grouped together.
These rules of segmentation also help you understand the type of users for whom the Journey experience will end as soon as they Enter/Exit the Segment.
Exit Trigger 3: When User's Profile Attribute Changes
Quick ReadUnderstanding User Attributes and how they allow you to track each user's preferences, spending habits, birthday, anniversary and so on!
This condition allows you to end the Trip for a user in the Journey as soon as a change occurs in the value of a specific User Attribute being tracked for them.
We recommend using this Exit Trigger if your Journey targets users who:
-
Have a similar LTV (lifetime value).
-
Have a similar ARPU value (Average revenue per user).
-
Have a similar RFM score.
-
Have the same membership status.
-
Belong to the same age group.
-
Share the same preferences (educational stream, fashion brand, movie/music genre), birthdate, anniversary date *and so on.
-
Configuring an Exit Trigger for each use-case discussed above helps ensure that users don't receive any redundant messages through the respective Journeys once their preferences change.
Here's how you can set it up:
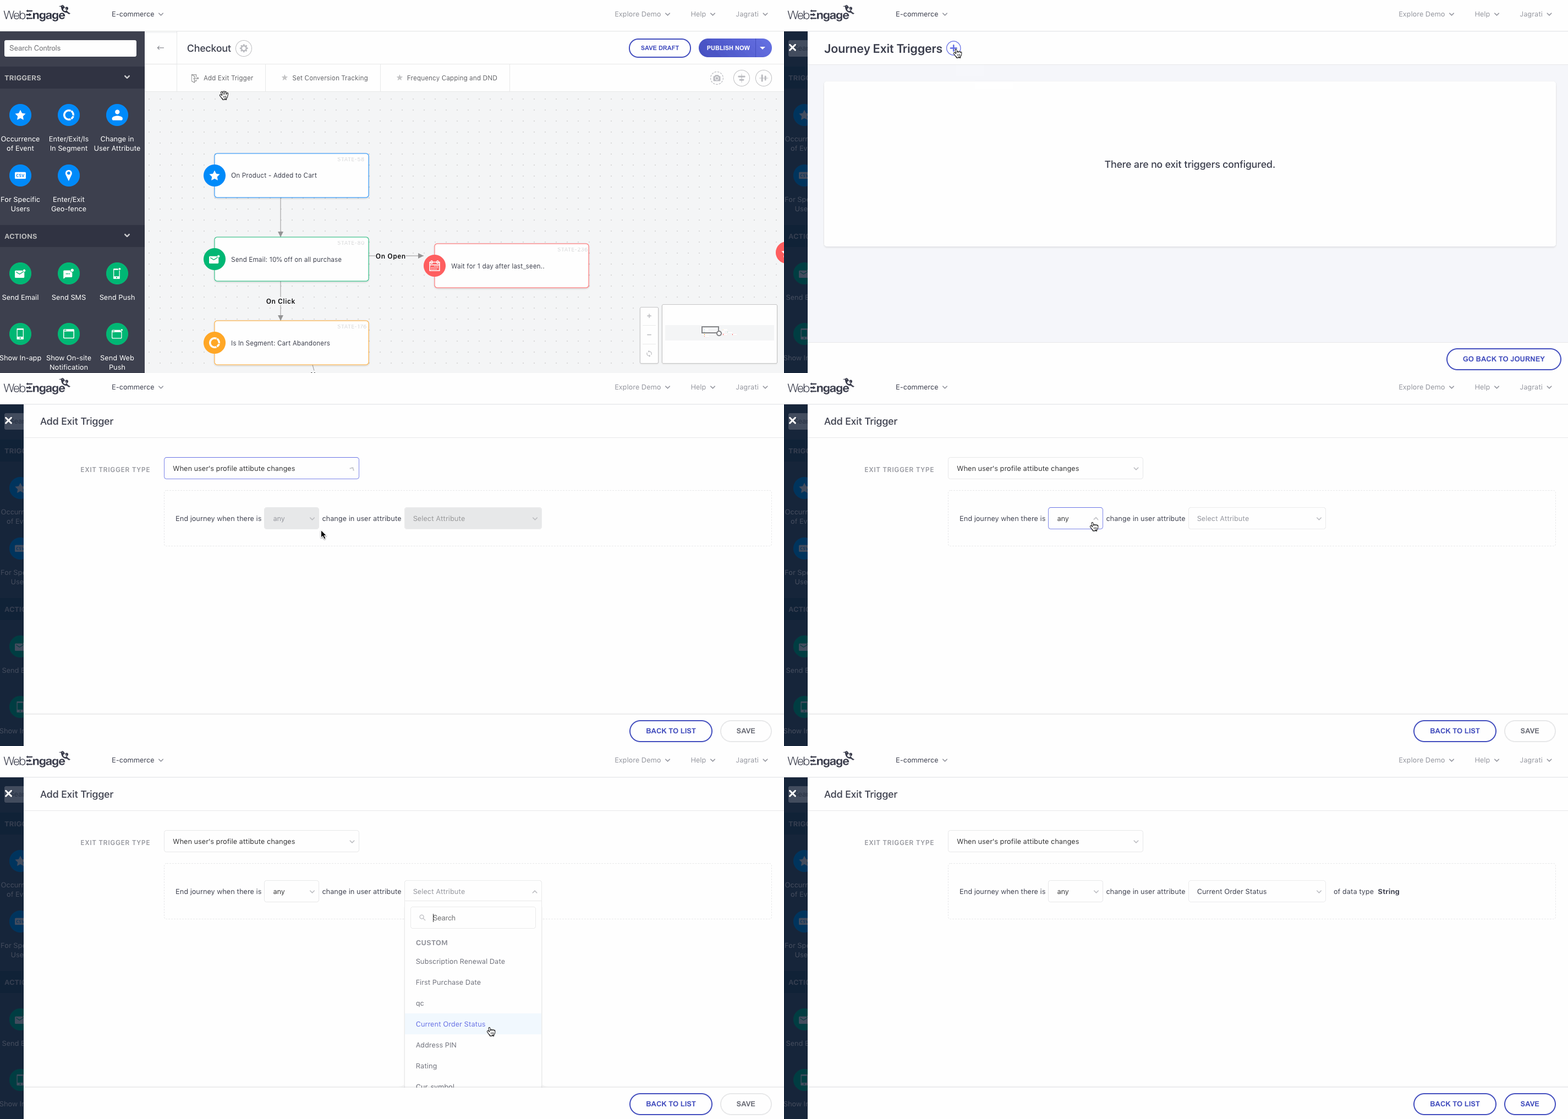
Click to enlarge
Step 1: Click on Add Exit Trigger
Step 2: Click on the Plus Icon placed on the top left
Step 3: Click on the Exit Trigger Type dropdown and select When User's Profile Attribute Changes
- In doing so, a second row will be added to the page
Step 4: Click on the first dropdown to select a logic - Any (change) or Specific (change)
-
Any: Ends the Journey experience for a user as soon as the value tracked against the specified User Attribute changes in their User Profile.
-
Specific: Ends the Journey experience for a user only if the specified change occurs in the value tracked against the specified User Profile Attribute.
- Selecting this logic will add another row to the page, allowing you to specify the type of change in the User Attribute's Value.
Step 5: Click on the second dropdown to select from a list of all the User Attributes being tracked for your account.
Step 6: As shown below, if you've selected Specific (change) at Step 4, then you can define the type of change with reference to the User Attribute's Old Value or New Value.
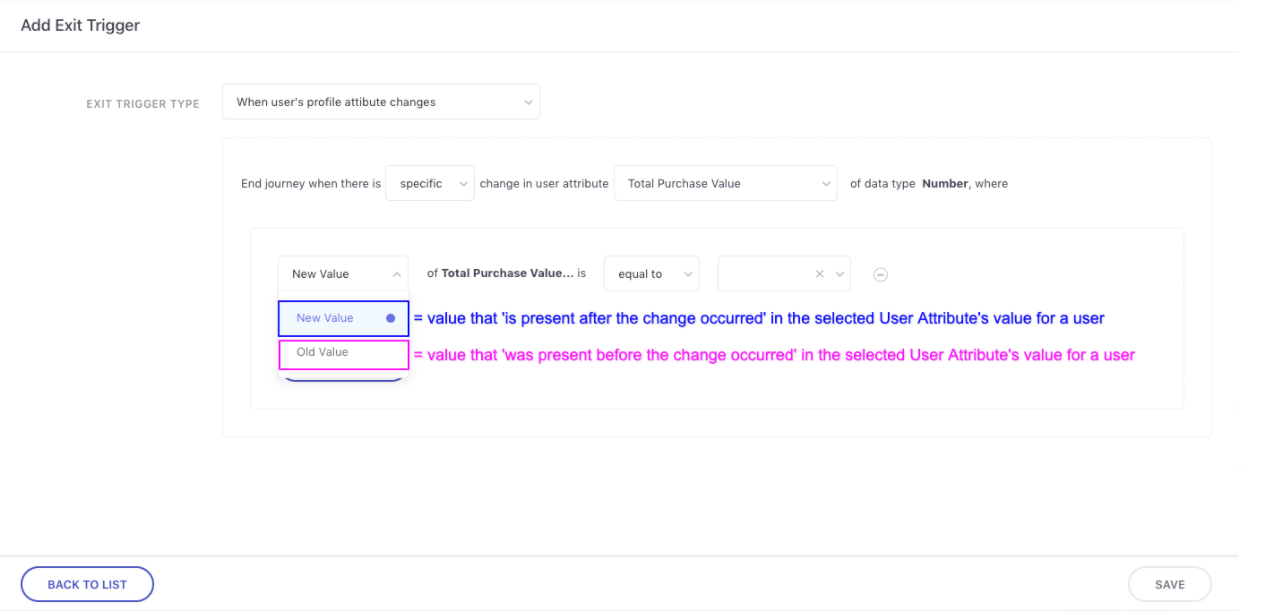
Click to enlarge
-
New Value: The value that is present after the change occurred in the specified User Attribute's value for a particular user.
-
Old Value: The value that was present before the change occurred in the specified User Attribute's value for a particular user.
Step 7 (Optional): Click on Add Condition to specify more changes
- As shown below, you can combine multiple types of changes using the AND/OR logic to end the Journey for a very niche set of users.
How It Works: Clubbing User Attribute Changes by AND/OR LogicAND: Helps you to end the Journey for users when a combination of all the changes occur in the value of their user profile attribute.
OR: Helps you to end the Journey for users when either of the specified changes occurs in the value of their user profile attribute.
We hope this has equipped you with a robust understanding of how you can leverage the Journey Designer to drive user engagement, conversions and revenue. Please feel free to drop in a few lines at [email protected] in case you have any further queries or feedback. We're always an email away!
Updated 3 months ago