Configure Control Groups
Create control groups and use them to assess the effectiveness of your campaigns.
If you would like to use this feature, please contact your Customer Success Manager or [email protected].
A Control Group is a small portion of a campaign's target audience that is randomly selected, which represents the behaviour and preferences of the entire segment, and does not receive the campaign.
Control Groups are created to test the efficiency of their campaign, i.e. to see if more customers are making purchases after they were sent a notification of the campaign or the ones who weren't sent any notifications (users part of the Control Group).
Types of Control Groups offered by WebEngage
Control groups are of mainly of 3 types, i.e. Campaign Level Control Group, Universal Control Group, and Custom Control Group. Each of which have been explained below:
-
Campaign level Control Group: A campaign control group is a control group created from a targeted segment in a specific campaign. These are chosen at random, and users assigned to the control group in one campaign may not be assigned to the control group in another (even if the target segment selected is same).
-
Universal Control Group (UCG): Unlike Campaign control group, UCG is created on your entire user base (and not based on any particular segment). Users once assigned to UCG will be excluded from receiving any campaigns even if they are part of targeted segment . UCG allows you to keep a percentage of your user base from not being targeted for any campaign at all times, as well as helps to measure the incremental impact of your overall campaigns.
-
Custom Control Group: Similar to universal control group, Custom control group is also created on your entire user base but its created for custom use cases.These control groups are usually for shorter durations. Example use cases:
- Set of Diwali sale campaigns to be sent across channels (push, email, etc.) and having same control groups users in them .
- If you are running multiple abandon cart journeys, then you can have same set of control group users across these journeys as well to make sure these users are not sent any campaigns.
Please Note
- At any point of time only 1 Universal CG and 5 Custom Control Group can be active.
- Users in each Control Group are mutually exclusive from each other.
How to Set up Control Groups?
For app-based campaigns (In-app Notifications, App In-line Content)Make sure your Android core SDK is v4.1.0 or higher, and your iOS core SDK is v6.1.0 or higher. It is highly recommended to do so to ensure that users added to any Control Group are not targeted for app-based campaigns.
To set up and configure Control Groups:
- Step 1: Click on the Configuration option of the left navigation panel.
- Step 2: Select Control Groups.
- Step 3: You will land on Control Group listing page.
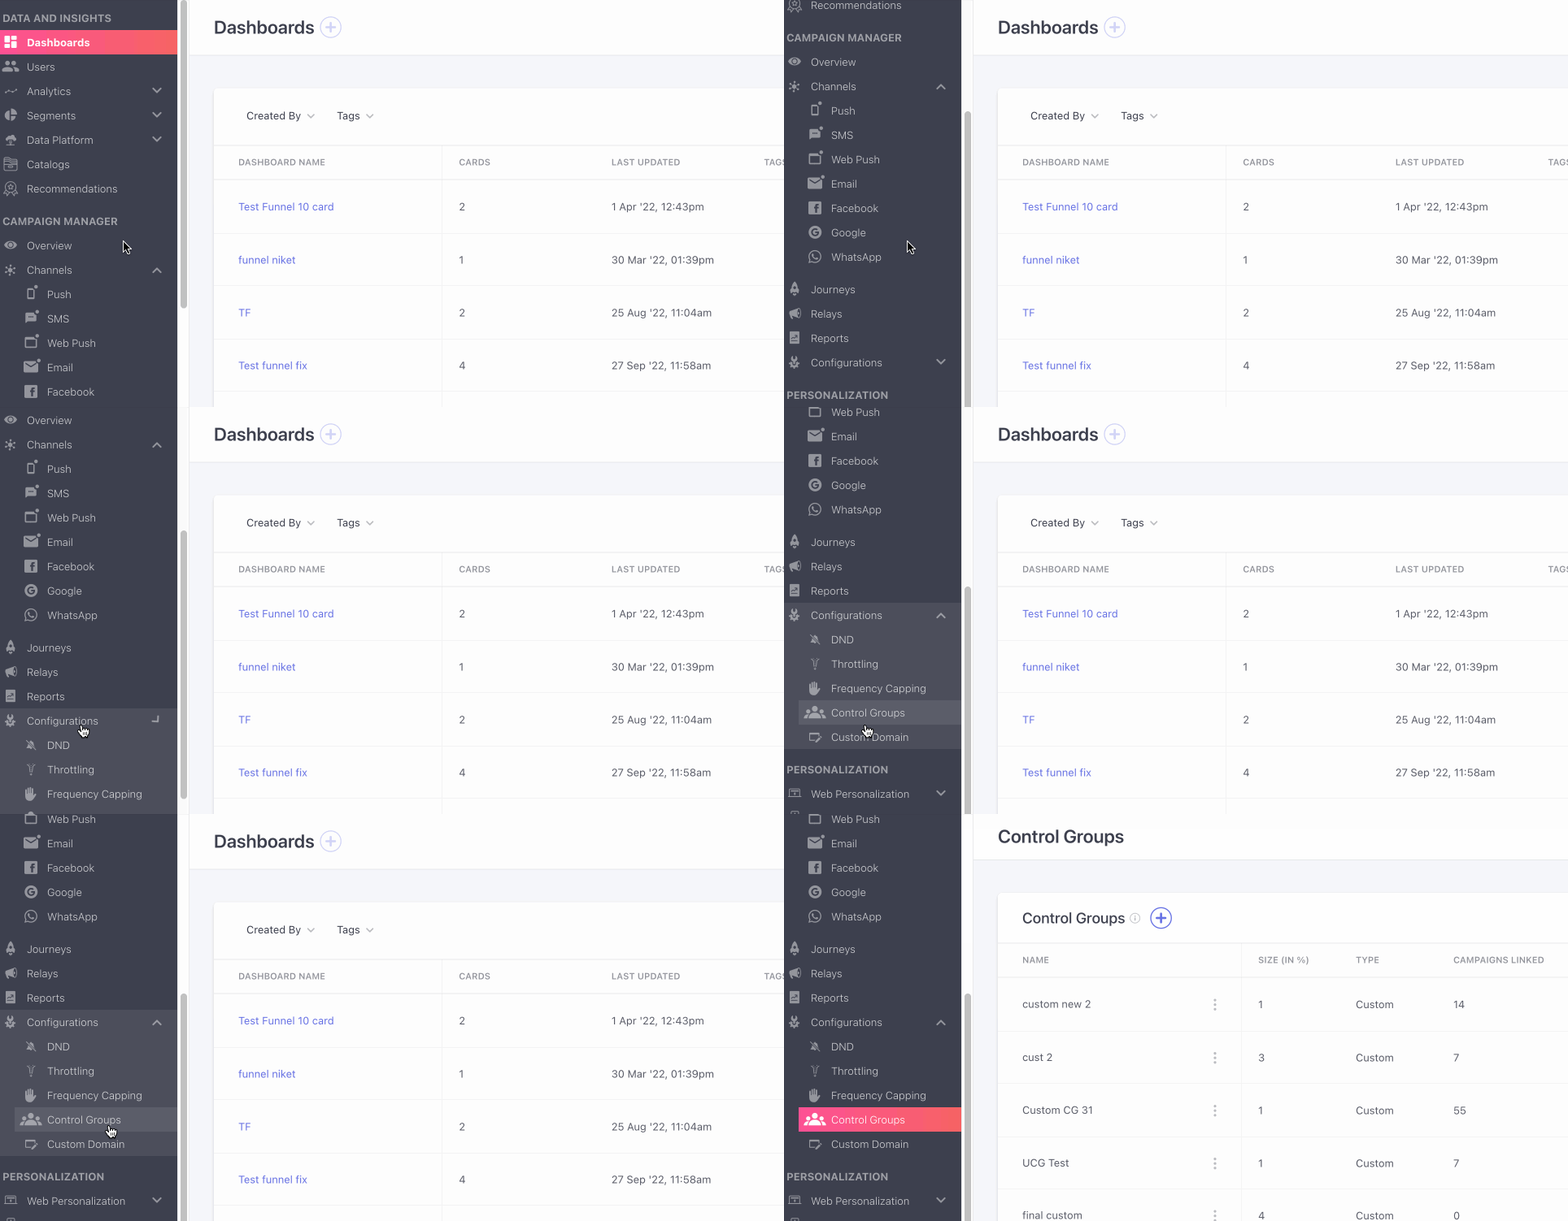
Once you’ve reached the Control Group section on the dashboard, you can now start creating Control Group’s by clicking on the ‘➕’ option, which will then open up a modal. This modal consists of 2 options- Universal Control Group and Custom Control Group.
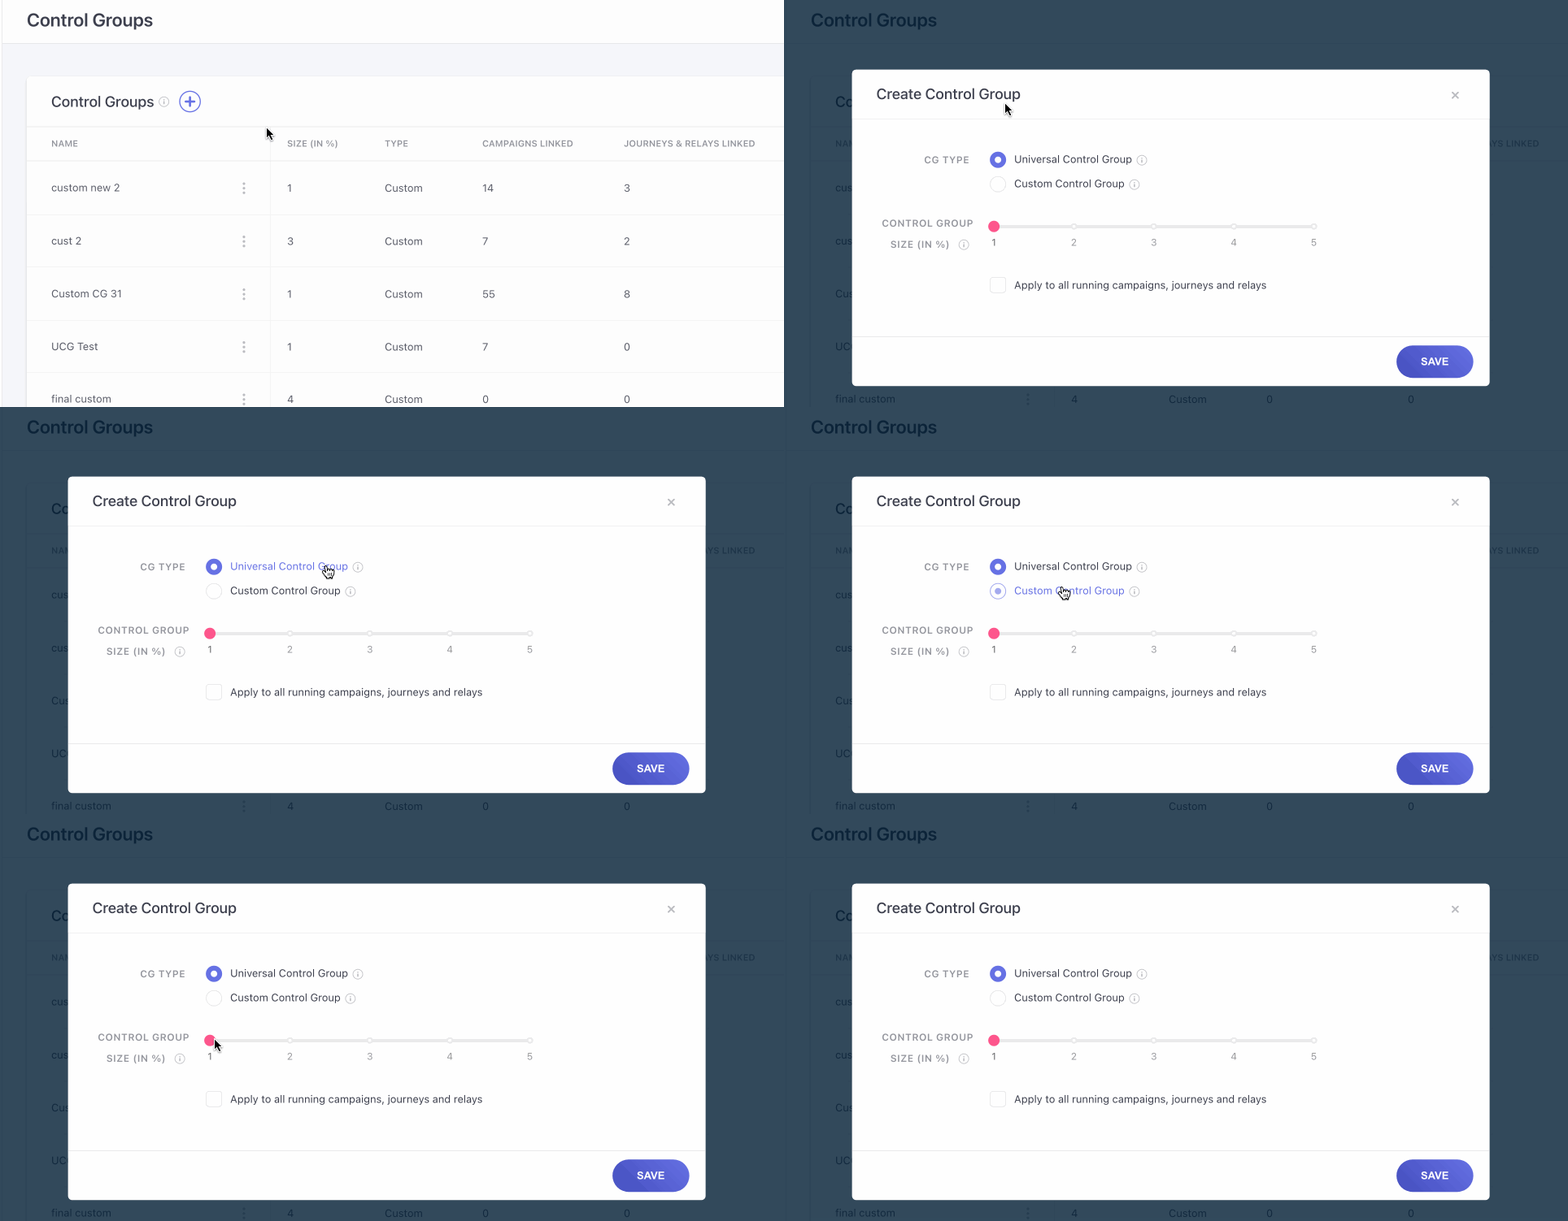
Setting up Universal Control Groups
Once you've logged into the WebEngage dashboard, continue on to the 'Configurations' option, in the Navigation Panel, under which you can find the 'Control Groups' section.
- Step 1: Click on the '➕' next to control groups.
- Step 2: Under 'CG Type' click on the 'Universal Control Group' option.
- Step 3: Use the slider on 'Control Group Size (in %)' to set the size of the control group as per your convenience, between 1% to 5%.
- Step 4 (optional): If you would like to apply this control group to all of your existing campaigns and journeys, then check the checkbox 'Apply to all existing campaigns, journeys and relays'.
- Step 5: Once that has been done, click on 'Save'. In case you checked the 'Apply to existing campaigns, journeys and relays' option then a confirmation modal will open showcasing the number of campaigns in which UCG will be applied. Verify and click on 'Confirm'.
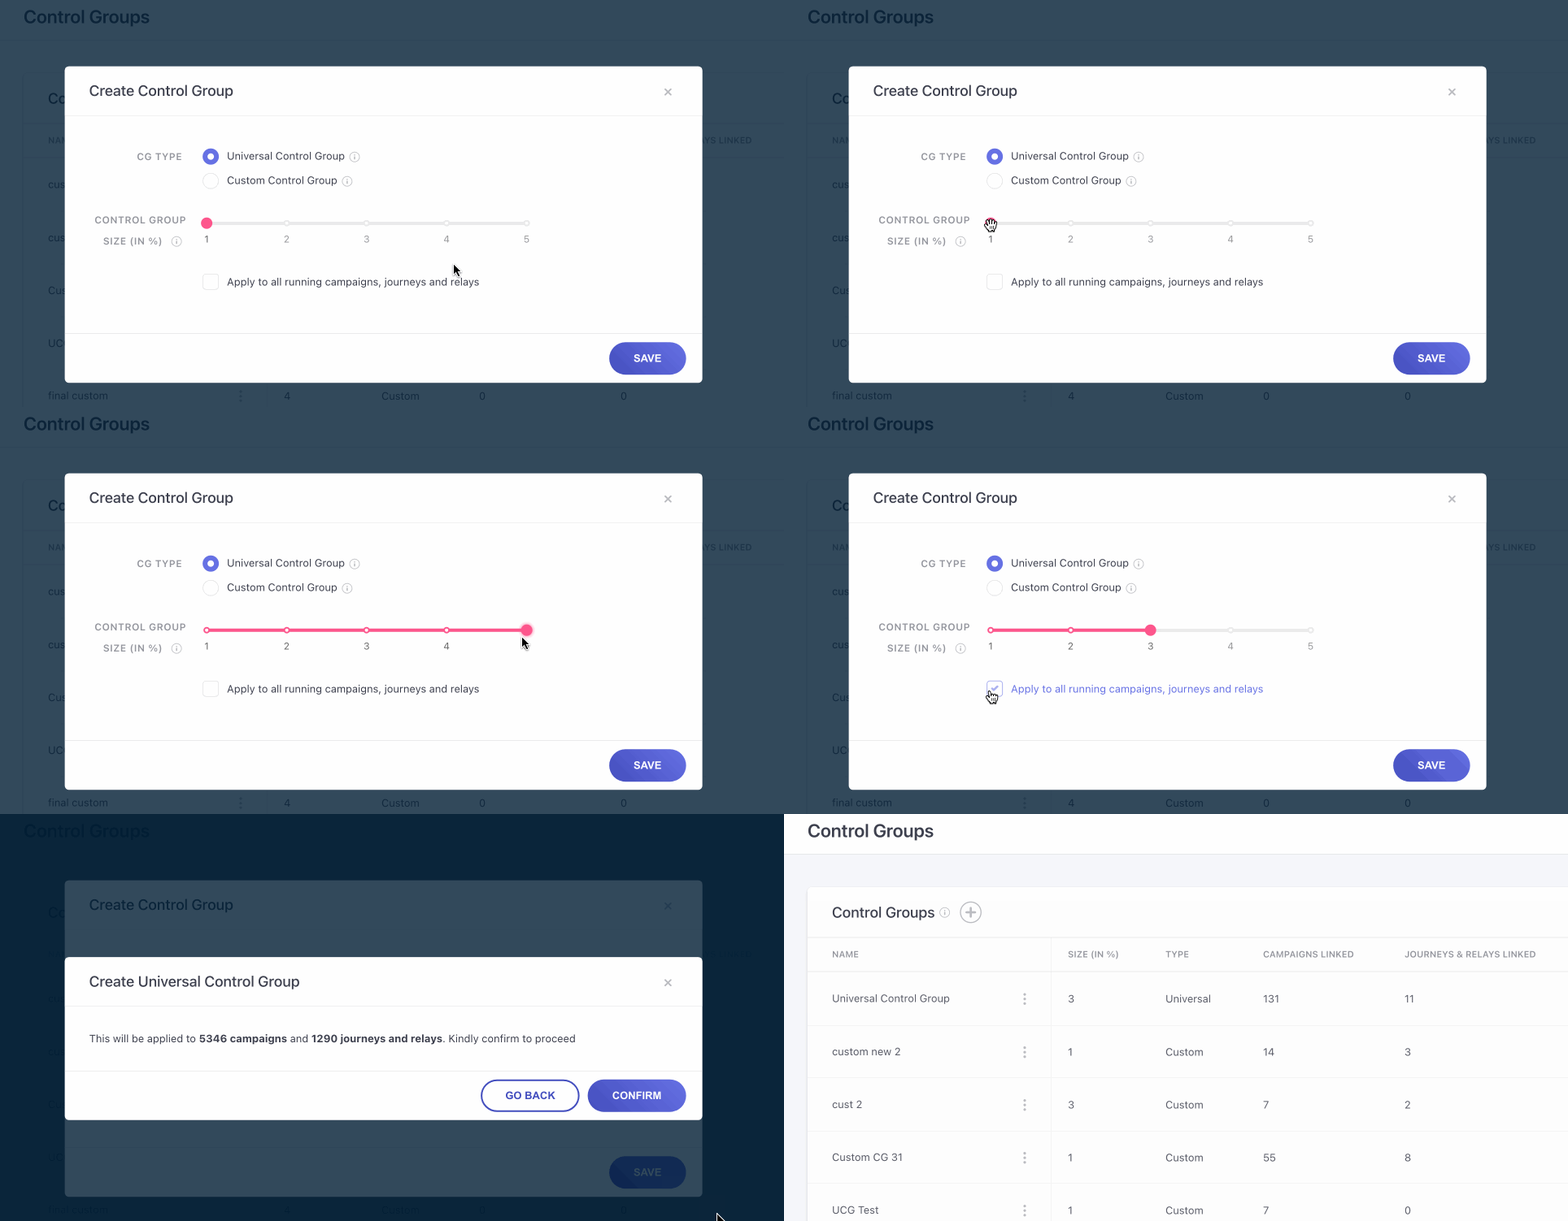
Please NoteThere can only be 1 Universal Control Group that can be created for a particular account, that can be edited or deleted later.
Setting up Custom Control Groups
Similar to how Universal Control Groups are being set, Custom Control groups can also be created. Custom Control Groups are specific to certain use cases. Follow these steps to set up your Custom Control Group.
- Step 1: Click on the '➕' next to control groups.
- Step 2: Under 'CG Type' click on the 'Custom Control Group' option.
- Step 3: Now type in a name for this Custom Control Group in the text box that has been provided.
- Step 4: Use the slider on 'Control Group Size (in %)' to set the size of the control group as per your convenience, between 1% to 5%.
- Step 5: Proceed by clicking on the 'Save' option.
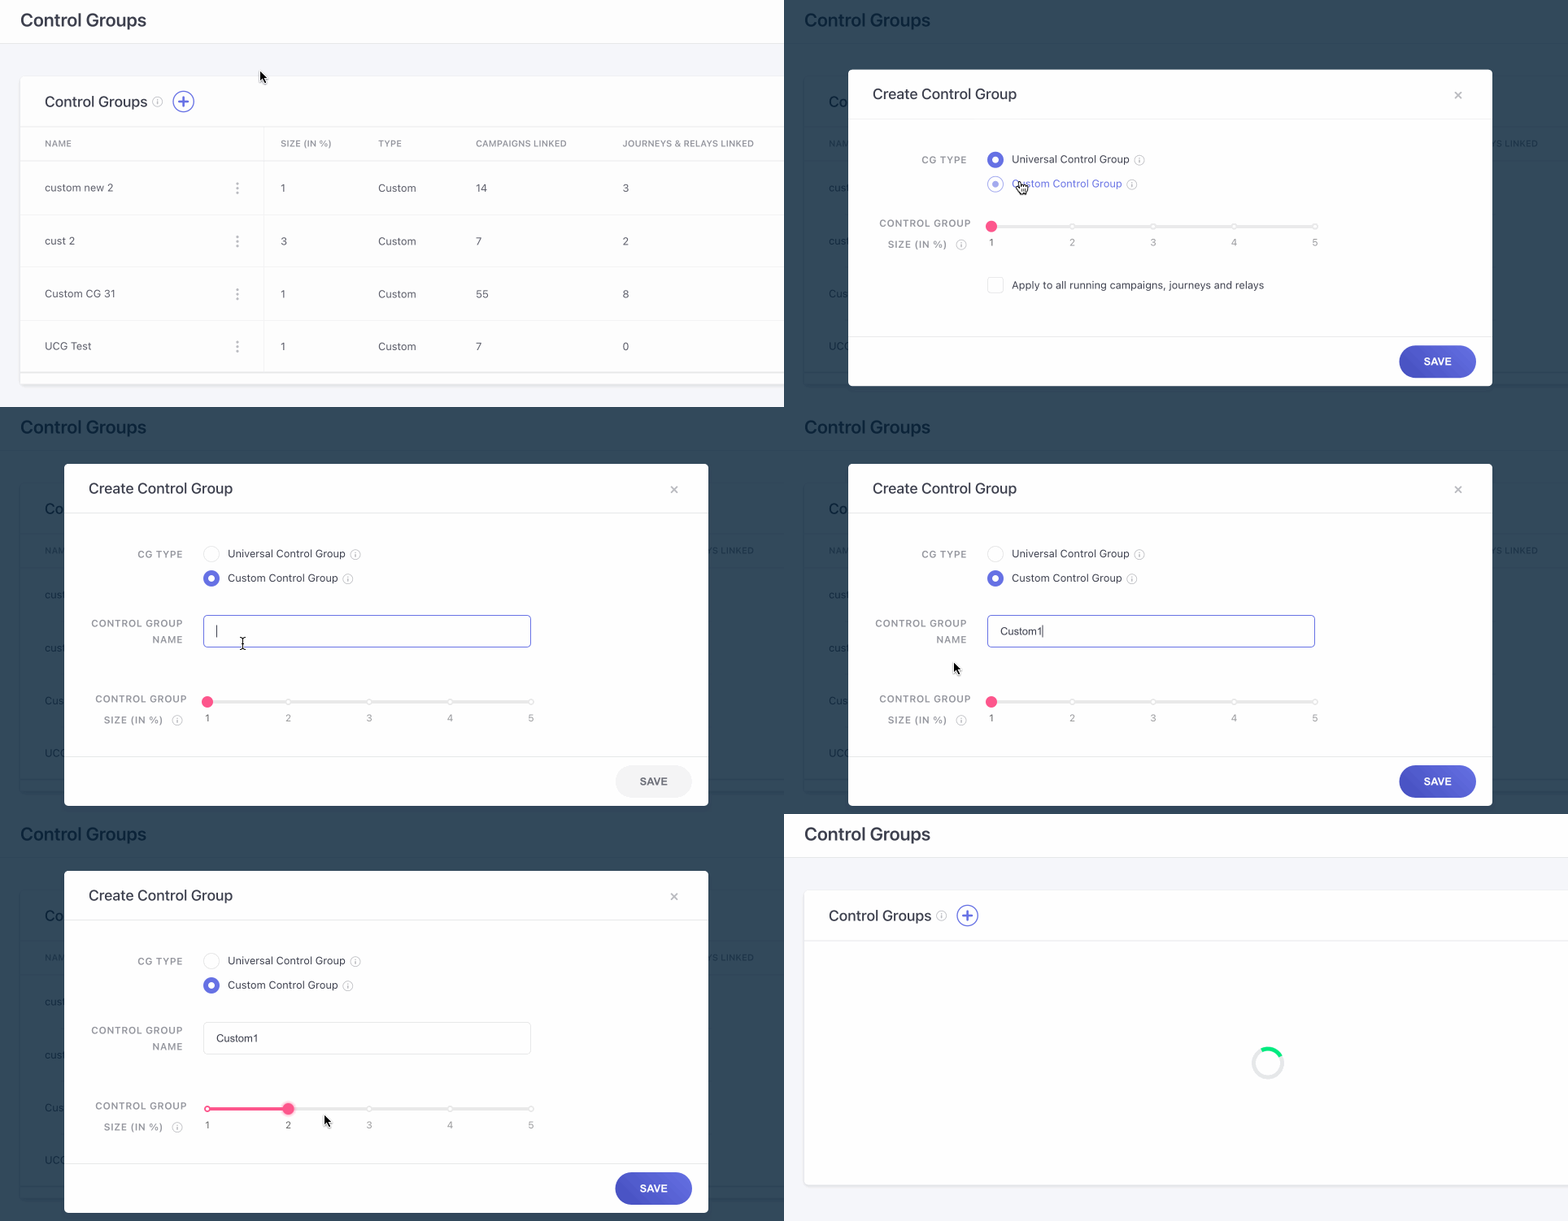
Fact CheckCustom control groups can only be applied to campaigns in which conversion tracking is enabled.
Here's a short video to help you get started with creating control groups and how you can apply it to your campaigns:
Editing Control Groups
Universal or Custom control groups once created can also be edited.
Must ReadIf Universal Control Group or Custom control group are applied to multiple campaigns and journeys then editing its size can impact the corresponding campaign stats as well.
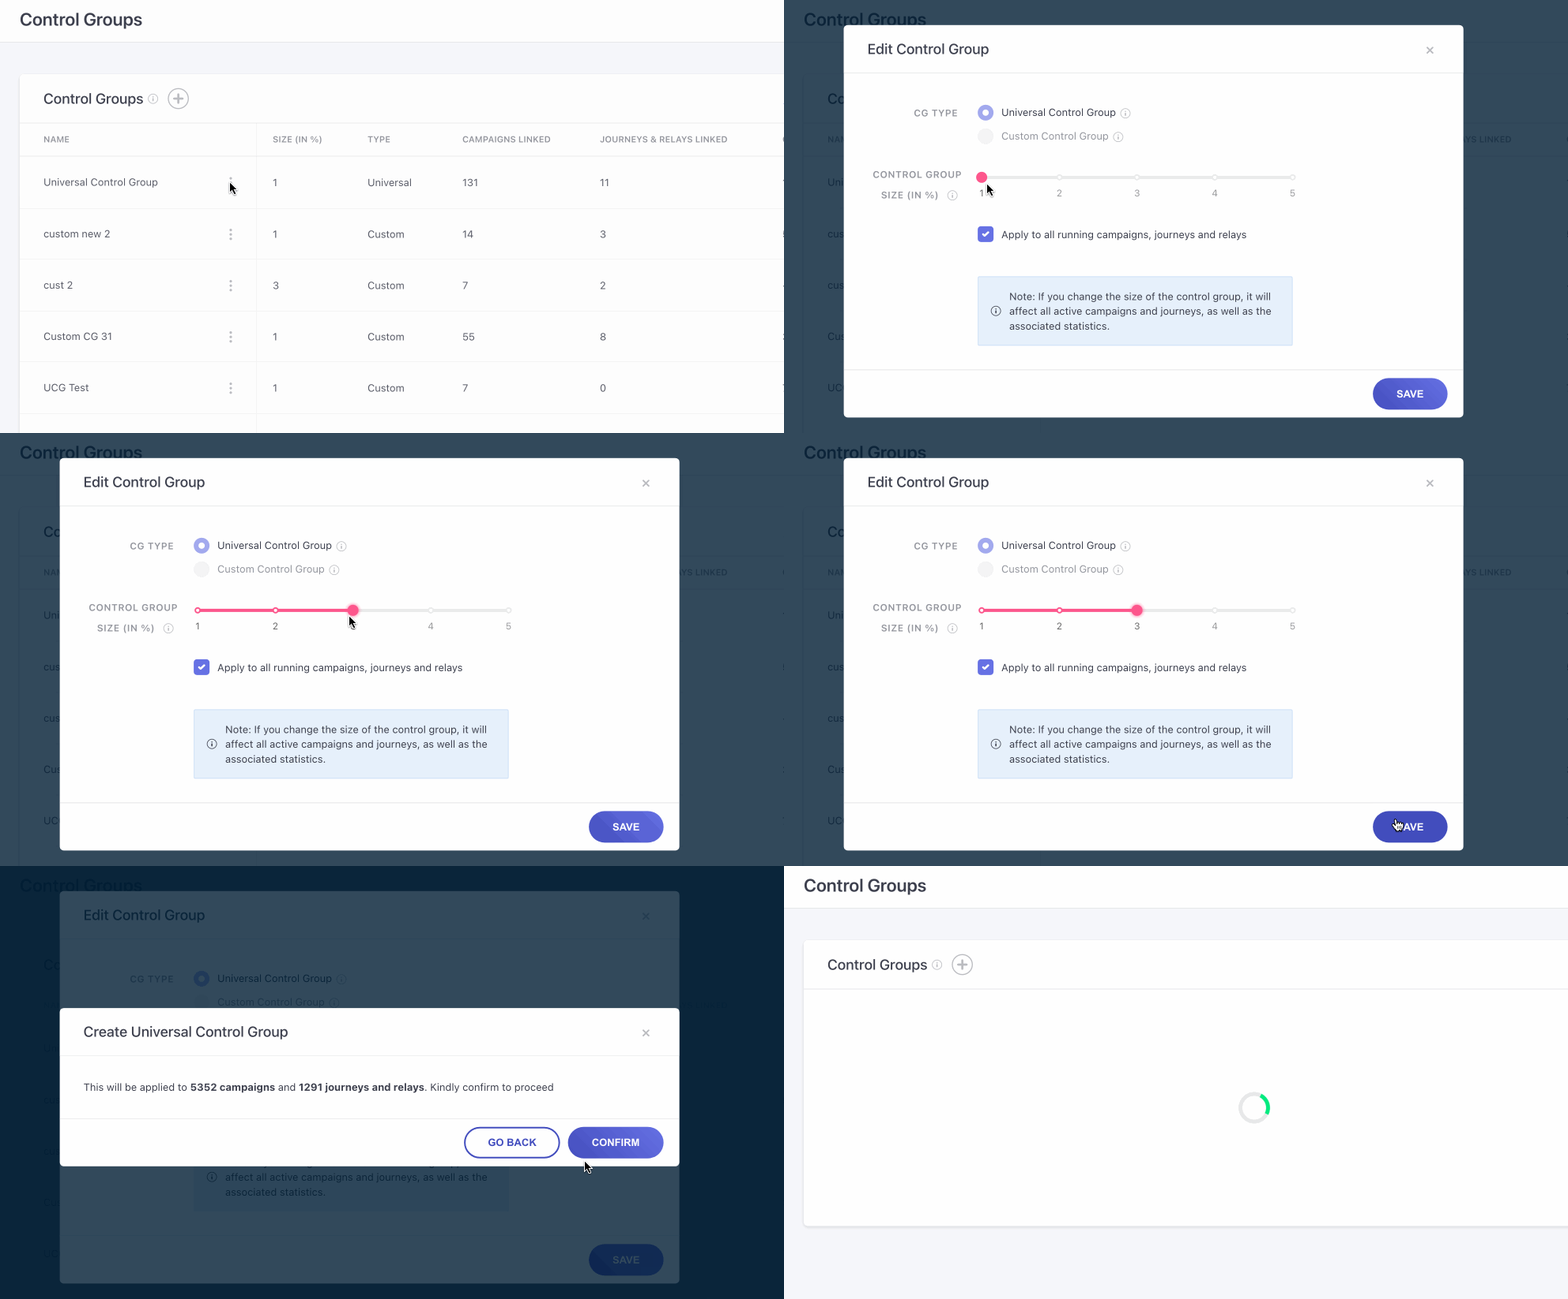
To Edit Universal Control Group
Use the following steps to edit your Universal Control Group.
- Step 1: Click on the action menu besides the control group name.
- Step 2: Click on 'Edit'.
- Step 3: A pop up will appear, which will allow you to edit the percentage of the control group. You can increase or decrease the percentage as per your use case.
To Edit Custom Control Group
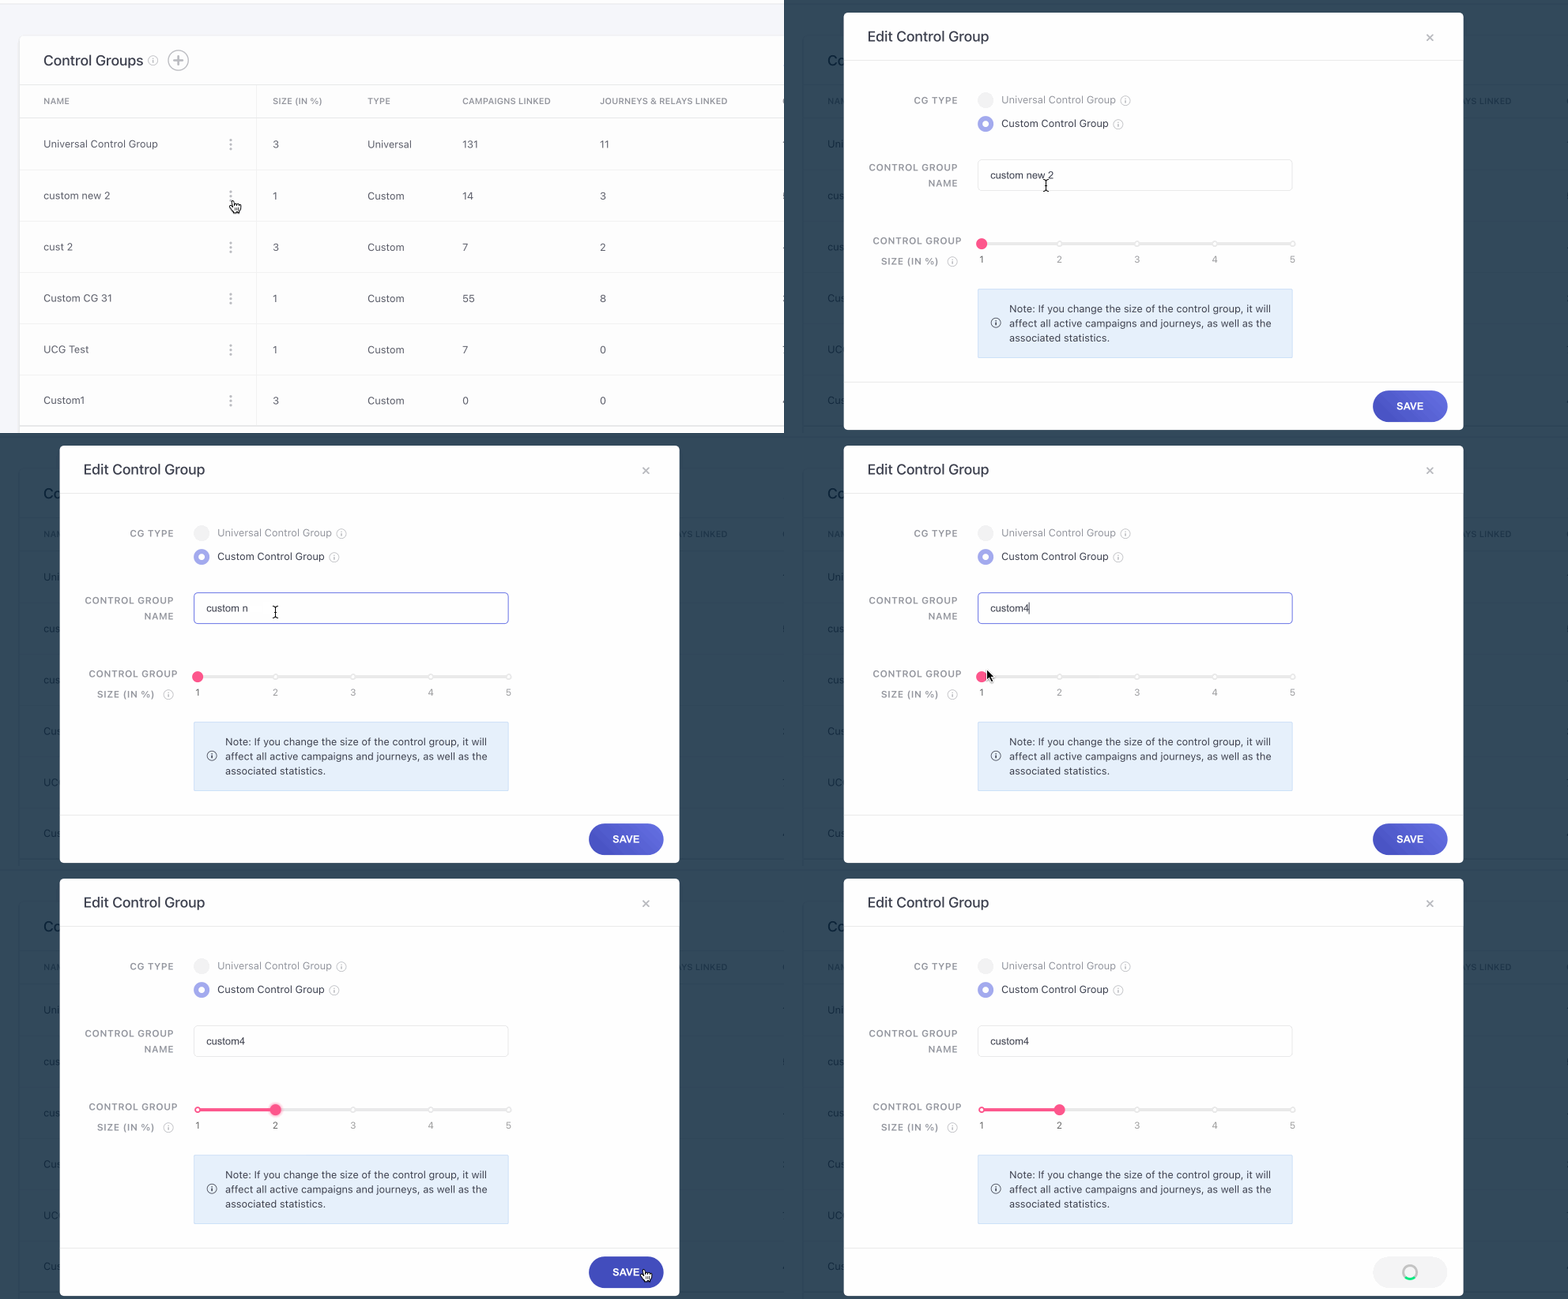
Here are the steps to be followed while editing your custom control groups.
- Step 1: Click on the action menu besides the control group name.
- Step 2: Click on the 'Edit' option.
- Step 3: A pop up will appear, which will allow you to edit the control group's name as well as its size .
- Step 4: If custom control group, it will also allow you to edit the custom control group's name
Deleting Control Groups
Control groups once created can be deleted as well.
Before Deleting Control Groups, keep this in mind!
- Deleting control group will remove it from all linked campaigns and journeys. This can have an impact on campaign and channel level stats.
- Once deleted, all the users will in the control group be eligible to receive the campaigns (if campaigns are in the running state and if they are part of the targeted segment).
Delete Universal Control Group
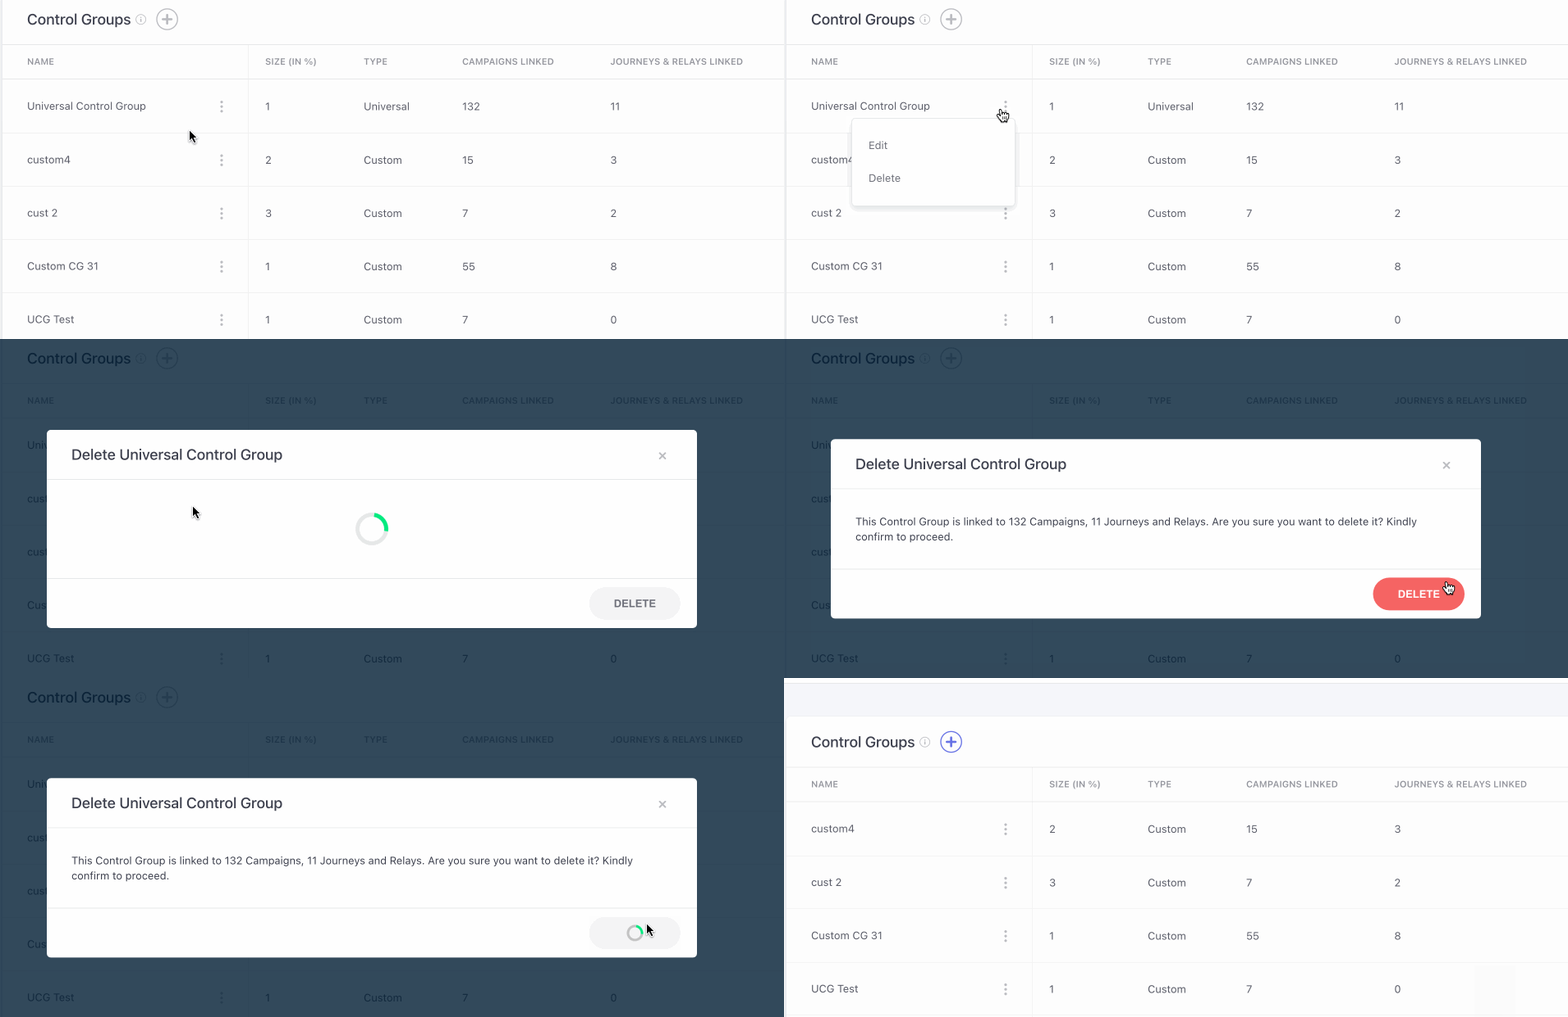
You can delete your Universal Control Groups by following the steps given below.
- Step 1: Click on the action menu besides the control group name.
- Step 2: Click on Delete.
- Step 3: A pop up will appear, which will ask you for your confirmation. Once confirmed the control group will be deleted.
Delete Custom Control Group
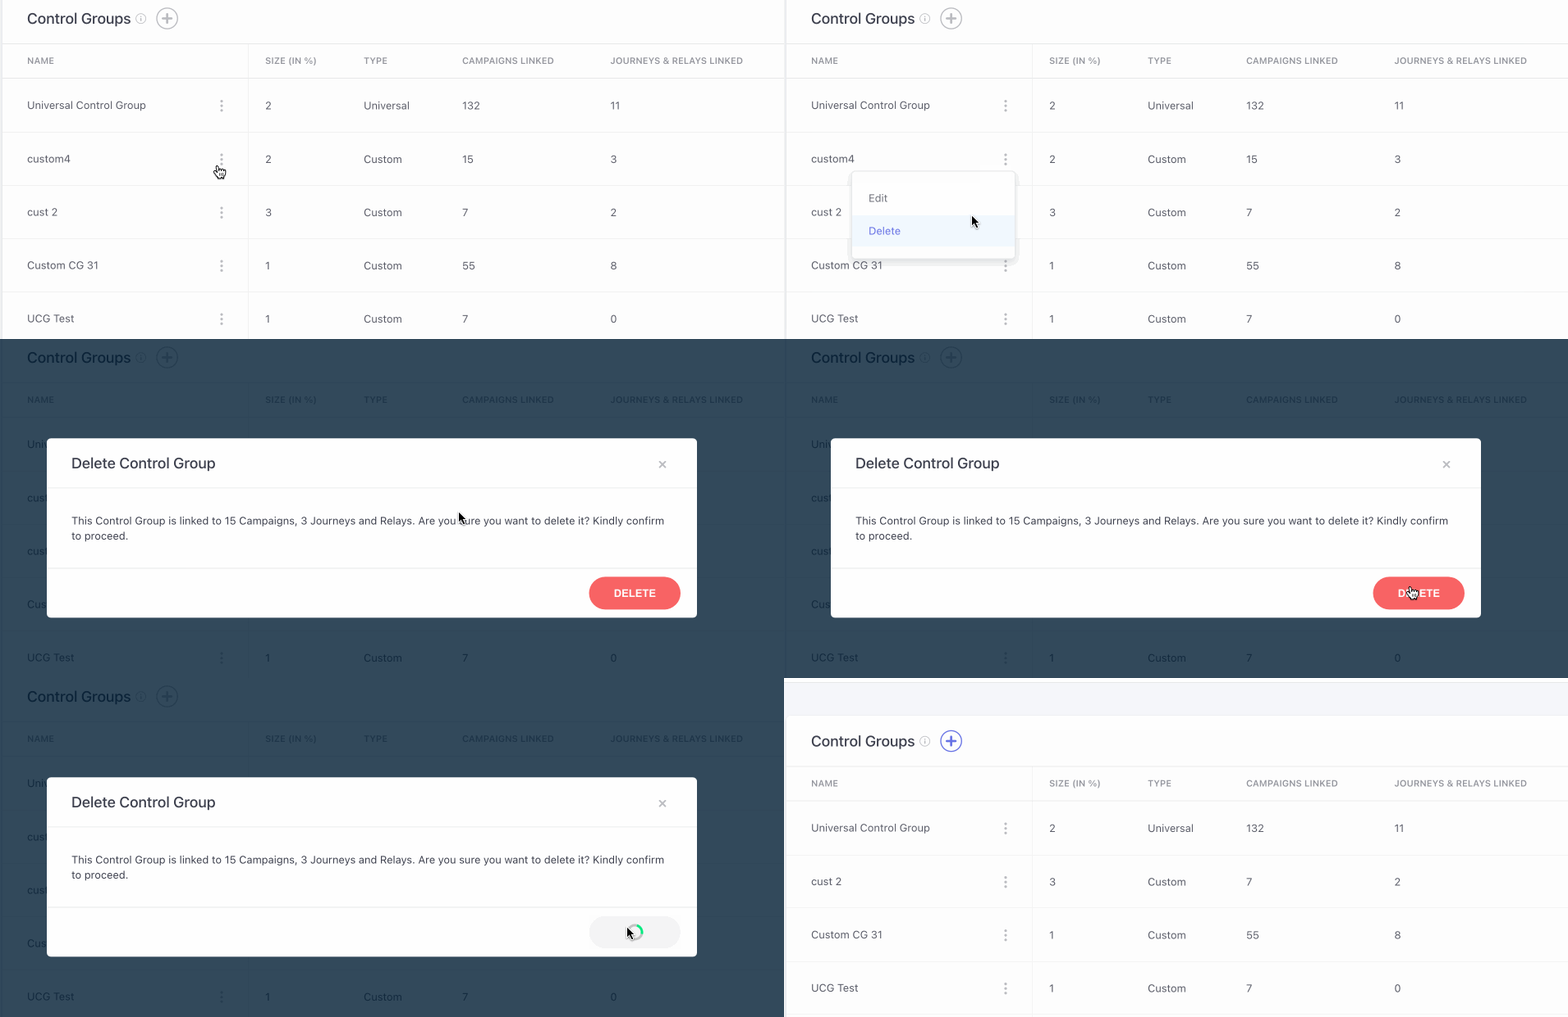
To delete your Custom Control Groups, use the following steps.
- Step 1: Click on the action menu besides the control group name.
- Step 2: Click on Delete.
- Step 3: A pop up will appear, which will ask you for your confirmation. Once confirmed the control group will be deleted
Updated 3 months ago