Creating Live Segments
Must ReadPlease ensure that you have a robust understanding of Users and Events before proceeding, as these concepts are the building blocks of Segments in your dashboard.
As highlighted below, click the Plus icon placed at the top left in List of Segments to start building a segment.

Click to enlarge
Let's demonstrate a use-case to help you get acquainted with the workings of this section.
Use-case: Segmenting users to increase conversion rateLet’s say that you run an online grocery store and want to engage all users based in Mumbai, India who have added products to their cart but have not made a purchase over the last 7 days.
Broadly, here’s what you’ll need to:
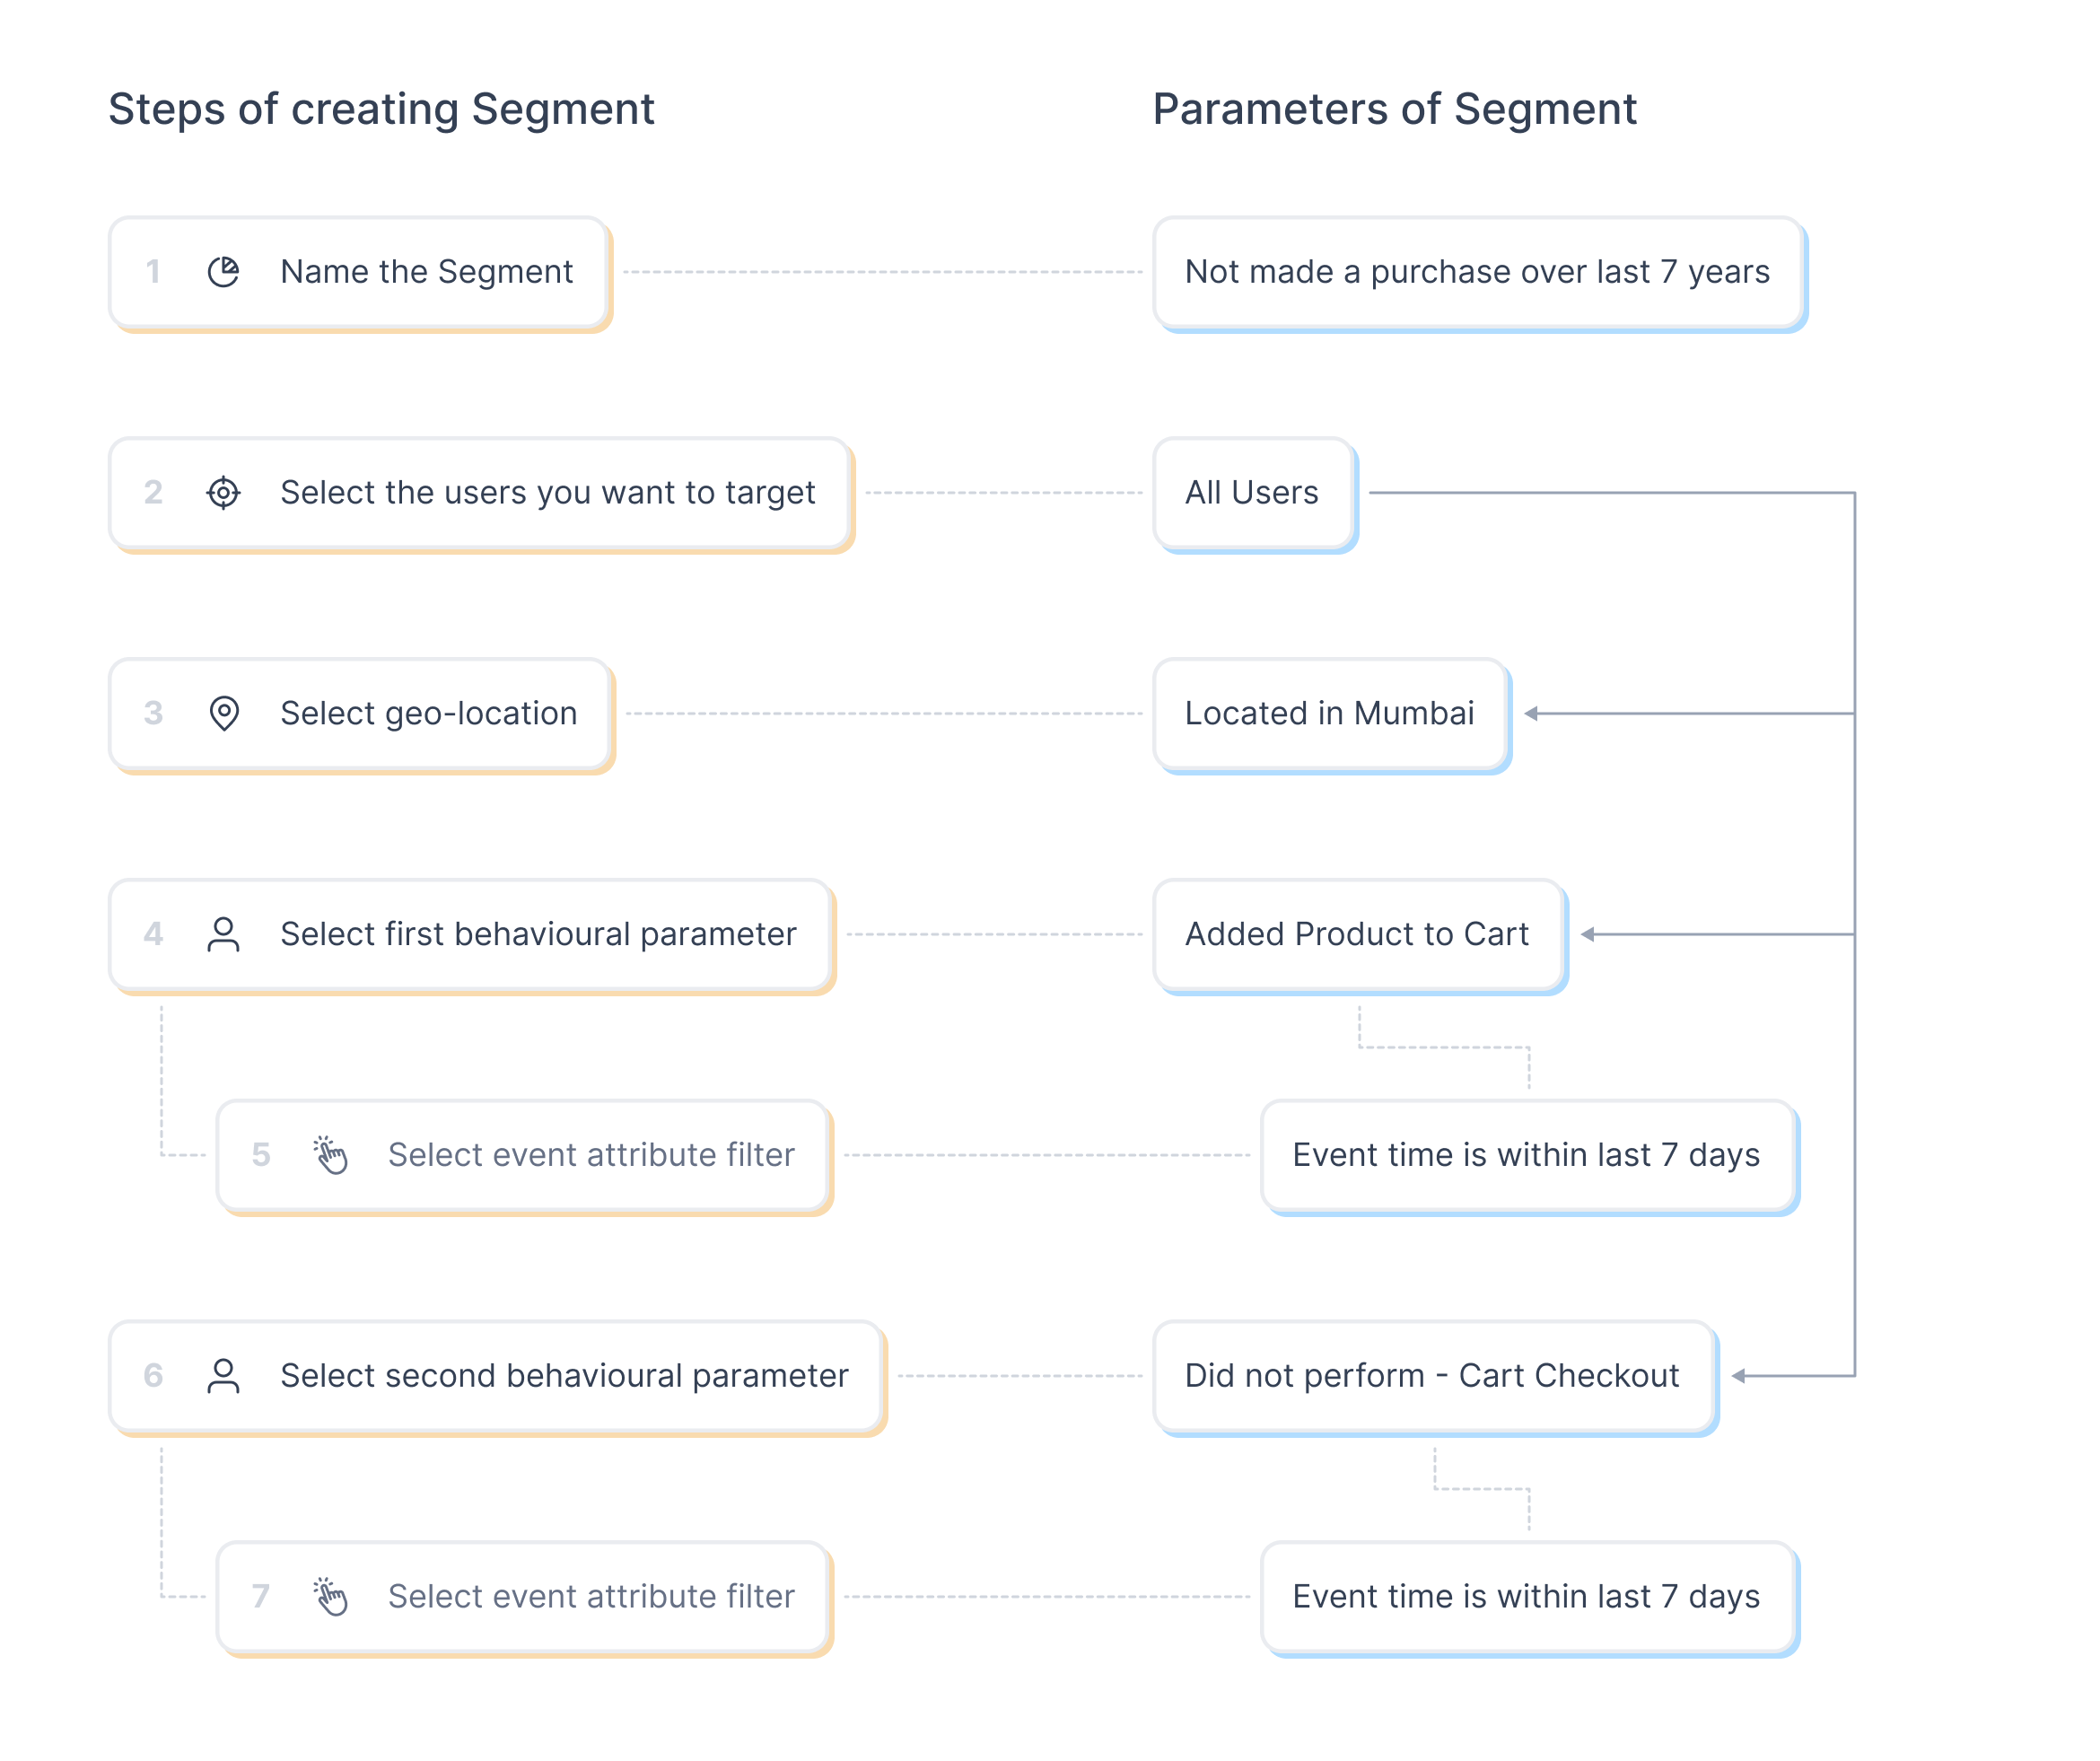
Click to enlarge
It’s as simple as that!
Creating segments in WebEngage is like building a house of Legos - all you need to do is select the right blocks and place them. After building the structure, if you don’t like the way it has turned out, you can always hit the reset button (at each step) to start afresh.
Now let’s deep dive into all the steps of segment creation.
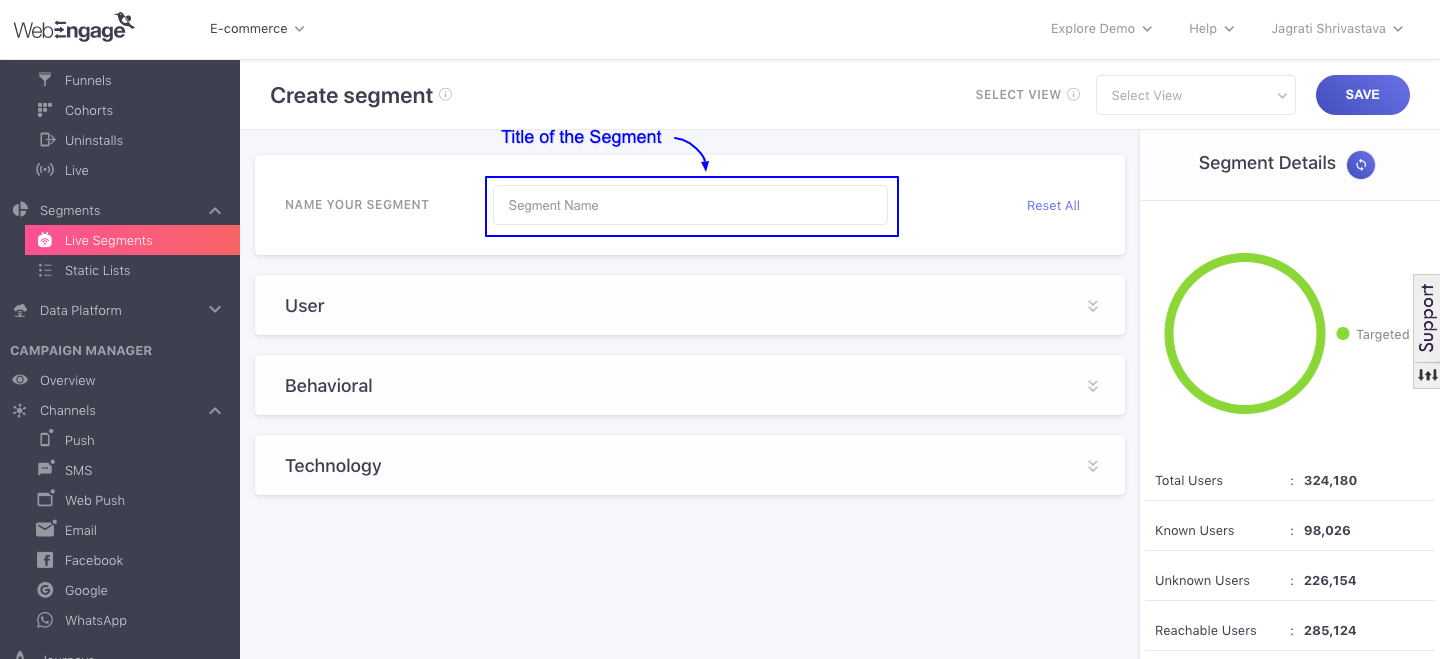
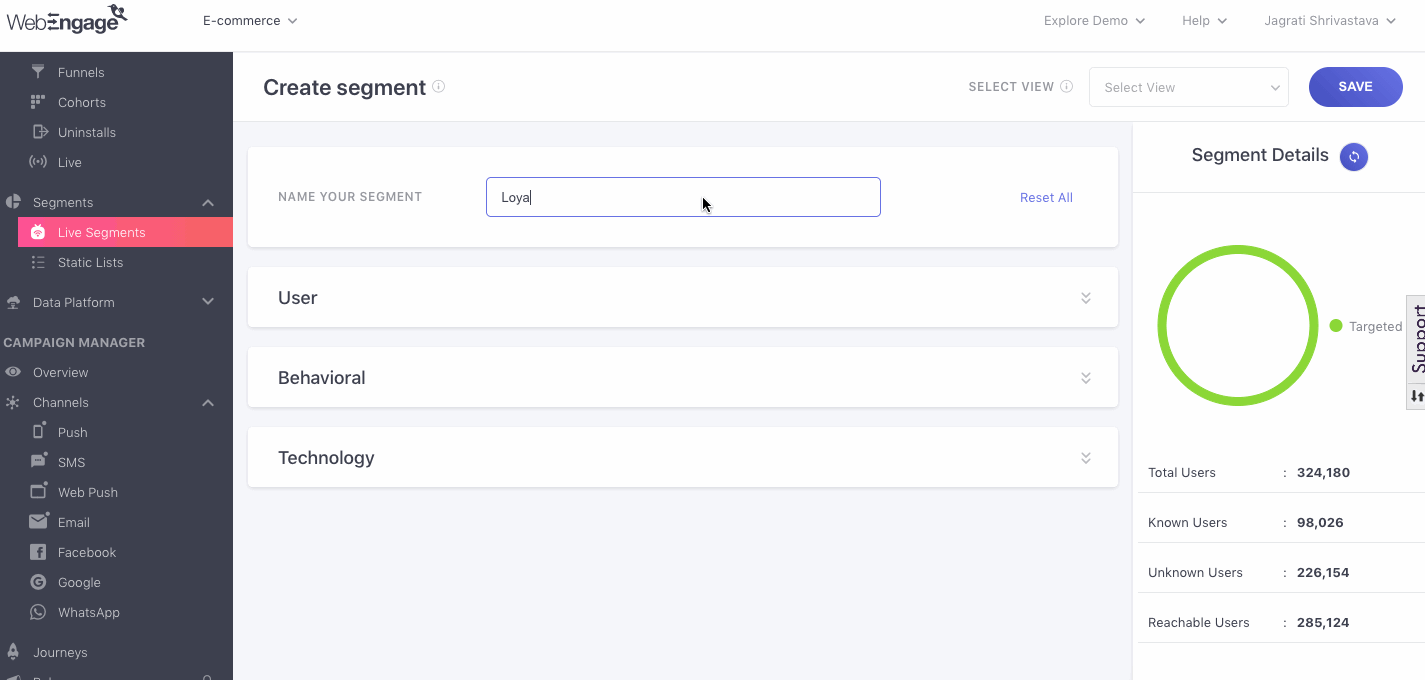
Step 1: Name Your Segment
The first step is to give your segment a unique name that will help you identify its purpose or properties. This can be edited anytime you like.
Click to enlarge
Ignore Case for String Filters
By default, string-based segmentation filters are case-sensitive. This means values such as Mumbai and mumbai are treated as different values.
To perform a case-insensitive comparison, enable the Ignore case toggle.
When enabled:
Mumbai,mumbai, andMUMBAIare treated as the same value.- The setting applies to:
- Event attributes
- User attributes
- Device attributes
- Event aggregate (Affinity) conditions
- It works across supported string operators such as Equals, Contains, and Starts with.
Note: The toggle is disabled by default to ensure existing segments continue to behave as before.
Step 2: Define the Rules of Segmentation
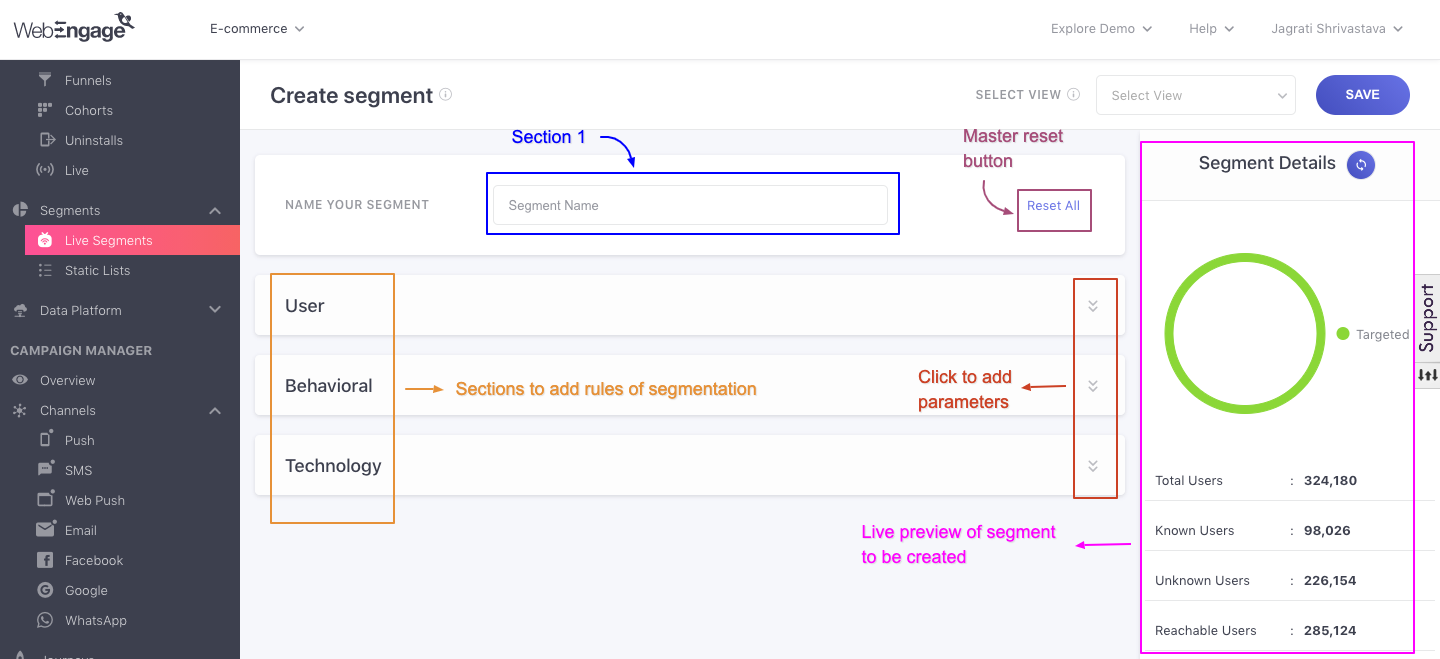
Click to enlarge
As highlighted above, segment creation comprises of the following sections:
- 3 broad sections for defining the rules of segmentation:
- User (details like last seen, location, acquisition source, etc.)
- Behavioural (events or actions performed or not performed by users)
- Technology (technological preferences like OS, Browser, Devices etc.)
- Live preview of the segment you're creating
Let's walk you through all the parameters nested under each section and how you can leverage all your data to create highly differentiated segments.
Ignore Case for String Filters
String-based segmentation filters support an Ignore case toggle. When enabled, values are matched without considering letter casing, so entries such as Mumbai, mumbai, and MUMBAI are treated as identical.
This option is available for:
- Event attributes
- User attributes
- Device attributes
- Event aggregate (Affinity) conditions
Note: Ignore case is disabled by default, so existing segments continue to use case-sensitive matching unless the toggle is enabled. The setting applies consistently across all string operators, including Equals, Contains, and Starts with.
This version is concise enough for a knowledge base while still capturing the feature, scope, default behavior, and backward compatibility.

2.1 User
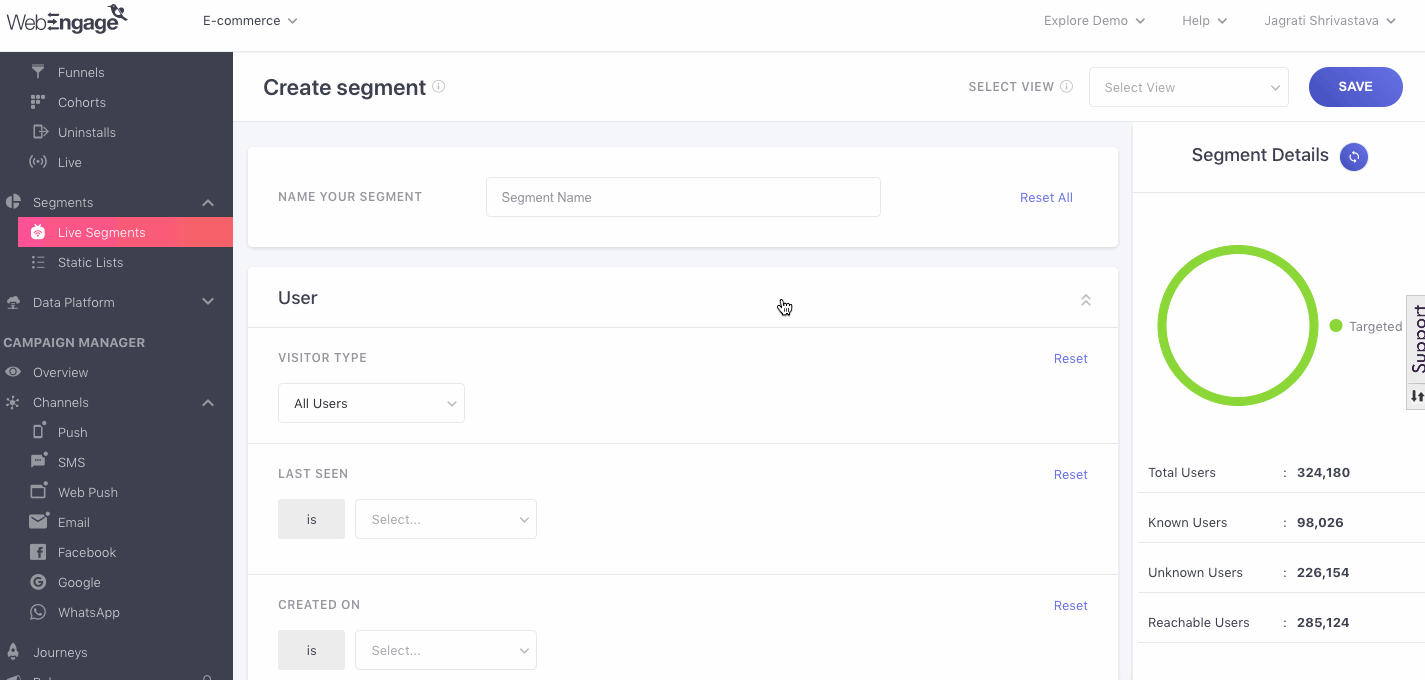
Click to enlarge
Here you can leverage all the System and Custom User Attributes tracked in your dashboard to categorize users by the following parameters:
- Visitor Type (New/Returning)
- Last Seen (Date)
- Created On (Date)
- Location (Geo Filtering)
- User Attribute Value
- First Acquisition Source
- User ID
- Channel Reachability
Let's walk you through each one:
Visitor Type
Using this field you can filter users based on how frequently they interact with your mobile app/website.
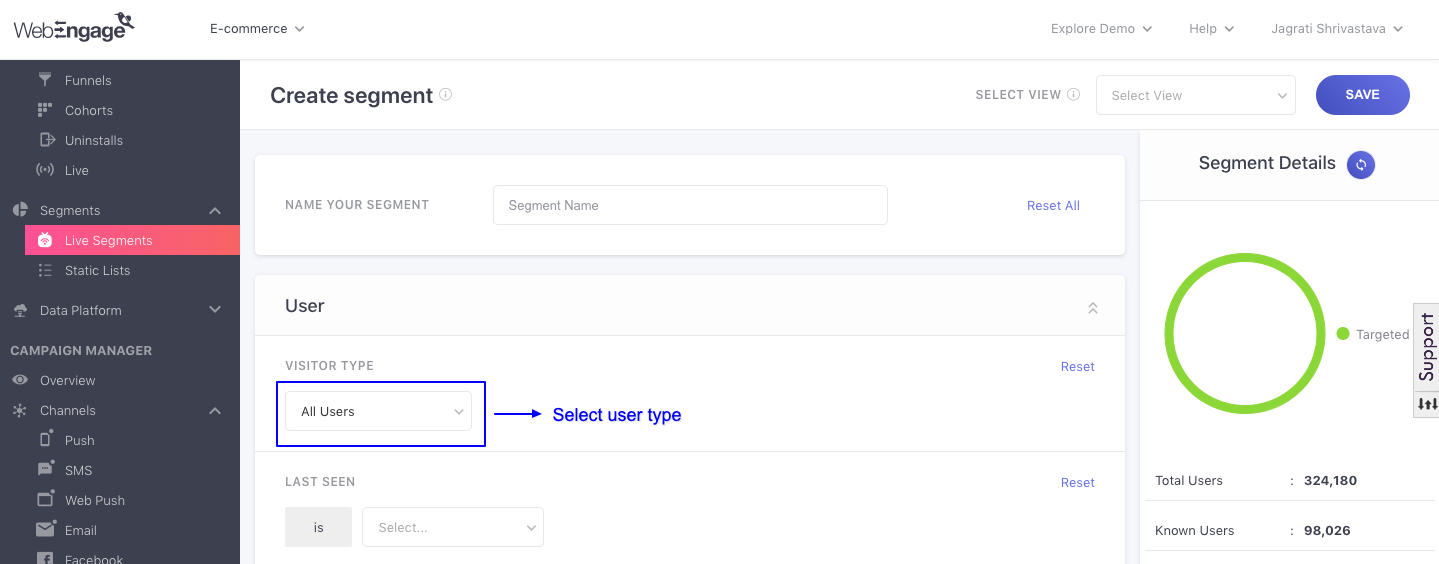
Click to enlarge
The dropdown includes the following options:
All Users
New Users (With only one session)
Returning Users (More than one sessions)
No. of Sessions (can be defined by any of the following conditions; equal to, not equal to, one of, none of, less than, greater than, less than or equal to, greater than or equal to)
Last Seen
Here you can include users in your segment by the frequency of their interaction with your app and website. This can be done by specifying a date or time frame, in the past or future.
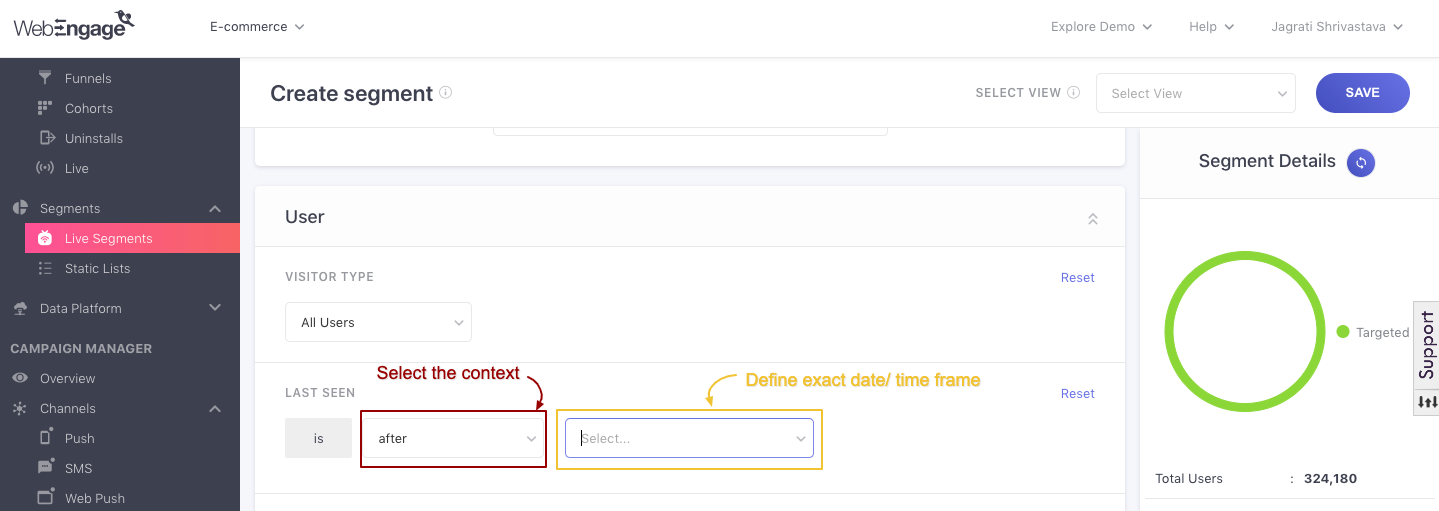
Click to enlarge
The following options are included here:
Last seen is after a specified period which could be;
date
last (enter value) minutes/hours/days/weeks/months/years
next (enter value) minutes/hours/days/weeks/months/years
Last seen is before a specified period which could be;
- any one of the fields specified above
Last seen is within a specified period which could be;
any one of the fields specified above
last (enter value) minutes/hours/days/weeks/months/years to last (enter value) minutes/hours/days/weeks/months/years
next (enter value) minutes/hours/days/weeks/months/years to next (enter value) minutes/hours/days/weeks/months/years
Last seen is present (will include users who have visited your app and/or website at least once in their lifetime)
Last seen is not present (will include users who exist in your database but have never interacted with your app and/or website. This means that the users were acquired offline and were added manually through a CSV upload to your WebEngage account.)
Created On
Here you can segment users based on the first time they came into contact with your brand. This field enables you to leverage first acquisition details gleaned from your app, website, server, and third-party platforms like CRM and lead-management systems via REST API.
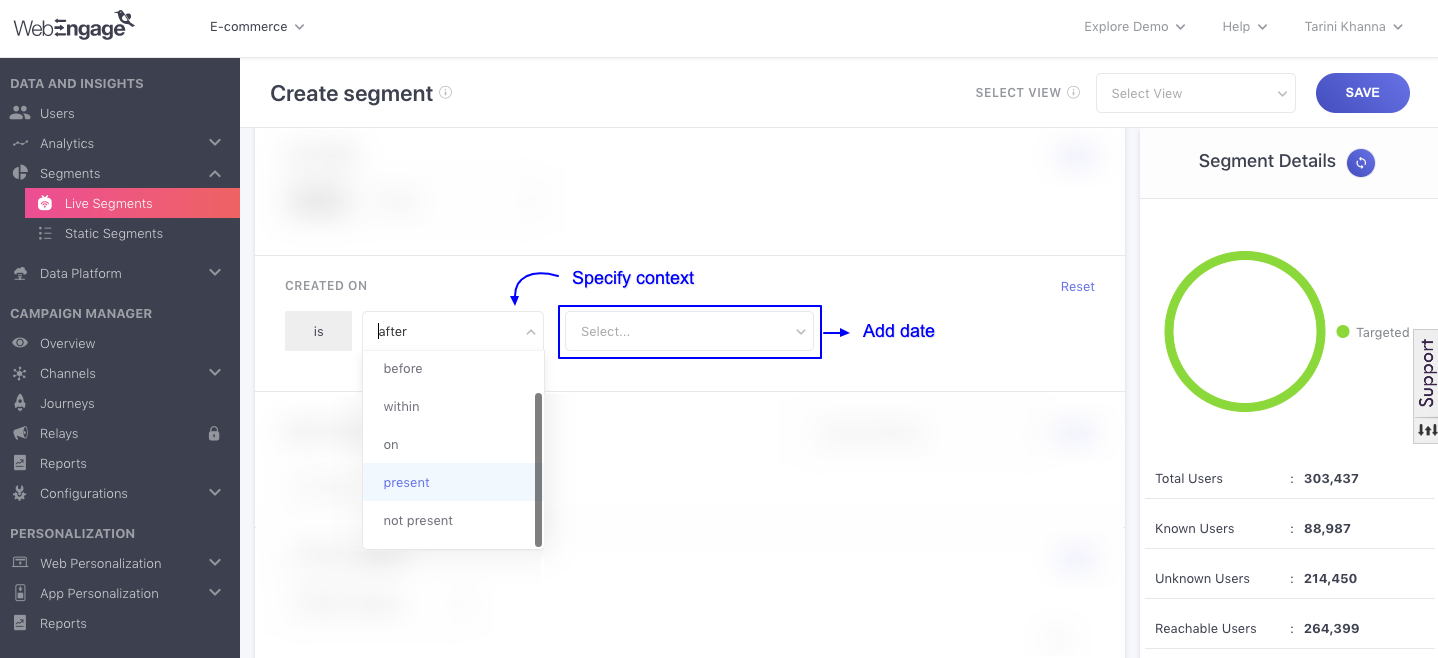
Click to enlarge
As shown below, simply select a condition, specify the first-acquisition date or time frame, and you're good to go!
The following options are included here:
(Contact) Created On the date that is after a specific period which could be;
date
last (enter value) minutes/hours/days/weeks/months/years
next (enter value) minutes/hours/days/weeks/months/years
(Contact) Create On the date that is before a specific period which could be;
- any one of the fields specified above
(Contact) Create On the date that is within a specific period which could be;
any one of the fields specified above
last (enter value) minutes/hours/days/weeks/months/years to last (enter value) minutes/hours/days/weeks/months/years
next (enter value) minutes/hours/days/weeks/months/years to next (enter value) minutes/hours/days/weeks/months/years
(Contact) Created On a specific date
(Contact) Created On date is present (Will include users for whom your database has a first-acquisition date.)
(Contact) Create on date is not present (Will include users who exist in your database were added manually through a CSV upload to your WebEngage account, due to which their first acquisition date is not present.)
Geo Filtering
Using this field you can choose to include or exclude users in a segment by their location, making it possible for you to communicate contextually.

Click to enlarge
- A maximum of three locations can be added here.
- Multiple locations can be clubbed by the Inclusion/ Exclusion logic.
- This can be added by selecting Any (inclusion) or None (exclusion), from the drop-down placed on the top right.
So, if we were to club the locations with Any then it would lead to the creation of a segment which specifically includes users residing in the defined locations.
On the contrary, clubbing the locations with None would lead to the creation of a segment which does not include users residing in the specified locations.
The following parameters can be defined for each location:Country < filtered by Region < further filtered by City
User Attribute
Here you can add one or multiple system attributes and custom attributes to the rules of segmentation.
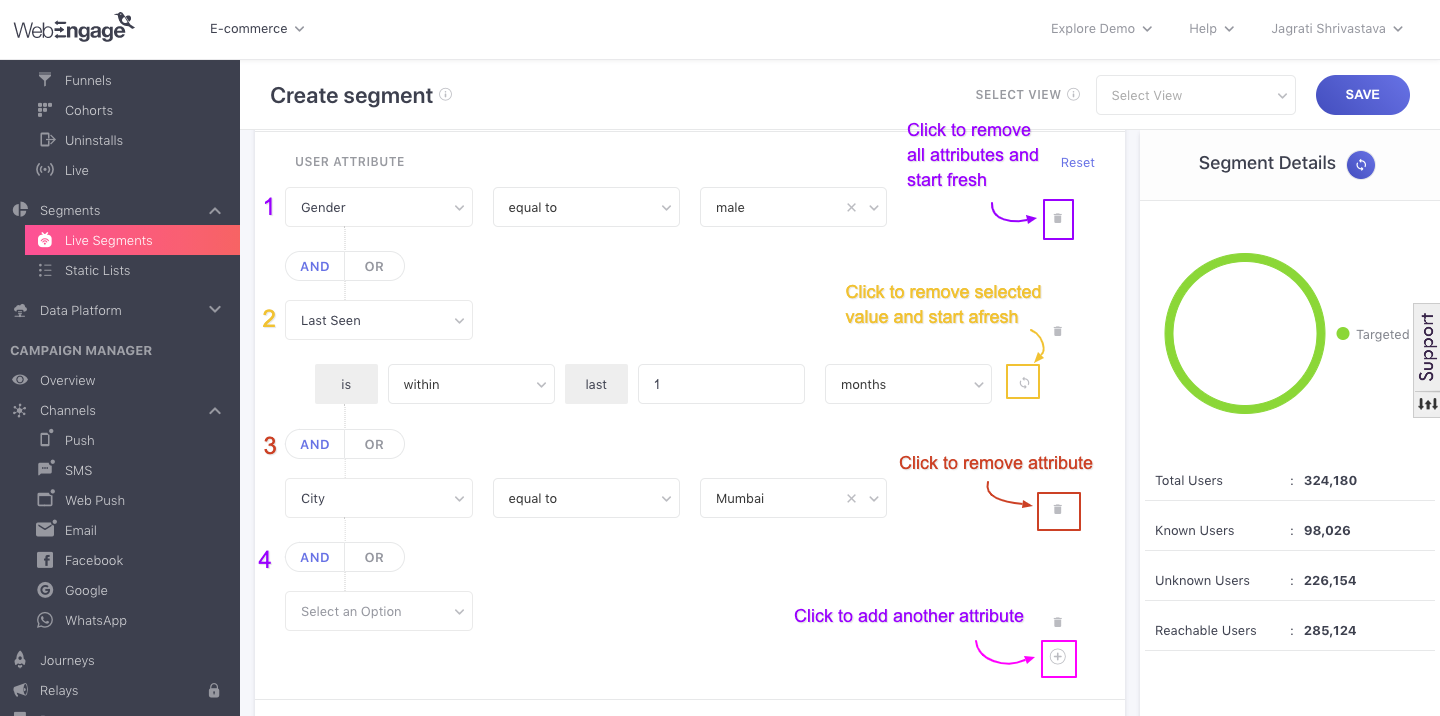
Click to enlarge
- Each attribute can be defined by adding a value against it.
- Multiple attributes can be added by clicking the Plus icon on the left.
- All attributes can be clubbed using the AND logic or the OR logic.
Let's solve a short use-case to understand the workings of this section, better:
Use-case: Clubbing multiple user attributes to create a segmentLet's say that you run an international fashion e-commerce app and would like to segment users specifically based in Singapore to engage them with the latest fashion trends and collections of the region. You decide to extend your premium collection to loyal customers first, before making it available to your entire user base.
We'll use the following attributes to create the segment:
Country is equal to Singapore
Loyalty Reward Points is equal to or greater than 5000
Solution: Club attributes by the AND logic to create the segment
Since we would like to create a very niche segment of users to engage with our premium collection, we'll create a segment of users who are located in Singapore AND have 5000 or more Loyalty Reward Points.
Click to enlarge
On the contrary, if we club the user attributes by the OR logic, then it would broaden the segment's userbase by including users who are either located in Singapore OR have 5000 or more Loyalty Reward Points. While doing so is not useful for the use-case at hand, you can apply the OR logic to club attributes for several other cases which require you to include users based on any one of the related parameters.
The following system attributes are included in the dropdown here:
Country
Region
City
Locality
Postal Code
First Name
Last Name
Birth Date
Gender
Company (Name)
Phone (Number)
Hashed Phone (Number): At WebEngage, we extend the option of encrypting all critical user details to avoid any privacy breaches. Hence, using this attribute you can include the encrypted phone numbers to add specific users to your segment.
Email (Address)
Hashed Email (Address): Similarly, using this attribute you can include encrypted email addresses to add specific users to your segment.
Last Seen (as discussed under Last Seen, above.)
(Please note thatcustom user attributes vary for each WebEngage account, making it impossible to list here)
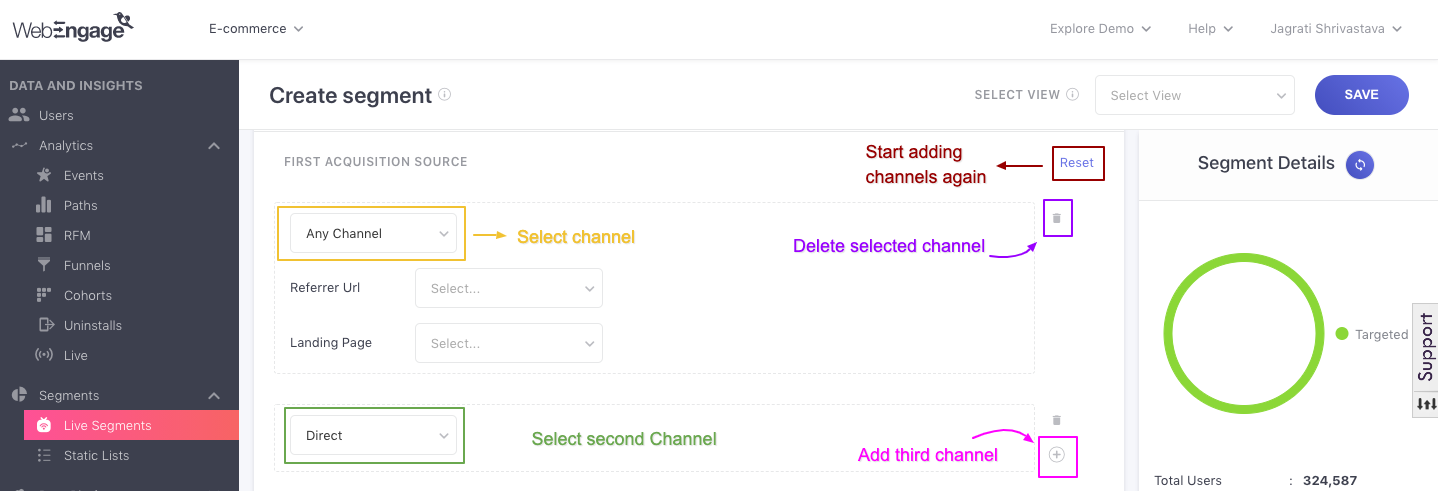
First Acquisition Source
Using this field you can choose to include only those users who have been acquired through a specific channel, landing page, referral source or a combination of these, as shown below.
Click to enlarge
Here too, you can choose to club the channels by the AND/OR logic - its implications have been explained under User Attribute.
Understanding First Acquisition Source for Website Users
Any Channel: Includes users acquired via any one of the channels listed henceforth. The scope of inclusion can further be refined by defining:
- Referral URL
- Landing Page URL
- You can choose to define multiple referral and landing page URLs as per your segmentation needs.
Direct: Includes users who directly entered your webpage's URL in the browser to visit it. All users for whom, document.referrer is empty are considered to be acquired directly.
Email: Includes all users for whom the landing page URL contains the UTM parameter, utm_medium where the value is email.
Organic Search: Includes all users for whom the referral URL contains one of the search engine's URL but does not contain paid campaign UTM parameters like utm_medium equal to cpc, paidsearch, ppc or GCLID query parameters (used for Adwords).
-
The following search engines are taken into consideration:
- Bing
- Yahoo
- Baidu
- Yandex
- Naver
- Daum
- Nate
-
The scope of inclusion can further be refined by defining a Search Phrase or a keyword that the user must have typed into the search engine's search bar.
Display: Includes users for whom the landing page URL contains the UTM parameter, utm_medium where the value is equal to display, cpm or banner.
Social: Includes users for whom the referrer URL contains the domain of a social media platform like Facebook, Twitter, Google+, Pinterest, LinkedIn, Me2Day. OR The landing page URL contains the UTM parameter, utm_medium where the value is equal to social, social-network, social-media, sm, social network, social media and so on.
- The scope of inclusion can further be refined by defining a Social Network.
Referral: Includes users who visit your webpage from another domain. All users for whom, document.referrer is not empty and does not match the landing page's domain are considered to acquired through referral.
- The scope of inclusion can further be refined by defining a Referral URL.
Campaign: Includes users for whom the landing page URL contains the any or a mix of the value specified against the following UTM parameters:
-
Campaign Name: Add the value that the UTM parameter,
utm_campaignmust contain in the landing page URL for a user. -
Campaign Source: Add the value that the UTM parameter,
utm_sourcemust contain in the landing page URL for a user. -
Campaign Medium: Add the value that the UTM parameter,
utm_mediummust contain in the landing page URL for a user. -
Campaign Term: Add the value that the UTM parameter,
utm_termmust contain in the landing page URL for a user. -
Campaign GCLID: Add the unique Google Ads tracking ID that the landing page URL must contain for a user.
Paid Search: Includes users for whom the landing page URL contains the UTM parameter, utm_medium where the value is equal to cpc, paidsearch, ppc or GCLID query parameters (used for Adwords). The scope of inclusion can further be refined by defining:
- Query value
- Term
Please NoteAny parameters added against the fields, AppsFlyer, Adjust, Branch, Tune and Metrix are not applicable to web users as these are mobile specific attribution tools.
Understanding First Acquisition Source for App Users
Since all mobile apps are downloaded through Google's Playstore or Apple's App Store, acquisition source attribution works differently than it does for websites.
We have partnered with several leading mobile attribution platforms like &#xNAN;_AppsFlyer, Adjust, Branchand **&#xNAN;Tune**_to ensure that you're able to track down the sources through which users discover you.
All you need to do is integrate your mobile apps with any of the aforementioned platforms and connect your WebEngage account with it. In doing so, we will start gleaning acquisition source information for all users that download your app.
You can specify the following parameters to segment users (based on the info gleaned through the third-party attribution platform):
-
Campaign Name: Add the value that the UTM parameter,
utm_campaignmust contain in the page URL for a user prior to downloading your app. -
Campaign Source: Add the value that the UTM parameter,
utm_sourcemust contain in the page URL for a user prior to downloading your app.
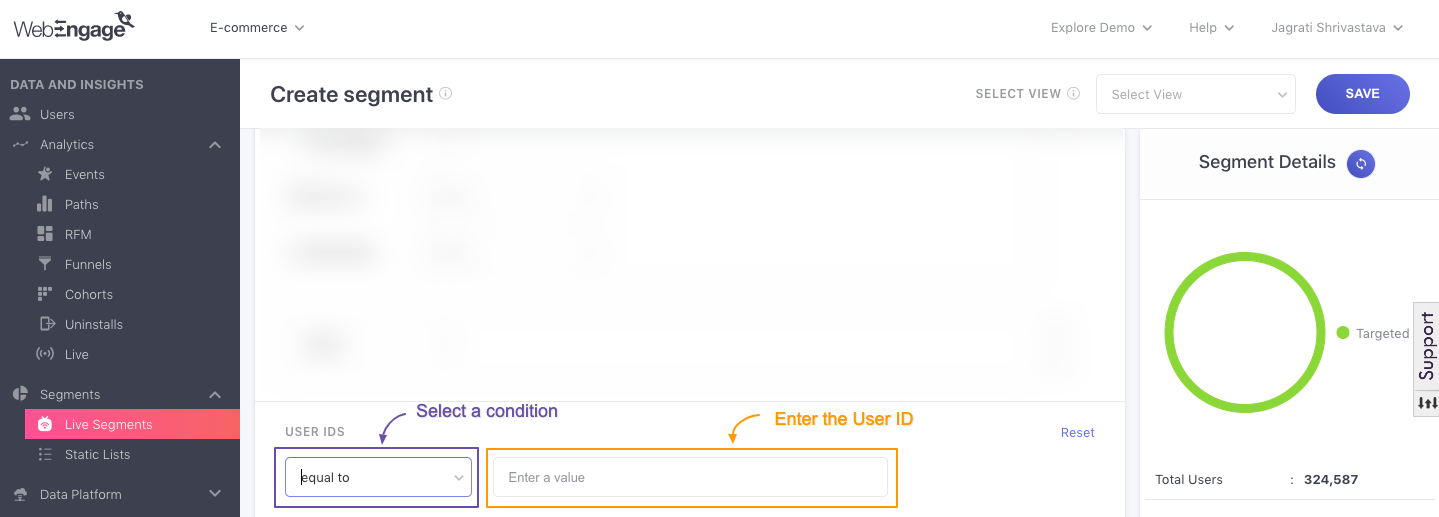
User IDs
Here you can enter specific user IDs to create a very niche segment.
Click to enlarge
User IDs can be prefixed by any one of the following conditions:
- Equal to
- Not equal to
- One of
- None of
- Starts with
- Does not start with
- Ends with
- Does not end with
- Matches regex (regex is a sequence of characters that define a search pattern - used in several coding languages.Detailed read)
- Does not match regex
- Contains
- Does not contain
Or, you could simply include users in your segment by specifying a condition wherein the User ID is empty or is not empty.
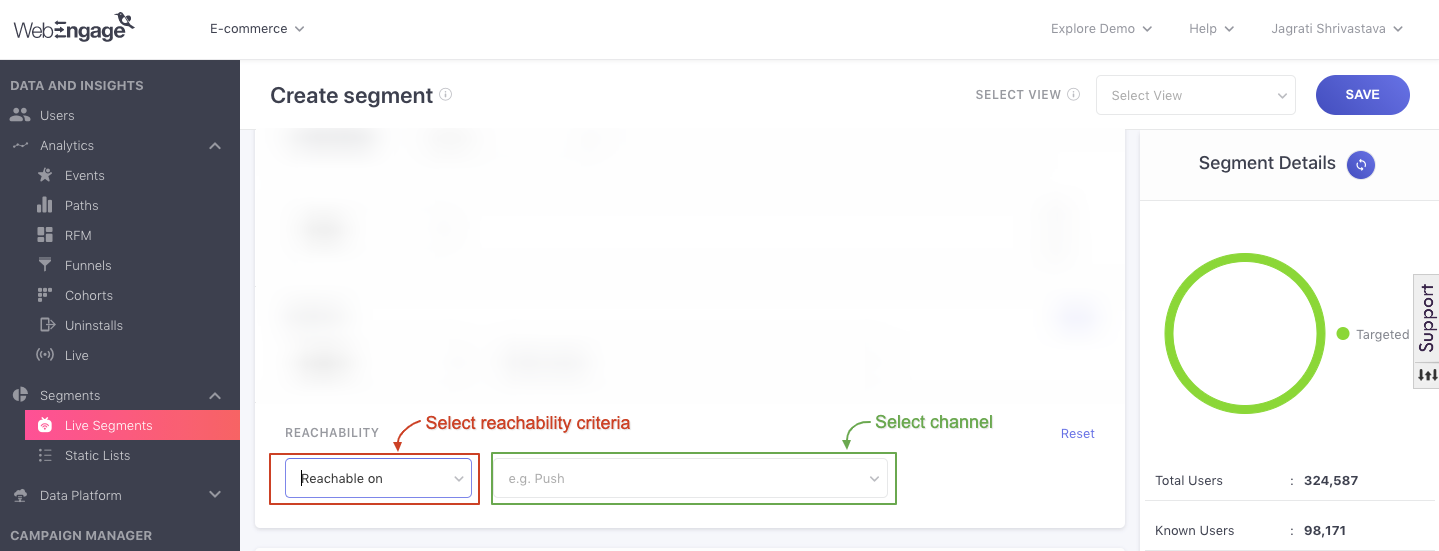
Reachability
Must ReadPlease ensure that you have a broad understanding of Channel Reachability before proceeding. Doing so will help you understand this aspect of segmentation, better.
This parameter enables you to include users in your segment based on the channels on which they can (or cannot) be reached.
Click to enlarge
Here's how it works:
Step 1: Define Reachability Criteria
The following options can be selected here:
Reachable on: Include users that can be reached on one or a combination of multiple channels.
Not reachable on: You can choose to include only those users that are not reachable on specific channels.
Let's help you understand the value proposition of creating a segment of users that are Not reachable on a particular channel with a use-case.
Use-case: App only business with a significant share of users that have disabled PushLet's say that you are an app only business and rely heavily on push notifications to engage your users. But how do you communicate with users that have disabled push notifications on their devices?
Your next best options are Email and SMS.
But how do you identify the users that can be reached through either or both these channels? And identify which, amongst the two channels would be most effective?
Solution: Create a segment for users that are_Not reachable on Push_
Once this segment is created, you will be able to get a clear idea of the other channels that you can leverage to engage these users! Such details can be found under the segment's analysis section.
Now, let's solve a quick use-case to demonstrate how you can use this feature to create micro-segments for users that are Reachable on a particular channel.
Use-case: Creating a long-term engagement plan for app usersLet's assume that you are an online travel agency and operate through both, a website and an app. More than 40% of your bookings are made through your mobile app, making app engagement a top priority for your marketing/growth team. So, they come up with a two-step plan to engage all app users.
Step 1: Engage them with informational content about the locations they are visiting.
Step 2: Occasionally promote guided tours of popular historical areas and experiential activities offered by your partners, in the vicinity, they are currently in.
We'll use the following criteria to create this segment:
- Is Reachable on Push
Solution: Create a segment of users that are_Reachable on Push_ and trigger contextual campaigns as per their geo-location
Once this segment is created, you will be able to create multiple journey campaigns for the segment that triggers informational content and offers every time a user enters/exits a geo-fence pre-defined by you!
Step 2: Select Channel
You can choose to include users within your segment based on their reachability criteria across several channels. All channels can be combined by the OR logic in the drop-down itself. By doing so, you will be limiting the scope of inclusion to either of the following cases:
- Users that are Reachable on a channel.
- Users that are Reachable on either one of the selected channels.
- Users that are Not reachable on a channel.
- Users that are Not reachable on either one of the selected channels.
Platform Filter
The Platform system attribute is available in the new List UI and lets you filter events using a predefined list of platform values instead of entering numeric platform IDs.
Available values include:
- Android
- iOS
- Web
When you select a platform, WebEngage automatically maps the value to the corresponding internal platform ID.
Note:This enhancement is available only in the new List UI. The legacy List UI and Live Segments continue to use the existing Platform ID field, which requires numeric values. The previous Platform field has been renamed to Platform ID to distinguish it from the new string-based Platform field.
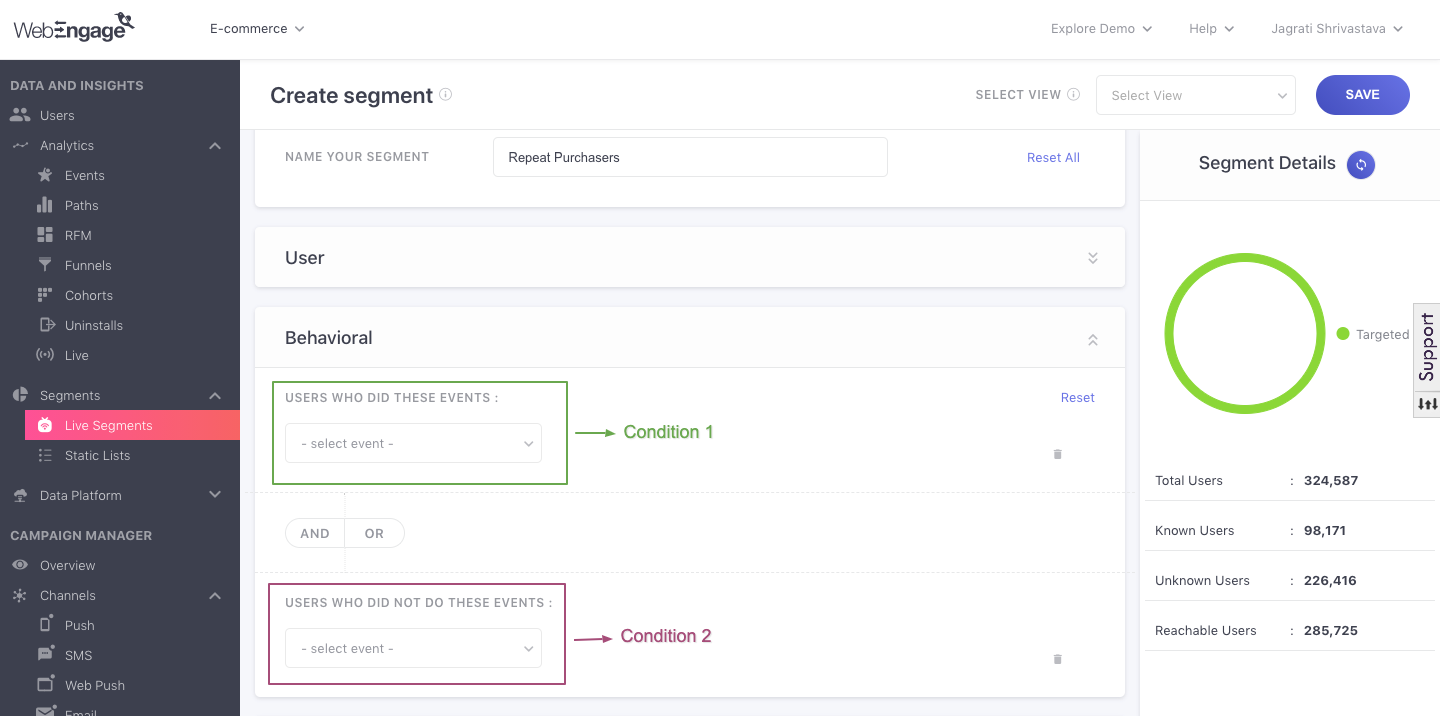
2.2. Behavioral
Here you can leverage all the System - Custom Events and Event Attributes tracked for your app/web users to create niche segments that reflect the frequency of platform interactions, purchase behavior, campaign interactions, and other distinct behavioral patterns of each user group.
Let's quickly go over how this section works:
Understanding Behavioral Conditions
Click to enlarge
-
You can execute highly targeted engagement strategies by defining behavioral parameters under 2 conditions:
-
Users who DID these Events: Helps you group users who have performed a specific System/Custom Event within a specific time frame.
-
Users who DID NOT do these Events: Helps you group users who have not performed certain actions on your app/website within a specific time frame.
-
-
Further, you can narrow down the segment's audience to a niche set of users by combining the Conditions via AND/OR logic. Here's how it works:
-
AND: Segment will include only those users who have performed the Event(s) specified under the condition,Users who DID these Events AND have not performed the Event(s) specified under the condition Users who DID NOT do these Events.
-
OR: Segment will include all users who *have either performed the Event(s) specified under the condition, Users who DID these Events OR have not performed the Event(s) specified under the condition Users who DID NOT do these Events.
-
Use-case: Targeting E-commerce Customers Who Have Purchased, But Not RecentlyLet's take the example of a fashion e-commerce app. Marketers of the app are always on the lookout for ways to boost repeat purchases and decided to experiment with a personalized Push Notification targeted at users who have:
Purchased at least once
Have opened the app within the last 2 weeks
Have not purchased within the last 2 weeks
Pre-requisites:
Each time someone makes a purchase, it's tracked as the Custom Event, Checkout Completed.
Each time someone launches the e-commerce app on their device, it's tracked as the System User Attribute, Last Seen (Date-time)
Here's how they created the segment:
Rule 1 (User): Last Seen is within the last 2 weeks
Rule 2 (Behavioral): Users who did the Event, Checkout Completed at least once AND Users who did not do the Event, Checkout Completed where Event Time is within last 2 weeks
And voila!
The Push Notification achieved a conversion rate of 9.5%.
Configuring Behavioral Rules
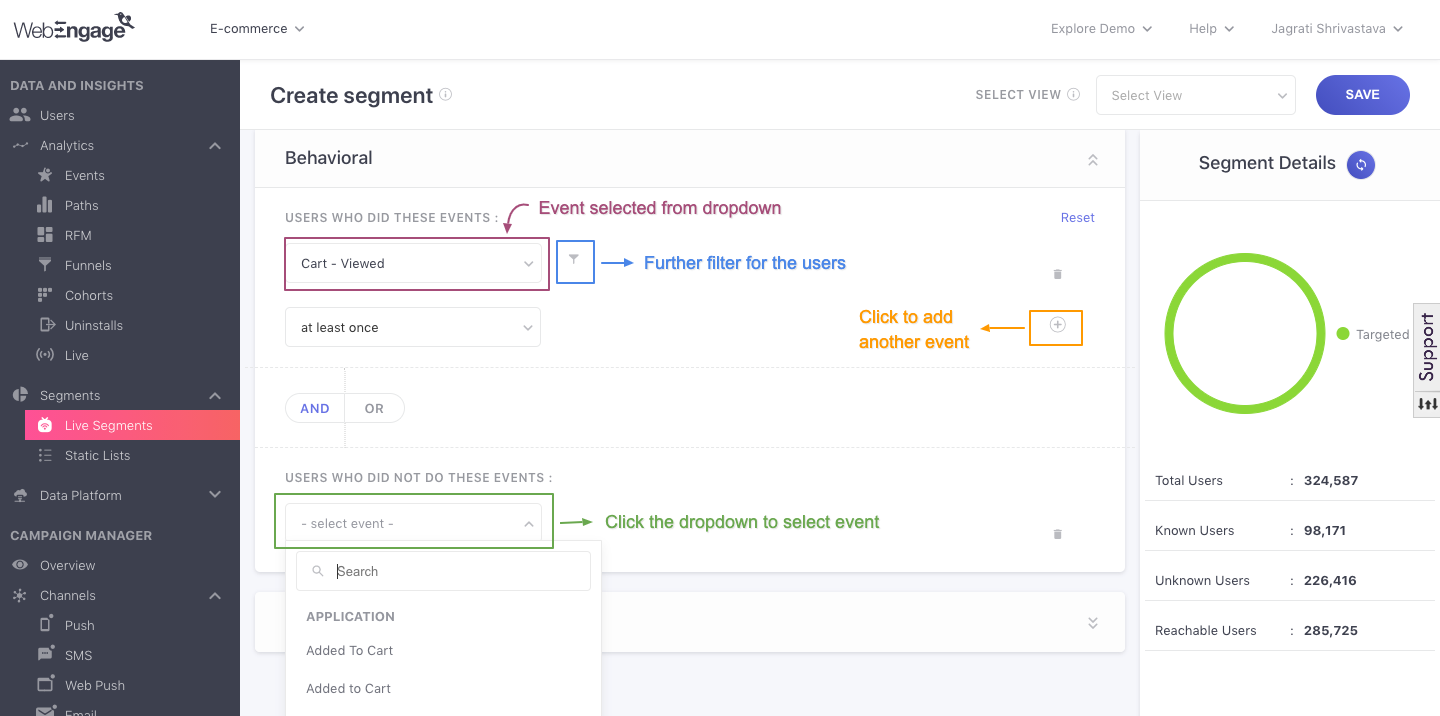
Here's how you can add Events and Event Attribute filters under each Condition to create rules of segmentation.
Step 1: Select Event
(Applicable to bothBehavioral Conditions)
Click to enlarge
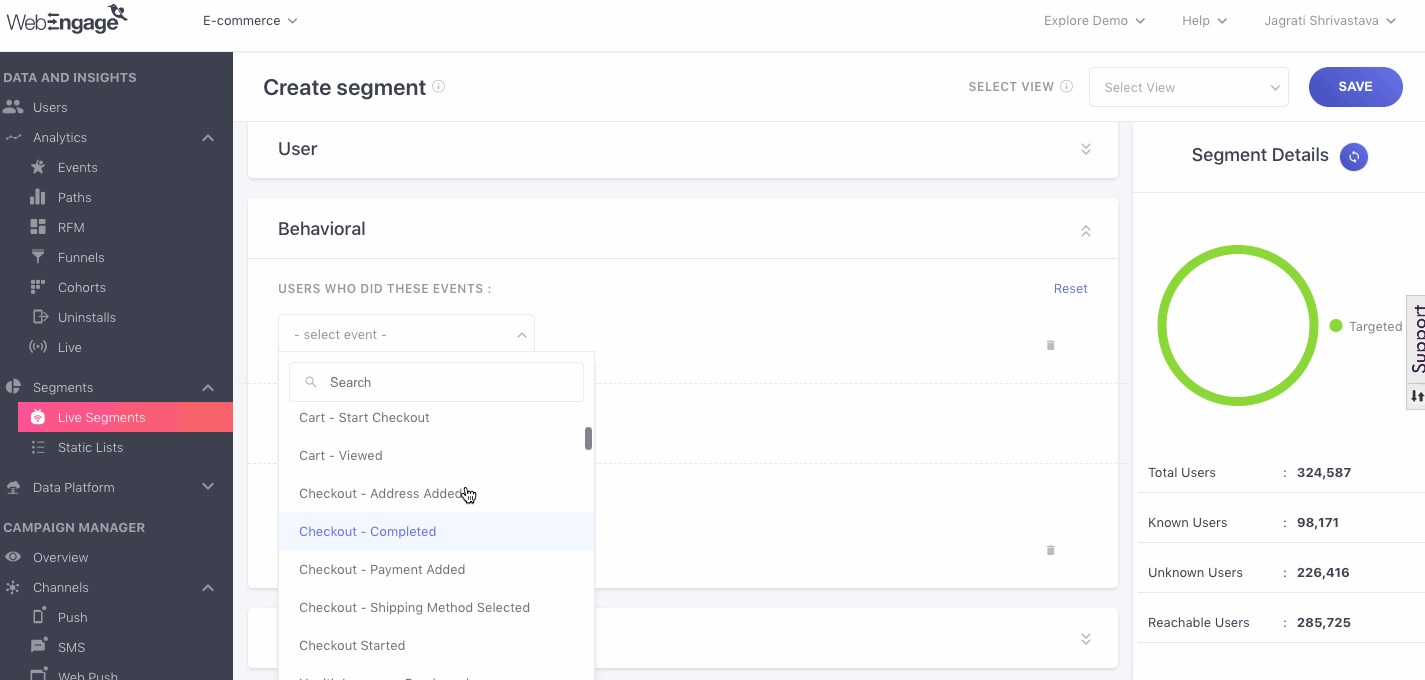
A drop-down including all the custom events, system events and campaign events being tracked for your account has been included under each condition. Select any one.
Event Dropdown OptionsPlease refer to this section for a list of all the system events included in the dropdowns under both conditions.
(Please note that custom events vary for each WebEngage account, making it impossible to list here)
To add multiple events under a condition, click the Plus icon placed next to the second dropdown (as shown below). A maximum of three events can be added under each condition, clubbed by the AND/OR logic.
Click to enlarge
Step 2: Add Event Attributes Filters to Event
(Applicable to bothBehavioral Conditions)

Click to enlarge
Click Add Filters to add an attribute to the event - this will add a dropdown to the screen, including a contextual list of all the attributes which can be added to the selected event.
Each drop-down includes a contextual list of the system attributes and custom attributes which can be added as filters to the selected event.
Event Attribute Dropdown OptionsHere's a list of all the system attributes included in the drop downs under both conditions.
(Please note, Custom Event Attributes are exclusively tied to a Custom Event and will show up in the drop-down accordingly.)
To add multiple attributes, click Add Filters again. Multiple filters can be clubbed by the AND/OR logic - the implications of which have been explained above, under User Attribute.
Let's solve a practical use-case to understand the workings of this section, better.
Use-case: Segmenting users by two events with event attributes (applied to each)Let's say that you run a grocery delivery app and want to individually engage users who have added products to their shopping cart, but have not made a purchase yet.
You decide to create a different engagement strategy for high-value users, whose cart value is $100 or higher by offering them a 5% discount. Since you're offering a discount, you decide to extend this offer specifically to users located in the vicinity of your warehouse in Sacramento, California.
Solution
-
Assume the first event, products added to shopping cart to be; Product - Added to Cart
- The event attributes we'll need to add to it will be; Cart Value, Country, City
-
And assume the second event, not made a purchase yet to be; Cart - Checkout Completed.
Now let's show you how to combine these events to create a segment:
Click to enlarge
Step 1: Add the event, Product - Added to Cart under Users who DID these Events
Step 2: Add event attribute 1, Cart Value, defined as; greater than $100
Step 3: Select AND logic for adding the next attribute
Step 4: Add event attribute 2, Country, defined as; equal to United States
Step 5: Select AND logic for adding the next attribute
Step 6: Add event attribute 3, City, defined as; equal to Sacramento
Step 7: Select AND logic to combine both the conditions; Users who DID these Events, Users who DID NOT do these Events
Step 8: Add event, Cart - Checkout Completed under Users who DID NOT do these Events
Step 9: Hit Save!
And there you have it - a segment updated in real-time for engaging users with discount coupons, located in a specific region, motivating them to complete the transaction.
Step 3: Specify Event Occurrence Frequency/Recency
(Applicable only toBehavioral Condition, Users who DID these Events)
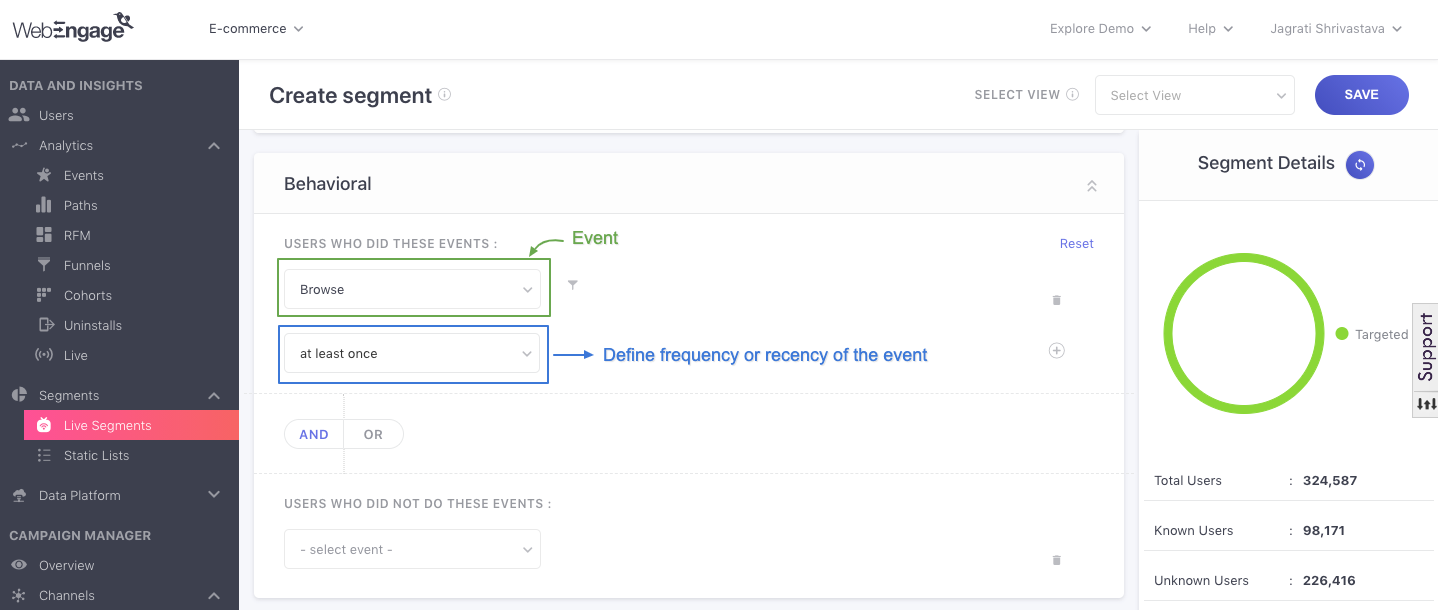
Click to enlarge
Using the second dropdown (below Add Filters) you can further define the context of an event by adding a time-bound parameter of how frequently or recently the event has been performed. This feature helps you create highly targeted segments, facilitating in-the-moment interactions.
While the parameters included in the dropdown here vary contextually as per the event, these parameters apply to all:
At least once
Only once
No. of occurrences (scope can further be refined by adding a value prefixed by; is equal to, does not equal to, less than, greater than, is less than or equal to, is greater than or equal to, between, not between )
Most recent event time (scope can further be refined by adding a date prefixed by; after, before, within. Or you could simply define the context as present, not present - leaving it up to us to check whether or not the event has been performed by each user recently, adding them to the segment accordingly.)
Least recent event time (scope can further be refined in the same manner as Most recent event time)
2.3. Technology
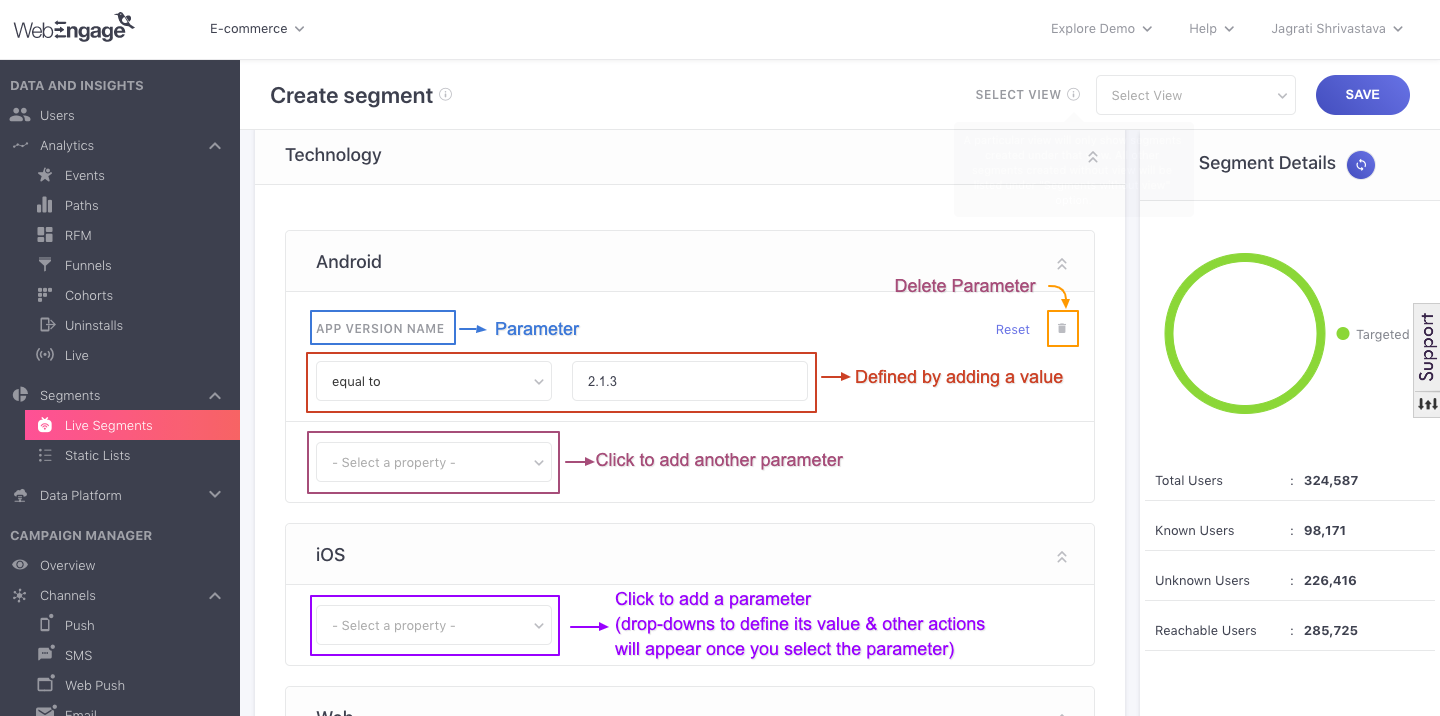
Click to enlarge
Here you can choose to include only those users who use a particular operating system, making it easier for you to tailor campaigns with elements native to each OS (Android, iOS, and Web).
Use-case: Using OS as a segmentation parameter to create stylised campaignsFor example, rich mobile push notifications can only be seen on devices that use the recent versions of iOS and Android. Thus, when creating a segment for engaging users with rich push notifications, you can you specify the latest versions of iOS and Android devices under the rules of segmentation.
You can even combine multiple Operating Systems to include a broader set of users by adding parameters under each OS. All these parameters will be combined by the OR logic by default.
Here’s a list of the technical details you can add to the rules of segmentation under each OS:
2.3.1. Android
App Installation Date
Last Seen
Total Time Spent (in seconds): Time spent on your mobile app throughout their entire lifetime
App Version Name
App ID
App Version Code
API Version
SDK Version (Refers to the WebEngage Mobile SDK version added by you to the platform. All user data is collected through it)
Advertising ID
Android ID
Manufacturer
Model
Brand
2.3.2. iOS
- All data points listed under Android (excluding Android ID, Manufacturer, Brand)
- Vendor ID
2.3.3. Web (Website)
Devices (Mobile, Desktop, Tablet)
Web Push Subscribe - Source URL (The page through which the user opted-in)
OS (Mac OS version, Windows, Linux etc.)
Browser (Chrome version, Safari version, Firefox version etc.)
Step 3: Preview Segment
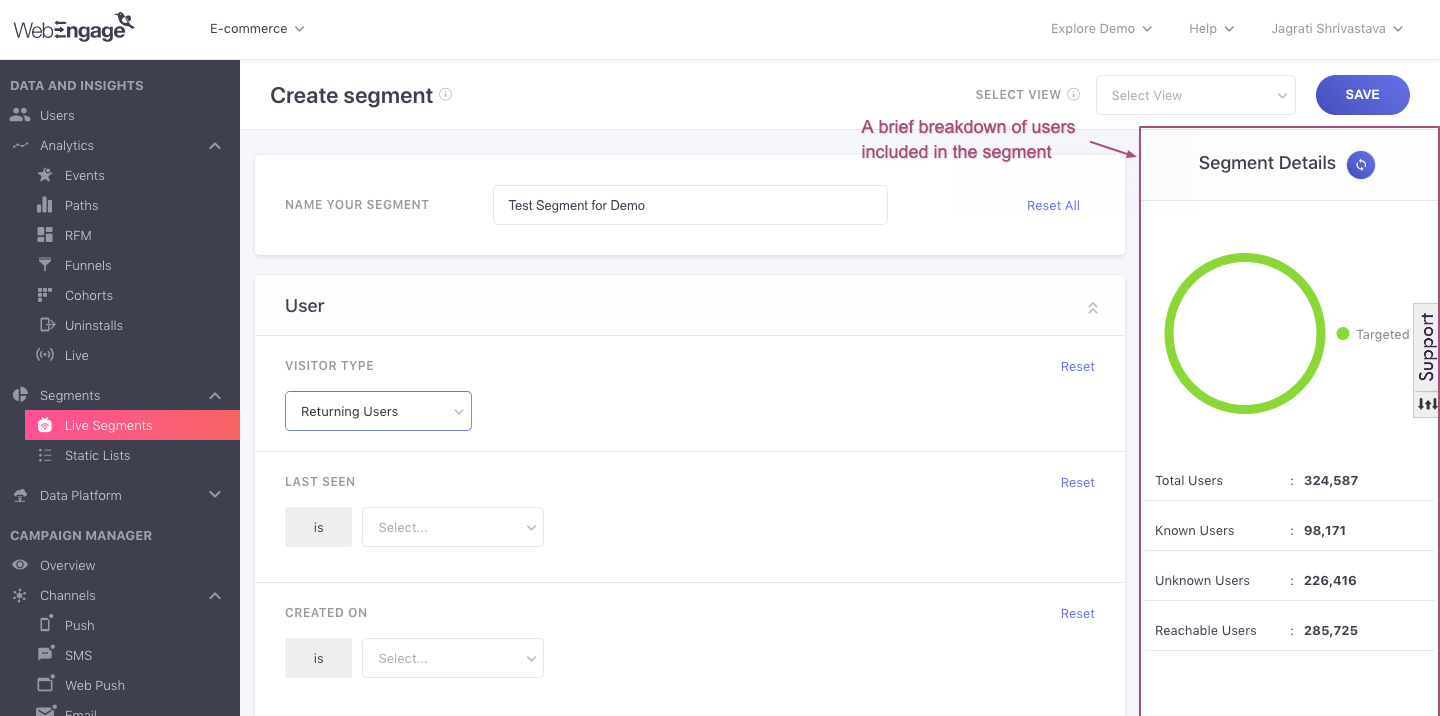
Click to enlarge
Placed on the right, a real-time preview of the segment you're creating shows a top-level breakup of its users. At WebEngage, we believe it’s essential to see the possibilities offered by each segment you create clearly. Thus, this preview has been designed to help you develop practical in-sized segments, substantially differentiated and can be engaged via a channel.
The following parameters are included in the preview:Total Users: It indicates the total number of users included in the segment, further broken down by;
Known Users (Here's what this means)
Unknown Users (Here's what this means)
Reachable Users: It indicates a sum of the segment's users who are reachable via at least one channel of engagement - Push, In-app, SMS, On-site, Web Push, Email. (Here's what this means)
What happens after you have built a segment?
Once you have reviewed details of the segment to-be-created - hit the Save button, placed on the top right.
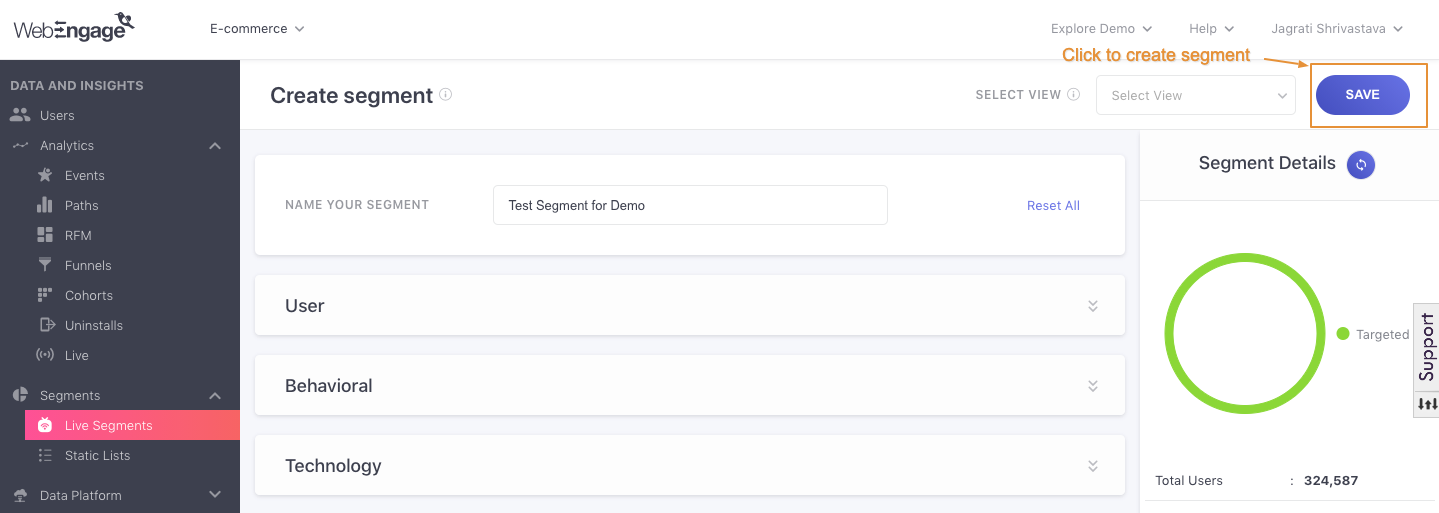
Click to enlarge
Doing so will take you back to the List of Segments, showing your newly created segment at the top of the list.
Please NoteDepending on the volume of data and parameters set by you, it may take us some time to brew the segment. In cases where this happens, you will see; In Progress, against the segment’s title on the homepage.
So, what will be the first segment you create in your account?
Updated 1 day ago