Preface
Welcome to WebEngage's Knowledge Base!
Please NoteMethods of personalization discussed here are applicable only to One-time, Triggered, Recurring, Journey & Relay campaigns. Looking to personalize Transactional Campaigns? Let's get you started!
If real-time communication is a necessity for modern digital engagement, then personalization lays the foundation for delivering one-on-one messages. And the way you track your user's actions and preferences in your app and website play a crucial role in fueling your personalization strategy.
We have made it extremely easy for you to create hyper-personalized messages across channels by helping you leverage real-time user data and behavioral data in the most optimal way. From personalizing a campaign's message, images, links, and email attachments to using REST APIs to request data from your servers - you can achieve all this (and more) with our campaign creation interface in minutes!
Must ReadPlease ensure that you have a robust understanding of all the concepts related to Users and Events before proceeding as they lay the foundation for campaign personalization in WebEngage.
Personalizing a Campaign's Image & Icons
Be it any channel or medium, nothing can beat the rich experience provided by visually engaging media. This is why, we have made it extremely easy for you to create dynamically personalized, media messages across Push, In-app, Web Push and Email.
One-on-one image personalization can be achieved by tracking data points related to image views as User Attributes and Custom Event Attributes in your WebEngage dashboard.
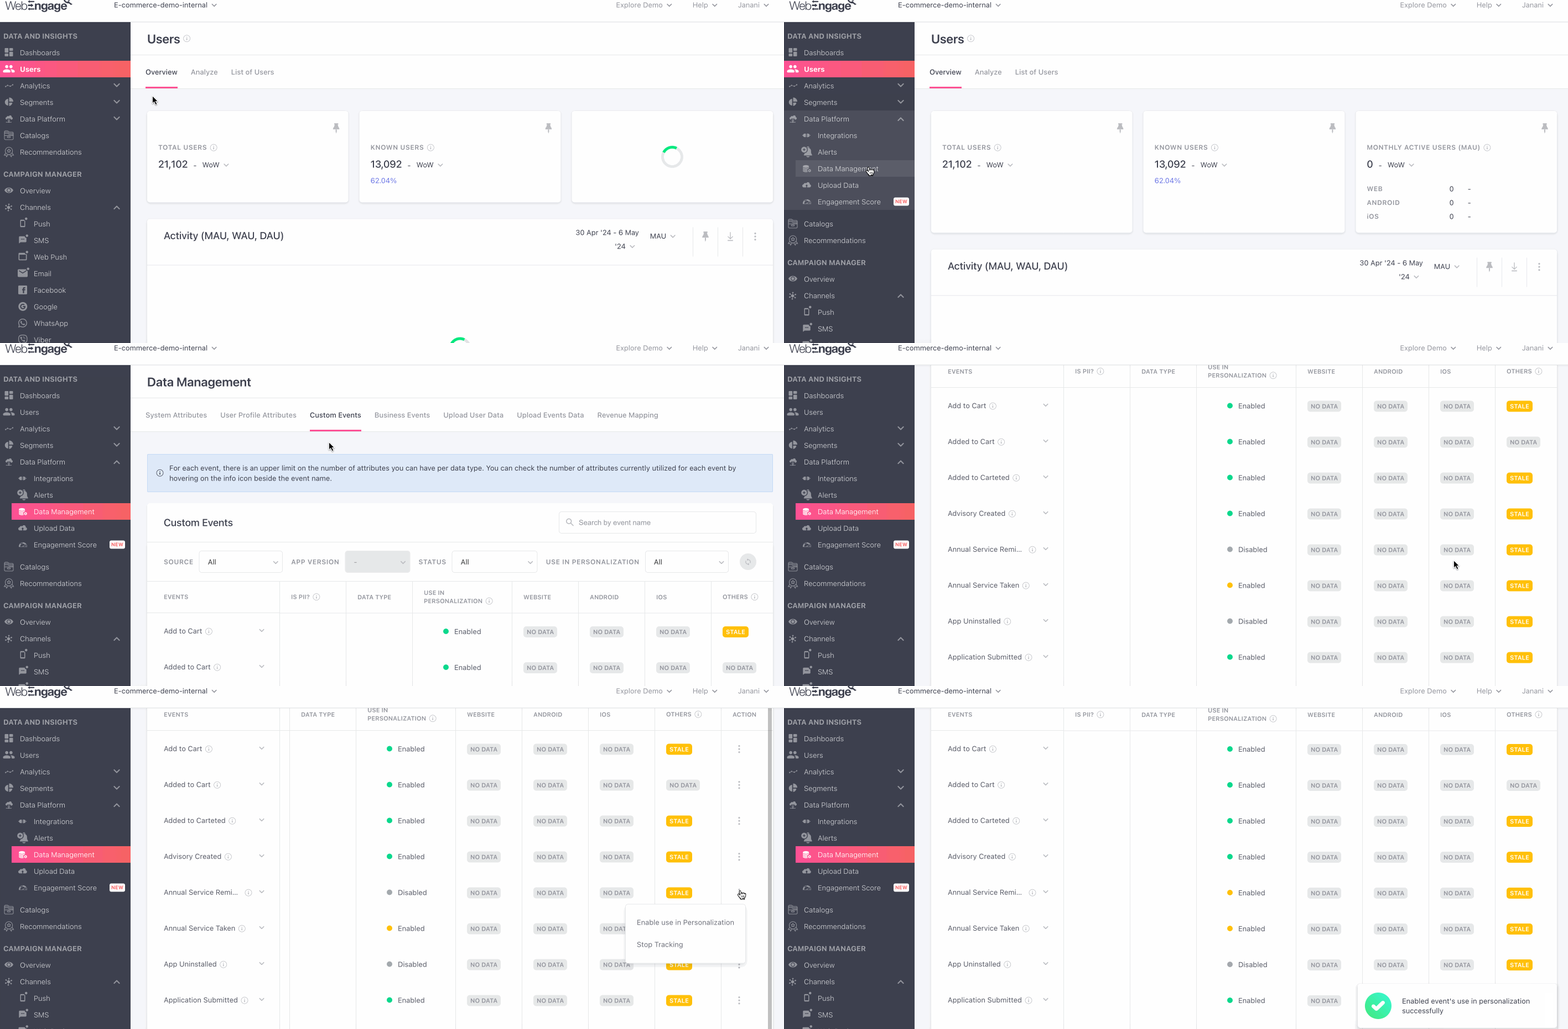
In order to use Custom Event Attributes, the event needs to be marked as "Enable use in Personalization" in "Data Platform > Data Management > Custom Events" tab.
To utilize the Custom Event Attributes ,navigate to Data Platform on the navigation panel, proceed by clicking on Data Management tab, and then to Custom events, where you can click on the action button and designate the event to 'Enable to use in Personalisation'.
For example, whenever a user views a product on your app or website, you can track the action as the Custom Event, Product Viewed and add the ImageURL, or Product-Name as a Custom Event Attribute to it. Then, you can leverage these data points to create a highly personalized media message.
Similarly, you can capture your user's preferred Language, Genre and several other preferences as Custom User Attributes from your app/website and leverage them to personalize campaign images.
Depending on your internal data structure, this can be achieved in two ways:
Method 1: Tracking the link of the images seen by a user in your app or website as an attribute of the Custom Event that tracks a related action
Method 2: Building the image URL by mapping the parent link's path to the value of the Custom Event Attributes gleaned for related actions (that are being tracked as Custom Events)
In both the case, the action could be anything like Product Viewed, Product Added to Cart, Holiday Package Viewed, Hotel Details Viewed, Course Viewed, Product Added to Wishlist and so on.
Use-cases: Personalizing Images to Amplify Conversions
E-commerce: User views product on your platform but leaves without purchasing
Product-Viewed
- ProductID
or
- ImageURL
- ID of the product viewed by a user(as listed in your database)
or
- Link to exact address where the image is hosted
OTT: Promoting an upcoming season of a series the user has watched with a poster highlighting the main lead
Show-Streamed
- ShowID
or
- ImageURL
- ID of the show streamed by the user (as listed in your database)
or
- Link to exact address where the image is hosted
Ed-tech: Nudging users to continue learning with images personalized to the course they're currently studying like: Graphic Design, Photography, Nutrition, HTML
Course-Purchased
- CourseID
or
- ImageURL
- ID of the course the user is currently subscribed to (as listed in your database). This could be anything like; 135 for Graphic Design, 245 for Photography, 355 for Nutrition, 465 for HTML
or
- Link to exact address where the image is hosted
Fin-tech:Updating users with status of the mutual fund in which they are currently investing
MF-Purchased
- SchemeID
or
- ImageURL
- Name of the scheme in which the user is currently investing
or
- Link to exact address where the image is hosted
Online Travel: Nudging users to complete booking their holiday package by highlighting the selected location
Location-Selected
- LocationID
or
- ImageURL
- Name of the location for which the user has explored a holiday package
or
- Link to exact address where the image is hosted
Multi-language users: Greeting users on a festival with a banner image customized to their preferred language
Language
- Name of the language in which the user prefers to interact with your platform
E-commerce: Personalizing the icon in a Push or Web Push campaign to the user's avatar
Avatar-Link
- Link to the exact address where the user's avatar is hosted
Now let's show you how you can implement each method to create highly personalized messages across channels.
Method 1: Track Image URL as a Custom Attribute
The most recommended way, capturing the Image URL as a Custom Event Attribute at all the relevant steps allows you to contextually personalize campaign images to a particular action or Custom Event performed by a user. All you need to do is:
- Host all the images listed in your app/website on a publicly accessible domain or cloud service (like AWS).
- Each time the user performs a Custom Event that involves a visual element, capture the image link and pass it as the Custom Event Attribute, ImageURL, to your WebEngage account.
(Here are a few ideas to help you get started)
Related ReadsStep-by-step guide on tracking Custom Events & Attributes for Websites, Android, iOS, Cordova, React Native & Unity apps
Let's go over a use-case to demonstrate how you can go about it:
Personalizing Banner Image to Custom Event Attribute, image_urlLet's assume that you are creating a Push Notification to motivate users to purchase a product they have viewed in your app.
- Each time users view product details, it's tracked as the custom event, Product - Page Viewed and the product's image is tracked as the Custom Attribute, image_url.
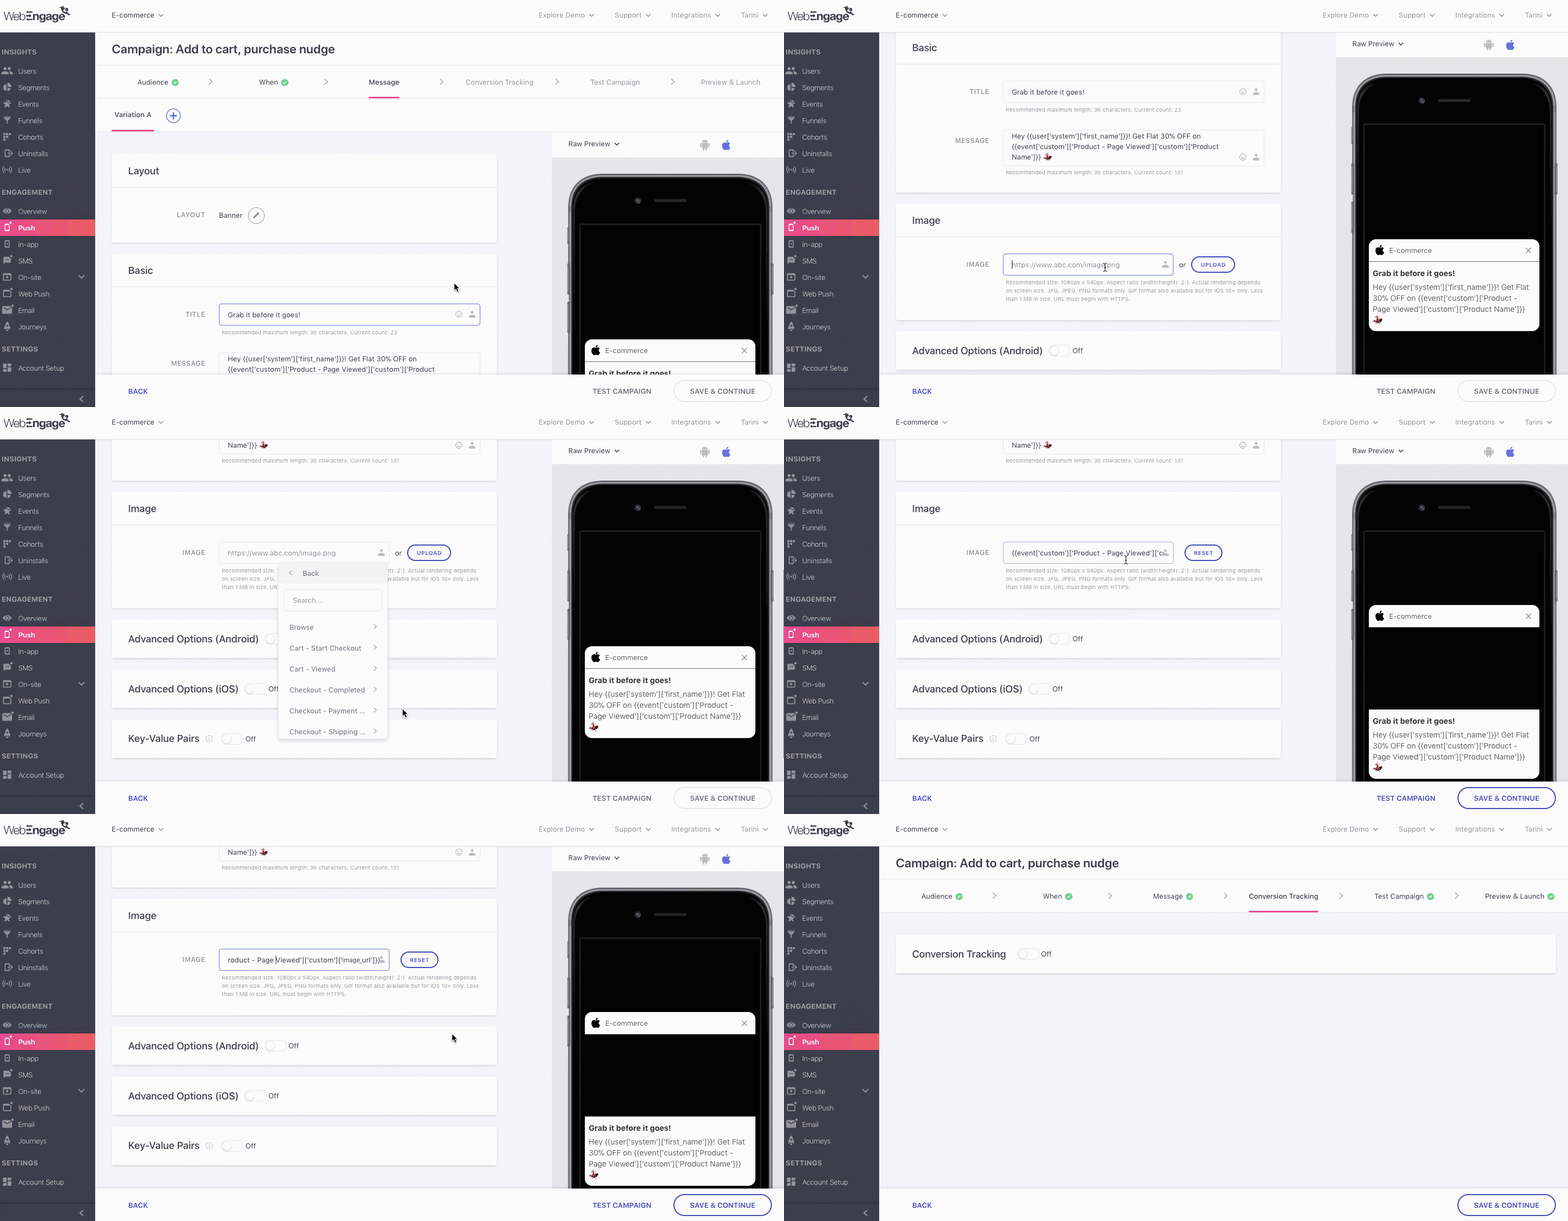
As shown below, you can add the attribute, image_url against the field, Image. Doing so will enable us to populate the correct banner image for each user while sending the campaign.
Click to enlarge
Here's how you can go about it:
Step 1: As shown above, click the Personalization icon nested under the field, Image
Step 2: Select Custom Events from the menu and click on Product - Page Viewed
- In doing so, a second menu will open up, allowing you to select from a list of all the Attributes tracked for Product - Page Viewed
Step 3: Select image_url as the Custom Attribute
- In doing so, {{event['custom']['Product - Page Viewed']['image_url']}} will be added to the field, Image.
- Once you launch the campaign, we will populate the image link with the link gleaned for each user from your app/website.
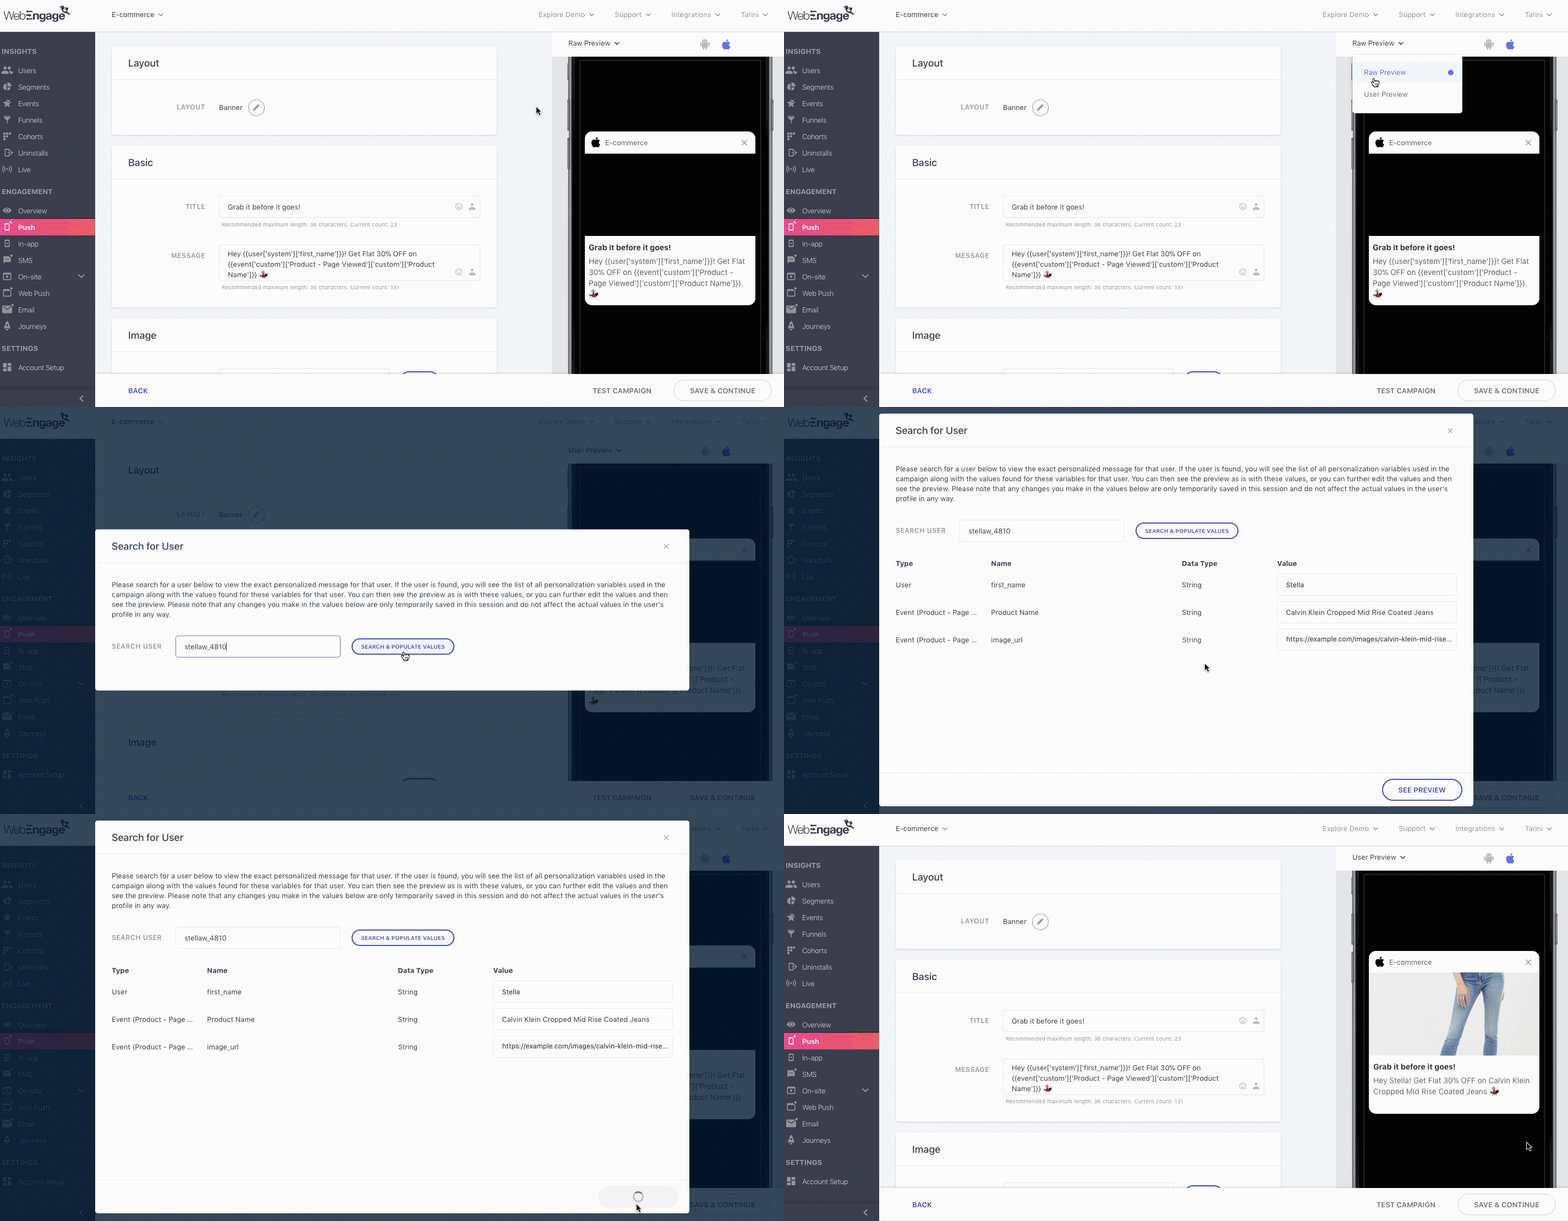
For example, as shown below, on previewing the notification for the User ID, stellaw_4810 we see that the image and message have been personalized to the latest product viewed by the user - Calvin Klein Mid Rise Coated Jeans:
Click to enlarge
Similarly, you can personalize images and icons for all campaigns sent through In-app, Web Push and Email. (Here are a few ideas to help you get started)
Related ReadsCreating dynamically personalized, media-rich Push, In-app, Web Push and Email campaigns
Method 2: Build Image URL by Adding Custom Attribute as the Path
While tracking the entire link to an image/GIF is the most recommended method to create dynamic media-rich campaigns, you can always adopt this workaround in case you are unable to execute Method 1.
This method relies on matching the value of a Custom Event Attribute to the file name of an image hosted on your domain/cloud storage. Let's quickly refresh our basics before proceeding:
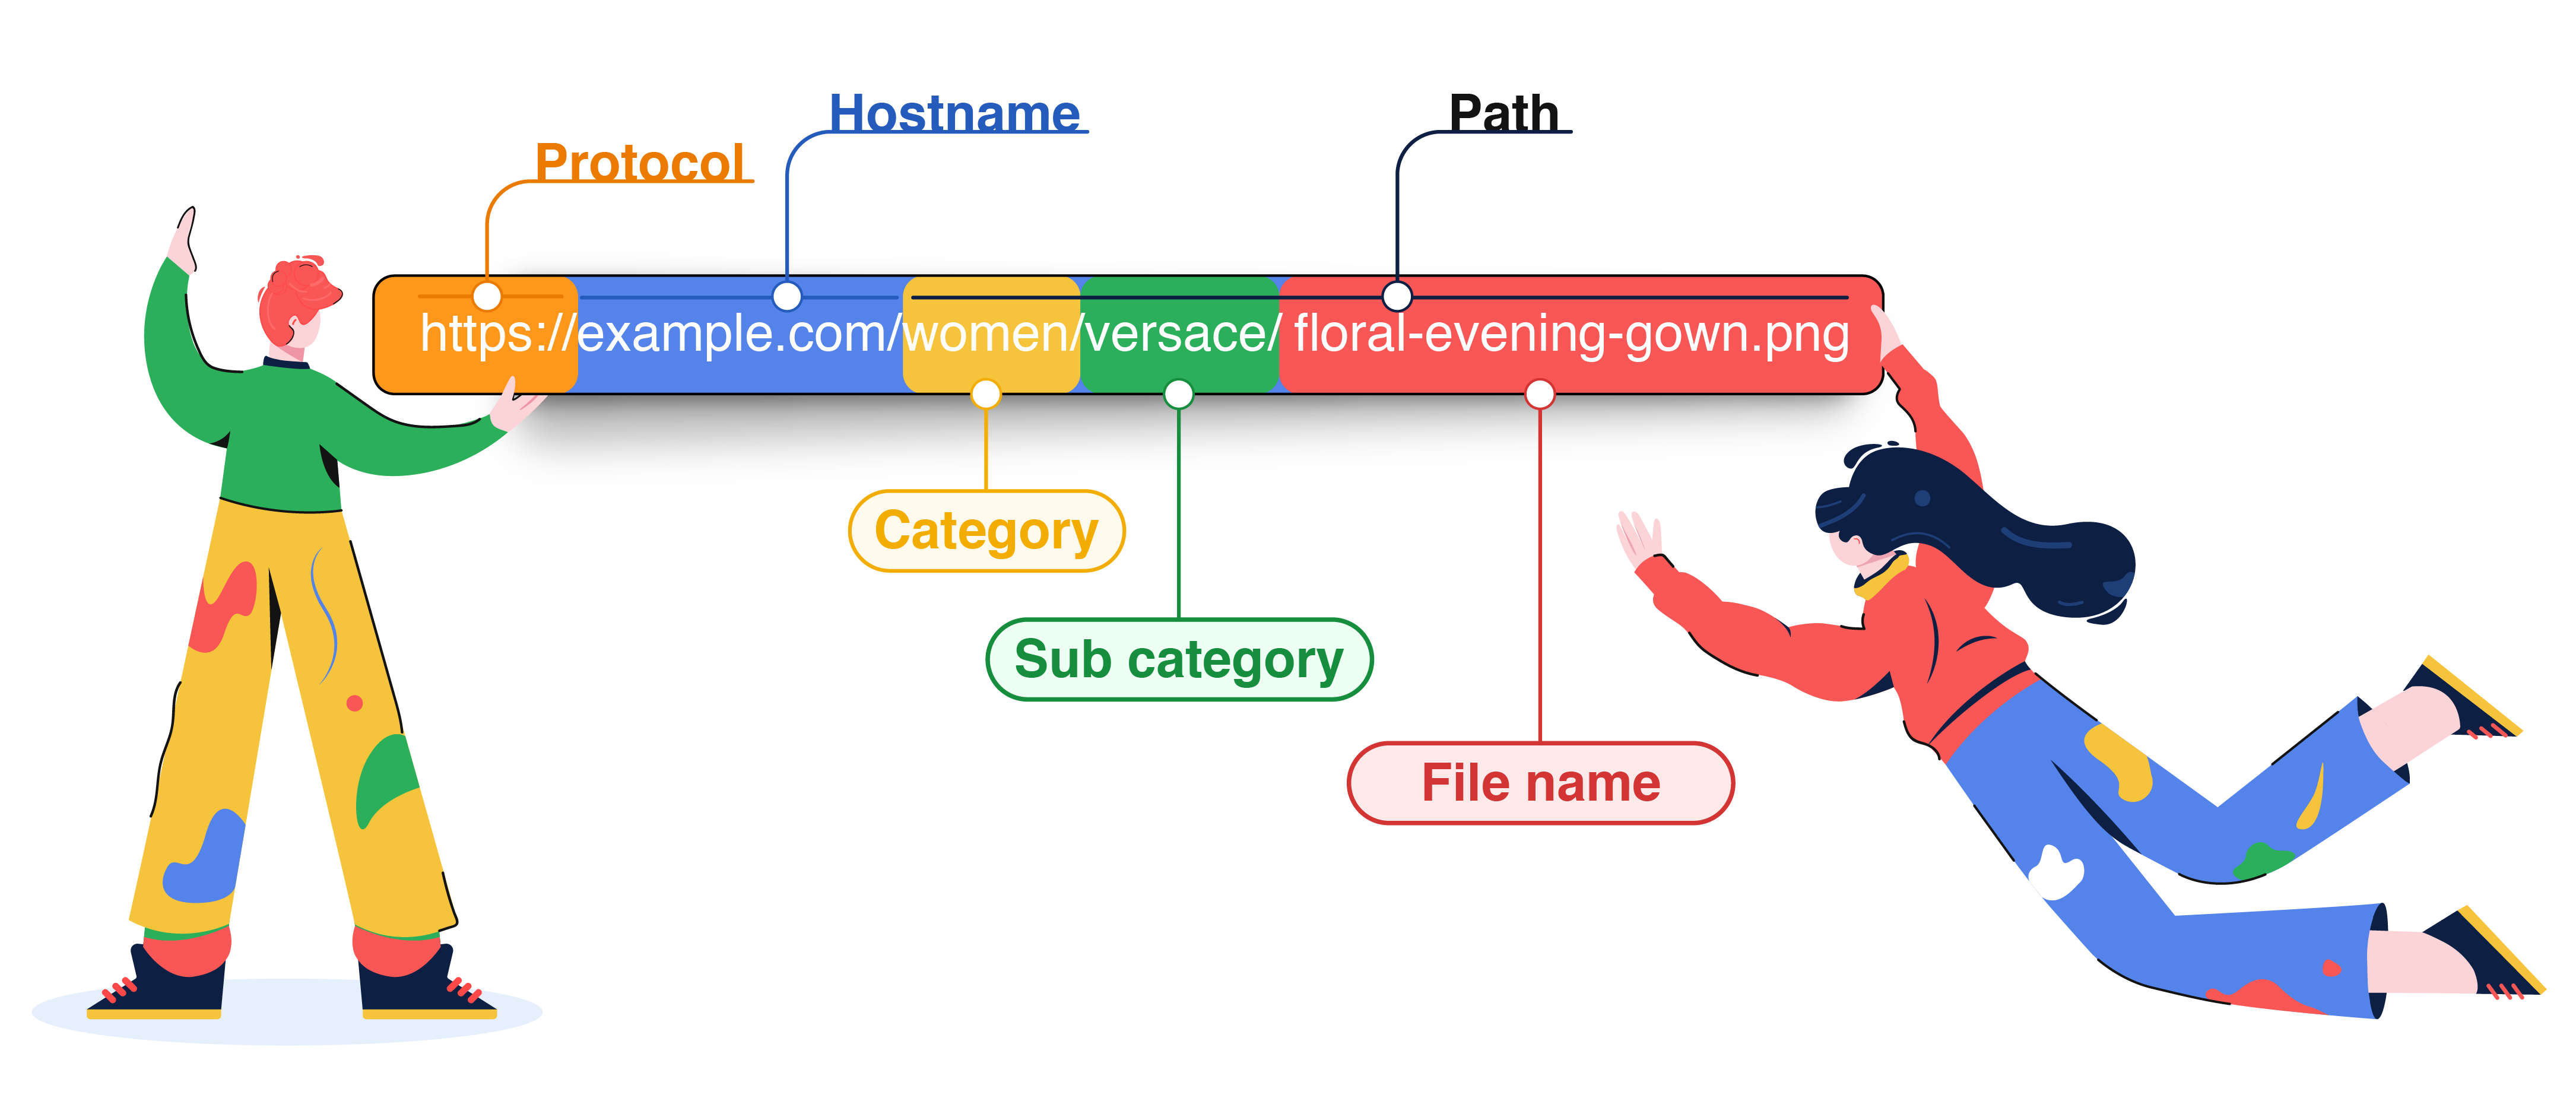
As highlighted below, a link has 3 parts: Protocol (http:// or https://), Hostname (domain), Path (name of page/file hosted on the domain).
- The Path indicates the exact location of a certain file or page in your domain's file structure and can consist of several hierarchies like, Category > Sub Category > File Name.
Anatomy of a URL
Thus, by creating links that contain the same file name as the value of a Custom Event Attribute or a Custom User Attribute tracked for your app/website, you can easily create contextual media-rich messages for all your users. All you need to do is:
- Add the parent link
- Add a custom attribute that has the same value as the file name
- Add the image format towards the end of the attribute to complete the link structure
(Here are a few ideas to help you get started)
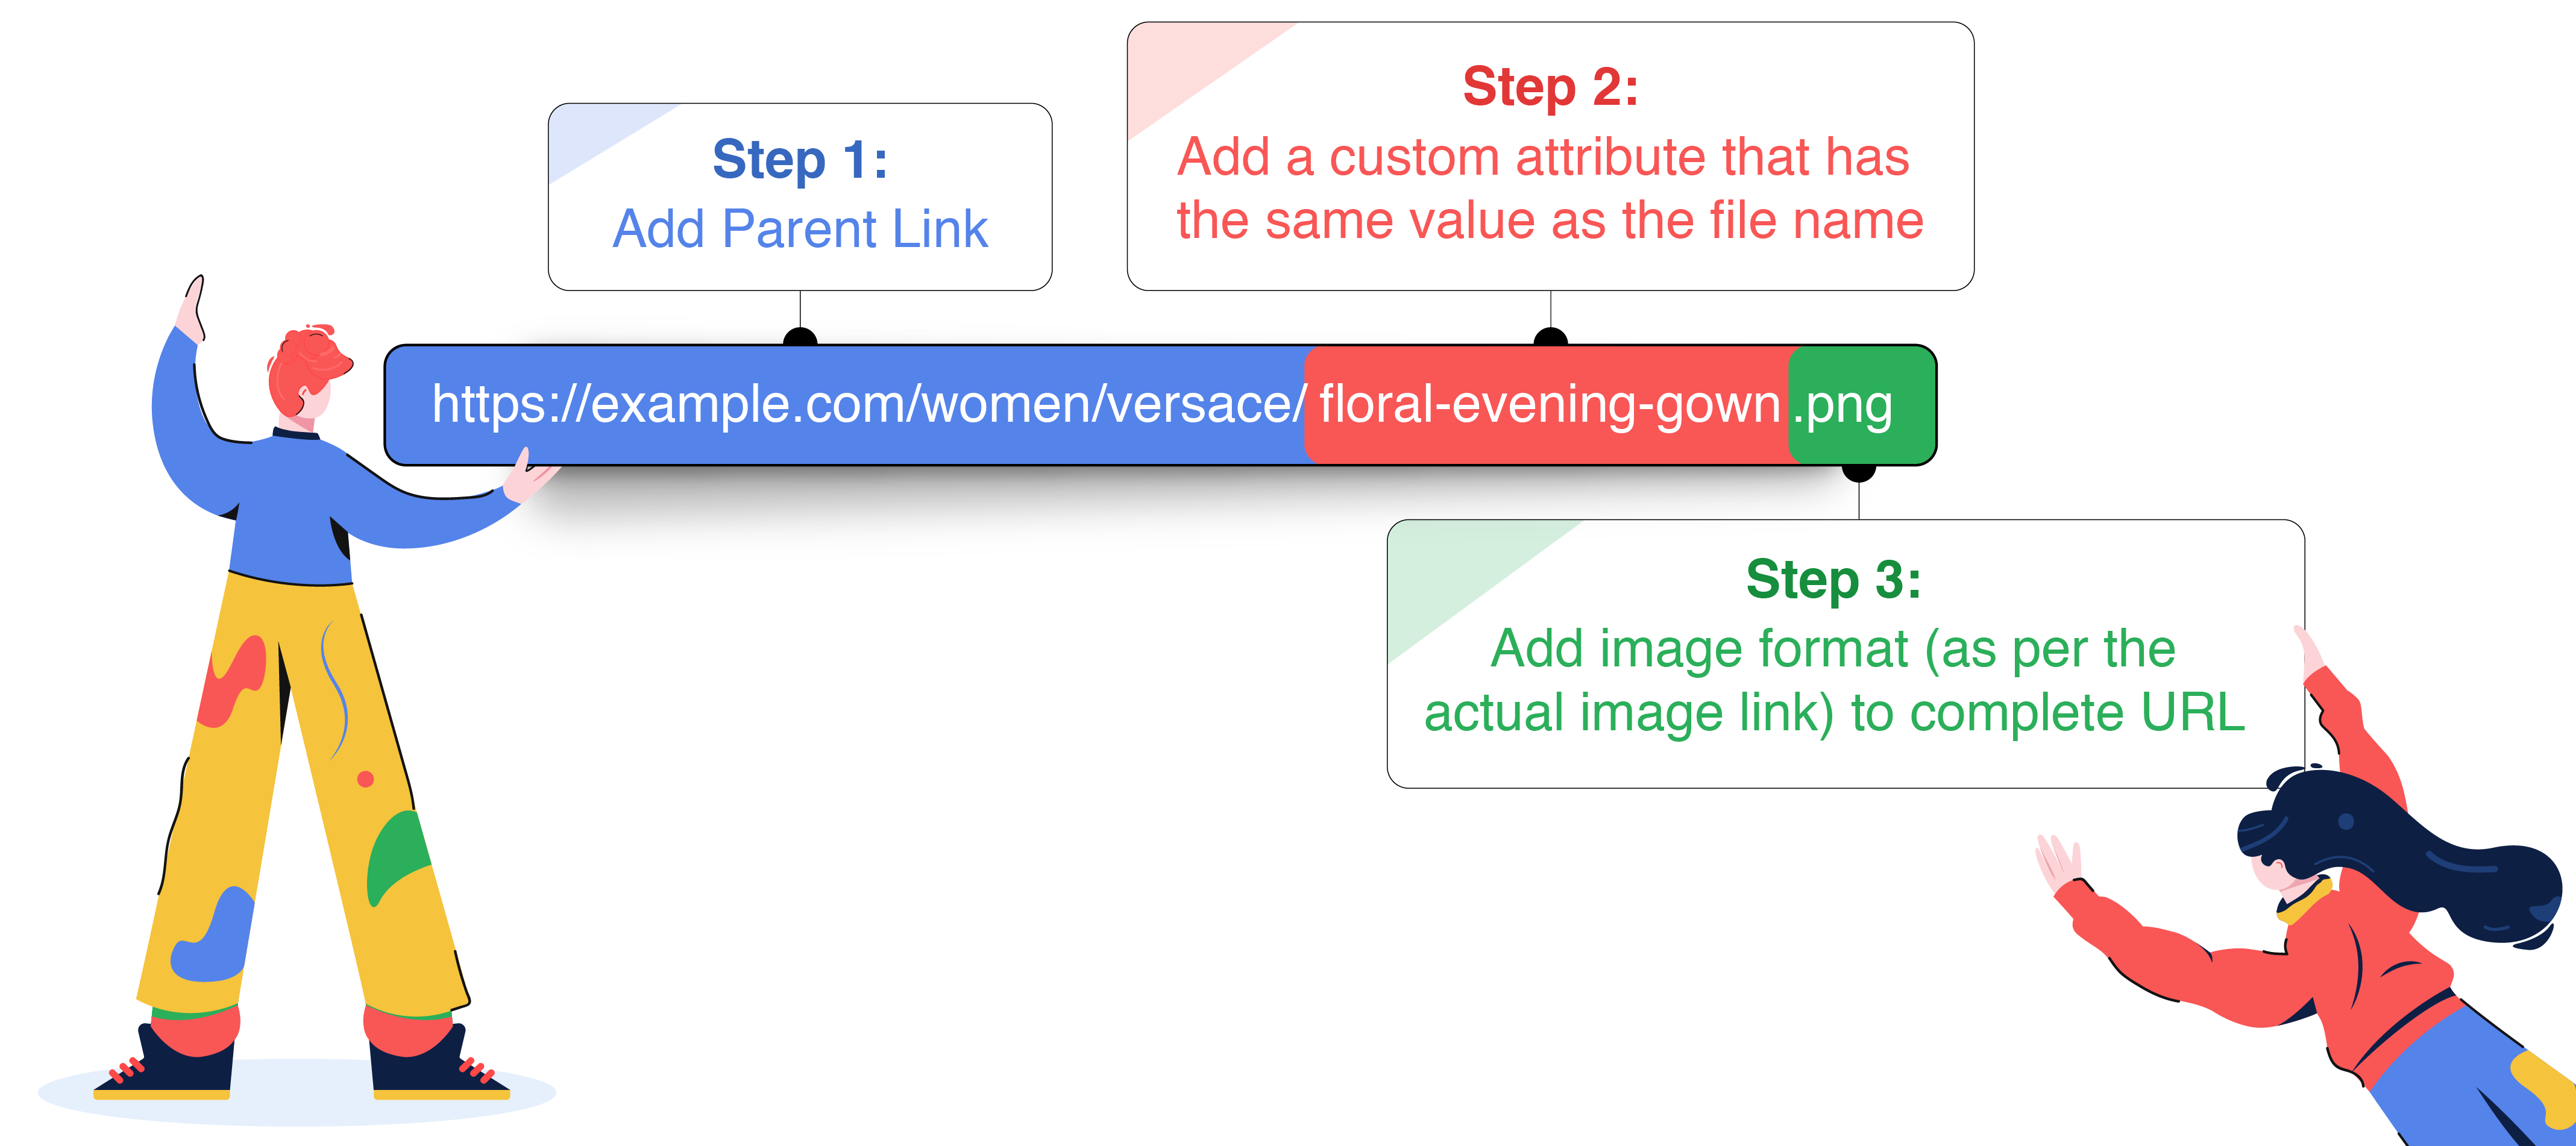
Let's go over a use-case to show you how you can implement it:
Personalizing Banner Image to Custom Event Attribute, Product IDLet's take the example of an e-commerce app that exclusively sells shoes. They recently launched a premium designer collection for women. While the collection garnered a lot of traction, they noticed that most users left without making a purchase.
Hence, they decided to engage all these users with a personalized Banner Push Notification, urging them to own the limited edition collection before it sells out!
Here's how they went about it:
Step 1: Create banner images for all the designs launched as a part of the collection.
- For example, the e-commerce platform launched 15 designs and thus, create 15 banner images.
- Each image file was named as per their Product ID, making personalization possible.
Step 2: Host the banner images on a publicly accessible domain.
- For example, marketers of the app decided to host their images on their domain [www.example.com/images]
Step 3: Add the parent link, [www.example.com/images/] to the field, Image, as shown below.
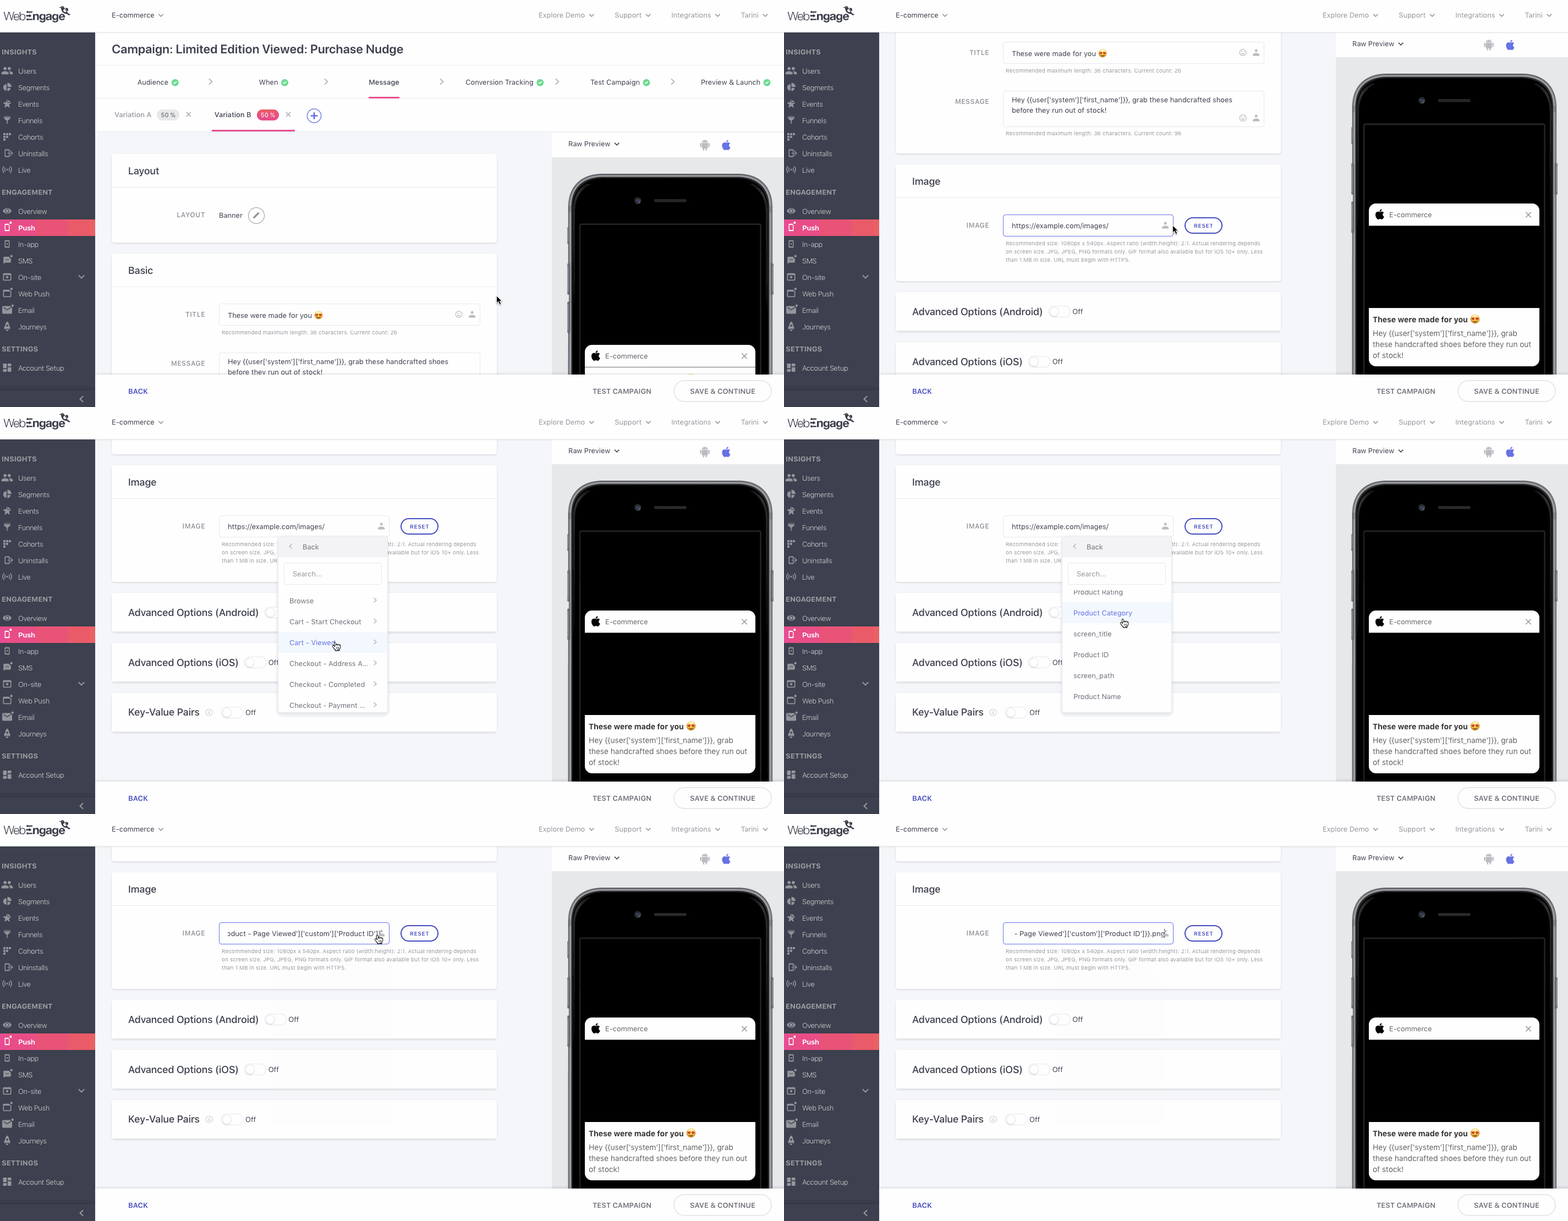
Click to enlarge
Step 4: Click the Personalization icon nested under the field, Image, as shown above.
Step 5: Select Custom Events from the menu and click on Product Page - Viewed
- In doing so, a second menu will open up, allowing you to select from a list of all the Attributes tracked for it
Step 6: Select ProductID as the Custom Attribute
- In doing so, {{event['custom']['Product Page - Viewed']['custom']['Product ID']}} will be added to the field, Image.
Step 7: Add the image format like, .png, .jpeg, .jpg, .gif, at the end of the link structure
- For example, marketers of the app uploaded all the images in a .png format and thus added the same to the link which looks like this:
www.example.com/images/{{event['custom']['Product Page - Viewed']['custom']['Product ID']}}.png
As shown below, on previewing the notification for User ID, jquinn_492, we see that the image is personalized to the Blood Red Pumps viewed by them. This means that the image hosted at the following link has been added to the notification: [www.example.com/images/3879.png] (since the Product ID is 3879)
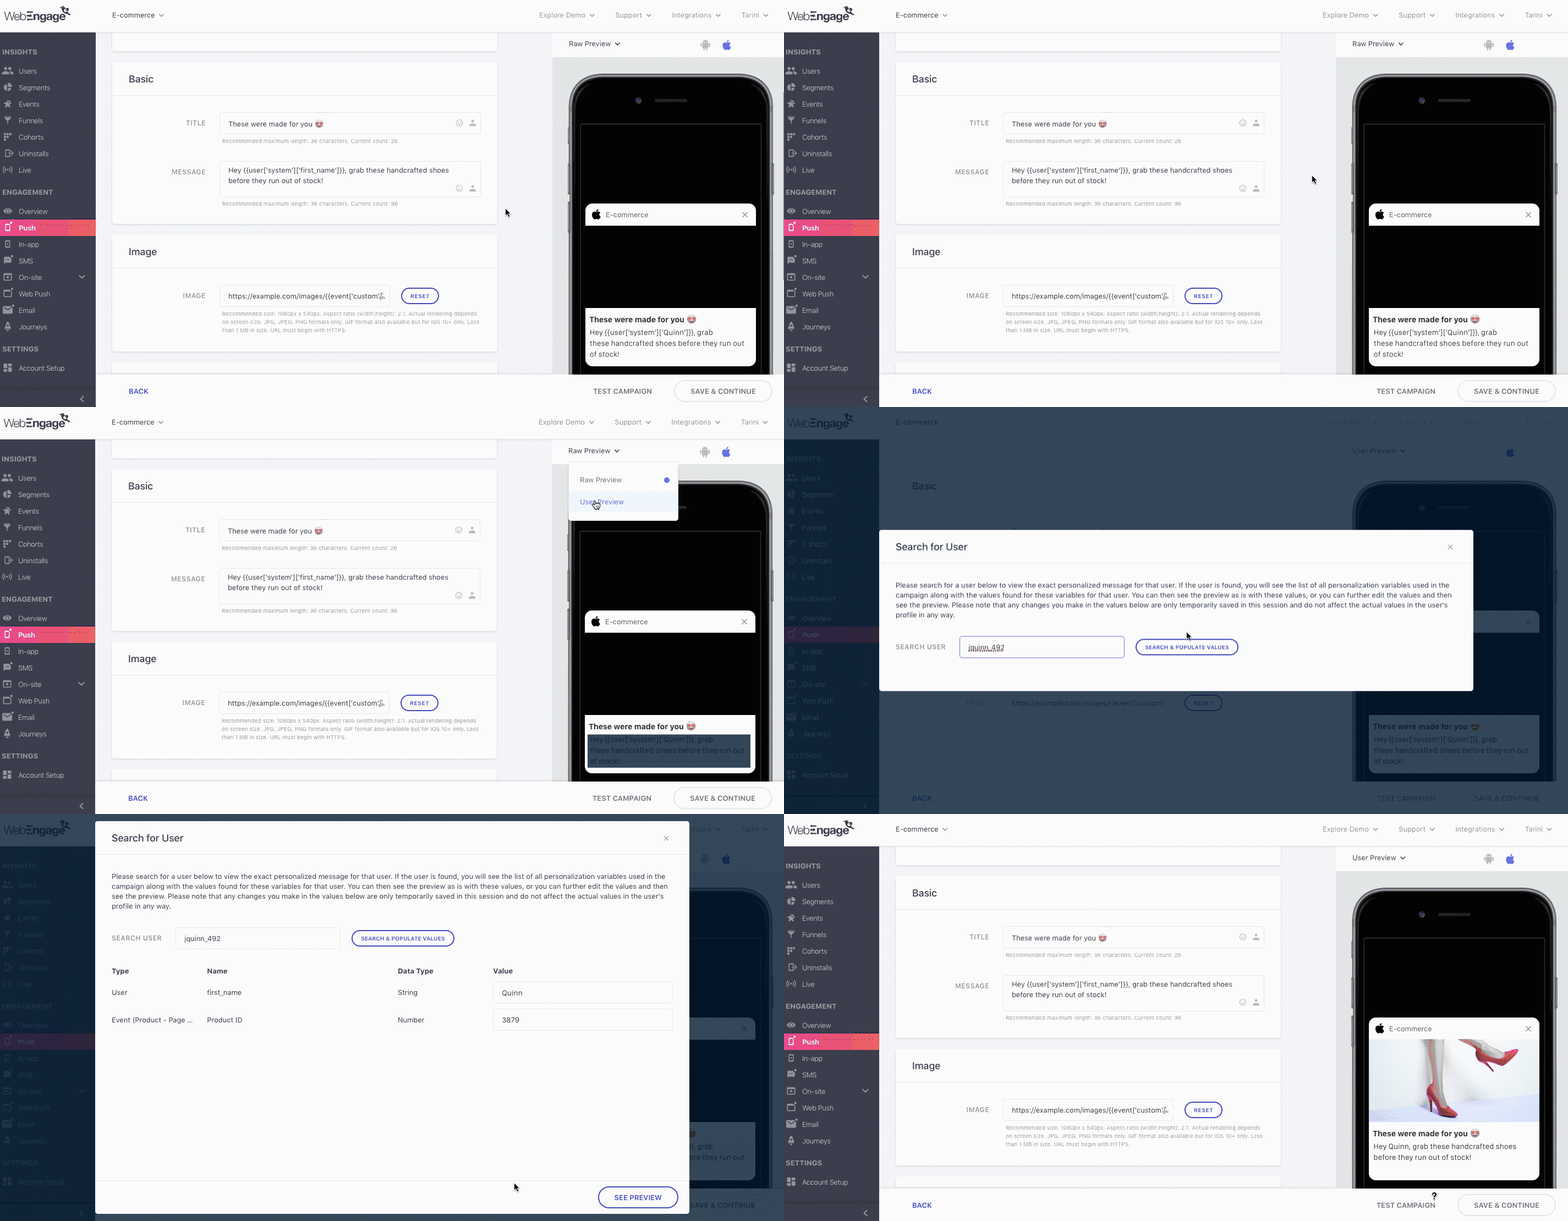
Click to enlarge
Similarly, you can personalize images and icons for all the campaigns sent through Push, In-app, Web Push and Email. (Here are a few ideas to help you get started)
Things to keep in mind
The value of the Custom Event Attribute, gleaned from your app and website must be identical to the image's name in the URL structure. This will ensure that the correct image is added to the message.
Host the images on a publicly accessible domain to ensure that they render for all users receiving the message.
Don't forget to add the image format towards the end of the personalization token to match the URL structure of the image file.
Related ReadsCreating dynamically personalized, media-rich Push, In-app, Web Push and Email campaigns
Personalizing a Campaign's Link
Be it deep links or URLs, one-on-one link personalization can be achieved by tracking the app screen link, page link, screen name or page type as aCustom Event Attributesof aCustom Event* that tracks a related action for your app and website, respectively.
This is a great way to create highly contextual platform experiences when users click on a button or link embedded in a Push, In-app SMS, Web Push or Email campaign.
For example, whenever a user views a product on your app or website, you can track the action as the Custom Event, Product Viewed and add the Screen-Link, Page-URL or Product-ID as a Custom Event Attribute to it. Then, you can leverage these data points to create highly personalized experiences.
Depending on your internal data structure, this can be achieved in two ways:
Method 1: Tracking the link of the screens or pages visited by a user in your app or website as an attribute of the Custom Event that tracks the action
Method 2: Building the image URL by mapping the parent link's path to the value of a Custom Event Attribute gleaned for a Custom Events
In both the case, the action could be anything like Product Viewed, Product Added to Cart, Holiday Package Viewed, Hotel Details Viewed, Course Viewed, Product Added to Wishlist and so on.
Use-cases: Personalizing Links to Amplify Conversions
E-commerce: User adds product to cart & leaves without purchasing
Cart-Updated
- Page-Type (for web)
- Screen-Name (for app)
or
- Page-url(for web)
- Screen-Link (for app)
- Name of the cart page/ screen (as tagged in your website/ app code)
or
- Link to the user's cart page/ screen
E-commerce: User adds products to their Wishlist & forgets
Wishlist-Added
- Page-Type (for web)
- Screen-Name (for app)
or
- Page-url (for web)
- Screen-Link (for app)
- Name of the Wishlist page/ screen (as tagged in your website/ app code)
or
- Link to the Wishlist created by the user
Online Travel: User views flight details but leaves without booking
Flight-Viewed
- Page-Type (for web)
- Screen-Name (for app)
or
- Page-url (for web)
- Screen-Link (for app)
- Name of the page/ screen on which the user viewed flight details (as tagged in your website/ app code)
or
- Link to the flight details viewed by the user
E-commerce: User compares devices & leaves without purchasing
Device-Compared
- Page-Type (for web)
- Screen-Name (for app)
or
- Page-url (for web)
- Screen-Link (for app)
- Name of the page/ screen on which the user compared devices (as tagged in your website/ app code)
or
- Link to the comparison page/ screen visited by the user
OTT: Nudging users to finish watching an episode they left mid-way
Show-streamed
- Episode-Name (for web & app)
or
- Page-url (for web)
- Screen-Link (for app)
- Name of the show's episode (as tagged in your website/ app code)
or
- Link to the page/ screen from where the user can continue streaming the episode
Now let's show you how you can implement each method to create highly personalized messages across channels.
Method 1: Track Page URL or Screen Link as a Custom Attribute
The most recommended way, capturing the Page URL or Screen Link as a Custom Attribute of a Custom Event allows you create contextual platform experiences when nudging users to perform a certain action in their lifecycle. All you need to do is:
- Each time a user performs an action (custom event) that tracks an important step in their lifecycle, capture the link to the app screen or site page on which the action was performed.
- Then, simply leverage this data to create personalized campaign links! (Here are a few ideas to help you get started)
Related ReadsStep-by-step guide on tracking Custom Events & Attributes for Websites, Android, iOS, Cordova, React Native & Unity apps
Now let's go over a use-case to show you how this works:
Personalizing On-click Action Link to a Page Visited by a UserLet's take the example of an online home decor store. Marketers of the platform recently noticed a fall in their checkout rates. In a bid to drive the numbers, they decided to re-engage users who have browsed through products but left without taking any action.
As a part of their plan, they created a Web Push Notification targeted at users who've viewed a product but hadn't made a purchase even after 2 days. The idea was to personalize the notification's message, image, and link to the product page on which users spent the maximum amount of time.
- All product views are tracked as the Custom Event, Product - Page Viewed.
- Additional details of the user action like the product's name, category, cost, rating, page link, image link and so on are tracked as the event's Custom Attribute.
Here's how they customized the Web Push's link to each user's behavioral history:
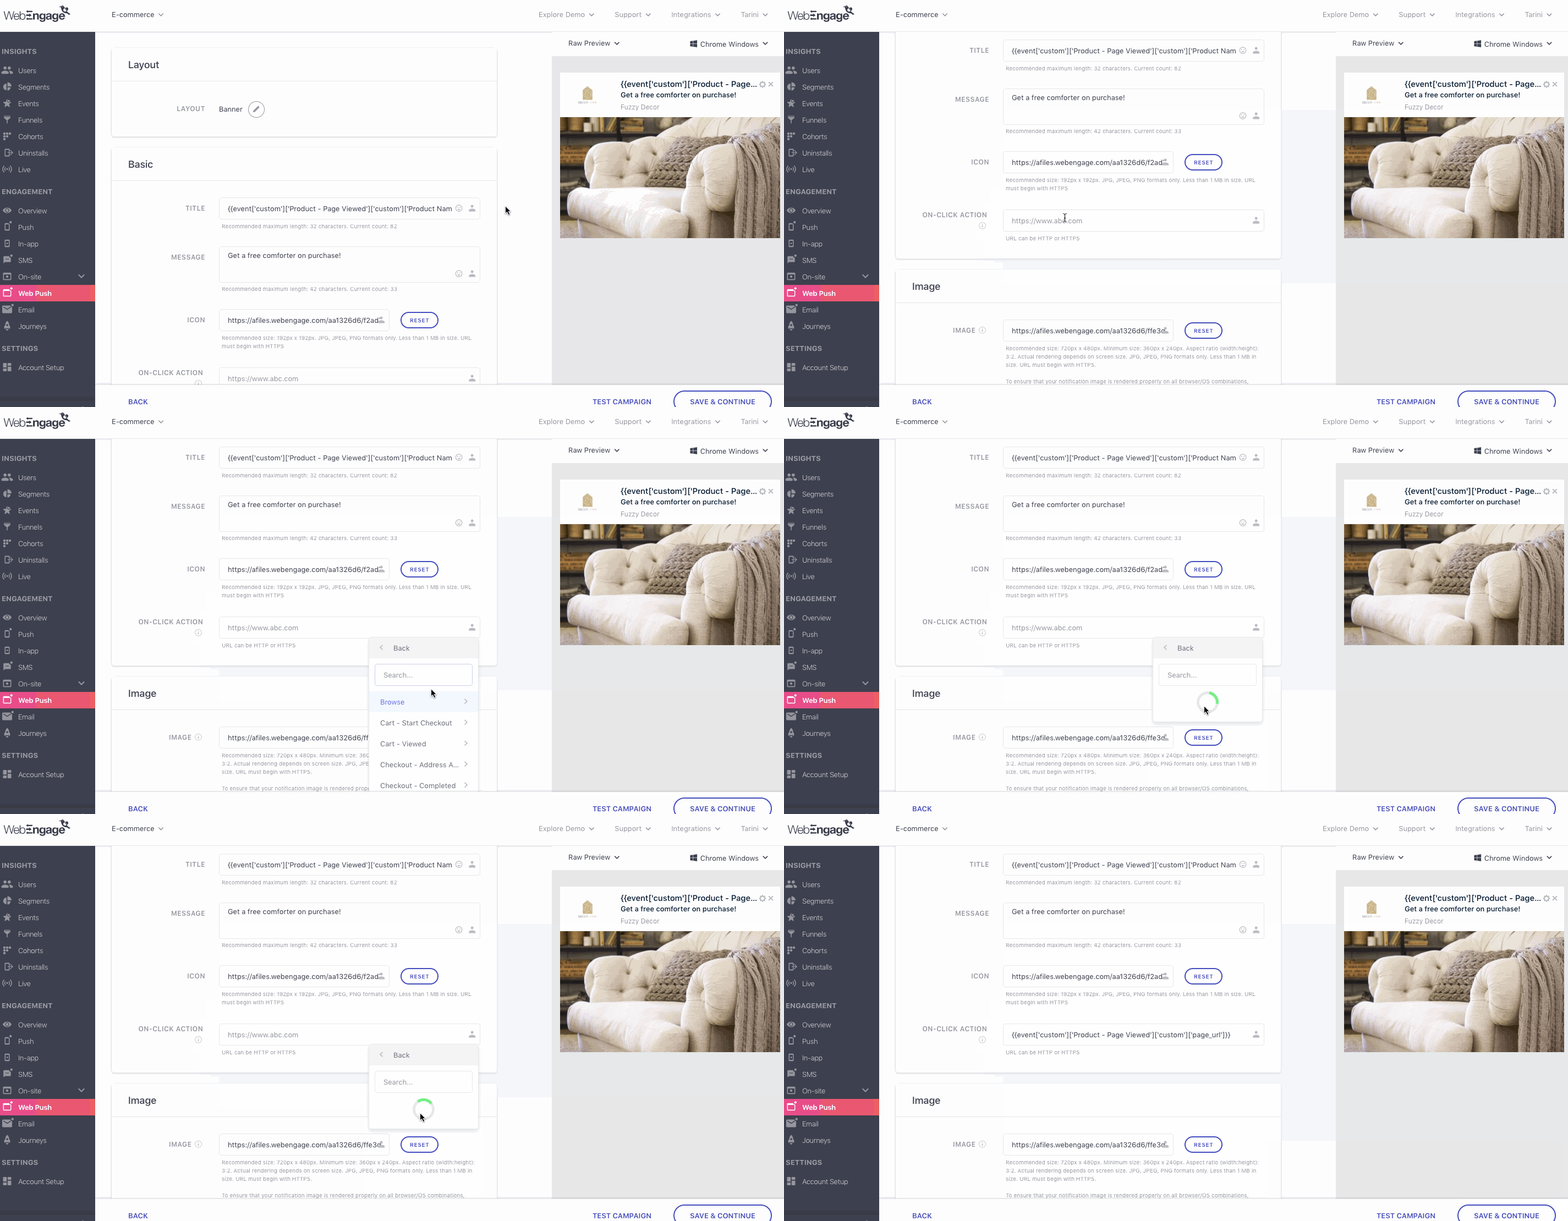
Click to enlarge
Step 1: As shown above, click the Personalization icon nested under the field, On-click Action
Step 2: Select Custom Events from the menu and click on Product - Page Viewed
- In doing so, a second menu will open up, allowing you to select from a list of all the Attributes tracked for it
Step 3: Select page_url as the Custom Attribute
- In doing so, {{event['custom']['Product - Page Viewed']['page_url']}} will be added to the field*
- Once you launch the campaign, we will populate the field with the link gleaned for each user, directing them to pages of the respective products viewed by them.
Similarly, you can personalize links for all the campaigns sent through Push, In-app, SMS, Web Push and Email. (Here are a few ideas to help you get started)
Related ReadsCreating contextual platform experiences through Push, In-app, SMS, Web Push and Email campaigns
Method 2: Build the Page URL or Screen Link by Adding Custom Attribute as the Path
While tracking the link to a page or an app screen is the most recommended method to create dynamic platform experiences, you can always adopt this workaround in case you are unable to execute Method 1.
This method relies on matching the value of a Custom Event Attribute to the screen/page name in a deep link or page URL, respectively. Let's quickly refresh our basics before proceeding:
As highlighted below, a link has 3 parts: Protocol (http:// or https://), Hostname (domain) and Path (name of page/file hosted on the domain).
- The Path indicates the exact location of a certain file or page in your domain's file structure and can consist of several hierarchies like, Category > Sub Category > Page.
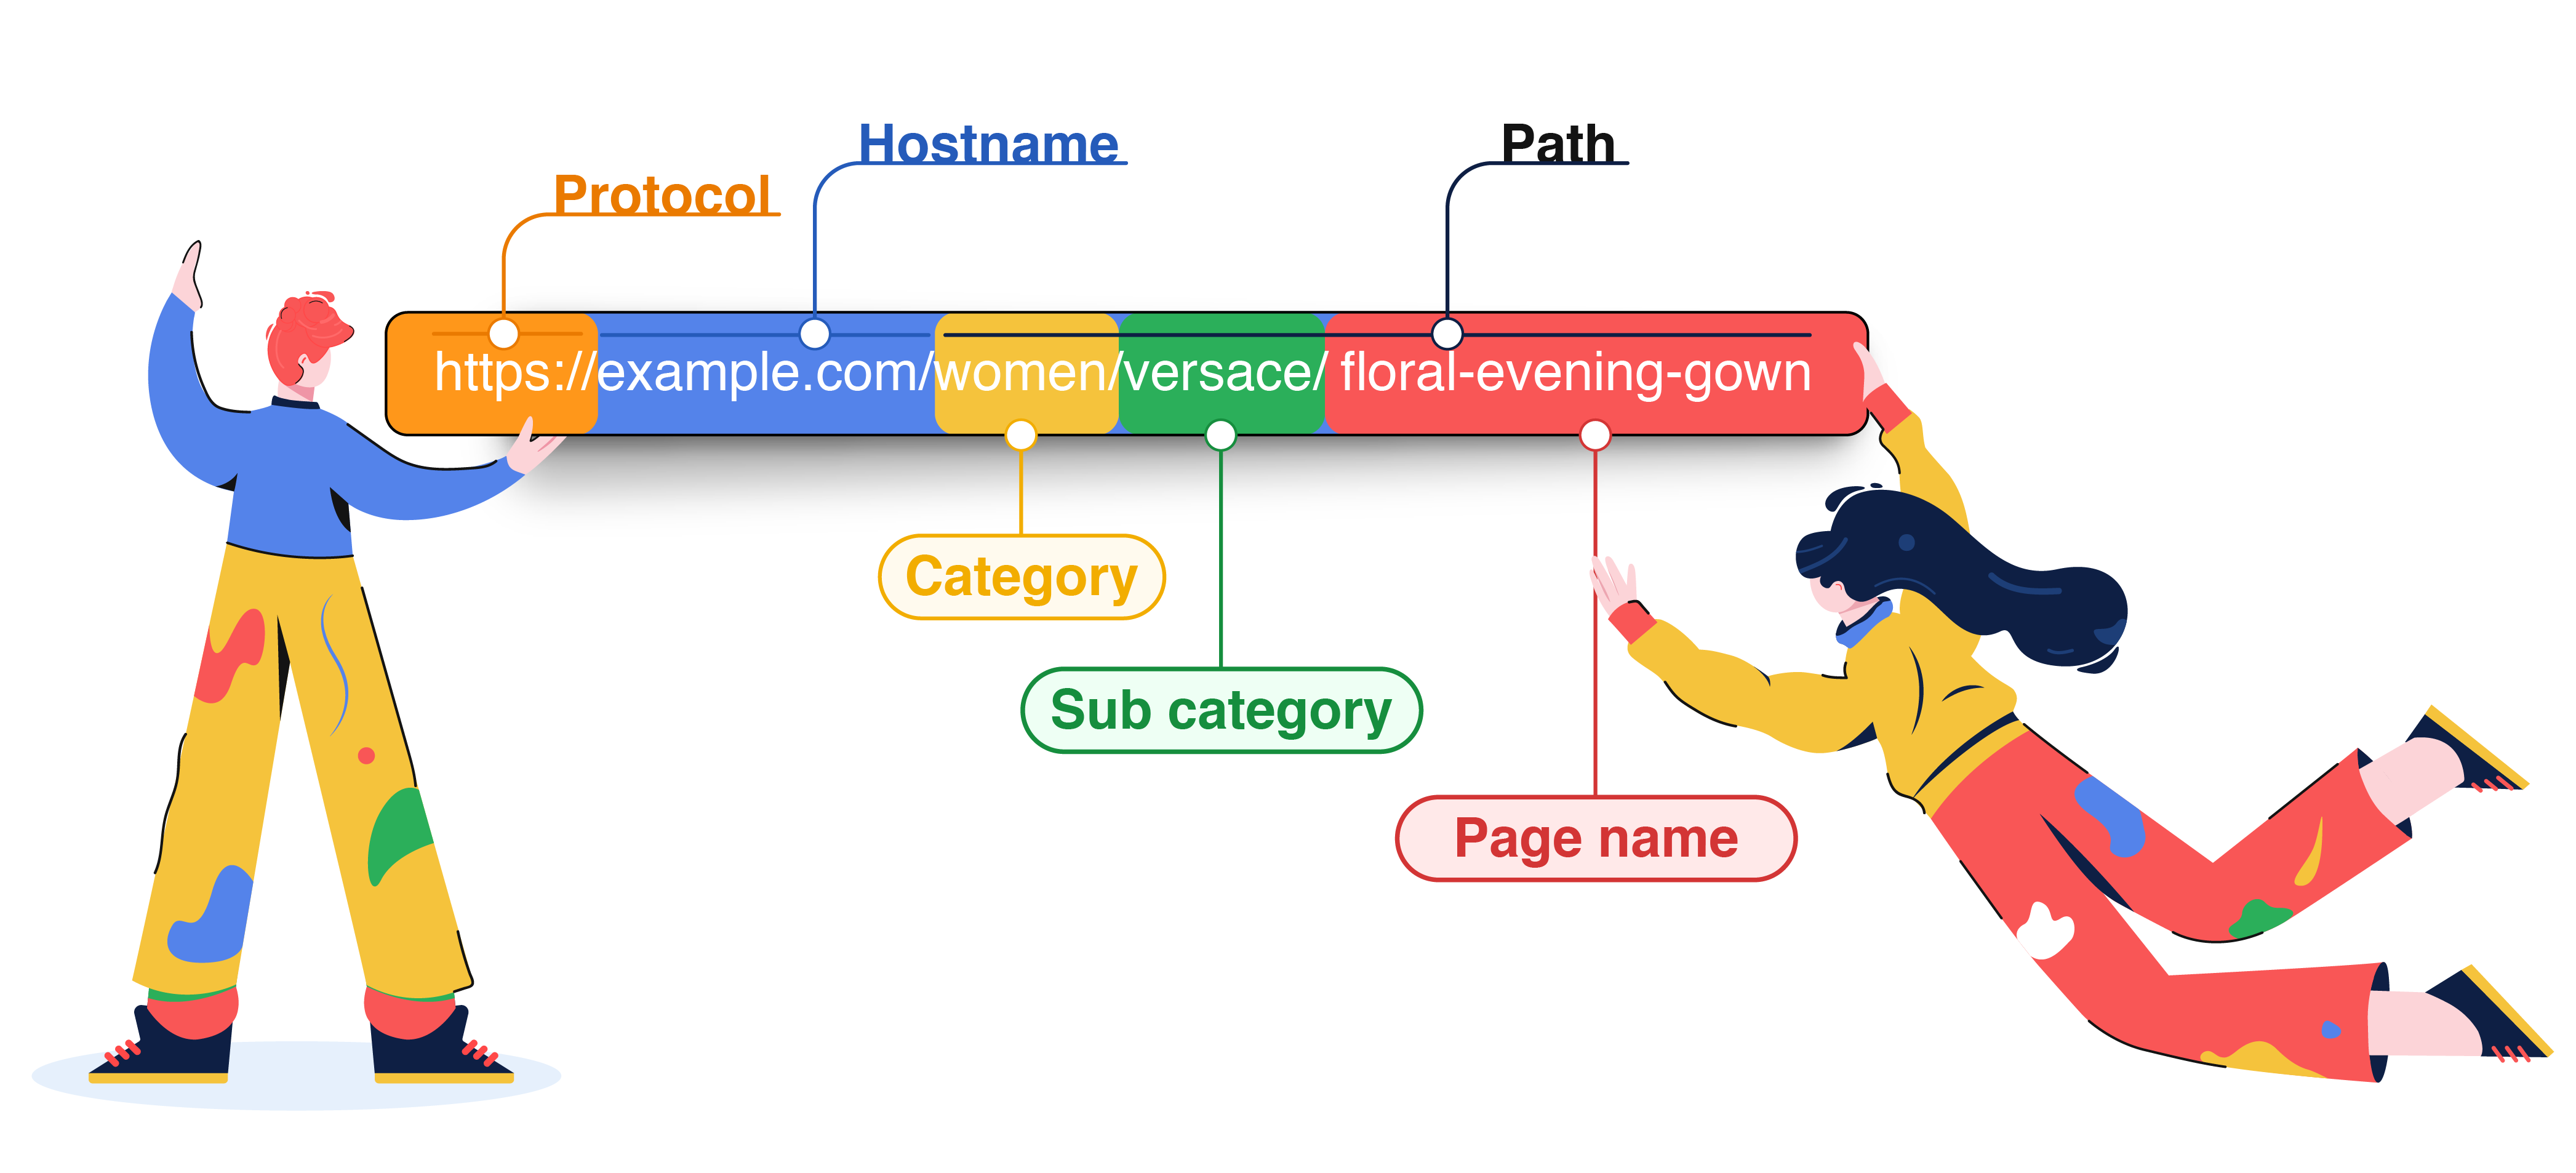
Anatomy of a URL
Thus by creating links that contain the same page name as the value of a Custom Event Attribute tracked for your app/website, you can easily create contextual platform experiences for all your users. All you need to do is:
- Add the parent link
- Complete link by adding a custom event attribute that has the same value as the page name. (Here are a few ideas to help you get started)
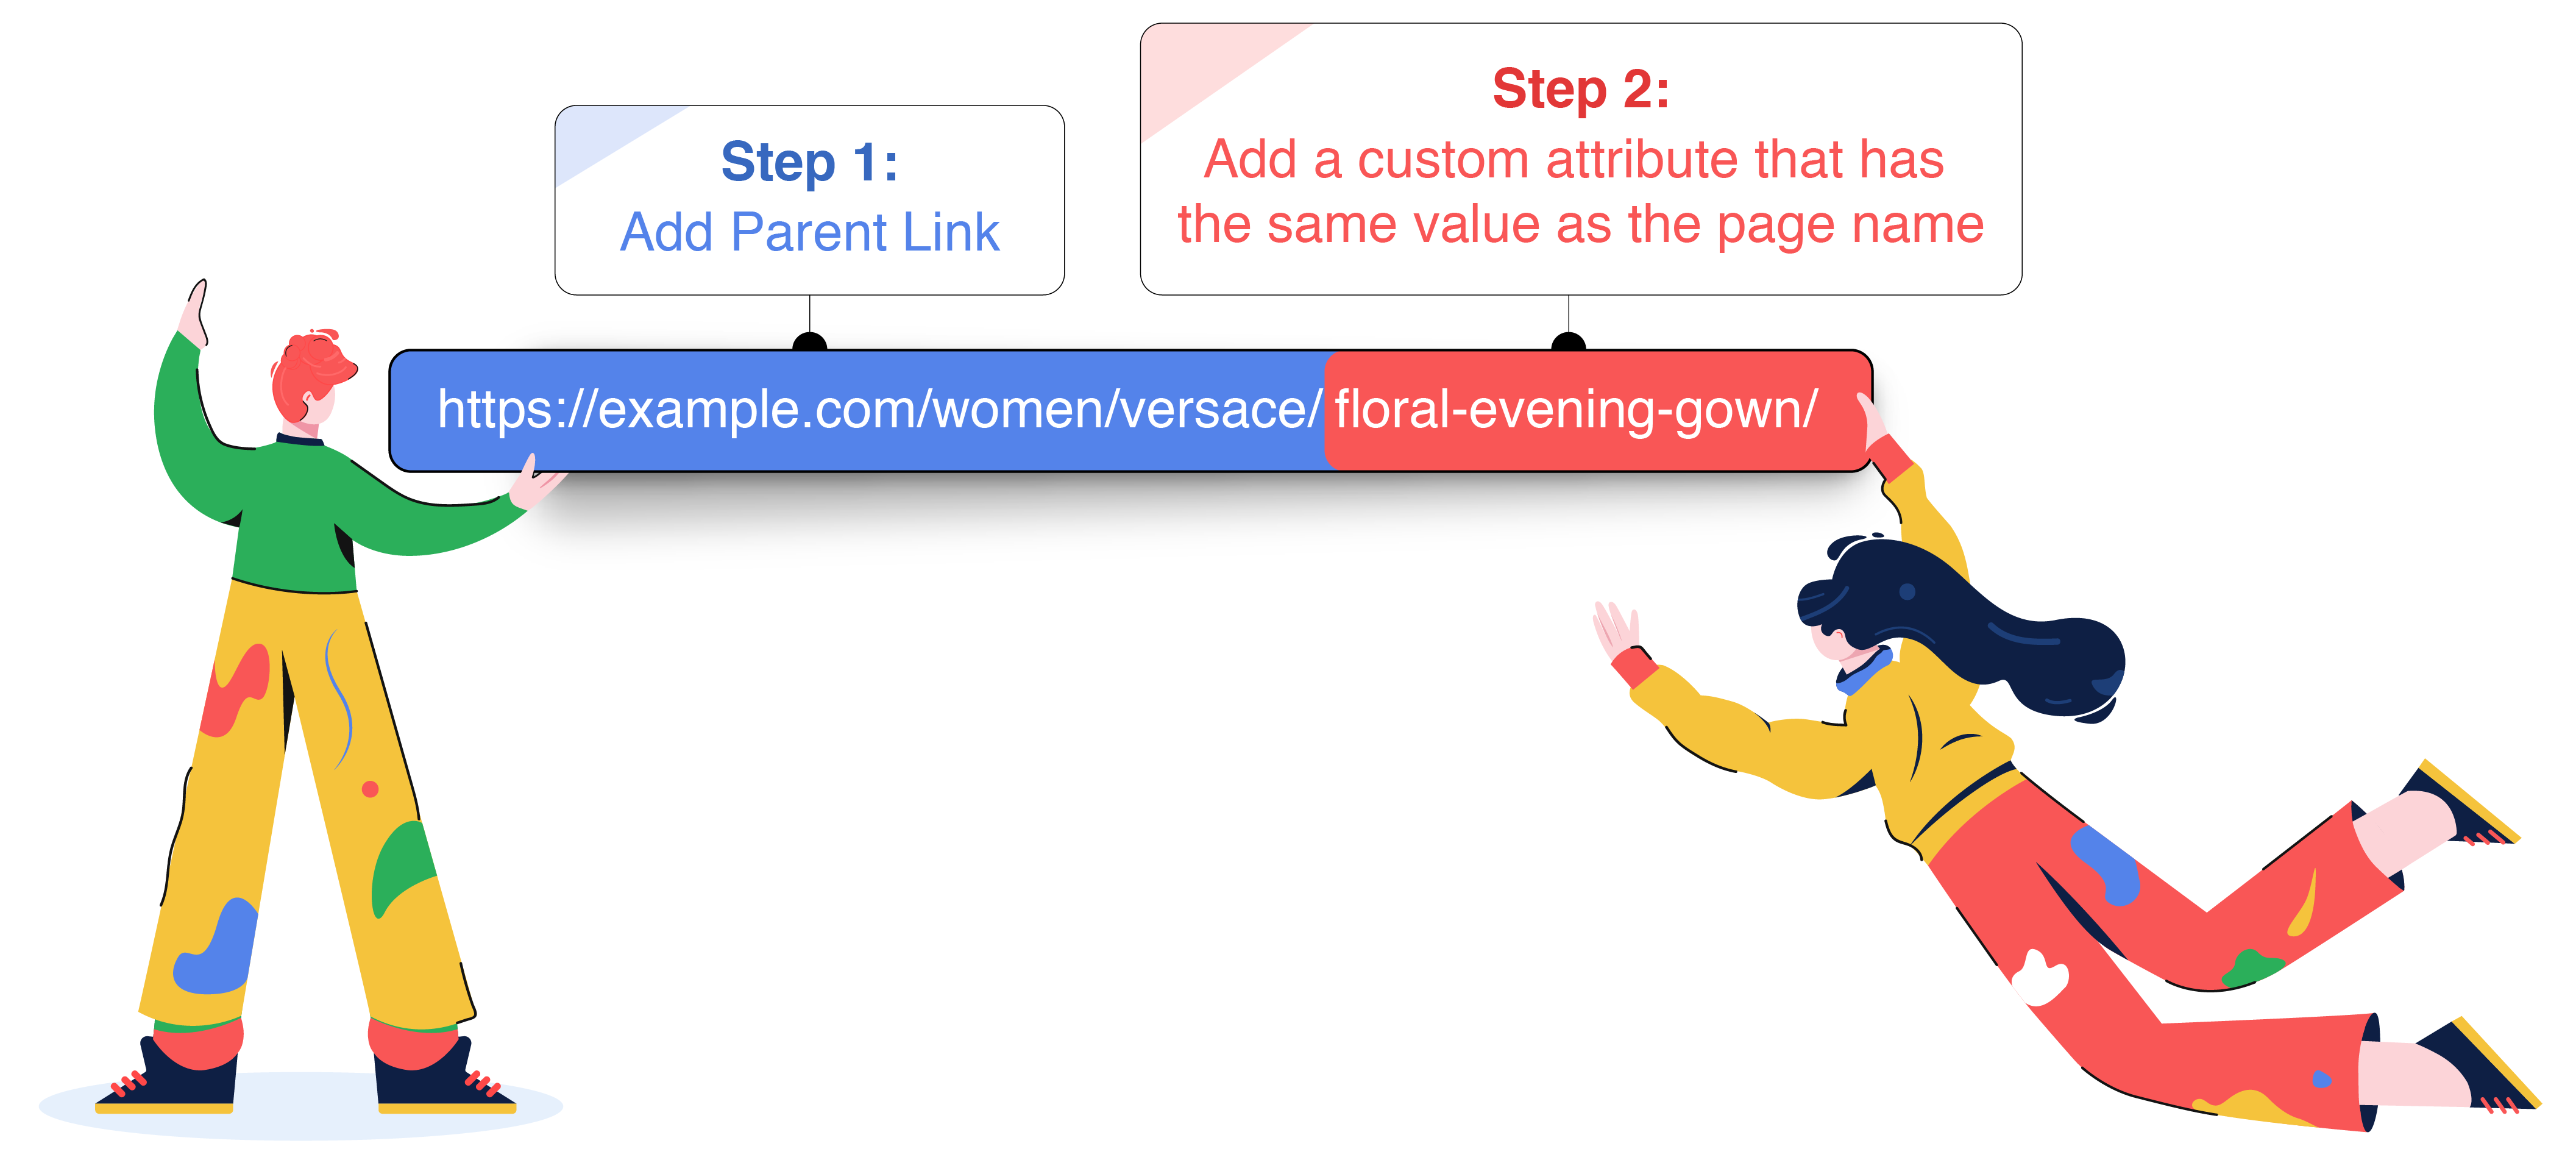
Let's go over a use-case to show you how this works:
Personalizing Tracking Link to a User's Order IDLet's take the example of an online grocery store. Each time a user places an order, they track it as a Custom Event, Order Placed. Details of the order like Order ID, Delivery Address, Payable Amount, Discount and so on are tracked as the event's Custom Attributes.
This enables them to dynamically personalize delivery updates to the latest order placed by each user along with providing a personalized tracking link.
- Prerequisite: Marketers of the website collaborated with their tech team to create tracking links for each new_Order ID created whenever the Event, Order Placed is performed by a user._
Here's how they created a highly personalized 'Out for Delivery' SMS:
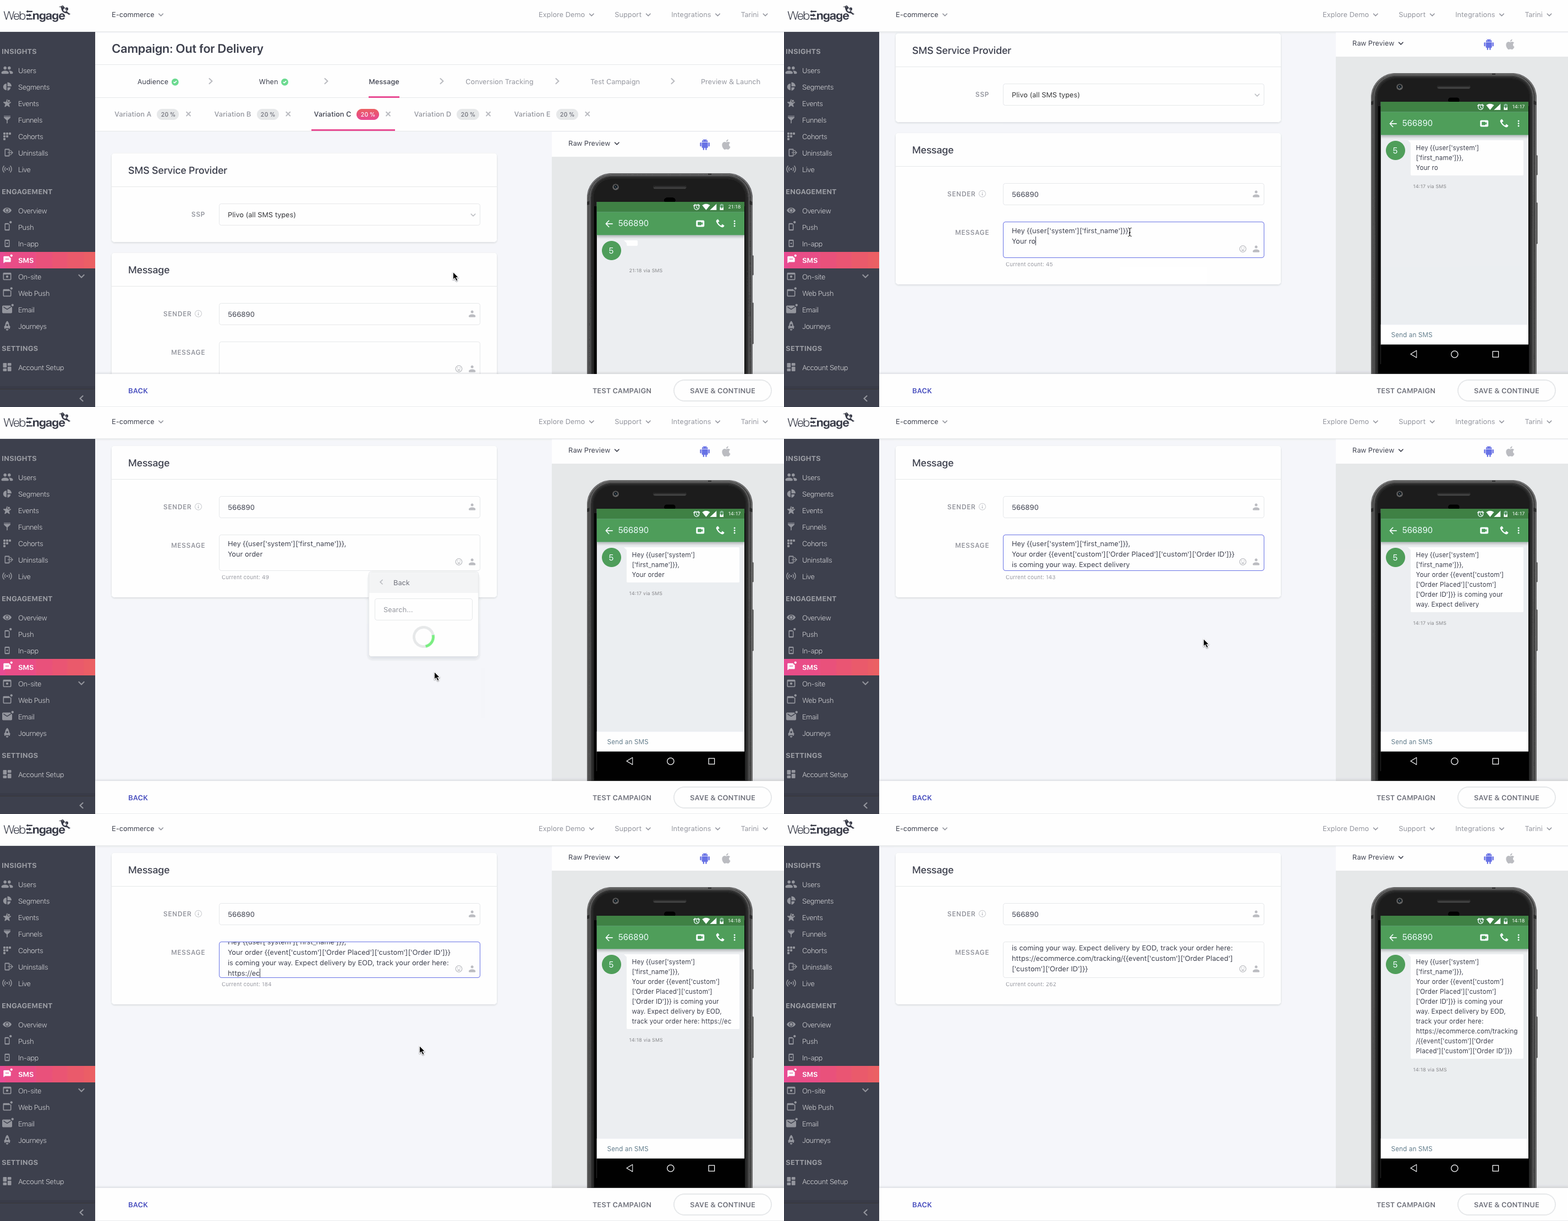
Click to enlarge
Step 1: Add your text to the field, Message.
Step 2: Add elements of personalization to create a dynamic message. As shown above, click the Personalization icon and select an appropriate data points from the User Attributes and Custom Events gleaned for your account.
- For example, we have personalized the message with:
- System user attribute, First Name - {{user['first_name']}}
- Attribute of the Custom Event, Order Placed, Order ID - {{event['custom']['Order Placed']['custom']['Order ID']}}
Step 3: Add the parent link of the webpage or app screen you'd like to direct the user to.
- For example, we have added [www.ecommerce.com/tracking/] to the message.
Step 4: Add the attribute, Order ID to complete the link structure.
- This means that the tracking link will look something like this:
www.ecommerce.com/tracking/{{event['custom']['Order Placed']['custom']['Order ID']}}
Thus, whenever the message is sent to a user, we will populate the First Name and Order ID with the respective values gleaned for their user profile.
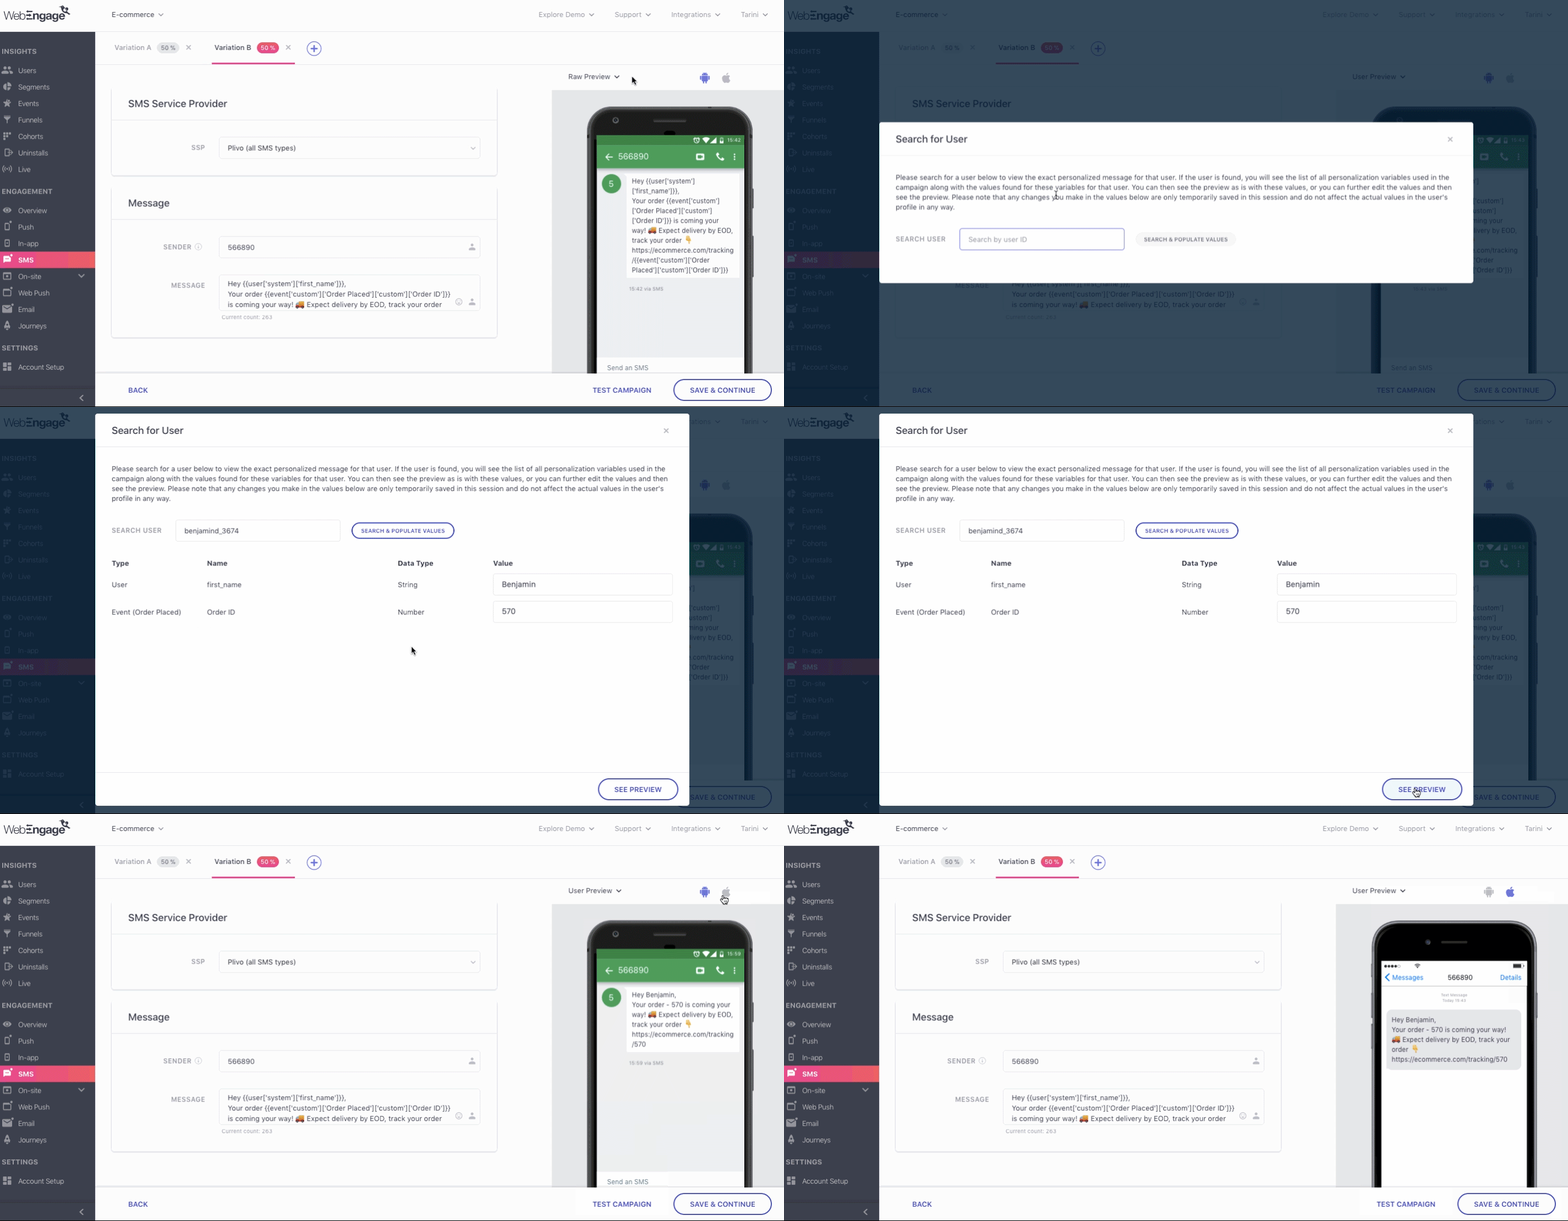
Click to enlarge
For example, as shown above, on previewing the message for the User ID, benjamind_3674 it reads:
Hey Benjamin,
Your order - 570 is coming your way! 🚚 Expect delivery by EOD, track your order 👇
[www.ecommerce.com/tracking/570]
Similarly, you can personalize button links for all the campaigns sent through Push, In-app, SMS, Web Push and Email. [(Here are a few ideas to help you get started)]
Related ReadsCreating contextual platform experiences through Push, In-app, SMS, Web Push and Email campaigns
We hope this has equipped you with a robust understanding of how you can leverage the various features of your dashboard to deliver dynamically personalized experiences at scale.
Please feel free to drop in a few lines at [email protected] in case you have any queries or feedback. We're always just an email away!
Updated 3 months ago