Creating WhatsApp Campaigns
A step-by-step guide to creating WhatsApp campaigns in your dashboard
This Guide Only Covers the Creation of One-time, Triggered & Recurring CampaignsLooking to automate Transactional WhatsApp campaigns? Let's get you started!
Pre-requisites For WhatsApp MessageBefore you set out to create and send WhatsApp messages, kindly make sure you have your WhatsApp Service Provider (WSP) setup and add the Whitelisted Message Template.
To know how to set up WSP and add templates, kindly refer to the WhatsApp Integration guide.
Your dashboard comes with a highly intuitive campaign creation interface that makes it easy to execute highly personalized campaigns in minutes!
Now, let's walk you through the campaign creation process.
Create Campaigns
As shown below, the campaign creation interface can be accessed by clicking the Plus icon placed on the top left of the central hub of WhatsApp. In doing so, you will be prompted to select the type of campaign you'd like to create.

Click to enlarge
Camapign Type
Let's quickly walk you through each campaign type:
These are stand-alone messages that are sent to your users only once and generally comprise time-bound offers. These campaigns end as soon s they are delivered to the target audience.
These are ongoing cycles of communication sent to only those users of your target audience who perform a particular event on your app/website.
These are ongoing cycles of communication that are scheduled to be sent periodically to its target audience. Such campaigns help you automate communication for several recurring events in your user's lifecycle like subscription renewals, policy renewals, bill payments, recurring investments and so on.
These are highly contextual messages that your users expect to receive while interacting with your brand through your app, website, or offline. This could be acknowledging user interactions like sign up (welcome newsletter), password reset, payment confirmation (invoice), order confirmation, and so on.
Audience
This is where you set the basic details for your campaign like name, audience type, and so on.
Campaign Name
The first step is to give your campaign a unique name that helps you identify its purpose.

Click to enlarge
Campaign Tags (Optional)
Tag is a handy feature that helps you categorize your campaigns as per their purpose, target audience, frequency, or any other parameter that makes them easier to search for. Tags also help you analyze campaign results for a group of campaigns that belong to a tag.

Click to enlarge
Audience Type
One of the key differentiators of successful campaigns is that they're tailored to the behavior and preferences of a specific group of users. Thus, by selecting an Audience Type, you can choose to target a specific segment of users or combine several segments to define your WhatsApp campaign's audience.
Quick Read: Segmenting opted-in WhatsApp Users
As shown below:

Click to enlarge
-
Select Send to users in single segment to target all users who are included within a particular segment.
-
Select Send to users in multiple segments and/or don't send to users in certain segments to narrow down the audience to a very specific user persona, defined by including and excluding several segments from the target audience.
Send To
Depending on the option you selected in Audience Type, the answer may vary.
Here's how you can set up each Audience Type:
1. If 'Send to users in single segment' is selected as 'Audience Type'
As shown below, click the dropdown nested beside Send To, to specify the target segment.

Click to enlarge
Let's quickly walk you through Segment Preview:
-
Reachable Users: Indicates the number of users from the selected segment that can be engaged through WhatsApp as a channel at present.
-
Rules of Segmentation: You can choose to segment your entire user base by 3 broad parameters - User (attributes), Behavior and Technology. Thus, Segment Preview presents a snapshot of all the users against the parameters based on which they have been grouped.
Detailed Read on Segments.
2. If 'Send to users in multiple segments and/or don't send to users in certain segments' is selected as 'Audience Type'
When you want toInclude a set of target audience:
Using multiple segments to define the target audience is an excellent way to target users who have similar preferences, belong to the same location, or perform certain actions on your app/website without creating a new segment.
Here's how you can go about it:
-
Step 1: Select a Condition
-
Select Users in ANY of these segments to send the campaign to all the users included within each segment.
-
Select Users in ALL of these segments to send the campaign only to those users who are shared by all the segments.
-
-
Step 2: Select a Segment
-
Step 3: Click Add Segment to select another one.

Click to enlarge
For example, in the above visual, we have selected Users in ALL of these segments. This means that the campaign will be sent to only users included within all three segments at any given point in time. Users who are a part of 2 or fewer segments will not receive the message.
When you want toExclude a set of target audience:
You can choose to exclude a segment or multiple segments from the target audience by configuring the field, Don't Send To. This is a great way to engage users that match a specific persona selectively.
Here's how you can go about it:
-
Step 1: Select a Condition**
-
Select Users in ANY of these segments to prevent users in each segment from receiving the campaign.
-
Select Users in ALL of these segments to prevent only those users from receiving the campaign that is common between all the segments.
-
-
Step 2: Select a Segment
-
Step 3: Click Add Segment to select another one.

Click to enlarge
When Segment Isn't Specified Under the field, 'Send To'By default, a campaign is set to be delivered to All Users. Thus, if no segment is selected under Send To AND segments are specified under Exclude Users from These Segments, then the campaign will be sent to all the users who arereachable on WhatsApp AND are not included within the specified segments.
WebEngage allows you to Edit and Create New Segments while creating campaigns.
Edit Segment
Click on the Edit icon, placed towards the right of the dropdown to edit the selected Segment. In doing so, you will be prompted by a pop-up, pre-populated with the existing segmentation rules, as shown below.
Make your edits and click Save to proceed. In doing so, you will preview the number of reachable users as per your edits.

Click to enlarge
Create a New Segment
You can create a new Segmentof users by clicking the Plus icon placed towards the right of the dropdown. In doing so, you will be prompted by a pop-up, allowing you to build a new segment, as shown below.
Once created, you will be able to access the Segment through the List of Segments and while creating a campaign/journey.

Click to enlarge
Create a New, Single-use Segment
You can create disposable segments or segment users specifically for the campaign and avoid adding it to the List of Segments in your dashboard. This can be achieved by leaving the field Name blank while creating the segment. In doing so, it will become an Ad hoc segment in your dashboard, which will be available only for sending the campaign you're currently creating.

Click to enlarge
Remove Duplicates
For One-Time and Recurring campaigns, Remove Duplicates option will automatically ensure that a particular phone number doesn't receive any WhatsApp campaign multiple times if your project has multiple users with the same phone number.

Click to enlarge
If multiple users have the same phone number (as shown in the example below), WebEngage will only pick one of these users while sending the campaign.

Click to enlarge
Please NoteRemove Duplicates option will be enabled by default for new campaigns created. However, you can disable it manually as per your campaign's requirement.
Apply Universal Control Group
Conditional OptionThis is a conditional option which will be shown only if the you have created Universal control group in your account. Click here to know how to create Universal control group.

click to enlarge
- When the box is checked, the campaign will not be sent to users who are part of the Universal Control Group in the segment that is selected.
- When the box is unchecked, the campaign will be sent to all users that are part of the segment inclusive of the Universal Control Group users.
When to Send
This step of campaign creation allows you to:
- Specify when and how often you'd like the target audience to receive the WhatsApp.
- Manage the role your campaign plays in your overall engagement strategy.
Hence, When has been divided into two sections:
Let's get you acquainted with the workings of each:
Campaign Schedule

Click to enlarge
Here you can specify when and how often the target audience should receive your campaign. This can be determined by configuring the Campaign Type selected when you initiated campaign creation.
- One-Time
- Triggered
- Recurring
Here's how you can go about it:
One-time Campaign

Click to enlarge
-
Step 1: Specify the Delivery Time. You can choose to send the campaign Now or Later at the selected date and time.
-
Step 2: If Later is selected, you can send messages per each user's timezone by selecting In User's Timezone from the last dropdown!
You can choose from the 2 options i.e. Send Intelligently or to send at a specific time.- Send Intelligently: optimizes campaign send-time for each user, our system intelligently decides the best time to send a campaign based on your user’s interactions with past campaigns of each channel. Click here to know more.
- Send at Specific Time: You can specify the time at which you would like to send your campaign to your users, either from the users time zone or the campaign's project time zone.
Triggered Campaign

Click to enlarge
-
Step 1: As shown above, select the event Upon the Occurrence of which the campaign will be triggered or sent to the user.
-
Step 2: (Optional): Add Attribute Filters to the Event by clicking the filter icon. Further, you can choose to club multiple event attributes by the AND/OR logic to define the scope of occurrence of the event.

Click to enlarge
- Step 3: Specify the Delivery Time of the triggered campaign
As shown in the below:- SelectSend as soon as the event occurs to deliver the campaign immediately
- SelectWait for (duration) and then send to deliver the campaign after sometime
- You can set up a wait time in Minutes, Hours or Weeks, after which the campaign will be sent to the respective users

Click to enlarge
- Step 4: Specify the Start Date or the date-time on which the triggered campaign should start getting delivered to the target audience. You can choose to send the campaign Now or Later at the selected date and time.

Click to enlarge
- Step 5: Specify the End Date or the date-time on which the triggered campaign should cease getting delivered to the target audience. You can choose Later to stop the campaign at a specific date and time or Never to run the campaign indefinitely (you can always Pause the campaign through Campaign Overview.
Recurring Campaign

Click to enlarge
-
Step 1: Specify the Delivery Time or the frequency and date-time of campaign delivery.
-
Step 2: Specify the Start Date or the date-time on which the recurring campaign should start getting delivered to the target audience. You can choose to send the campaign Now or Later at the selected date and time.

Click to enlarge
- Step 3: Specify the End Date or the date-time when the campaign should cease getting delivered to the target audience. You can choose Later to stop the campaign at a specific date and time or Never to run the campaign indefinitely (you can always Pause the campaign through Campaign Overview).
Frequency Capping, DND & Throttling

Click to enlarge
Here you can leverage the features of Frequency Capping (FC), DND Hours, Queueing, Throttling to determine how a user perceives your WhatsApp campaign in the context of your entire brand experience. These features allow you to manage the frequency and timing of campaign delivery for each user.
Let's get you acquainted with the workings of each:
Frequency Capping
Using Frequency Capping, you can control the number of campaigns a user receives within a Day, Week, Month and maintain a consistent gap between consecutive messages (sent through multiple channels or the same channel).
If you are sending time-sensitive messages, then you can ignore Frequency Capping.

Click to enlarge
Set Frequency Capping Limits
If you have not set up Frequency Capping yet, then you can choose to configure it by clicking the Configurations > Frequency Capping on the left panel. Once set, you will be able to send all your campaigns with FC enabled, including the existing one.
Detailed read on How to configure FC & Time Gap.
DND
Using the DND Settings of your account, you can prevent users from receiving campaigns during specific periods, such as when they may be asleep, and so on. The best part - DND hours are determined individually for each user. This means that the duration specified by you will be applied to all your users only in the context of their time zone!
You can skip DND while sending time-sensitive or urgent messages.

Click to enlarge
Set DND Hours
If you haven't set up DND Hours yet, then you can choose to configure it by clicking on Configuration > DND on the left panel. Once set, you will be able to send all your campaigns with DND hours enabled, including the existing one.
Detailed Read on How to configure DND Hours.
Queueing
If you choose to send a campaign with Frequency Capping or DND enabled, then Queueing is automatically enabled. It's a feature that allows delayed delivery of the message to a user in cases where immediate delivery is not possible due to your FC or DND settings.

Click to enlarge
- SelectQueue message for up to..., to enable the feature and specify a custom queueing duration for the campaign in Minutes, Hours or Days.
- Doing so will ensure that we hold on to the campaign for the specified duration and send it only when a combination of your FC and DND settings allow us to. (How delivery time is determined for queued messages)
- SelectDo not Queue messages... to drop the message if we're unable to deliver it to a user due to FC/DND settings (Disabling Queueing for a campaign)
Throttling

Click to enlarge
-
SelectDo not throttle campaign... to send all messages instantly to the entire target audience.
-
SelectThrottle campaigns as per channel throttling limits to control the number of messages delivered per minute.
-
SelectThrottle campaigns at... to specify a custom message throttling duration for this campaign.
Please NoteThis limit cannot be higher than the channel-level throttling limit specified under Configurations > Throttling.
Detailed read on How to setup Throttling.
Message

Click to enlarge
As highlighted above, the message creation interface comes loaded with intuitive features like Variations, Dynamic Personalization, and User Preview - enabling you to create high-impact messages in minutes.
Let's see how you can create a message in minutes:
Select a Message Template
From the list of whitelisted message templates added to your WebEngage account, select a template that you would like to send to your customers. Templates can be of text, image, video and document types.

Click to enlarge
WhatsApp Template Media Sizing GuideTo know more about the media sizing guide that you need to follow while creating your WhatsApp templates and campaigns, click here.
Populate Personalization Variables
Personalization variables help you send highly targeted messages.
Click on the Icon and choose the User and Event Attributes from the drop-down to complete the message template as shown below:

Click to enlarge
Adding Links to WhatsApp Message
Each time a user clicks on a link included with the message, it's tracked as the performance indicator, Total Clicks and Unique Clicks under the WhatsApp Campaign's Overview section.
In case of WhatsApp, click tracking works in a different manner when compared to other channels as there are multiple types of templates and are required to be pre-approved by WhatsApp . Scenarios where links can/cannot be tracked are added below:
| Sr no. | Scenario | Clicks Trackable (Y/N) | Details |
|---|---|---|---|
| 1. | Link placed against numbered placeholder {{x}} within the message content. | Y | Whenever you add a link against a numbered placeholder variable {{x}} , we automatically append it to a WebEngage domain (weurl.co) or your configured custom domain while sending the campaign. This allows us to track users who click on it. |
| 2. | Template approved with a static link within the message content. | N | When a static link is added and approved by WhatsApp, the links cannot be appended/shortened as it would lead to template mismatch and campaign failures. So in such cases link clicks cannot be tracked. |
| 3. | Templates with Quick Reply buttons. | N | Quick Reply buttons are like inbound messages on WhatsApp. Since they are not links WebEngage cannot track clicks of these buttons. However you can get the data of such button clicks through your WhatsApp Service Provider. |
| 4. | Button template with a Static link. | N | When a static link is added and approved by WhatsApp, the links cannot be appended/shortened as it would lead to template mismatch and campaign failures. So in such cases link clicks cannot be tracked. |
| 5. | Button template with a dynamic link. | Y | The button clicks in such case can only be tracked when the 'Destination URL' option is selected while creating the campaign (Details mentioned below). |
Buttons with Dynamic link:
While configuring the Message tab, when you select a template with Dynamic button, you will find 2 options for adding the Button Links: 'Dynamic Suffix' and 'Destination URL'.
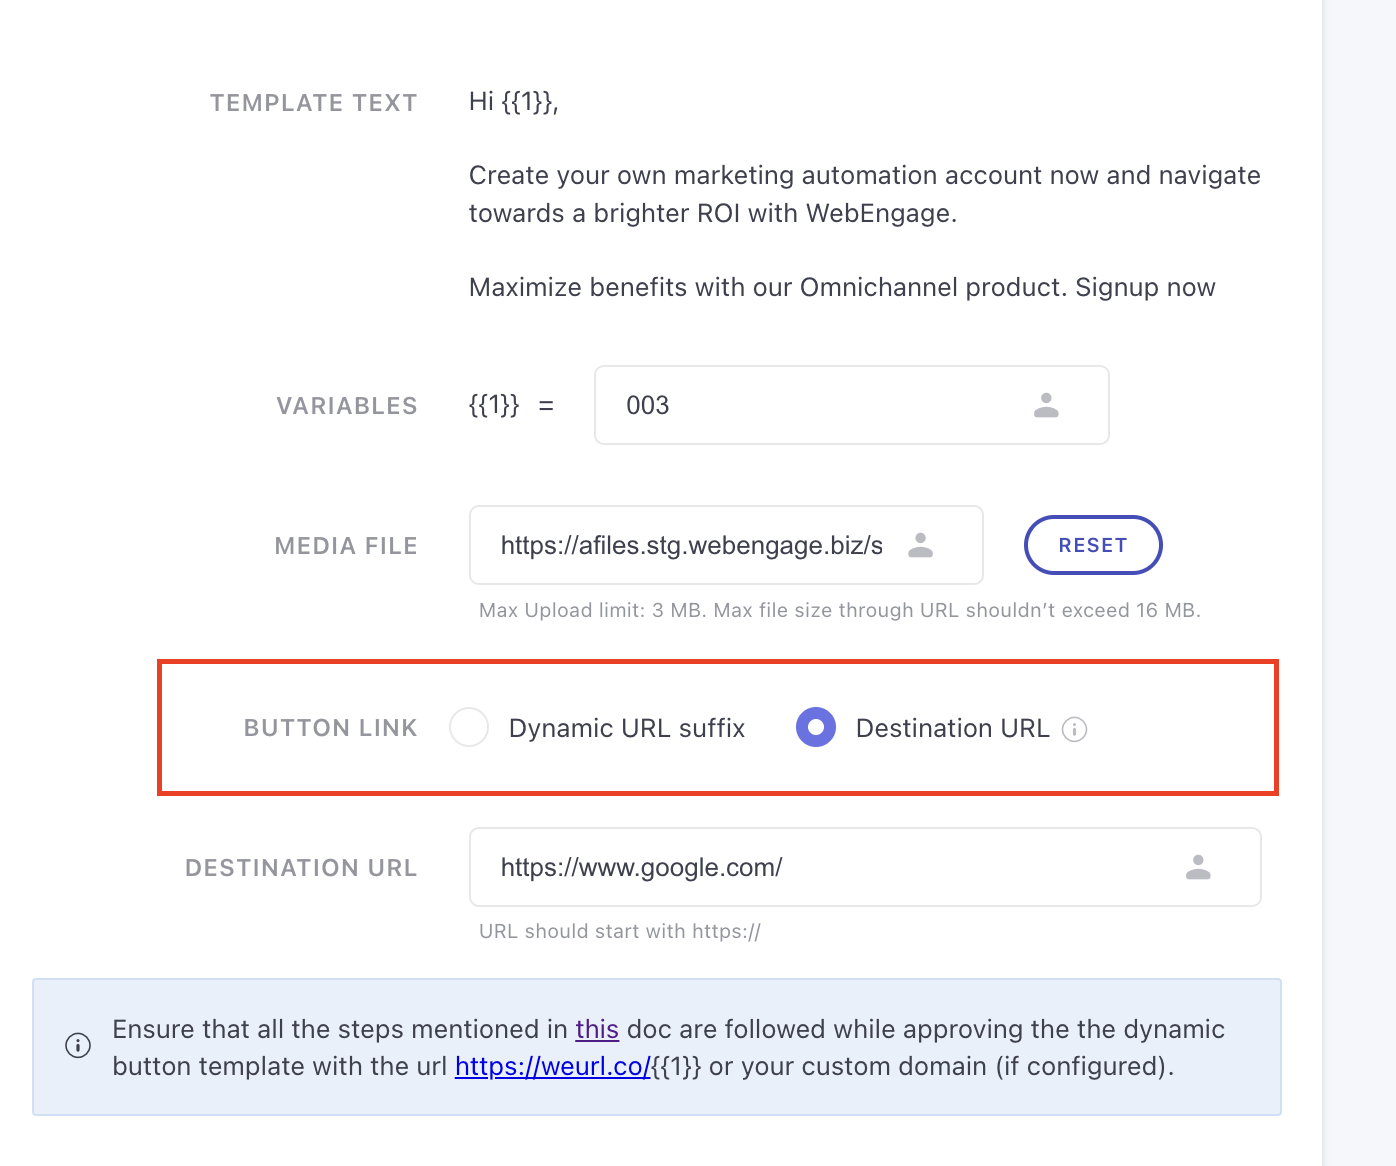
- Dynamic Suffix: This option has to be selected in cases where you have configured the template with destination domain while approving it through WhatsApp. In this case you only need to configure the suffix thats needs to be appended to the destination domain.
Note: When using the option, button clicks will not be tracked.
- Destination URL: If you want to track button clicks through WebEngage, you need to select this option. If selecting this option, you need to make sure to the steps mentioned for approving your template and configuring the campaign:
- While Approving the template at WSP end: When getting the template with dynamic buttons approved, add the destination domain as [https://weurl.co/{{1}}] OR if you have configured a custom domain then configure the same domain. For example if your custom domain is wsins.com, then, add the destination domain as[https://wsins.co/{{2}}]
- Once the template is approved and added in WebEngage dashboard, select the template while configuring the 'Message' tab of your campaign.
- While creating the campaign on WebEngage: For dynamic button templates, you will see an option of Destination URL. Add the exact URL where you would like to navigate the users when they click on the button. For example if you want to navigate the user to your website login page then add the exact URL here: [https://www.westernstateinsurance.com/login]. You can also add personalized variables here.
By following these steps the clicks of such button will become trackable and will be visible in campaign metrics.
Please Note
- While configuring the Destination URLs, make sure the template is approved with proper URL: [https://www.weurl.co/{{x}}]('x' signifies the variable number) OR your custom domain (whichever is applicable.
- In case the URL is not configured properly, it will lead to template mismatch and campaign failures.
- It is highly recommended, to test the campaigns before launching to it to make and sure the campaign is configured properly.
UTM Parameters
- Start by enabling UTM at the global level through the Configurations section on the dashboard. This ensures that campaign-level UTM tagging is enabled by default. Click here to know how.
- Modify or Edit UTM at Campaign Level: While global UTM is setup, you can modify parameters for specific campaigns as well as per you needs.
- Disabling Global UTM: While disabling the UTM setup at global level you can choose whether to keep UTM for already running campaigns or remove it from all campaigns.
Note: Campaigns which are already sent with UTM parameters cannot be removed.
Preview Message

Click to enlarge
As highlighted above, the top panel of the message creation interface allows you to toggle between a Raw Preview and User Preview to gauge each Variation's message's appearance. Here's how it works:
Raw Preview
It displays the raw message and attributes, as added by you.

Click to enlarge
User Preview
Allows you to view the message for an actual user from your account by populating it with data from their user profile, as per the elements of personalization added to the template.

Click to enlarge
-
Step 1: Select User Preview from the top panel.
-
Step 2: Enter the User ID, preferably of a power user included within the target audience.
-
Step 3: Click the Search and Populate button.
-
Step 4: Click the See Preview button on the pop-up to visualize the notification with real user data.
Create Variations
Variations are just different versions of the campaign's message that facilitate easy multivariate testing and are referred to in the following manner in your dashboard: Variation A (the first version of the message), Variation B (second version of the message), and so on for subsequent versions.

Click to enlarge
As shown above, by default, the message creation interface consists of a single Variation A. You can create up to 5 variations of the message by clicking on the Plus icon.
-
SelectCreate New to start building the new Variation from scratch
-
SelectCopy from Variation A (or any of the previous versions) to make minor edits to the new Variation
-
Each Variation can be created independent of the other, allowing you to test varying messages and links to identify what works best with your target audience.
-
The percentage values indicate the share of users that will receive a Variation and can be customized during Conversion Tracking.
Test Message
You can easily test the message with an internal segment of users before sending it to your entire user base. As shown below, click the Test Message button to select a Variation and Test Segment.

Click to enlarge
Conversion Tracking
This part of campaign creation allows you to measure the effectiveness of your campaign in various ways like:
- Tracking conversions for a specific goal.
- Comparing performance against a control group.
- Testing multiple variations of the message to identify a winning version.
Hence, it has been divided into two sections:
However, depending on the number of message variations created by you, the view of Conversion Tracking will vary:
When only 1 Variation Exists
On proceeding to this step from Message, you will be welcomed by an interface on which Conversion Tracking is disabled.
When Multiple Variations Exist
As shown below, on proceeding to this step from Message, you will be welcomed by an interface on which:
- Conversion Tracking is disabled
- Variation Distribution meter indicates the share of the audience that will receive each Variation
Click to enlarge
Now, let's get you acquainted with the workings of Step 4: Conversion Tracking:
Conversion Tracking (Recommended)
Must ReadWe recommend that you gain a broad understanding of how Conversion Tracking works in your dashboard before proceeding. Doing so will lay a strong foundation for understanding whether or not you need to enable Conversion Tracking for the campaign and its impact on Revenue Tracking.
By default, Conversion Tracking is disabled for all WhatsApp campaigns. As shown below, you can use the toggle switch to enable it.
The Conversion Tracking can be set up by:
- Selecting a Conversion Event
- Selecting Conversion Deadline
- Selecting a Control Group (Optional)
Select a Conversion Event
The term, Conversion Event is an alias that helps identify the event you expect users to perform after receiving the message.

Click to enlarge
As shown above, you can choose from a list of all the Custom Events being tracked for your account to specify the campaign's conversion goal.
Pro TipWe recommend that you map all the Custom Events that record the occurrence of a monetary transaction in your app as Revenue Events in your dashboard. This will help ensure that selecting the respective events as the Conversion Event of a campaign helps track Conversions and Revenue for the campaign and its channel.
Add Attributes to the Conversion Event
Depending on the end goal of the campaign, you can choose to narrow down the scope of conversion to a specific action. This can be done by adding attribute filters to the selected Conversion Event.
Here's how you can go about it:

Click to enlarge
Step 1: As shown above, click on the filter icon placed next to the drop-down
Step 2: As shown below, click Add Filter to add more attributes to the event and apply the AND/ OR logic further.
Select a Conversion Deadline
The Conversion Deadline is a duration defined by you that tells us when to stop tracking conversions for a campaign.
This means that once your campaign is delivered, we will track users who perform the Conversion Event in the context of its attribute filters (if any), only till the specified Conversion Deadline.
By default, a Conversion Deadline of 7 days is set for all campaigns. You can choose to specify a custom duration in Hours or Days, as per the campaign's end goal.

Click to enlarge
Select a Control Group (Optional)

Click to enlarge
A Control Group is a small portion of the target audience of a campaign that is randomly selected, representing the behavior and preferences of the entire segment, and does not receive the campaign.
An optional but recommended step, adding a Control Group to the target audience allows you to compare the campaign's performance against the organic behavior of Control Group users. This makes for the perfect benchmark to assess the true impact of the campaign on influencing user behavior.
Detailed read on Control Group.
On checking the Control Group checkbox, you are presented with another choice called 'Target Control Group', that lets you choose between two options.
- Set a new control group for this campaign
- Custom Control Group
Option 1: Set a new control group for this campaign: This will be a campaign level control group which means a control group that is created for a specific campaign only. The users in this control group are randomly added from the selected segment in 'Audience' tab. This control group is good if the aim is to measure impact for a specific campaign.

click to enlarge
On clicking this option, the Variation Distribution slider is exposed that allows you to select percentage of users to be added in Control Group from target audience.
Option 2: Custom Control Group: This option is shown when at least one Custom Control Groups is created in your account. Click here for detailed read on creating custom control group.

click to enlarge
Since this is a pre-created control group, overlapping users within this group and the target segment won't be receiving the campaigns.
Custom control groups are good for analyzing effectiveness of multiple campaigns. For example: Analyzing effectiveness of SMS and Email campaigns during Diwali sale.
Unlike Campaign level control group, the percentage of users to be part of control group cannot be controlled when Custom control group is selected.
Variation Distribution

Click to enalrge
If you have created multiple variations of the Message, you can choose to automate the testing process by enabling Send Winning Variation Automatically. Doing so will allow you to test all the Variations (and Control Group if enabled) with a smaller test audience. We will automatically send the winning variant to the entire target audience.
However, you can opt to test the Variations and Control Group manually if you cannot automate testing due to the small size of the target audience (less than 2,000 users) of a One-time or Recurring campaign. Or if you are unwilling to test a Triggered campaign with a minimum of 500 messages.
Send Winning Variation Automatically
Must Read
Basics of setting up Send Winning Variation Automatically for a campaign
How Send Winning Variation Automatically enables intuitive multivariate testing for your campaign
Depending on the campaign type selected at the steps of setting up automated variation testing will vary as:
- One-time Campaign
- Triggered Campaign
- Recurring Campaign
- Manual Distribution
One-time Campaign
Given the short lifespan of One-time campaigns, we suggest that you launch the campaign well in advance for testing and schedule it for delivery at the most viable time slot. Doing so will ensure that your users receive the most effective version of your campaign at a time that records the highest engagement rate.
-
Step 1: Specify Size of Test Audience
-
Step 2: Define Time to Test
-
Step 3: Select Win Criteria

Click to enlarge
Detailed Read: How automated variation testing works for one-time campaigns
Triggered Campaign
Triggered campaigns are ongoing cycles of communication that are sent to users only when they perform a certain action or Event. Thus, the most scientific way to test Variations of a triggered campaign is by ensuring that a significant number of messages are delivered before we draw a comparison.
- Step 1: Specify Size of Test Audience
- Step 2: Select Win Criteria

Click to enlarge
Detailed Read: How automated variation testing works for triggered campaigns
Recurring Campaign
If you choose to create a Recurring campaign, then the entire first run of the campaign will be considered its Test Audience by default.
-
We will calculate the test results 1 hour before the second run of the campaign to identify a winning variation.
-
A winning Variation will be determined as per the Win Criteria and sent as the only campaign to all users from the second run onwards.
Thus, as shown below, we just need to define the Win Criteria as Clicks or Conversions, and we will take care of the rest.

Click to enlarge
Detailed Read: How automated variation testing works for recurring campaigns
Manual Distribution
If you are unable to set up Send Winning Variation Automatically due to the small size of the target audience (less than 2,000 users) of a One-time or Recurring campaign, or if you are unwilling to test a Triggered campaign with a minimum of 500 messages, then you can choose to test the Variations manually.

Click to enlarge
Detailed Read: How manual Variation Distribution works
Impact on Variation Slider if Control group is enabled
In case the Control Groups have been enabled the Variation Distribution slider behaves differently based on the type of control group selected:
If Campaign level control group is selected: In this case, the user will have the option of adding the control group by deciding the percentage or size of the control group on variation distribution slider.
If Custom Control Group is selected: You will not be able to manually select the size of the control group using the variation slider since the Custom Control Group is pre-created and overlapping users in the selected Custom Control Group and target segment, won't be receiving the campaign.
Keep in mind
In a particular campaign, Custom Control Group and campaign control group cannot be applied together.
Universal control group can be added irrespective of Custom Control Group or Campaign Control Group is selected.
In case multiple control groups are applied within same campaign (E.g: Universal Control Group + Custom Control Group or Universal Control Group + Campaign control): In this case, since the users in both the control group are mutually exclusive, the overall control group size will increase and the target audience size will decrease.
Test Campaign
Iron out all the creases in your WhatsApp message by testing it with internal team members for maximum impact!

Click to enlarge
While this is an optional step, we recommend that you test all campaigns to ensure that everything's in order.
However, you can always choose to skip it by clicking the Skip Test & Proceed button to skip to the next step Preview and Launch.
Test Message Variation
Now, let's show you how you can test all the message Variations:
Step 1: Select a Variation
Select the variation you want to test.

Click to enlarge
Step 2: Select Test Segment
All the test segments created while testing a campaign, for any channel can be found under the dropdown, Send Test Message To, along with details of all its users.

Click to enlarge
Step 3: Personalize Test Message
You can test personalization in two ways:
- Use own data of users included in the test segment to receive a message personalized to your user profile
- Use data of a specific user to receive the exact message that the selected user would receive.

Click to enlarge
Here's how you can personalize the message to a specific user:

Click to enlarge
- Step 1: Click the Search User button.
- Step 2: Add the User ID.
- Step 3: Click the Search and Populate Values button.
- Step 4: Click the Save and Return to Test Campaign button to proceed with the selected user.
- Step 5: Click the Send Test & Proceed button to test the campaign.
Creating Test Segment
Prerequisite for adding internal team members to a test segmentAs you are aware, all the data stored in your WebEngage is either gleaned from your integrated apps and website or can be manually uploaded as a CSV file. Thus, it may so happen that details of internal teammates may not be readily available in your dashboard (even if they are account admins).
Hence, we recommend that you request the respective members to opt-in to WhatsApp on your platform so that we can populate their respective User Profiles with their personal and behavioral data. Doing so will come in handy when:
Creating Test Segments
Personalizing the test message to the data of users added to the test segment
Viewing a User Preview of the message
Step 1: Name Your Test Segment
As shown below, the segment's name is prefixed with TEST - and can be customized henceforth.

Click to enlarge
Step 2: Add Internal Users Through Filters
Step 3: Click on the Create Test Segment button.
Editing Test Segment
WebEngage allows you to Edit the test segment in two simple steps.
Step 1: Click the Edit icon placed next to the field - Send Test Message To to edit the users included within the selected Test Segment.
Step 2: Make all your changes and click the Update Test Segment button to proceed.

Click to enlarge
Deleting Test Segment
You can delete a test segment in two simple steps:
Step 1: Click the Bin icon placed next to the field - Send Test Message To to delete the selected Test Segment.
Step 2: Click the Delete Segment button on the pop-up.

Click to enlarge
Preview & Launch
Once you are satisfied with the test results, it's time to send the message to your users! But before that, we recommend that you conduct a quick preview of the campaign's message and settings to ensure that it's in line with your end goal.

Click to enlarge
As shown above, the last step of campaign creation presents a snapshot of its:
- Target Segment
- Campaign Type, Delivery Time, Frequency Capping, DND Hours, and Queueing settings
- Message Variations
- Conversion Tracking and multivariate test settings
Edit Campaign Before Launch
You can always choose to edit a step by clicking the Edit icon, placed next to each step's header. In doing so, you will be directed back to the step, as shown below. Make your edits, save them, toggle back to Preview & Launch to continue your review.

Click to enlarge
We hope this has equipped you with a robust understanding of how you can create WhatsApp campaigns for various campaigns, track conversion, automate multivariate testing and test your campaign internally before launch. Please feel free to drop in a few lines at [email protected] if you have any related queries or feedback. We're always just an email away!
Updated 8 months ago