Creating Web In-line Content Campaigns
A step-by-step guide on how you can deliver highly tailored experiences to all your website vistors
Web In-line Content campaigns enable you to wow users by delivering contextual platform experiences. Be it the first-fold of your homepage, a tailored welcome message, or a small section of your webpage - personalized web content is a massive growth driver that can help you to skyrocket conversions and forge lasting brand relationships. All you need to do is:
-
Step 1: Group users into highly differentiated segments and identify their key motivators.
-
Step 2: Map website elements that you'd like to personalize for different types of users.
-
Step 3: Add contextually personalized content above/below the mapped web elements or replace them entirely.
-
Step 4: Experience the magic of website personalization, see your revenue & retention stats go up!
So, let's get you started.
Must ReadAt WebEngage, we are obsessed with enabling consumer businesses, like yours, to create personalized and contextual experiences that facilitate retention-led growth. This is why user data (User Attributes), behavioral data (Events & Event Attributes) and Segments play an integral role in campaign creation. We recommend that you get yourself acquainted with the respective concepts before proceeding.
Your dashboard comes with a highly intuitive 5-step campaign creation interface that makes it easy to execute customized campaigns in minutes! Here's a quick summary of the exciting possibilities offered by the campaign creation interface:
-
Personalize your website to each user's preferences and behavior, across the various stages of their lifecycle by creating highly differentiated segments (skip to Step 1: Audience)
-
Moderate your website experience by controlling the webpages on which the personalized elements are displayed and creating daily/hourly visibility schedules (skip to Step 2: Where & When to Show)
-
Automate multivariate testing to identify the most effective web experience - we'll automatically send the winning variant to the entire audience (skip to Step 4: Conversion Tracking & Variation Distribution)
How to Access
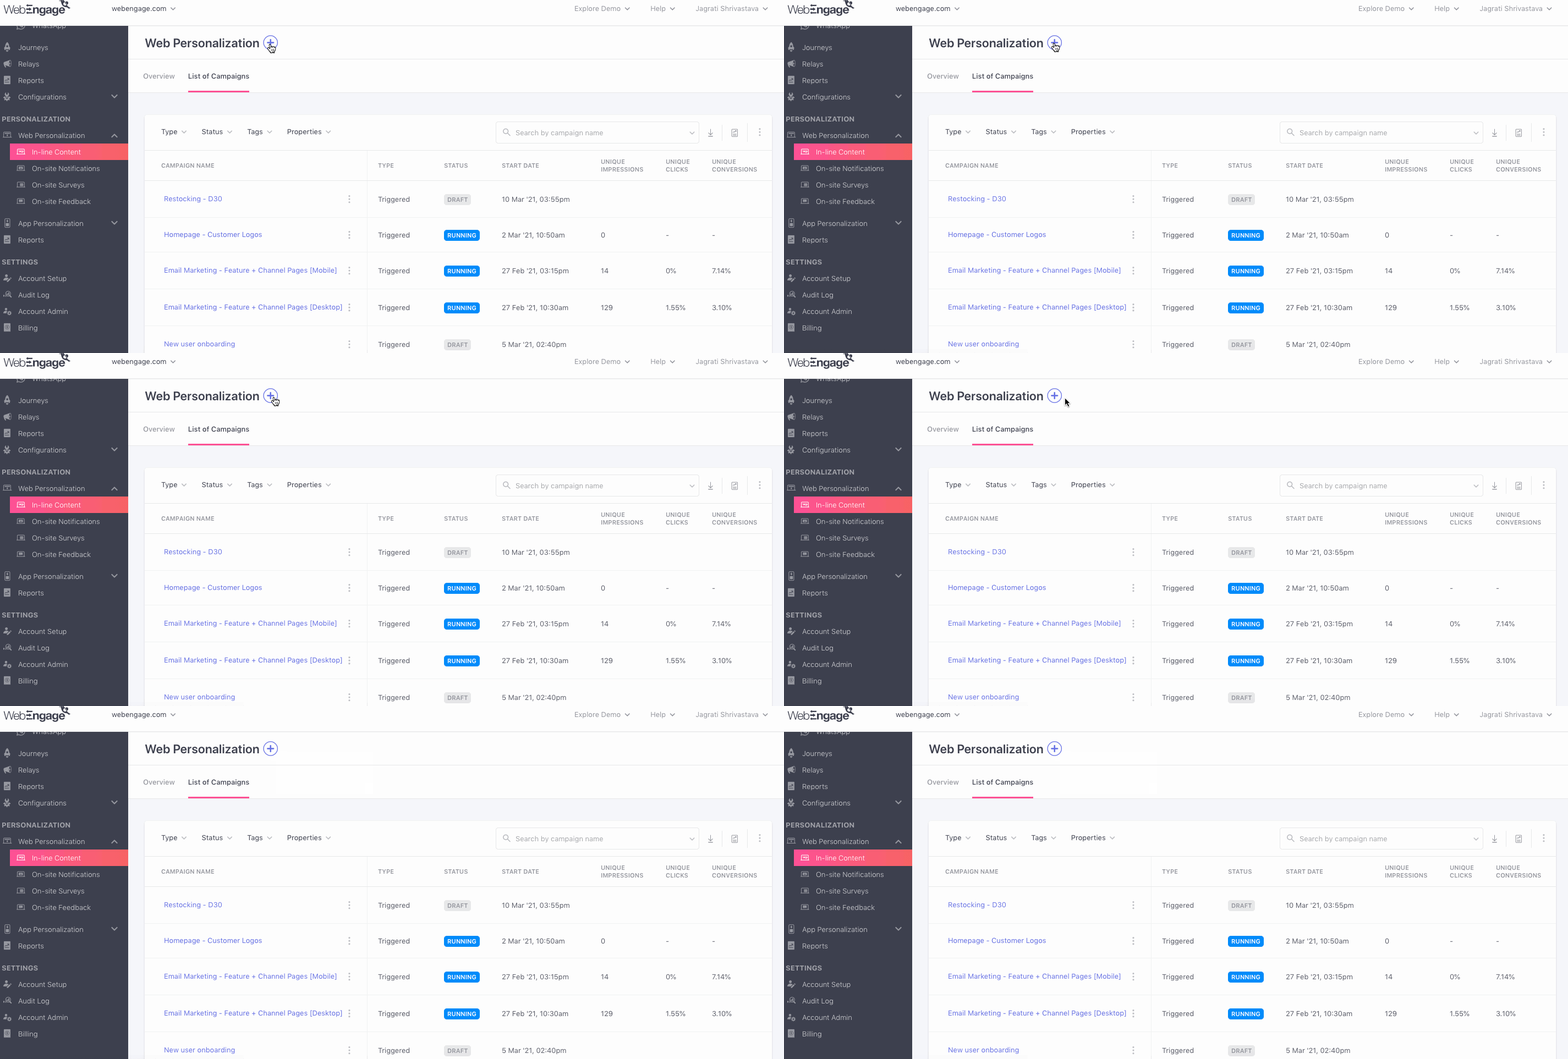
As shown below, you can initiate campaign creation by clicking the Plus icon placed on the top left of the central hub of Web In-line Content.
Click to enlarge
Select Layout
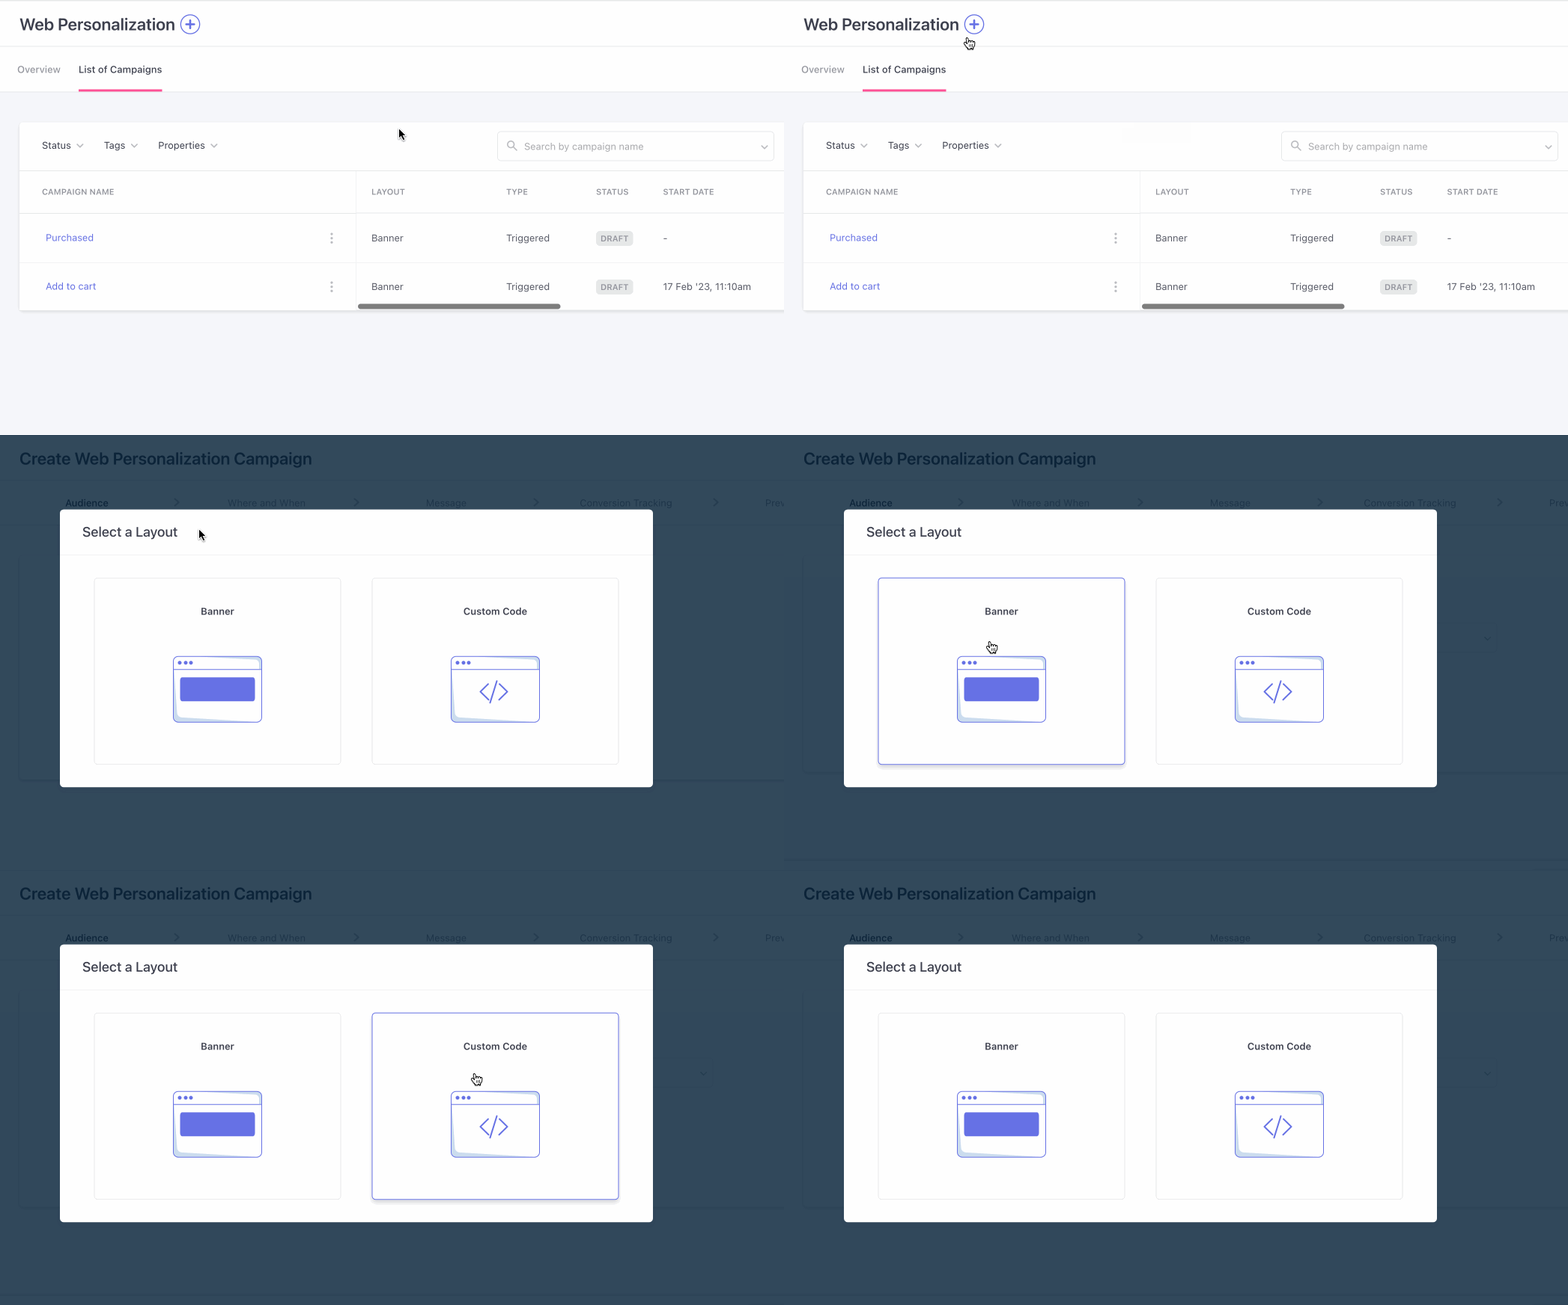
As shown below, you can select a ready-to-use template or add a custom HTML/CSS code to personalize your website.
Banner Layouts enables you to personalize all types of background images, hero images, and icons. Each banner can be superimposed with a personalized message and CTA buttons as per your engagement strategy. (How to Configure)
Custom Code Layout enables you to create and render any custom layout as per your usecase.
Details of each layout have been in the Message section below.
Click to enlarge
Use CaseLet's discuss this further with the help of a use case.
- An e-commerce company specializing in selling men, women, and kids' wear from multiple brands has launched its summer collection.
- They want to send a web personalization campaign named 'New Summer Collection' about women's summer dresses to women aged between 20-40 and who have made at least a single purchase from their website.
- Since it is a web personalization campaign, they want to target women who use the desktop browser to purchase.
- The campaign is supposed to go live on the weekend from Friday to Sunday and show up on the landing page with the user's greeting and name.
Step 1: Define the Audience
Click to enlarge
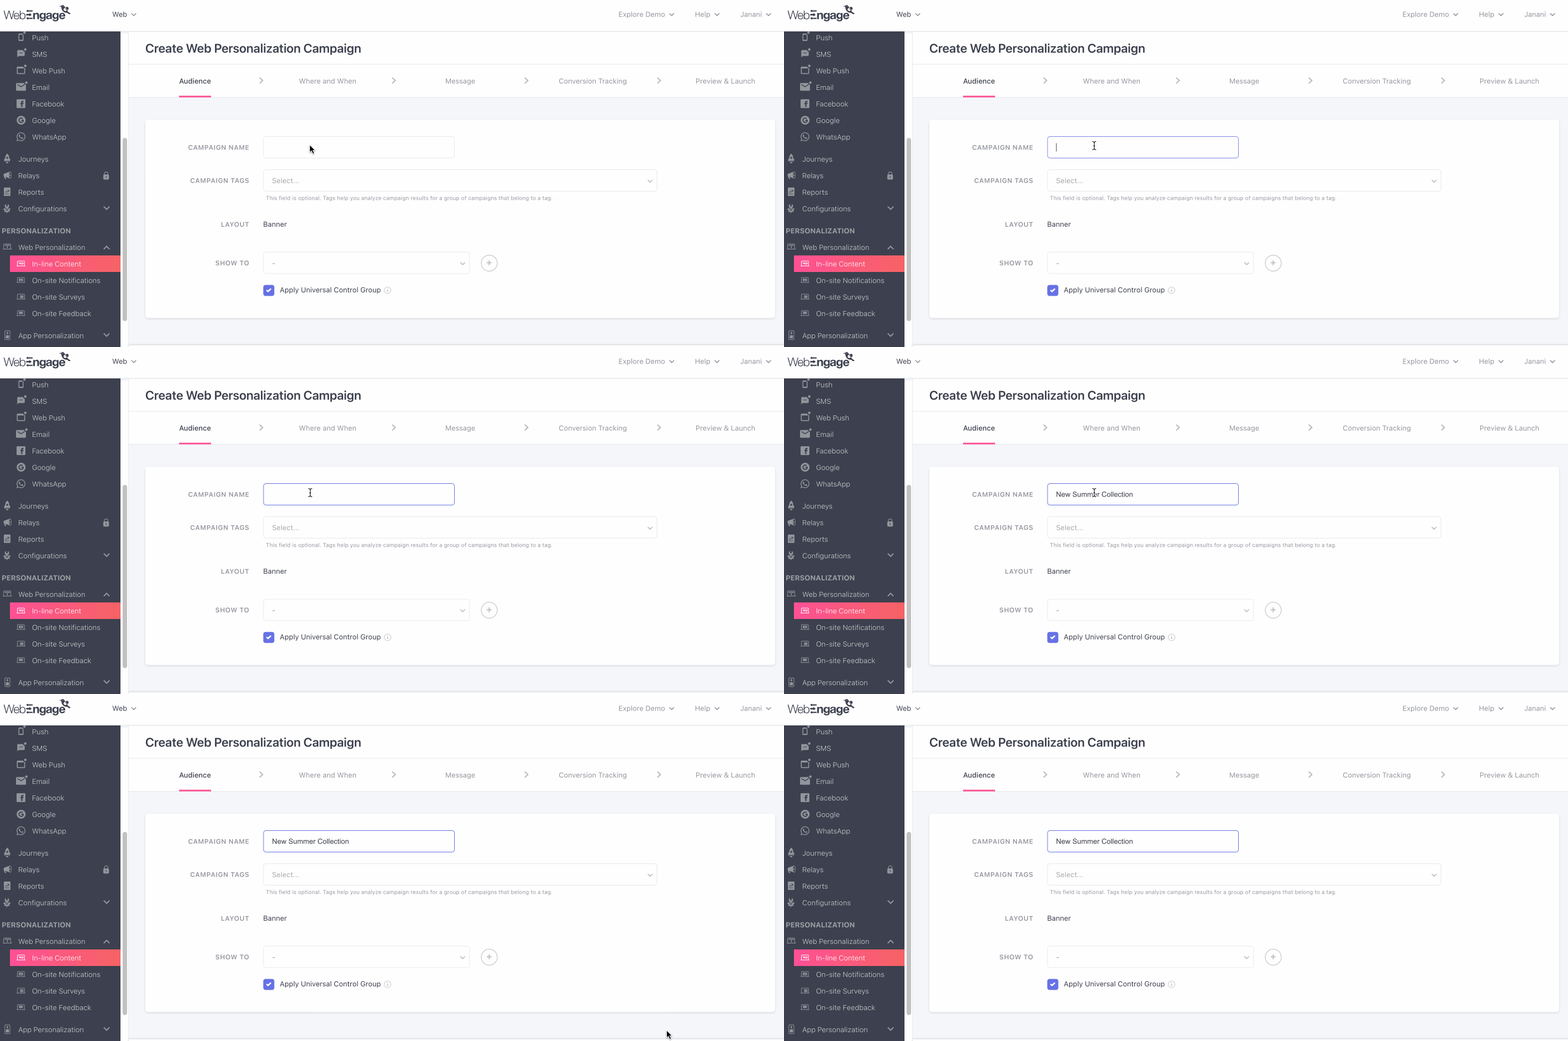
1. Name Your Campaign
The first step is to give your campaign a unique name that helps you identify its purpose.
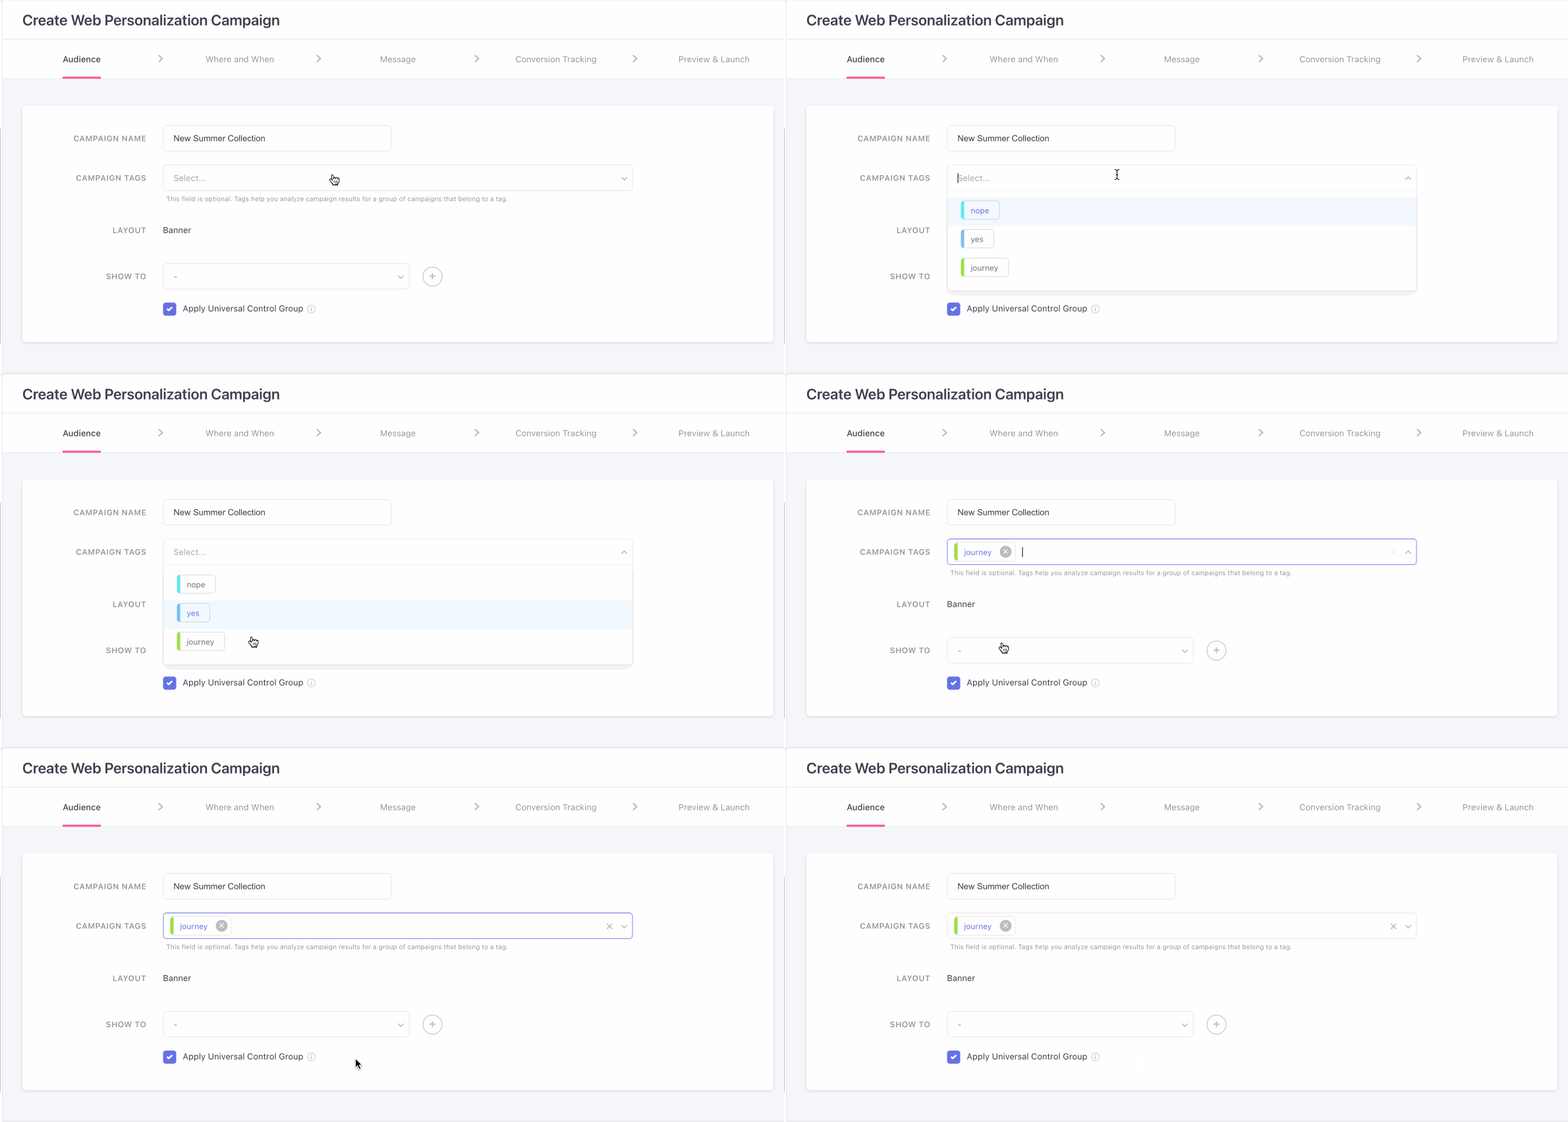
2. Tag Your Campaign
Tags is a handy feature that helps you categorize your campaigns as per their end-goal, target audience, frequency, engagement strategy, and so on. While tagging is optional, we highly recommend that you do so as:
- It becomes easier to locate the campaign in your dashboard (you can simplyfilter List of Campaigns by Tags!).
- It enables you to group similar campaigns and analyze their collective impact on driving user engagement, conversions, and revenue.
- It enables you to compare the performance of campaigns categorized under each Tag and identify the most effective category.
Click to enlarge
3. Define Target Audience (Show To)
One of the key differentiators of successful campaigns is that they're tailored to the behavior and preferences of a specific group of users. Thus, this section enables you to leverage all the User Attributes and Events tracked for your users to build micro-segments - so that you can deliver unparalleled web experiences.
As shown below, click the dropdown nested beside Show To, to specify the target audience by selecting an existing segments or lists. (Here's how you can build a new one)
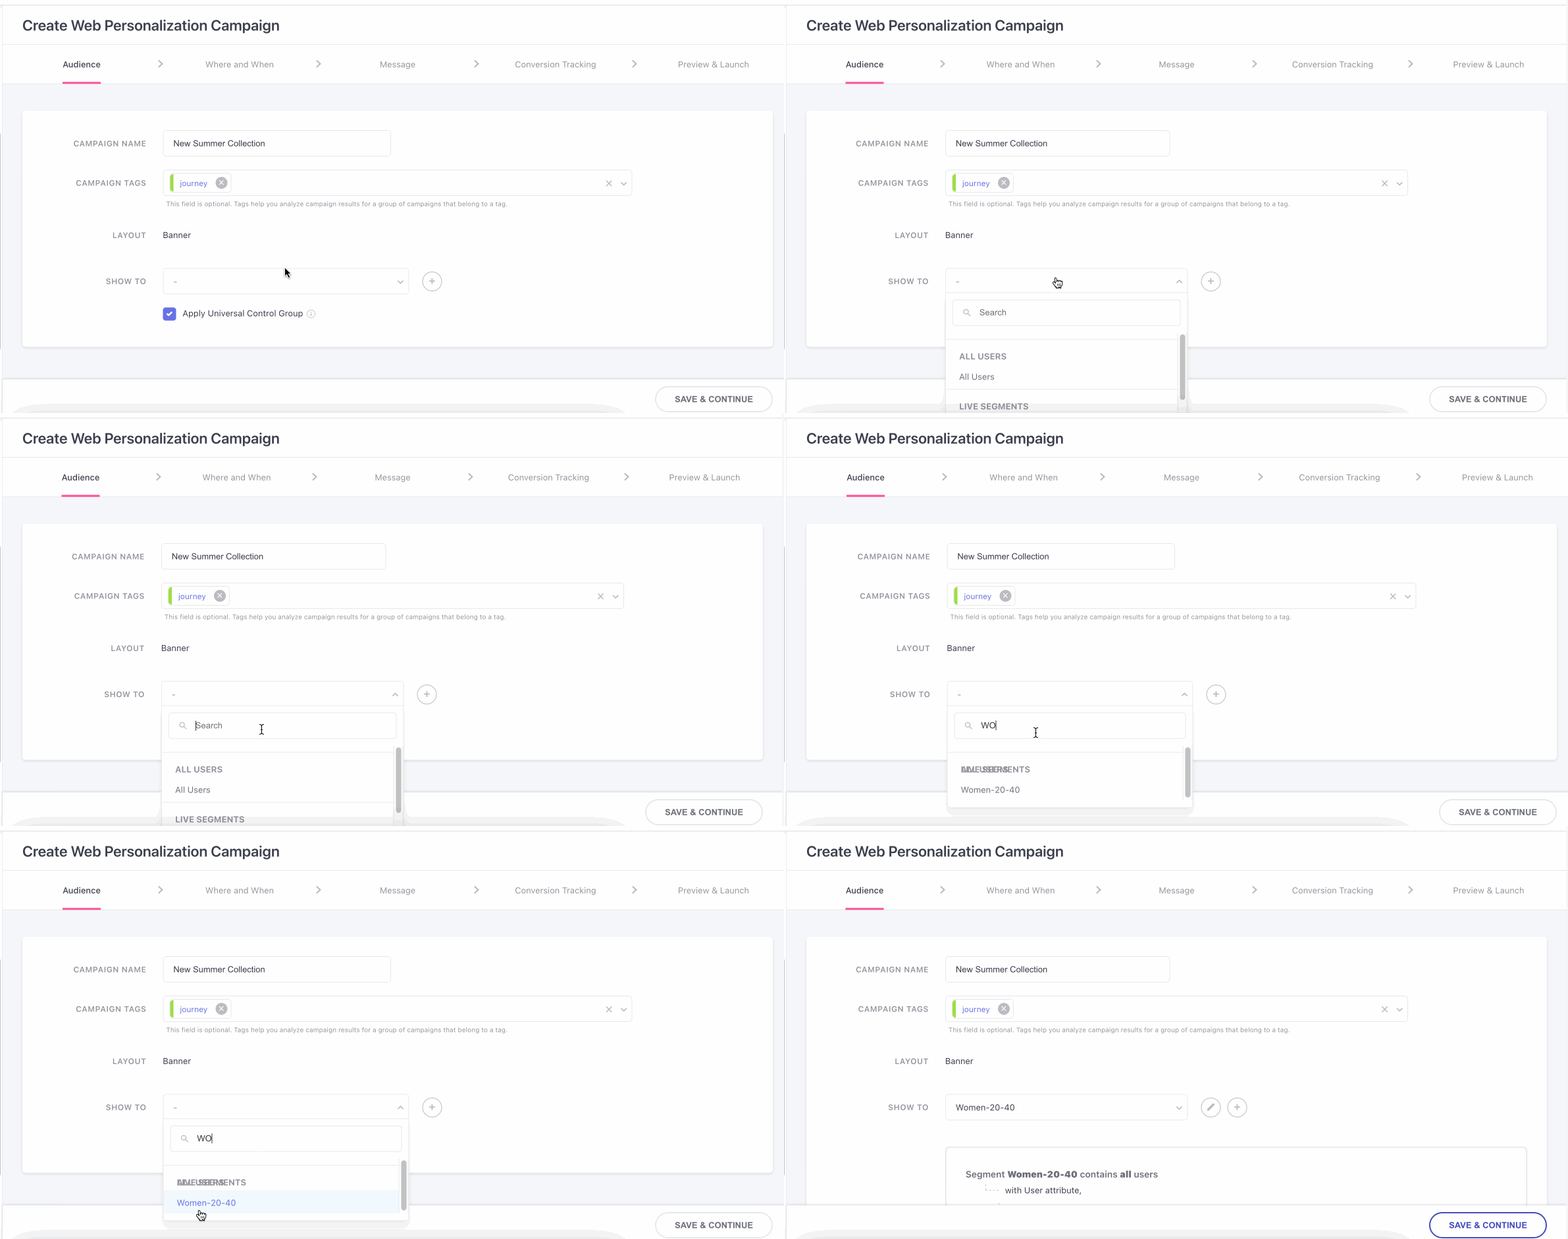
Click to enlarge
On selecting a segment, you will be able to preview a snapshot of Reachable Users and the Rules of Segmentation. Let's quickly walk you through Segment Preview:
-
Reachable Users: Indicates the number of users, from the selected segment, that can be engaged through Web Personalization campaigns at present. (Includes only those users who have been active on your site over the last 30 days).
-
Rules Of Segmentation: You can choose to segment your entire user base by 3 broad parameters - User (attributes), Behavior (events), and Technology. Thus, Segment Preview presents a snapshot of all parameters, based on which the users have been grouped together.
Edit Segment
Click the Edit icon, placed next to the dropdown, Send To, to edit the selected Segment. In doing so, you will be prompted by a pop-up, pre-populated with the existing rules of segmentation, as shown below.
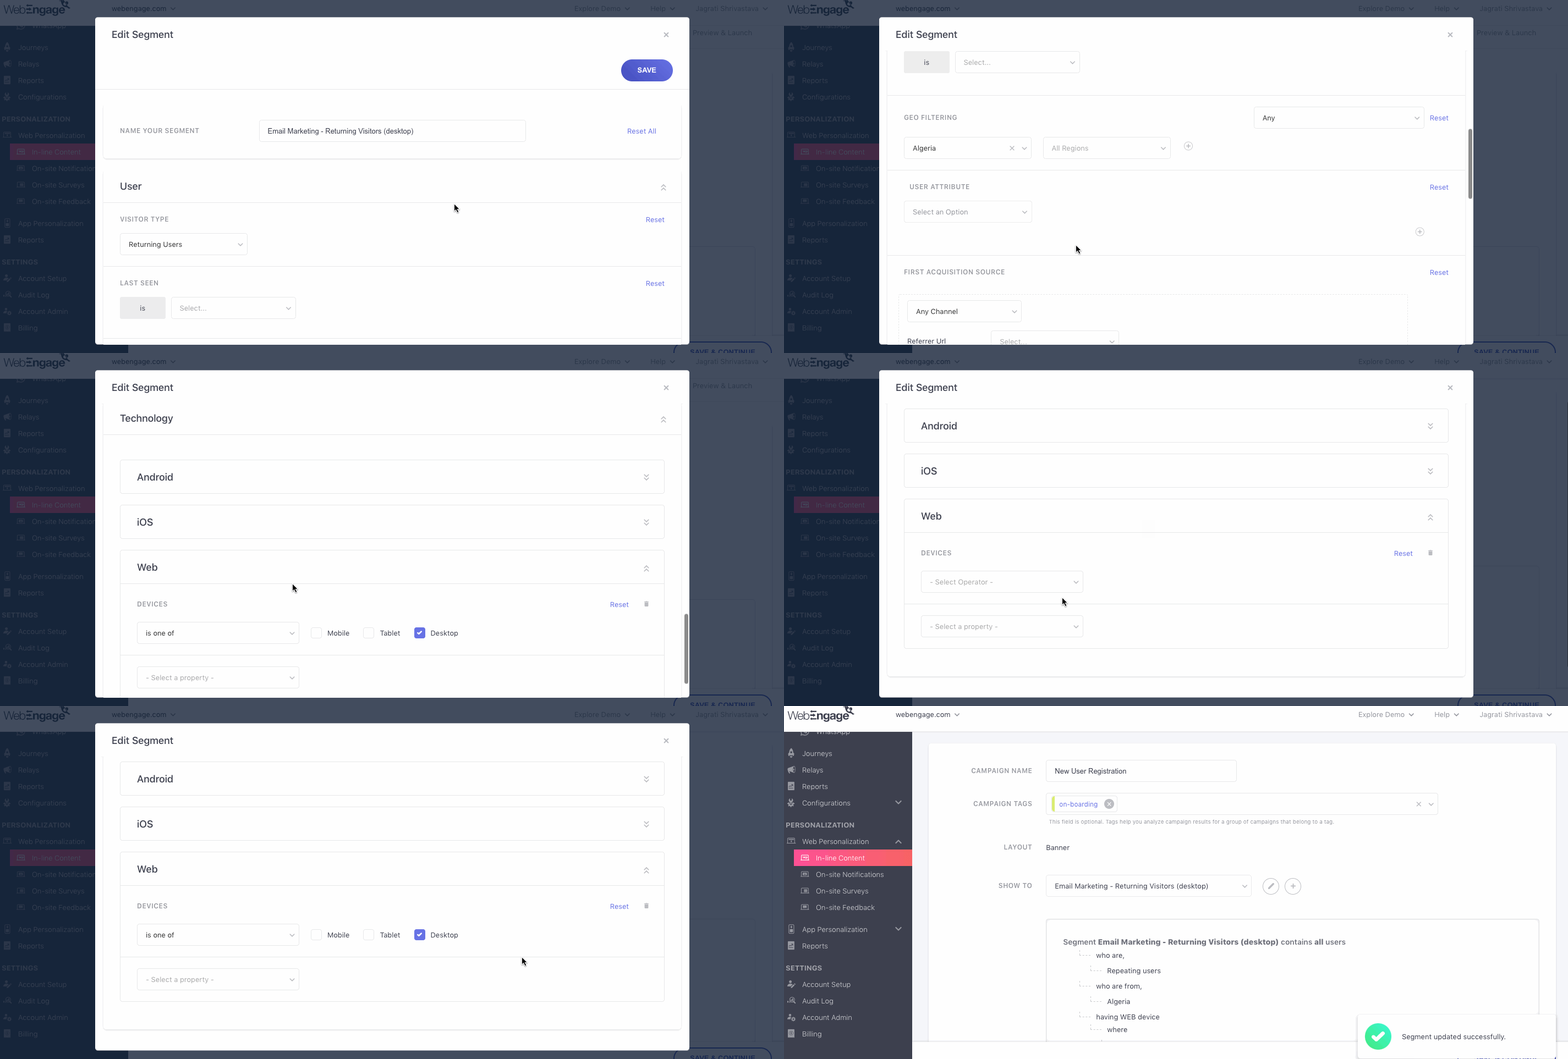
Click to enlarge
Simply make your edits and click Save to proceed. In doing so, you will able to preview the number of reachable users as per your edits.
- For example, in the above visual we can see that the number of reachable users
Create a New Segment
You can choose to create a new Segment of users from the campaign creation interface by clicking the Plus Icon. In doing so, you will be prompted by a pop-up, allowing you to build a new segment, as shown below.
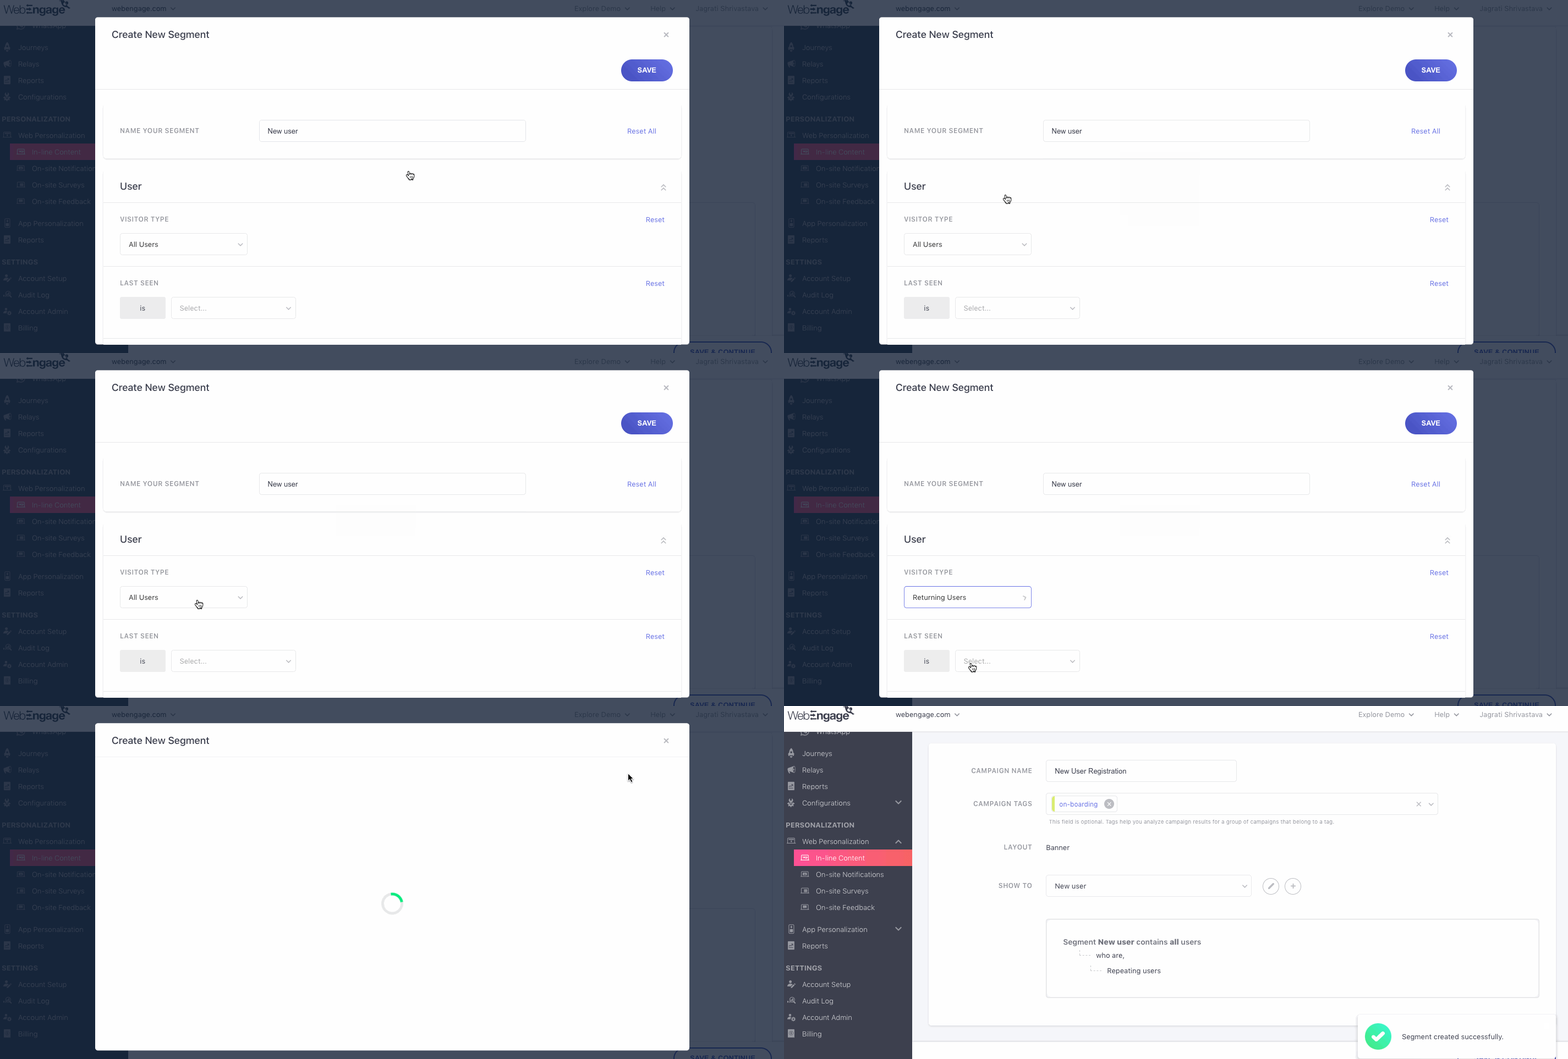
Click to enlarge
Once created, you will be able to access the Segment through the List of Segments in your dashboard.
Related Read: Rules of SegmentationPlease refer to Creating Segments for step-by-step guidance on how you can segment your users by their preferences (user attributes), behavior (events), and technological preferences.
Creating a New, Single-Use Segment
You can also choose to create disposable segments or segment users specifically for the campaign and avoid adding it to the List of Segments in your dashboard.
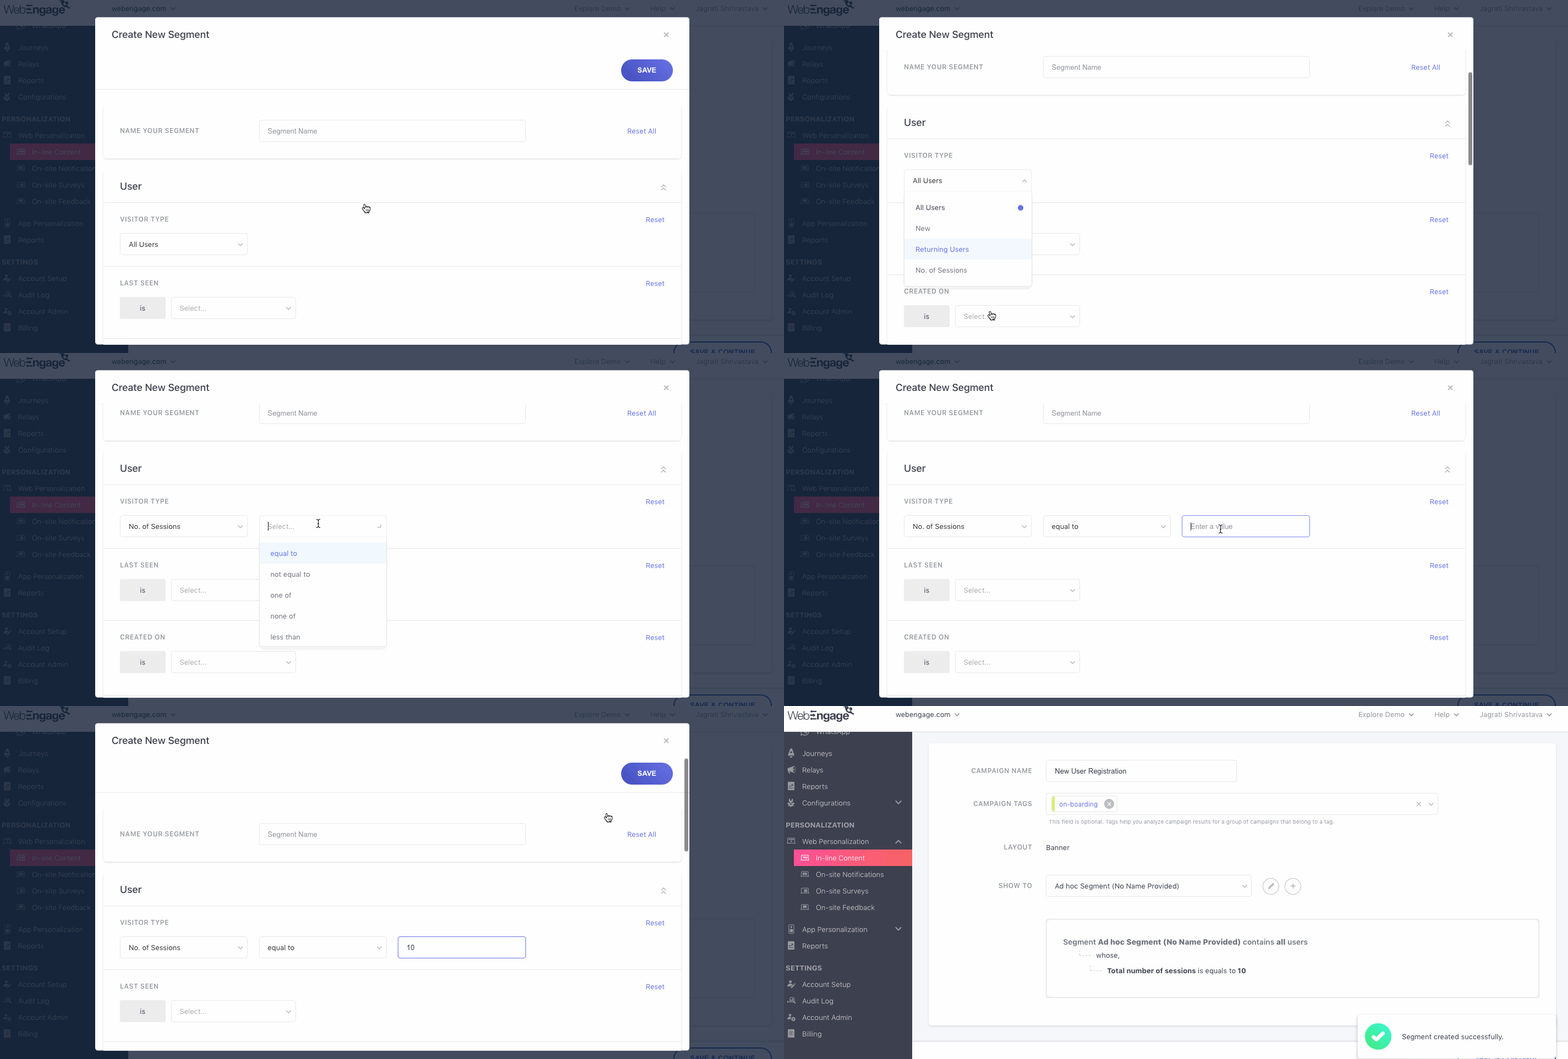
Click to enlarge
As shown above, this can be achieved by leaving the field, Name blank while creating the segment. In doing so, it will become an Ad hoc segment in your dashboard, which will be available only for sending the campaign you're currently creating.
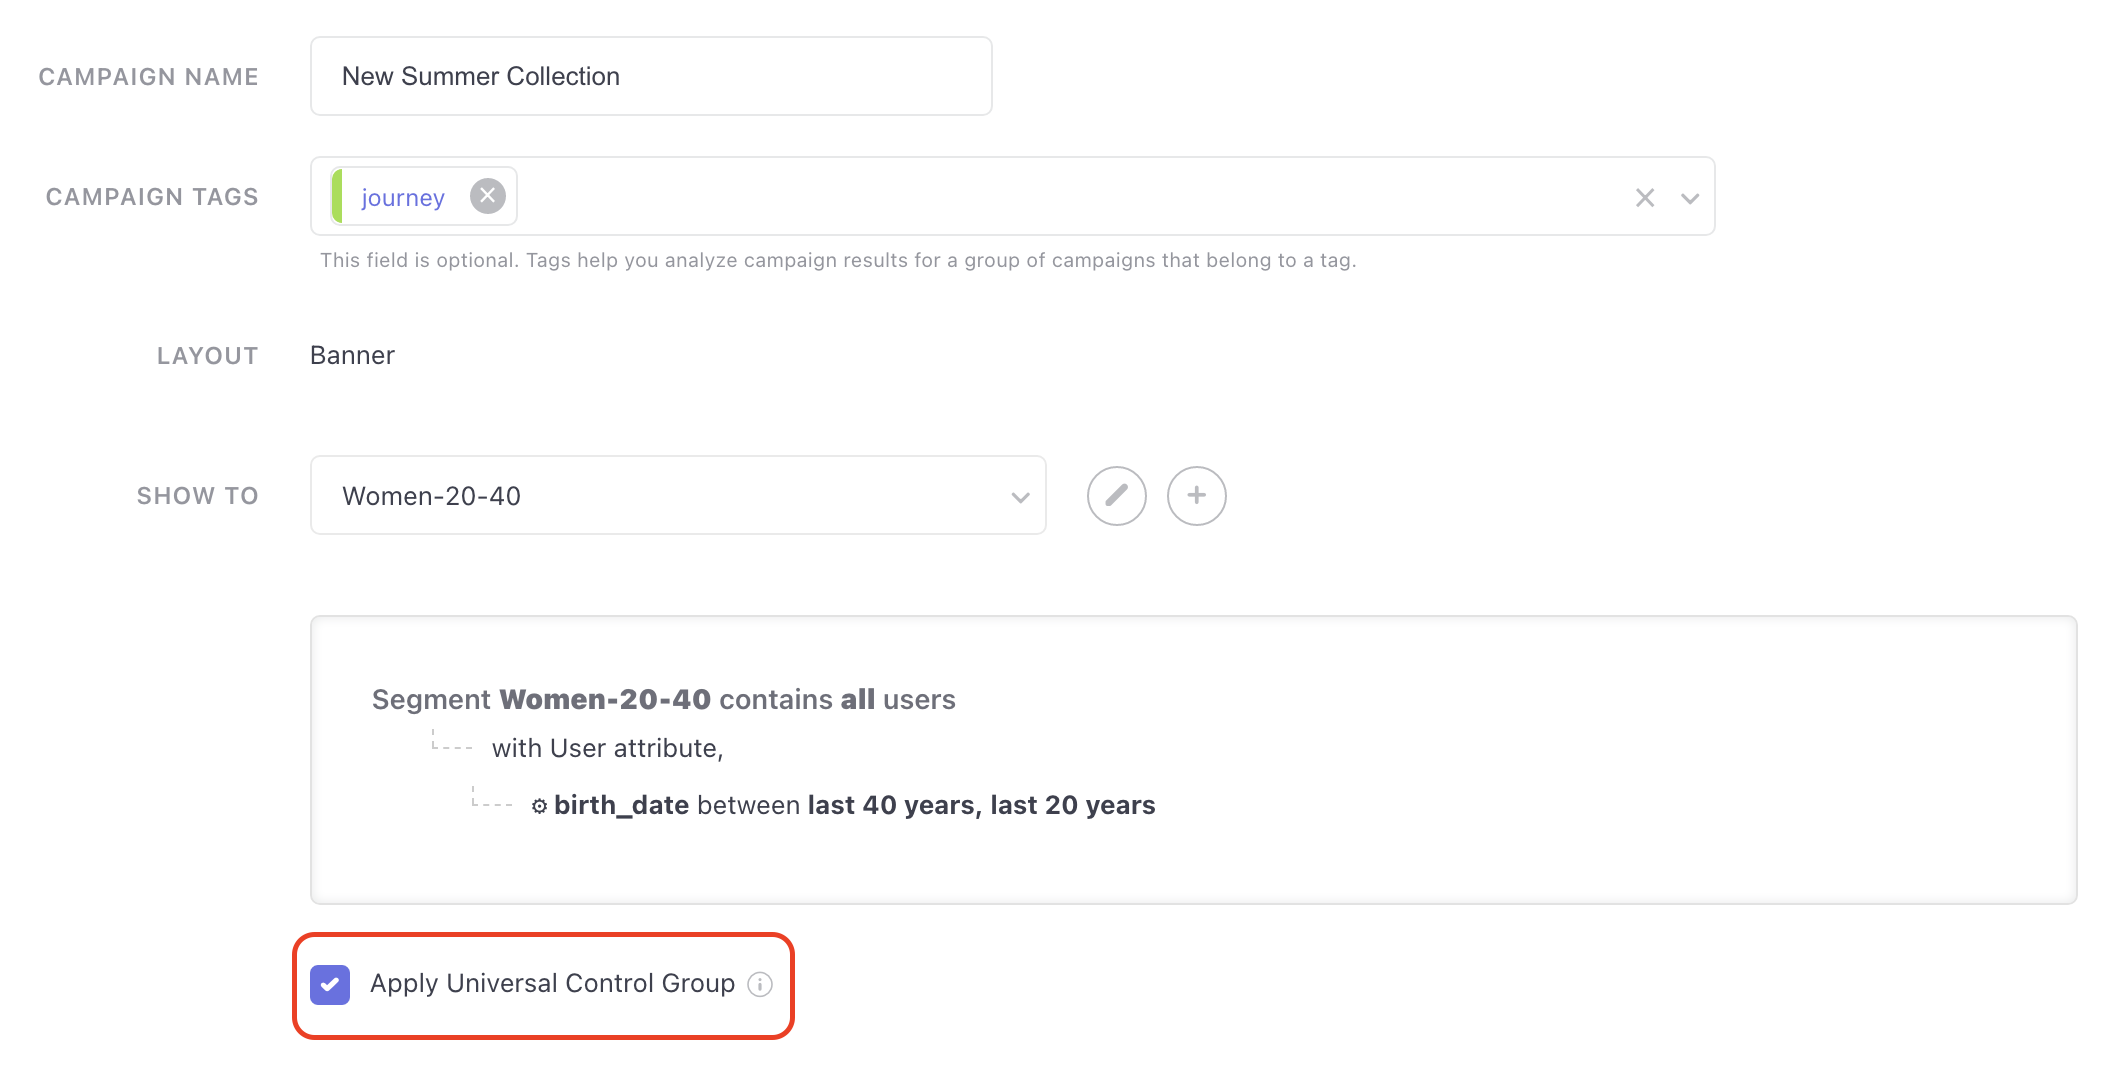
Apply Universal Control Group
Click to enlarge
Conditional OptionThis is a conditional option which will be shown only if the you have created Universal control group in your account. Click here to know how to create Universal control group.
- When the box is checked, the campaign will not be sent to users who are part of the Universal Control Group in the segment that is selected.
- When the box is unchecked, the campaign will be sent to all users that are part of the segment inclusive of the Universal Control Group users.
Step 2: Specify Where & When to Show Personalized Element
Click to enlarge
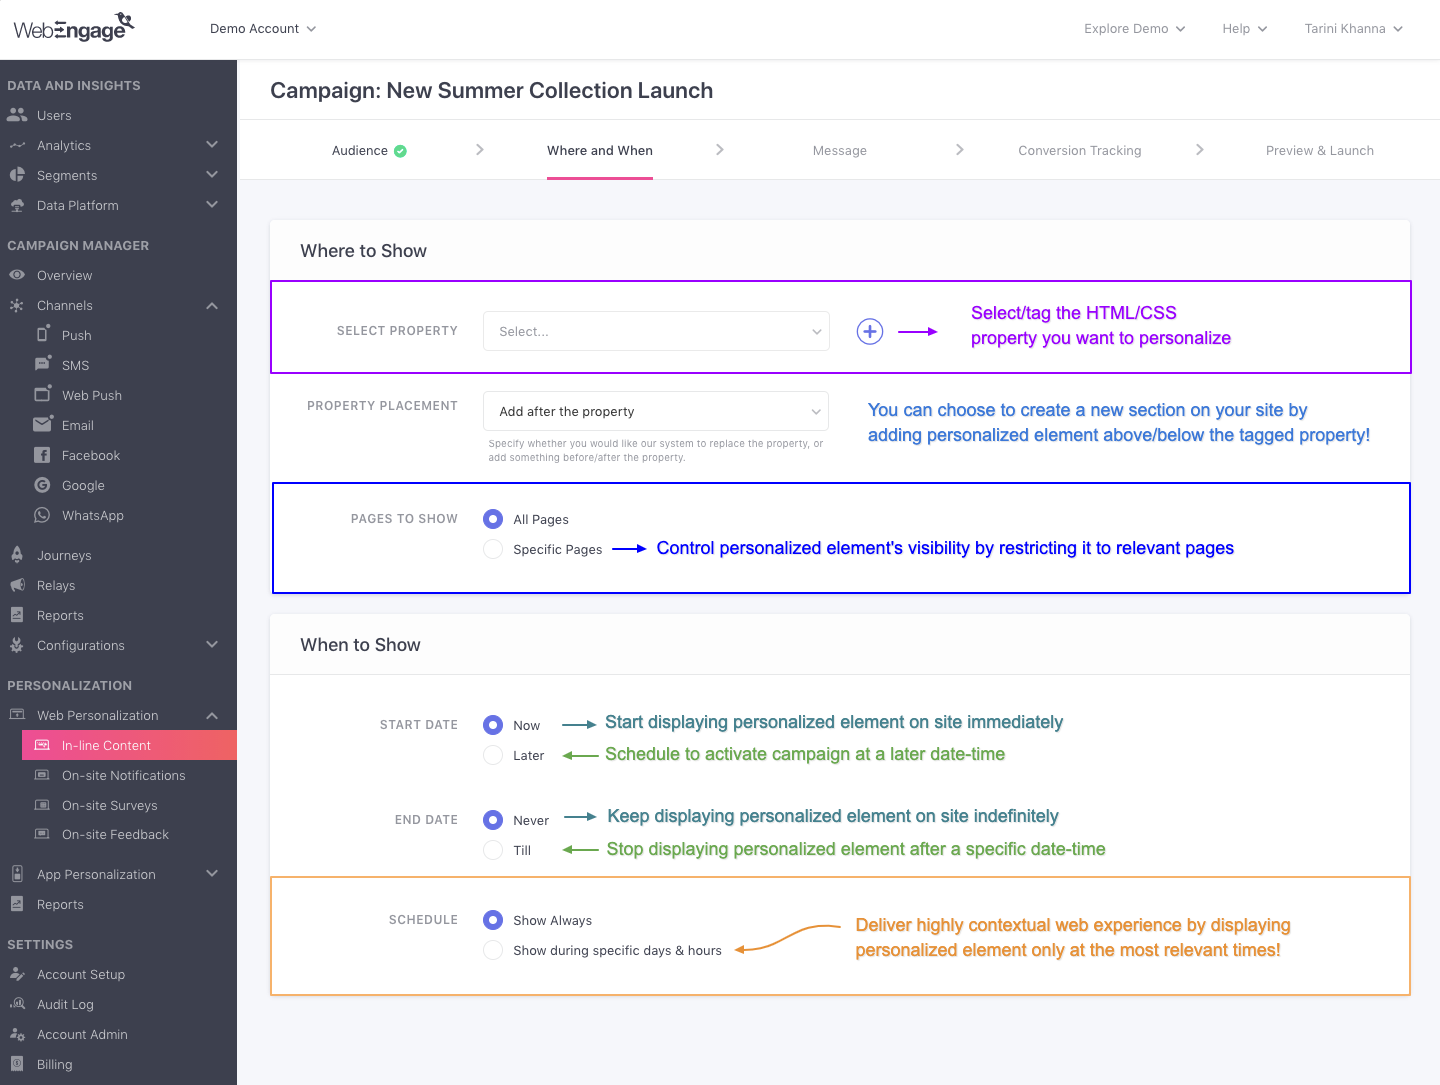
As highlighted above, Step 2 is divided into 2 sub-sections that enable you to:
-
Define the web element (image/content) or section of your site that should be personalized via the campaign. (Skip to: Select/ Tagging New Web Property)
-
Specify the pages on which the personalized element must be displayed. (Skip to: Specify Target Web Pages)
-
Specify a specific day or hours of the day during which the target audience must experience the personalized element (Skip to: When to Show)
Let's walk you through the workings of each section:
Where to Show
Step 1: Select Property
You can select the property from the drop-down menu. The drop-down shows the existing property names.
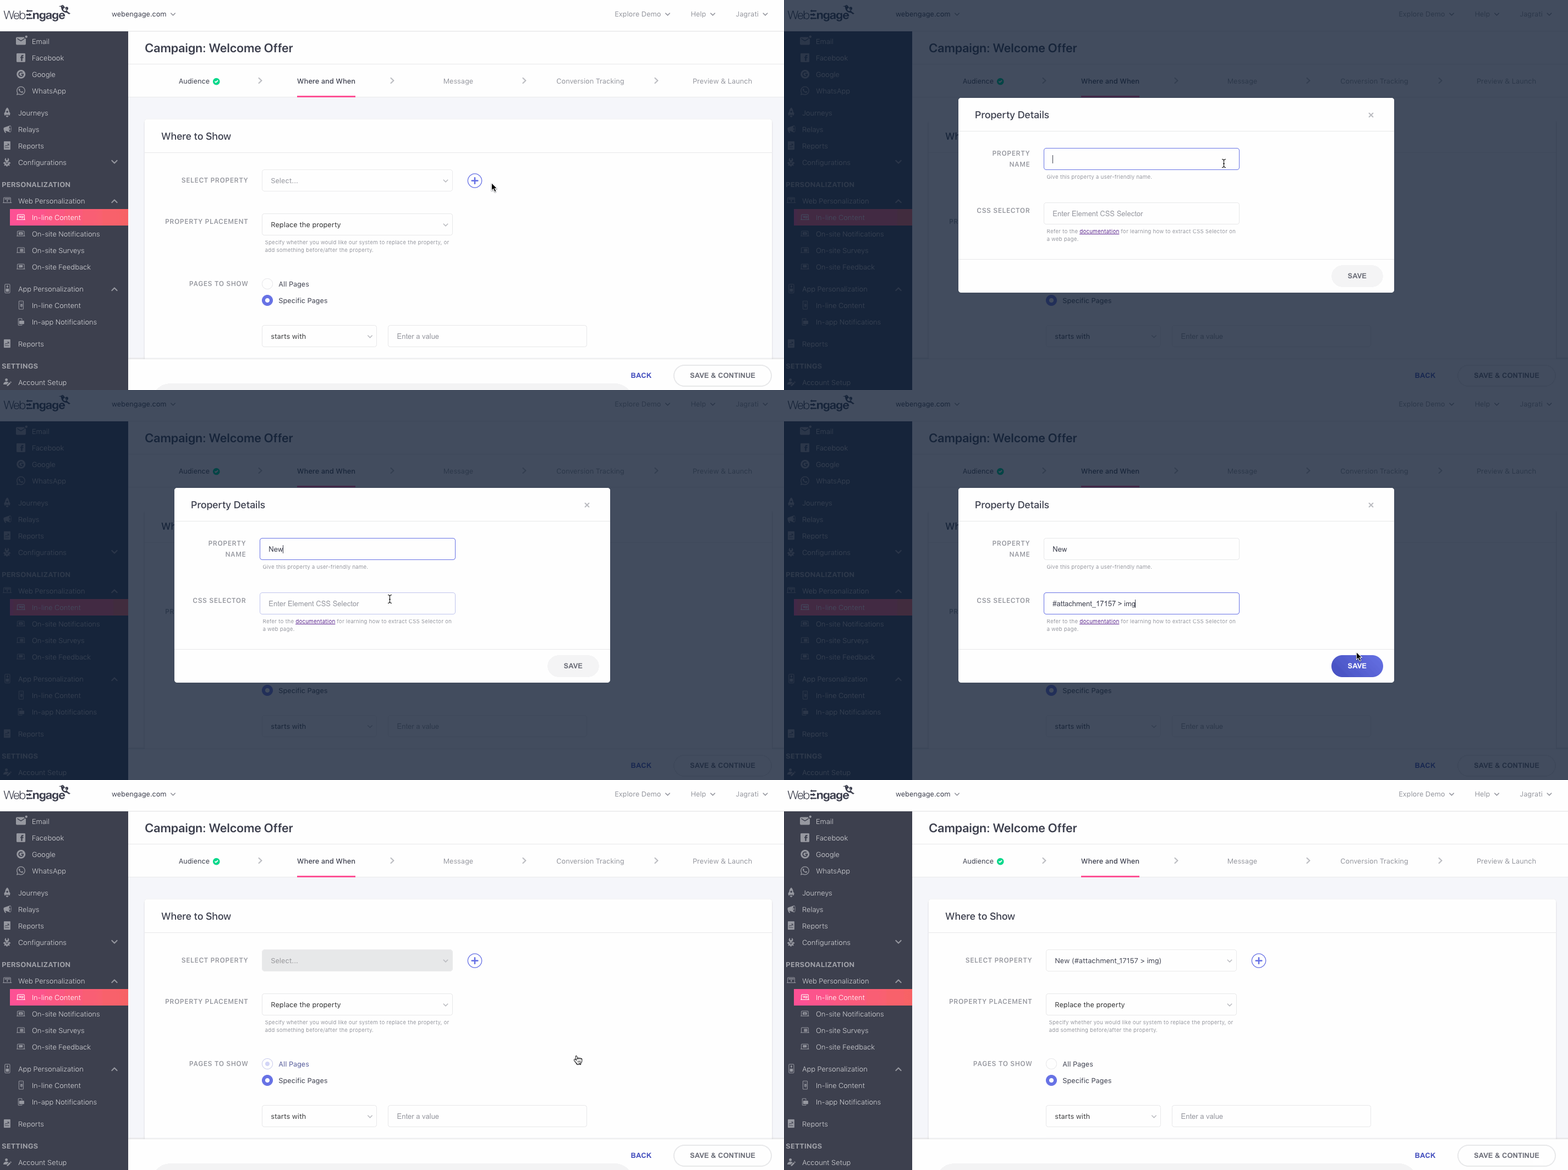
If the property name is not on the list, you can create one of your own by clicking on the Plus icon.
Creating Property
Click to enlarge
A new page pops up that will let you create your own property. The input fields required are as follows:
-
Property Name: It is necessary to give the property a name. In the input box, enter the name of the property that you want.
-
CSS Selector: This field is mandatory as well. You have to enter the element CSS selector. Kindly refer to this document to learn about extracting CSS selector from a webpage.
The property name will be successfully saved upon clicking on the Save button. You will be able to see the property name in the drop-down menu now. In case there is a validation error, a message pop-up will show up stating the reason for the error.
-
If the property name already exists, the error message will pop up with the message
A property with the {property name} name already exists, please provide a unique property name -
If the property ID already exists, the error message will pop up with the message
A property with the {propertyId} ID already exists, please provide a unique property ID.
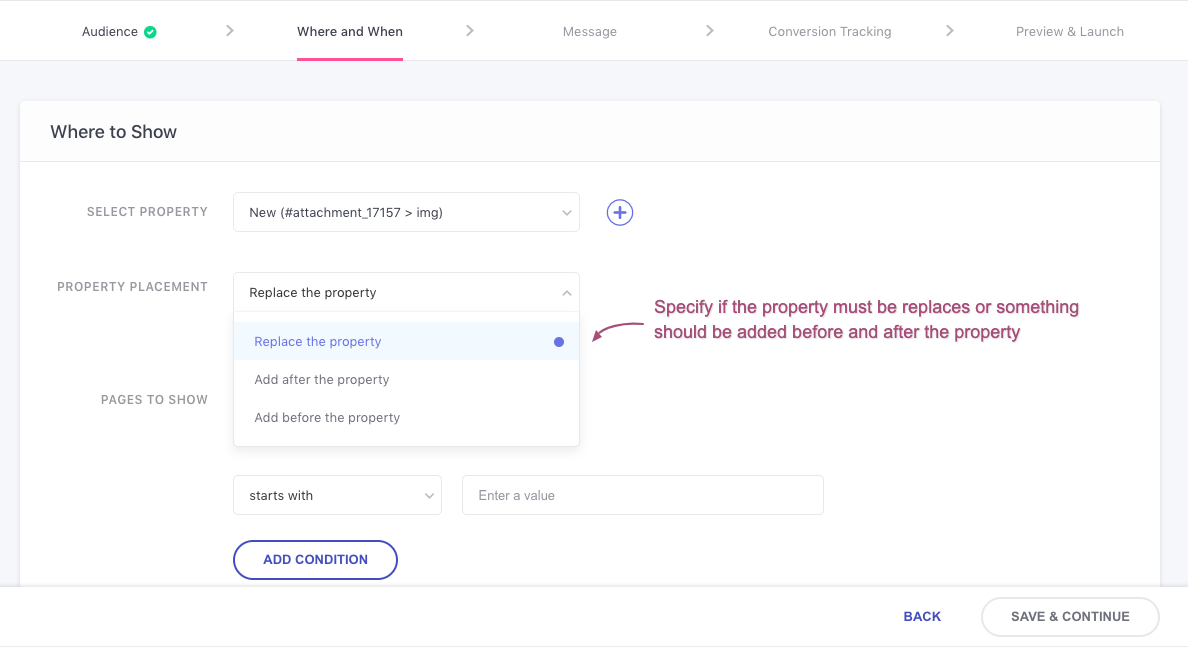
Step 2: Specify Campaign Placement
Click to enlarge
As highlighted above:
- SelectReplace the Property to display the campaign in place of the tagged web element.
- SelectAdd after the Property to create a new section on your site and display the campaign under the tagged site element.
- SelectAdd before the Property to create a new section on your site display the campaign above the tagged site element.
Step 3: Define Pages to Show On
By default, your campaign will be displayed on all pages that contain the tagged web property (as defined above). However, you can choose to limit the campaign's visibility to specific pages of your site, depending on your engagement strategy.

Click to enlarge
As highlighted above:
-
SelectAll Pages to display the campaign on all webpages where the tagged property exists.
-
SelectSpecific Pages to define specific sections of your website (on which the tagged property exists) and you'd like to display your campaign. This option enables you to:
- Show the personalized element to users only when they visit specific pages.
- Prevent the personalized element from being displayed on certain pages.
Here's how you can control the visibility of Personalized Web Elements:
Method 1: Add the Page URL(s).
- Recommended when targeting or excluding visitors of a specific webpage/ a specific category of your website.
Method 2: Specify a Path Parameter that is included in multiple pages of your website. This could be anything like price, genre, category ID, offer ID or any other keyword and so on.
- For example, if you're running a Web In-line campaign that nudges users to explore the latest fashion collection on your website, then you can exclude the notification from being displayed on pages related to the collection.
Let's quickly revise the basics of a URL structure before we deep dive into each method:
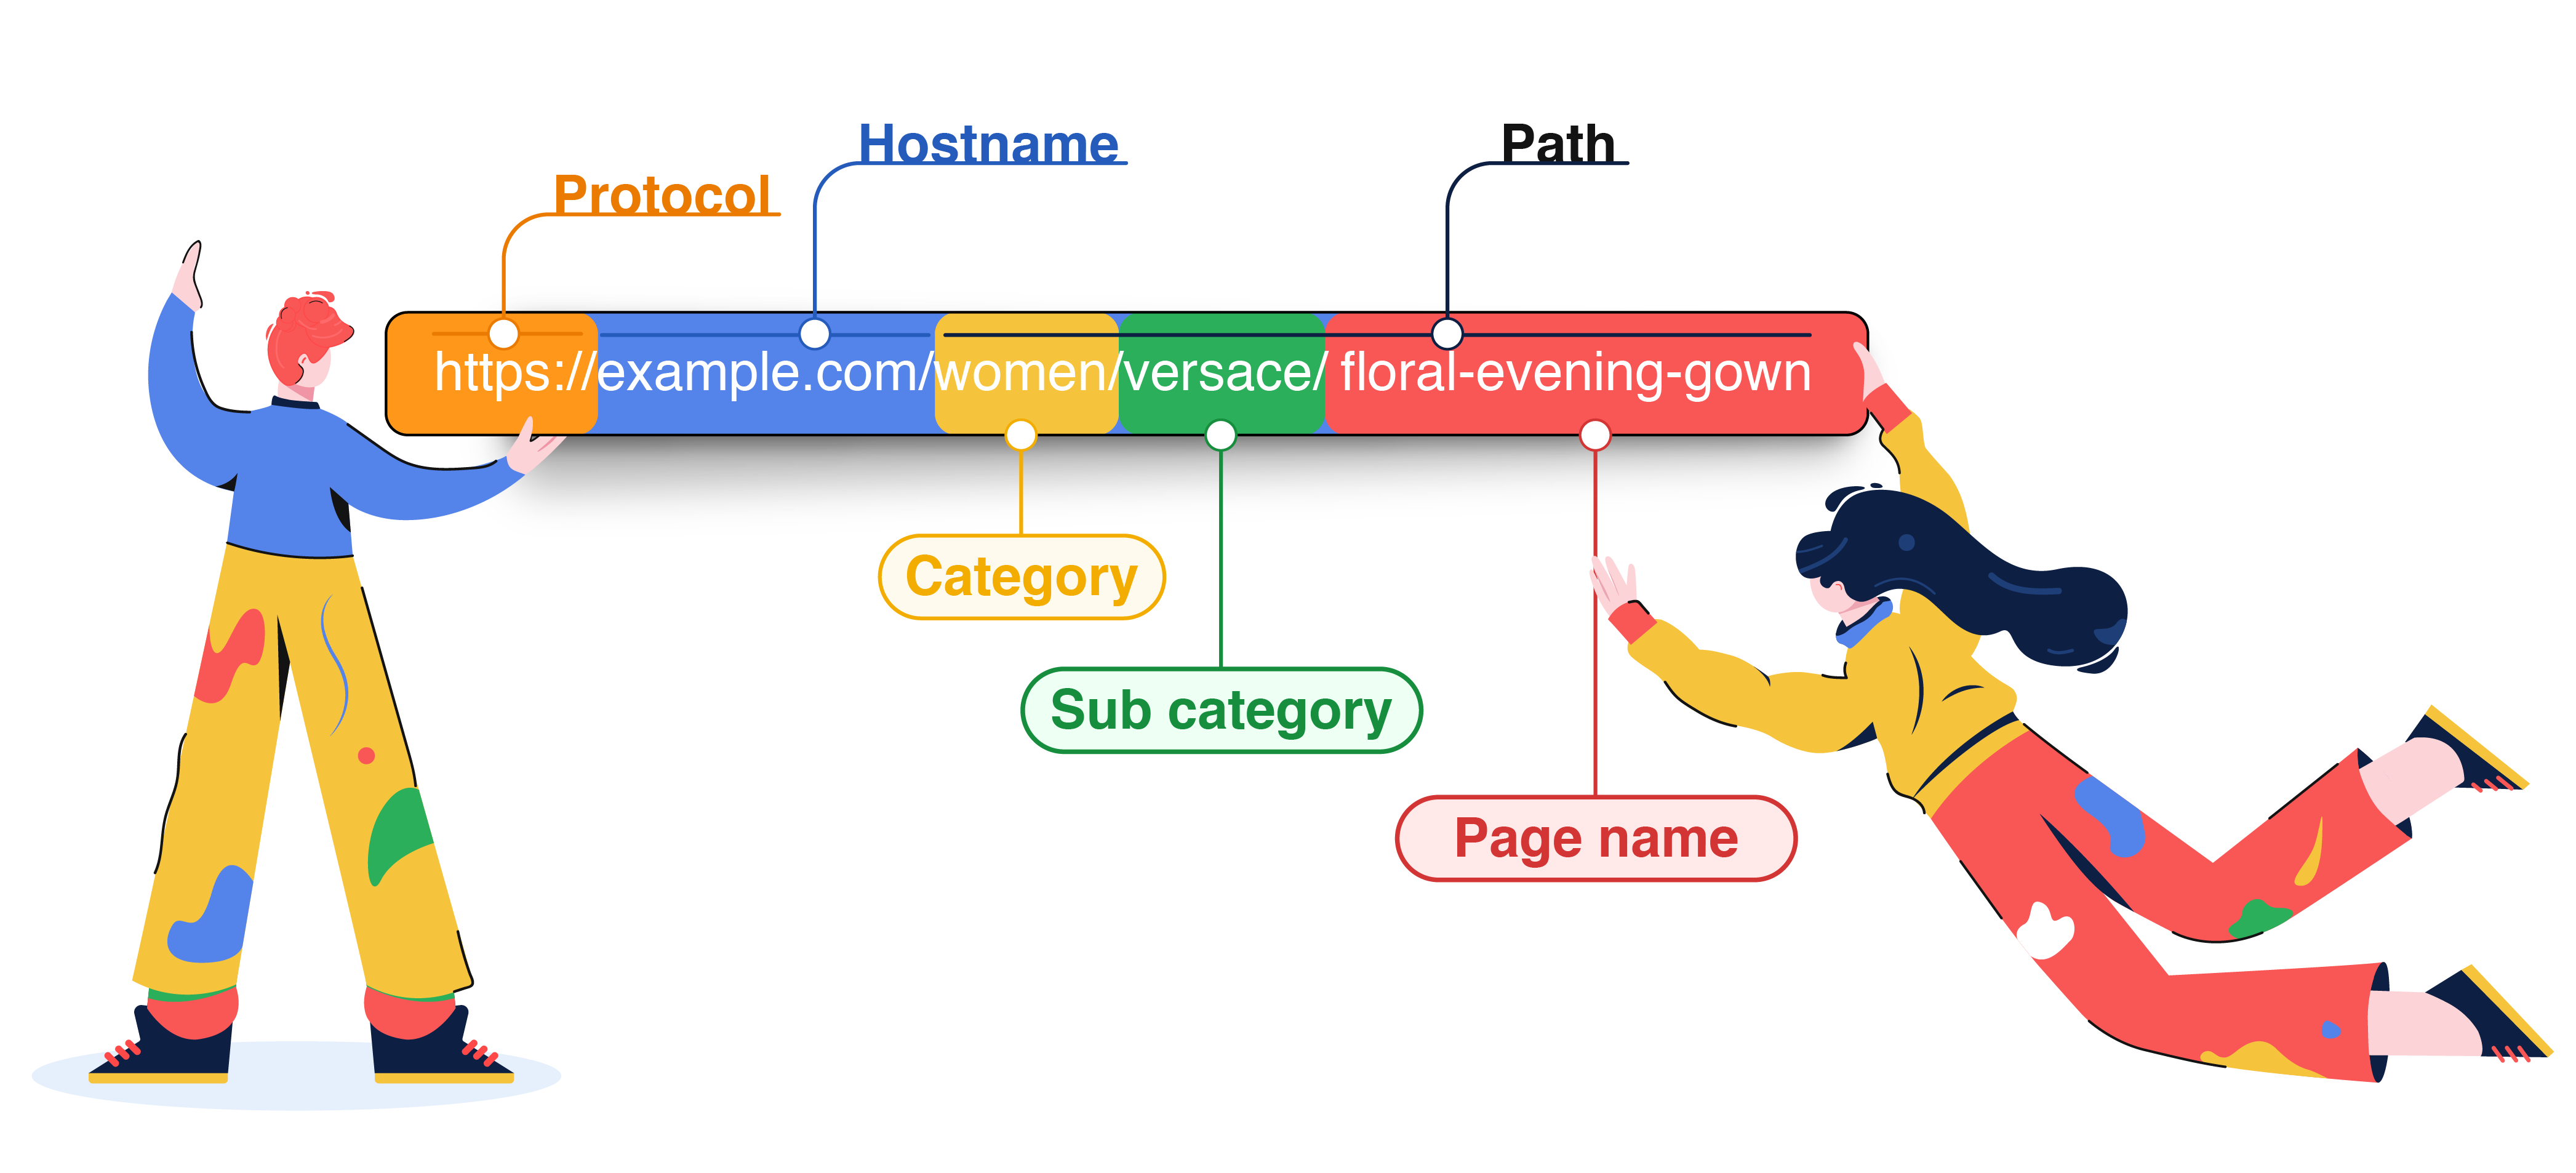
Click to enlarge
As highlighted above, a link has 3 parts: Protocol HTTP:// or HTTPS://), Hostname (domain) and Path (name of page/file hosted on the domain).
The Path indicates the exact location of a certain file or page in your domain's file structure and can consist of several hierarchies like Category > Sub Category > Page.
The Parent Link consists of the protocol, hostname, and primary folder name under which a category or page is being hosted.
Now, let's walk you through each method:
Method 1: Add Page URLs
If you're looking to target/ exclude visitors of a specific webpage or a handful of pages that start with the same parent link, then we recommend that you add the page URLs here. Here's how you can go about it:
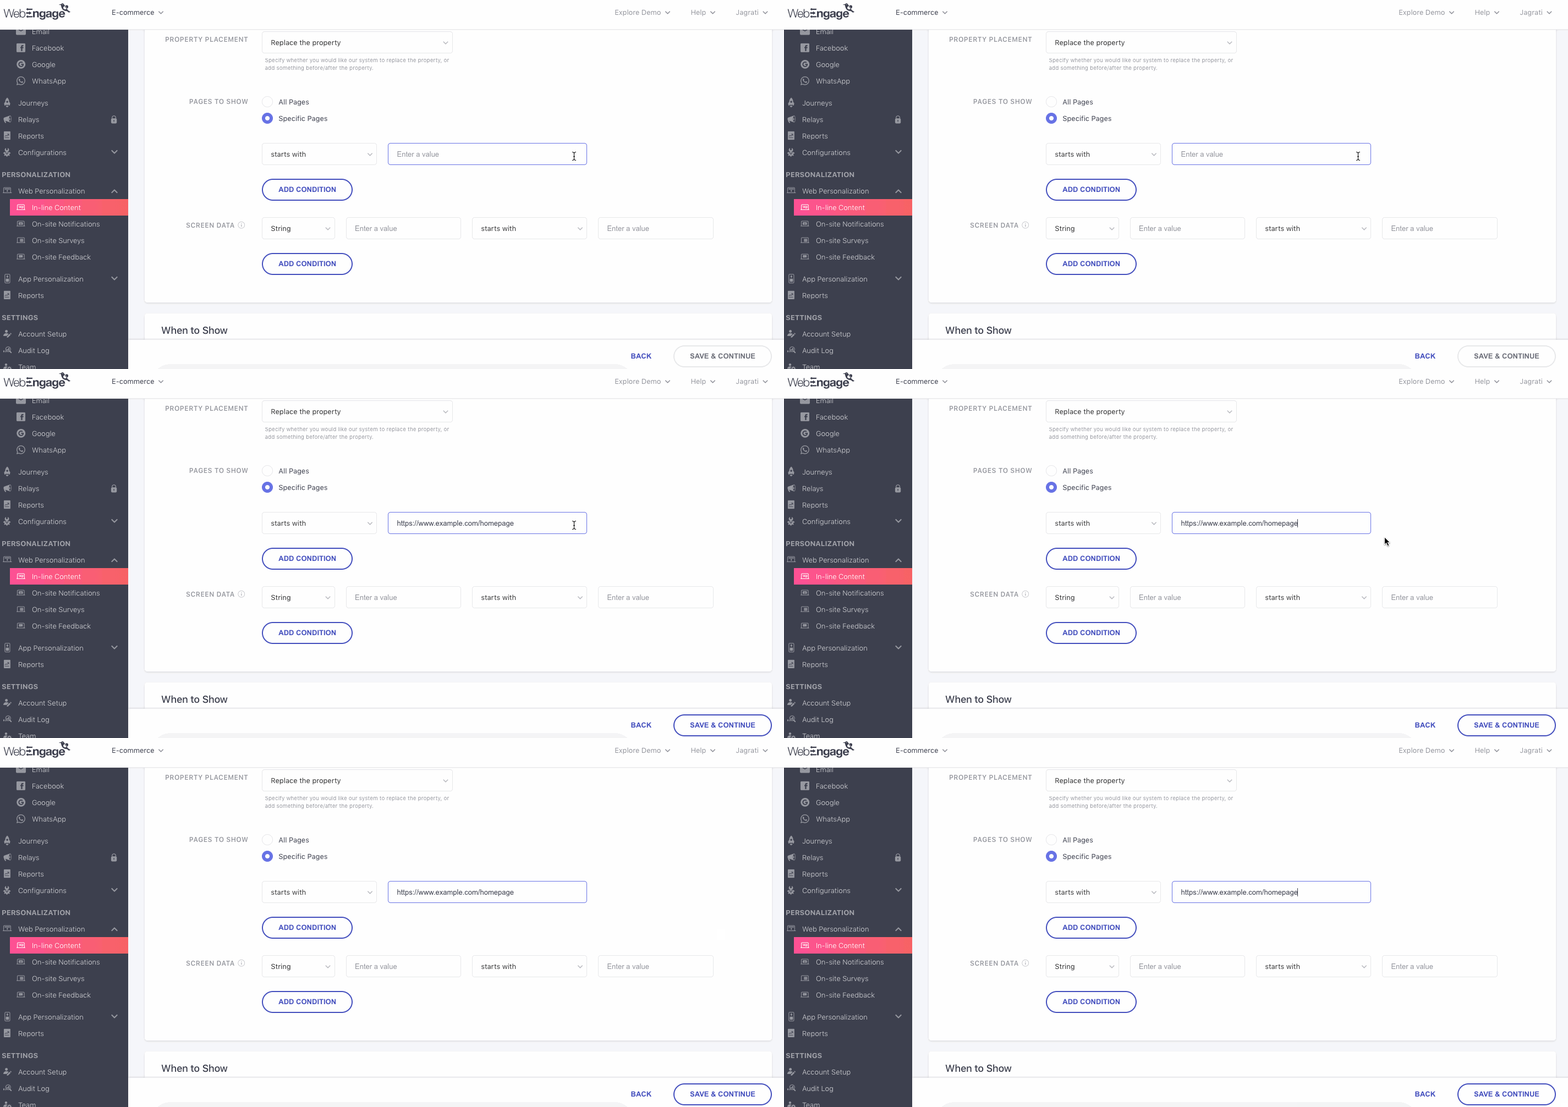
Click to enlarge
Step 1: Select a Condition
Depending on your use-case, you can prefix the page URL with any of these conditions:
-
Equals To: Implies that the Web In-line Content will be shown only on the URL specified here.
-
Starts With: Implies that the Web In-line Content will be shown on all pages whose URL starts with the specified parent link.
- For example, in the above visual we have specified www.example.com/zara as the target URL.
- This means that the notification will be shown on all the pages listed under the folder, Philips. It could be anything like:
-
Not Equal To: Implies that the Web In-line Content will not be shown on the URL specified here.
-
Does not Start With: Implies that the *Web In-line Content will not be shown on pages whose URL starts with the specified parent link.
Step 2: Add the Page URL/ Parent Link
Please ensure that your URL(s) start with http:// or https:// when adding them.
Step 3 (Optional): Add More Links
When specifying multiple links, combine them by the logic - Any rule can satisfy to implement your use-case. (The logic,All rules must satisfy is valid only for combining path parameters.)
Method 2: Add Path Parameters
If you're looking to include or exclude visitors of a specific set of pages from the Web In-line campaign's target audience, then you can easily achieve this by grouping them by their path parameters. Here's how you can go about it:
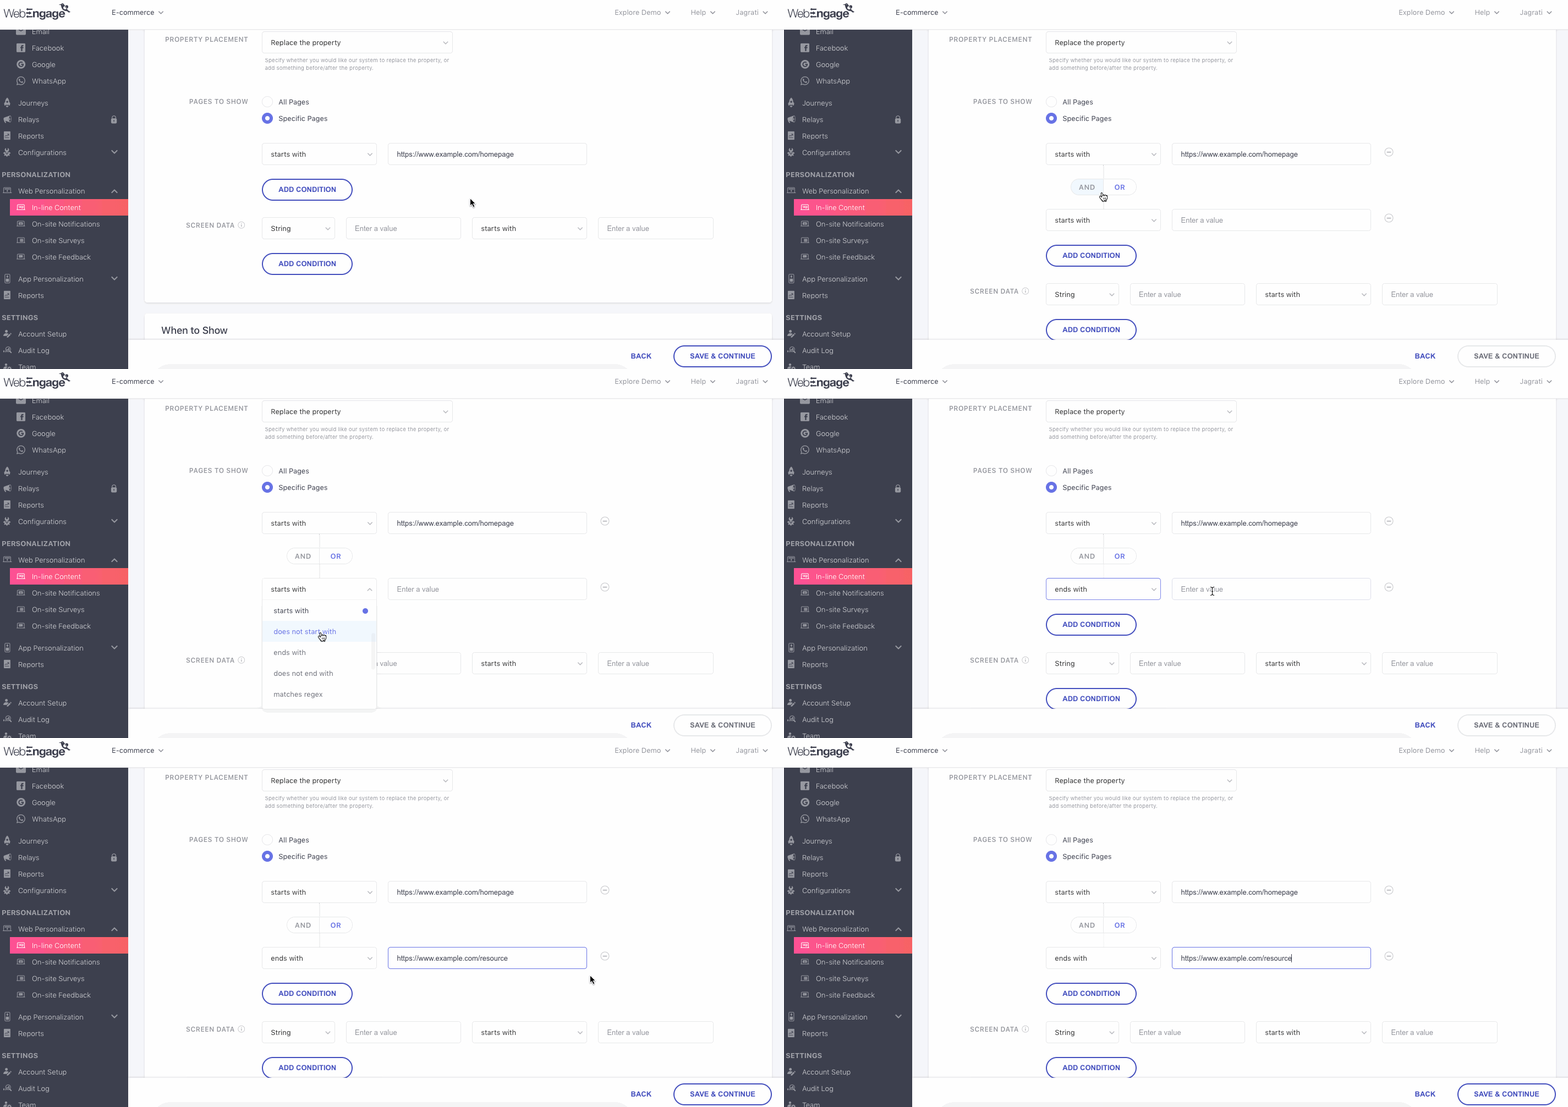
Click to enlarge
Step 1: Select a Condition
Depending on your use-case, you can prefix the path parameter(s) by any of the following conditions:
-
Ends with: Implies that the Web In-line campaign will be shown only on those pages that contain the path parameter at the end of their URL structure.
-
For instance, if the path parameter is
bubblegum, then the Web in-line campaign will be shown only on the following pages: -
Contains: Implies that the Web In-line campaign will be shown on all pages that contain the path parameter in their URL, irrespective of their placement.
- For example, if the path parameter is
versace, then the notification will be shown on the following pages:
- For example, if the path parameter is
-
Matches Regex: (Regex is a sequence of characters that define a search pattern - used in several coding languages.Detailed read.)
-
Does not End With: Implies that the Web In-line campaign will not be shown on the pages that contain the path parameter at the end of their URL structure.
-
Does not Contain: Implies that the Web In-line campaign will not be shown on pages that contain the path parameter in their URL.
Step 2: Add the Path Parameter
Step 3 (Optional): Add More Path Parameters
Depending on your use-case, you can choose to combine multiple path parameters by any of the following logic:
-
Any Rule Can Satisfy: Implies that the Web In-line campaign will be shown to visitors of all pages whose URL structure contains any one of the path parameters specified by you.
-
All Rules Must Satisfy: Implies that the Web In-line campaign will be shown to visitors of only on those pages whose URL structure contains all the path parameters specified by you.
Step 4: Screen Data
This field enables you to target specific user behavior through Web In-line Content. You can specify conditions based on your own business data. You need to pass the data using Javascript API.
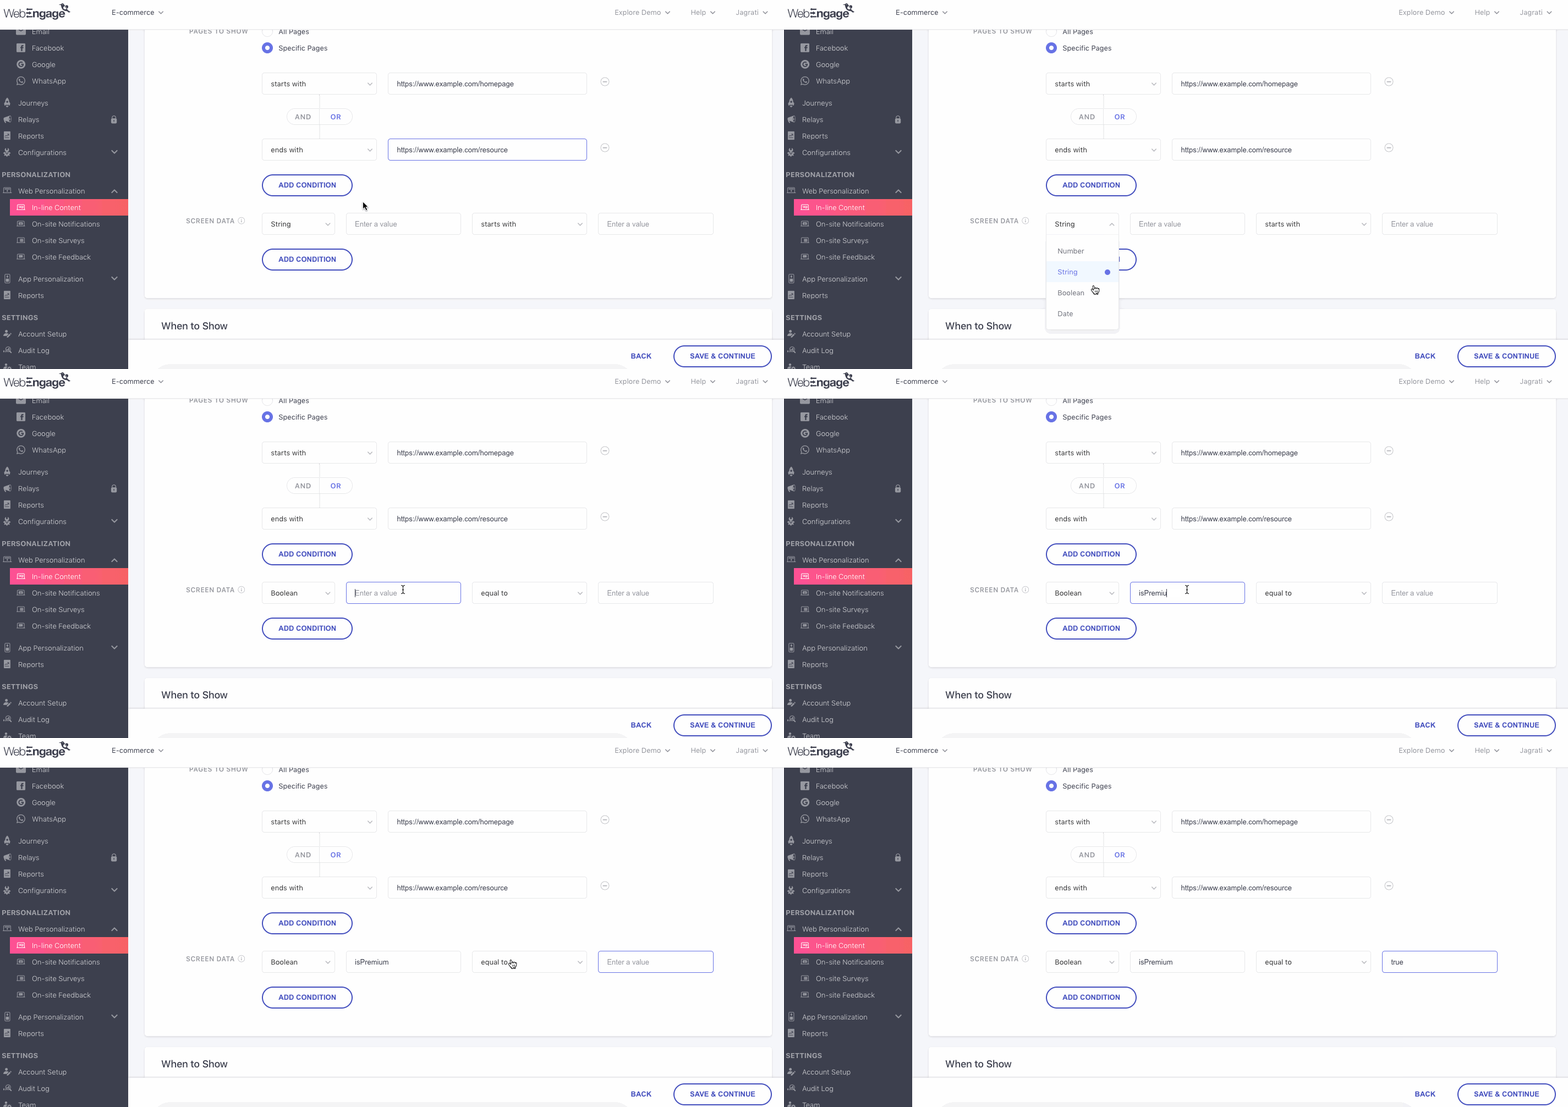
Click to enlarge
Step 1: Select Data Type
Select the type of data that is tracked against the data attribute.
- Number: Select if only a numerical value is tracked.
- String: Select if an alpha-numeric value like class_10 is tracked.
- Boolean: Select if a True/False scenario like Paid User = True is tracked.
- Date: Select if only date (YYYY/MM/DD) is tracked.
**Step 2: Add Data Attribute and Select Condition
Please check in with your tech team to ensure that the correct Data Attribute (and data type) are specified here (as per your use-case). Entering incorrect values may cause your notification to show up for all users!
Step 3: Specify a Value (Tracked against the data attribute)
Step 4: Add Multiple Data Attributes (Optional)
Depending on your use case, you can choose to specify multiple data attributes to target specific user behavior. You can combine the attributes by any of the following logic:
-
Any Rule Can Satisfy: Implies that the Web In-line Content will be shown to all users whose interactions match any one of the data attributes specified by you.
-
All Rules Must Satisfy: Implies that the Web In-line Content will be shown only to those users whose interactions match all the data attributes specified by you.
Learn more about Screen Variables
When to Show
By default, all Web in-line campaigns are displayed to the target audience as soon as they're launched. However, depending on your engagement strategy, you can choose to run the campaigns for a specific time period by defining a Start Date and End Date.
You can further refine their visibility by setting up a Schedule that determines specific days and hours during which the campaigns must be active on your site (it'll remain hidden at other times!). This comes in handy, especially when you're promoting festive offers with personalized web content, running a flash sale, promoting a specific event, and so on.
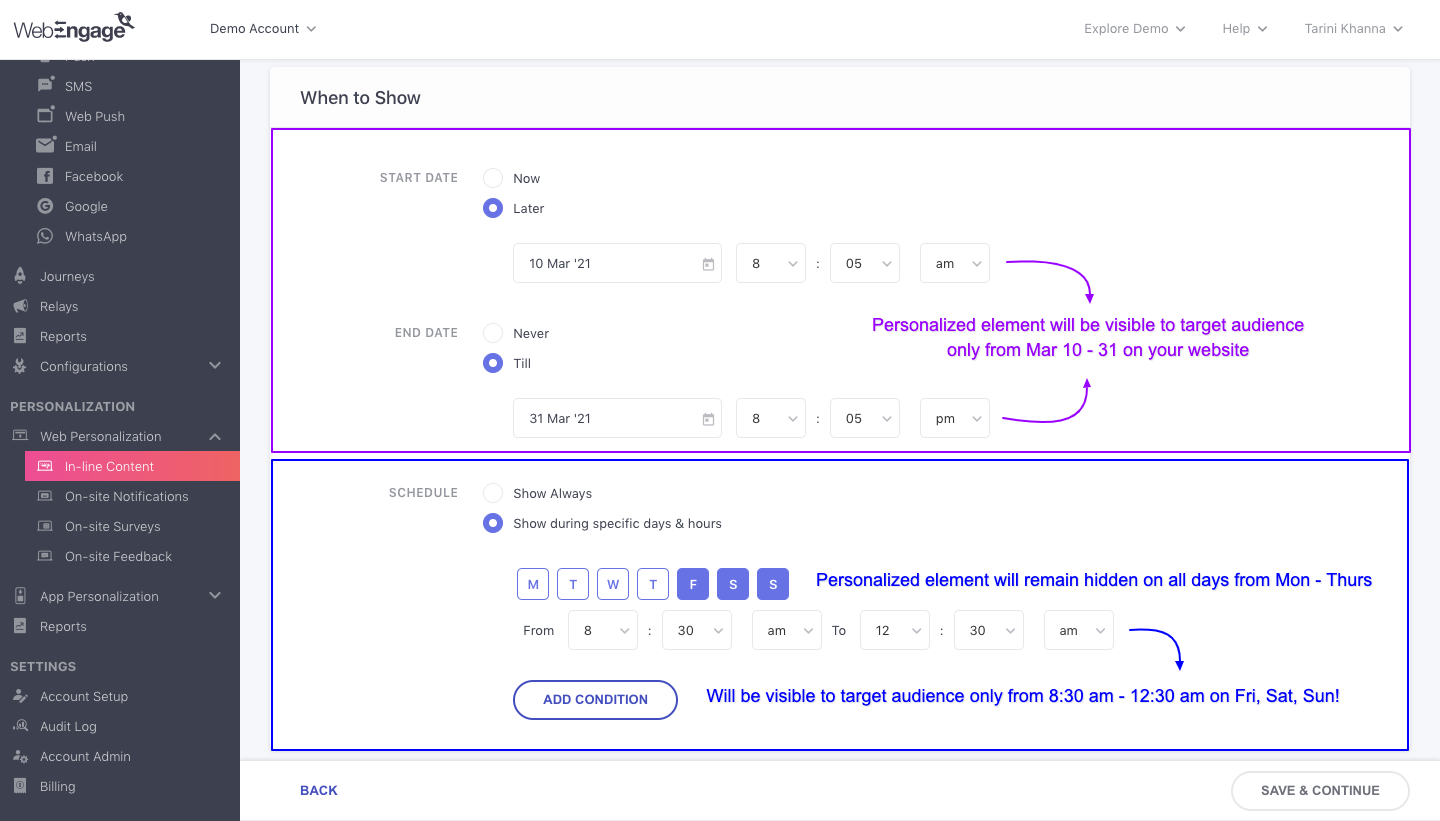
Here's how you can configure these settings:
Step 1: Specify Start Date
By default, the campaign will be activated on your website as soon as it's launched. However, you can choose to delay its visibility by specifying a Start Date.
As highlighted below:
- SelectNow to activate the campaign immediately.
- SelectLater to activate the campaign at a later date-time.
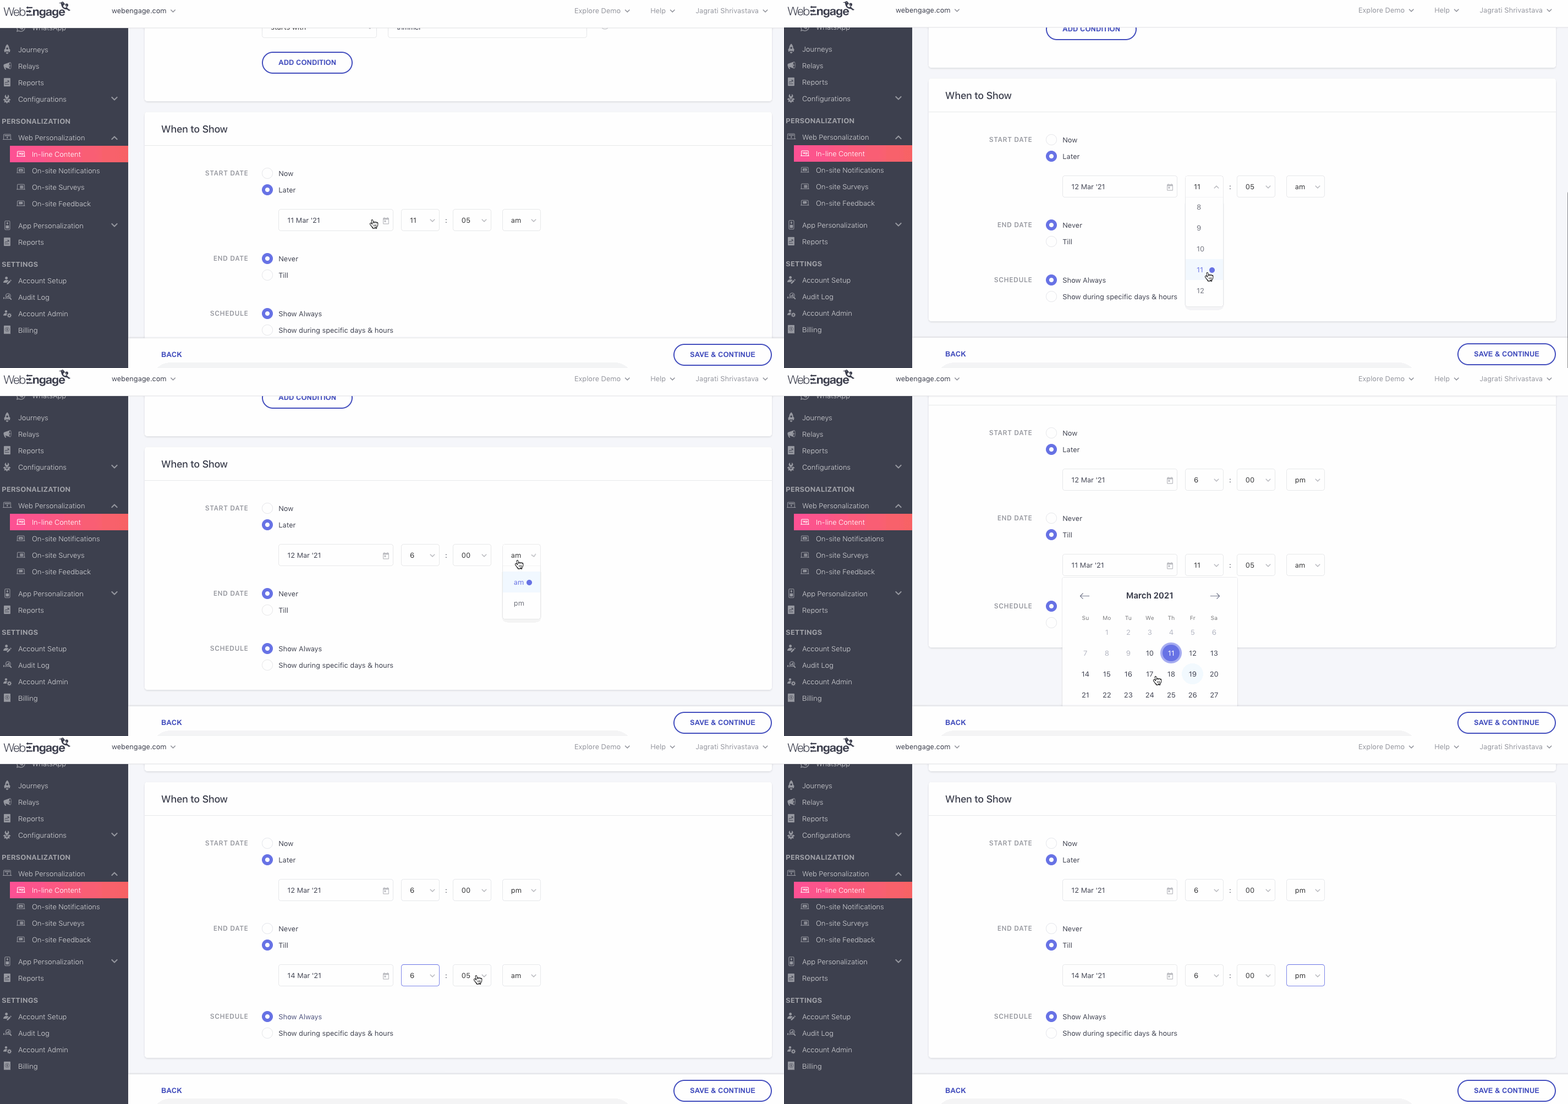
Click to enlarge
Step 2: Specify End Date
By default, the campaign will be displayed indefinitely to the target audience each time they visit your website. However, you can put an expiry date on it by specifying an End Date-time. This comes in handy when you're promoting a product launch, flash sale, festive offer, or new content released on your platform.
As highlighted above:
-
SelectNever to run the campaign indefinitely (you can always Pause the campaign through its Campaign Overview)
-
SelectTill to specify a date-time at which the campaign should stop being displayed.
Step 3: Setup Campaign Schedule
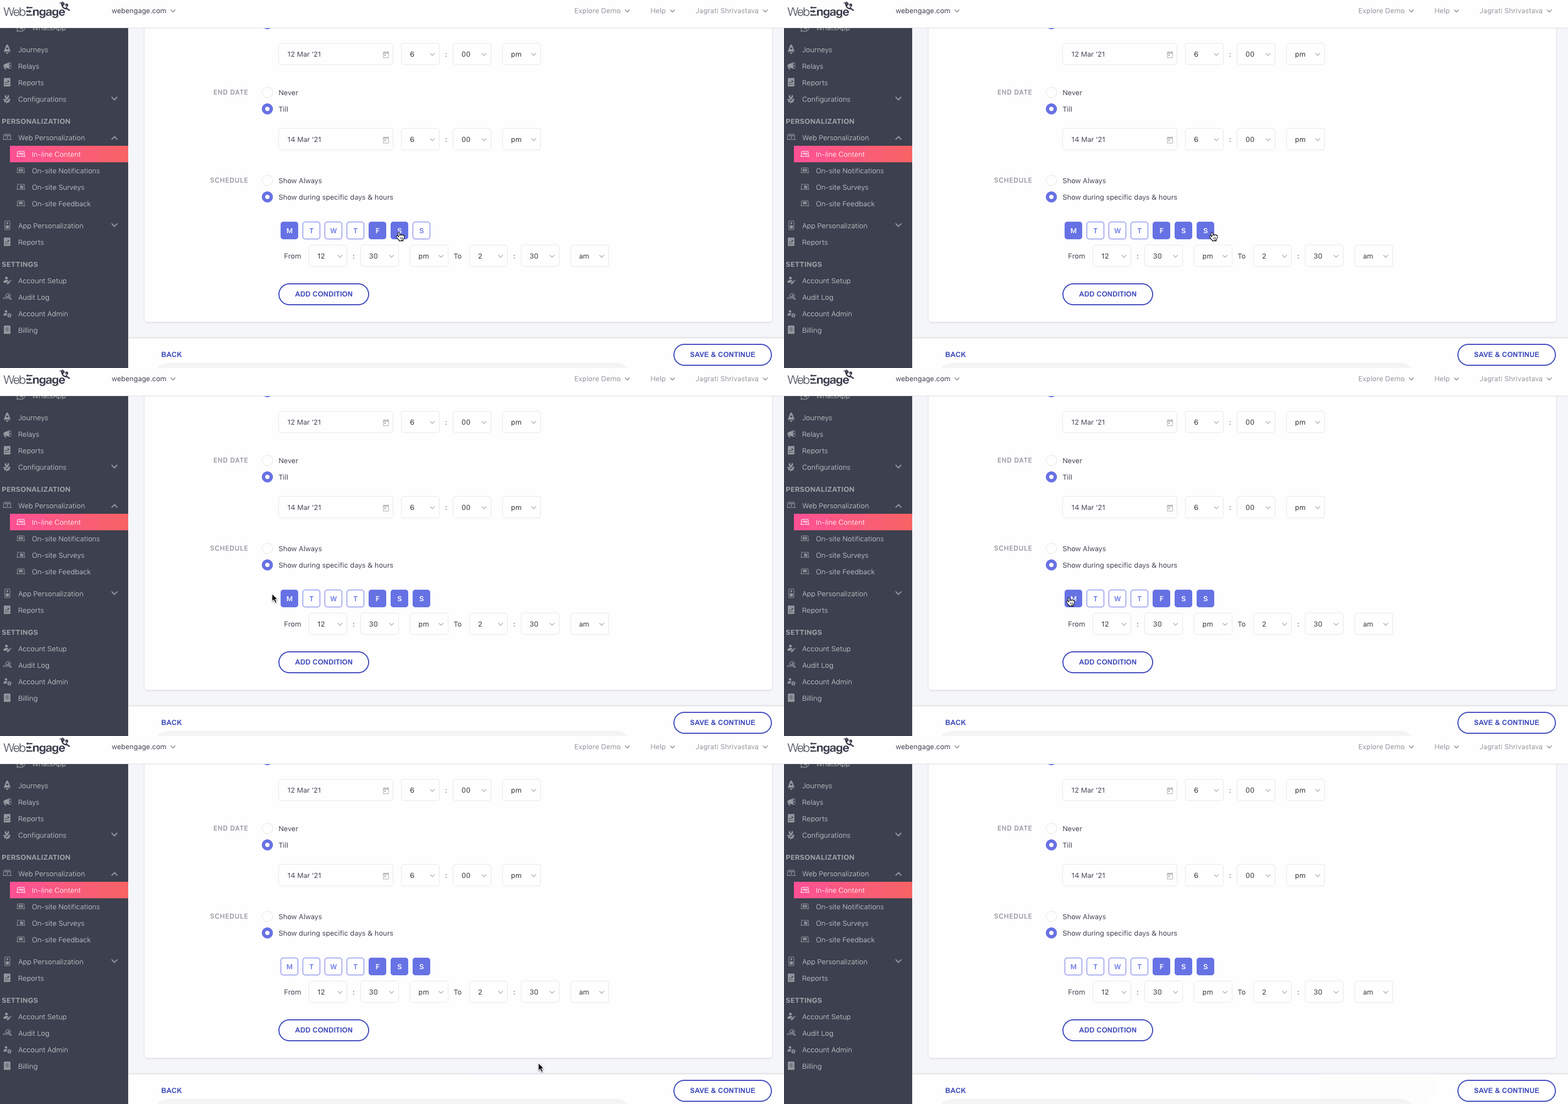
By default, all your Web In-line campaigns are visible at all times to the target audience. However, you can control its visibility by creating a schedule. Doing so ensures that the personalized elements are displayed only on appropriate occasions and remain hidden at other times. This comes in handy, especially when you're highlighting new content as per your weekly/monthly schedule.
Click to enlarge
As shown above:
-
SelectShow Always to run the campaign indefinitely. (you can always Pause the campaign through its Campaign Overview)
-
SelectShow During Specific Days & Hours to configure a schedule at which the personalized element must be displayed on your site.
- You can choose to specify multiple display timeslots by adding more fields, as shown above.
Click Save & Continue to proceed.
Step 3: Message
The most exciting part of campaign creation - building the message!
Let's get you acquainted with each layout:
Banner Layout
Banner Layouts enables you to personalize all types of background images, featured images, and icons. You can choose to superimpose the banner with a personalized message and CTA-buttons by adding Custom HTML/CSS.
Here's how you can add personalized banners to your website.
Step 1: Add Image
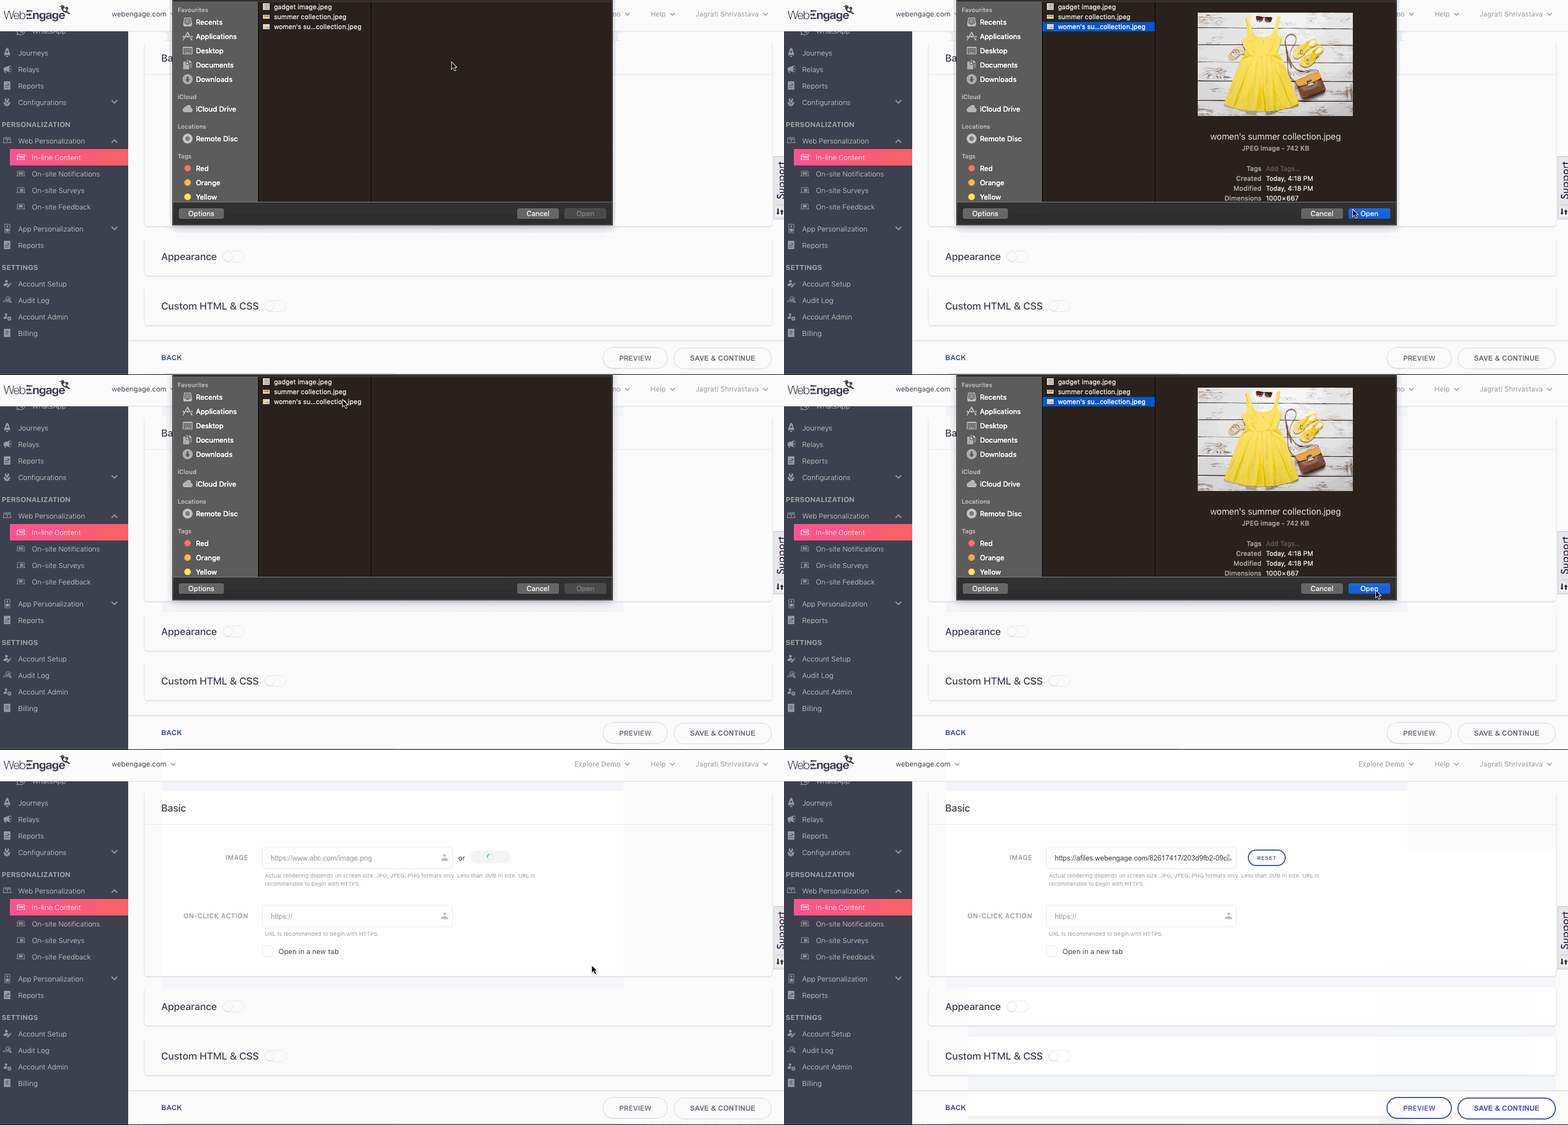
Click to enlarge
As shown above, a banner image can be added in two ways:
1. Insert Image Link: The image must be hosted on a publicly accessible domain to ensure that it renders for all users receiving the message.
2. Upload Image: Click the Upload button placed next to the field, select a file from your desktop. In doing so, the image will get hosted on WebEngage's domain: https://afiles.webengage.com.
You can always click the Reset button to link/upload a new image.
Please Note
Please ensure that the image is hosted on an HTTPS domain.
If you are uploading the image, kindly ensure that the image is in JPG, JPEG, or PNG format and the file size doesn't exceed 3MB.
Step 2: Hyperlink Banner (On-Click Action)
You can choose to hyperlink the personalized banner so that whenever a user clicks on it, they're directed to a specific webpage. This is a great way to boost app downloads, drive traffic to new web properties of your brand and boost user engagement by creating tailored landing pages!
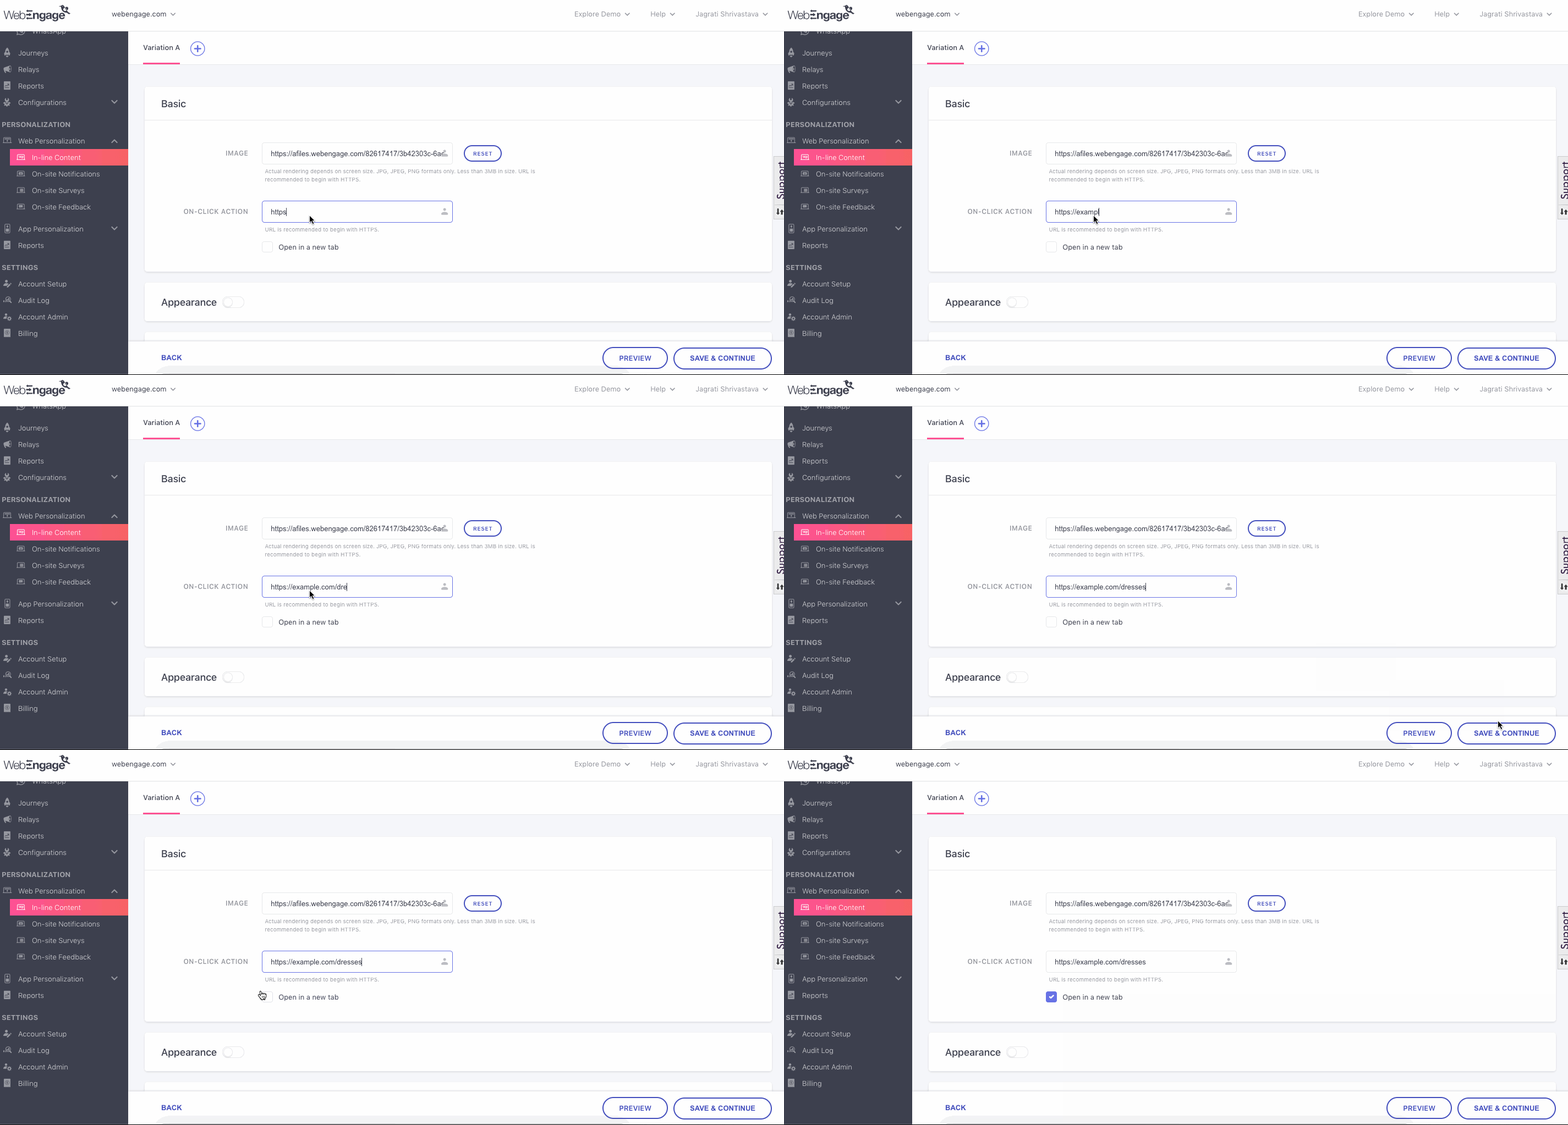
Click to enlarge
As shown above:
Step 1: Simply add the link to which you'd like to direct users.
Step 2: Enable the checkbox to ensure that the webpage opens in a new browser tab.
Customize Appearance (Optional)
You can further customize the personalized banner's appearance by specifying a maximum width in pixels and adding rounded corners (for an aesthetic touch). As shown below, click the toggle switch to enable the section and implement your settings.
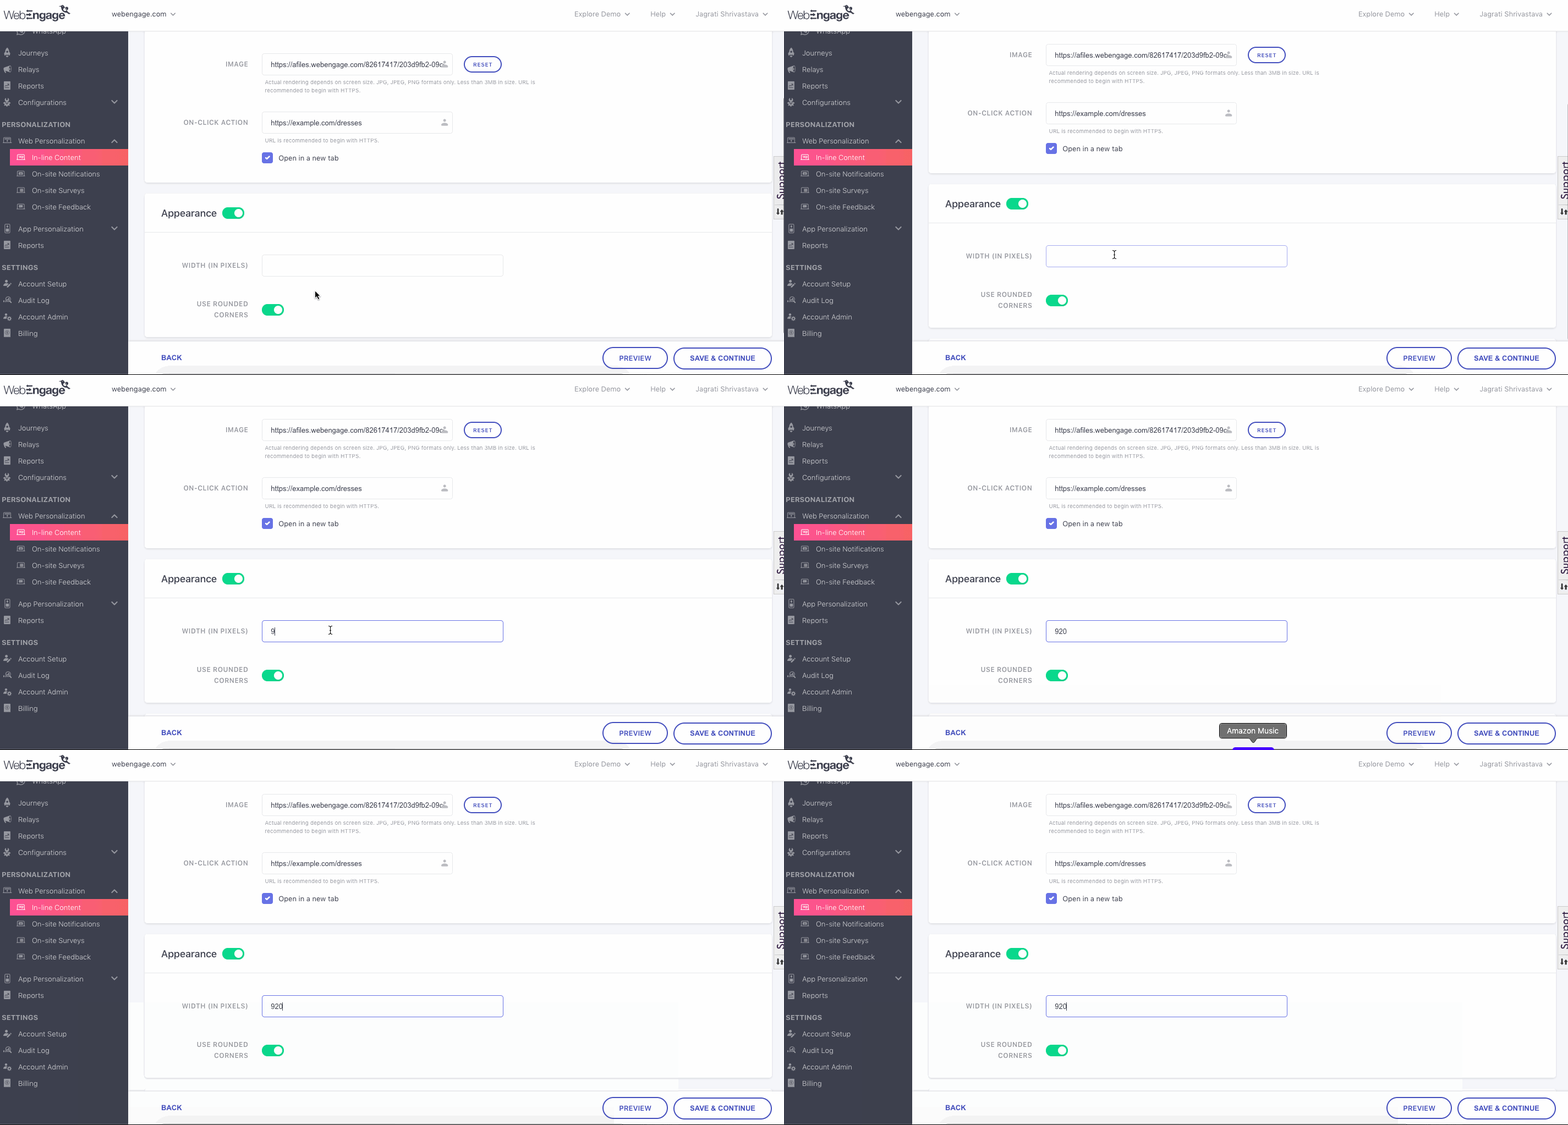
Click to enlarge
Superimpose Notification with Message & CTAs (Custom HTML/CSS)
WebEngage lets you enter your own HTML or CSS code by giving you a space for a code editor. The toggle option is by default off but you can enable it by sliding it to the opposite side.
Enabling the HTML & CSS will show you the space to write the code. You can manually add images, CTA buttons, links and customize their appearance as needed.
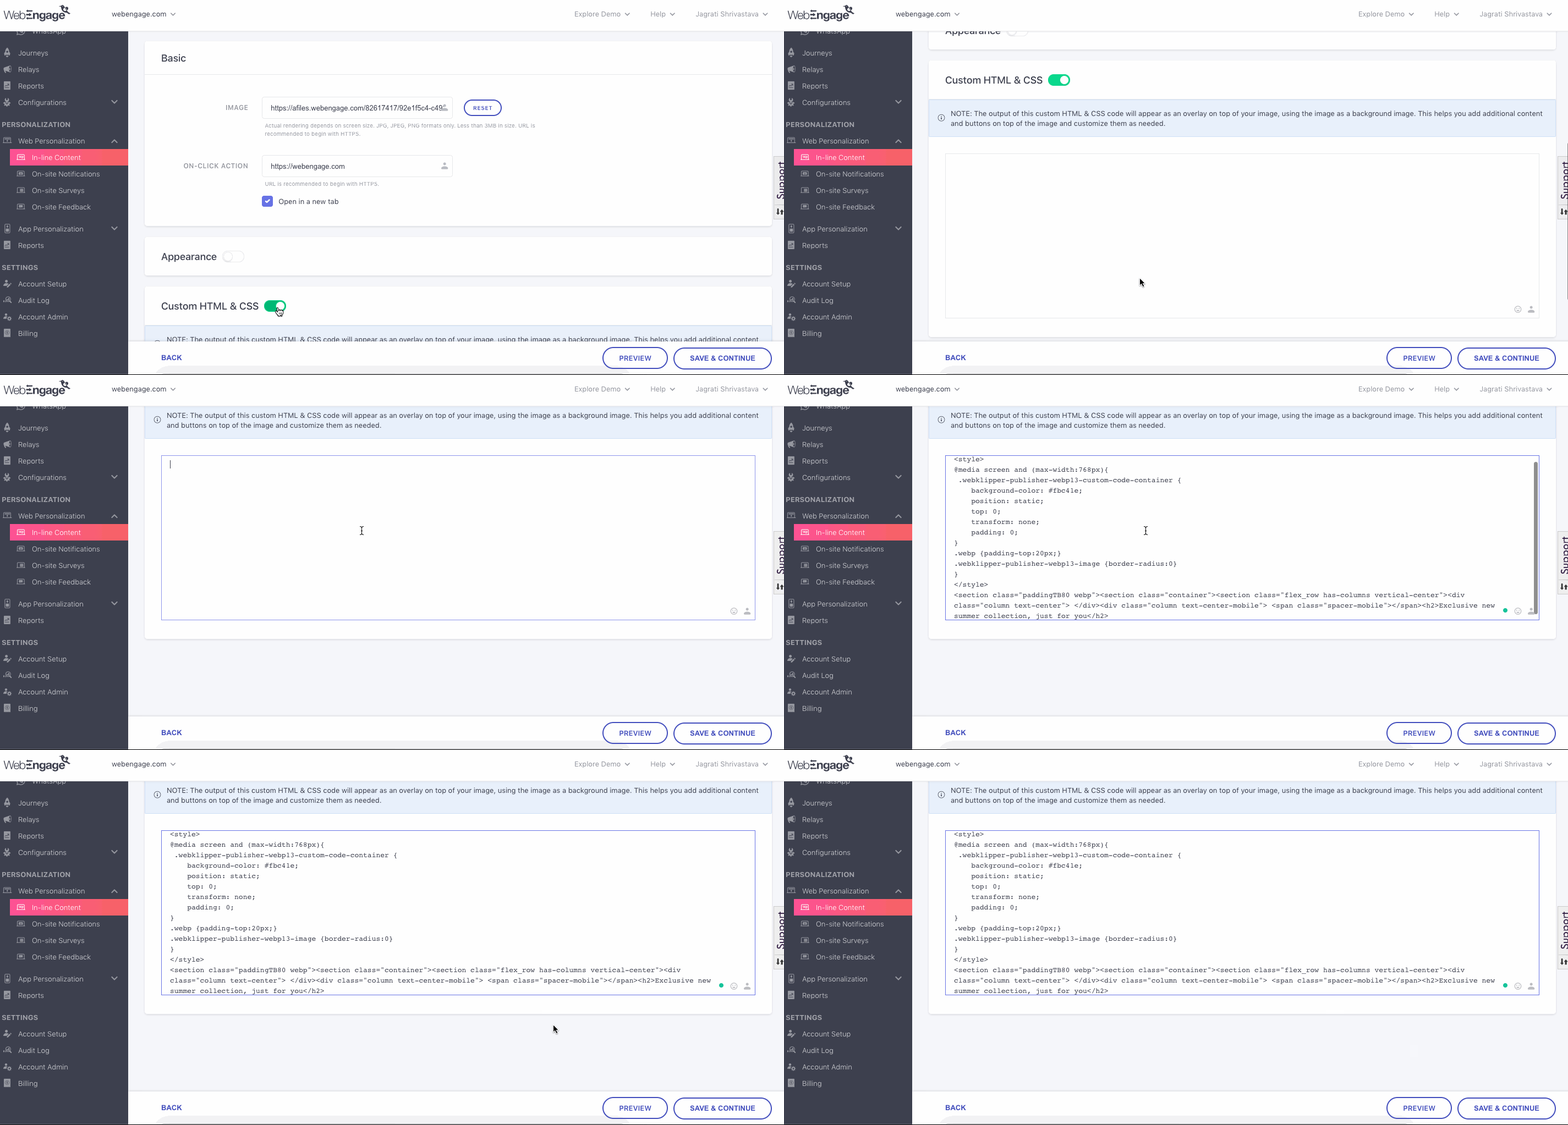
Click to enlarge
The following is the code snippet for curating personalized banner messages:
<style>
@media screen and (max-width:768px){
 .webklipper-publisher-webp13-custom-code-container {
    background-color: #fbc41e;
    position: static;
    top: 0;
    transform: none;
    padding: 0;
}
.webp {padding-top:20px;}
.webklipper-publisher-webp13-image {border-radius:0}
}
</style>
<section class="paddingTB80 webp"><section class="container"><section class="flex_row has-columns vertical-center"><div class="column text-center"> </div><div class="column text-center-mobile"> <span class="spacer-mobile"></span>
<h2>Message {% if user['system']['first_name'] %}{% if user['system']['first_name'].includes(" ") %}
{{user['system']['first_name'].split(" ")[0]}},{% else %}{{user['system']['first_name']}},{% endif %}{% else %}You,{% endif %}
</h2>
<a href="https://webengage.com/register-for-demo/" data-modal2="modal2-1" class="btn open-modal2">Checkout Styles Curated For You</a></div>
</section></section></section>
Please Note
- Any Javascript or flash elements added to the code will be stripped. CSS will be scoped.
UTM Parameters
- Start by enabling UTM at the global level through the Configurations section on the dashboard. This ensures that campaign-level UTM tagging is enabled by default. Click here to know how.
- Modify or Edit UTM at Campaign Level: While global UTM is setup, you can modify parameters for specific campaigns as well as per you needs.
- Disabling Global UTM: While disabling the UTM setup at global level you can choose whether to keep UTM for already running campaigns or remove it from all campaigns.
Note: Campaigns which are already sent with UTM parameters cannot be removed.
Preview Personalized Element
As shown below, you click the Preview button placed on the bottom right to gauge its appearance as a mobile and desktop user. This comes in handy, especially when you're fine-tuning the Custom HTML/CSS code that will be superimposed on the personalized element.
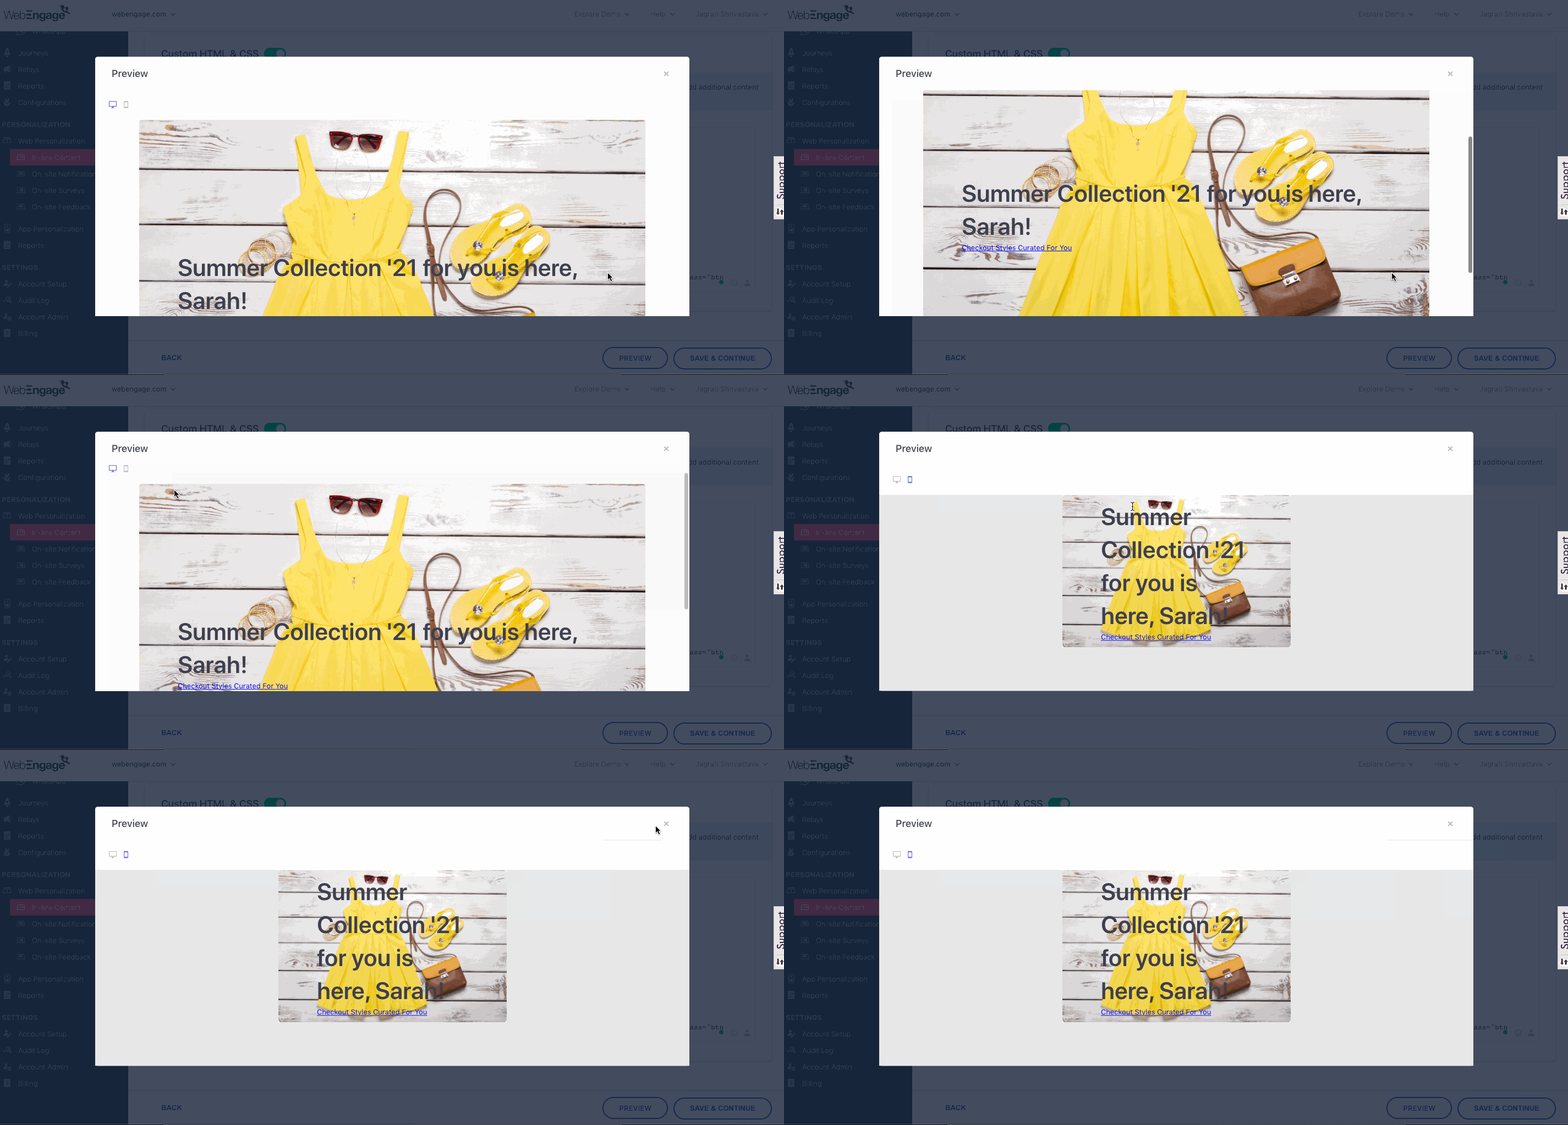
Click to enlarge
Please NoteDepending on the custom HTML/CSS code, the banner may look different. However, the final product will look like below:
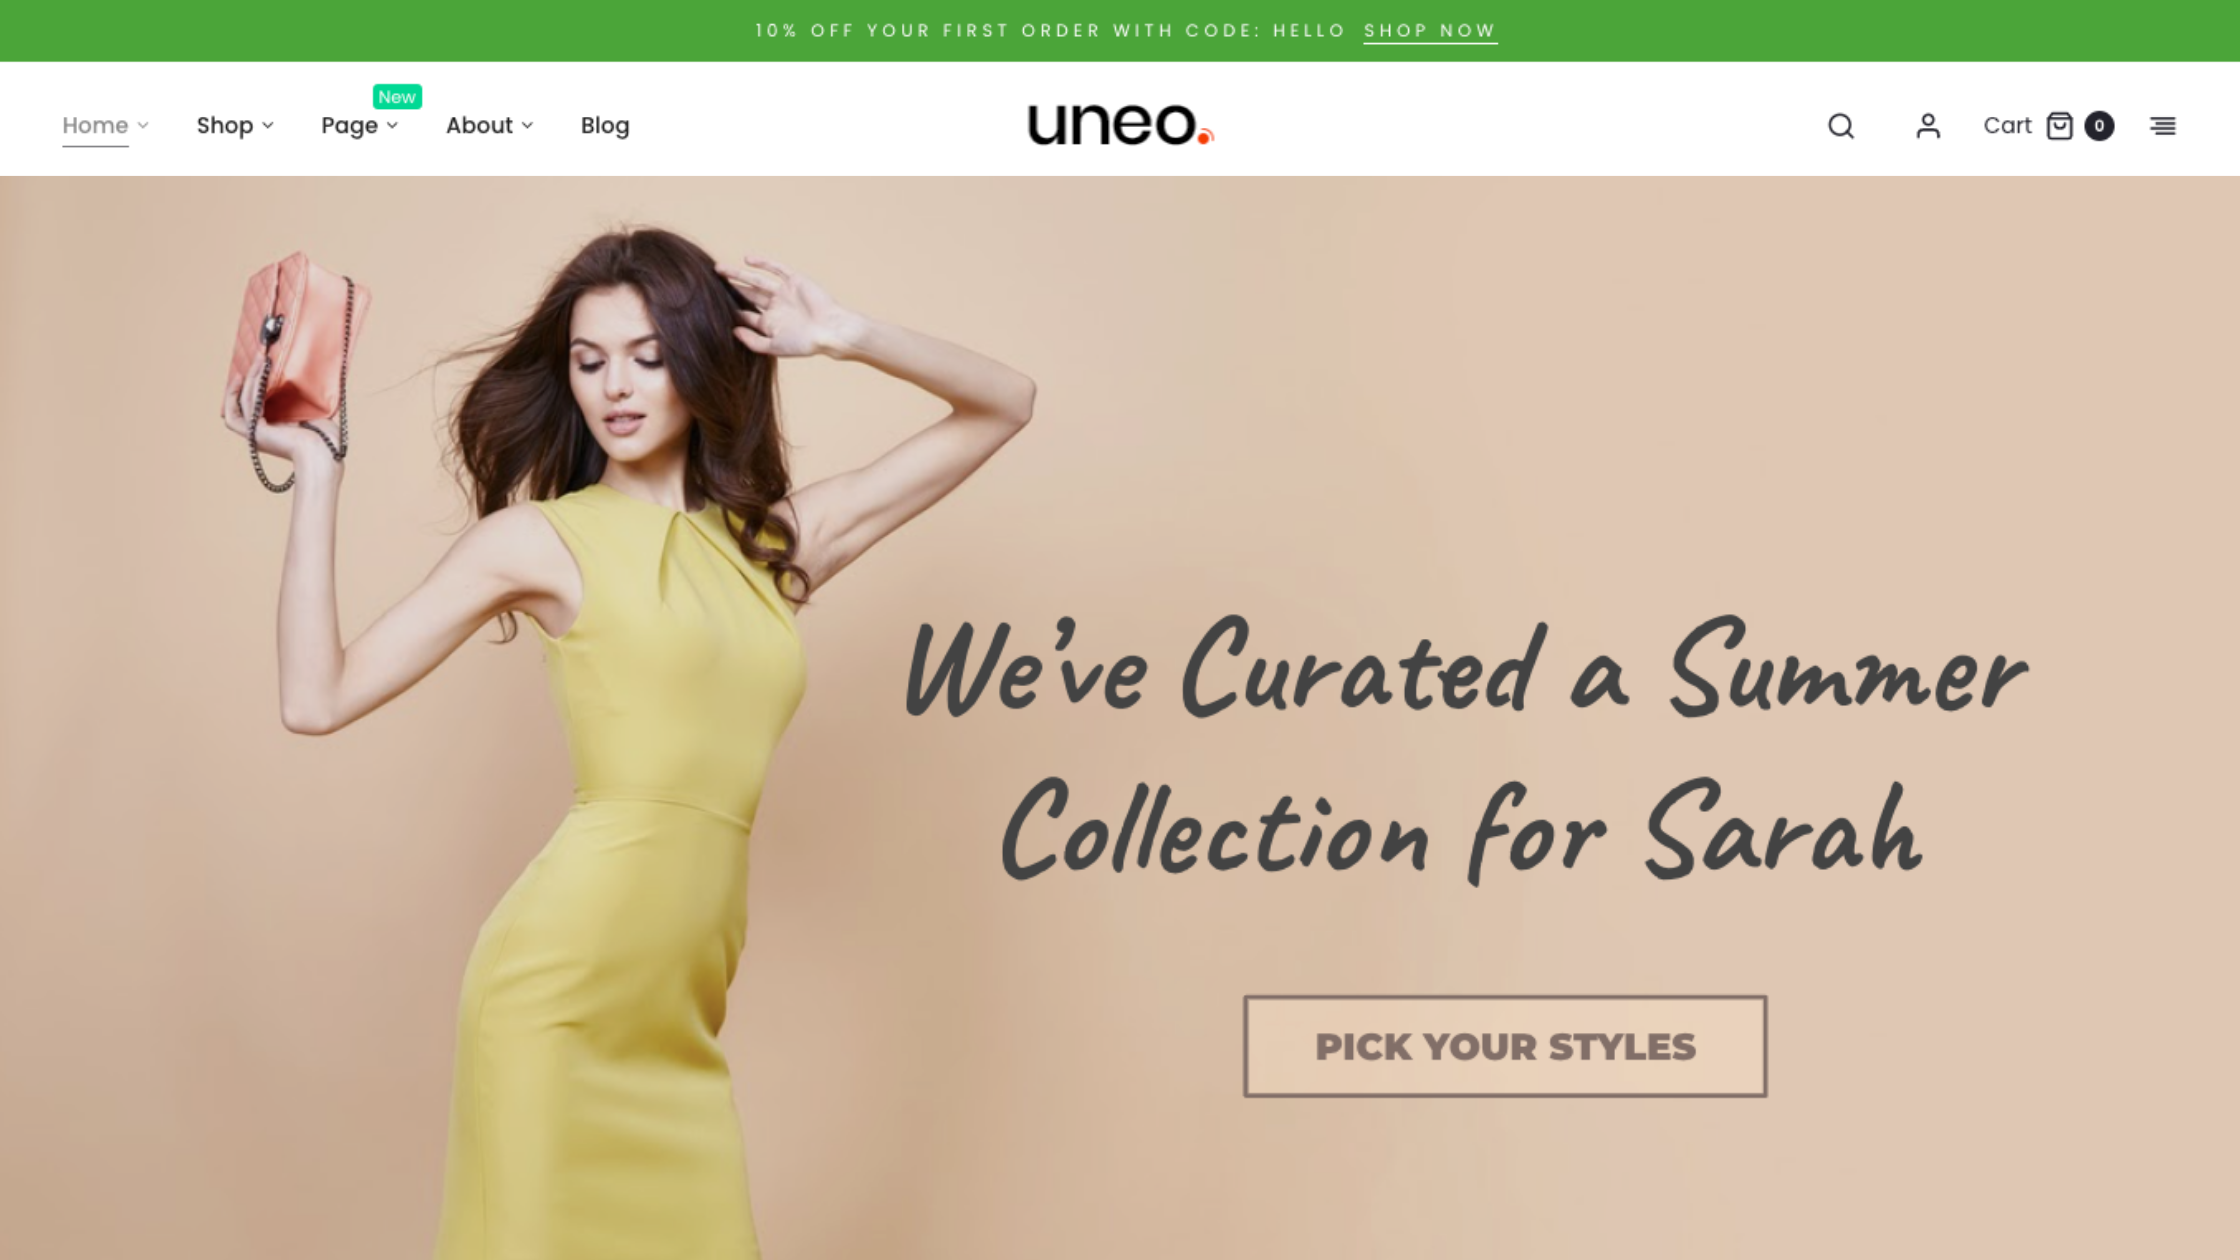
Click to enlarge
Use CaseThe campaign can be further personalized to generate sales. Let's discuss this with a use case:
- Personalized offer for the segment of women who have been active on your site over the last 2 weeks
- Have made a purchase at least once
- Have not made a purchase over the last 2 weeks.
- Content is personalized to brands of products last purchased by the user
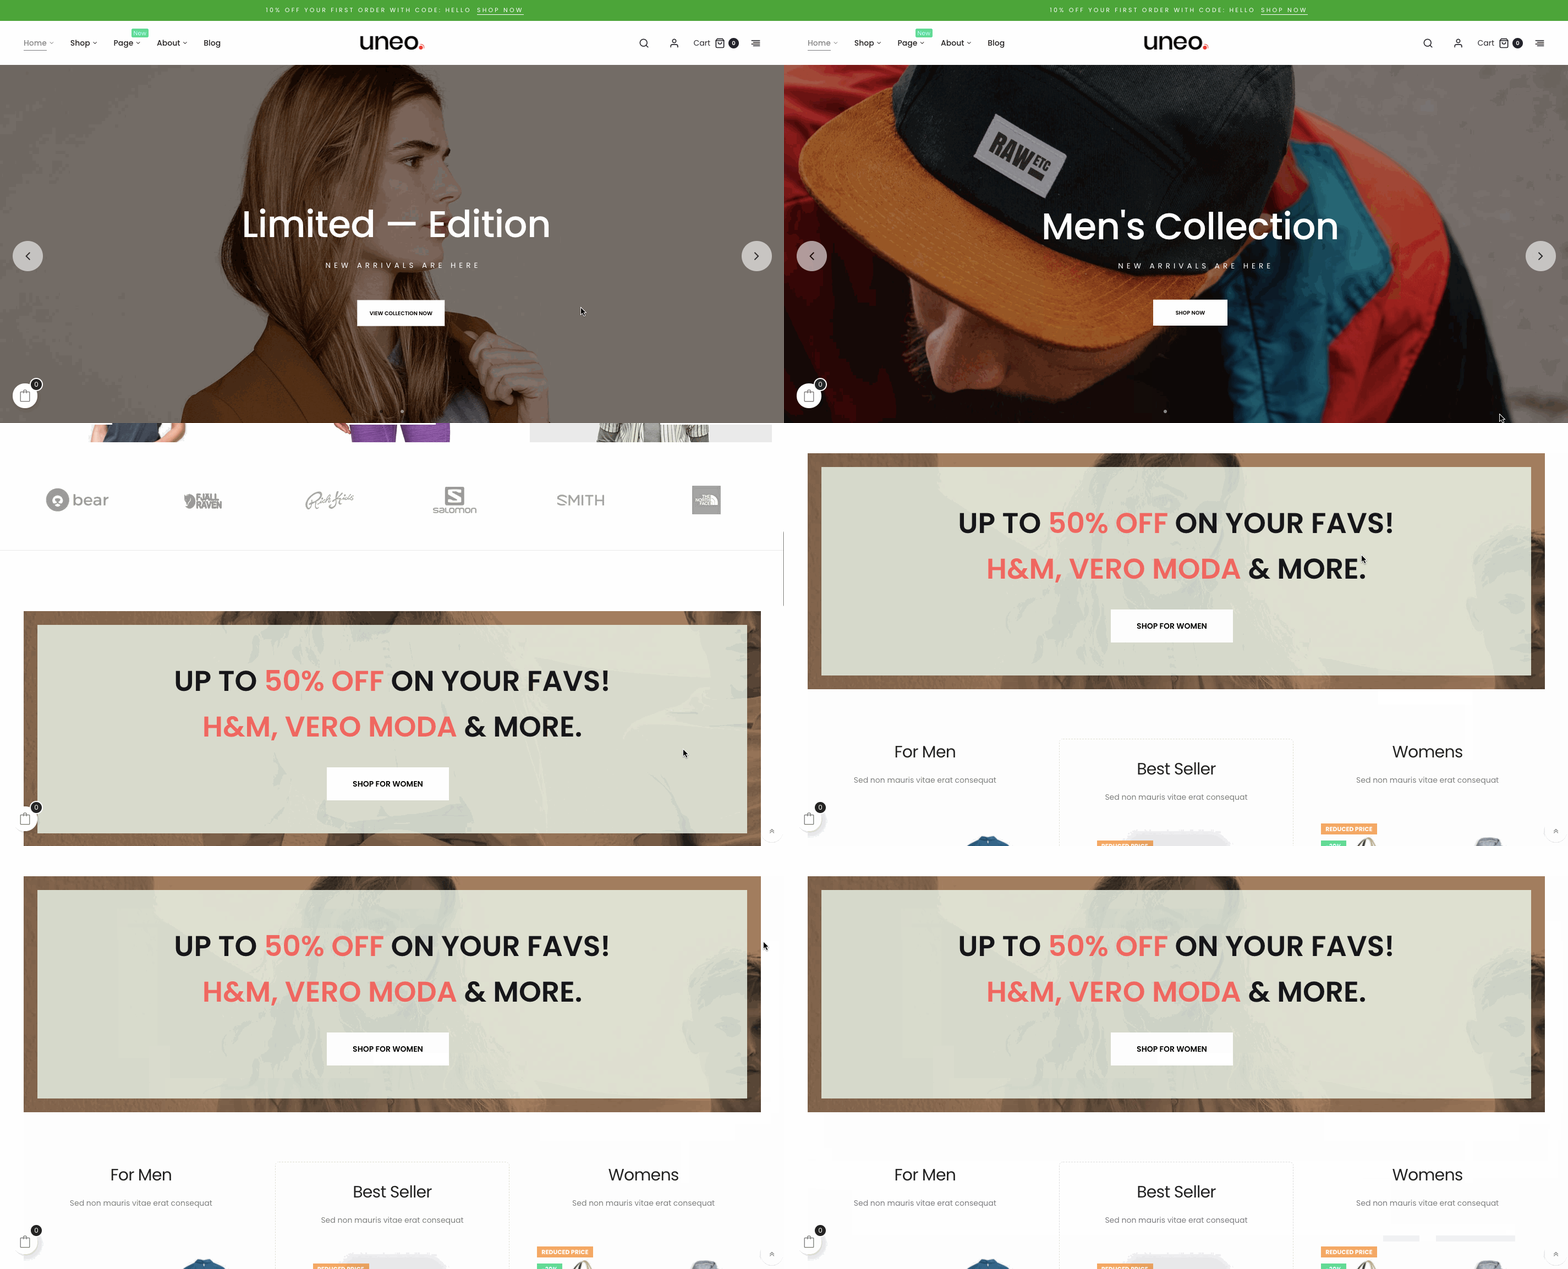
Click to enlarge
Custom Code Layout
Custom code layout provides the flexibility to create personalised banners as per you specific needs and requirements. You can add, edit, and replace any section of your website.
Through custom code layout, you can:
- Provide recommendations based on user events and attributes
- Change text based on if/else conditional logic (based on user attributes such as gender, location, and more)
- Product re-stock reminders at the check-out page
- Fetch updated product information or reviews through Catalog on respective product pages
Create Variations
Variations are just different versions of the campaign's message that facilitate easy multivariate testing and are referred to in the following manner in your dashboard:
Variation A: The first version of the message.
Variation B: The second version of the message.
Variation C, D, E: Subsequent versions of the message created for testing.
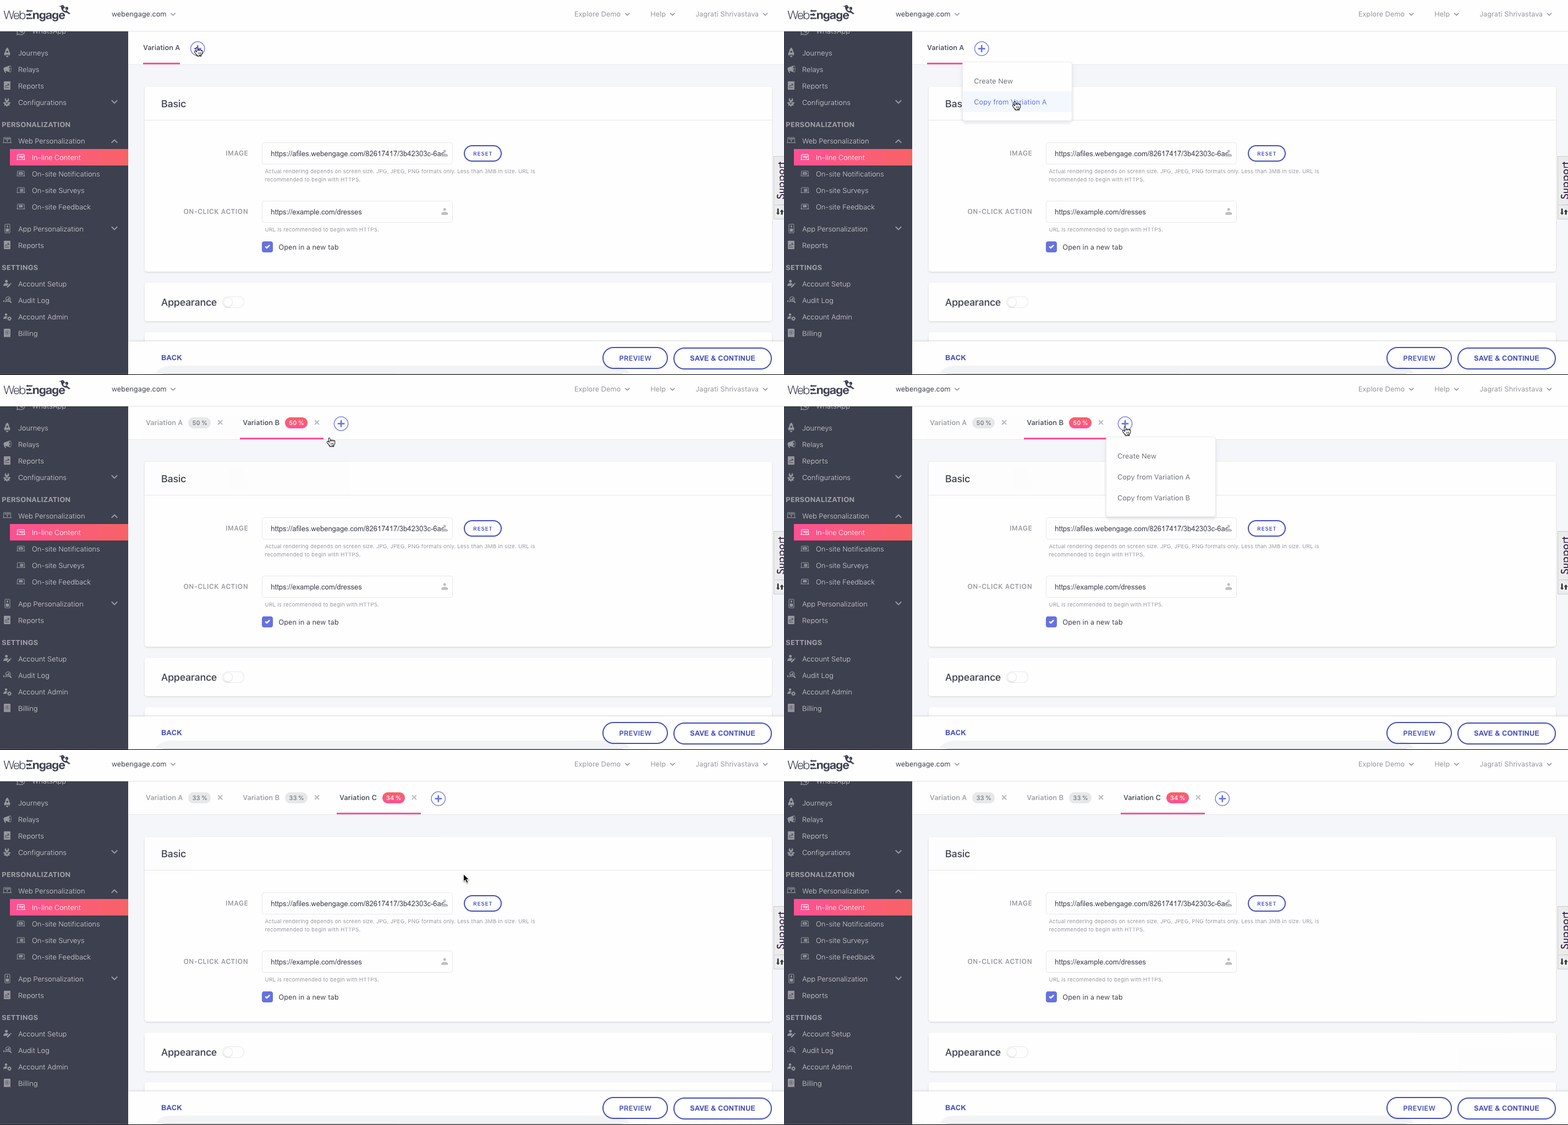
Click to enlarge
As shown above, by default the message creation interface consists of a single Variation A.
-
You can click on the Plus icon to create up to 5 versions of the message.
- SelectCreate New to start building the new Variation from scratch
- SelectCopy from Variation A (or any of the previous versions) to make minor edits to the new Variation
-
Each Variation can be created independent of the other, allowing you to test multiple aspects like its layout, body copy, buttons, and links to identify a mix that resonates with your entire target audience. (How to test message Variations)
-
The percentage values indicate the share of users, that will receive a Variation and can be customized at Step 4: Conversion Tracking.
Step 4: Setup Conversion Tracking & Variation Testing
The fourth step of campaign creation allows you to measure the effectiveness of your campaign in various ways like:
- Tracking conversions for a specific goal
- Comparing performance against acontrol group
- Testing multiple variations of the message to identify a winning version
Hence, it has been divided into two sections: Conversion Tracking and Variation Distribution. However, depending on the number of message Variations created by you, the view of Step 4: Conversion Tracking varies:
When only 1 Variation Exists
As shown below, on proceeding to this step from Step 3: Message, you will be welcomed by an interface on which Conversion Tracking is disabled.
- Click the toggle button to enable the setting and configure it.
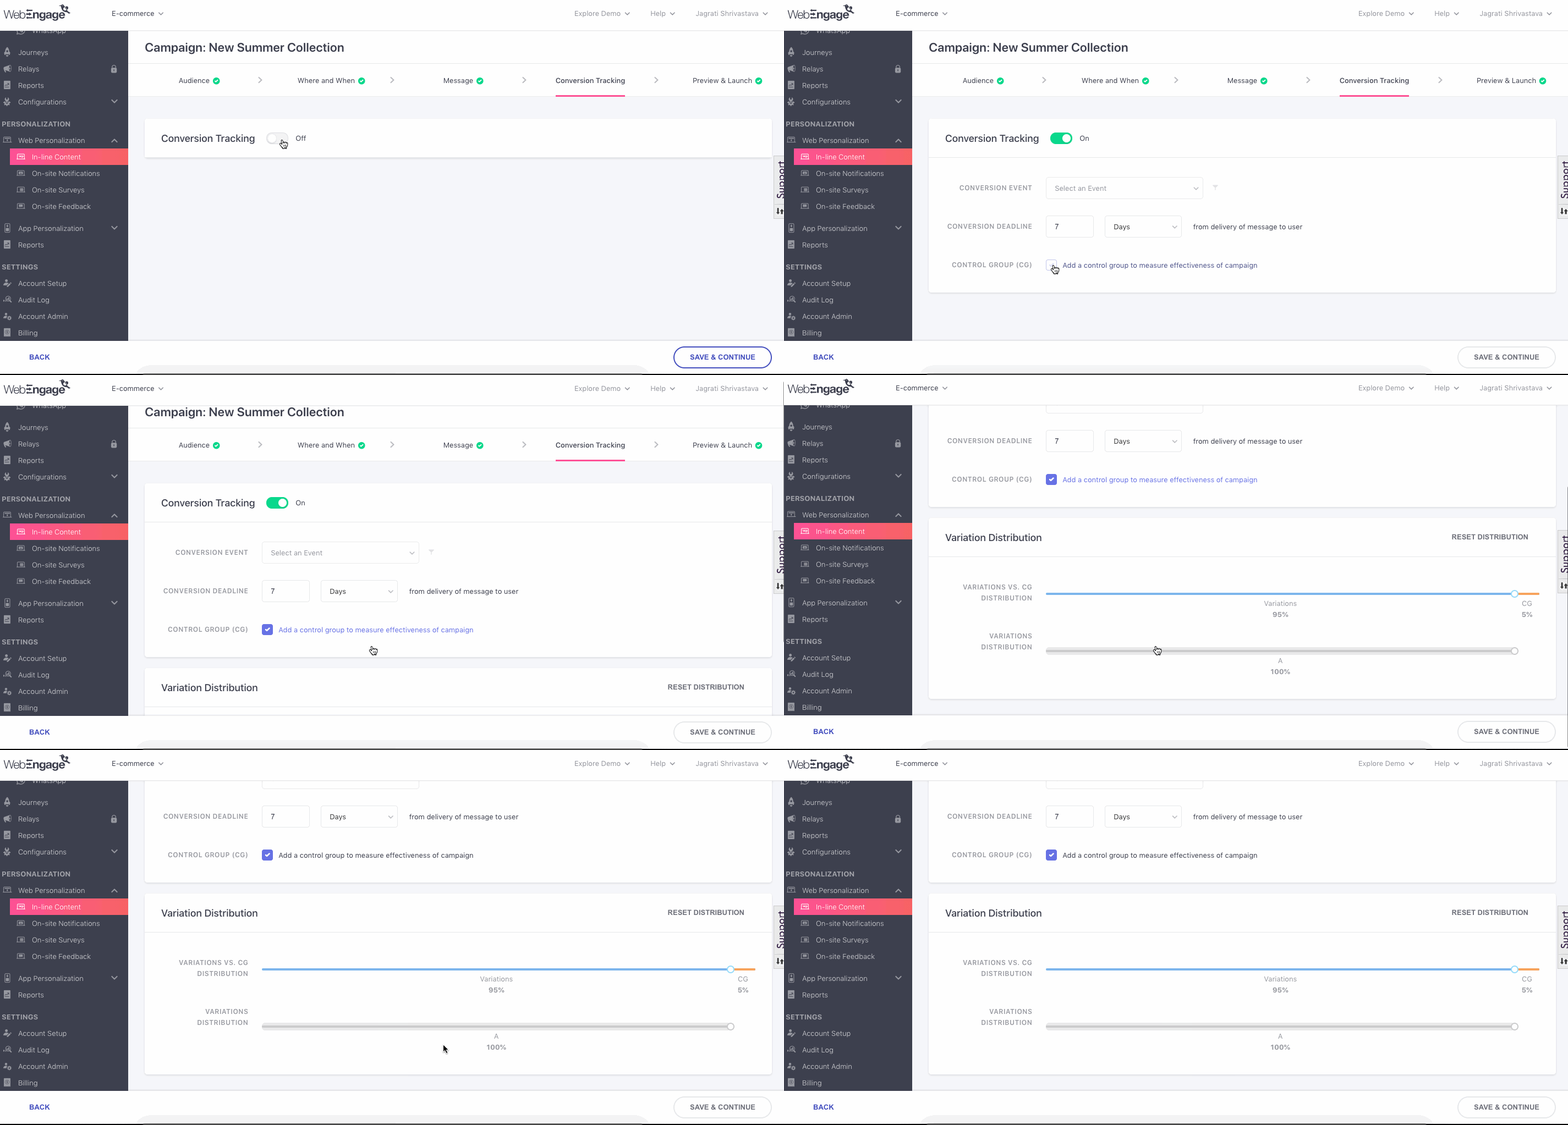
Click to enlarge
When Multiple Variations Exist
As shown below, on proceeding to this step from Step 3: Message, you will be welcomed by an interface on which:
- Conversion Tracking is disabled
- Variation Distribution meter indicates the share of the audience that will receive each Variation
Click the toggle button to enable the respective settings and configure them.
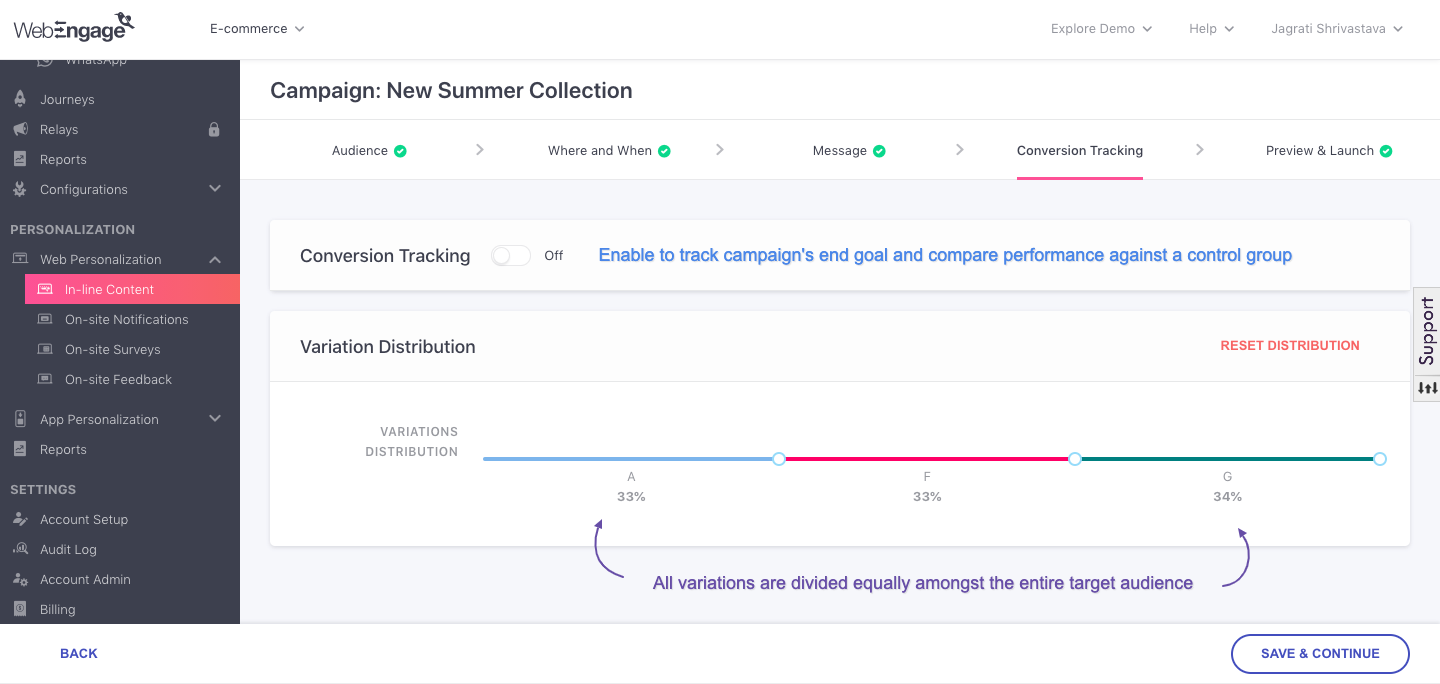
Now, let's get you acquainted with the workings of Step 4: Conversion Tracking:
Conversion Tracking
Must ReadWe recommend that you gain a broad understanding of how Conversion Tracking works in your dashboard before proceeding. Doing so will lay a strong foundation for understanding whether or not you need to enable Conversion Tracking for the campaign and its impact on Revenue Tracking.
By default, Conversion Tracking is disabled for all Web Personalization campaigns. As shown below, you can use the toggle switch to enable it.
Step 1: Select a Conversion Event
The term, Conversion Event is an alias that helps you identify the event you expect users to perform after receiving the Web Personalization Message.
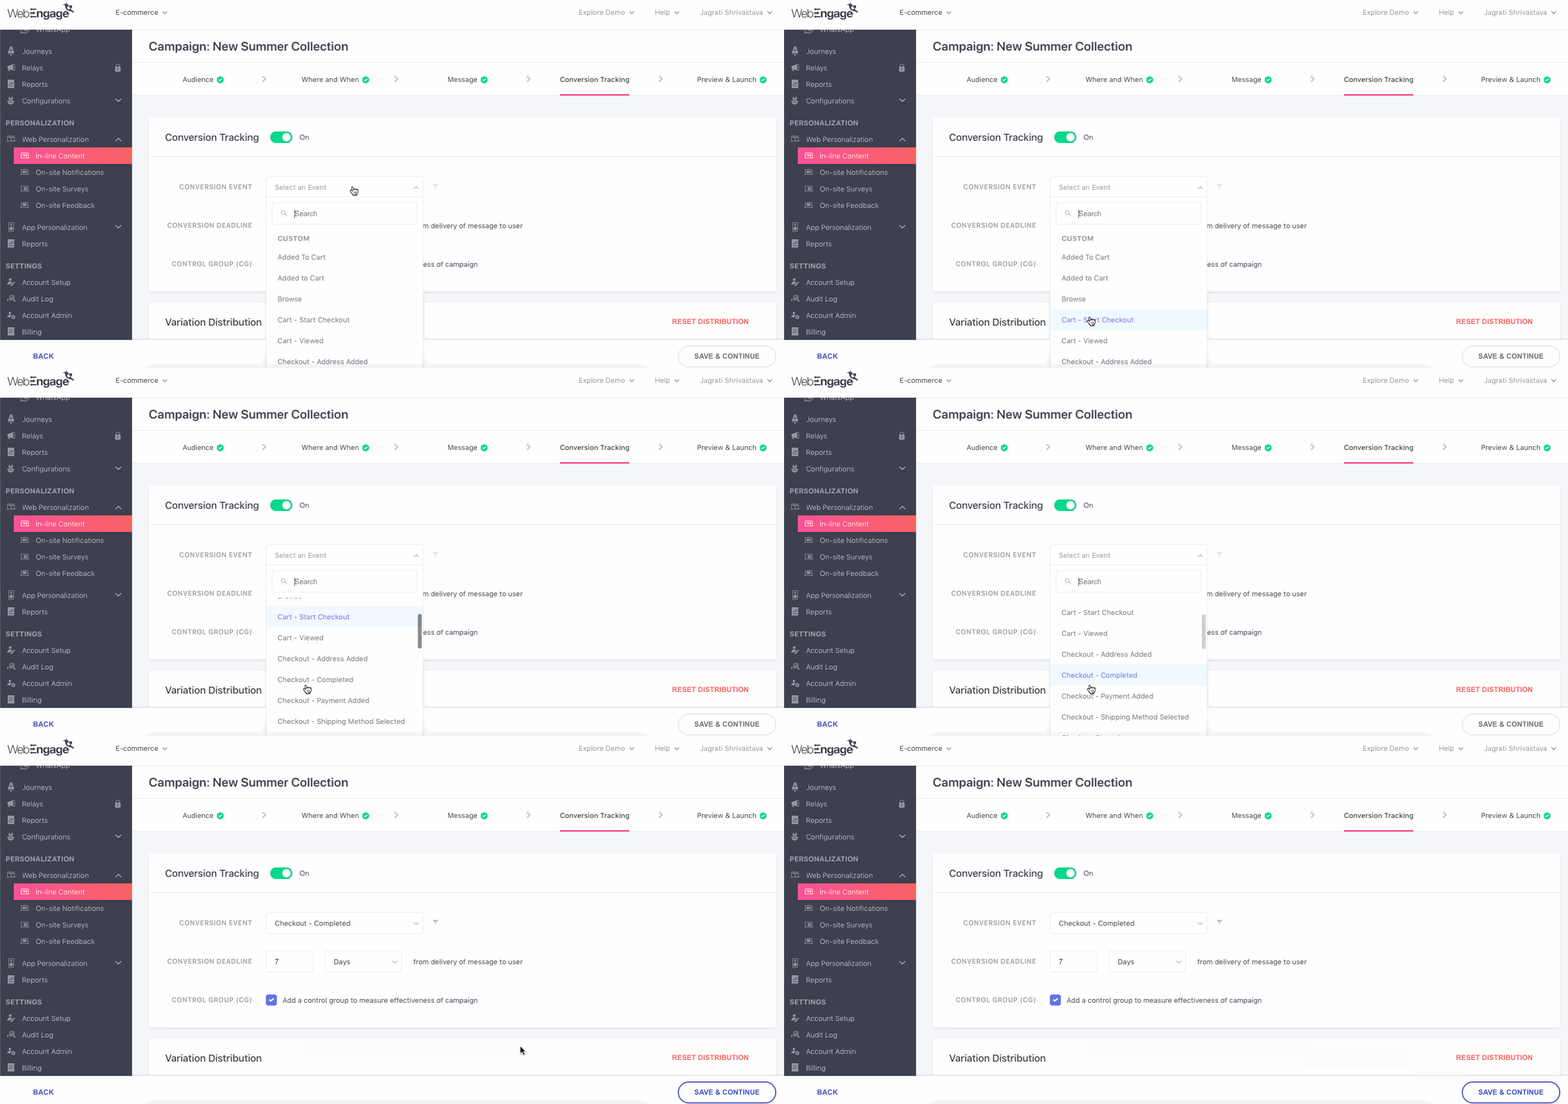
Click to enlarge
As shown above, you can choose from a list of all the Custom Events being tracked for your account to specify the campaign's conversion goal. For example, we have specified the campaign's conversion goal as the custom event, Checkout - Completed.
The following options can be selected here:
Custom (All the custom events being tracked for your account).
System (Session Started, User Login).
Pro TipWe recommend that you map all the Custom Events, that record the occurrence of a monetary transaction in your app, as Revenue Events in your dashboard. This will help ensure that selecting the respective events as the Conversion Event of a campaign helps you track Conversions and Revenue for the campaign and its channel :)
Step 2: Add Attributes to the Conversion Event
Depending on the end goal of the campaign, you can choose to narrow down the scope of conversion to a specific action like Jimmy Choo Pumps Purchased, Episode 3 Streamed, Chapter 7 Started, MF Investment Done, Game Credits Purchased and so on.
This can be done by adding attribute filters to the selected Conversion Event. Here's how you can go about it:
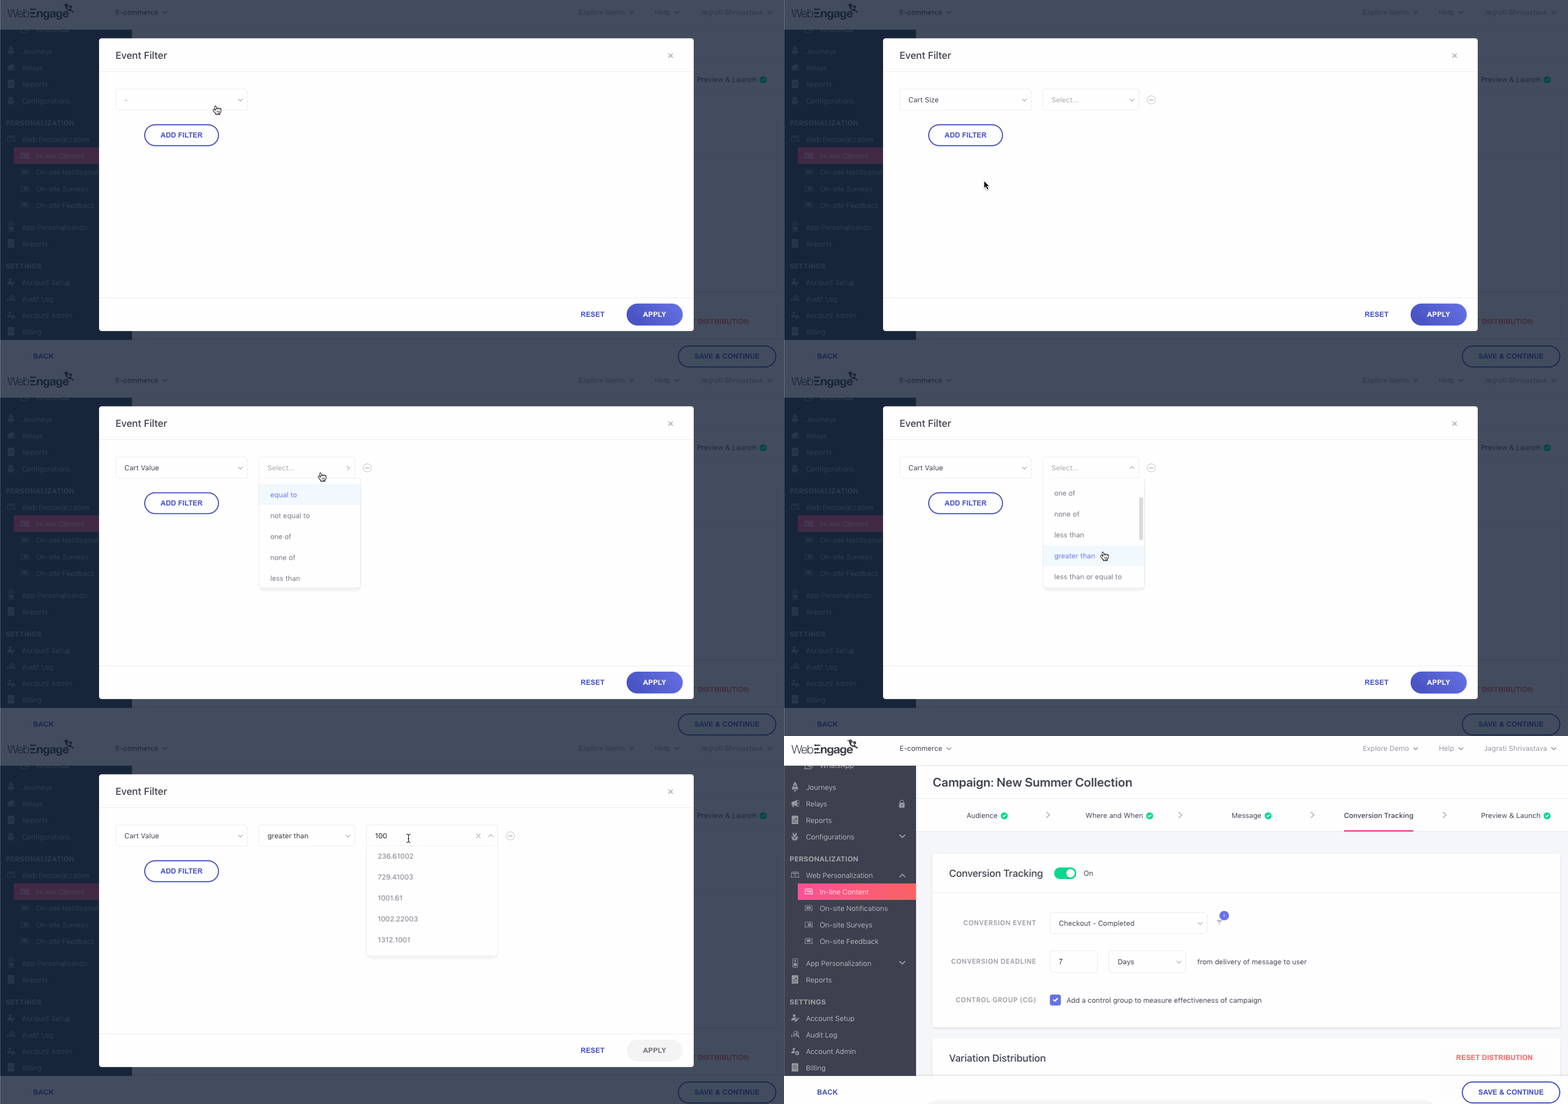
Click to enlarge
Step 1: As shown above, click on the filter icon placed next to the drop-down
-
In doing so, you will be prompted by a pop-up allowing you to select an attribute and specify its value
-
For example, in the above visual, we have filtered the event, Checkout Completed, by the attribute filter, Cart Value which is greater than 100 ((indicates the monetary value of the transaction, irrespective of thecurrency)
- This implies: Only those users who make a purchase of more than 100 (as per the account's currency) will be counted towards the campaign's conversion metrics.
The following options can be selected here:
Custom (all thecustom attributes attached to the custom event selected as the conversion event)
Time (Event Time)
Location (City, Country)
Step 2: As shown below, click Add Filter to add more attributes to the event
-
You can club multiple event attributes by the AND/OR logic
-
This way only those users who perform the Conversion Event in the context of All/Either attribute filters will be considered towards the Conversion numbers of the campaign.
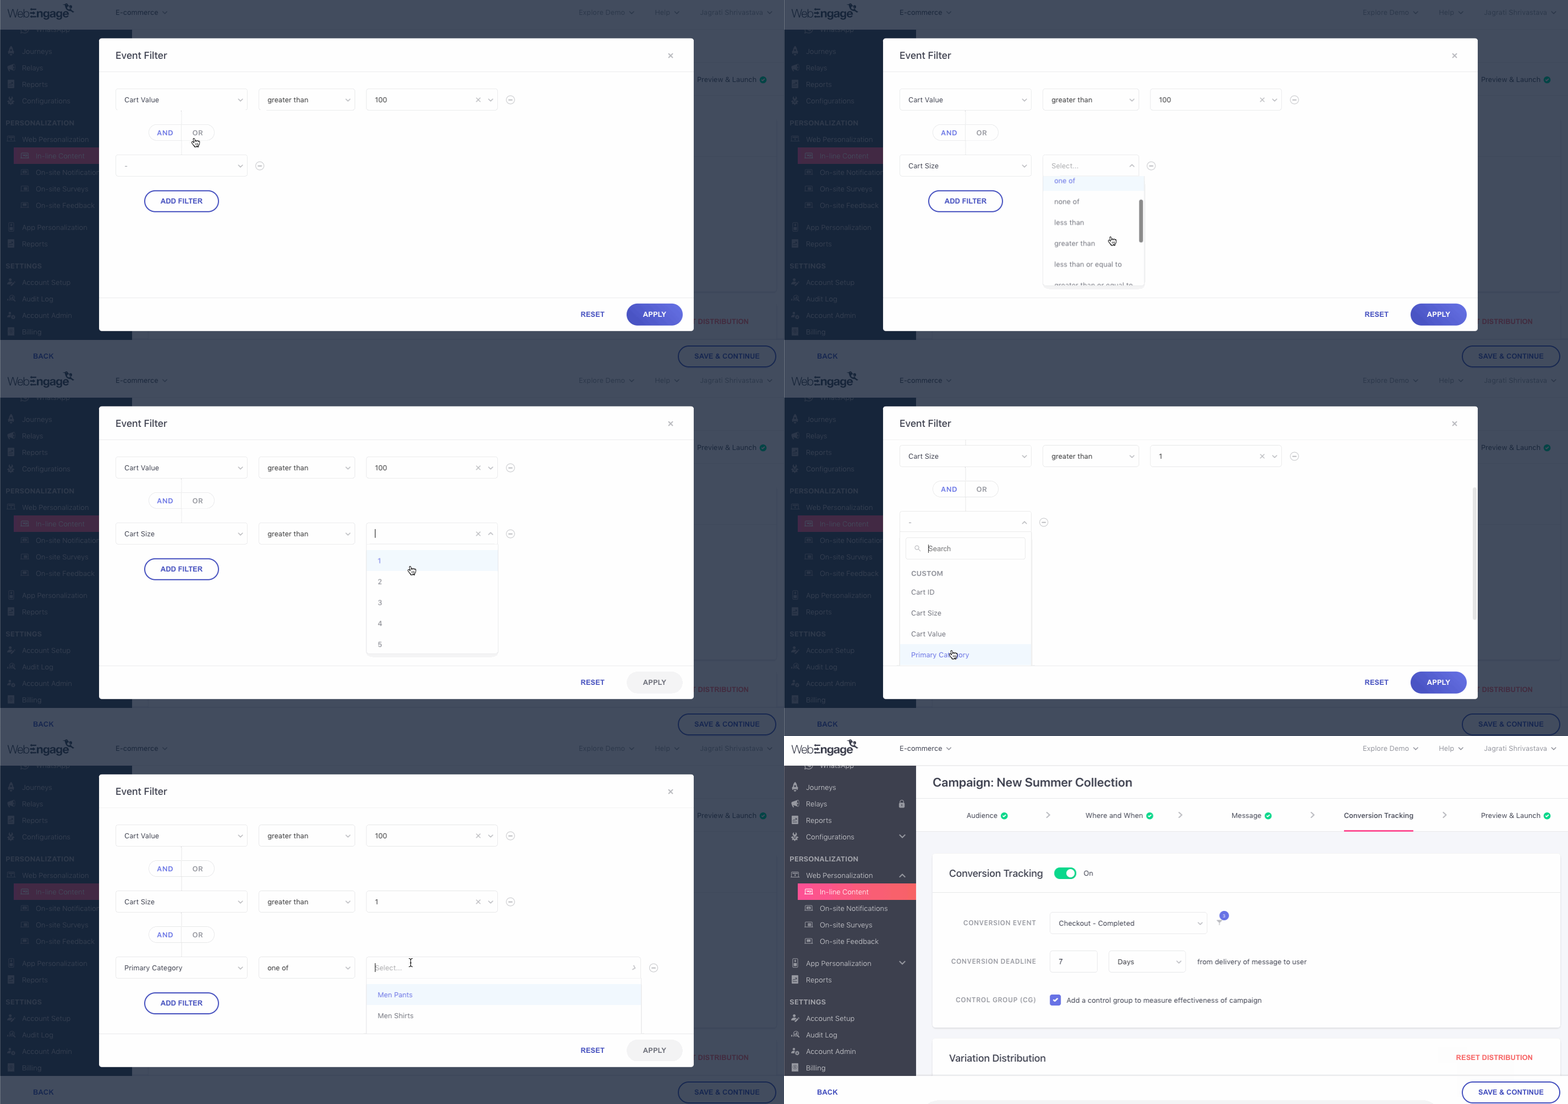
Click to enlarge
For example, in the above visual, we have filtered the custom event, Checkout - Completed by the following attribute filters:
- Cart Value which is greater than 100 (indicates the monetary value of the transaction, irrespective of thecurrency)
AND
- Cart Size which is great than 2 (products)
AND
-
Primary Category which is one of, Women Dresses.
-
This implies: Only those users who purchase more than 2 products from one of the mentioned categories AND make a purchase of more than 100 (as per the account's currency) will be counted towards the campaign's conversion metrics.
How It Works: Clubbing Event Attributes by AND/OR LogicAND: Clubbing multiple event attribute filters by the AND logic helps you narrow down the scope of occurrence of the Conversion Event. This means that only those users will be counted towards the campaign's Conversions who perform the Conversion Event in the context of all the event attributes.
OR: Clubbing multiple event attribute filter by the OR logic helps you widen the scope of occurrence of the Conversion Event. This means that users who perform the Conversion Event in the context of any of the specified event attributes* will be counted towards the campaign's conversions.
Step 3: Set Conversion Deadline
The Conversion Deadline is a duration defined by you that tells us when to stop tracking conversions for a campaign.
- This means that once your campaign is delivered, we will track users who perform the Conversion Event in the context of its attribute filters (if any), only till the specified Conversion Deadline.
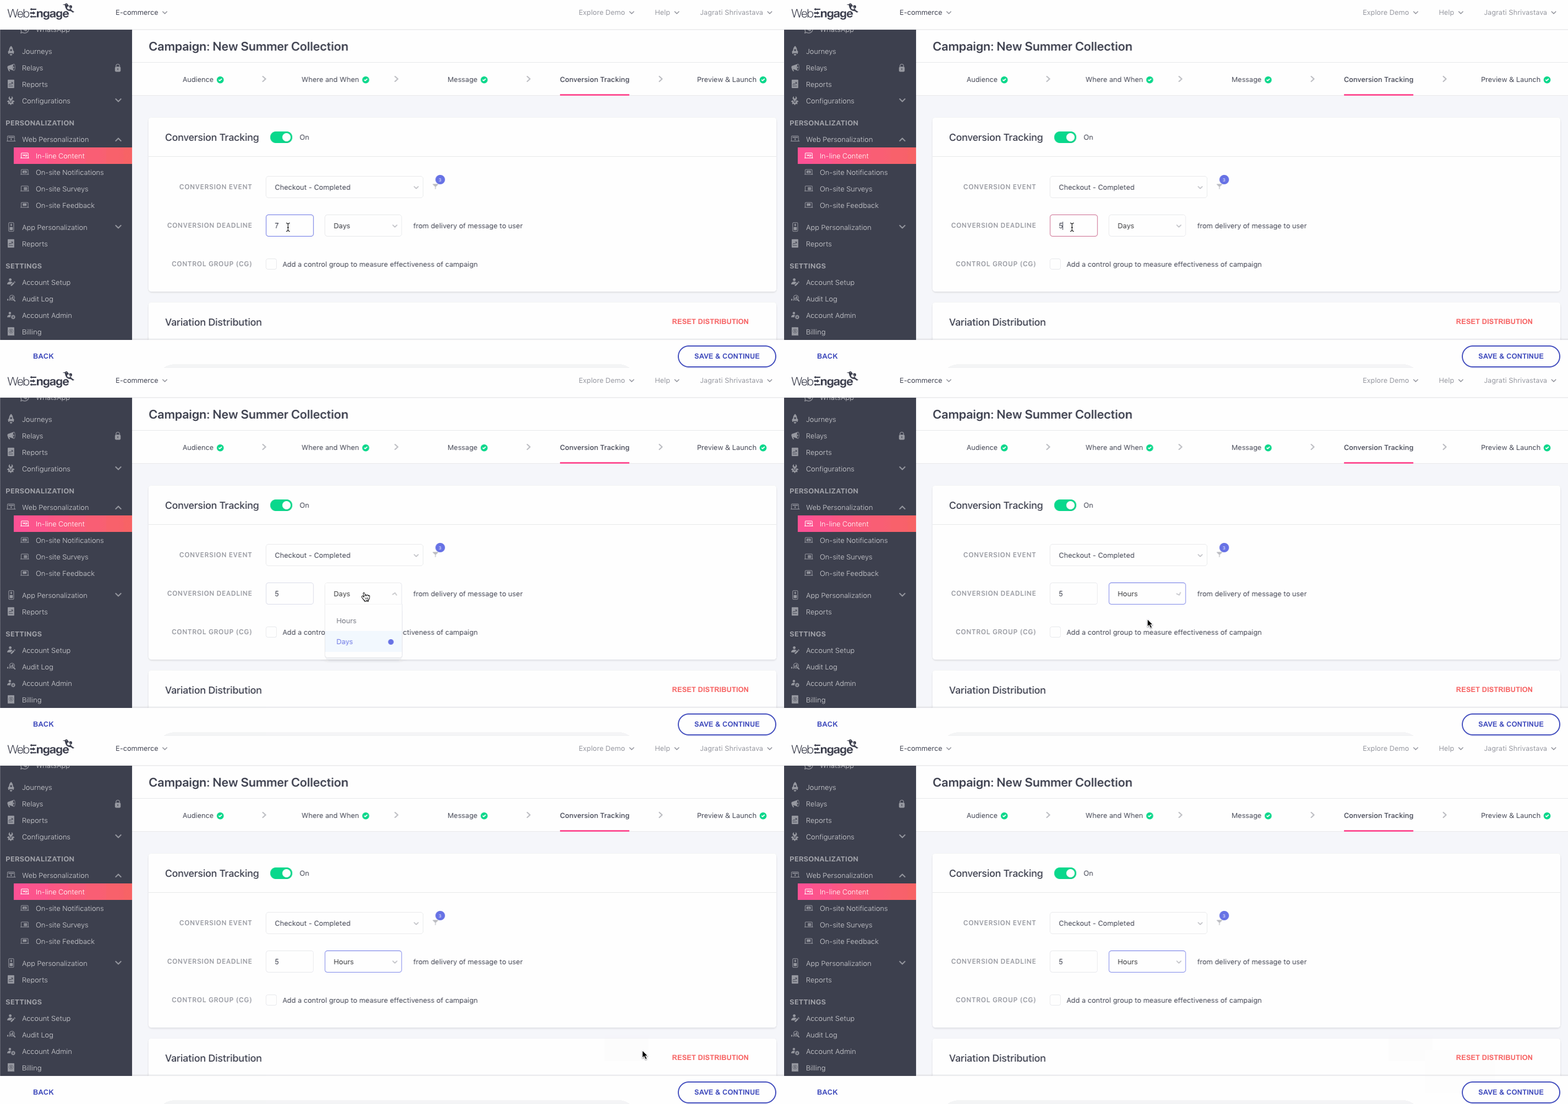
Click to enlarge
As shown above, by default, a Conversion Deadline of 7 days is set for all campaigns. You can choose to specify a custom duration in Hours or Days, as per the campaign's end goal. For example, in the above visual, we have defined a deadline of 5 Hours for the Conversion Event, Checkout - Completed.
Related ReadList of all the Conversion metrics and Performance Indicators tracked for Web In-line Content campaigns.
Step 4: Enable Control Group (Optional)
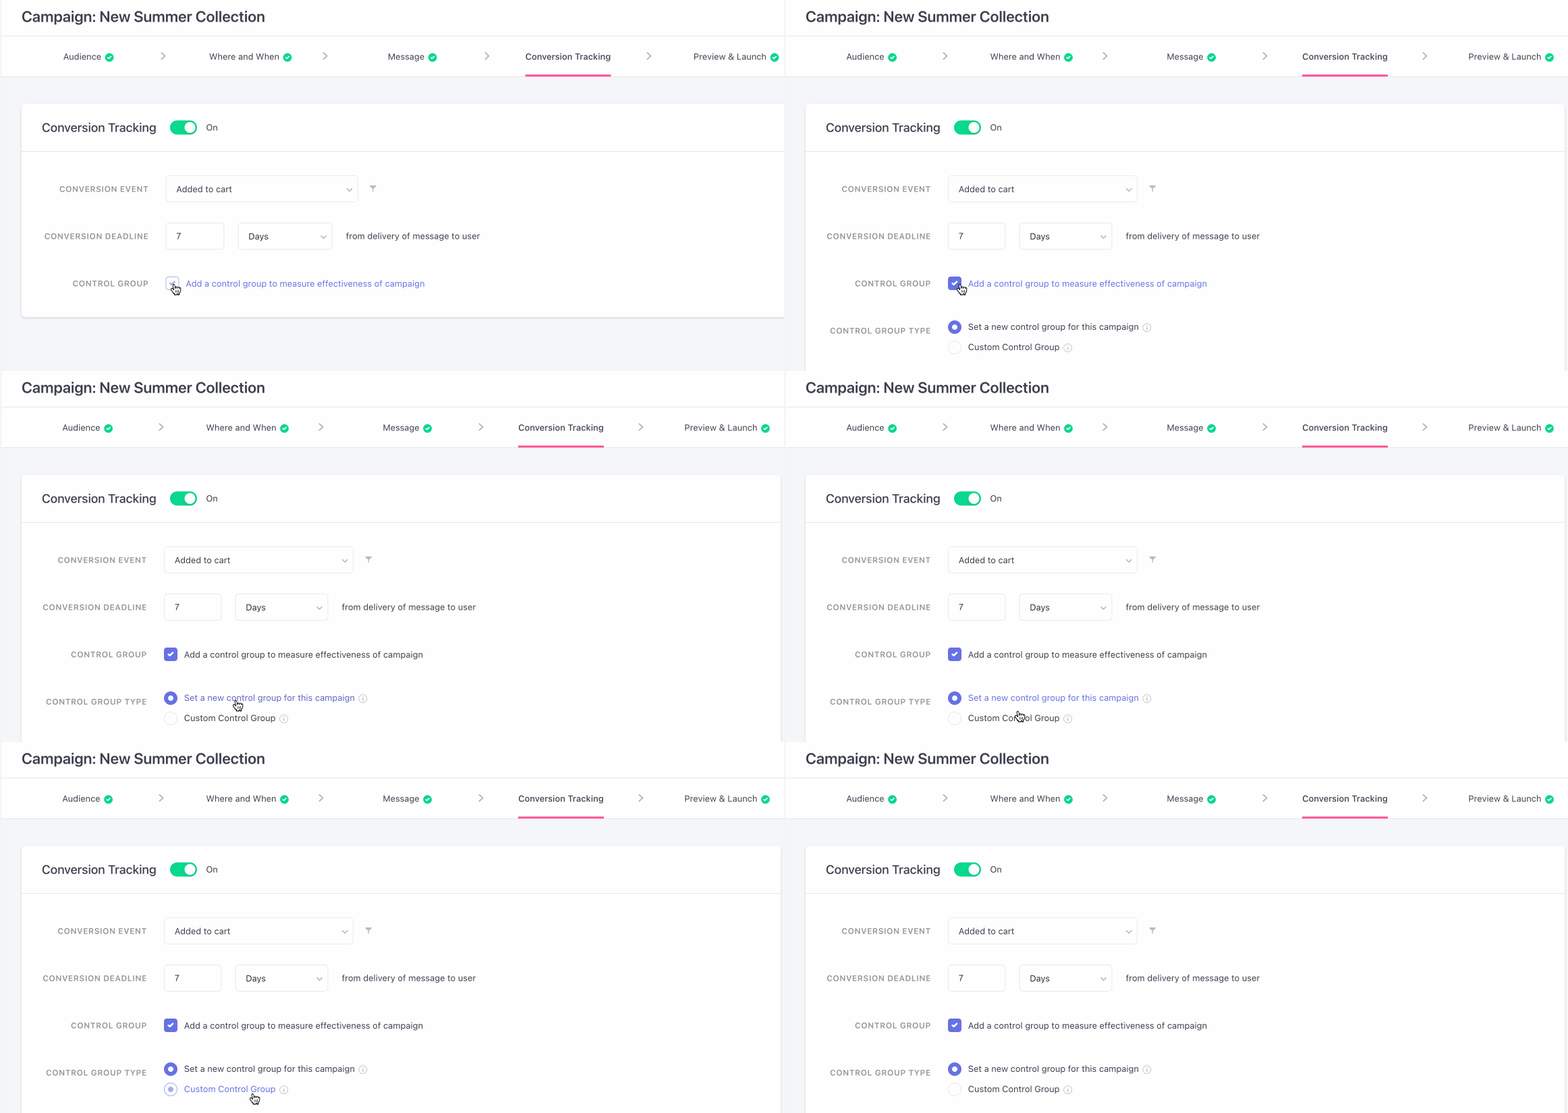
Click to enlarge
A Control Group is a small portion of the target audience of a campaign that is randomly selected, representing the behavior and preferences of the entire segment, and does not receive the campaign.
An optional but recommended step, adding a Control Group to the target audience allows you to compare the campaign's performance against the organic behavior of Control Group users. This makes for the perfect benchmark to assess the true impact of the campaign on influencing user behavior.
Must ReadWhy you should (almost) always use Control Group to measure the effectiveness of your campaign and how it works in your dashboard
On checking the Control Group checkbox, you are presented with another choice called 'Target Control Group', that lets you choose between two options.
- Set a new control group for this campaign
- Custom Control Group
Option 1: Set a new control group for this campaign: This will be a campaign level control group which means a control group that is created for a specific campaign only. The users in this control group are randomly added from the selected segment in 'Audience' tab. This control group is good if the aim is to measure impact for a specific campaign.
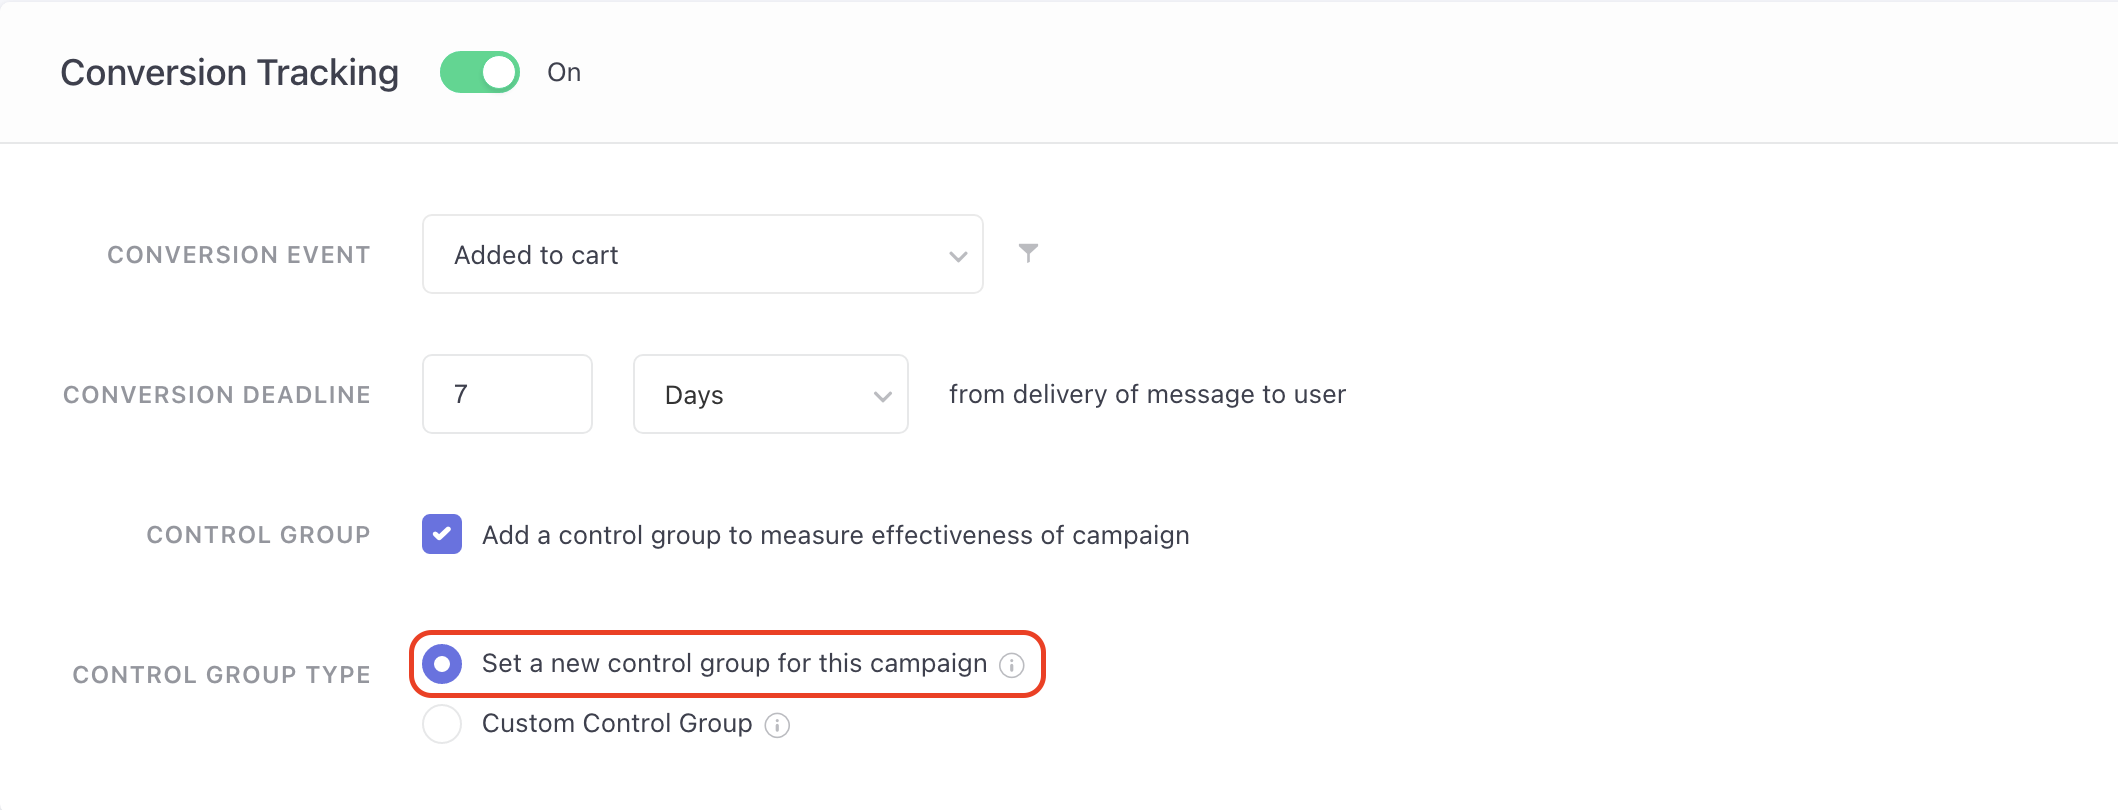
click to enlarge
On clicking this option, the Variation Distribution slider is exposed that allows you to select percentage of users to be added in Control Group from target audience.
Option 2: Custom Control Group: This option is shown when at least one Custom Control Groups is created in your account. Click here for detailed read on creating custom control group.
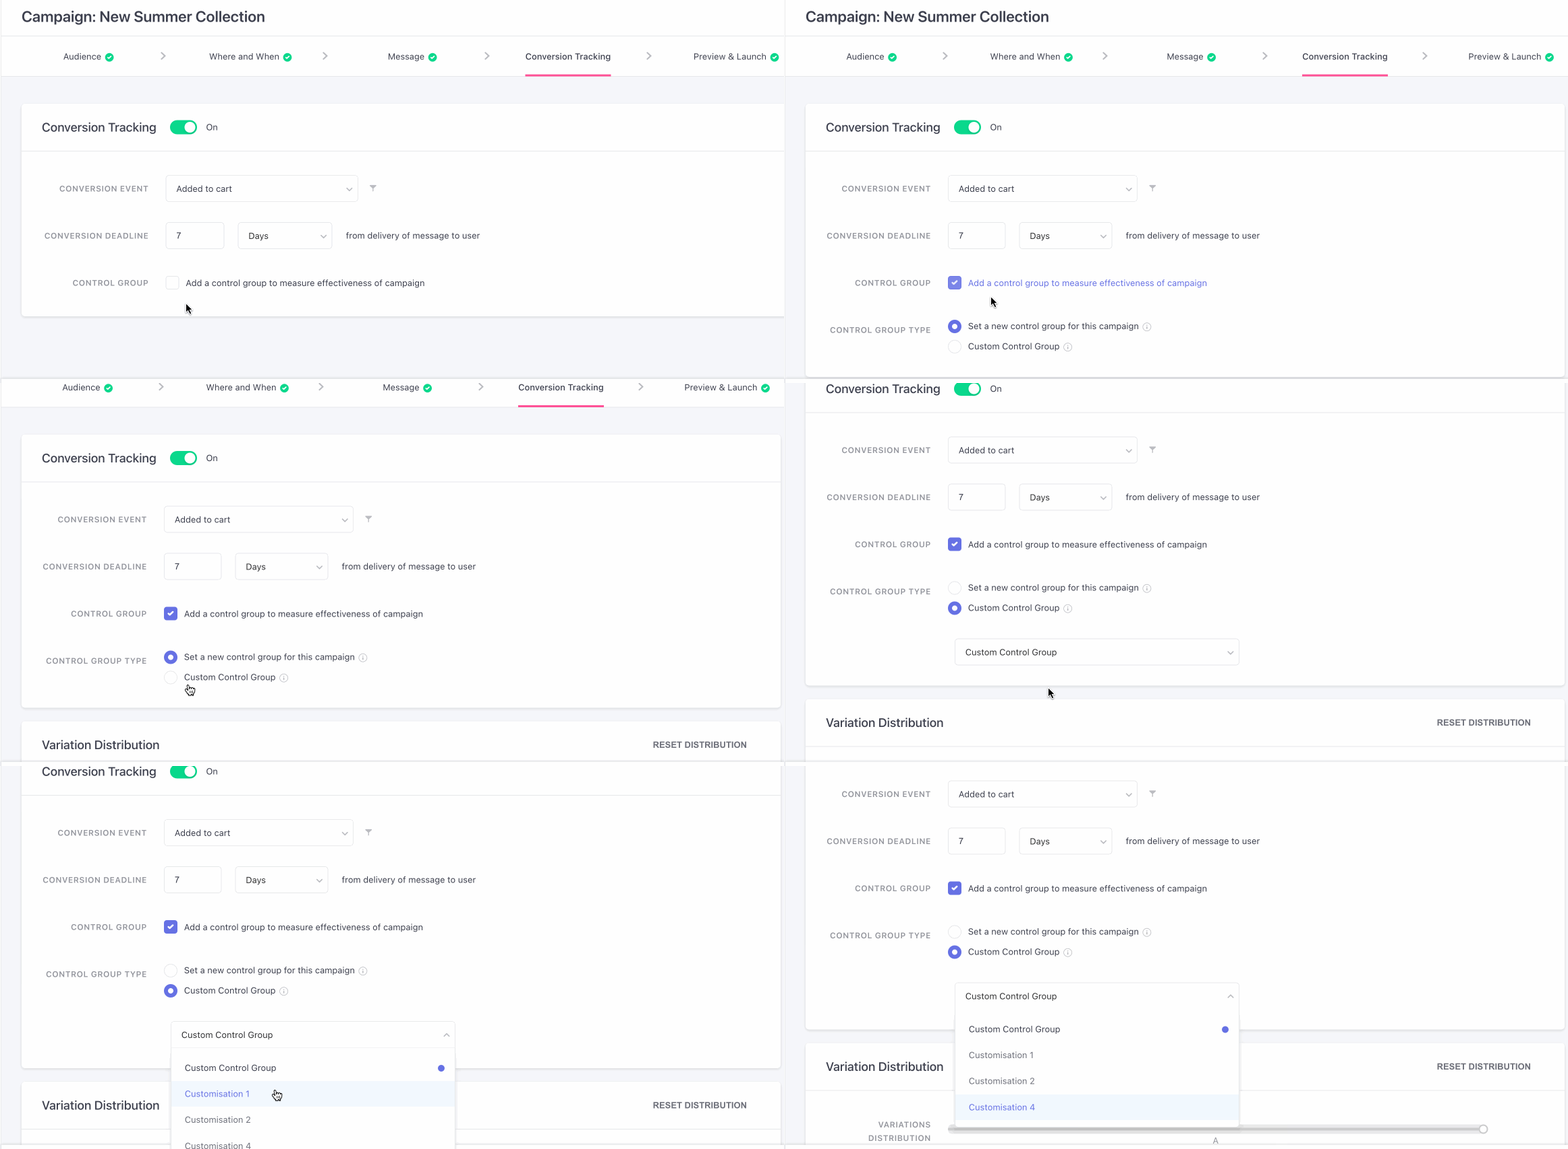
click to enlarge
Since this is a pre-created control group, overlapping users within this group and the target segment won't be receiving the campaigns.
Custom control groups are good for analyzing effectiveness of multiple campaigns. For example: Analyzing effectiveness of SMS and Email campaigns during Diwali sale.
Unlike Campaign level control group, the percentage of users to be part of control group cannot be controlled when Custom control group is selected.
Variation Distribution (Multivariate Testing)
If you have created multiple versions of the Web In-line campaign at Step 3: Message, then you can opt to test the _Variations and _Control Group* if you are unwilling to test the campaign with a minimum test audience of 500 messages.
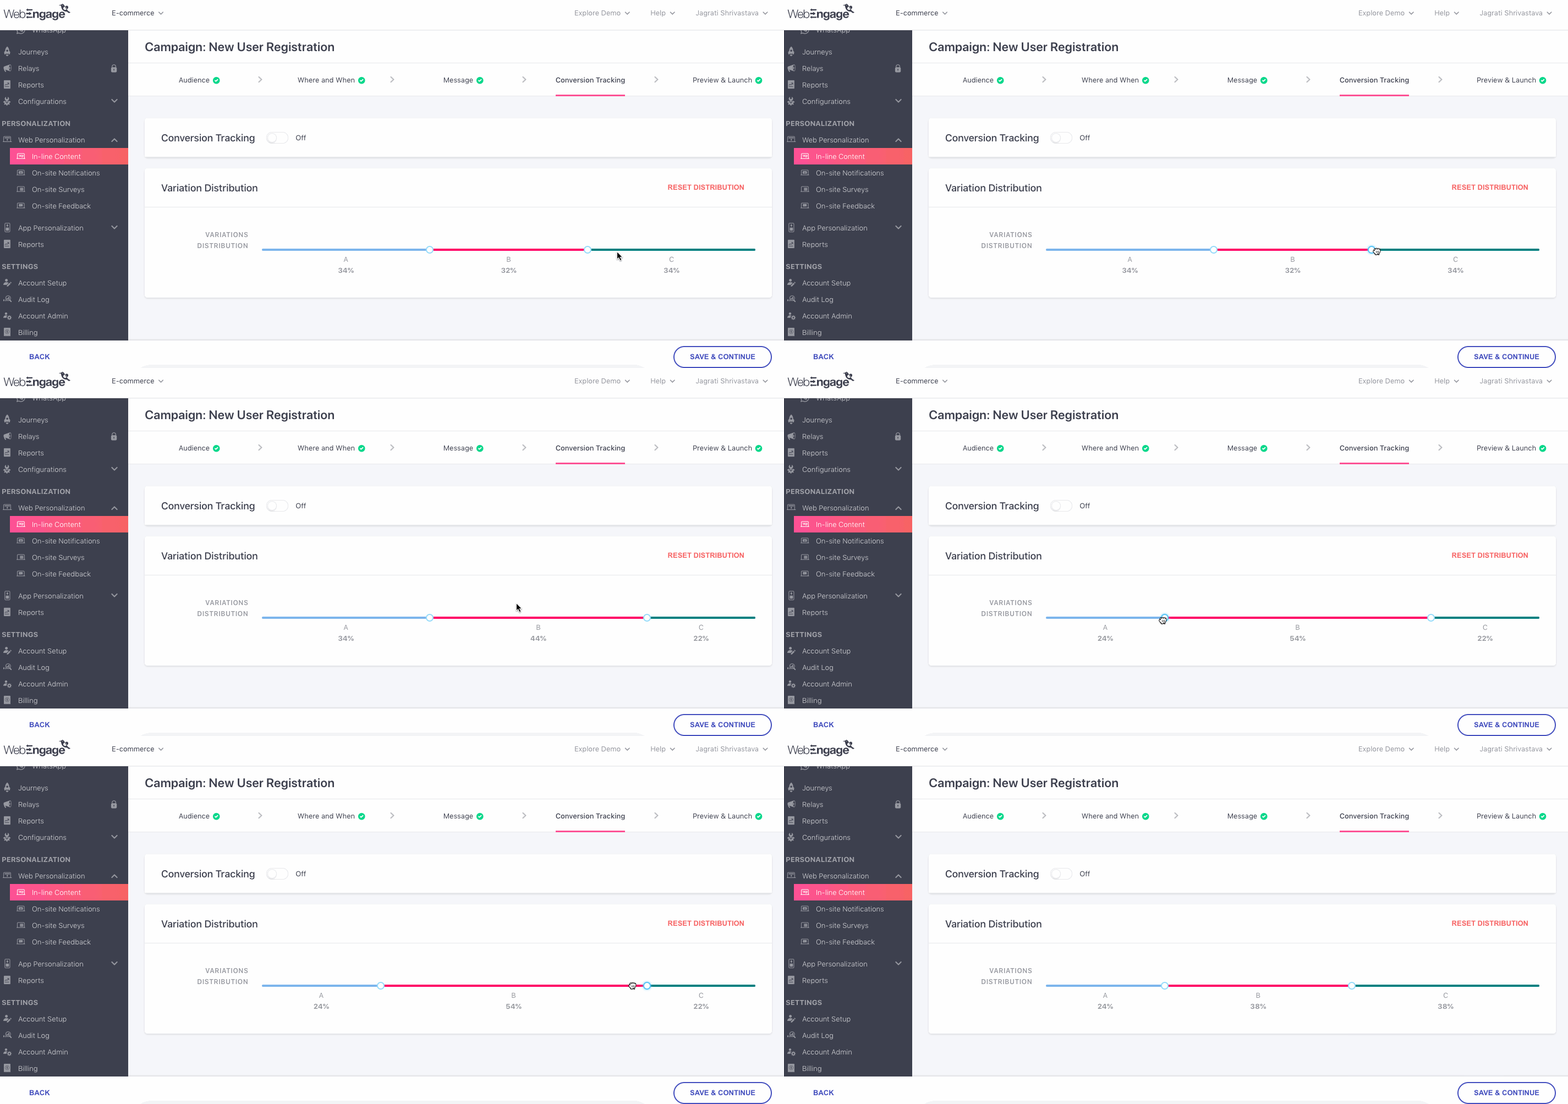
Click to enlarge
As shown above, all the Variations created in Step 3: Message are equally divided amongst the entire target audience. Using the slider, you can choose to specify a custom share for each Variation and Control Group, if enabled.
Quick Read: How manual Variation Distribution works
- Automatic Variation Distribution is not supported at the moment. It will be rolled out soon.
Depending on your Variation testing settings, the campaign will be tested against the Control Group in either of the following ways:
Impact on Variation Slider if Control group is enabled
In case the Control Groups have been enabled the Variation Distribution slider behaves differently based on the type of control group selected:
If Campaign level control group is selected: In this case, the user will have the option of adding the control group by deciding the percentage or size of the control group on variation distribution slider.
If Custom Control Group is selected: You will not be able to manually select the size of the control group using the variation slider since the Custom Control Group is pre-created and overlapping users in the selected Custom Control Group and target segment, won't be receiving the campaign.
Keep in mind
In a particular campaign, Custom Control Group and campaign control group cannot be applied together.
Universal control group can be added irrespective of Custom Control Group or Campaign Control Group is selected.
In case multiple control groups are applied within same campaign (E.g: Universal Control Group + Custom Control Group or Universal Control Group + Campaign control): In this case, since the users in both the control group are mutually exclusive, the overall control group size will increase and the target audience size will decrease.
Step 5: Preview & Launch
Once you've set up the campaign it's time to start impressing users with your highly personalized website!
But before that, we recommend that you conduct a quick preview of the campaign's message and settings to ensure that it's in line with your end goal.
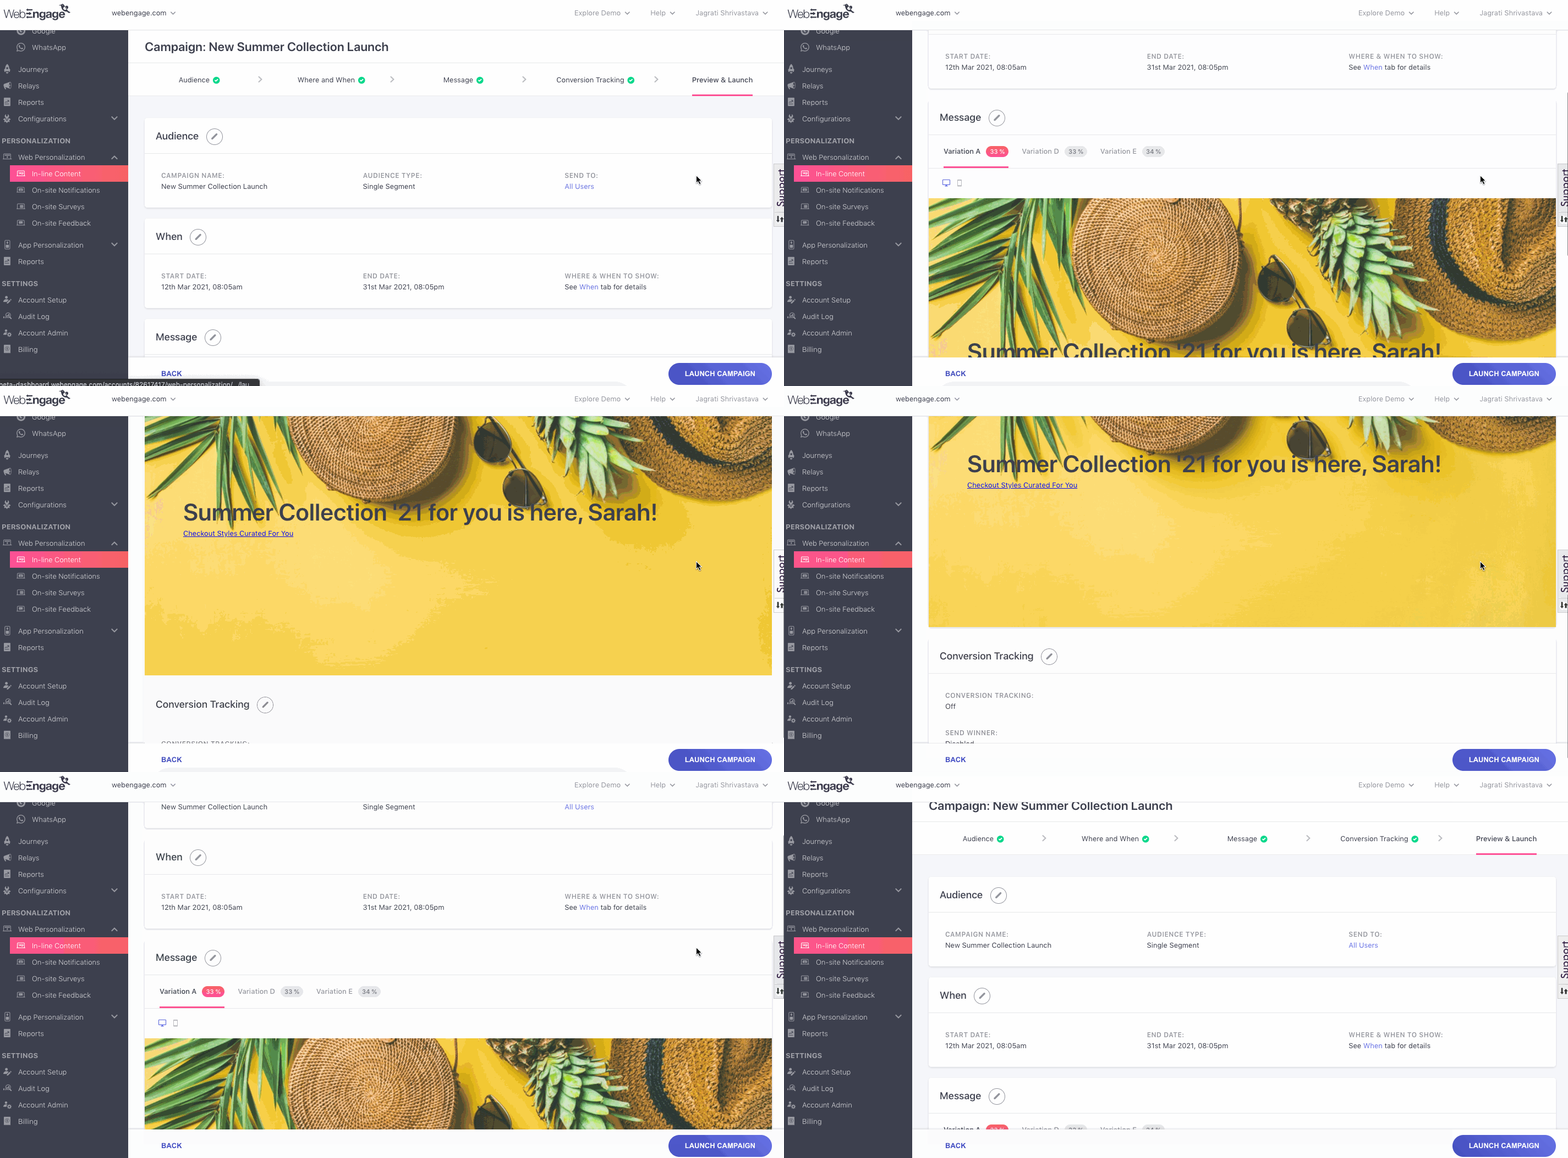
Click to enlarge
As shown above, the last step of campaign creation presents a snapshot of its:
-
Target apps and segment (Step 1: Audience)
-
Target screens, message frequency and trigger settings (Step 2: When)
-
Message Variations and Desktop-Mobile preview (Step 3: Message)
-
Conversion Tracking and multivariate test settings (Step 4: Conversion Tracking)
Edit Campaign Before Launch
You can always choose to edit a step by clicking on the Edit icon, placed next to each step's header. In doing so, you will be directed back to the step, as shown below.
Simply make your edits, save them, toggle back to Step 5: Preview & Launch to continue your review, as shown above.
Saving Campaign as a Draft
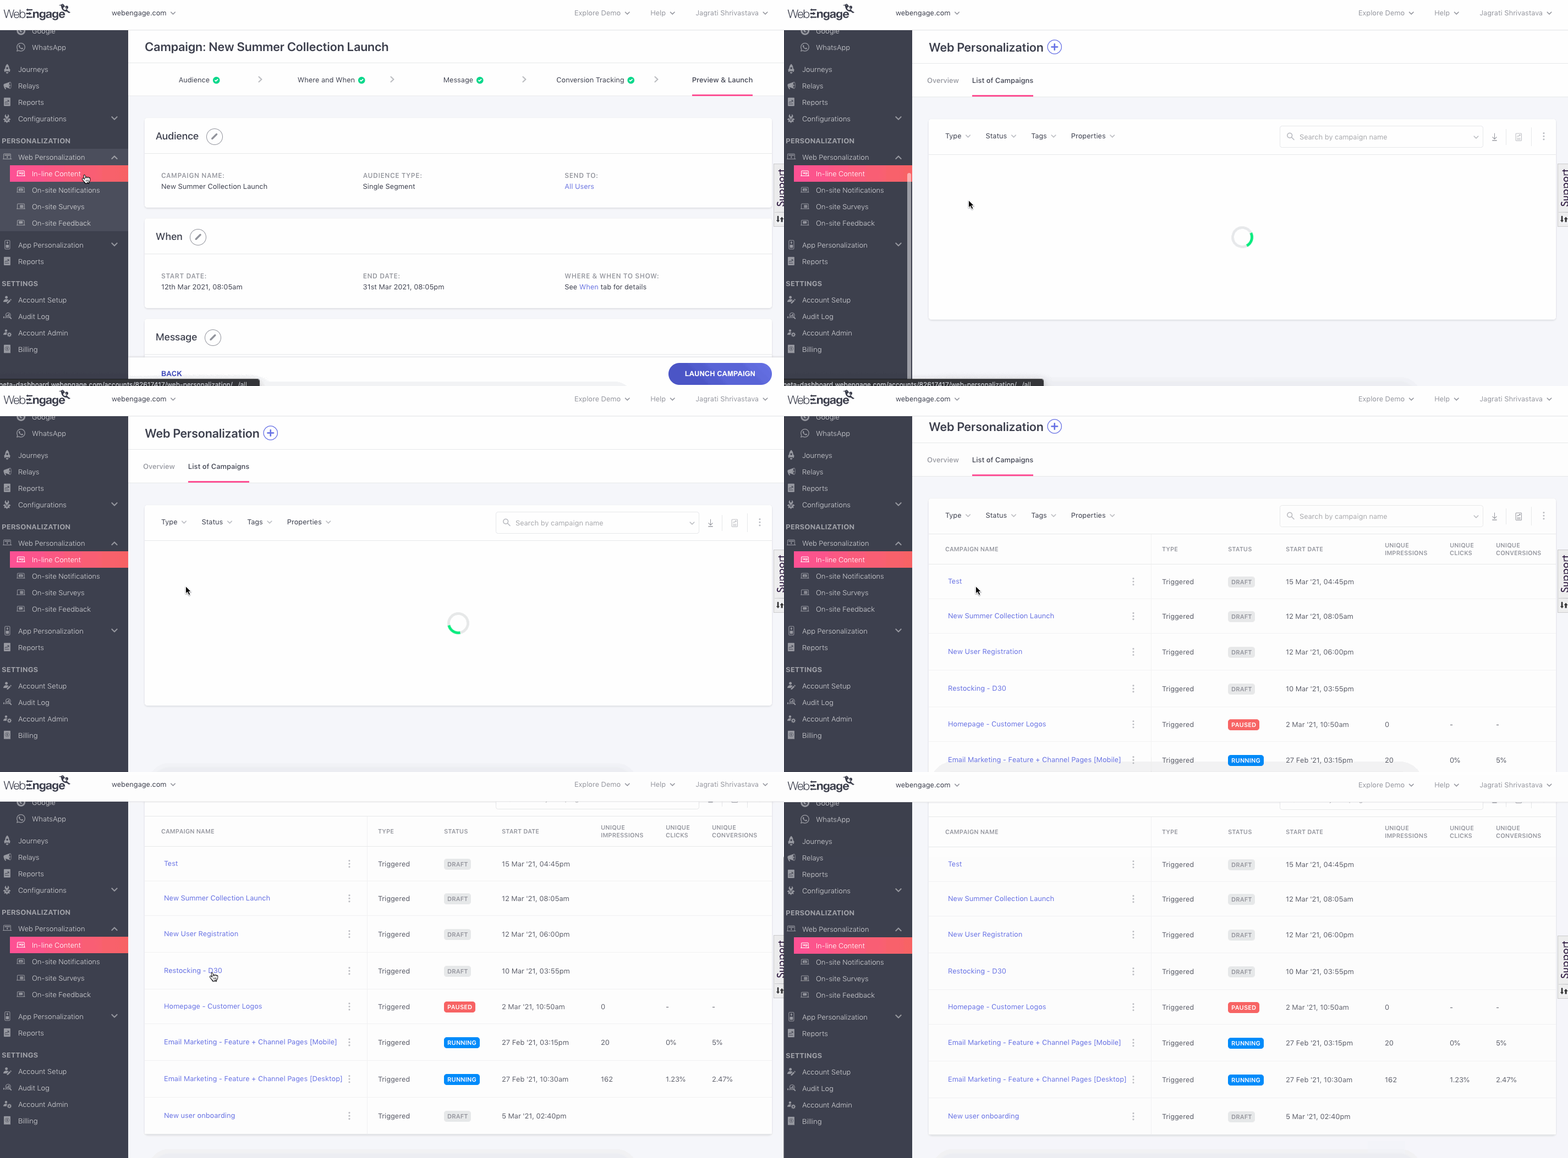
If you're unsure or are awaiting approval of the campaign's contents, then you can simply go back to the central hub of Web In-line campaigns after saving your settings, as shown below. Doing so will automatically save the campaign as a Draft, allowing you to edit or launch it anytime you like.
Click to enlarge
Launching Scheduled Campaigns
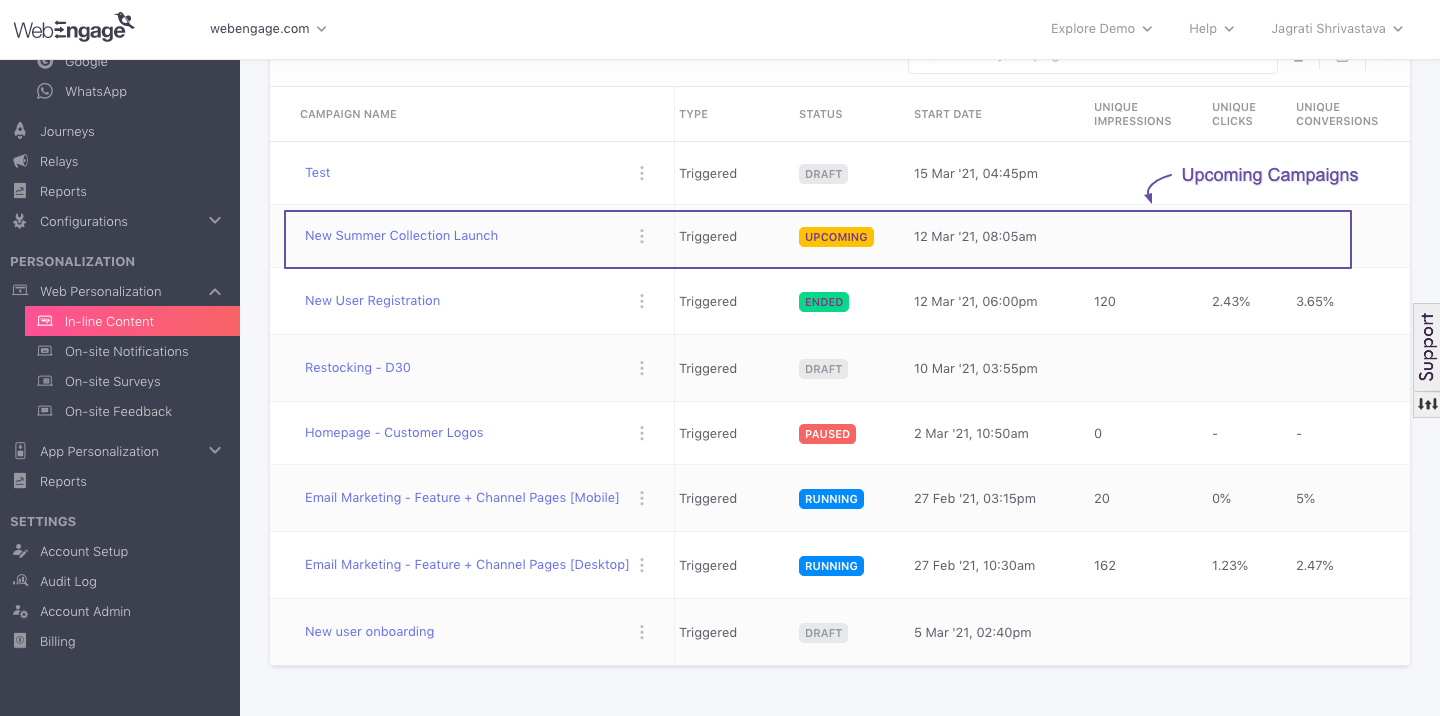
If you have chosen to schedule/ start the campaign at a later date-time, then on launching it, its status will indicate Upcoming in Web In-line Content, List of Campaigns, as shown below.
Click to enlarge
What Happens After a Campaign is Launched?
Once launched, messages are sent to users included in the target audience as per the campaign's settings. Throughout its run time, the campaign's status will indicate Running (in Web In-line Content, List of Campaigns) until it ends or is manually paused by you.
1. Analyzing Campaign's Performance
You can analyze each campaign's real-time impact on user engagement, conversions, and revenue by accessing its Overview section through the List of Campaigns of Web In-line Content, as shown below.
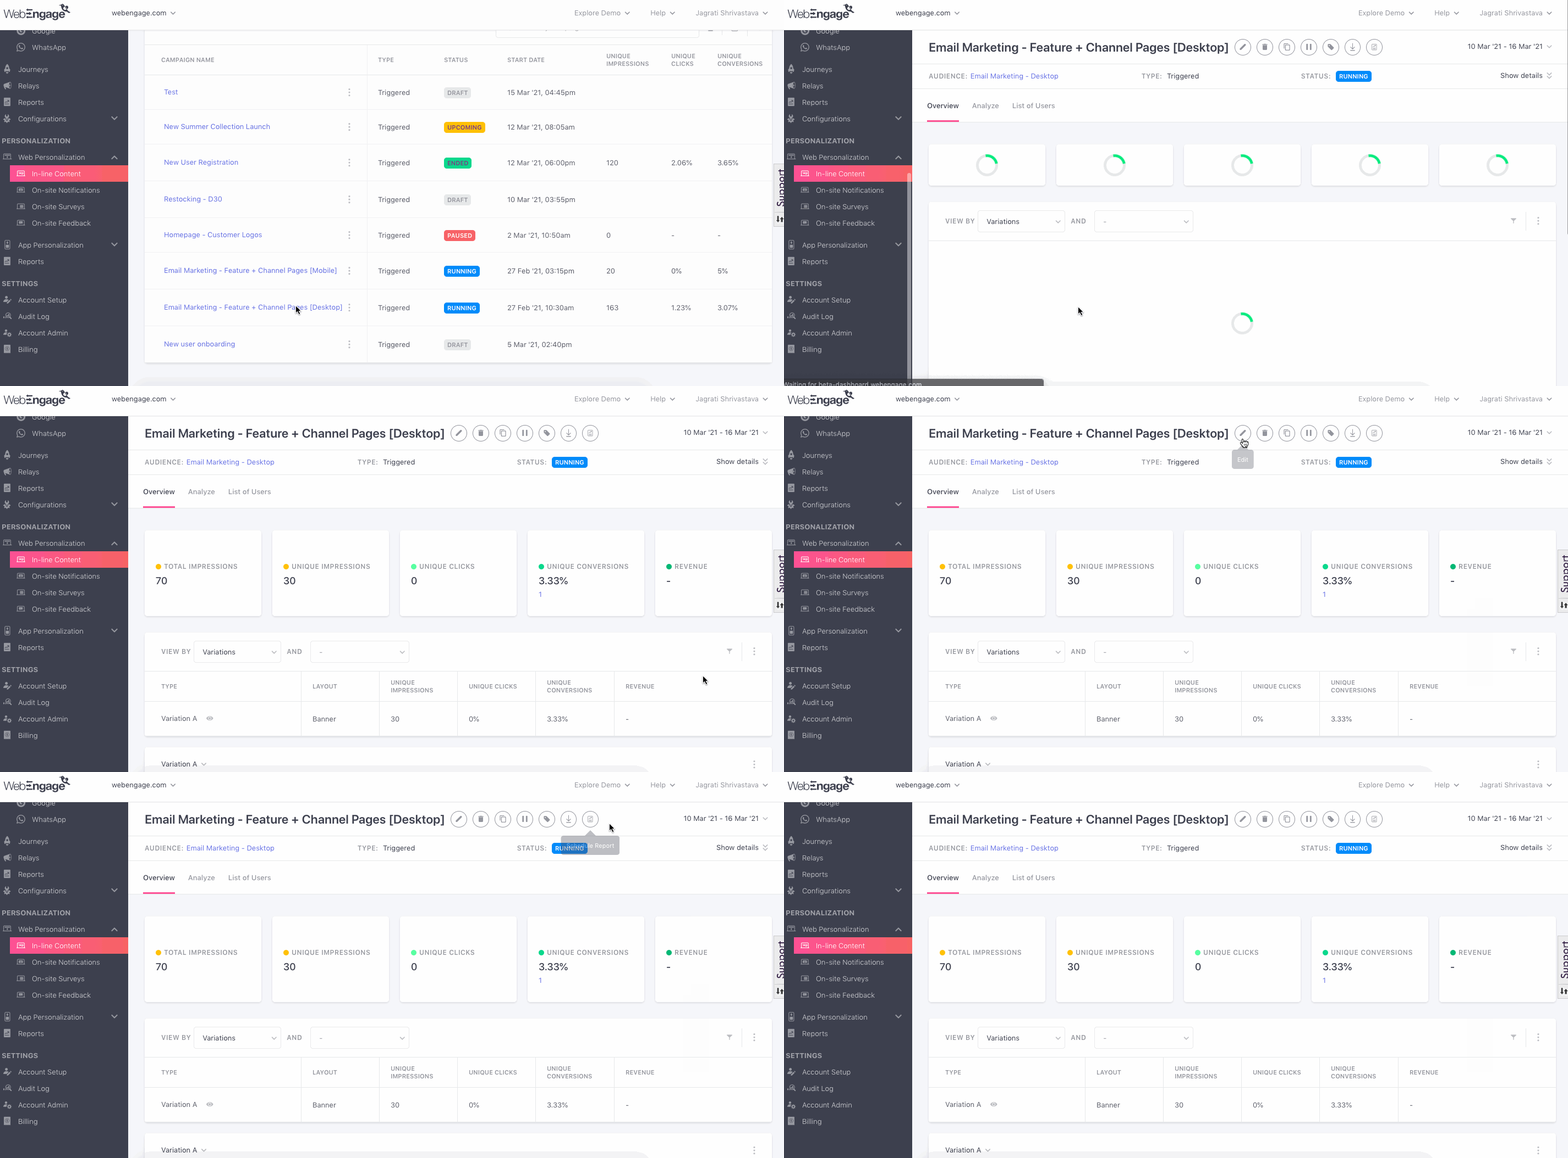
Click to enlarge
2. Modifying the Campaign
Further, you can always choose to Edit or Pause an Upcoming or Running) campaign if you feel the need to.
3. Scheduling Campaign Reports
Once you have launched a campaign, you easily monitor its performance through scheduled reports, delivered straight to your (& your teammate's) inbox! This can be configured through the campaign's analysis section. Here's how you can go about it..
Further, you can also schedule Channel-wise reports to monitor the overall performance of Web In-line campaigns through the Settings section of your account. Here's how you can go about it.
We hope this has equipped you with a robust understanding of how you can deliver highly tailored website experiences at scale. Please feel free to drop in a few lines at [email protected] in case you have any related queries or feedback. We're always just an email away!
Updated 3 months ago