Journey Creation Guide
A step-by-step guide to building the first Journey experience in your dashboard
Please NoteKindly refer to Journey Creation: How It Works for an in-depth understanding of how each block works before creating a Journey.
The Journey Designer is a powerful tool that enables you to deliver one-on-one brand experiences to your users at crucial moments in their lifecycle.
Each Journey can be designed using an If-then-else logic, allowing you to personalize your user's experience in the context of their behavioral history, channel preferences, location, and real-time interactions with your app, website, and campaigns.
Such logic-based flexibility is powered by the various Blocks that help you build the Journey. In your dashboard, these blocks have been grouped under the following headers:
So without much ado, let's help you create your first Journey Experience!
Create Journey
Click on the Plus sign on the top of the dashboard, next to Journey to create a new Journey.

Click to enlarge
Journey Settings
When starting to design a journey, it is necessary to understand your target segment and design the journey to fetch you maximum returns.
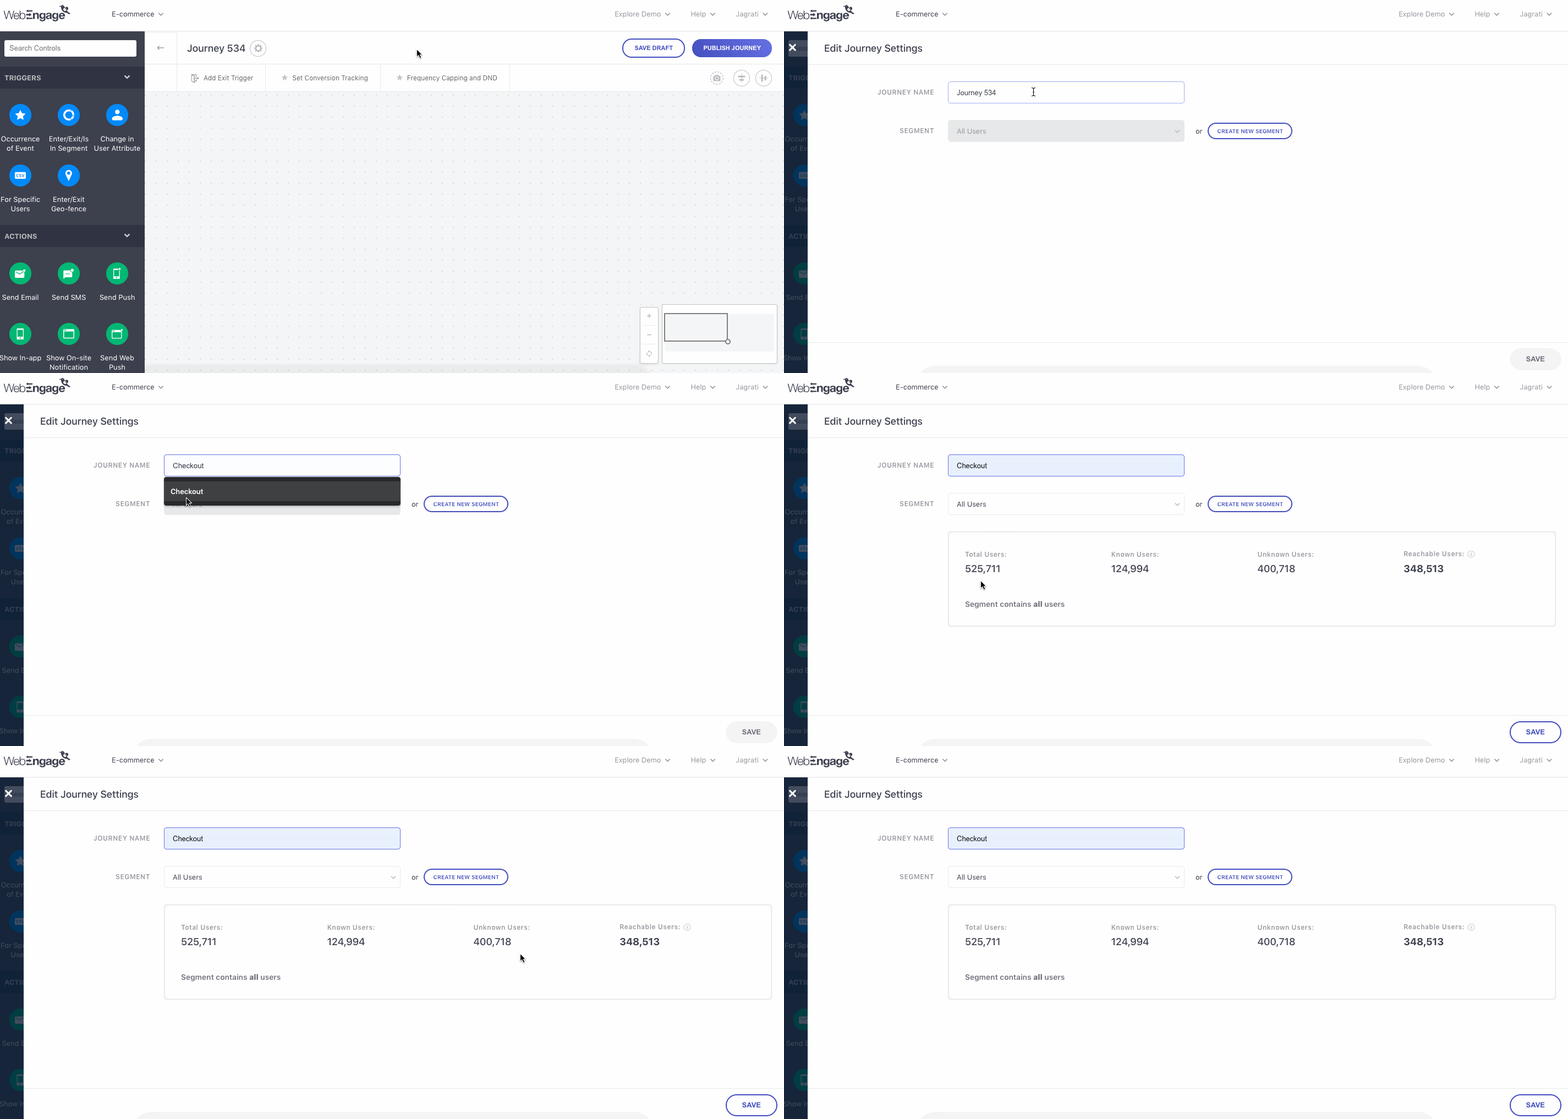
Click the Gear icon to configure Journey settings. Doing so will open a page that will allow you to enter the name of the journey and the segment details. Let's discuss it further in detail:
Journey Name
Giving your Journey a unique name helps you identify its purpose and makes it easier to search in the future.
Click to enlarge
Segment
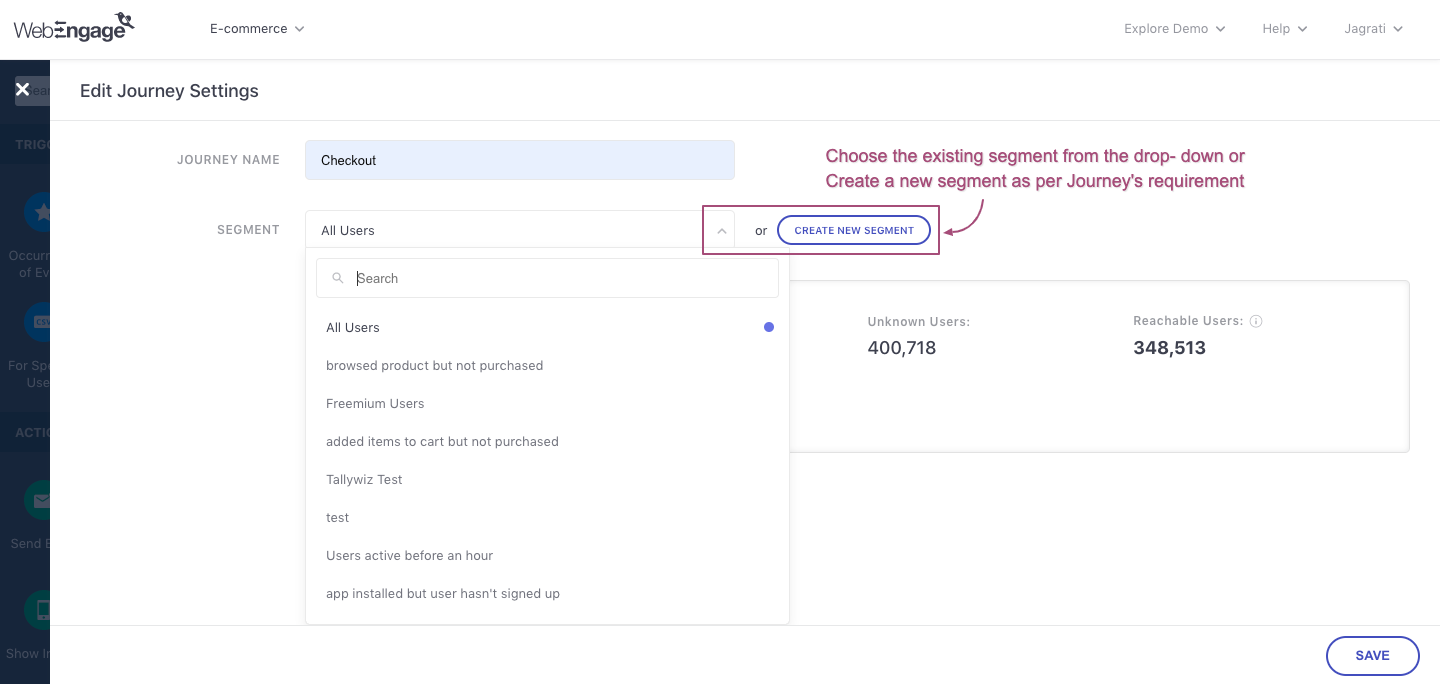
Specifying Segment helps you target users more effectively. You can either choose from the existing segments or create a new segment.
Click to enlarge
Create Segment
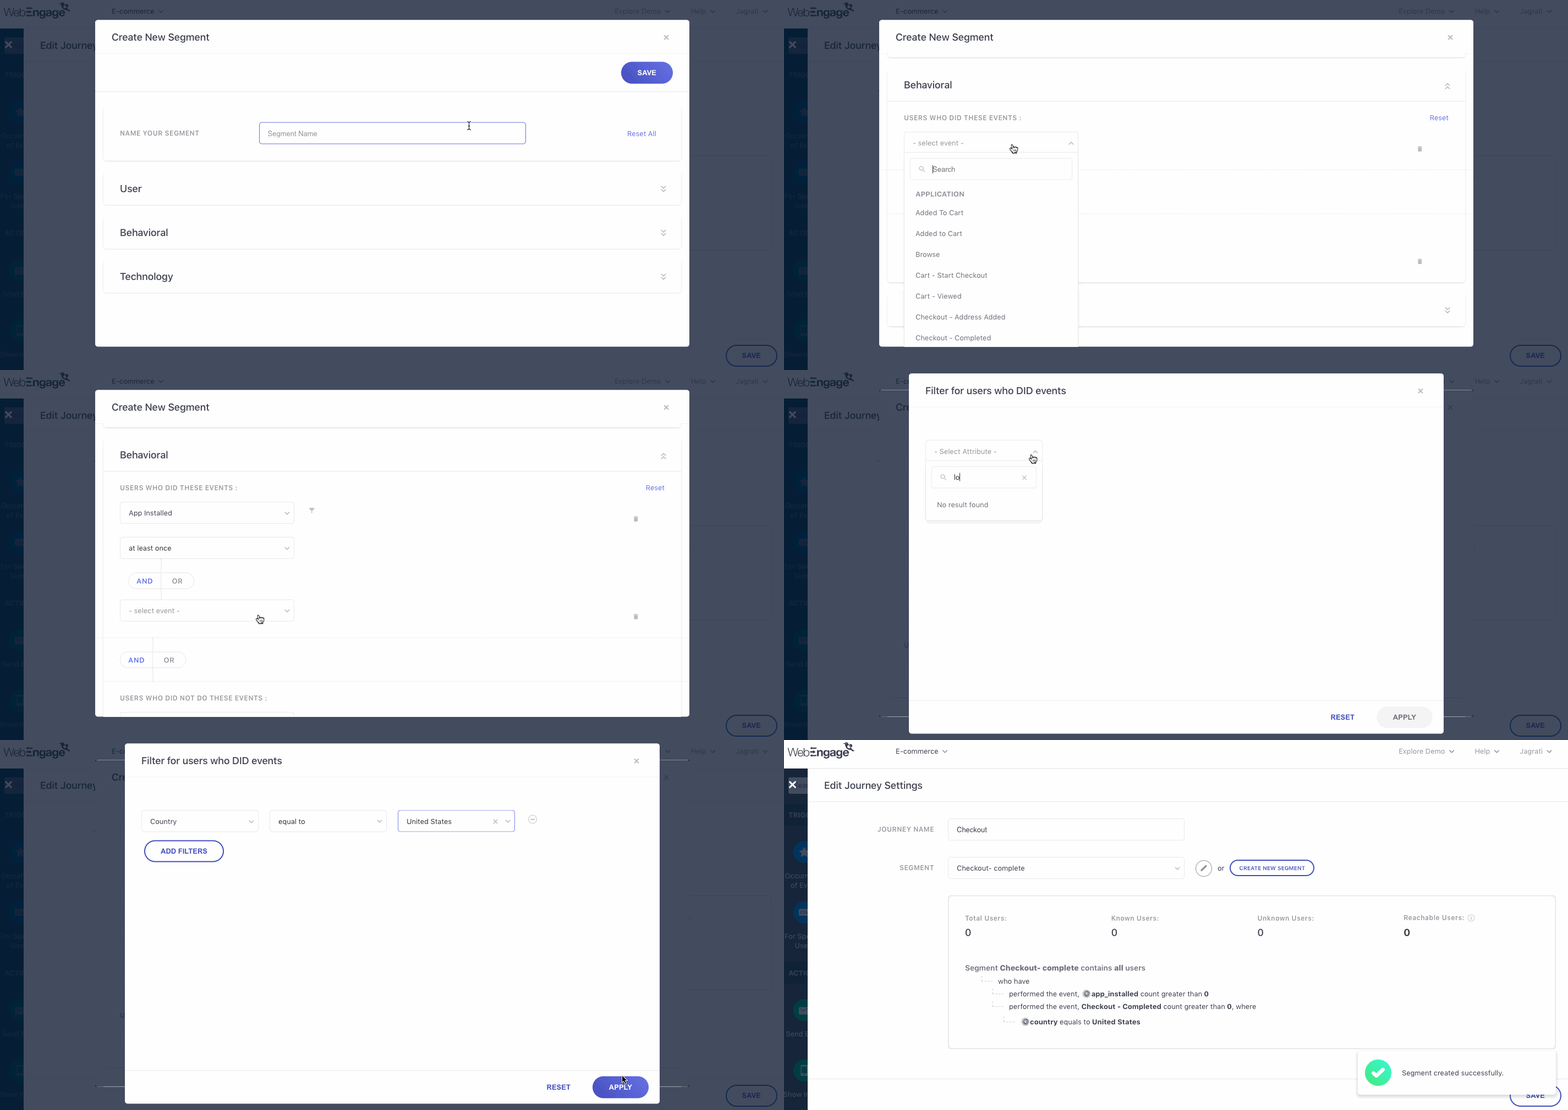
You can choose to segment your entire user base by 3 broad parameters - User (attributes), Behavior, and Technology. Hence, here, you will find a summary of all the rules based on which the segment's users have been grouped. These rules also help you understand the type of users who will enter the Journey and subsequently experience it.
Click to enlarge
In doing so, you will be able to preview a snapshot of its users and segmentation rules.
Let's walk you through the details:
Total Users: Indicates the total number of users currently a part of the segment.
Known Users: Indicates the number of identified users out of the total users included within the segment. All users are identified based on the Unique Identifier specified by you while setting up your WebEngage account.
Unknown Users: Indicates the number of anonymous users out of the total users included within the segment.
Reachable Users: Indicates the total number of users in your segment that can be reached through at least one channel of engagement (Push, In-app, SMS, On-site, Web Push, Email) at present.
Editing Segment
Click on the Edit icon, placed next to the dropdown. In doing so, you will be prompted by a pop-up, pre-populated with the existing segmentation rules to make the changes you want.

Click to enlarge
Simply make your edits and click Save to proceed. In doing so, you will able to preview the number of reachable users as per your edits.
Creating a New Segment
You can choose to create a new Segment_of users from the campaign creation interface by clicking on the _Create Segment button. In doing so, you will be prompted by a pop-up allowing you to create a new segment.
Once created, you will be able to access the Segment through the List of Segments in your dashboard.
Related Read: Rules of SegmentationPlease refer to Creating Segments for step-by-step guidance on how you can segment your users by their attributes, behavior (events), and technological preferences.
Creating a New, Single-use Segment
You can also choose to create disposable segments or segment users specifically for the campaign and avoid adding it to the List of Segments in your dashboard.
This can be achieved by leaving the field, Name blank, while creating the segment. In doing so, it will become an Ad hoc segment, which will be available only for sending the campaign you're currently creating.
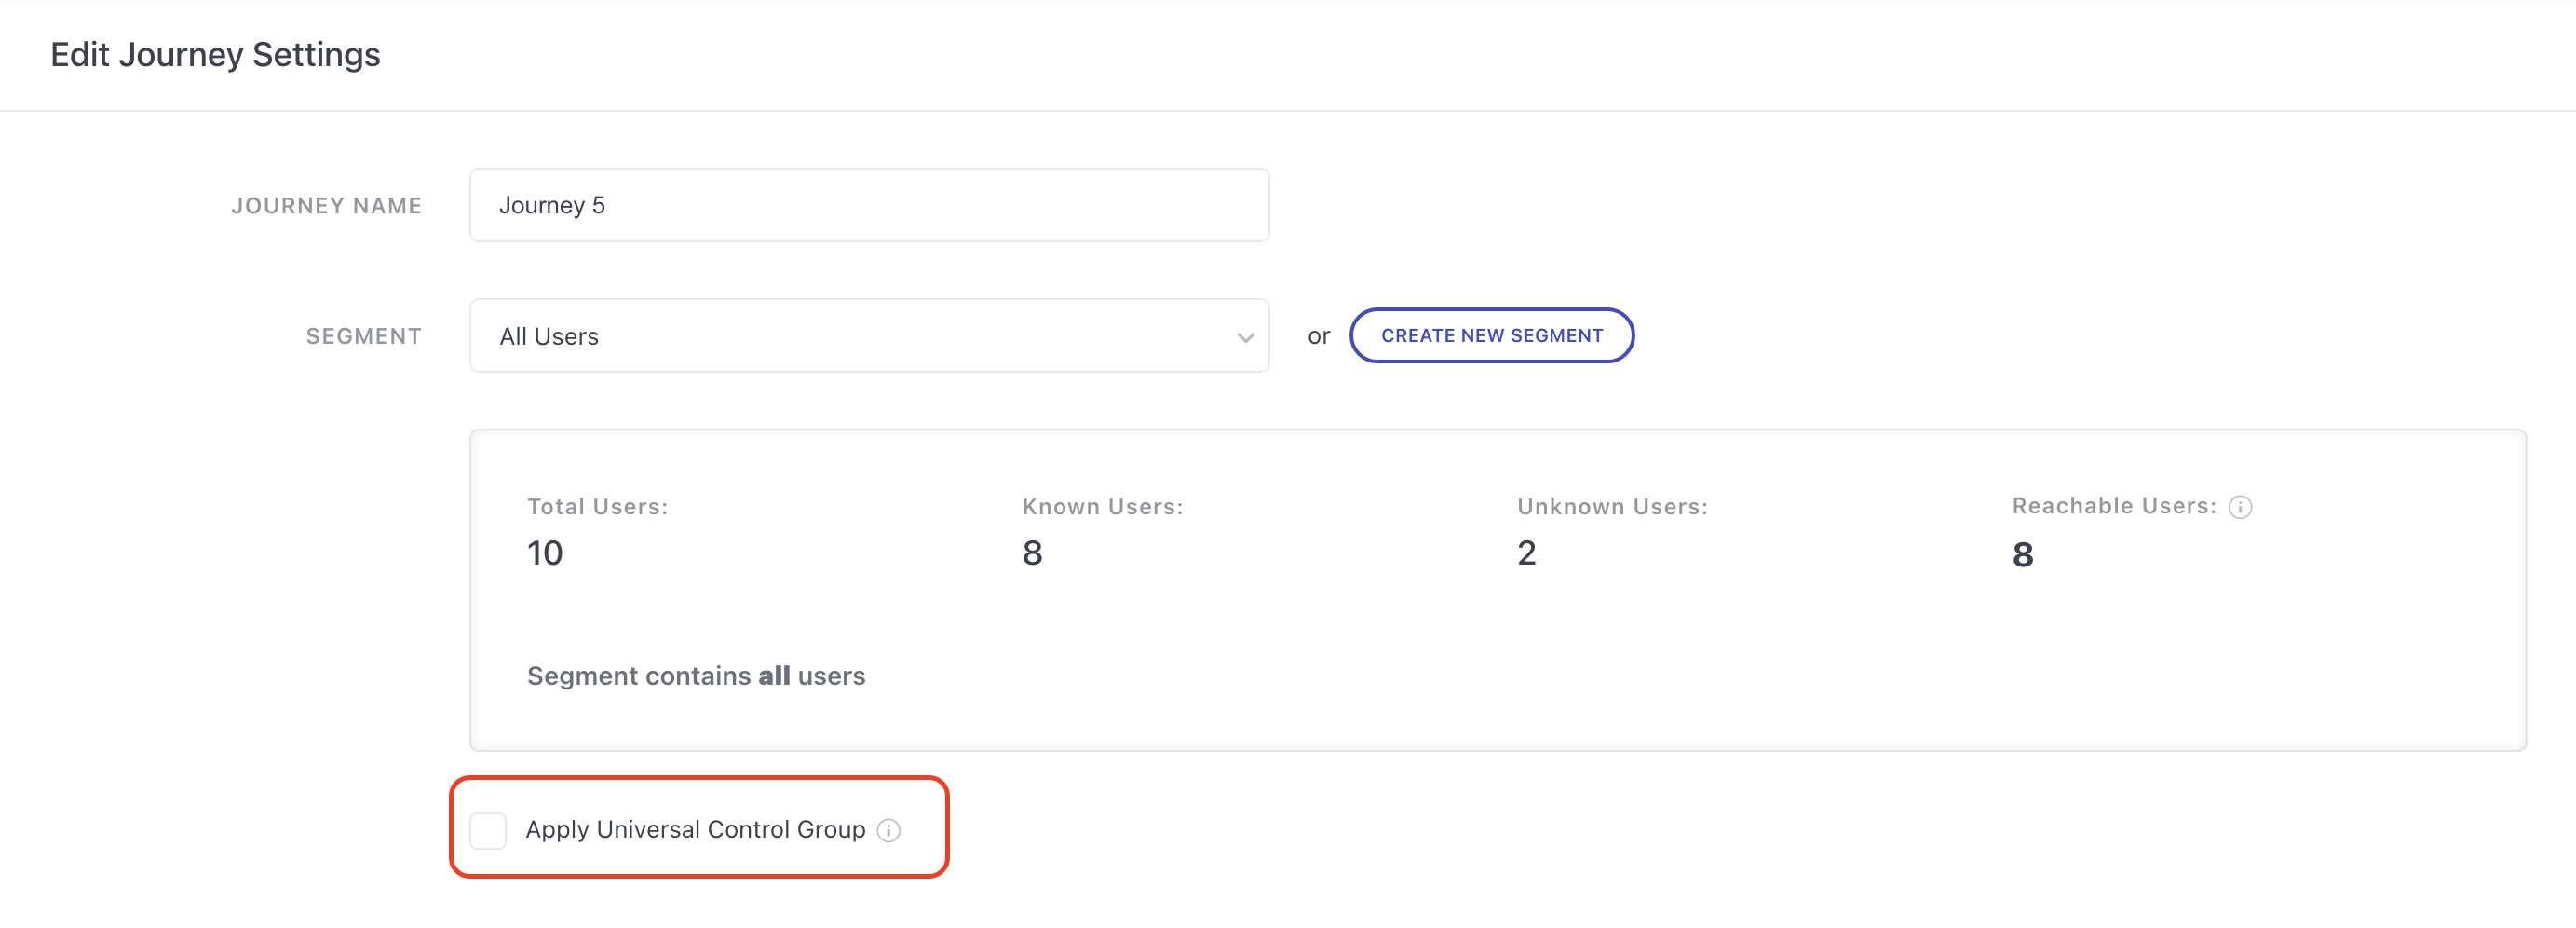
Apply Universal Control Group
click to enlarge
Conditional OptionThis is a conditional option which will be shown only if the you have created Universal control group in your account. Click here to know how to create Universal control group.
- When the box is checked, the journey will not be sent to users who are part of the Universal Control Group in the segment that is selected.
- When the box is unchecked, the journey will be sent to all users that are part of the segment inclusive of the Universal Control Group users.
Add Entry Trigger
Must Read: How Each Trigger WorksHow to configure Entry Triggers to start the Journey experience for a user
Click to enlarge
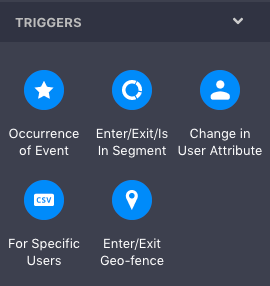
The most important part in building your Journey is to add the Trigger(s), based on which users will experience the Journey. You can think of Triggers as entry points that qualify users against the parameters specified by you.
These parameters could be anything like:
- Occurance of Event performed by the user on your app/website.
- Enter/ Exit/ Is in Segment that the user is included in or excluded from (as per the rules of segmentation defined by you).
- Change in User Attribute in a user's profile Attributes.
- For Specific Users or the list of users uploaded by you to trigger the Journey.
- Enter/ Exit Geofence that the user enters/exits.
Must Read: How Each Trigger WorksHow to configure Entry Triggers to start the Journey experience for a user
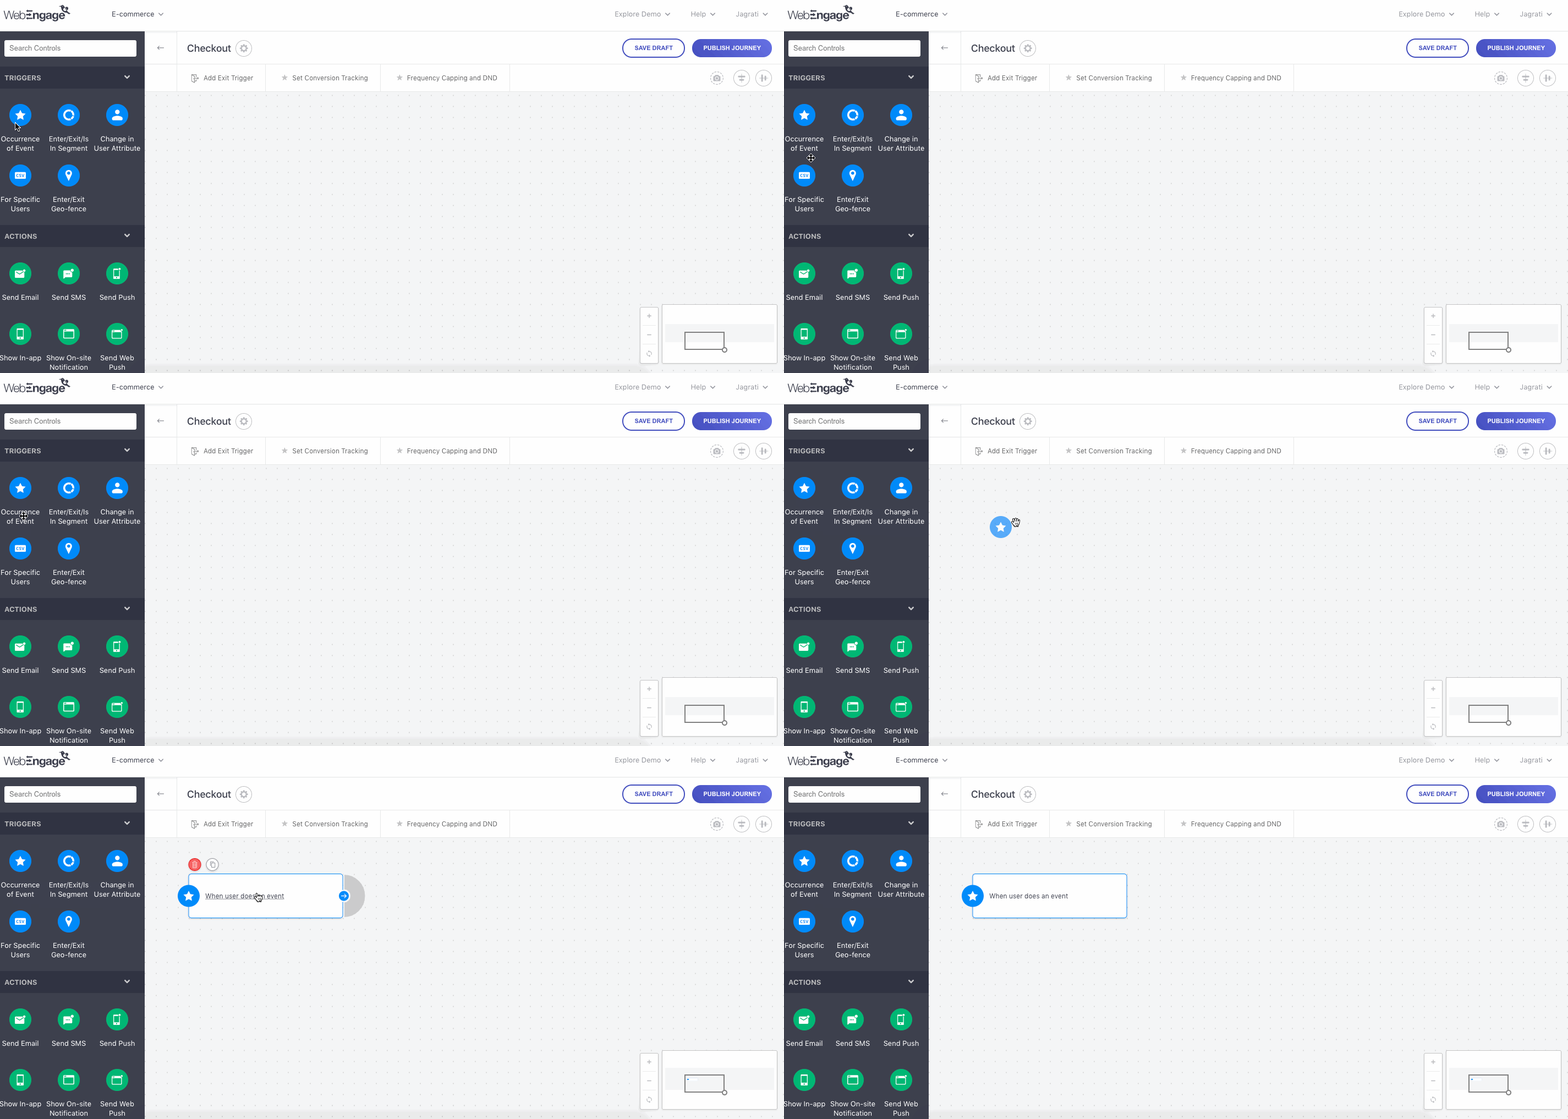
Drag and drop the trigger onto the Journey Canvas, as shown below
Click to enlarge
Add Conditions and Flow Controls
Click to enlarge
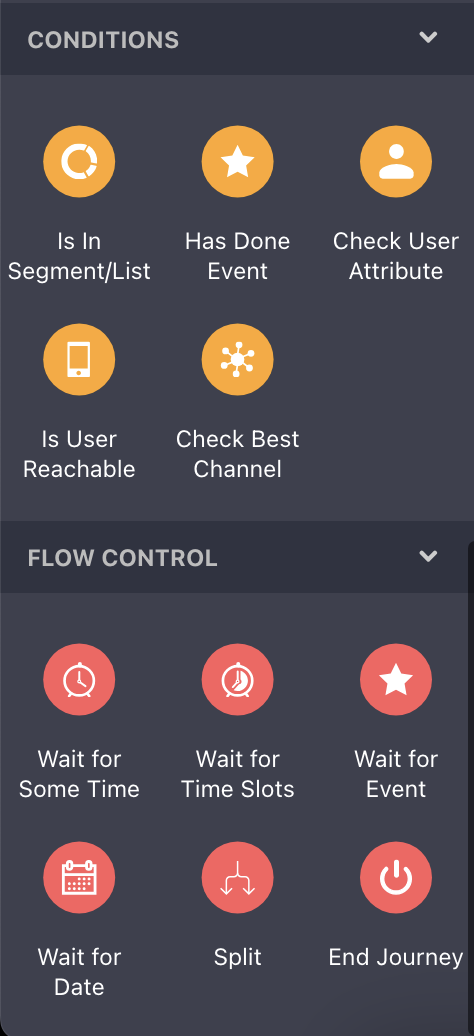
Once a user enters the Journey through a trigger, they immediately experience the next block it connects to. Depending on your engagement strategy, the Entry Trigger can be succeeded by a Condition or Flow Control.
Conditions: These are checkpoints that help you contextually personalize the Journey experience for each user based on their behavior and preferences in real-time. They work on a simple Yes-No logic allowing you to create different Flows for users in the Journey.
Flow Controls: These help you determine the duration over which users experience the Journey and contextually end the Journey for each user.
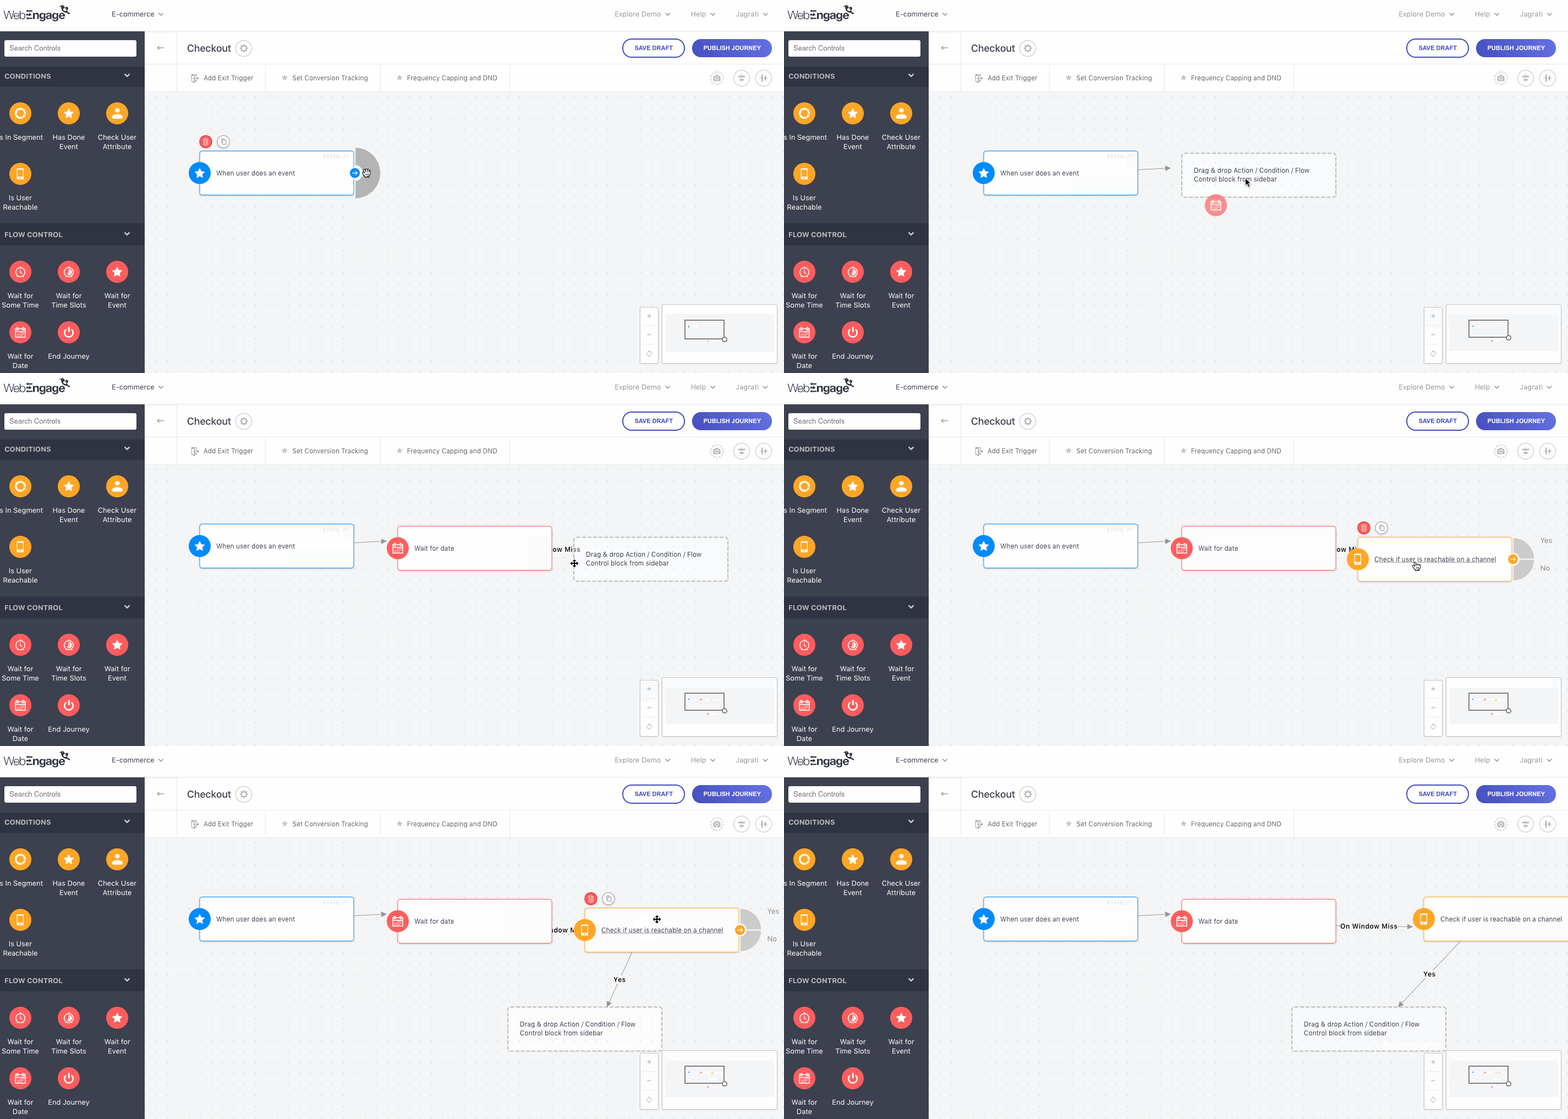
Click to enlarge
Must Read: How Conditions & Flow Controls WorkHow to configure Conditions and Flow Controls to modulate the Journey experience for each user that enters it
Few Recommendations to help you Create Exceptionally Engaging Experiences
Always space out consecutive messages by adding a Wait for Event or Wait for Specific Duration block after sending out the first campaign. Doing so enables you to maintain a healthy time gap between messages and prevents users from receiving redundant communication if they've already acted upon the previous one!
Always create fallbacks for engaging users through alternate channels by checking their channel reachability. (Conditions > Is User Reachable). Doing so enables you to engage the maximum number of users that Enter the Journey.
Always Wait for a Specific Duration before engaging the user with a message after they have performed an event. Doing so helps ensure that your dashboard has sufficient time to log in all the behavioral data for a user.
Add Action Blocks
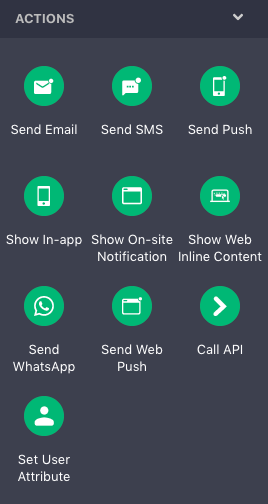
Click to enlarge
Action blocks are points of user engagement that help you deliver contextually personalized messages in real-time through each user's preferred channel like, Push, In-app, SMS, Web Push, Email, and WhatsApp.
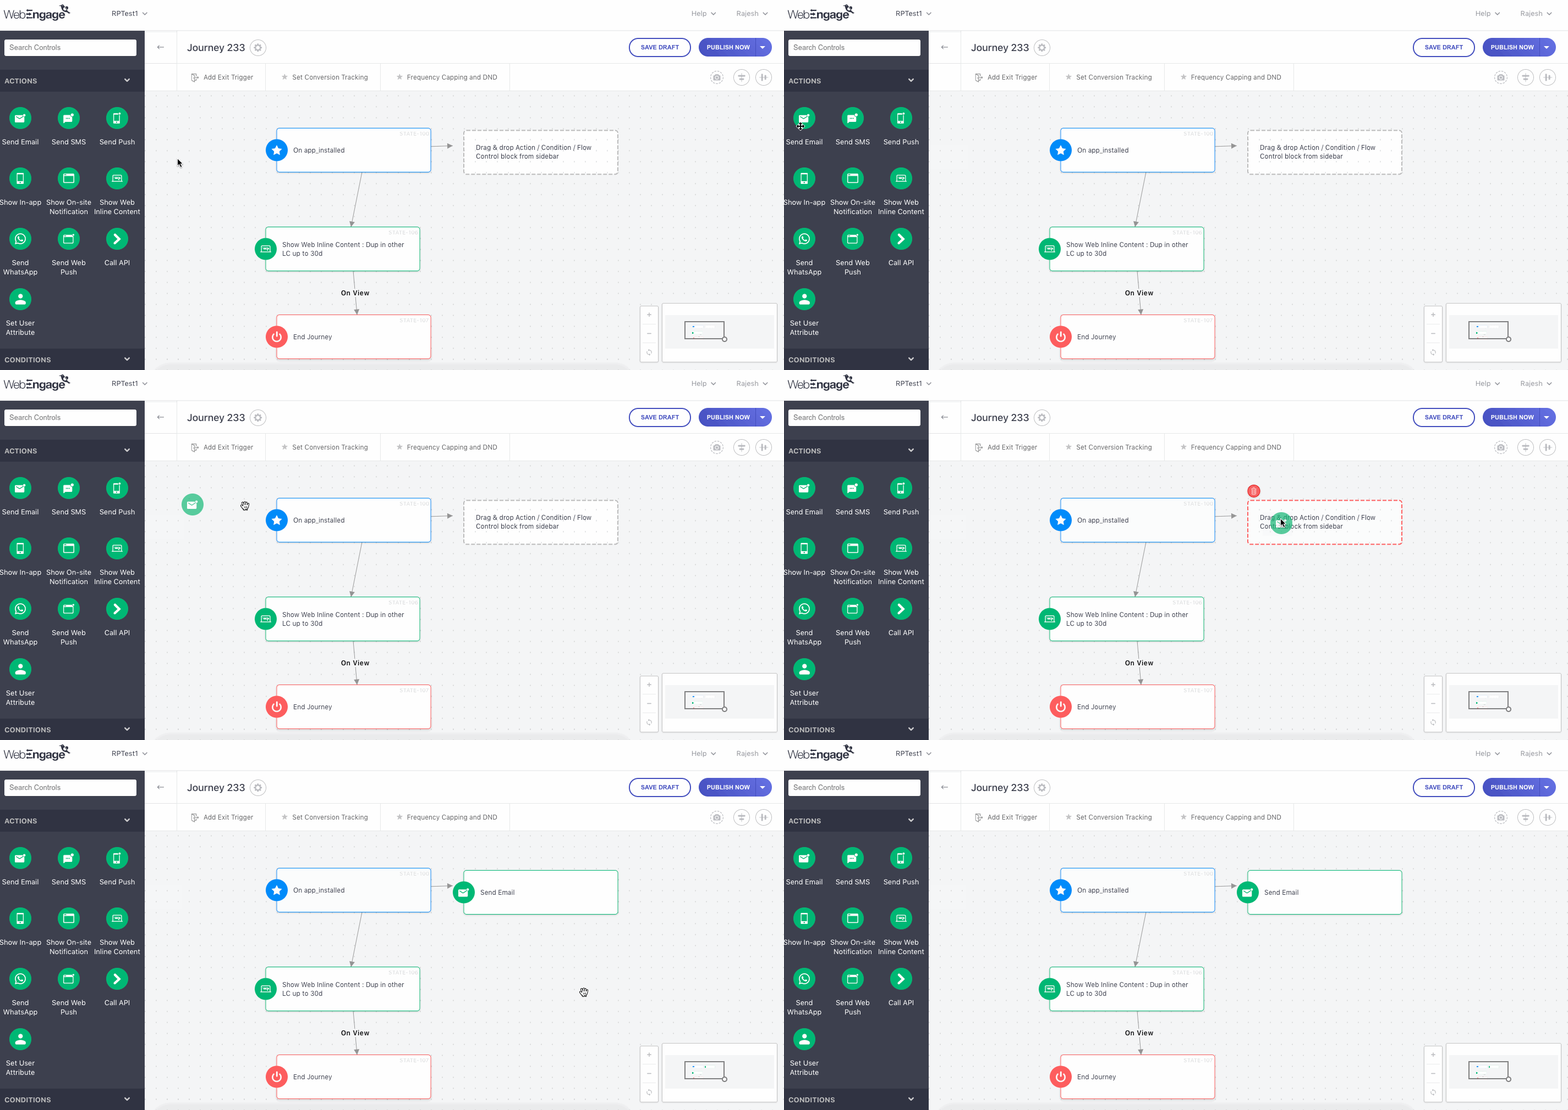
Click to enlarge
These are crucial stages that help you cement your relationship with a user. This is why - merely sending a message is not enough. In our experience of working with hundreds of B2C companies, we've identified a few crucial elements that go into making 'just a message,' an 'exceptionally engaging message.'
1. The Right Tone: Crafting messages that appeal directly to a user's pertinent needs at a particular stage is the key to establishing a long-lasting relationship. Here's an empathy map to get you started.
2. The Right Moment: Identify the right moment where they are likely to engage with your message or notification.
3. Contextual Personalization: Go beyond first_name and personalize your messages to your user's last interaction to effectively engage users.
4. Balanced Frequency: Trying to rush users into converting or proceeding to the next stage in their lifecycle can more often than not backfire. The key is to give users enough time to act upon a message as per their organic will.
This is why we recommend that you space out each consecutive Action Block in the Journey by adding wait for blocks (akaFlow Controls) like Wait for Some time, Wait for an Event, Wait for a Specific Date and so on.
Pro TipLeverage the various Flow Control blocks to modulate the duration of the entire Journey experience and the frequency of engagement.
End Journey
Every Journey must have an endpoint where the user's Trip ends. Just drag and drop the End Journey from Flow Controls and connect it to the action or trigger which will end the user's journey.
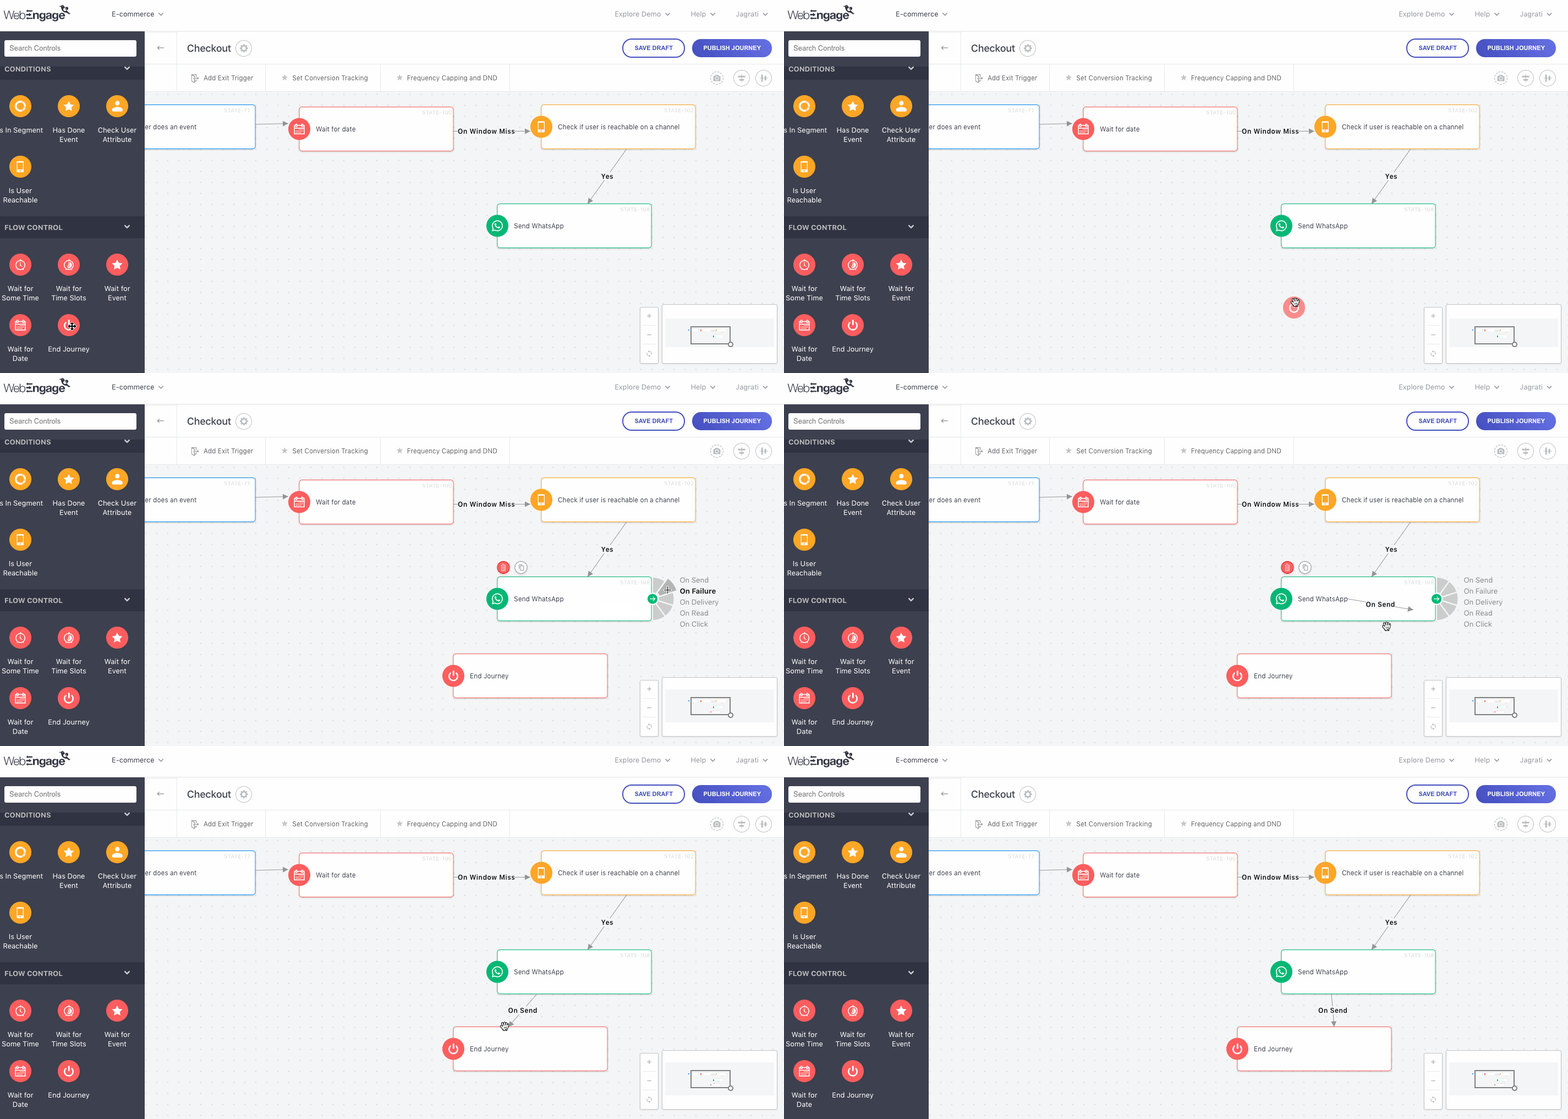
Click to enlarge
Add Exit Trigger

Click to enlarge
Exit Triggershelp you end the_Journey experience prematurely for users once they perform the desired behavior, as per the Journey's end goal. We highly recommend that you configure an _Exit Trigger* to ensure that users don't receive any redundant/out-of-context messages.
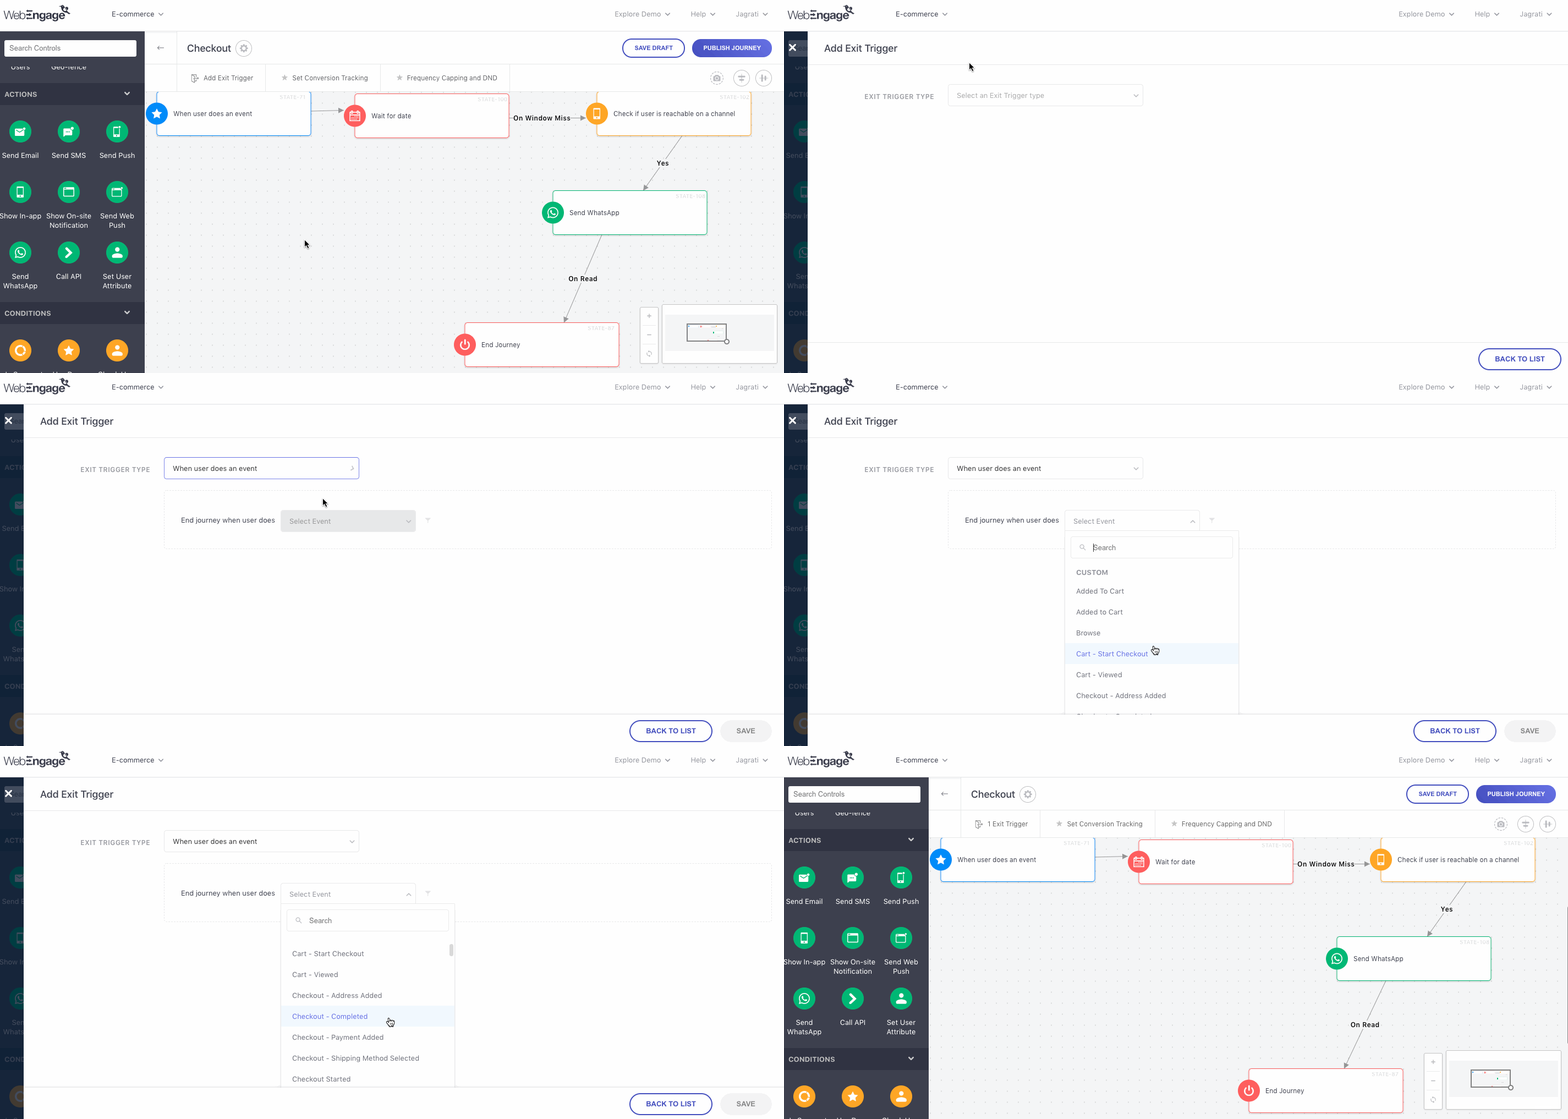
Click to enlarge
As shown above, click on Exit Triggers in the Top Panel to end the experience for users when their behavior causes:
- The occurrence of an Event.
- The user to enter/ exit a Segment created by you.
- A change in the value of their User Profile Attribute.
Fact CheckEach time the Exit Trigger causes a user's Trip to end, it's counted towards the number of Exits of the Journey.
Set Conversion Tracking
Once you have designed the Journey experience, the next step is to:
-
Configure Conversion Tracking to track Journey's effectiveness in achieving the end goal and generating Revenue.
-
Enable Control Group to compare Journey's ability to drive conversions against the organic behavior of control group users.
Let's walk you through each setting:
By default, Conversion Tracking is disabled for your Journey. As shown below, you enable it by accessing Set Conversion Tracking through the top panel. Doing so allows us to track the Journey's end goal through all its Journey campaigns.
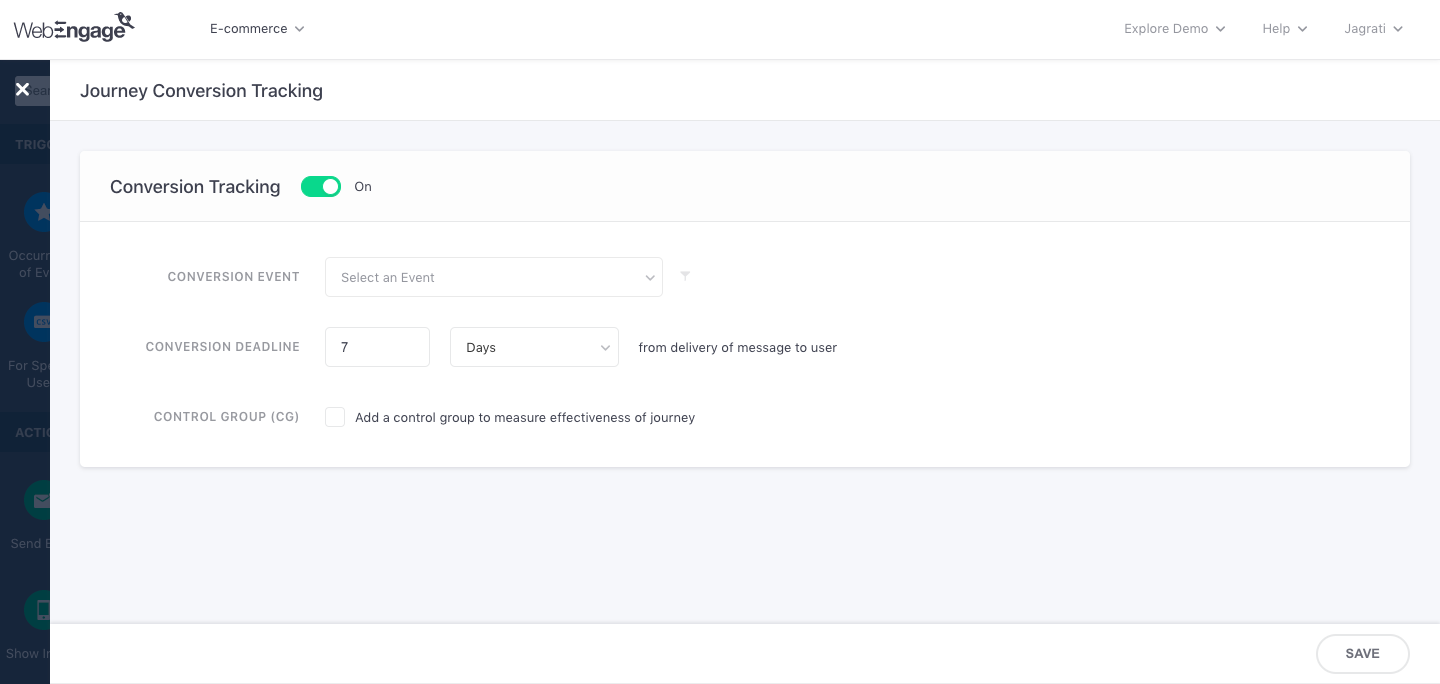
Click to enlarge
Related ReadsHow Conversion Tracking works for a Journey.
Here's how you can configure it:
Conversion Event
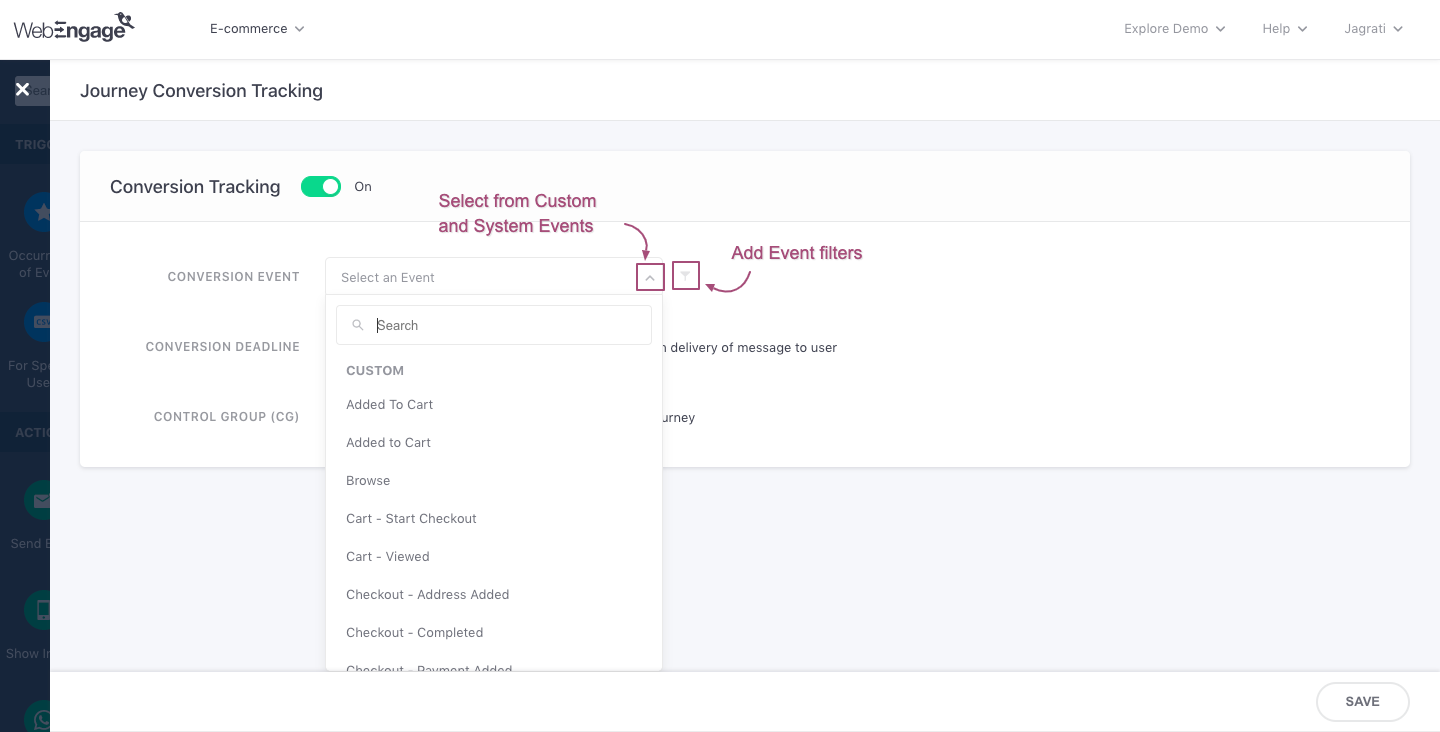
The term, Conversion Event is an alias that helps you identify the event you expect users to perform after receiving a message through the Journey.
Click to enlarge
As shown above, you can choose from a list of all the Custom and System Events being tracked for your account to specify the Journey's conversion goal.
-
Custom: All the custom events being tracked for your account
-
System: Session Started, User Login - events automatically tracked by us
Pro TipWe recommend that you map all the Custom Events that track a monetary transaction in your app/website, as Revenue Events in your dashboard.
This will help ensure that both, Conversions and Revenue are tracked for the Journey if the respective event is specified as its Conversion Event.
Add Attributes to the Conversion Event
Depending on the Journey's end goal, you can choose to narrow down the scope of conversion to a specific action by adding event attribute filters to the selected Conversion Event by:
Step 1: Click on the filter icon placed next to the dropdown
Step 2 (Optional): Click on Add Filter to add more attributes to the event
- You can club multiple event attributes by the AND/OR logic
- This way only those users who perform the Conversion Event in the context of All/Either attribute filters will be considered towards the Journey's Conversions
Conversion Deadline
Click to enlarge
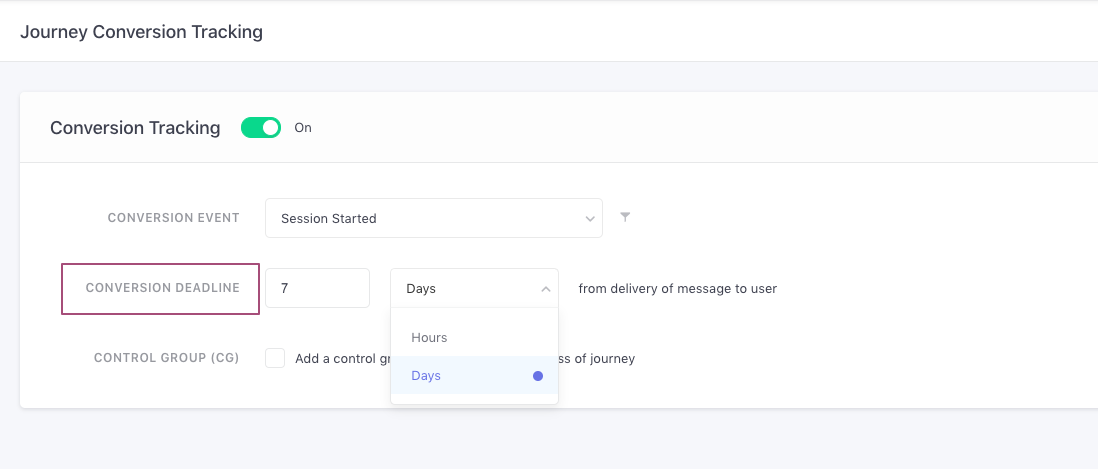
The Conversion Deadline is a duration defined by you that tells us when to stop tracking conversions for the Journey.
-
This means that once a Journey campaign is delivered, we will track users who perform the Conversion Event in the context of its attribute filters (if any), only till the specified Conversion Deadline.
-
By default, a Conversion Deadline of 7 days is set for the Journey. You can choose to specify a custom duration in Hours or Days, as per the end goal.
Control Group
A Control Group is a small portion of the target audience that is randomly selected, represents the behavior and preferences of all the users who experience the Journey, and does not receive any Journey campaigns.
An optional but recommended step, adding a Control Group to the target audience, allows you to compare the Journey's ability to achieve the end goal against organic behavior. It makes for the perfect benchmark to assess the real impact of the Journey experience on influencing user behavior.
Related ReadWhy You Must Test Your Journey Against a Control Group's Organic Behavior
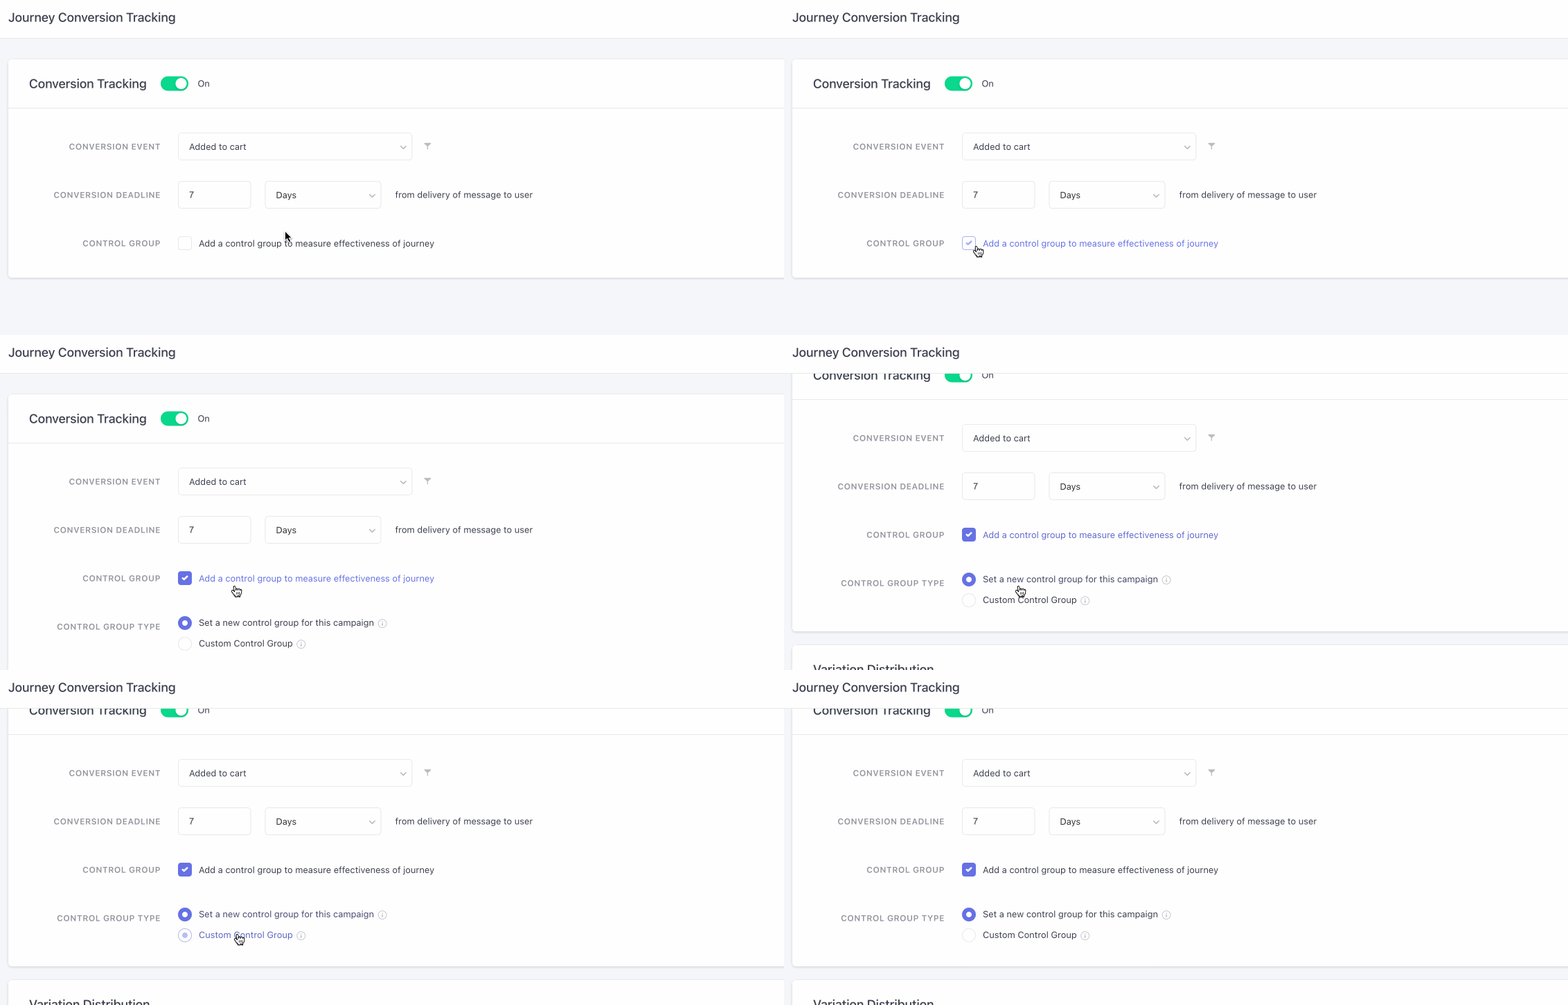
On checking the Control Group checkbox, you are presented with another choice called 'Target Control Group', that lets you choose between two options.
- Set a new control group for this campaign
- Custom Control Group
Option 1: Set a new control group for this journey: This will be a campaign level control group which means a control group that is created for a specific campaign only. The users in this control group are randomly added from the selected segment in 'Audience' tab. This control group is good if the aim is to measure impact for a specific campaign.
On clicking this option, the Variation Distribution slider is exposed that allows you to select percentage of users to be added in Control Group from target audience.
Option 2: Custom Control Group: This option is shown when at least one Custom Control Groups is created in your account. Click here for detailed read on creating custom control group.
Since this is a pre-created control group, overlapping users within this group and the target segment won't be receiving the journey.
Unlike Campaign level control group, the percentage of users to be part of control group cannot be controlled when Custom control group is selected.
Here's how you can configure it:
Click to enlarge
Frequency Capping & DND

Click to enlarge
Frequency Capping, DND Hours, and Queueing help you modulate your brand's experience by controlling the frequency and timing of campaign delivery for each user.
Let's get you acquainted with the workings of each:
FC
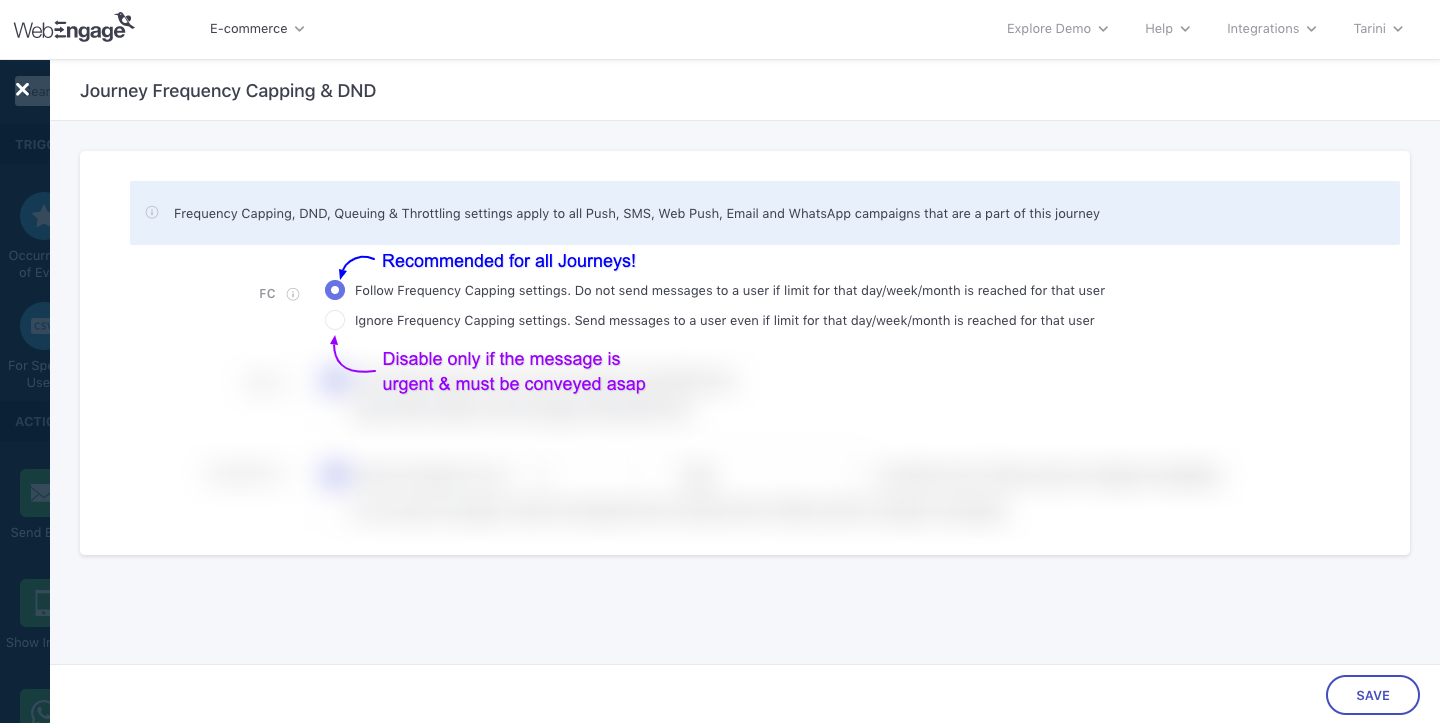
Using Frequency Capping you can control the number of campaigns a user receives within a Day, Week, Month and maintain a consistent gap between consecutive messages (sent through multiple channels or the same channel).
Click to enlarge
As highlighted above:
-
*Select Follow... to send all the Journey campaigns as per your account's frequency capping and time gap settings.
- This means that if the upper limit on the number of messages a user can receive within a day, week, or month is exhausted, then this campaign will get queued for delayed delivery (How delivery time is determined for queued messages)
Detailed read on applying FC to a Journey
- SelectIgnore... to ensure campaign delivery even if the frequency cap for the day/week/month has been met for a user
DND
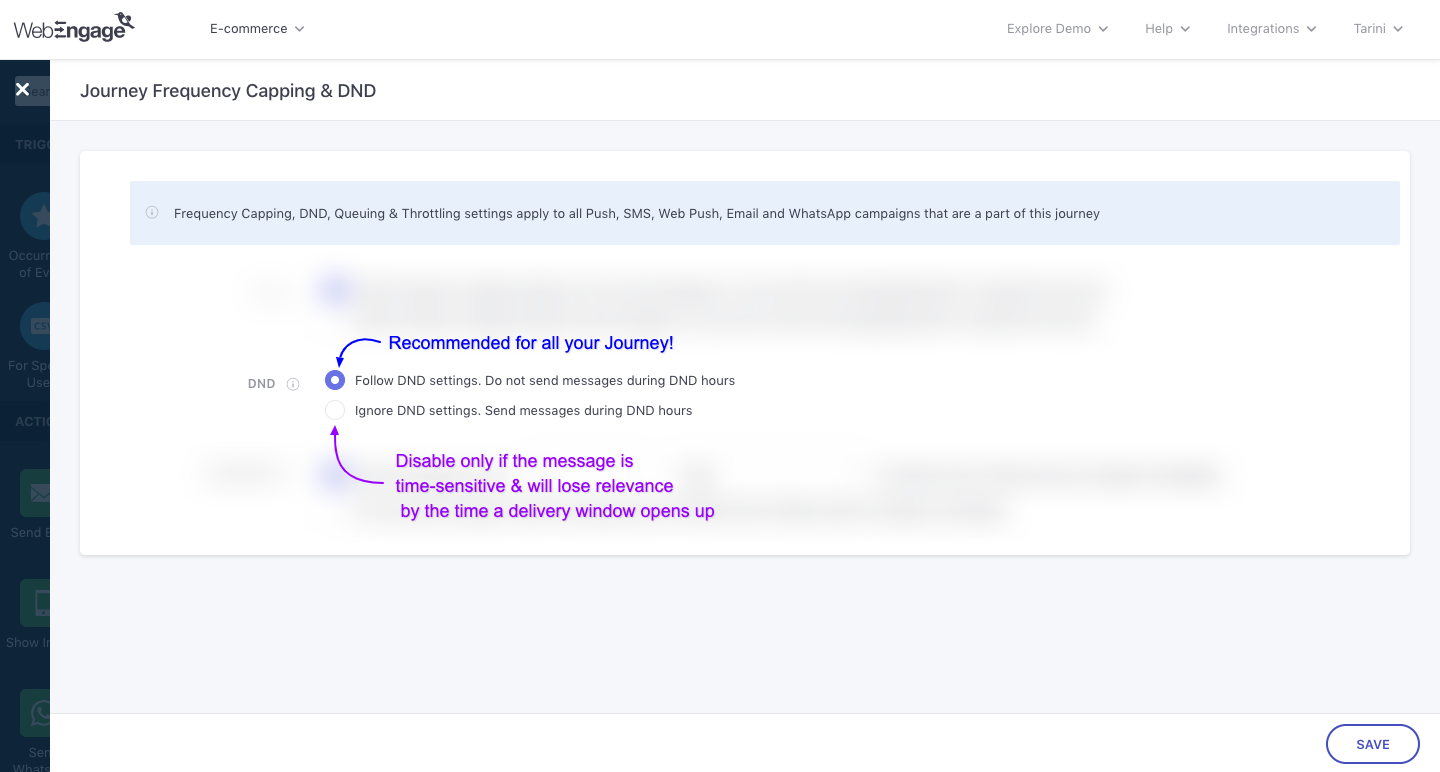
Using DND Hours, you can prevent users from receiving campaigns during specific periods such as when they may be asleep. The best part - DND hours are applied to all your users only in the context of their time zone!
Click to enlarge
As highlighted above:
-
*Select Follow... to ensure that users aren't disturbed by a Journey campaign at the hours specified by you.
-
SelectIgnore... to ensure that Journey campaigns are delivered even if DND hours apply to a few users
Detailed read on (how DND works for a Journey)*
Queueing
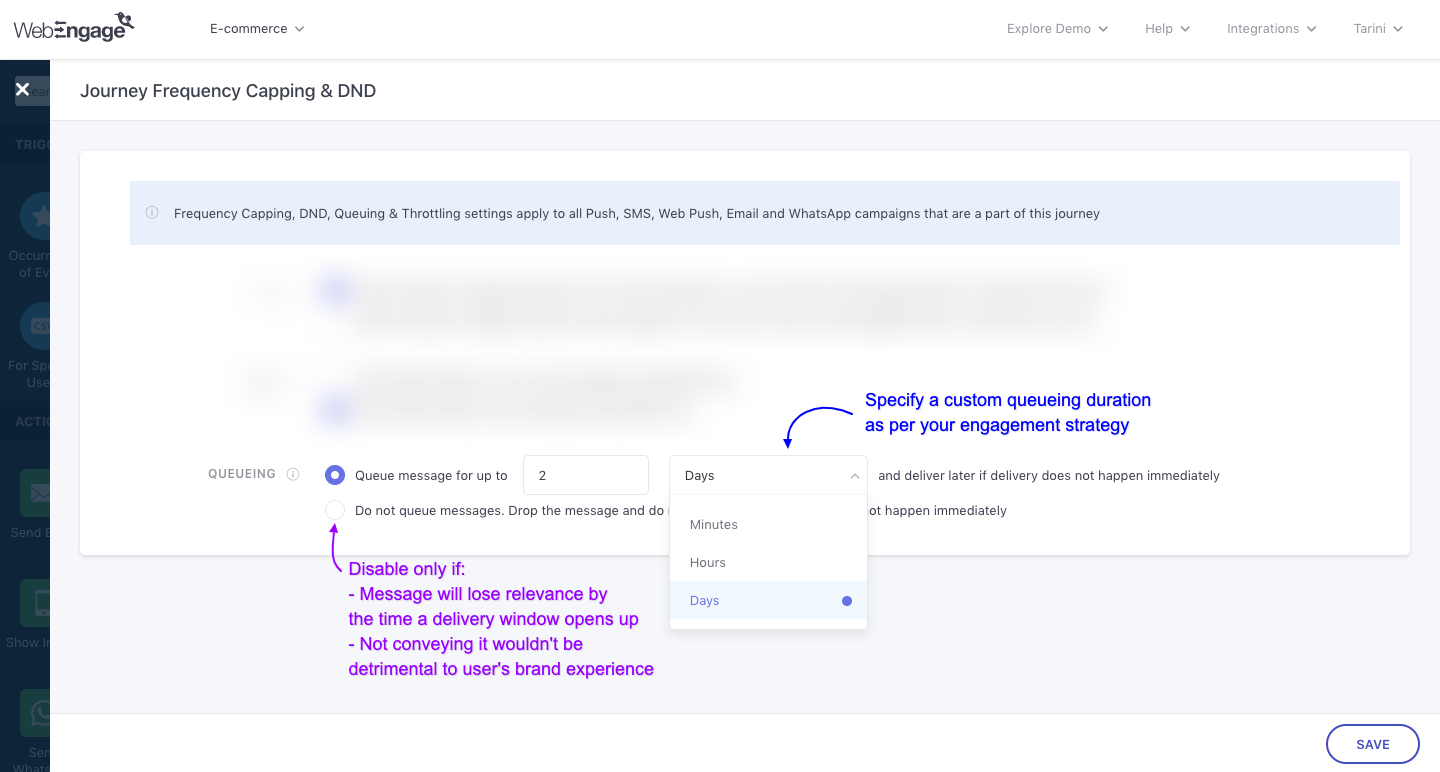
It enables delayed delivery of the message to a user when immediate delivery is not possible due to your Frequency Capping or DND settings. If you've enabled FC or DND for the Journey, all attached Journey campaigns will automatically be queued for 2 days.
Click to enlarge
As highlighted above:
-
*Select Queue message for up to..., to enable the feature and specify a custom queueing duration for all Journey campaigns in Minutes, Hours, or Days.
- Doing so will ensure that we hold on to the campaign for the specified duration and send it only when a combination of your FC and DND settings allows us to do so. (How delivery time is determined for queued messages)
Detailed read on (how Queueing works for a Journey)*
- SelectDo not Queue messages... to drop the message if we're unable to deliver it to a user due to FC/DND settings
Publish Journey
Now that you've carefully curated the Journey Experience, it's time to start engaging users!
Click to enlarge
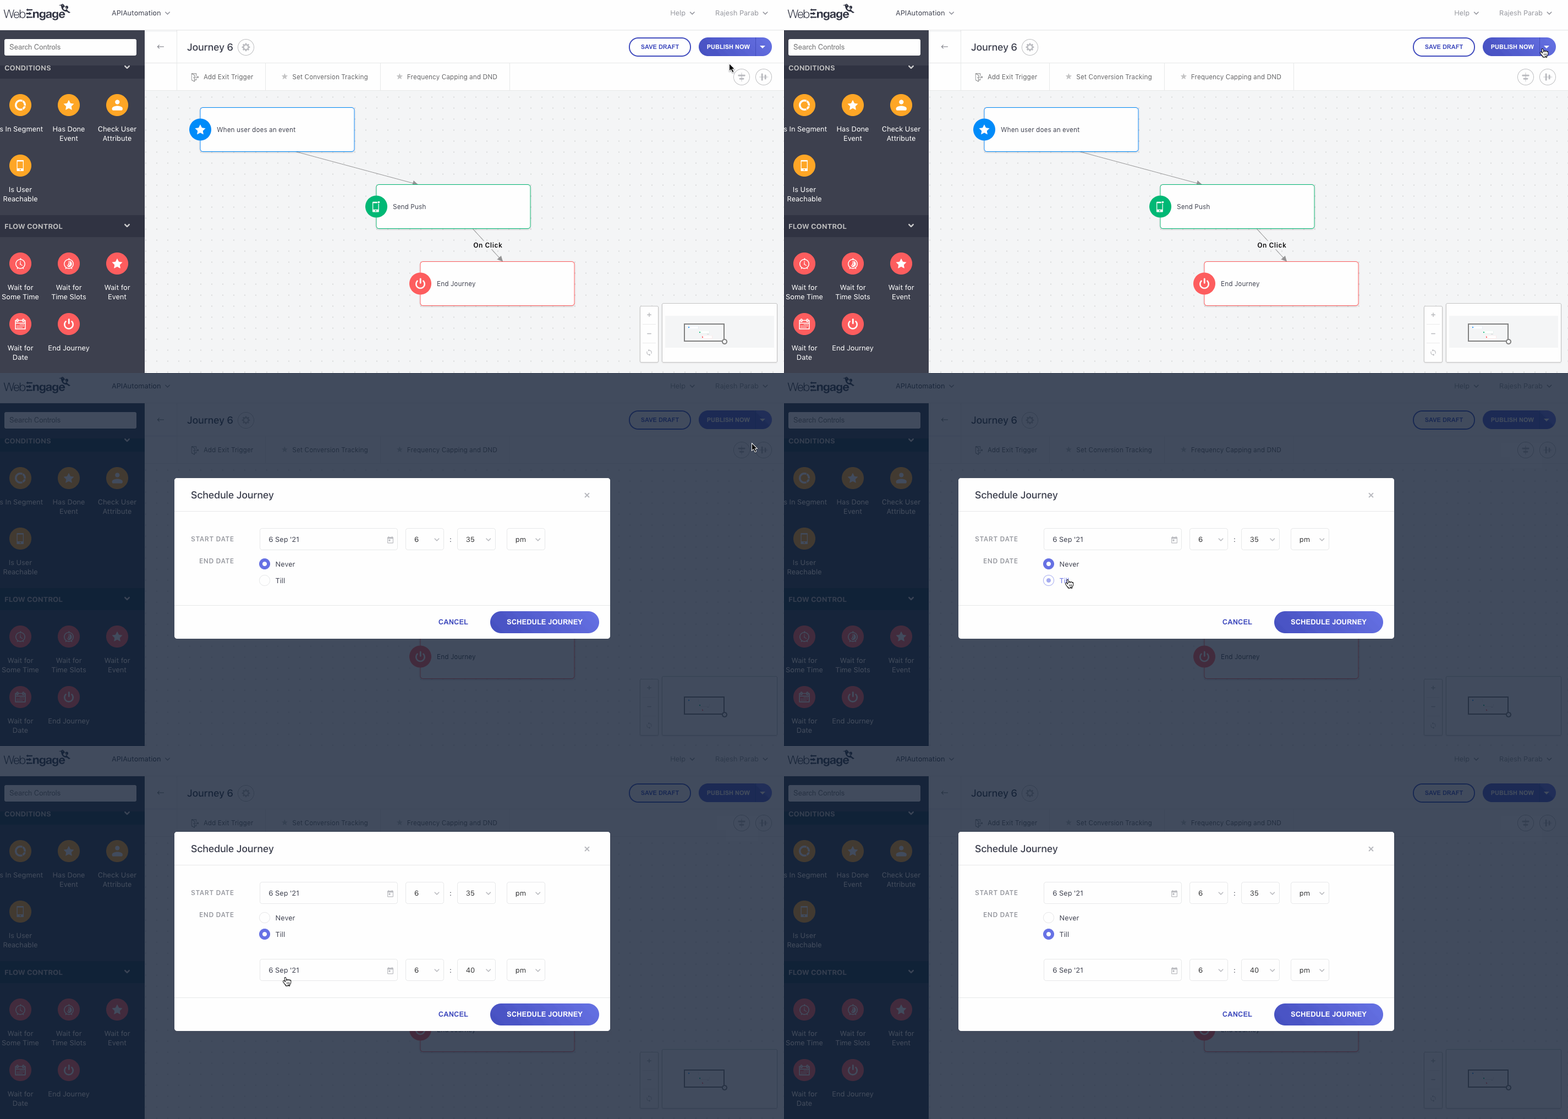
As shown above, click the Publish button on the top right to activate the Journey. In doing so, users will gradually start entering the Journey as per the Entry Trigger and Target Segment defined by you.
You can also schedule the journey for later by clicking on the drop-down and selecting Publish Later. You can choose the journey's start and end date and time.
If you have selected a particular time and date for the Journey to launch, then the Journey Status will be Upcoming.
Save Draft
WebEngage allows you to save your journey as a Draft and make changes later as per your convenience. Just click on Save Draft and your entire journey canvas will be saved.
Features
WebEngage comes with Journey features to make your journey design easy and organized. Let's look into them:
Save an image of the Journey canvas
Click to enlarge
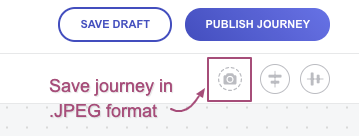
WebEngage allows you to save the journey you have designed in image (.JPEG) format. Just click on the Camera icon on the top panel, and it will allow you to save your journey.
Auto Align
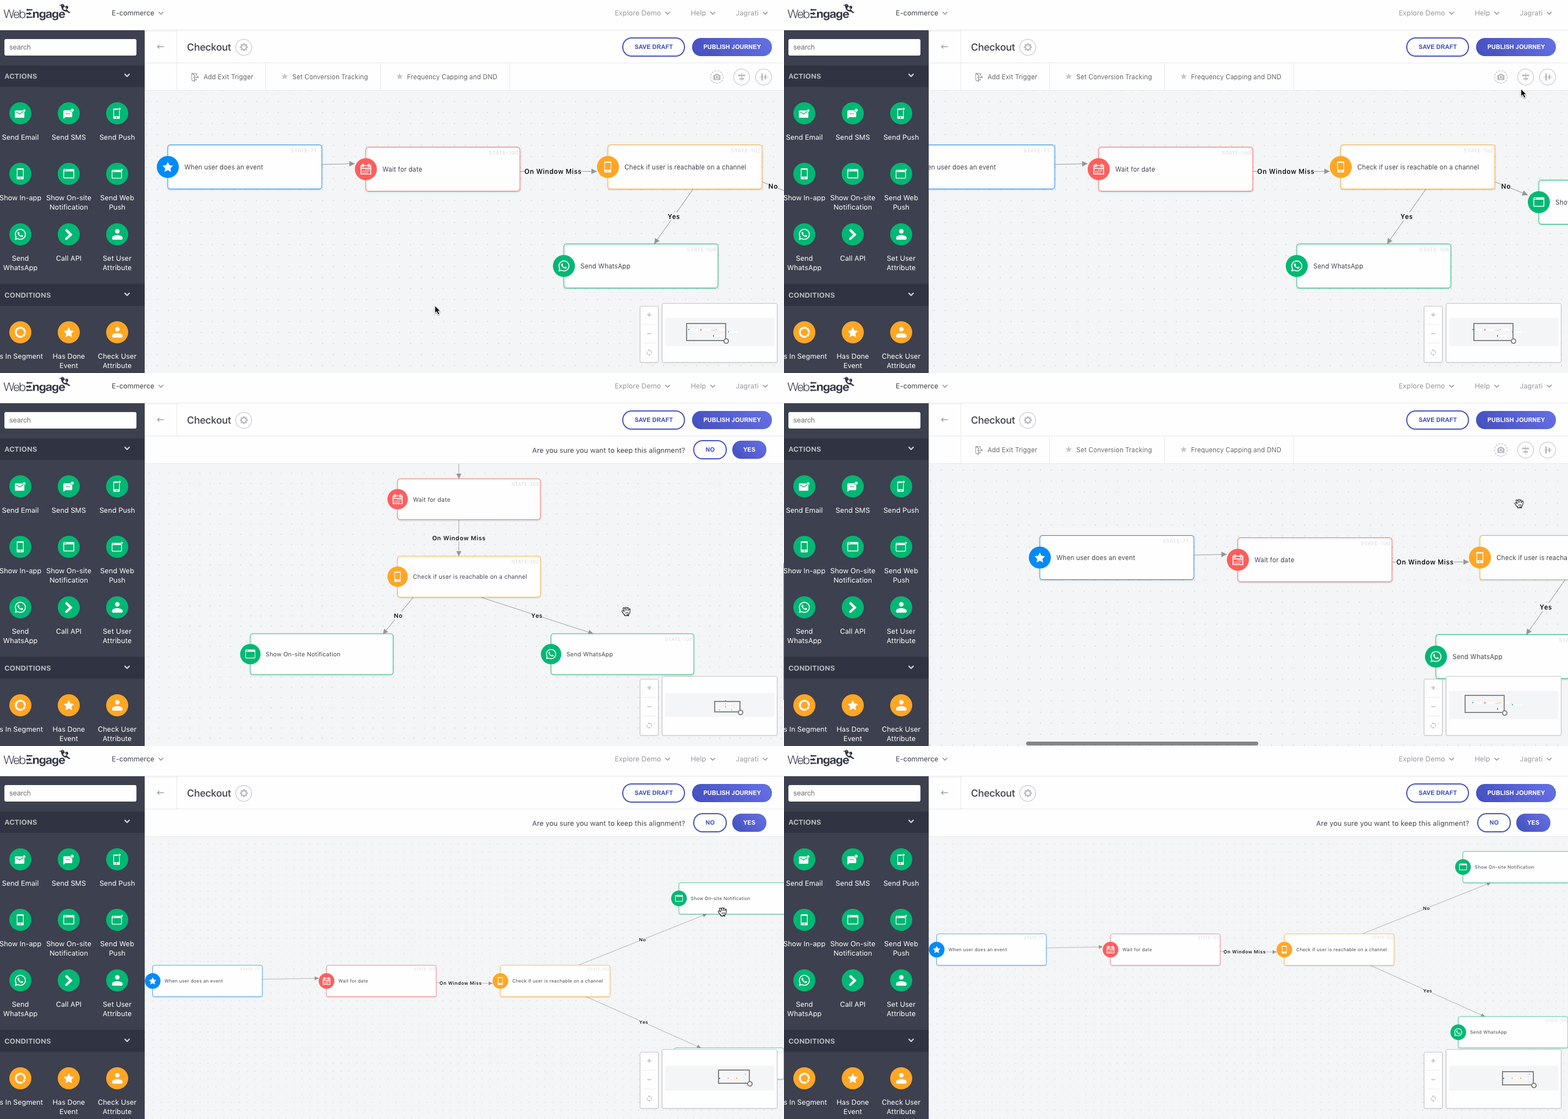
We understand that having a journey aligned can make it easier to read and understand. Hence,
WebEngage allows you to Auto-Align your journey either horizontally or vertically, as per your preference.
Click to enlarge
Journey Lifecycle Capabilities: Triggers, Actions, Conditions, and Flow Control
| Live | |||
|---|---|---|---|
| Triggers | Create | Update | Delete |
| Occurrence of Event | No | No | No |
| Enter/Exit/Is In Segment | No | No | No |
| Change in User Attribute | No | No | No |
| For Specific Users | No | Editable | No |
| Enter/Exit Geo-Fence | No | No | No |
| Actions | |||
| Send Email | No | Editable | No |
| Send SMS | No | Editable | No |
| Send Push | No | Editable | No |
| Show in-app | No | Editable | No |
| Show In-line Content | No | Editable | No |
| Show On-Site Notification | No | Editable | No |
| Send Whatsapp | No | Editable | No |
| Show Web In-Line Content | No | Editable | No |
| Send Web Push | No | Editable | No |
| Call API | No | Editable | No |
| Set User Attribute | No | Editable | No |
| Conditions | |||
| Is In Segment/List | No | No | No |
| Has done Event | No | No | No |
| Check User Attribute | No | No | No |
| Is User Reachable | No | No | No |
| Check Best Channel | No | No | No |
| Flow Control | |||
| Wait for Some Time | No | Only Time Editable | No |
| Wait for Time Slots | No | Only Time Editable | No |
| Wait for Event | No | Only Time Editable | No |
| Wait for Date | No | Only Time Editable | No |
| Split | No | Editable | No |
| End Journey | No | No | No |
Let's explore why adding journey designing to your business strategy is crucial for long-term growth, happier customers, and a competitive edge.
We hope this has equipped you with a robust understanding of how you can design highly contextual Journey experiences to engage users at various stages in their lifecycle. Please feel free to drop in a few lines at [email protected] if you have any further queries or feedback. We're always just an email away!
Updated 3 months ago