Analyzing User Profiles
A detailed explanation of you can analyze the profile of each user by accessing it through various sections of your dashboard
Must ReadPlease ensure that you have a robust understanding of all the concepts related to Users and User Attributes before proceeding. Doing so will help you understand the workings of this section, better.
How to Access
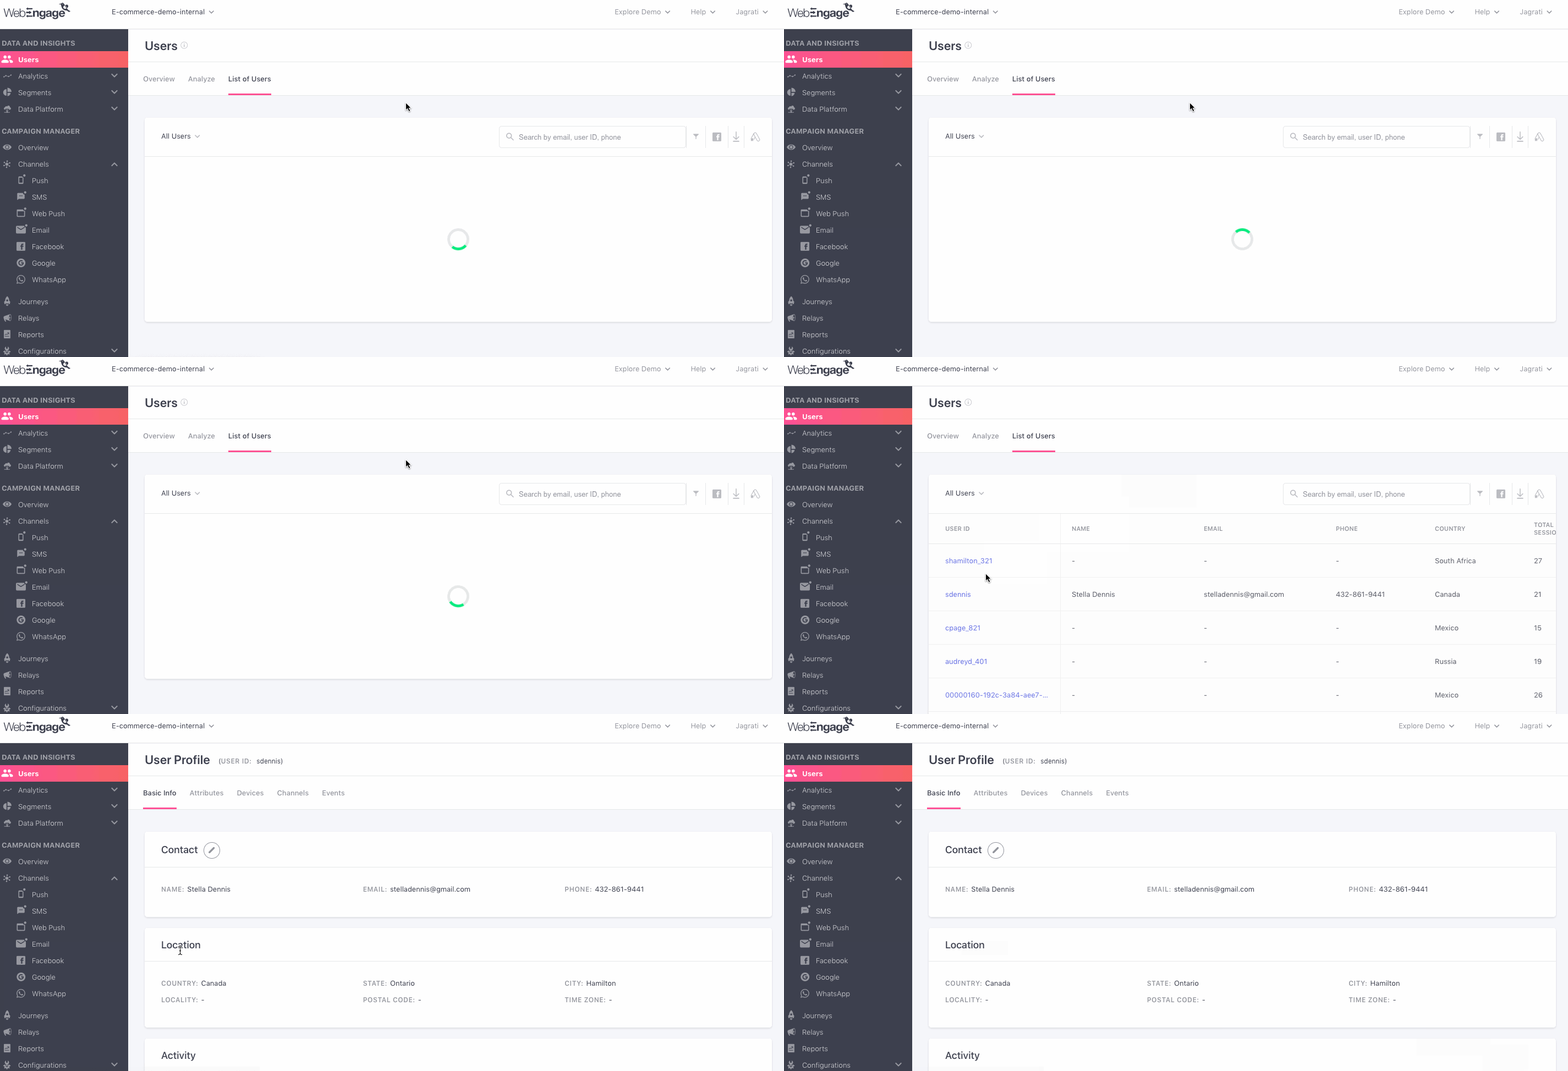
The profile of a user can be accessed by clicking on their User ID from the List of Users page, as shown below:
Click to enlarge
A List of Users can be found under the following sections in your dashboard:
-
Analyzing Users: List of Users includes details of all the users that have ever interacted with your app and website, over the entire lifetime of your account.
-
Analyzing Segments: List of Users includes details of all the users that are currently included within the segment. Once a user is removed from the segment, their details will no longer be accessible through the List of Users.
-
Uninstalls: List of Users includes details of all the users that have uninstalled your app within the selected time frame.
-
Analyzing Push, In-app, SMS, Web Push, Email Campaigns: List of Users includes an engagement report for all the users that have included within the campaign's target audience.
Now, let's get you acquainted with all the sections of a user profile and how you can analyze it.
First Impression
User Profiles have been designed to gain in-depth insights into a user's behavioral history and preferences. For this purpose, all profiles have been broken down into the following sections:
- Basic Information
- Attributes
- Devices
- Channels
- Events
These sections can be accessed through the navigation bar, as shown below.

Click to enlarge
Let’s go over each one in detail, starting with Basic Information.
Basic Information
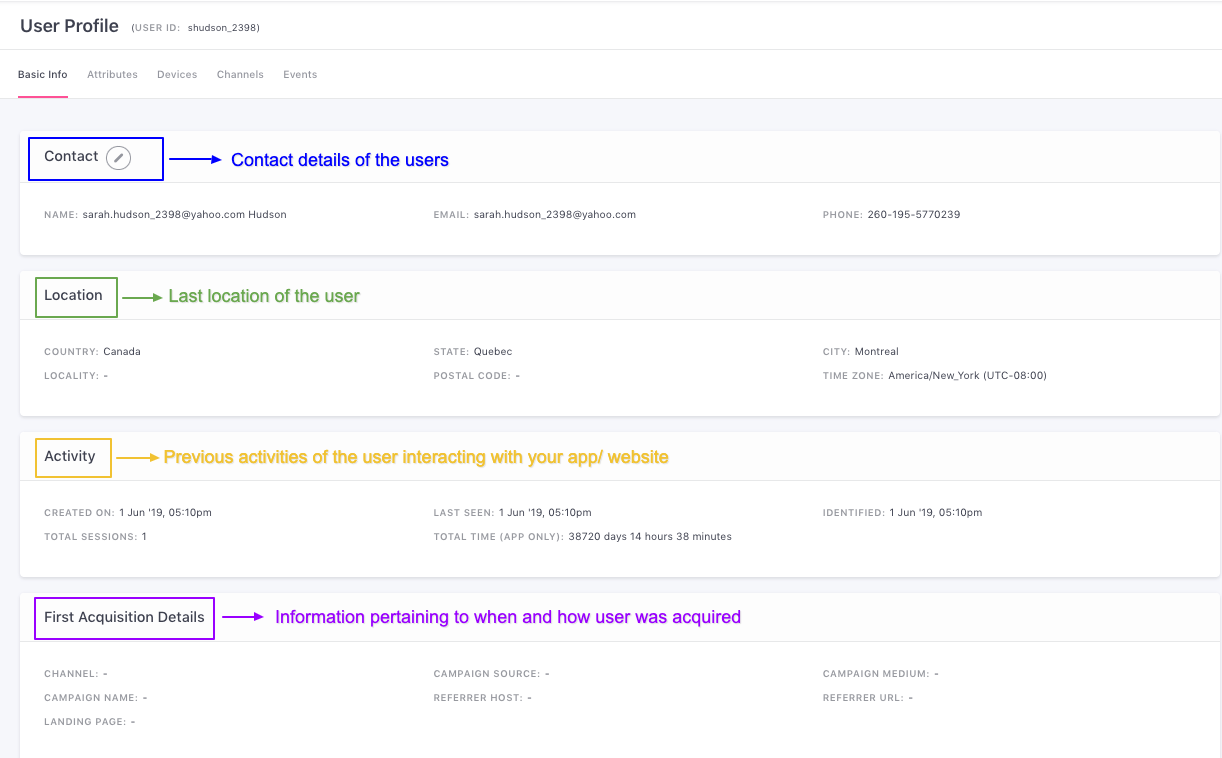
This section includes all the primary details related to a user like their contact information, the segments they have been included in, the latest campaigns received by them, details of the last time they interacted with your app and/or website and so on.
Click to enlarge
Basic Information has further been broken down into the following subsections:
Contact
Here you will find details like the user’s name, email address and phone number - all of which can be edited by clicking the pencil icon placed next to the card’s header.
Location
Our system automatically gleans users’ location to help you identify where your users are located and use that information for better segmentation and personalization. So each time a user interacts with your app or website from a different location, this field gets updated.
When a user interacts with your website, their location is derived from the IP address. Similarly, while interacting with the app - if a user has given permission to track their location, then the accurate location is fetched by our system from the phone’s operating system; otherwise, the location is derived from the IP address. Tracking location using IP address is less accurate as compared to the location provided by the phone's operating system if the location permission is given by the user.
Activity
Under Activity, you will find details of when the user first discovered you, their interaction history, and so on. The following parameters are included here:
-
Created On: Indicates when the user was created.
-
Last Seen: Indicates when the user was last seen on your website or mobile app.
-
Identified: Indicates when the user became a Known User.
Why is the 'Identified' field important?As discussed under Users, all users are considered Unknown Users until information that can help us identify them is disclosed. This information is called a Unique Identifier and plays an essential role in user analysis and segmentation. Once a user becomes known, their existing Unknown User Profile merges with the newly created Known User Profile to give you a complete picture.
- Total Sessions: Indicates the total number of sessions created by the user on your website or mobile app.
Use-case: Understanding how total sessions is calculatedLet’s say that a user spends 10 minutes surfing through the products listed on your website, leaves and comes back the next day to shortlist a product, and finally completes checkout on the third day.
So, all these interactions will be counted as three sessions here.
- Total Time: Indicates the total time spent by the user on your mobile app.
Acquisition
Here you will see historical information on how the user was acquired and includes details like; Channel, Campaign Name, Landing Page, Referrer URL and so on.
Use-case: Understanding acquisition detailsLet’s say that a user discovered you through a link to one of your blog posts shared by someone on Twitter. They read the post and decide to signup. So, the user’s acquisition details would look something like this:
Channel: Social
Campaign Source: Organic
Campaign Medium: Social
Campaign Name: your_custom_utm_parameter
Landing Page: yourwebsite.com/the-blog-post
Referrer URL: twitter.com/the-sharer’s-account
Referrer Host: twitter.com
Attributes
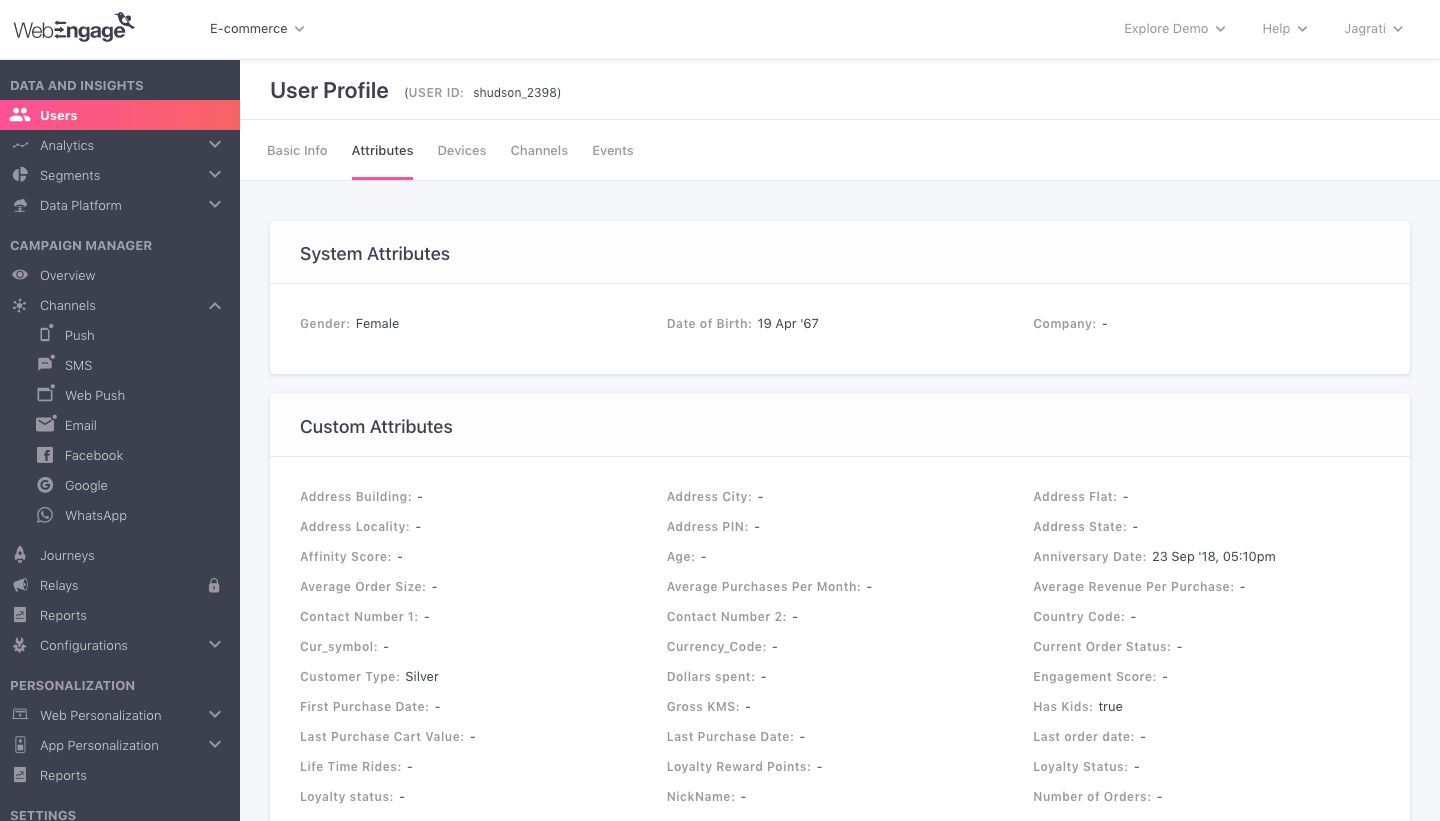
As discussed under Users Attributes, data points that give us more information about a user are called Attributes in WebEngage. Depending on their nature, attributes are categorized as; System Attributes or Custom Attributes.
Click to enlarge
So under this section, you will find a complete list of all the user attributes being tracked for your WebEngage account, with data pertaining to the user shown against each field.
Please NoteIn cases where no information is available yet, you will see a ‘--’ against the attribute field. This is likely to happen if the user is Unknown or hasn’t interacted well enough with your app/ website yet.
While the details shown under Custom Attributes will solely depend on the data points you choose to custom define and pass to your WebEngage account; the following details can be found under System Attributes in each profile:
- Gender
- Date of Birth
- Company
Devices
Here you will find a complete breakdown of all the devices used to interact with your app and website over the entire lifetime of a user. Such details come in handy, especially when debugging, fixing crash reports, and so on.
Depending on the platform(s) accessed by the user, this section will be contextually divided into the following subsections; Web (Website), Android, and iOS.
- A maximum of 10 devices with extensive technical details can be found under each subsection.
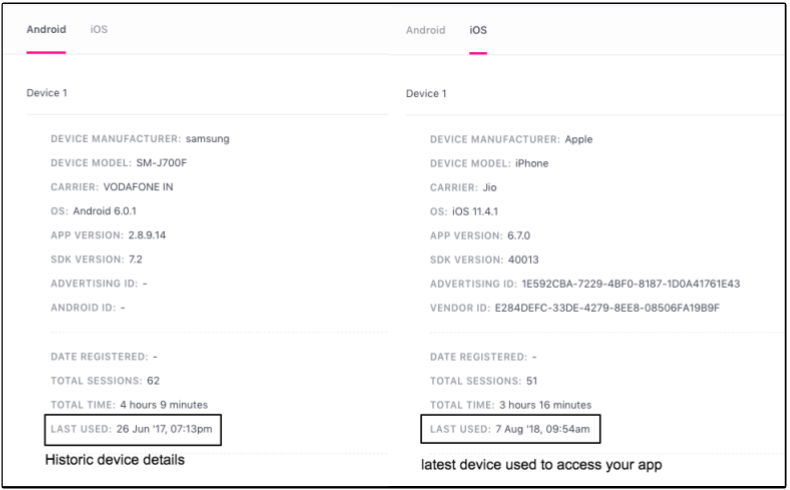
For example, in the visual below, we can see that the user has used at least one Android device and at least one iOS device to interact with the mobile app.

Click to enlarge
On further examination, we can see that the user used an Android device until mid-2017, and later switched to an iOS device.
Click to enlarge
Here’s a list of all the technical details shown under each subsection:
3.1. Web (Website)
- OS (Mac OS version, Windows, Linux etc.)
- Browser (Chrome version, Safari version, Firefox version etc.)
- Date Registered (The first time this device was used to access the website)
- Total Sessions
- Last Used (Last date of interaction)
- Web Push Subscribe - Source URL (The page through which the user opted-in)
3.2. Android
- Device Manufacturer
- Device Model
- Carrier
- OS (version)
- App Version
- SDK version (Refers to the WebEngage Mobile SDK version added by you to the platform. All user data is collected through it)
- Advertising ID
- Android ID
- Date Registered (The first time this device was used to access the app)
- Total Sessions
- Total Time (Time spent on your mobile app throughout their entire lifetime)
- Last Used (Last date of interaction)
3.3. iOS
- All data points listed under Android (excluding Android ID)
- Vendor ID
Channels
With WebEngage, you can engage with your users via six channels in real-time, which include; Push, In-app, SMS, On-site, Web Push and Email. Hence, under this subsection, you will find a comprehensive overview of the user’s channel reachability and interactions over the last two months.

Click to enlarge
The following parameters have been included here to give you a comprehensive overview;
- Reachability: At WebEngage, channel reachability is automatically gleaned for all your users. Here, you can read the ‘green tick’ as ‘is reachable’ and the ‘red cross’ as ‘not reachable’. These indicators are updated in real-time to reflect any changes in a user’s channel preferences.
For example, in the visual above, if the user decides to opt-in for web push notifications later, then the icon under the column; Web Push will be replaced with the ' green tick’.
Understanding Channel ReachabilityPlease refer to Channels and Channel Reachability for a detailed understanding of what reachability means for each channel and how it's calculated.
Events
Must ReadPlease refer to Events and Event Attributes for a detailed understanding of these concepts and related terms. Doing so will help you understand the workings of this section, better.
You can think of Events as behavioral data that help you trace what a user was doing, when, through which device, and platform. Such insights come in handy when looking into customer grievances. For this reason, a comprehensive set of data points called Event Attributes have been attached to each event, along with a date-time stamp, as shown below.
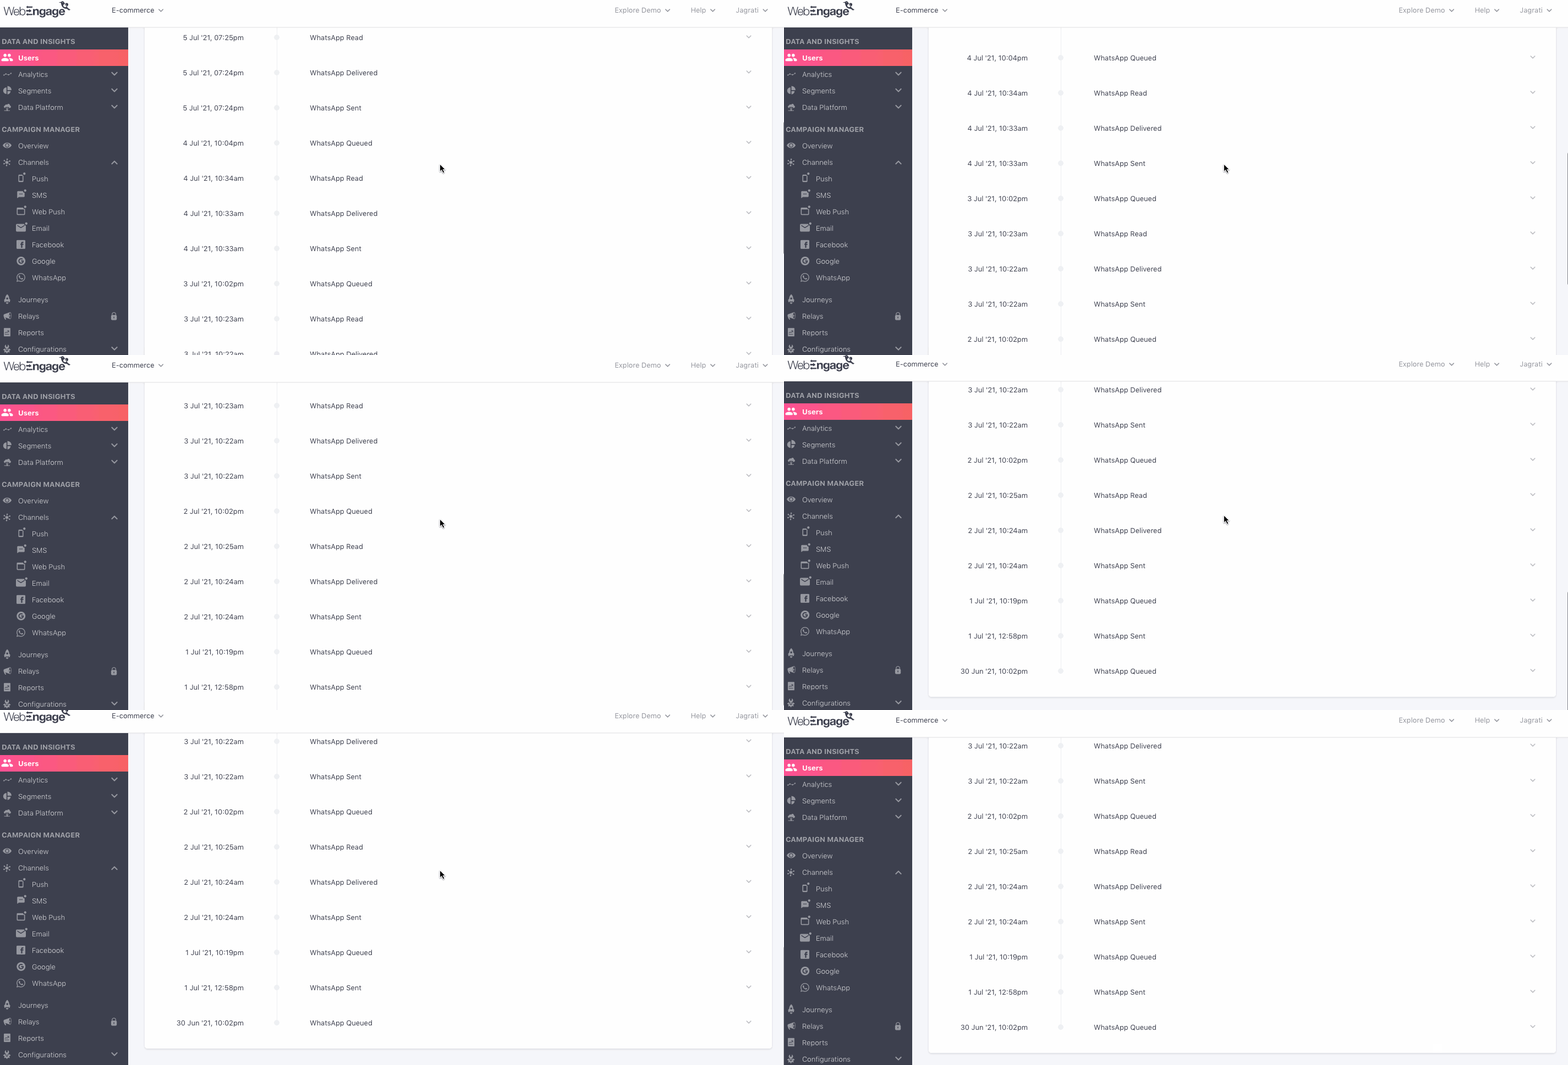
Click to enlarge
Hence, this section shows you a timeline of the most recent interactions of the user with your app/website and campaigns over the last 7 days. Let’s run you through its features:
Select Custom Date Range
Using the drop-down placed on the extreme right on the top panel, you can select a custom period for your analysis. (Maximum Time Period: 30 Days)
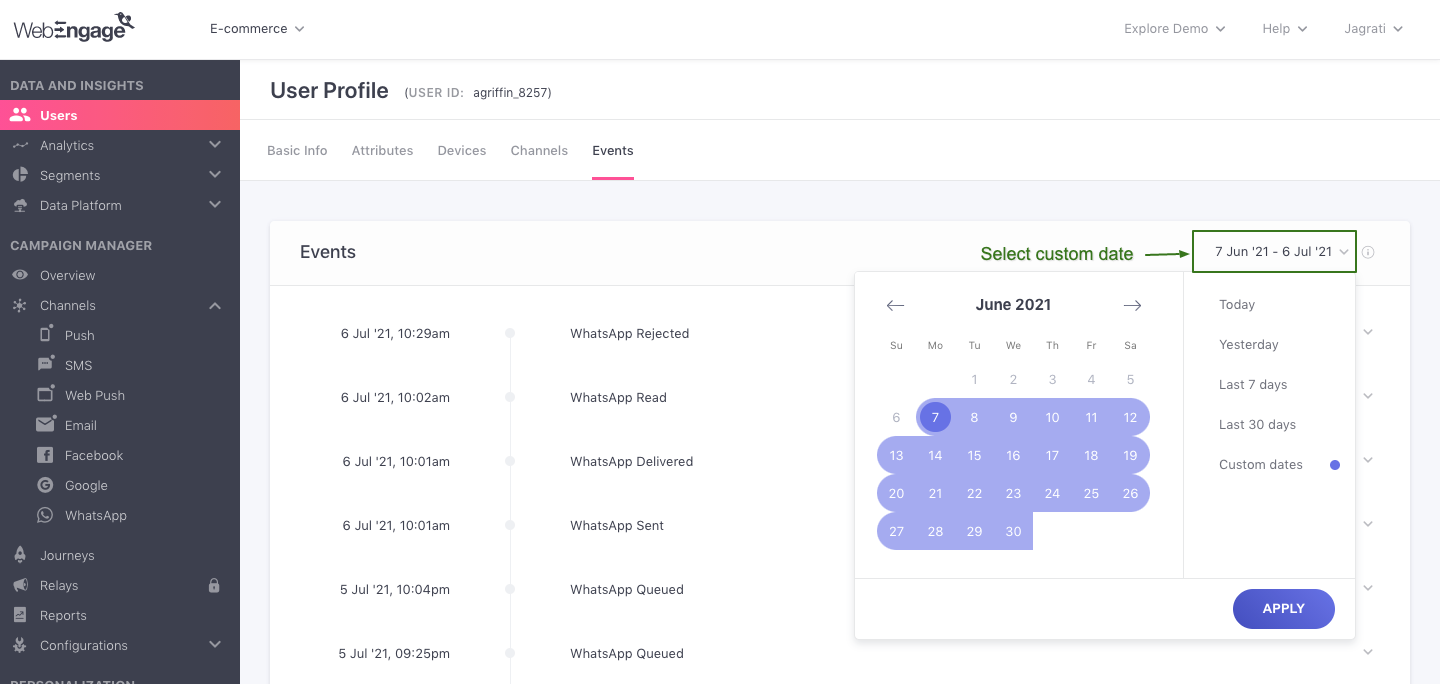
Click to enlarge
Analyze Event Attributes
As discussed previously, a contextual set of Event Attributes can be found attached to all the Events listed here. These can be accessed via the drop-down arrow placed towards the extreme right of each Event.
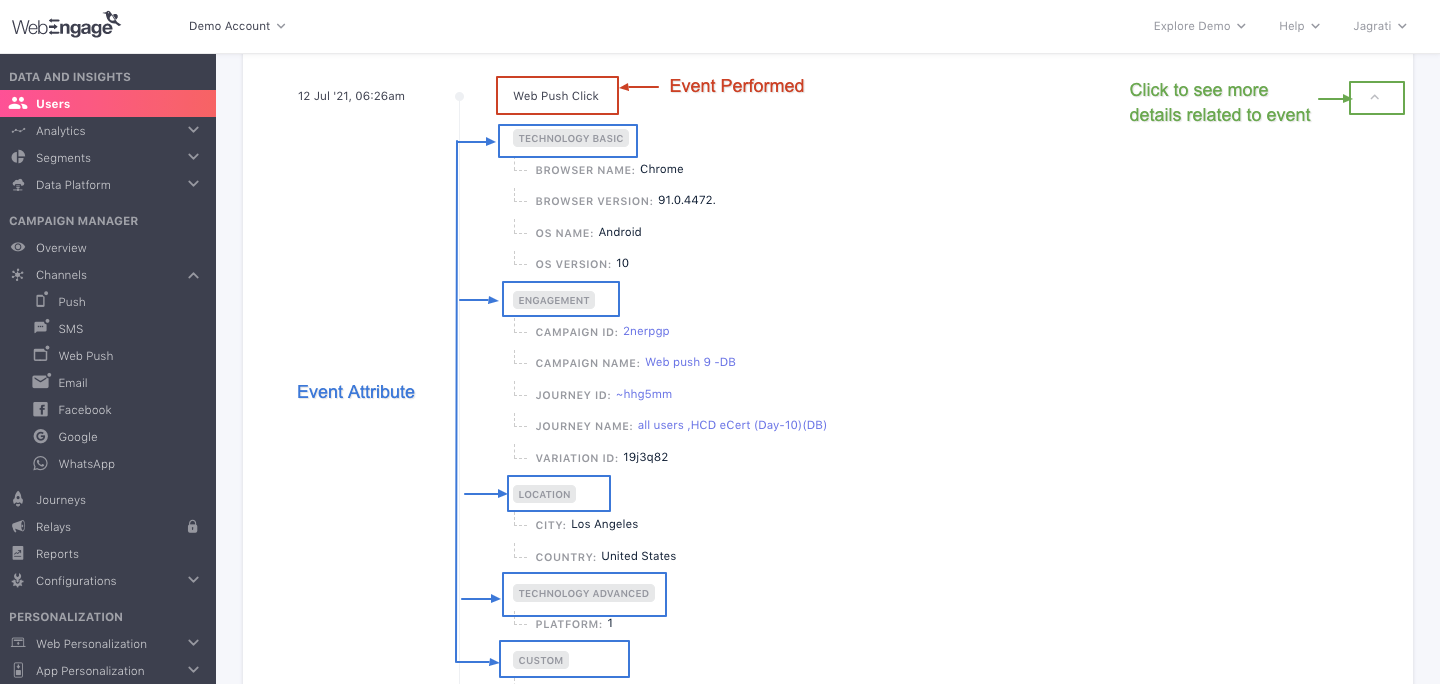
Click to enlarge
The indefinite scroll on this page makes it easier for you to track a timeline of all the actions performed by the user, in descending order.
The following event attributes can found under the Events listed here:
- Technology (Device, Browser, OS)
- UTM Parameters
- Location (Country, City)
- Page URL (only for website)
- Screen Name (only for mobile apps)
- Custom (Attributes) - Only for custom events
We hope this gives you a good idea of how you can leverage all the data stored under each user's profile. Please feel free to reach out via [email protected] in case you have any further queries. We’re always happy to help!
Updated 5 days ago