User Profile Attributes
A quick guide to managing all the Custom User Attributes tracked in your dashboard
Once you've integrated WebEngage with your apps & website, you can utilize the full potential of our Customer Data Platform by tracking the unique preferences and spending habits of each user as Custom User Attributes. Depending on your industry vertical and business model, these attributes could be anything like, Average Order Value, Customer Lifetime Value, Subscription Type, Order Status, Engagement Score, Last Purchase Date, Course Type, Preferred Genre, and so on. You can easily leverage all this data to:
-
Deliver contextual brand experiences at scale.
-
Engage users with highly personalized messages through their preferred channels.
-
Analyze users to identify their primary motivators and group them into highly differentiated segments.
-
Identify high-risk & dormant users to prevent churn.
-
Identify brand loyalists & high-spenders to fuel retention-led growth.
And much more!
Tracking Custom User Attributes for Your Platforms
Our robust CDP provides a 360-degree view of all your users and enables you to manage data gleaned from all your sources (apps, websites, servers, CRM & manual uploads), reducing dependency on your tech team. Thus, this section enables you to:
-
Enforce data security (mask data across your dashboard)
-
Moderate the Custom User Attributes available across your dashboard for behavioral analysis, segmentation, campaign targeting, and personalization (Stop/Start tracking attributes)
-
Identify tracking errors in real-time for all data sources
-
Change data type of the value tracked against a Custom User Attribute
Let’s show you how it works.
How to Access
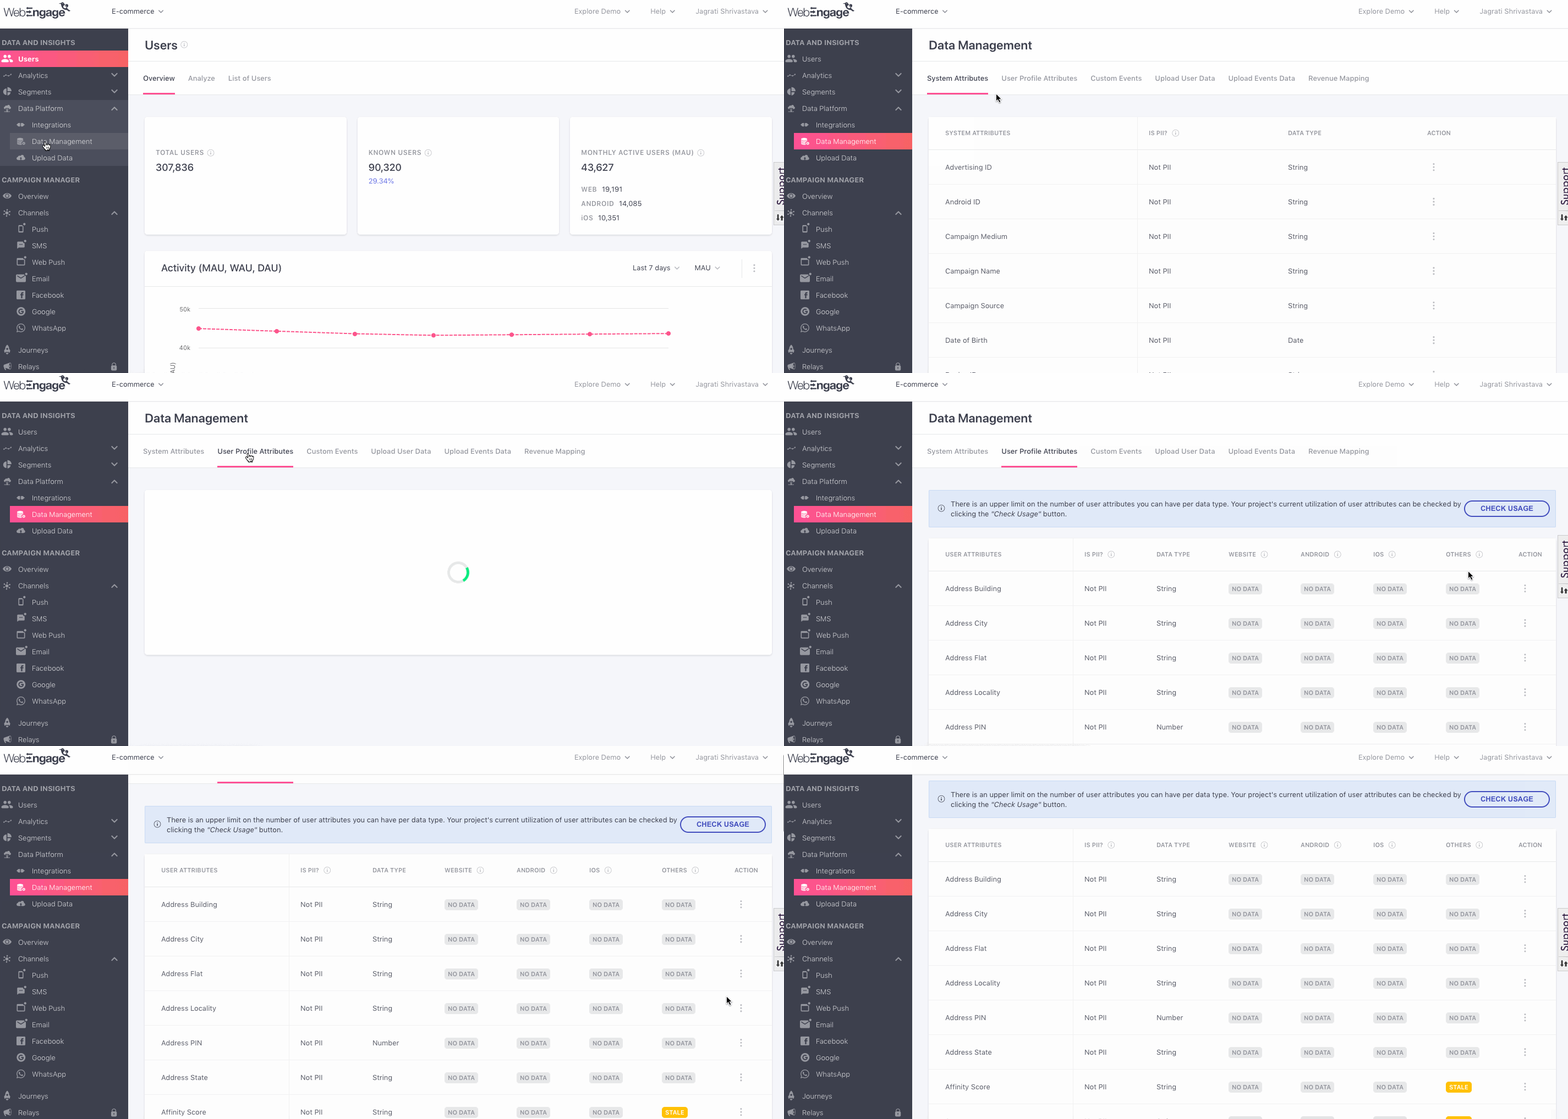
As shown below, you can access User Profile Attributes through Data Platform > Data Management in the main navigation panel of your dashboard.
Click to enlarge
Attribute Usage
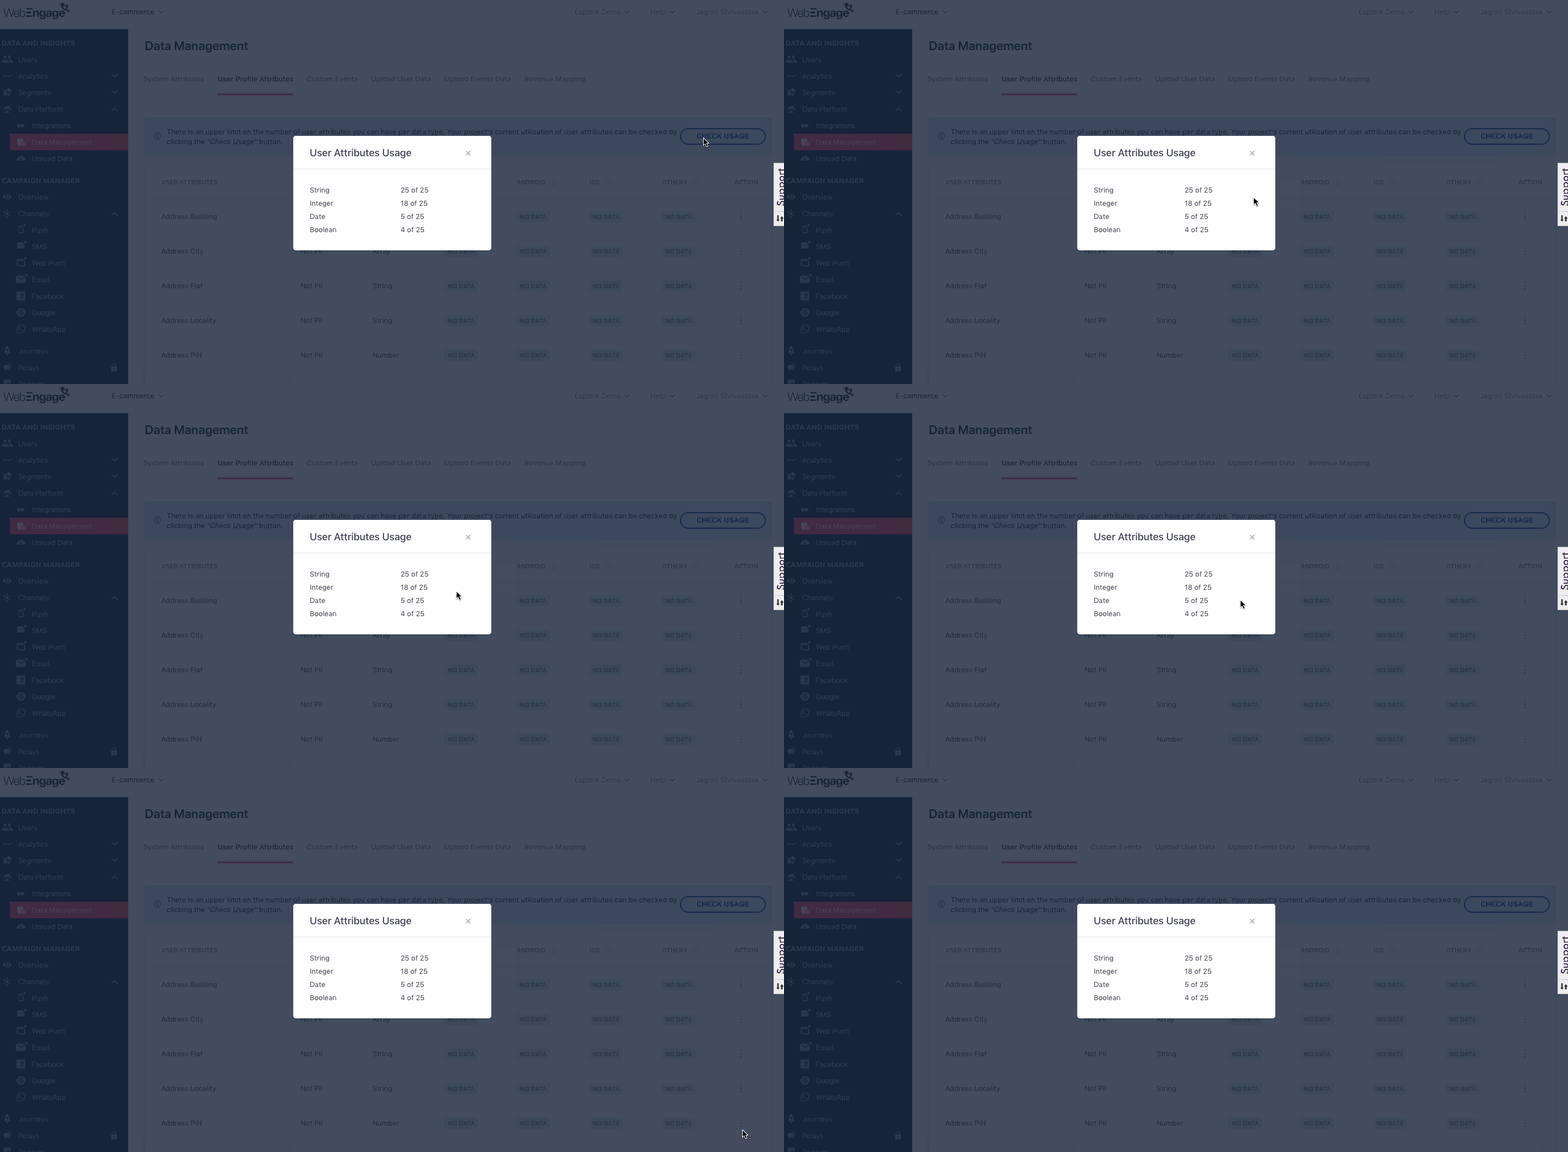
At WebEngage, each data type has an upper limit on the number of user attributes it can have. By clicking on, Check Usage you can check the number of user attributes that are being currently utilized.
Please NoteWebEngage allows you to add 25 attributes of each data type.
Click to enlarge
Overview
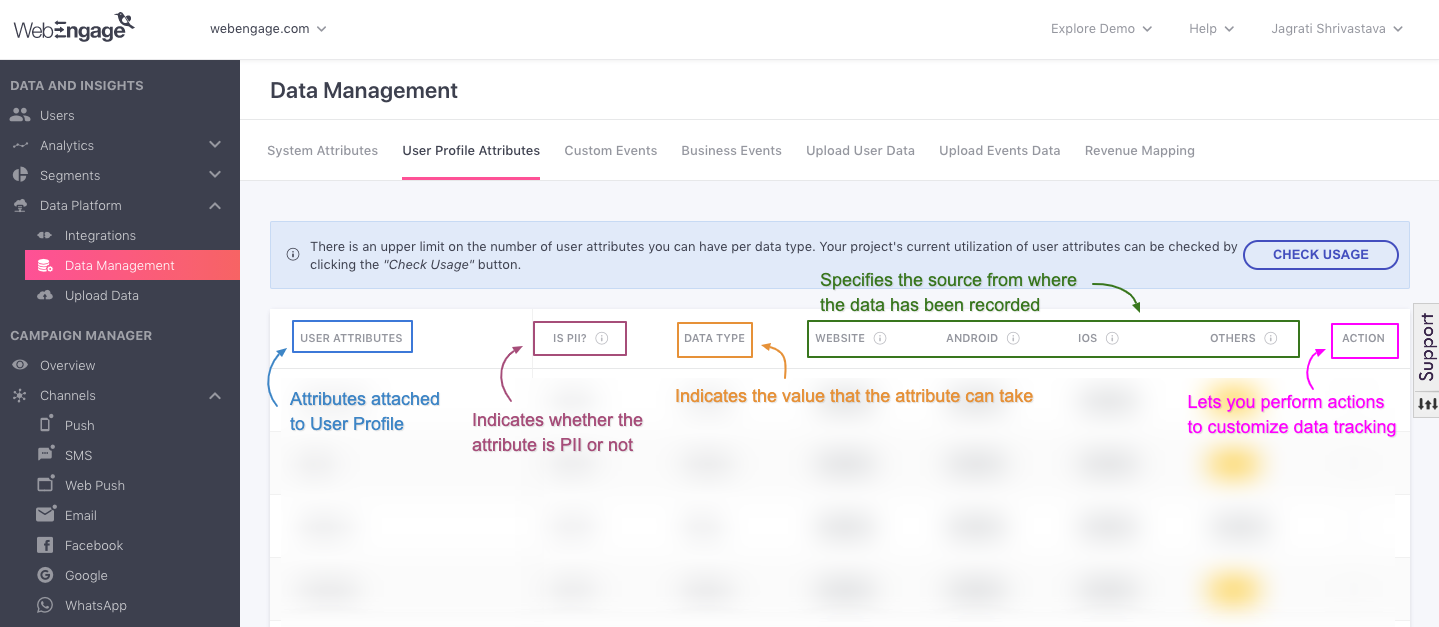
Here you will find key details for each Custom User Attribute tracked from all your sources - apps, website, REST API, third-party platforms, and manual data uploads.
Click to enlarge
Let's walk you through each column header:
User Attributes
Lists all the custom attributes defined for your users. These enable you to understand user personas and devise highly targeted, personalized communication strategies.
Personally Identifiable Information (PII)
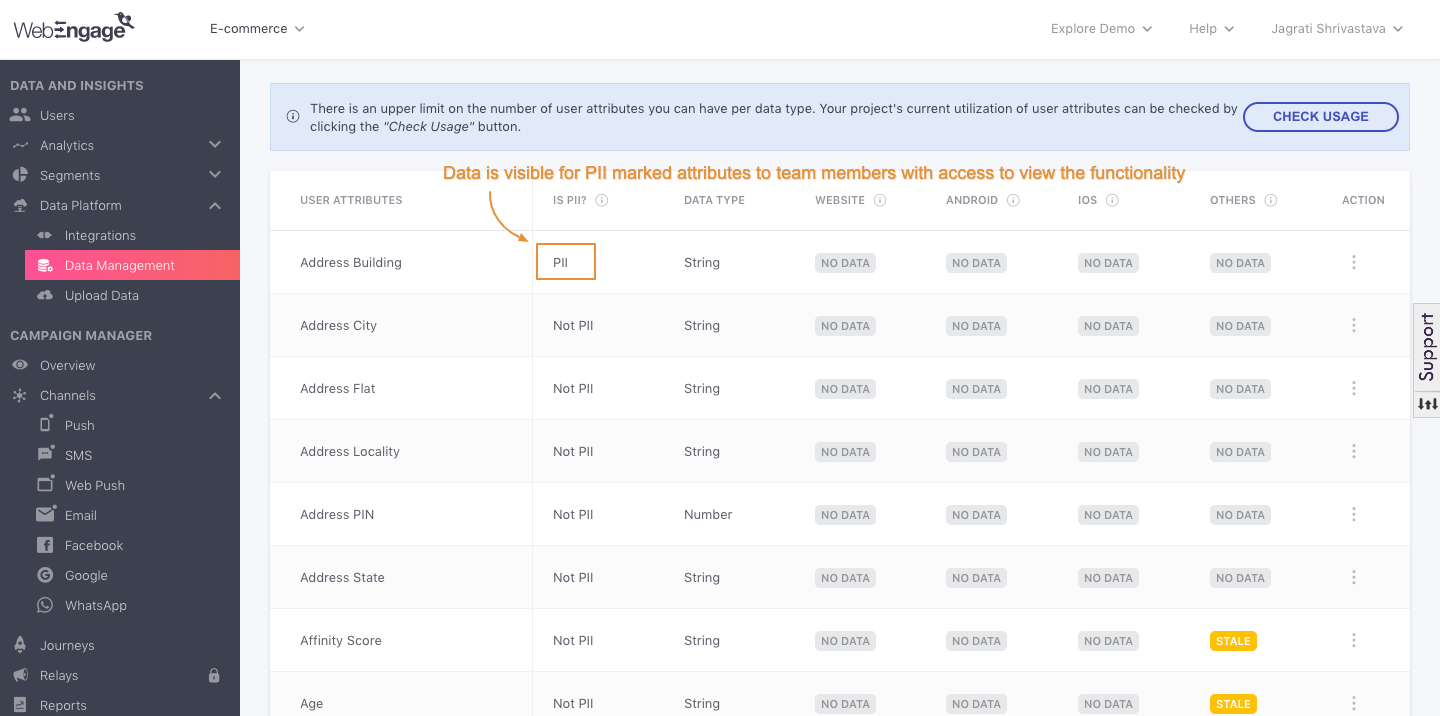
We understand your concerns regarding data security. This is why we've made it possible for you to mask the actual values tracked against each Custom User Attribute across your dashboard. You can do this by marking crucial data points as PII (as highlighted below).
Click to enlarge
How PII Masking Helps Secure User Data
Only account admins who have permission to View PII will see and download actual values tracked against the marked custom user attribute. Values will remain hidden for all other admins.
Don't worry; this doesn't affect user analysis, segmentation, and campaign personalization in any way!
Use Case: Marking Average Order Size & Lifetime Value as PIILet's take the example of an e-commerce platform that tracks the purchase value of each user through the Custom User Attributes, Average Order Size, and Lifetime Value. These are crucial business insights, which if leaked, can give your competitors insights into your users, revenue, and growth strategy.
With PII masking, you can ensure that such situations remain a distant nightmare!
Data Types
Data types refer to the format in which you are tracking the data points for a user against each Custom Attribute. At WebEngage, you can pass user attributes in any of the following formats:
-
String: Strings are a set of characters: alphabets, digits, blank spaces, punctuation marks, etc.
-
Number: The integer data types are Numeric values.
-
Date: Date shows the value of the date in the format:
YYYY-MM-DDTHH:MM: SS.000Z -
Boolean: Boolean can be either True or False, depending on the attribute.
-
Array: An array is a collection of elements (values or variables), each selected by one or more indices computed at run time during the execution of a program.
-
Map: Allows you to create and track values of multiple user attributes in one go, as Key-Value pairs. Here the Key is a Custom User Attribute and Value is the actual data point being tracked for a user which can be a String, Number, Date, Boolean, or Array.
Data Source & Tracking Status
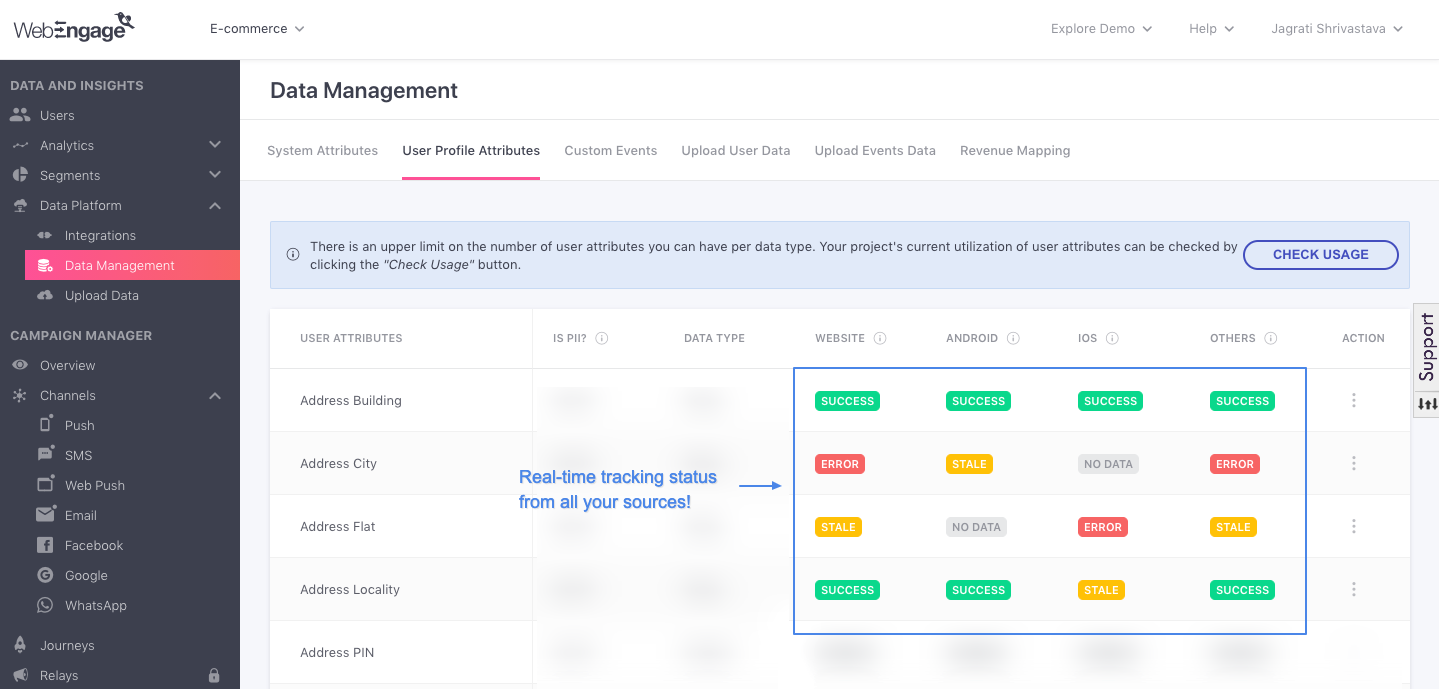
Click to enlarge
All data sources for your business are listed as individual columns here. This includes Website, Android, iOS, and Others (REST API data, server data from Segment.com). You will find the tracking status for all Custom User Attributes against each source to help you rectify integration and tracking errors promptly.
Understanding How Tracking Status WorksWebEngage considers only the last four hours of data for tracking as it can be possible that one web page or app may send the attribute in another data type to another page or screen in another data type. In this case, the signal will keep toggling red/ green over and over again. Hence, a window of 4 hours to correct any error that might be there.
Only the latest version of the app is considered for the data. If a new version of the app is released after correction, then the new app version overrides the previous error, and the status is reported only for the latest version.
Tracking Status
It indicates whether you're receiving data for an attribute through the respective data sources in real-time! You can easily turn off tracking for an attribute and activate it later, as per your needs.
Let's walk you through each status:
Status | What It Means |
|---|---|
| Actively receiving correct data from the Source. |
| The data for the attribute was received more than 2 days ago. |
| Indicates that we've received data in an incorrect format or haven't received any data over the last 4 hours. You can hover over the status to access key details for debugging purposes, like:
Please note that the latest app version is considered for tracking status. If the error has been rectified in the 4- hour window, it will turn green when the window ends; else, it will remain red for the next 4- hours. |
| You can choose to stop tracking an attribute as per your business needs. You can hover over the status to view the date-time at which tracking was stopped in such cases. |
| Indicates that you have never received any data against the attribute from the source. |
1. Website
Indicates tracking status for Custom User Attributes gleaned through the Web SDK (including AMP Pages), GTM and Segment.com’s Device Mode Integration.
2. Android
Indicates tracking status for Custom User Attributes gleaned for native Android apps integrated via Android SDK or Segment.com's Device Mode integration. And hybrid Android apps integrated via the respective SDKs - Cordova, React Native, Flutter, Xamarin, Unity.
3. iOS
Indicates tracking status for Custom User Attributes gleaned for native Android apps integrated via Android SDK or Segment.com's Device Mode integration. And hybrid Android apps integrated via the respective SDKs - Cordova, React Native, Flutter, Xamarin, Unity.
4. Others
Indicates tracking status for Custom User Attributes gleaned through REST API, apps and websites integrated via Segment.com's Cloud Mode, and attributes created through CSV upload.
Managing User Attributes
Depending on your business needs, you can choose to:
-
Mask the user attribute values.
-
Change the data type tracked against each attribute.
-
Stop (and later Start) tracking a specific custom user attribute from all your data sources (apps, website, server, third-party integrations).
Here's how you can go about it:
PII Masking
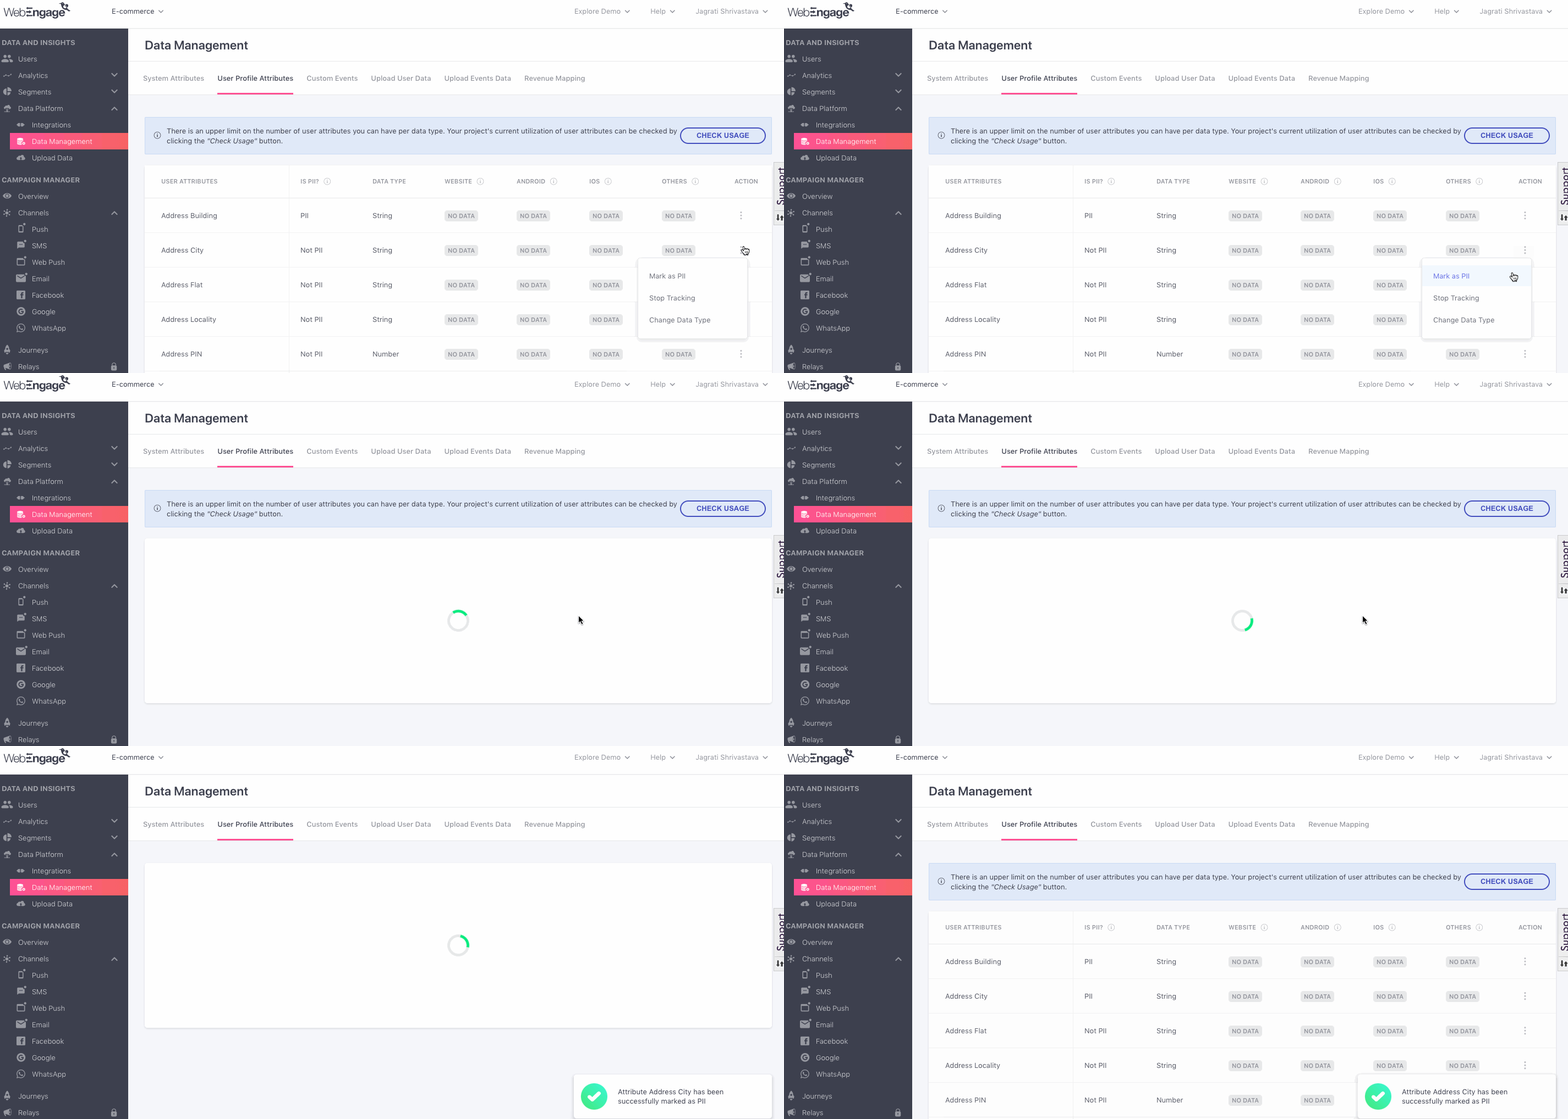
As shown below, you can hide the value of an attribute across your dashboard and reports by selecting Mark as PII from the Actions menu.(How It Works)
Click to enlarge
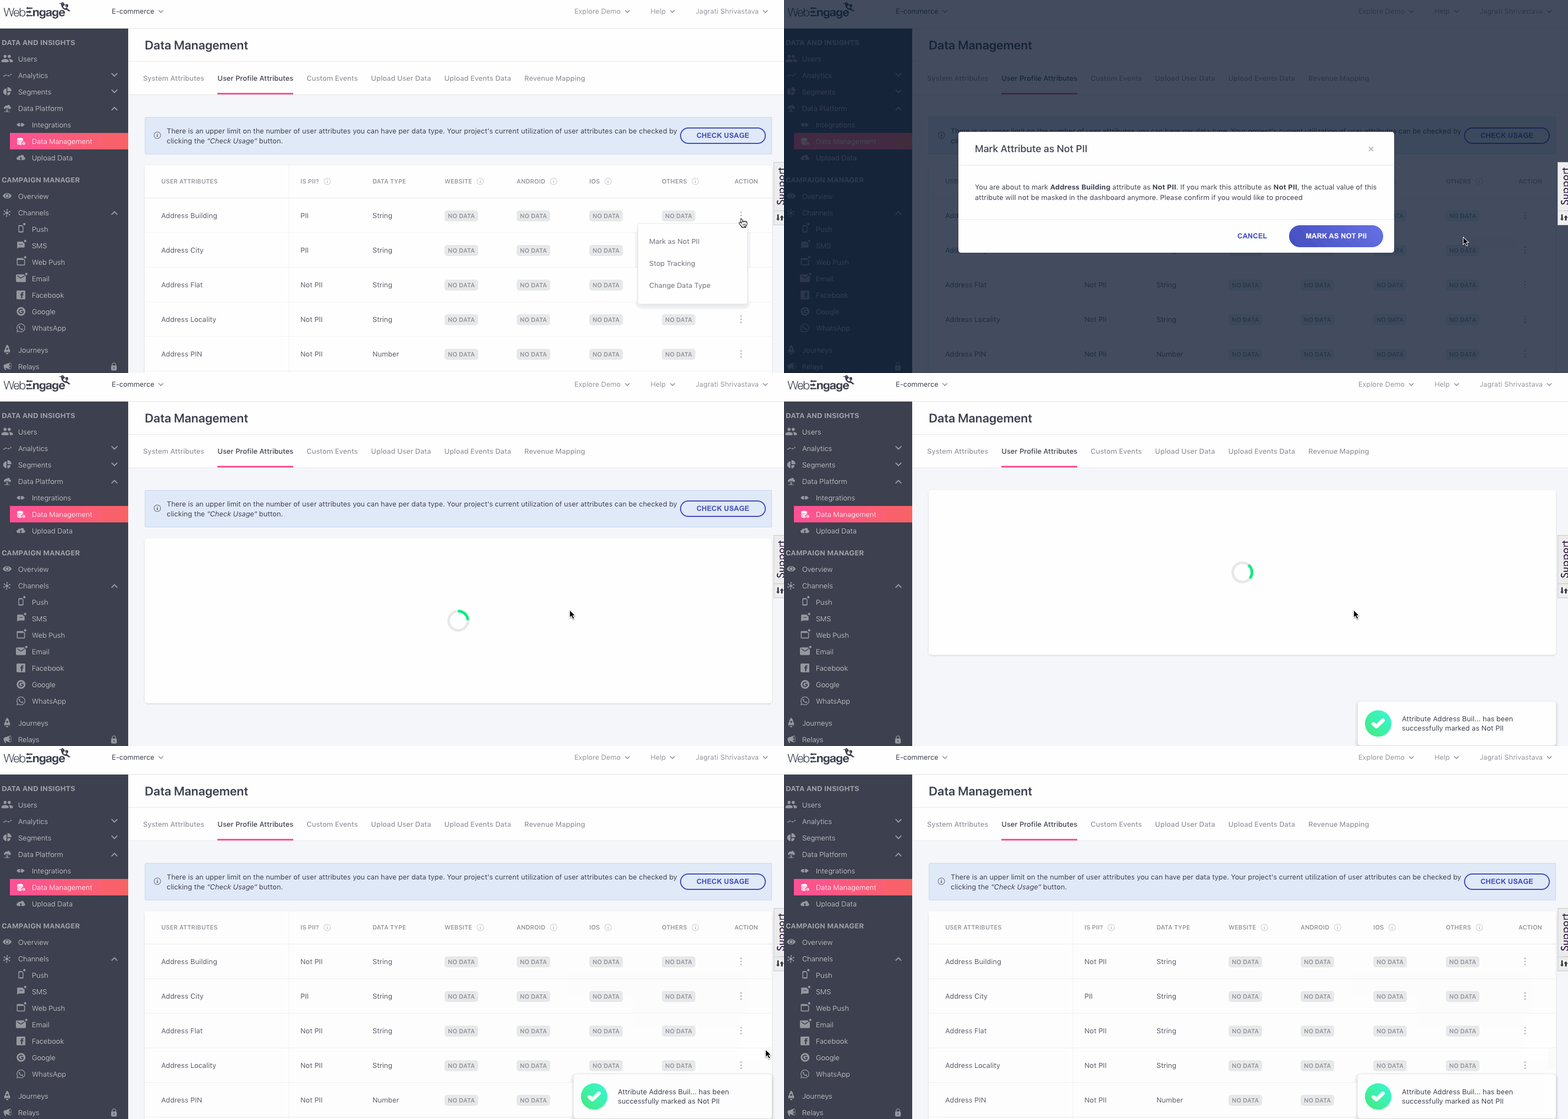
You can unmask a PII attribute anytime you like by selecting Mark as Not PII from the Actions menu (as shown below).
Click to enlarge
Change Data Type
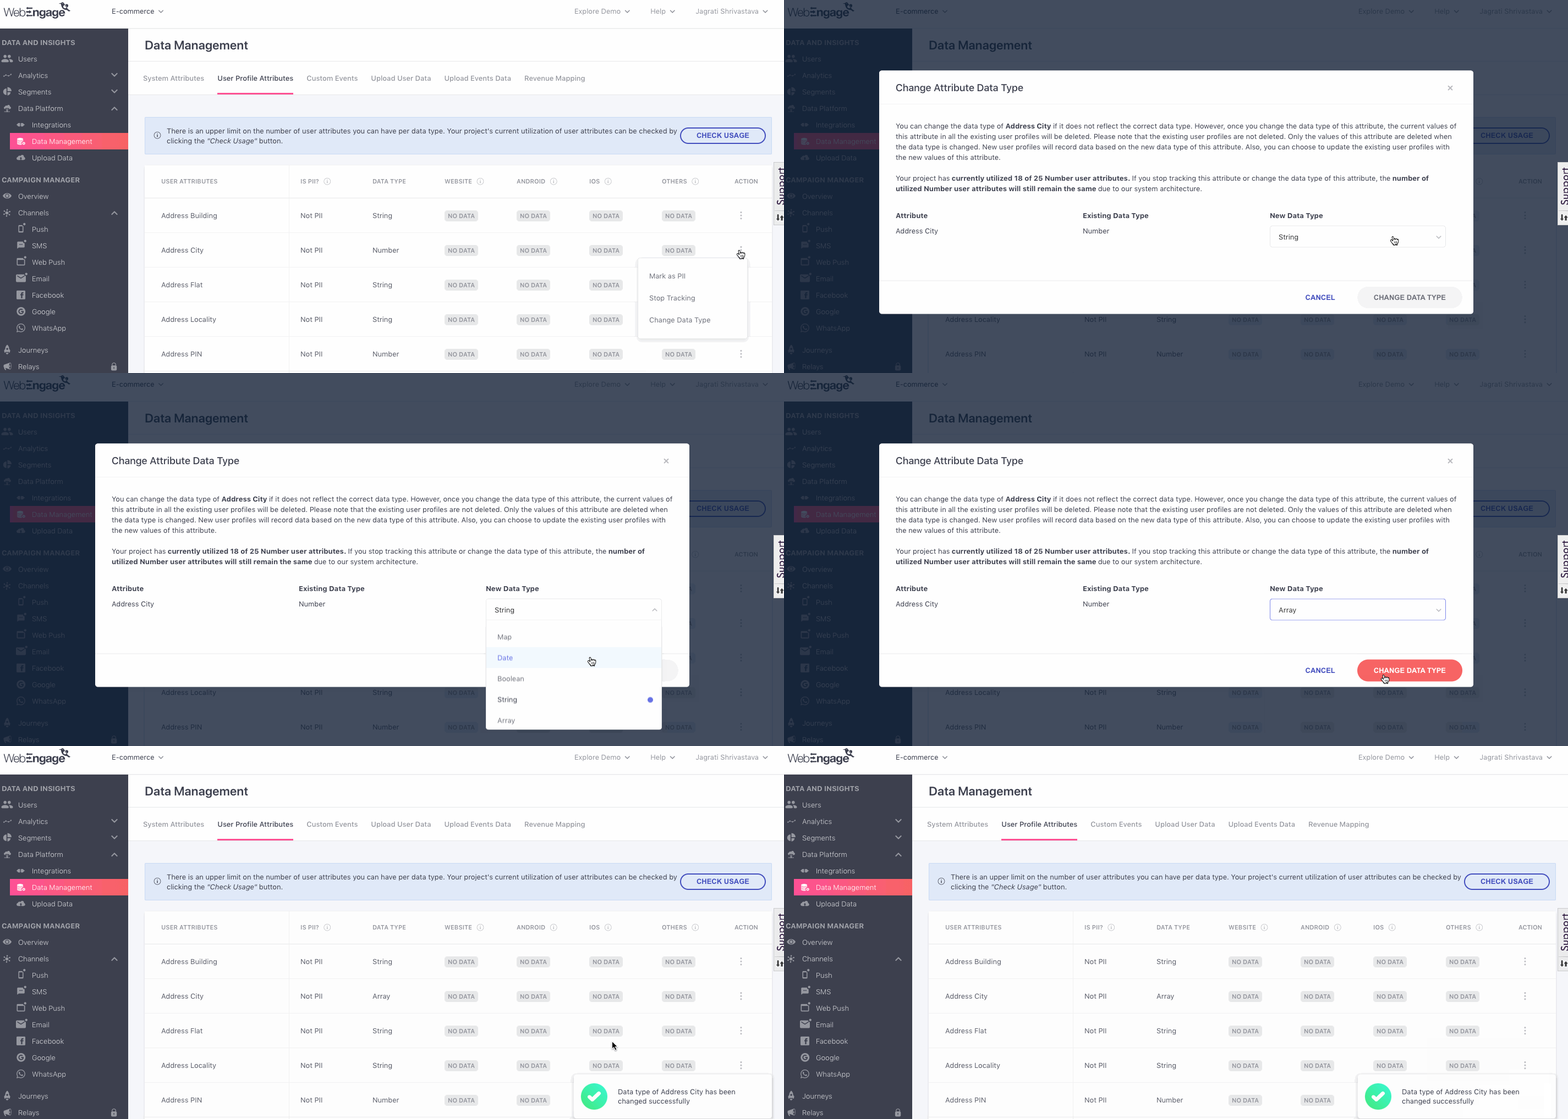
You can edit the data type of the value tracked against a Custom User Attribute directly through your dashboard. Doing so will help you utilize the data more effectively when personalizing campaigns.
Once updated, the existing data tracked for all users will be deleted and replaced with the new values, as per the new format.
Please NoteYou can change the data type only if the attribute is not a part of a running Campaign, Journey, Relay, an Active Live Segment, or Funnel. As long as the attribute is attached to either one, you will not be able to edit its data type.
Here's how you can go about it:
Click to enlarge
In cases where the Custom User Attribute is still in use, you will be prompted by the following message:
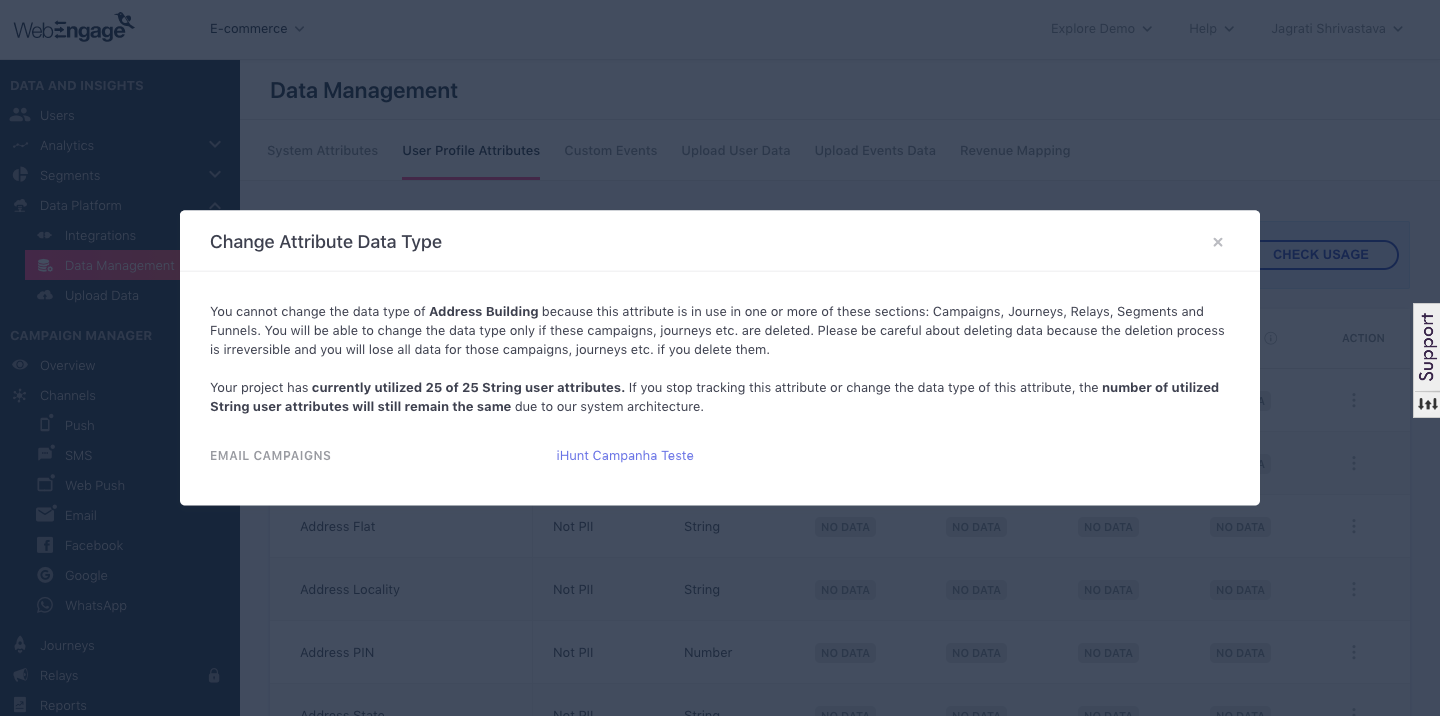
Click to enlarge
Stop/Start Tracking Data
There are several instances where you may want to stop tracking a Custom User Attribute, like:
-
Your app/website was updated, rendering specific sections (and the data tracked for them) redundant.
-
You are tracking an attribute's value via another Custom Attribute, in a different format. Let's help you understand this better with an example.
Tracking a User's Shipping AddressLet's say that you ask users for the following details to complete a purchase:
Shipping Address
Payment Mode
Email Address
Phone Number
Depending on your checkout form and process, you can choose to track the Shipping Address in any of the following formats:
Option 1: Track each line of the address as a different string attribute - Flat no, Building Name, Lane, City, Pin Code, State
Option 2: Track the entire address as an Object-type attribute, Shipping Address, and store the aforementioned details individually against it.
This way, you can reduce the number of Custom User Attributes being used to track a data point and can easily personalize messages.
Thus, if you choose to switch to Option 2 at a later date, you can Stop Tracking the Custom User Attributes, Flat no, Building Name, Lane, City, Pin Code, State.
How It Works
-
Stopping data tracking enables you to reduce the data clutter across various sections of your dashboard, helping you retain only the most relevant data points for segmentation and message personalization.
-
You can stop tracking attributes only if they are not attached to a Campaign, Journey, Relay, Segment, or Funnel.
-
If you'd like to stop tracking an attribute currently in use, you will need to delete the respective Campaign/ Journey/ Relay/ Segment/ Funnel before proceeding. This process has been put in place to preserve the sanctity of your data and ensure that all your engagement strategies keep running smoothly.
-
Currently, you cannot choose to stop data tracking for a specific platform. This means that if you're tracking a Custom User Attribute for your Android, iOS apps, and website, we will stop receiving the attribute from all 3 platforms.
- We recommend that you collaborate with your tech team to stop tracking data for a specific platform.
-
Once stopped, the attribute will be made unavailable for use across your dashboard. Don't worry; you can always start tracking an attribute if you'd like to use it in the future!
- The attribute will still be listed under User Profile Attributes with the Status, No Data (indicating that you've stopped tracking it).
Stop Tracking
As shown below, select Stop Tracking from the Actions menu of the respective Custom User Attribute to implement the change.
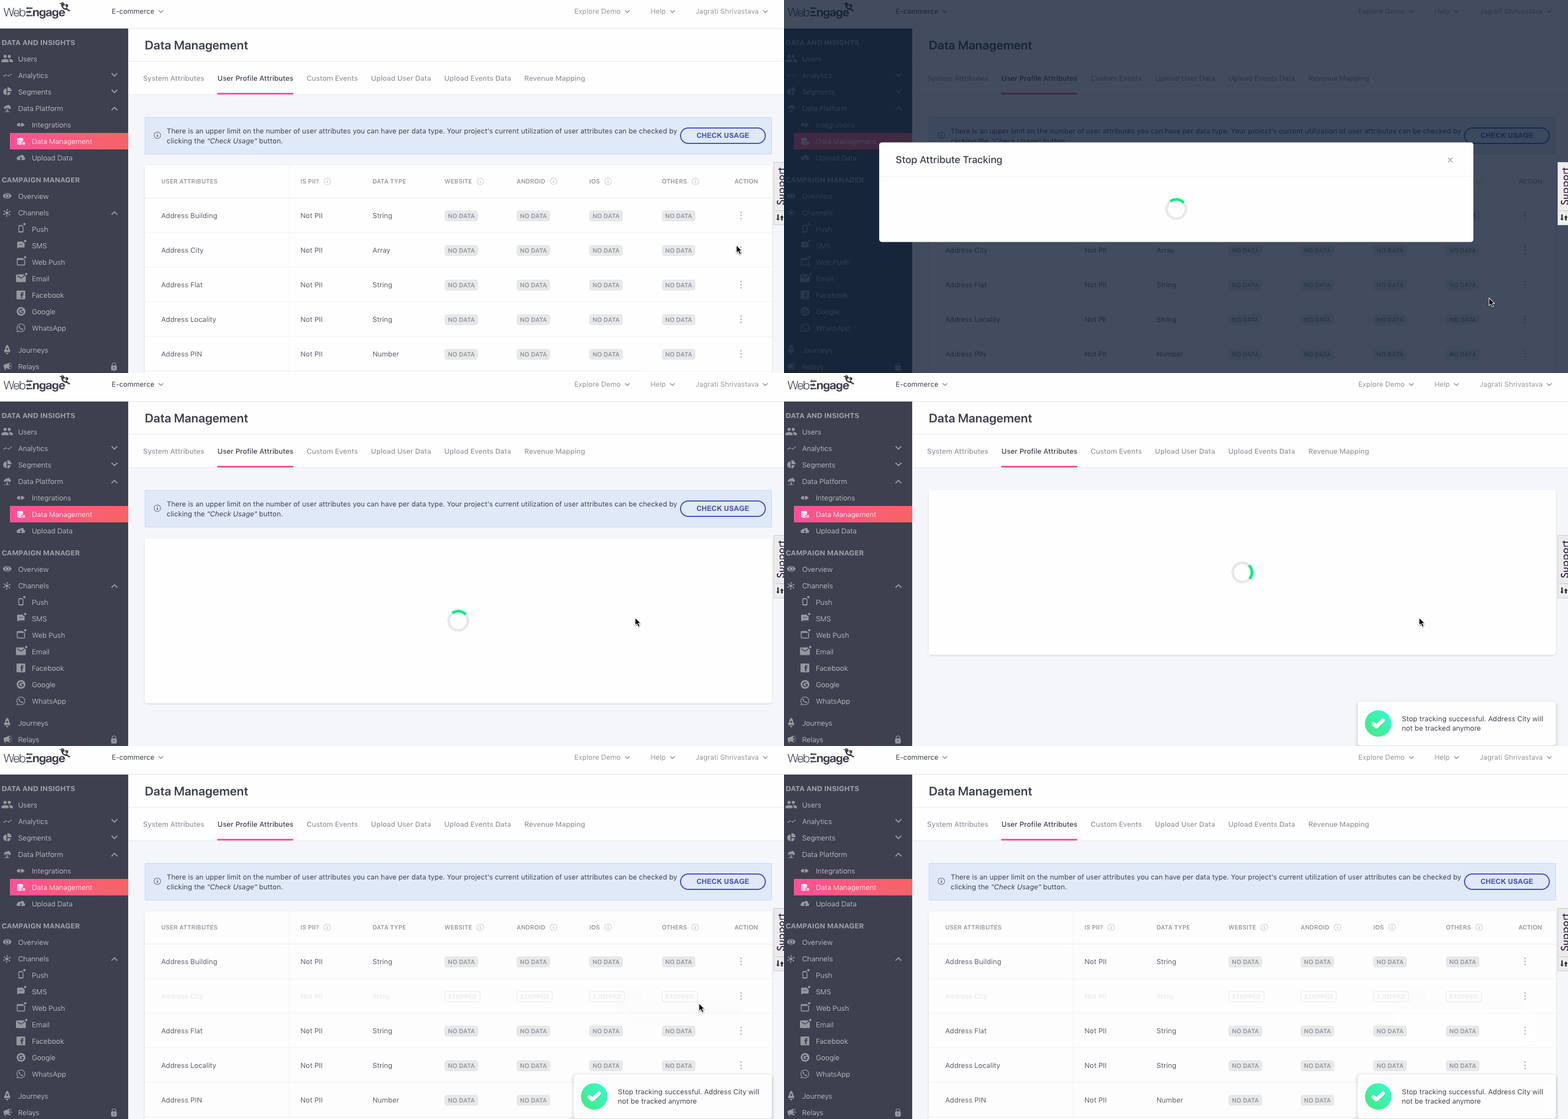
Click to enlarge
You will be prompted by the following message if we're unable to execute your change 👇
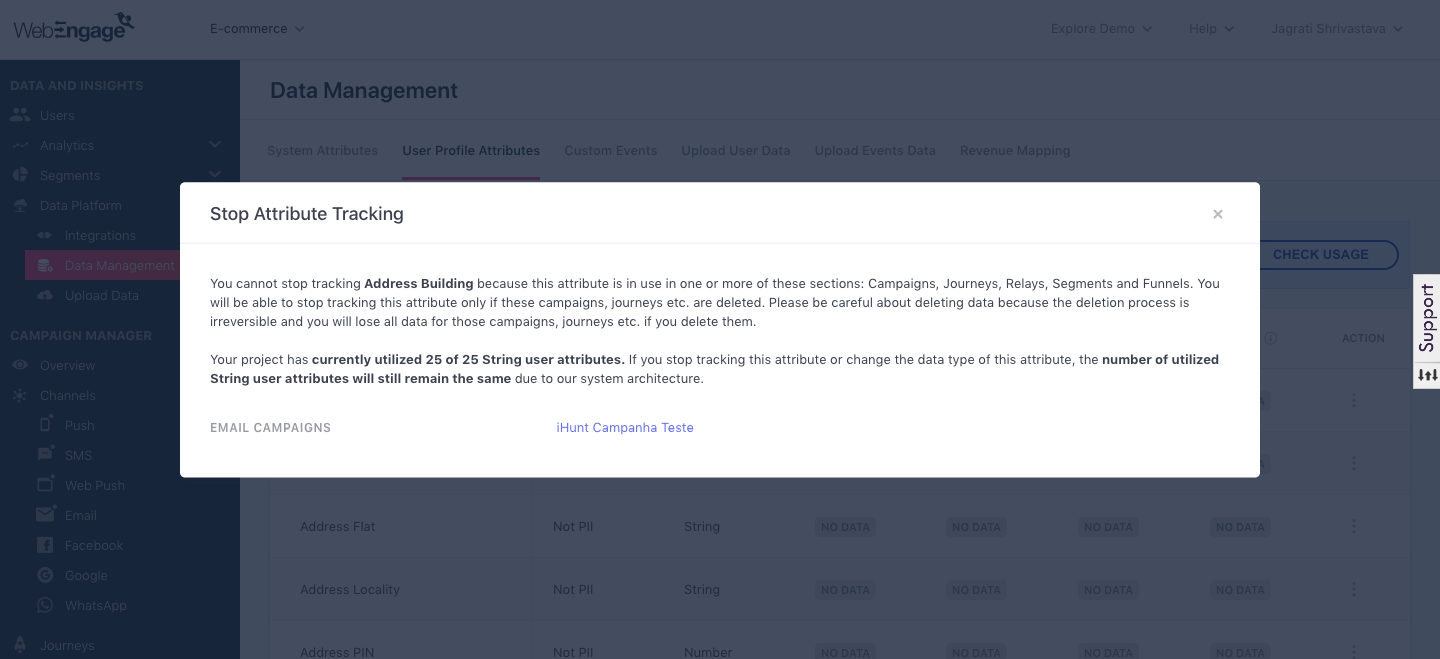
Click to enlarge
As shown below, select Start Tracking from the Actions menu to activate the Custom User Attribute and make it available across your dashboard.
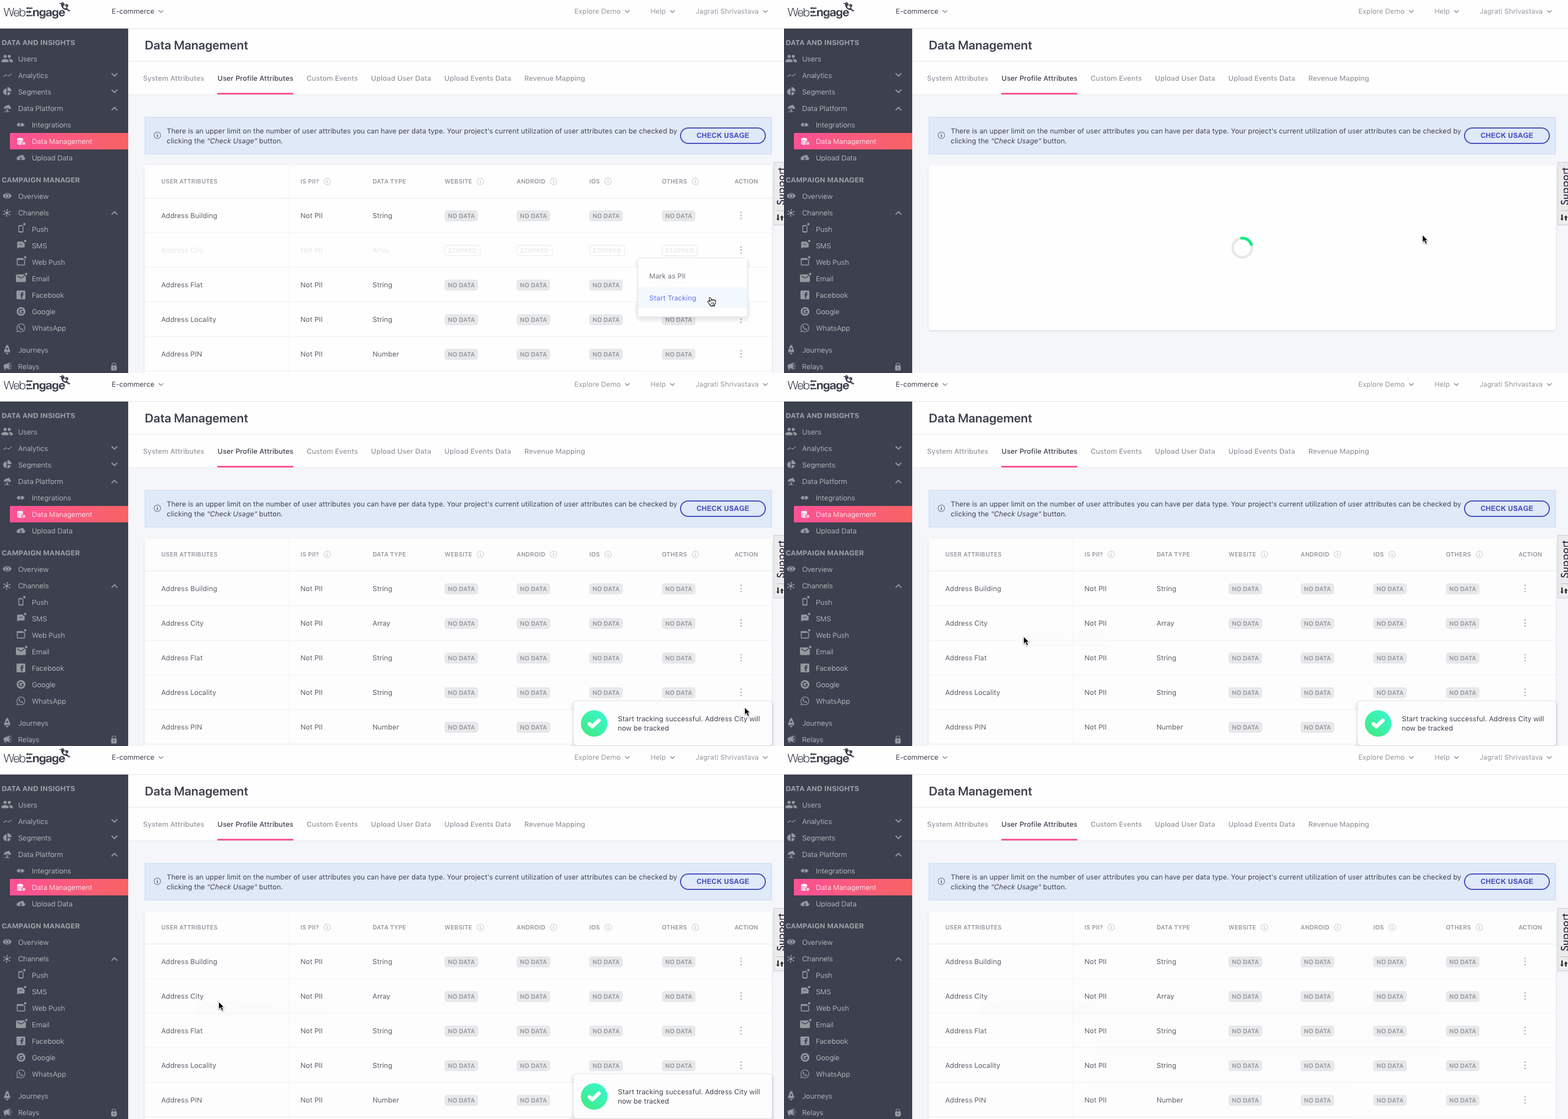
Click to enlarge
Renaming User/ Event Attribute
You can now directly rename existing events or user attributes through our dashboard, without having to depend on our support team, to make these changes from the backend.
Steps to Rename Attribute on WebEngage
Follow the steps below to learn how to initiate the renaming of your user/ event attributes.
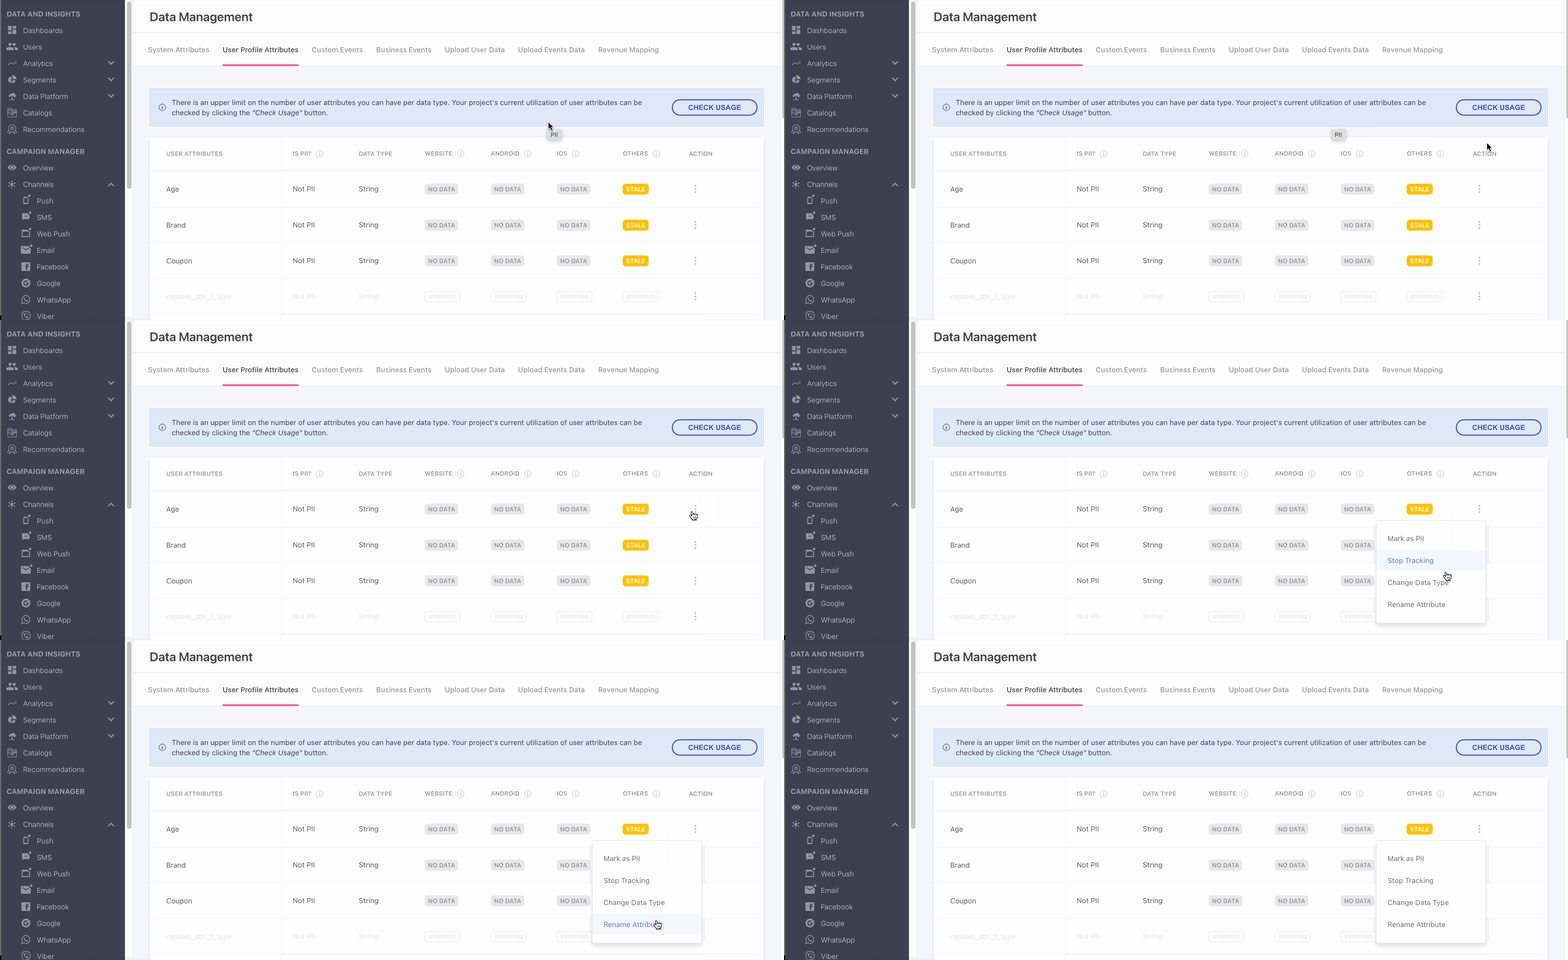
- Go to the Data Management page, you can now navigate to the event or user attribute tab.Now select rename attribute option, by clicking on the 3 dots in the Action column.
- On clicking on the Rename Attribute option, you’re now presented with a tab containing the 3 main steps in renaming your attributes
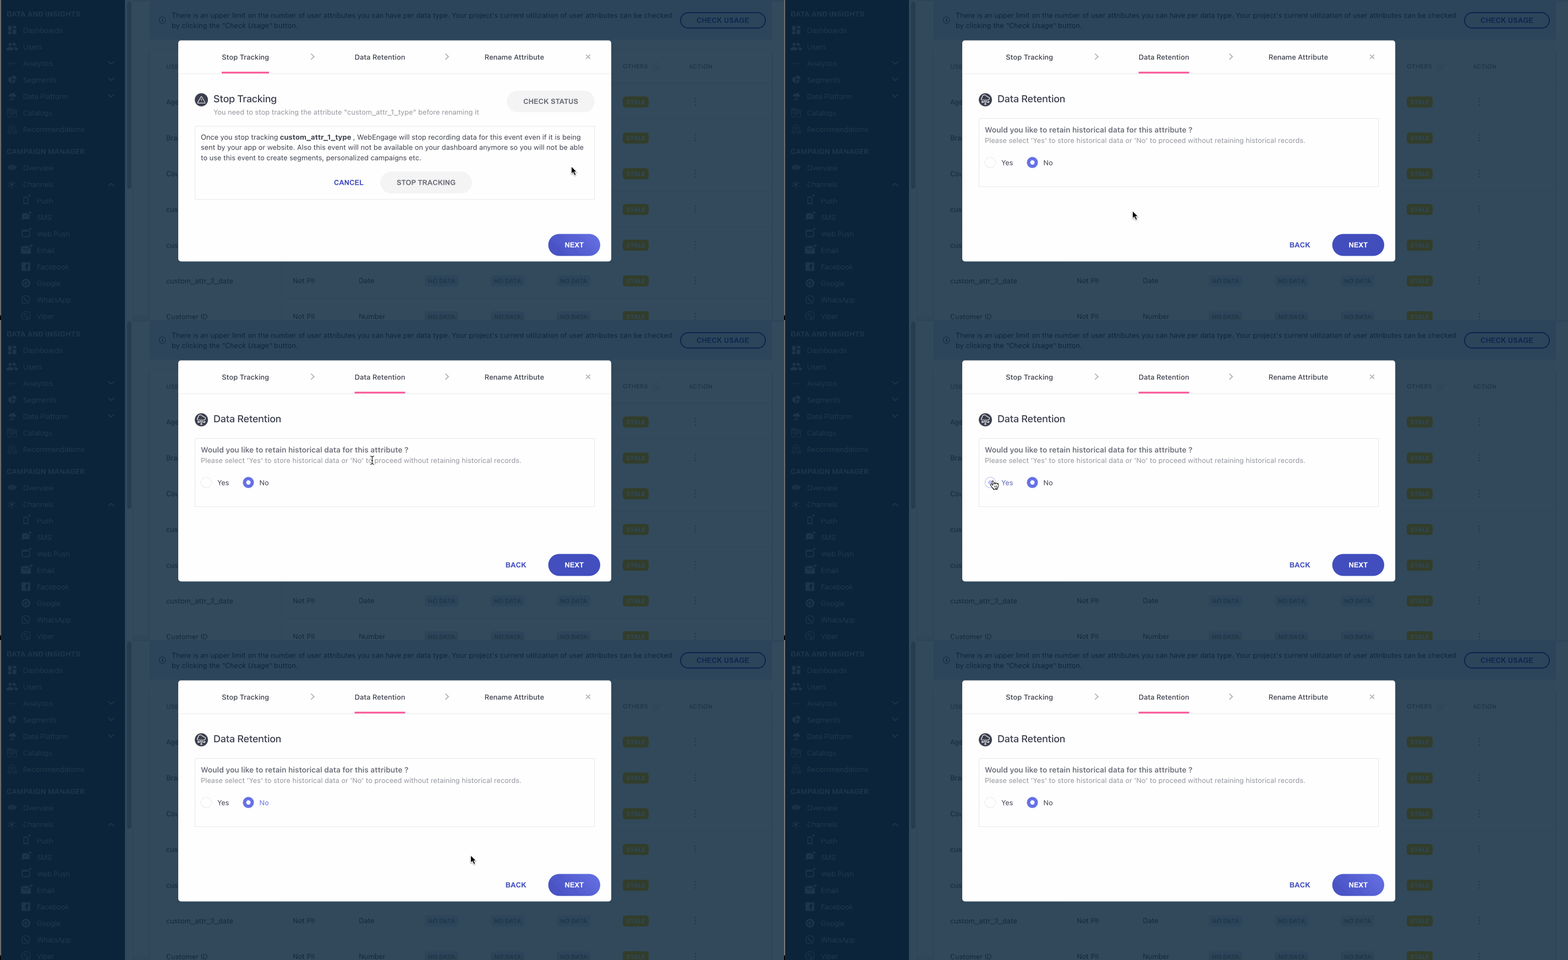
- Stop Tracking: Before renaming the attribute, it's necessary to stop tracking it first.
- Now click on the 'Check Status' button in this tab to stop tracking.
- A warning to verify if you want to stop tracking the attribute will pop up, now proceed by clicking on 'Stop Tracking'.
- You will then receive a confirmation for the same.
Keep In MindIf the attribute is utilized in any segment, journey, relay, analytics, etc., renaming will not be permitted. Users must first remove the attribute from all instances where it is employed before initiating the renaming process.
- Data Retention tab: Here you have the option of retaining the historical data of the attribute you want to rename, proceed by clicking on ‘yes’ or ‘no’ according to your preference. Keep in mind that, Data retention is only valid in case of renaming user attributes.
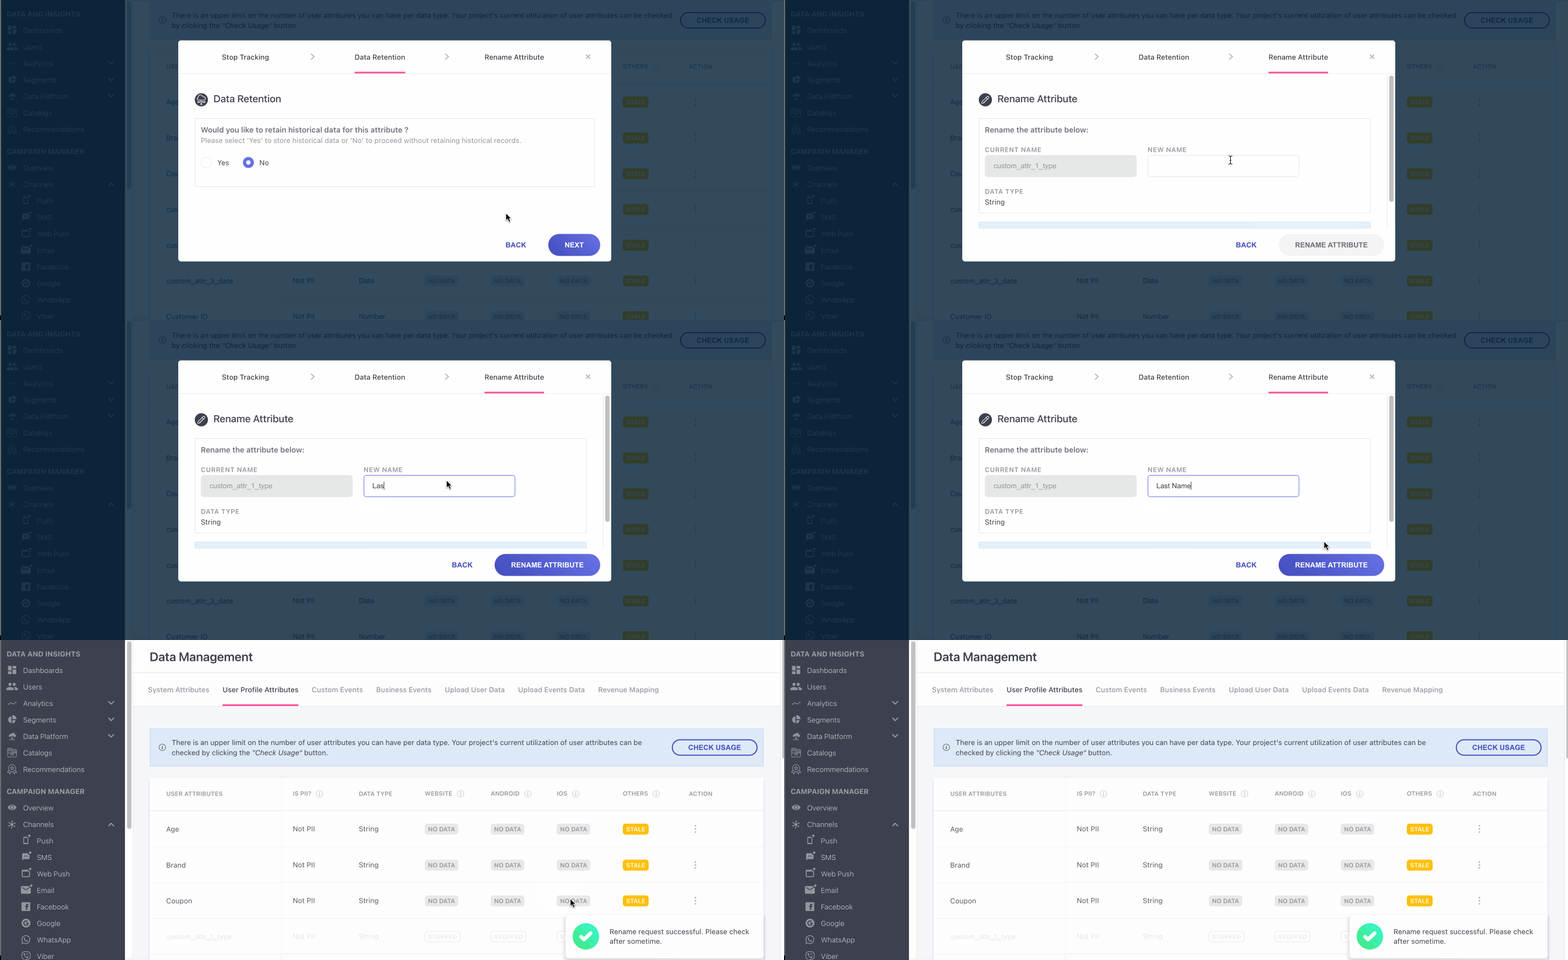
- Rename Attribute: You can now proceed to rename your attribute, by typing it in the ‘New Name’ text bar, and click on ‘Next’ to confirm.
RememberA minimum of 15 minutes is required for this change to be visible on your dashboard.
We hope this has helped you manage all your custom user data with great ease. Please feel free to drop in a few lines at [email protected] if you have any further queries. We're always just an email away!
Updated 8 days ago