Upload User Data
WebEngage enables you to consolidate your offline data or your historic user data by uploading it manually. You can convert your user data in the excel sheet in the form of a CSV file and upload it. Any User CSV file that you upload on WebEngage will be a combination of System and Custom Attributes that define each user.
You can learn more about the CSV file uploads and the file requirements here.
Understanding User Profile Data
Every user profile data on WebEngage has attributes that define a user, such as First Name, Last Name, Date of Birth, Gender, Score, Membership Type and so on.
Among the attributes above, there are certain attributes that are predefined by WebEngage such as First Name, Last Name, etc, these are called System Attributes. The second set of attributes you see above such as Score, Membership Type etc. are defined by you, these are called Custom Attributes.
Please refer to Users for more details on the system and custom attributes.
Let’s look at a tabular representation of a sample User CSV file. If you notice the first row in the table below, you will see that this CSV file has a mix of system attributes (user_id, email, phone, first_name, last_name) and custom attributes (score, membership_type).
| user_id | phone | first name | |
|---|---|---|---|
| 2123414 | [email protected] | +1 925 336 0294 | Adam |
| 2384708 | [email protected] | +65 9039 1135 | John |
In addition to defining specific user attributes as system attributes, WebEngage has also assigned the relevant data types to these system attributes (e.g., the system attribute email is of String data type).
ImportantWhile preparing the CSV file, kindly ensure that you use the same attributes and data types to represent the user data.
Note: Please keep in mind that you cannot change the name of these system attributes or the corresponding data types.
List of System Attributes that can be Uploaded
Following is the list of system attributes and their data types that have been defined by WebEngage and is available for use in CSV file uploads.
System Attribute Name | Data Type | Description |
|---|---|---|
|
| User ID |
|
| First name |
|
| Last Name |
|
| Birth date in YYYY-MM-DD format |
|
| Gender- value can only be the one of |
|
| Company |
|
| Country |
|
| City |
|
| Region |
|
| Locality |
|
| Postal Code |
|
| Email ID |
|
| Phone number of the user in E.164 format |
|
| Encrypted email address for use with a private ESP (Email Service Provider). See PII hashing for more details. |
|
| Encrypted phone number for use with a private SSP (SMS Service Provider). See PII hashing for more details. |
|
| If this is set to |
|
| If this is set to |
|
| If this is set to |
|
| If this is set to |
|
| If this is set to |
In addition to these system attributes, you can define various custom attributes (and their corresponding data types) representing a user. If you have integrated the WebEngage SDK in your mobile apps or website, you might have already defined these custom attributes.
You can check the custom attributes you have already defined on your WebEngage dashboard under the User attributes list under the Data Management section.
While preparing the User CSV file, you can choose to use the already existing custom attributes, or you could choose to add new custom attributes.
Do note that once these custom attributes are recorded in WebEngage, you will not be able to change their name. Therefore, kindly be careful while adding new custom attributes.
Pre-requisites of CSV file
While preparing your CSV file, it is important to remember that all the attribute names must be in the first row and each user's data in the subsequent rows.
Please take note of the following things when preparing your User CSV file:
-
The first row should contain the names of the attributes. You are not required to use all the system, and custom user attributes in each CSV file you create. However, if any of the subsequent rows contain data about an attribute, the corresponding attribute name is required in the first row. In other words, the first row cannot have any blank/empty values.
-
If you are using a system attribute, the name and data type of the attribute must match the name and data type defined mentioned in the List of System Attributes for CSV File Upload.
-
If you are using an existing custom attribute, then the name and data type of the attribute must match the data type you have already defined for this attribute in WebEngage. You can check the custom user attributes and the corresponding data types you have defined on your WebEngage dashboard under the Data Management > User attributes list section
-
If you’re defining a new custom user attribute, please note that you cannot change its name once an attribute is set. Therefore, kindly be careful when creating new custom attributes.
-
If you’re defining a new custom attribute, please note that the maximum length of the attribute name is 50 characters.
-
user_idneeds to be the first data point on each row of data (or in other words,user_idneeds to be the first column). -
The file must contain a unique user ID for each user.
-
The name of your user attribute should not begin with
we_. -
The maximum length of a
Stringdata type for an attribute is 1000 characters. -
Values of the attribute can only be of one of the following data types:
Boolean,Number,StringsandDates -
If you want a certain attribute to have a blank/empty value, kindly refrain from entering
NULLas a value for those attributes. Instead, leave the value blank/empty.
There can be instances where the attribute may not hold any value for a certain user. For example, if a user hasn't updated their last name compared to the one who did, it must be left empty. An empty cell indicates that there is no value for the attribute for the 'last_name'. Entering a NULL will be taken as a string.
| Attribute | Data | user_id |
|---|---|---|
| last_name | jones | 848577 |
| last_name | 903053 |
-
A user profile can have a maximum of 25 custom attributes per data type (i.e., 25 custom attributes of
Numberdata type, 25 custom attributes ofStringdata type, etc.). -
The maximum file size allowed is 200MB. This should be more than sufficient for millions and millions of rows of data.
Uploading a CSV file to User Data
CSV Uploads Are Only for Known UsersPlease note that CSV Uploads for Users can be used only to add or update details of known users. You will not be able to add or update the details of any unknown users through CSV uploads.
Please take note of the following limitations for any historical events data uploaded manually through a CSV file:
-
Historical events data (e.g.
event_timemore than 31 days from now) will be available for creating segments only 15 minutes after the CSV file has been uploaded. -
Historical events data will be visible in event analytics, funnels, cohorts after 12.30 am UTC on the same day or the next day, whichever is earliest.
-
Historical events data will be readily available for creating triggered campaigns, journeys and adding event-based personalization in messages.
-
Values of an attribute can only be of one of the following data types:
Boolean,Number,String, andDate. -
MapandArraydata types are not allowed for CSV uploads. -
A user profile can have a maximum of 25 custom attributes per data type for the following data types:
Boolean,Number,String,Date(i.e. 25 custom attributes ofNumberdata type, 25 custom attributes ofStringdata type etc.). -
The maximum length of a
Stringdata type for an attribute is 1000 characters. -
The maximum length of an attribute name is 50 characters.
-
The name of your user attribute should not begin with
we_.
How to Access
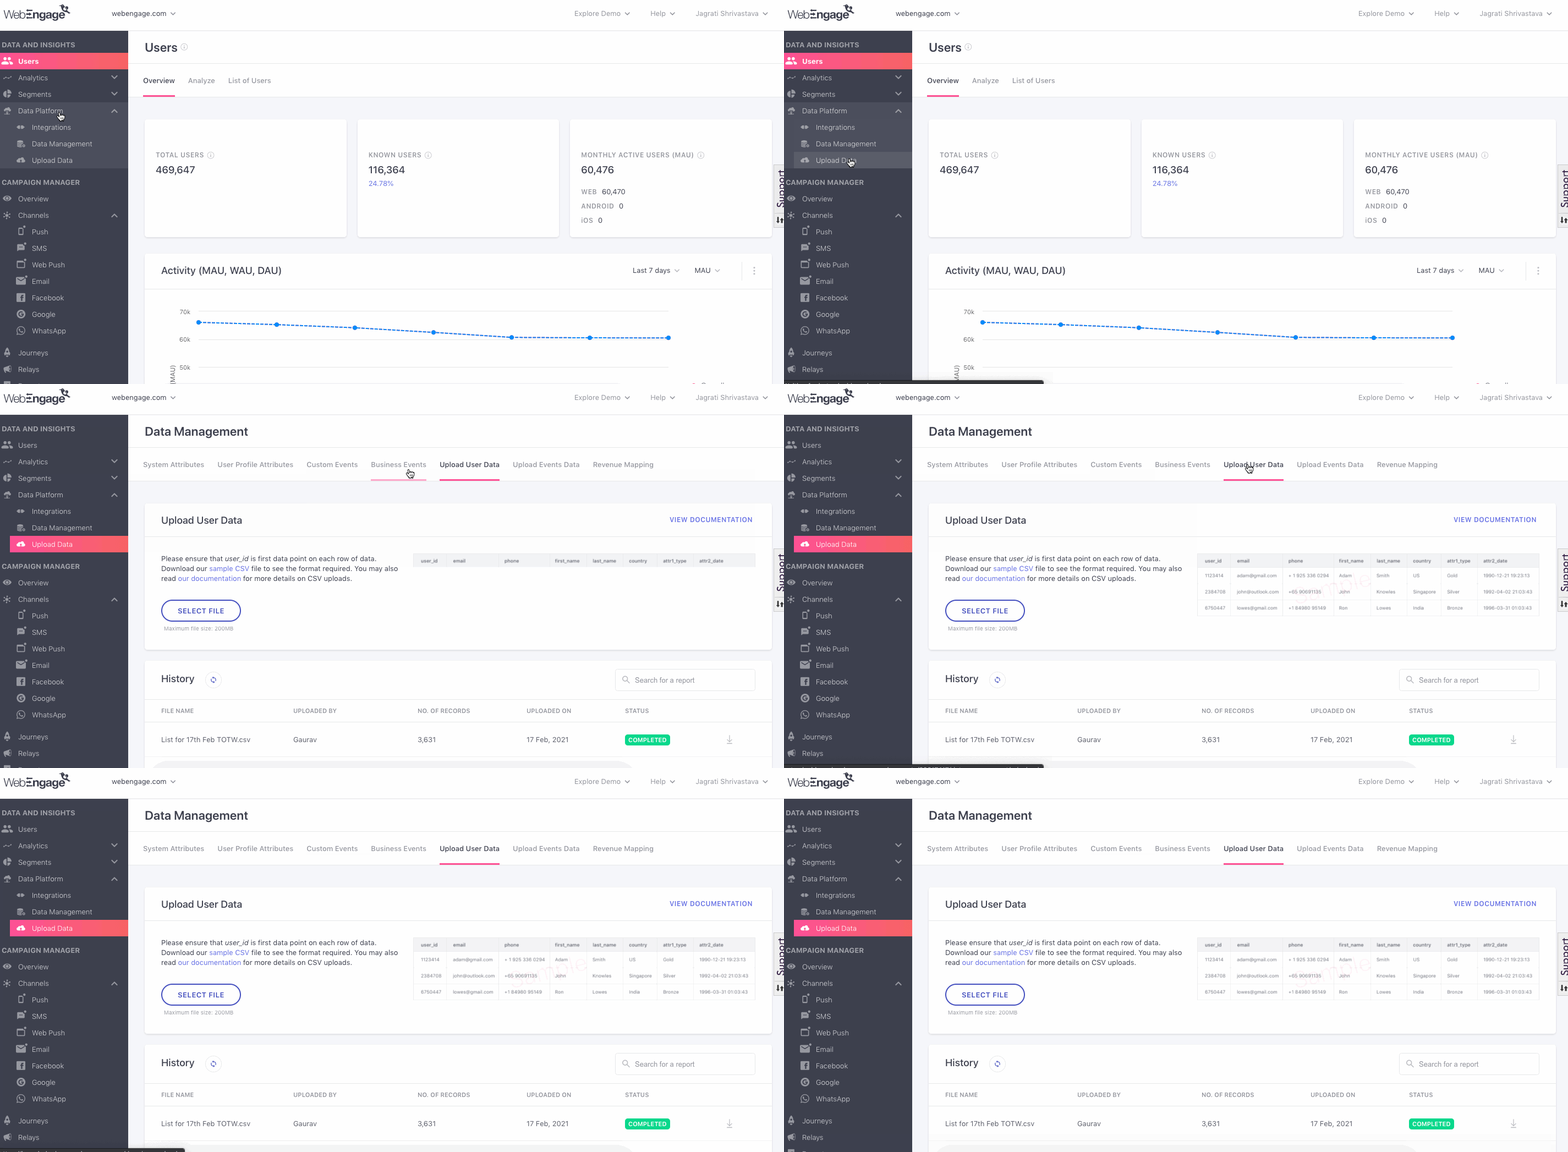
As shown below, you can access User Profile Attributes through Data Platform > Data Management or Data Platform > Upload Data.
Click to enlarge
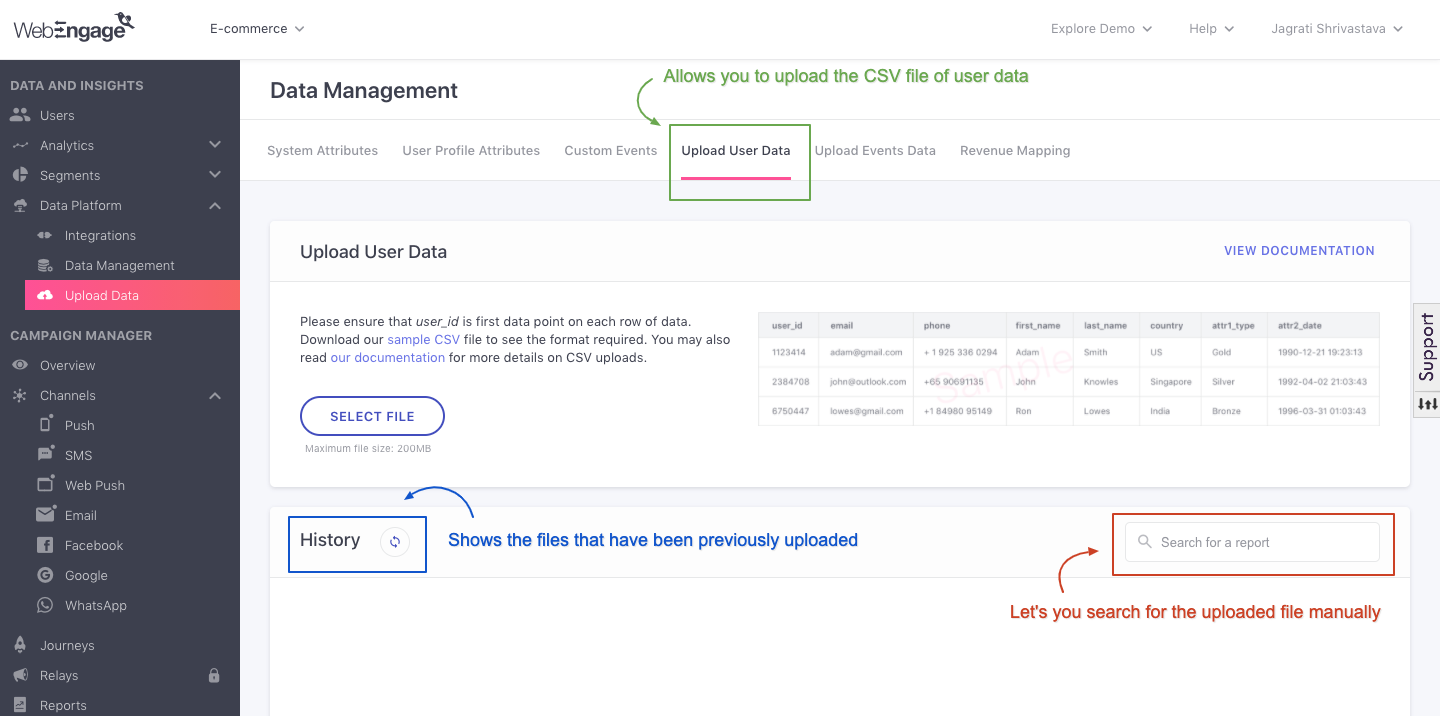
Overview
Here you will be able to upload the file or access any previously uploaded User Data file and download it for future references.
Click to enlarge
Step 1: Uploading CSV file
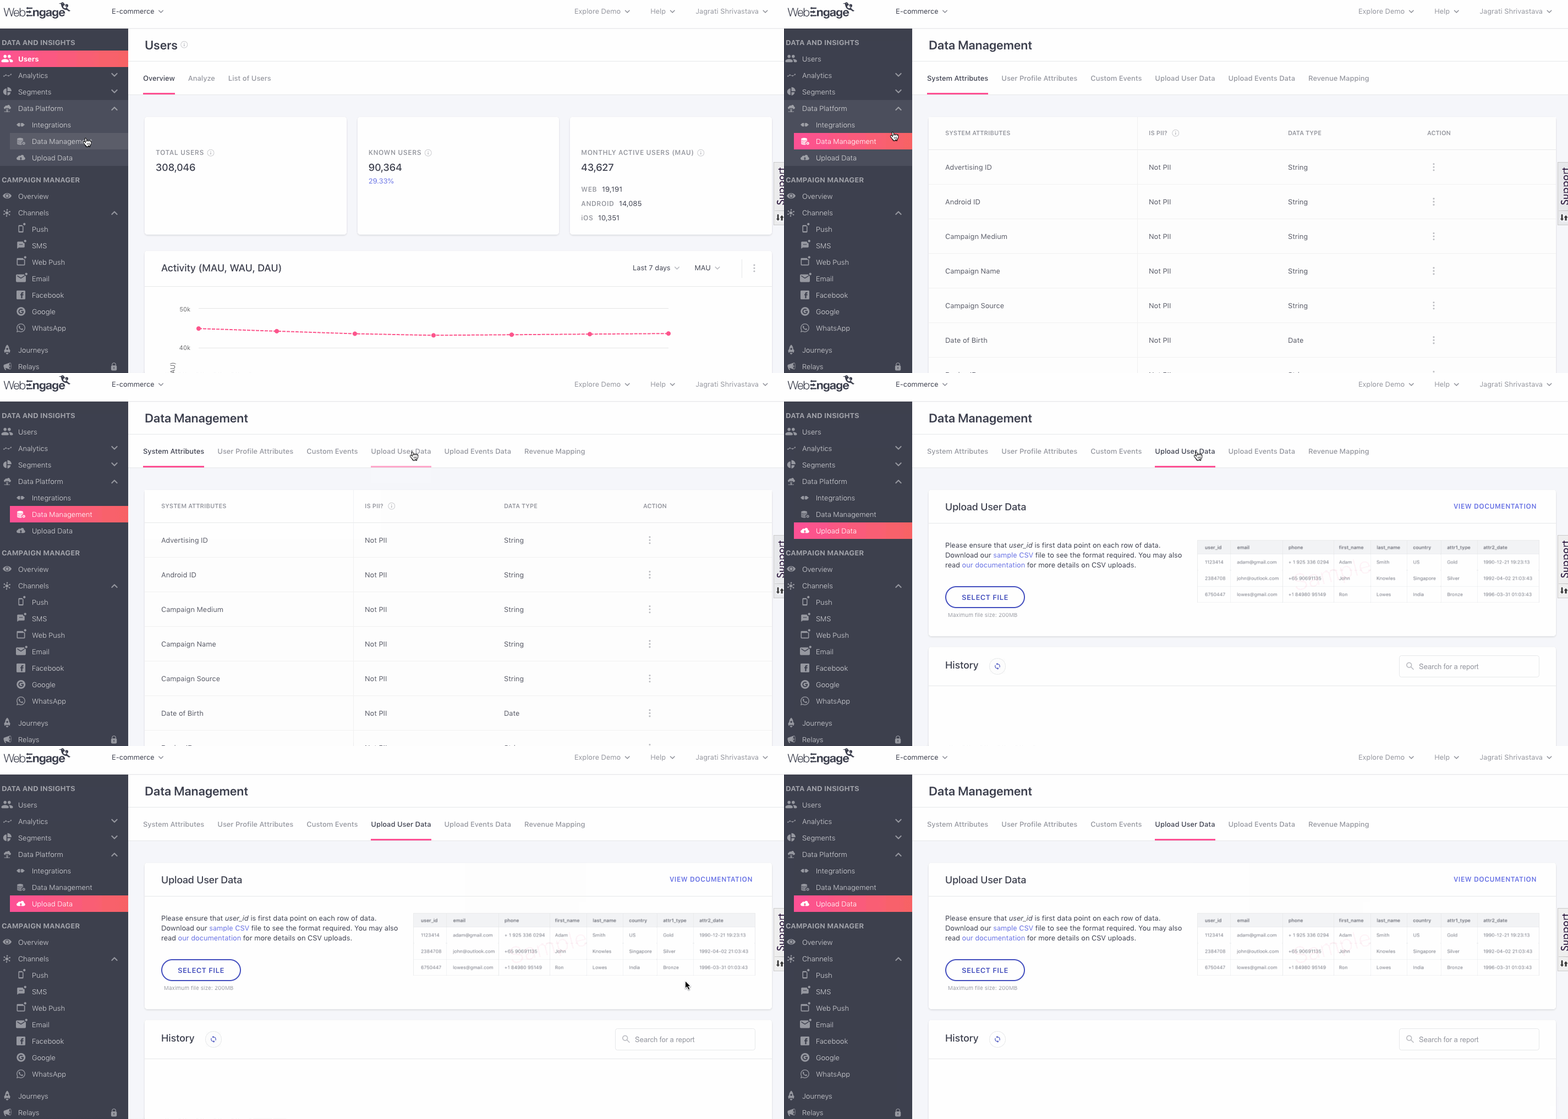
- Click on the Data Management section in your WebEngage dashboard to upload your file.
Click to enlarge
- From the tabs shows on the page, click on the Upload User Data tab.
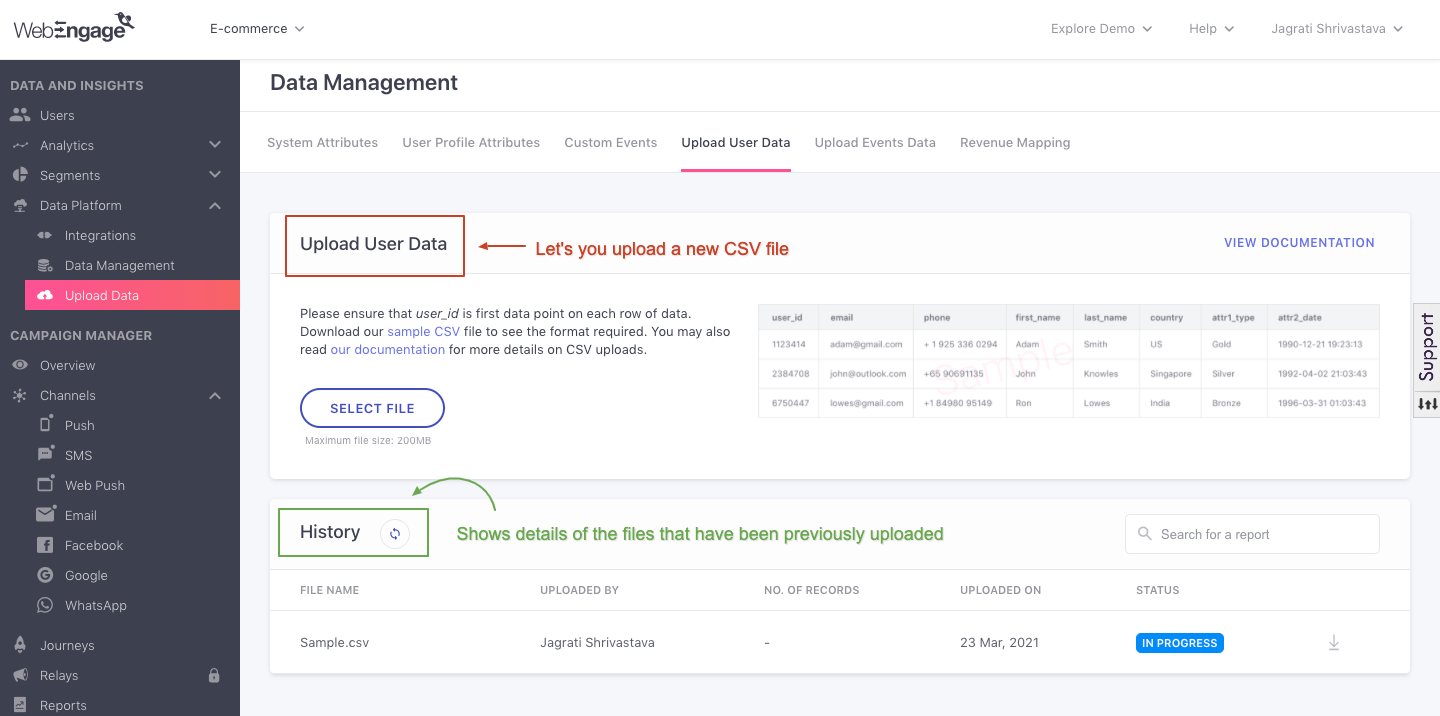
You will see two subsections on the screen that will allow you to upload the CSV file:
Click to enlarge
-
Upload User Data subsection where you can upload your CSV file.
-
History subsection where you can see the following details of the CSV files you had previously uploaded - file name of the CSV file that was uploaded, who uploaded it and when, the number of records found in the CSV file, the status of the upload (In progress, Successful or Failure). You may even download any of the CSV files you had previously uploaded by clicking on the download icon.
To begin the upload process, click the Select File button in the Upload subsection.
Step 2: CSV File Validation
Once you select your file and start the upload process, WebEngage will validate the CSV file before it is uploaded, and if validation is successful, the records will be saved in WebEngage.
There are two levels of validation as described below.
First Level of Validation
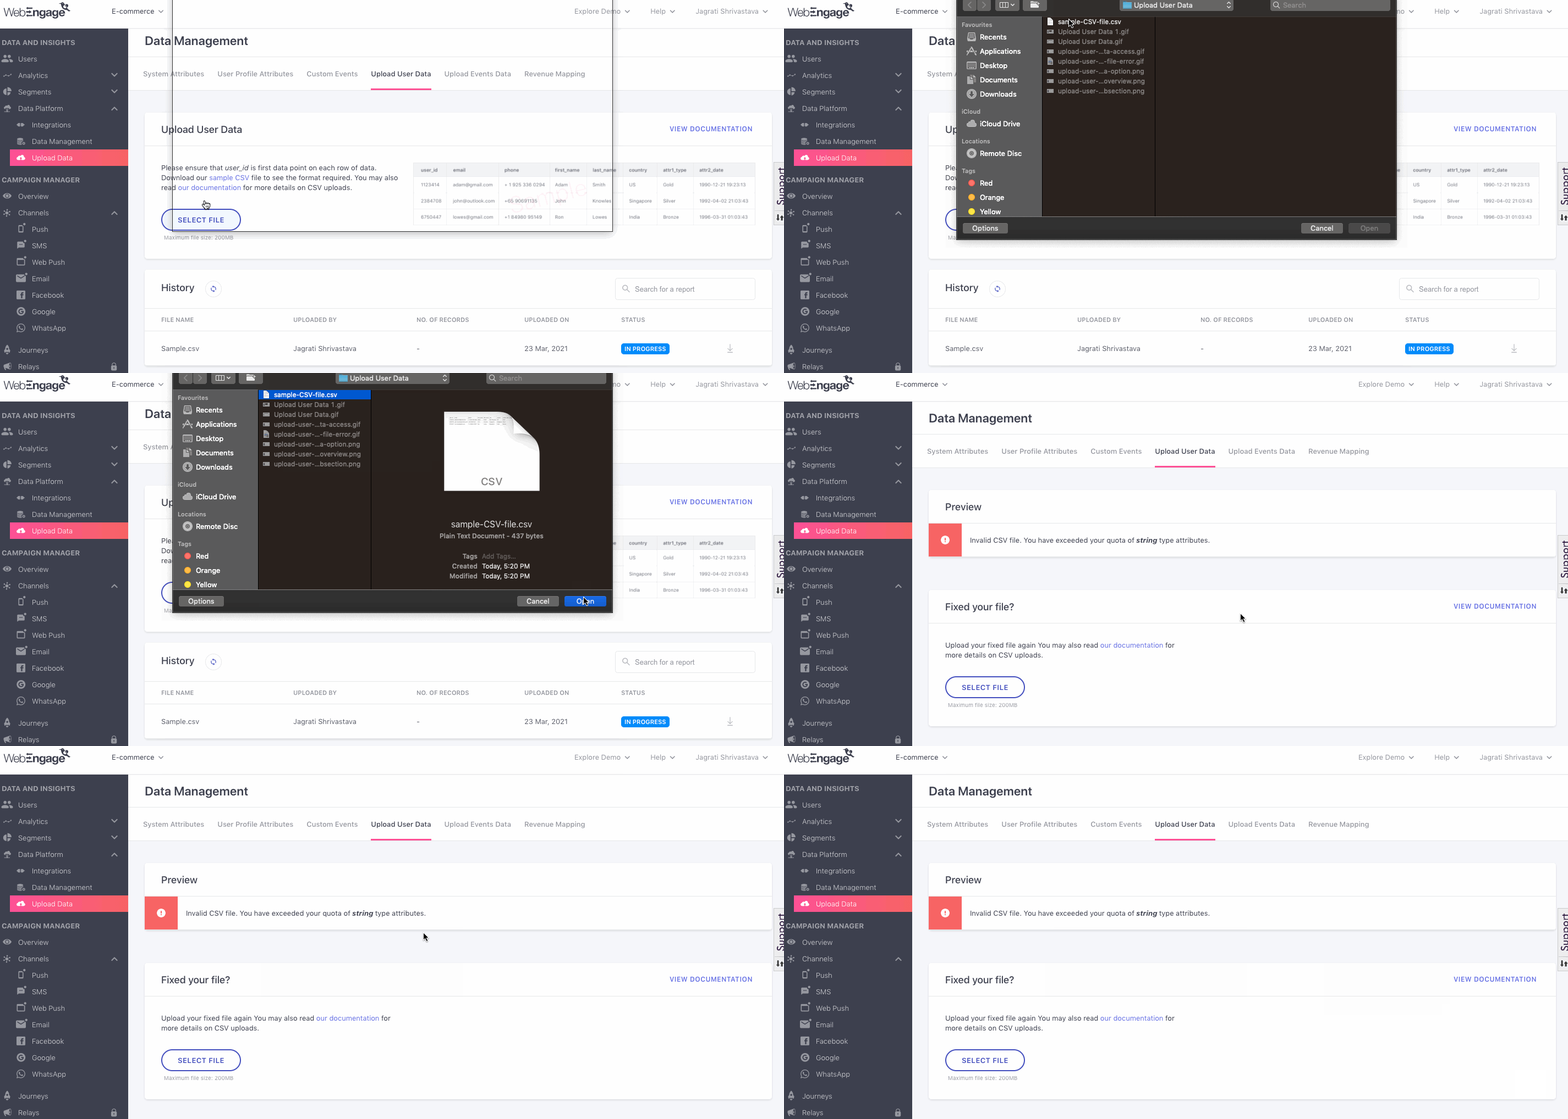
The first level of validation works on the first two rows of your CSV file, i.e., the first row containing the attribute name and the second row containing the value of the first user attributes.
If the first level of validation fails, then the file will not be uploaded, and the records will not be saved in WebEngage.
The first level of validation can fail if any of the conditions described above for Users is not followed. When the validation fails, the relevant message will be displayed on the dashboard.
When the first level of validation is successful, you will be asked to verify the data before the file gets uploaded and goes for the second level of validation.
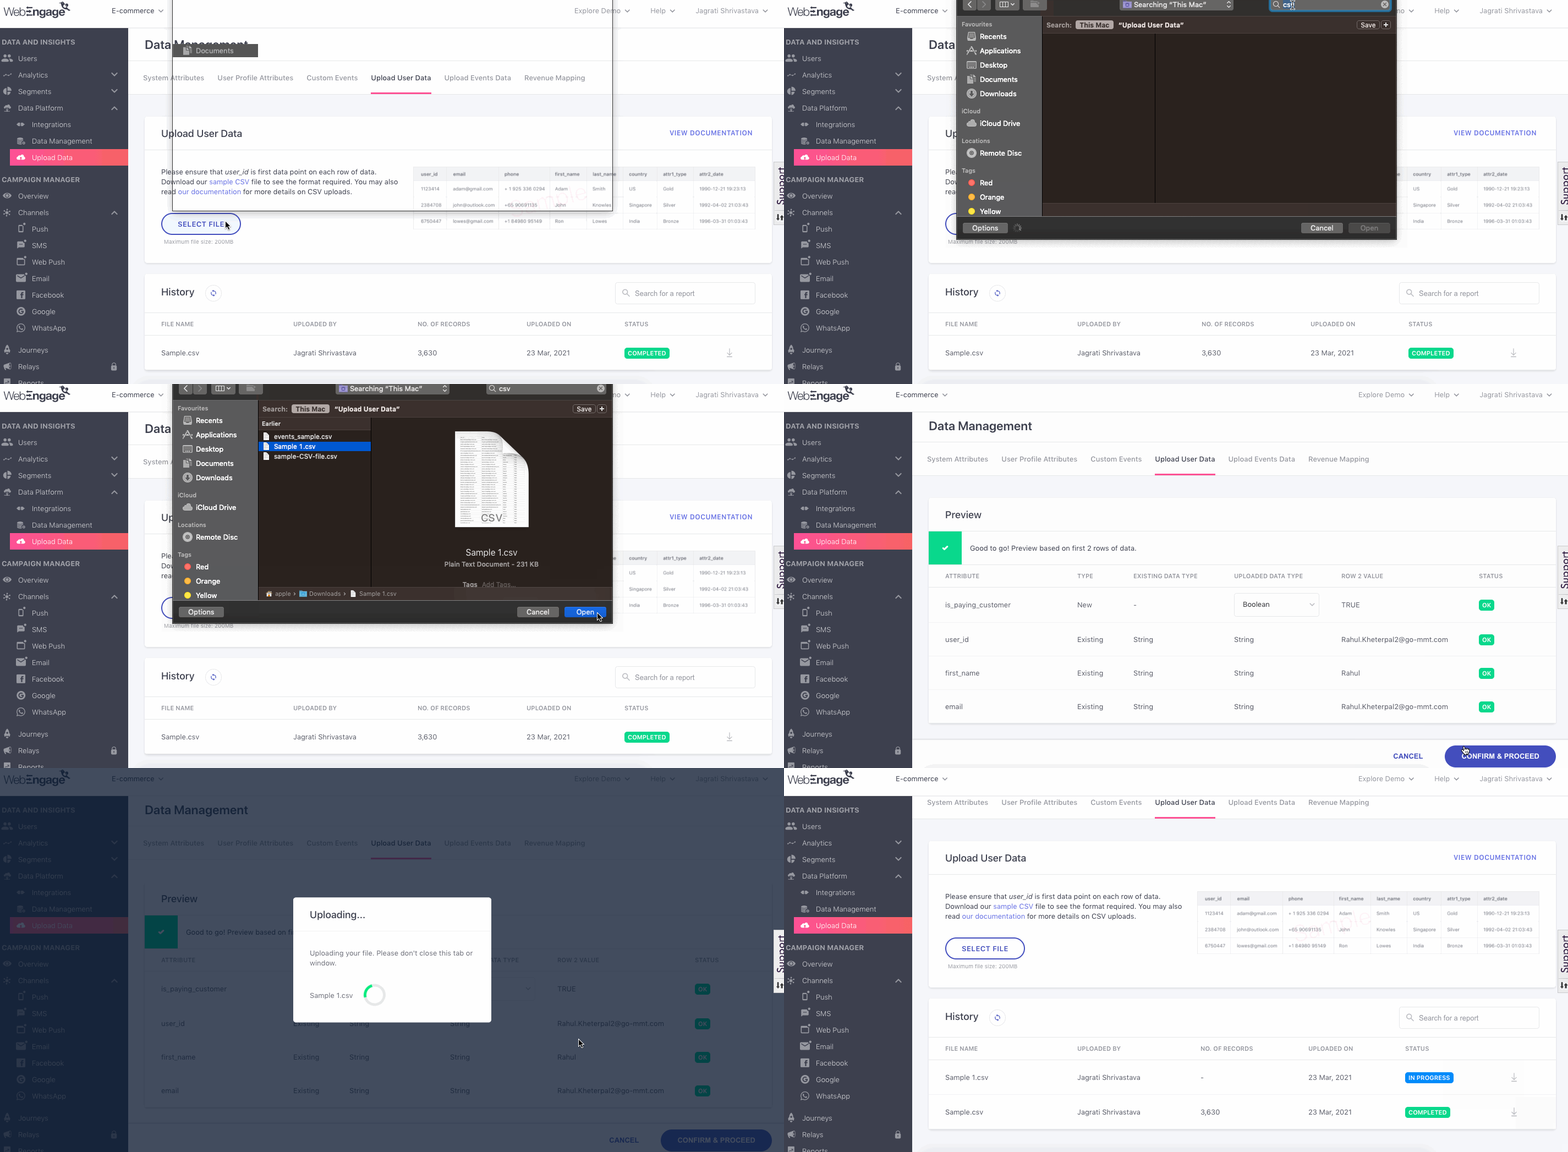
Click to enlarge
Second Level of Validation
In the second level of validation, WebEngage will go through each row of data to ensure that the conditions mentioned under Events are met.
You can see the status of the second level of validation under the subsection called History.
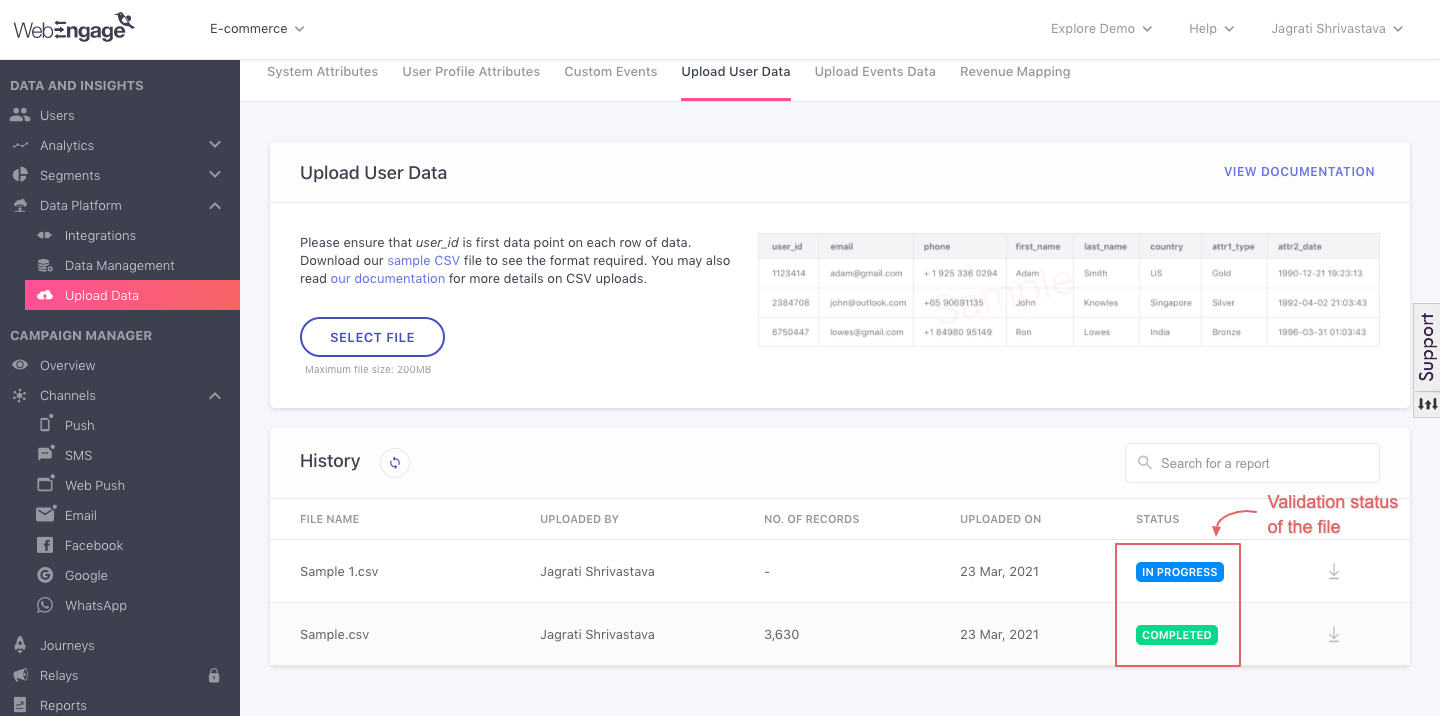
Click to enlarge
Status of Second Level of Data Validation
Under History, the second-last column denotes the status of the second level of validation. It can be one of the following:
-
In Progress: The second level of data validation might take a few minutes to a few hours, depending on the number of records in your CSV file. When the validation is in progress, the status will be In Progress.
-
Failure: If the second level of validation fails, then the status will show Failure. You can click the Fix link to understand why the upload failed. On the Fix page, you will be able to download a new CSV file. This new CSV file contains your original data-points appended with a data-point at the end that denotes the error on that row (if an error exists on that row). You can then correct the errors and upload the file again.
-
Success: If the second level of validation is successful, then your data is processed and will appear on WebEngage in a few minutes to a few hours, depending on the volume of data in your CSV file.
Step 3: View Your Uploaded Data (History)
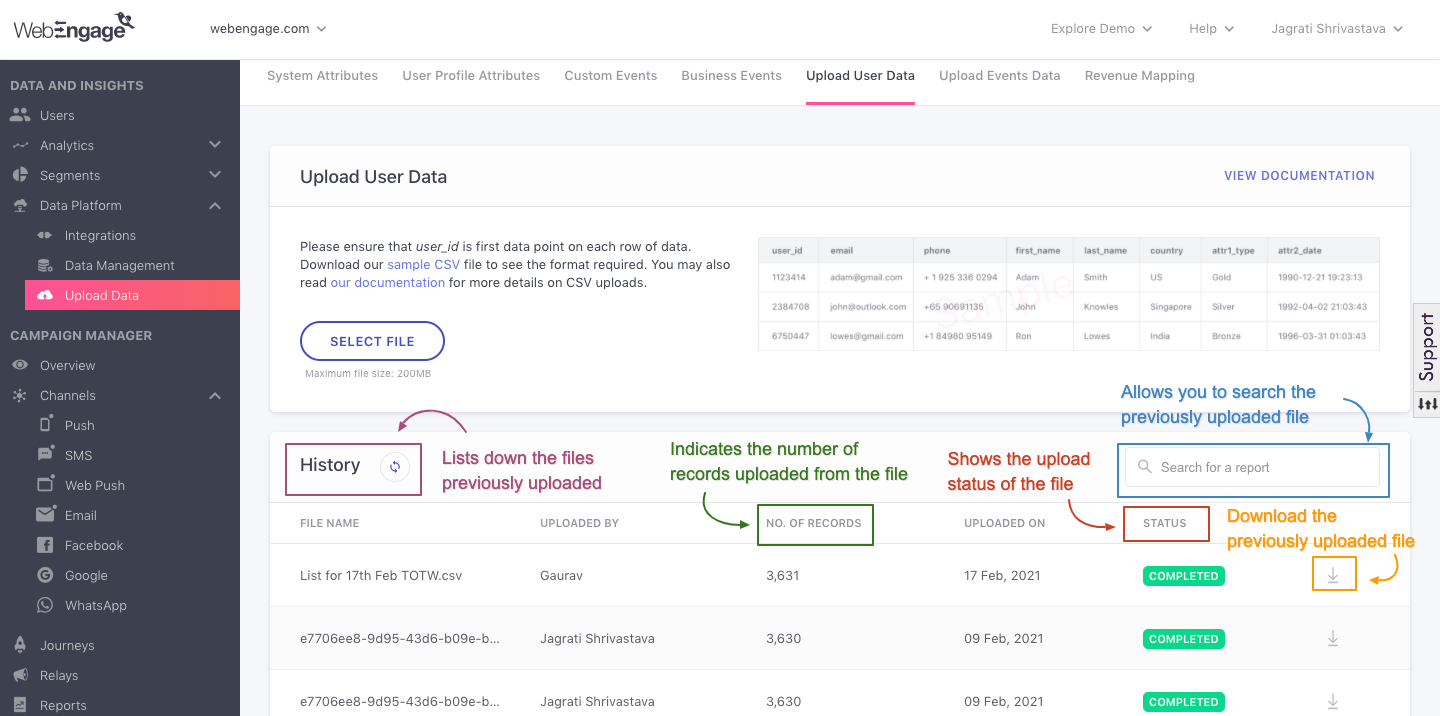
Click to enlarge
Once the second level of validation is successful, you will be able to view the data on your dashboard in a few minutes to a few hours, depending on the volume of data in your CSV file.
| Column Name | Description |
|---|---|
| File Name | Name of the file that has been previously uploaded. |
| Uploaded By | Name of the team member who uploaded the file. |
| Number of Records | The total number of rows in the CSV file. |
| Uploaded On | The date when the file upload was initiated. It can be different from the Completion Date. |
| Search Bar | If you want to search for a previously uploaded file, you can search by entering the filename into the search bar. |
| Download Symbol | Let's you download the CSV file that was uploaded. |
Status
The Status in the History section helps you understand the status of the document that has been uploaded. Broadly there can be three different status of the document:
In Progress: Shows the progress of the upload completion. Given the size of the file, the upload time can vary.
Completed: This shows that the file upload was completed successfully.
Failed: This shows that the file upload failed. You can see the details of the failure by clicking on it. You can re-upload the file after fixing the error(s) if any.
We hope this has enabled you to understand the process of uploading User Data. Please feel free to drop in a few lines at [email protected] if you have any queries or feedback. We're always just an email away!
Updated 3 months ago