Accessing and Understanding App In-line Campaigns
User-friendly guide on how to access App In-line campaigns and understanding the campaigns
How to Access
Let's quickly show you how you can access campaign analysis through the various sections of your dashboard:
Access Campaign Overview through List of Campaigns
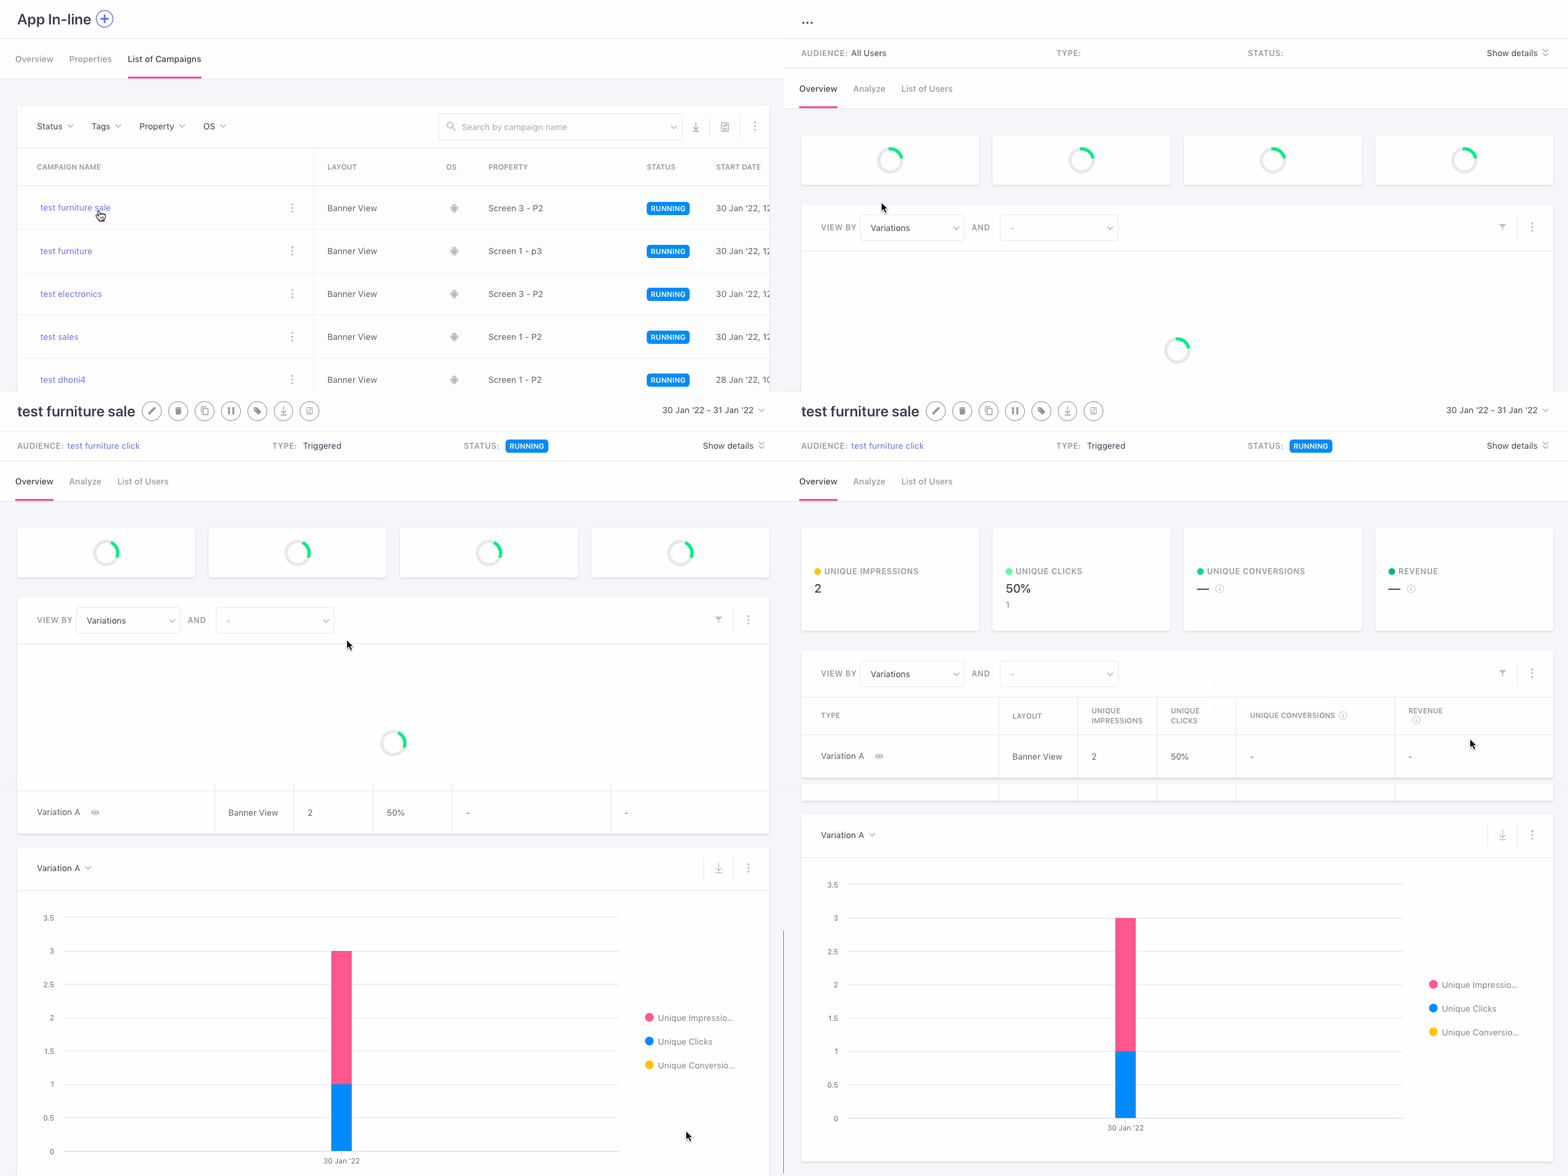
A list of all the campaigns created through the channel can be found under the List of Campaigns or the central hub of App In-line. As shown below, you can click on the (hyperlinked) Campaign’s Name to analyze a campaign in further detail.
Click to enlarge
Understanding Top Panel

Click to enlarge
Now, let's get you acquainted with its features:
Campaign Name
Shows the name of the campaign as defined while creating it.
Audience
Indicates the segment targeted by the campaign while creating the campaign. You can click the (hyperlinked) segment's name to analyze its users and rules of segmentation.
Status
Indicates the current status of the campaign, as per the settings specified while creating it.
If you save a campaign without launching it, then it will be saved as a draft. The same is reflected by the status, Draft.
Type
Given the highly targeted nature of App In-line, all campaigns created through the channel are considered to be Triggered campaigns by default.
Modify Campaign
As shown below, using the icons placed next to the Campaign's Name, you can choose to Edit, Delete, Duplicate, Pause/Resume and Tag the campaign, as per your marketing needs.

Click to enlarge
Once you Pause a Running campaign, you can choose to Resume its delivery to the target audience by clicking the Resume icon, as highlighted above.
Download a Report
Please NoteReports can be scheduled only by team members who have Admin, Manager, or Custom role that allows Update Data Management. If you are unable to do so, then please get in touch with the account owner.
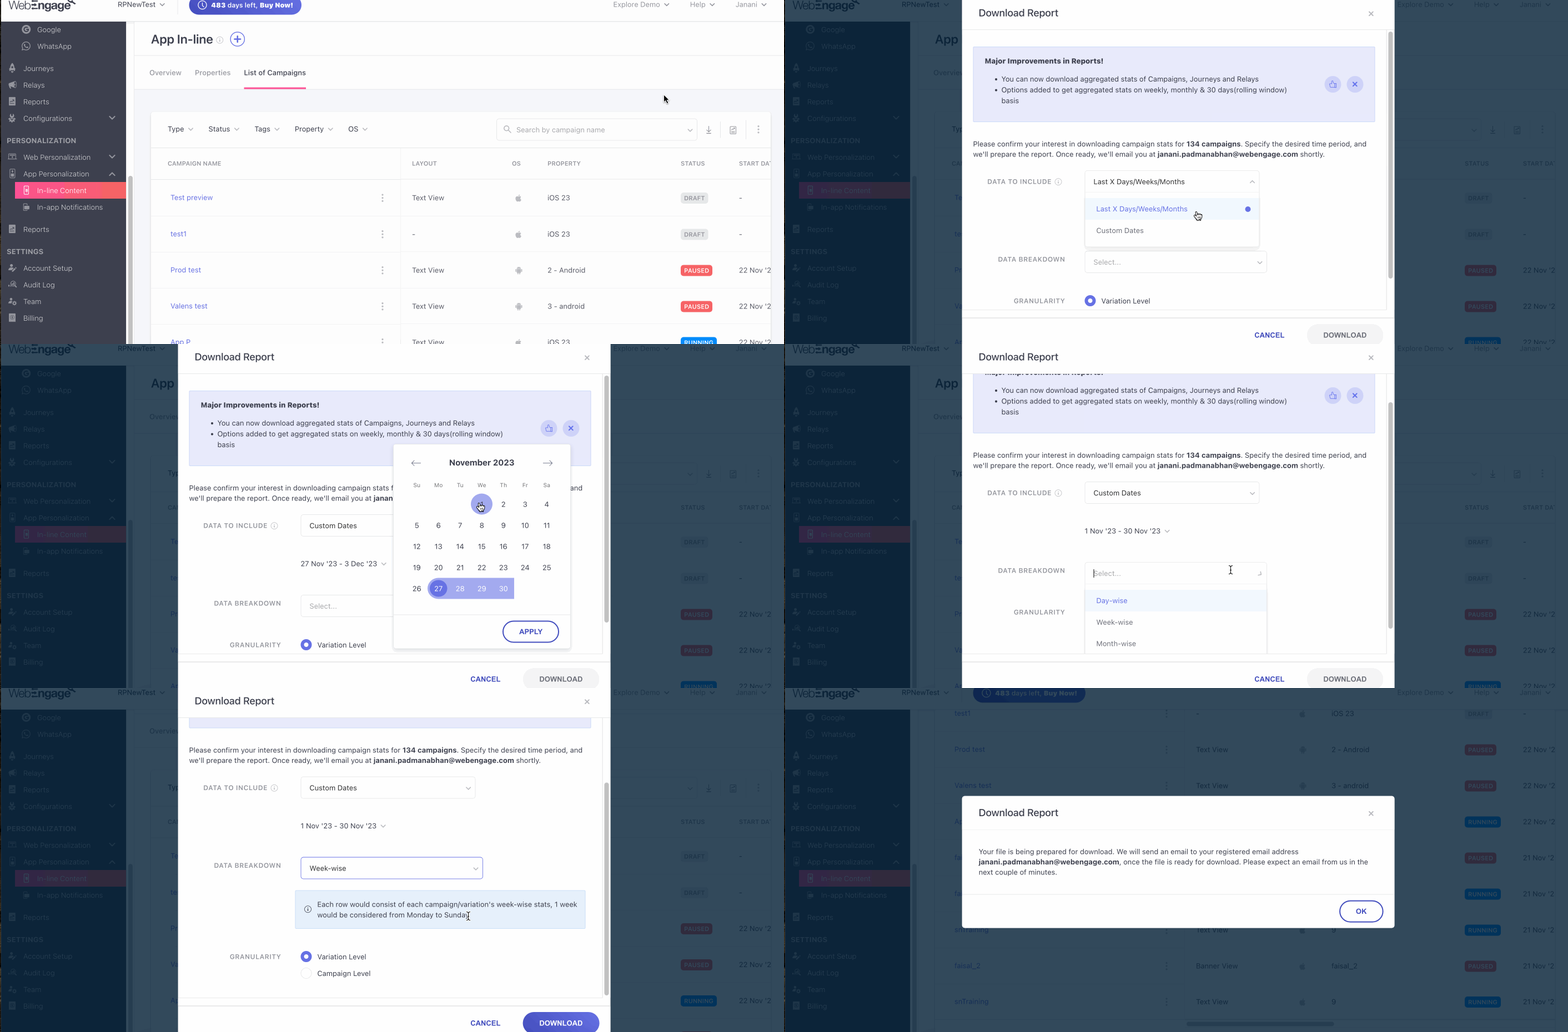
Here's how you can download a copy of campaign stats for offline analysis, upload it to another platform, and so on:
Click to enlarge
Step 1: Click the Download icon
As shown above, in doing so, you will be prompted to specify the kind of data you want to analyze.
Step 2: Specify the time frame for analysis
You can specify the time frame as:
- Campaign's Start Date till Present Date
- Custom Dates
Step 3: Select Data Breakdown
In this dropdown you can choose from 4 options i.e. _Day-wise, Week-wise, Month-wise, and 30 days rolling window. _Each of these have been explained below.
- Day-wise: When you choose the day-wise option the report that will be sent to you will have an aggregate of each day i.e. each row will consist of each campaign or variations day wise statistics.
For example, if you want to download a report for the last 7 days, by choosing the day wise data breakdown option, you will receive a report with 7 rows each containing data for each of the days. - Week-wise: When you choose this option the report will consist of the aggregate of each week, i.e. Every row will contain the week-wise statistics for each campaign or variation, with each week defined from Monday to Sunday.
For instance, if you download a report for the past 1 month on the 30 Nov ’23 , and set the data breakdown option to week-wise, then you will receive a report that consists of 5 rows of aggregated data for each week starting from Monday to Sunday. Whereas, if a month starts during the middle of the week, for example the 1st of the month is on a Thursday, then the row for the first week will be from Thursday to Sunday. - Month-wise: On choosing this option your statistics will be aggregated for each month i.e. each row will consist of month wise statistics. (calendar month will be considered)
If you wish to download a report spanning from January 1st to November 30th and select the month-wise data breakdown option, you will receive 11 rows. Each row will contain aggregated data for each respective month, providing a comprehensive breakdown of information (based on calendar month). - 30 day (Rolling window): On choosing this option, your statistics will be aggregated based on every 30 days irrespective of the calendar month, i.e. Every row will include the rolling window statistics for each campaign or variation for up to 30 days.
For example, if you choose a date range from 15th June to 14th August, two rows will be generated i.e. 15th June to 14th July and 15th July to 14th August.
Step 4: Specify Level of Data Granularity
You can create up to 5 versions of a campaign and test each one to determine the copy that resonates with your audience. Thus, while downloading a report, you can choose to analyze consolidated campaign stats OR a variation-wise breakdown.
As shown above:
-
Select Campaign Level Granularity to view the average performance of all campaign variations.
-
Select Variation Level Granularity to view the individual performance of each variation and identify the top-performing version.
Step 5: Click Download
Schedule a Report
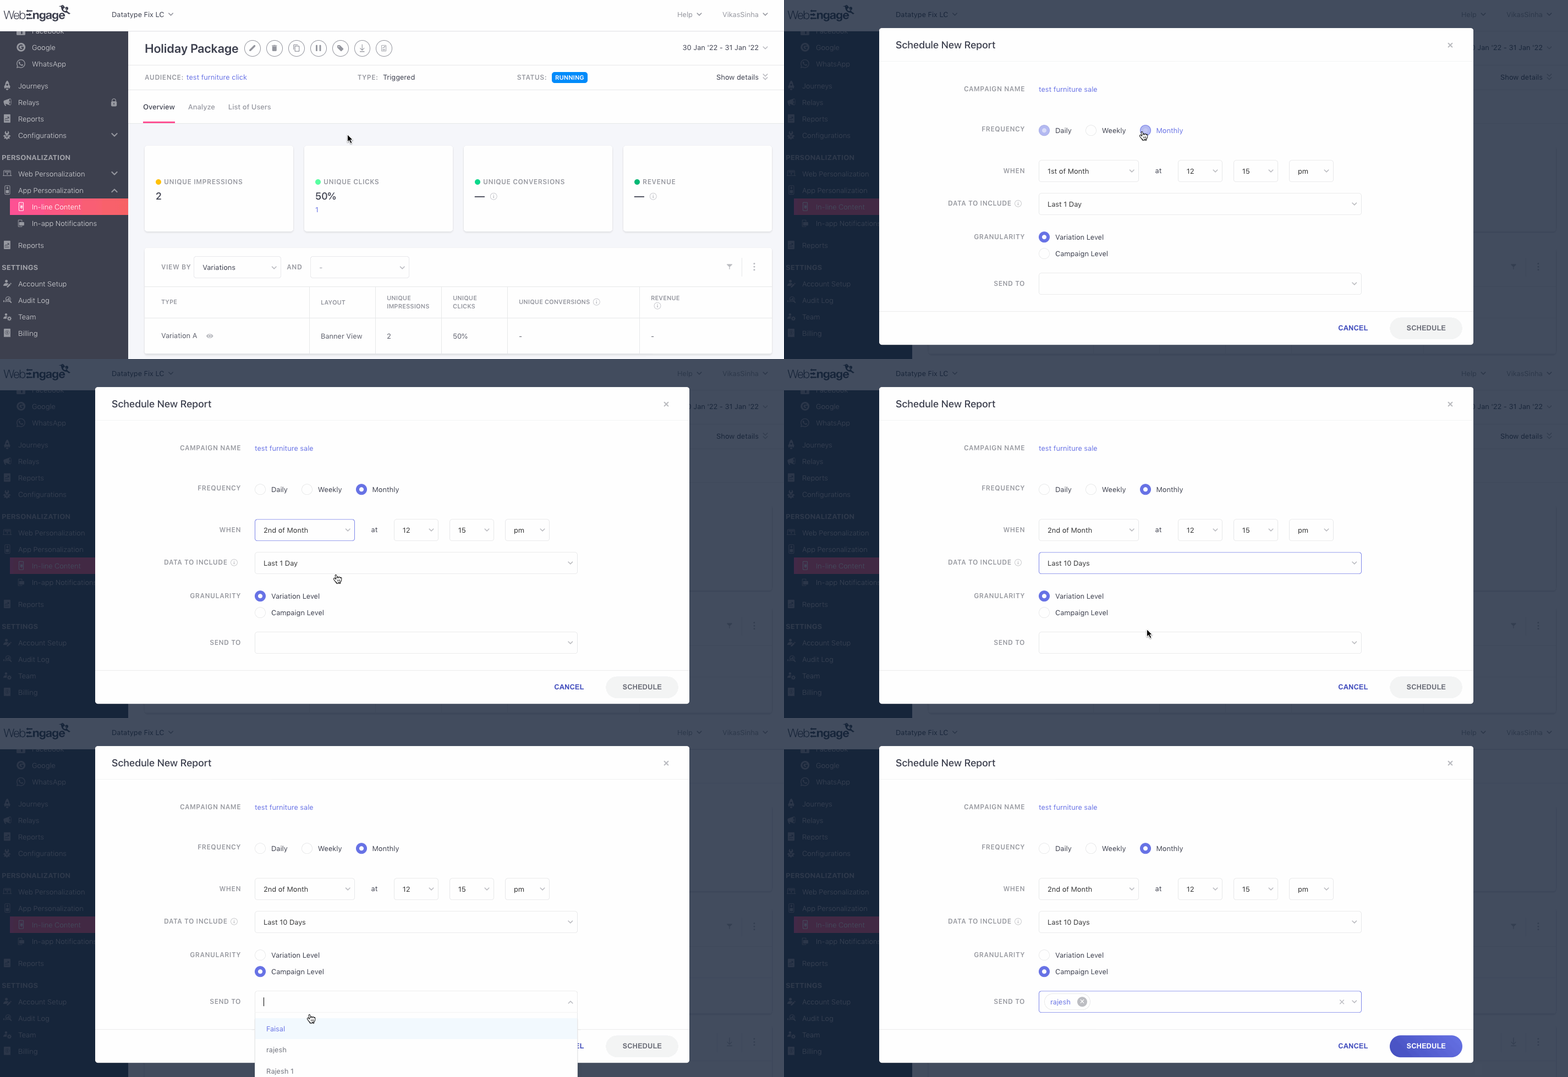
In our quest to make campaign reporting a seamless experience, we built Scheduled Reports - customizable and automated reports delivered straight to your inbox! You can set up a periodic report to have all the stats shown here, emailed to multiple team members.
Here's how you can go about it:
Click to enlarge
Step 1: Click the Reporting icon
- As shown above, you will be prompted to customize the report's settings in doing so.
- The report's name will be the same as the campaign's name.
Step 2: Define the Frequency of report delivery
You can choose to have a report delivered on a Daily, Weekly, or Monthly basis, as per your needs.
Step 3: Specify the time of delivery (When)
As shown above, you can choose to have the report delivered at a specific time of the day. The same can be defined in an AM/PM format against the field, When.
Step 4: Specify the time frame (Data to Include)
Kindly specify the time frame (number of days) for which you'd like to receive campaign stats. You can select a time frame between Last 1 Day to Last 30 Days against Data to Include.
Step 5: Select option for Data Breakdown
In this dropdown you can choose from 4 options i.e. Day-wise, Week-wise, Month-wise, and 30 days rolling window. Each of these have been explained below.
- Day-wise: When you choose the day-wise option the report that will be sent to you will have an aggregate of each day i.e. each row will consist of each campaign or variations day wise statistics.
- Week-wise: When you choose this option the report will consist of the aggregate of each week, i.e. Every row will contain the week-wise statistics for each campaign or variation, with each week defined from Monday to Sunday.
- Month-wise: On choosing this option your statistics will be aggregated for each month i.e. each row will consist of month wise statistics. (calendar month will be considered).
- 30 day (Rolling window):On choosing this option, your statistics will be aggregated based on every 30 days irrespective of the calendar month, i.e. Every row will include the rolling window statistics for each campaign or variation for up to 30 days. For example, if you choose a date range from June 15th to August 14th, two rows will be generated i.e. June 15th to July 14th and July 15th to August 14th.
Step 6: Select Level of Data Granularity
-
Select Campaign Level Granularity to view the average performance of all campaign variations.
-
Select Variation Level Granularity to view the individual performance of each variation and identify the top-performing version.
Step 7: Add team members as Subscribers
You can choose from a list of all the team members who have access to your WebEngage dashboard. Doing so will ensure that all the added users receive the campaign performance report, as per its settings. If the user is not a team member then you can add them as a team member and allot them a role.
Step 8: Click the Schedule button
-
A notification will pop up on the bottom right corner of the page, confirming that the report is scheduled.
-
You can modify or delete the report anytime you like through the Scheduled Reports section, nested under Settings in your account.
Please Note
Reports can be scheduled only by team members who have Admin, Manager, or Custom role that allows Update Data Management. If you are unable to do so, then please get in touch with the account owner.
You can schedule additional reports for campaigns sent through App In-line and all channels combined through Settings > Scheduled Reports in your dashboard.
Campaign Details
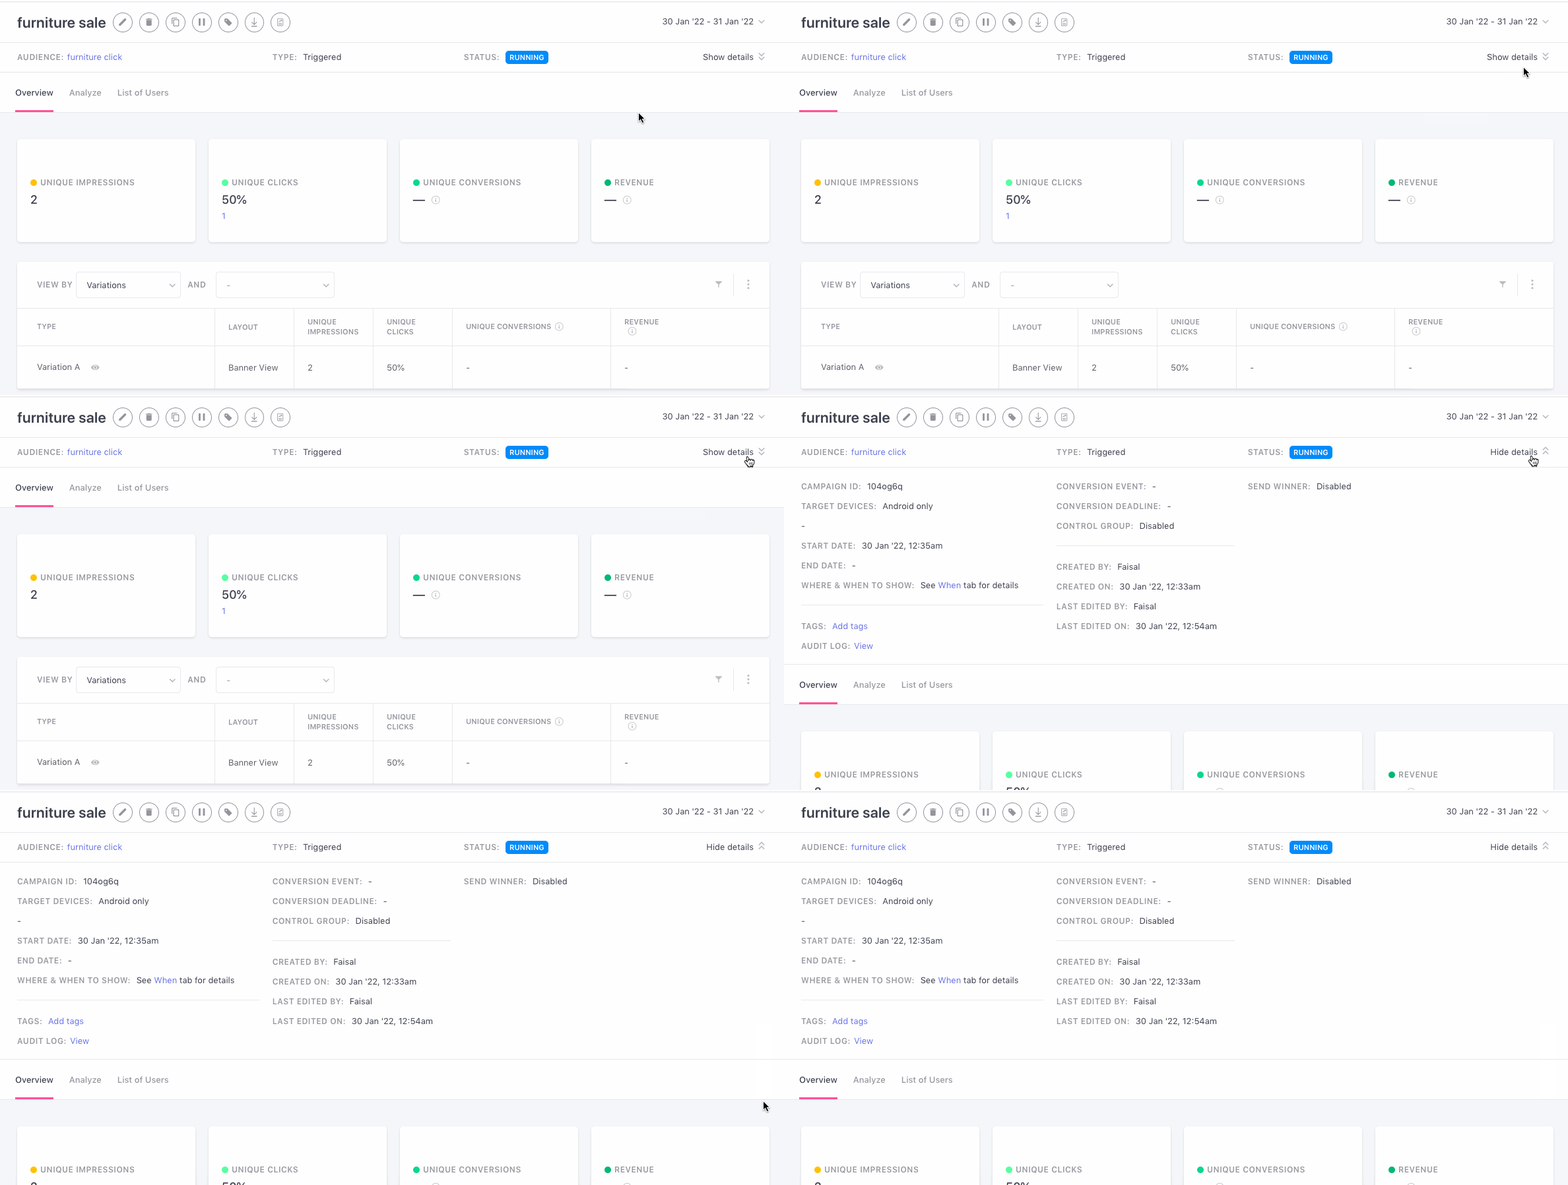
As demonstrated below, clicking Show Details reveals a thorough recap of all the rules and settings specified while creating the campaign. This section can be minimized by clicking Hide Details.
Click to enlarge
Here's a list of all the details shown here:
Campaign ID:A unique campaign ID is generated by us each time you create a campaign.
Start Date / Send Date: Indicates the date-time on which the campaign was launched or will be launched (if the campaign is still scheduled), as specified while creating it.
End Date: Indicates the date-time on which the campaign will end or cease getting delivered.
- Applicable only to Triggered campaigns, an End Date can be specified while creating it.
Time zone: Applicable only to One-time campaigns indicates whether the campaign was sent in the user's timezone or in your project's timezone, specified while creating the campaign.
Tags: Tag is a handy feature that helps you categorize your campaigns as per their purpose, target audience, frequency, or any other parameter that makes them easier to search.
-
If a campaign is tagged: All the tags added to the campaign will be shown here. You can click on a hyperlinked tag to add more tags to the campaign or remove existing ones.
-
If no tags have been added: As shown below, you can click on Add Tags to create new labels for the campaign and add existing ones to it.
Audit Logs: Click View to access a history of all your account admins' interactions with the campaign. Each action, including campaign creation, message edits, and changes to its settings, is recorded here.
Conversion Event: Indicates the action users are expected to perform on your app after receiving the campaign, as specified while creating it.
- If you have not set up Conversion Tracking for the campaign or the journey it's attached to, the same will be indicated by the status Disabled, here.
Conversion Deadline: Indicates the duration till which we will track the campaign's Conversion Event after it's delivered as specified while creating the campaign.
- If you have not set up Conversion Tracking for the campaign or the journey it's attached to, the same will be indicated by the status Disabled, here.
Control Group: Indicates whether or not a Control Group was set up to measure the campaign's effectiveness against organic user behavior. The same is indicated by:
- Enabled
- Disabled
Send Winner: Indicates whether automated Variation testing was configured for the campaign while creating it. The same is indicated by:
- Enabled
- Disabled
- If Send Winner is enabled, then the following details will help you out with a quick recap of the rules of testing:
- Size: Indicates the size of the test audience with which all the Variations of the campaign will be tested to determine a winning variant.
- Time to Test: Indicates the duration for which we will test all the campaign Variations.
- Win Criteria: Indicates the parameter (Impressions, Clicks, Conversions) based on which a winning Variation will be determined.
Created By: Indicates the name of the user who created the campaign.
Created On: Indicates the date-time on which the user started creating the campaign.
Last Edited By: Indicates the user's name who has made the most recent edit to the campaign.
Last Edited On: Indicates the date-time on which the most recent edit was made to the campaign.
Select the Time Frame of Analysis
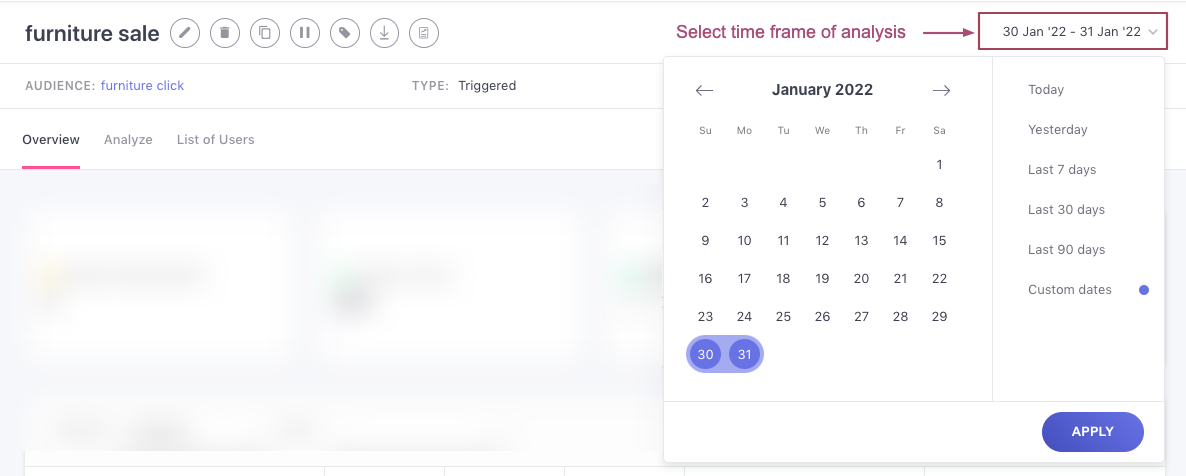
By default, all stats under Overview and Analyze are shown from the campaign's Start Date till the present day (if the campaign is Running) or till up to 45 Days from the campaign's End Date (if the campaign has ended).
Click to enlarge
As highlighted above, you can analyze the campaign's performance for a custom time frame using the date range filter.
The following durations can be selected here:
Today
Yesterday
Last 30 Days
Last 60 Days
Last 90 Days
Custom Dates (as selected by you)
Updated 3 months ago