Control Groups
A beginner's guide to analyzing campaign performance against a control group it’s types and why it's important
What is a Control Group?
A Control Group is a small portion of a campaign's target audience that is randomly selected, represents the behavior and preferences of the entire segment, and does not receive the campaign.
By excluding the Control Group from receiving the campaign, we can compare the campaign's outcome against the organic behavior of Control Group users. This makes for the perfect benchmark to assess the real impact of the campaign on influencing user behavior.
Yes, not sending the campaign to a few users may seem odd at first.
But, by not testing your campaigns with a Control Group, you make very risky assumptions like:
-
Sending campaigns can only lead to higher engagement and conversions.
-
Users must be engaged with appropriate campaigns continuously throughout their lifecycle to retain them.
Types of Control Groups
Control groups are of mainly of 3 types, i.e. Campaign Level CG, Universal CG, and Custom CG. Each of which have been explained below.
-
Campaign level CG: A campaign control group is a control group created from a targeted segment in a specific campaign. These are chosen at random, and users assigned to the control group in one campaign may not be assigned to the control group in another (even if the target segment selected is same).
-
Universal CG: Unlike Campaign control group, UCG is created on your entire user base (and not based on any particular segment). Users once assigned to UCG will be excluded from receiving any campaigns even if they are part of targeted segment . UCG allows you to keep a percentage of your user base from not being targeted for any campaign at all times, as well as helps to measure the incremental impact of your overall campaigns.
-
Custom CG: Similar to universal control group, Custom control group is also created on your entire user base but its created for custom use cases for e.g. Diwali sale campaign. These control groups are usually for shorter durations.
Why Your Campaigns Need to be Tested with a Control Group
Measuring the impression rate, click rate, conversion rate, and revenue of a campaign is a great way to understand how users are engaging with it. But these metrics help you analyze only one side of the story.
Let's go back to the basics of user engagement to gain some context on the complete story:
Engagement is an ongoing process throughout a user’s lifecycle and continues long after they have made a purchase. An ideal engagement strategy is one that builds trust, motivating users to continue their transactions over a long period of time and eventually become advocates of your brand, product or service.
However, identifying the exact moments in which engaging your users can help you drive the desired outcome is a tricky affair. A combination of various factors like the time, message, channel, the user's perceptions, and preferences can, more often than not, cause campaigns to have a negative impact.
Let's help you understand this with a short use-case.
Use-case: Motivating Gaming App Users to Play a Game At Least Once a DayLet's take the example of a gaming app that incentivizes user engagement with gifts (cards/reward points), credited to a user's account twice a day. Each time a bonus is credited, users are notified with a Push Notification.
End Goal: Motivating users to play a game at least once a day.
Marketers of the app tested two Variations of the Push Notification to identify the right messaging. At the end of the A/B test, they found:
2.2% of users who received Variation A, played a game at least once a day.
1.8% of users who received Variation B, played a game at least once a day.
Clearly, Variation A is the winner, and marketers of the app should continue sending it to all users.
But, what if we told you that 3.4% of users who received neither campaign played a game at least once in a day? This insight makes it evident that they should cease sending a Push Notification each time a gift is credited.
The use-case is a classic example of how most marketers assume that sending a campaign can only help drive engagement, retention, and conversion rates - not deter it.
Although most campaigns do have a positive impact on driving user engagement and conversions, there is always a possibility that certain moments in a user's lifecycle are best left to the user's organic will. Thus, having a Control Group helps you avoid situations where you are unknowingly damaging your relationship with your users.
We recommend that you enableControl Group for testing the following type of campaigns:
-
Promotional campaigns that prompt users to make a purchase, subscribe or renew an existing subscription by extending offers and discounts.
-
Campaigns aimed at driving a certain behavior on your app/website like trying a new feature, adopting a new service, changing the way they currently access certain sections of your app/website.
A few exceptions for Control Group testing:
-
Campaigns that convey urgent messages like upcoming events, recurring payments, monetary transactions and so on.
-
If the campaign's target audience includes less than 1,000 users, then it's resulting Control Group may not accurately represent the entire group, leading to skewed insights.
How Big Should a Control Group Be?
The biggest advantage of testing a campaign with a Control Group is that it accurately help you understand how the target audience would behave if they don’t receive the message. Thus, a Control Group's size depends on the strength of the target audience and needs to be large enough to effectively represent the entire group.
For example, if a campaign's target audience includes just 100 users, then a Control Group of 5% would mean that only 5 users will be added to it, diminishing the significance of the results. Hence, in this case, a Control Group of 30% - 40% users will help us gain viable insights.
Conversely, if the target segment includes millions of users, then a Control Group of 3% - 5% should be sufficient in helping us gauge the true impact of the campaign.
Despite the various benefits of Control Groups, most marketers are hesitant to use them as it would mean that a certain percentage of users will not receive the campaign. True, but the opportunity cost of not engaging a few users is far smaller than the risk of damaging your relationship with the entire audience!
Hence, we suggest that you start testing your campaigns with a Control Group of 10% users and work up or down the percentage value, as you see fit.
Fact CheckThe smaller the size of your target audience, the larger the percentage size of the Control Group needs to be, to ensure that it effectively represents the entire group.
Now that you have a robust understanding of how Control Groups can help you gauge the true impact of your campaigns, let's deep dive into how it works in your WebEngage dashboard.
How It Works
Must ReadPlease ensure that you have a robust understanding of how Conversion Tracking and Variation Testing work in your dashboard before proceeding. These concepts play an important role in understanding how you can leverage Control Groups to identify the true impact of your campaigns and journeys.
By default, Control Group is disabled for all campaigns and journey throughout the creation process.
Adding Control Group to a Campaign

Click to enlarge
You can enable Control Group for a campaign while setting up Conversion Tracking for it at Step 4: Conversion Tracking as shown above. This can be done for all Push, In-app, SMS, Web Push & Email campaigns created through your dashboard.
Adding Control Group to a Journey

Click to enlarge
As shown above, you can enable Control Group for a journey while setting up Conversion Tracking for it. In doing so, the Control Group will be applied to all the journey campaigns. This means that the specified share of users will exit the journey without receiving any campaigns, helping you draw a fair comparison.
How Campaign's Conversions are Tested Against Control Group's Behavior
Depending on your Variation testing settings, the campaign will be tested against the Control Group in either of the following ways:
1. When Send Winning Variation Automatically is Enabled
If you choose to enable Send Winning Variation Automatically while creating the campaign/journey, then the message Variation(s) and Control Group will automatically be equally distributed amongst the campaign's Test Audience..

Click to enlarge
-
The performance of the Variation(s) will be tested against the Unique Conversions achieved by the Control Group throughout the Test Time (depending on the type of campaign, this duration may).
-
If the Control Group achieves a higher Unique Conversion rate within the Test Time then it will be determined as the winner. As a result, the campaign will not be sent to its target audience.
2. When Variation Distribution is Set Manually
If you are unable to configure Send Winning Variation Automatically due to the small size of the campaign's or journey's target audience (less than 2,000 users), then you can choose to test the Variation(s) and Control Group manually.
-
When testing manually, by default 5% of the entire target audience is considered as the Control Group.
-
You can choose to custom define the share of audience that should be added to the Control Group while setting up manual Variation Distribution for the campaign. For example, as shown below, we have distributed the Variations and Control Group equally amongst the entire target audience to ensure that a fair comparison is drawn between each.

Click to enlarge
How Conversions are Tracked for a Control Group
Just like the campaign, Conversions for a Control Group are also tracked only till the Conversion Deadline specified for the campaign's Conversion Event.
-
This helps ensure that you are able to draw a fair comparison between the users who perform the campaign's/journey's Conversion Event after receiving the campaign, and users who choose to perform the Conversion Event organically, as a part of the Control Group.
-
The extent to which a campaign influences its target audience to perform the desired action (Conversion Event), compared to the organic user behavior, can be measured through its Conversion Uplift.
Conversion Uplift
Lift analysis is the most scientific way to quantify the degree to which a campaign is successful in motivating users to perform the desired action. Measured against the organic conversions achieved by control group users, Conversion Uplift indicates the percentage increase or decrease in the conversion achieved by the campaign.
Fact CheckConversion Uplift equals [(Unique Conversion Rate of Campaign/ Unique Conversion Rate of CG) x 100]- 100
Thus, lift analysis helps you identify and pause the low performing campaigns and double-down on the campaigns that help enhance your user's organic behavior, not deter it.
Conversion Uplift is calculated for both, the Total Conversion Rate and the Unique Conversion Rate of a campaign's Variation and the overall Unique Conversion Rate of the campaign. The same can be analyzed through the Campaign's Overview in your dashboard.
Let's help you understand this better with a short use-case:
How Conversion Uplift Helped a Travel App Identify a Campaign That Hindered Organic User BehaviorLet's take the example of a travel app that enables its users to book flight tickets. Recently, they launched Hotel Bookings as a new feature and in a bid to drive adoption, they decided to nudge active users with an In-app campaign.
About the campaign:
The In-app campaign was targeted at all the users who search for flights on their app, nudging them to book a hotel stay too at the travel destination.
However, since it was a new feature, they decided to test the campaign's performance against the organic behavior of their users by adding a control group to it.
Here's what their analysis looked like...

How to analyze Conversion Uplift under Campaign Overview
As shown above, lift analysis under the campaign's Overview revealed that:
-
The campaign achieved a negative conversion uplift of 26.43%!
- Control Group's Unique Conversion Rate: 73.91%
- Campaign's Unique Conversion Rate: 54.37%
-
This indicates that user who viewed the In-app Notification, nudging them to search for hotels, were put off by it and thus, performed the desired action 26.43% less than the organic search rate.
Takeaways:
Marketers of the travel app learned that most of their users did not appreciate being nudged to interact with the platform in a certain way. Hence, they stopped the campaign and allowed organic feature adoption, minimizing their chances of app uninstalls and unpleasant user experiences.
Related Reads
How to compare the Unique Conversion Rate acheived by a Push, In-app, SMS, Web Push, and Email campaign against the Control Group's Unique Conversion Rate through Conversion Uplift.
How to compare the conversions acheived by the Variations_of aPush, In-app, SMS, Web PushandEmail campaign against the_Control Group with Conversion Uplift.
Engaging Control Group Users if Campaign Achieves Higher Conversions
The most accurate way to gauge the effectiveness of a campaign is by comparing its ability to drive the desired user behavior, against organic behavior. This can easily be achieved by comparing the Campaign's and Control Group's conversions through Conversion Uplift.
If the uplift is negative (red): It indicates that the campaign hindered organic user behavior and should be ceased immediately!
If the uplift is positive (green): It indicates that the campaign played an important role in driving conversions.

Click to enlarge
So, if you are seeing a positive Conversion Uplift for a campaign, as highlighted above, then it's a good idea to send it to the Control Group users too. This can easily be done in 2 stages:
- Stage 1: Creating a Segment of the Campaign's Control Group users (step-by-step guide)
- Stage 2: Adding the Segment to the Campaign's Target Audience (step-by-step guide)
Here's how you can go about it:
Stage 1: Segmenting a Campaign's Control Group Users

Click to enlarge
As shown above:
Step 1: Click the Plus icon located on the top left of the main hub of Segments to begin.
Step 2: Name your campaign and go to the section, Behavioral.
Step 3: Under Behavioral, go to the section, Users who DID these events
Step 4: Click on the dropdown and depending on the campaign's channel, select any one of the following System Events:
- Push Notification Control Attempted
- In-app Control Attempted
- SMS Control Attempted
- Web Push Control Attempted
- Email Control Attempted
For example, in the above visual, we have selected Email Control Attempted as we'd like to segment the Control Group users of an Email campaign.
Step 5: Click Add Filter to specify the campaign, for which you'd like to segment the Control Group users.
Step 6: As shown above, click on the first dropdown and select Campaign ID as the filter.
Step 7: Select the logic, 'Equal to' and add the Campaign's ID.
- How to Identify a Campaign's ID: As shown below, you can easily track down a Campaign's ID by clicking Show Details in the Campaign's Overview section. This can be done for all the Push, In-app, SMS, Web Push & Email campaigns created through a channel or a journey.

Click to enlarge
Step 8: Next, head over the section, Users who DID NOT do these events to filter out all the users of the Control Group who have performed the campaign's Conversion Event.

Click to enlarge
Step 9: As shown above, click on the dropdown to select the Custom Event that has been specified as the campaign's Conversion Event.
- For example, we have selected Checkout - Completed.
- Next, if you had filtered the campaign's Conversion Event by adding Custom Attribute(s) while setting up Conversion Tracking, then please add the same filters to the Event selected here. Doing so will ensure that the segment includes only those users who have NOT PERFORMED the Event in the context of the specified attribute.
Step 10: Click Save to create the segment.
Detailed ReadStep-by-step Guide on Creating Segments in your WebEngage dashboard
Stage 2: Adding the Segment of Control Group Users to Campaign's Target Audience
Please NoteThis is applicable only to Triggered and Recurring campaigns that are currently Running. If you'd like to engage the Control Group users of a One-time campaign, then you will need to create a new campaign from scratch.
Now that we've segmented Control Group users who have not performed the campaign's Conversion Event yet, it's time to engage them! Here's how you can go about it:

Click to enlarge
Step 1: Go to the campaign's Overview, for which you have segmented the Control Group users.
Step 2: As shown above, click on the Pencil icon to edit the campaign's settings. Doing so will take you to the campaign creation interface.
Step 3: As shown below, under Step 1: Audience, select the option, Send to users in multiple segments, against the field, Audience Type.
- In doing so, you will able to select multiple segments against the field, Send to.

Click to enlarge
Step 4: As shown above, select the condition, Send to users in ANY of these Segments, against the field, Send to. In doing so, your existing target audience settings will be refreshed.
Step 5: As shown above, click on the dropdown placed second from the field, Send to, to select a Segment. For example, we have selected the Segment, Control Group - Email Campaign. (detailed read on how you can segment control group users)
Step 6: As shown below, click the Add Segment button to add the original segment that was specified as the target audience while creating the campaign.

Click to enlarge
Step 7: Click the Save & Continue button to implement the change for all future runs of the campaign.
- Changes can be confirmed through the details indicated against the field, Send to, under Step 6: Preview & Launch, as shown above.
Thus, you will be able to engage all the Control Group users who have not performed the campaign's Conversion Event, in its upcoming run (if it's a Recurring campaign) or whenever the user performs the Trigger Event specified by you (if it's a Triggered campaign).
Removing Control Group if Running Campaign Achieves Higher Conversions
Please NoteApplicable only if you are manually testing the campaign. If Send Winning Variation Automatically is enabled, then we will automatically remove the Control Group if higher Conversions are recorded for the campaign by the end of the test.
If you are seeing a positiveConversion Uplift for an on-going Triggered, Recurring or Journey campaign, then we recommend that you edit it to remove the Control group. Doing so will ensure that all new users added to the target segment receive the message, as per the campaign's settings.
As highlighted below, an on-going campaign can be identified through the Campaign Status,Running, indicated under the respective Channel's List of Campaigns and the Campaign's Overview.

Click to enlarge
Here's how you can stopControl Group testing for the future runs of a campaign:
Step 1: Click on the campaign's name in the List of Campaigns to access it's Overview section, as shown below.

Click to enlarge
Step 2: As shown above, click the Pencil icon to edit the campaign. Doing so will direct you to the campaign creation interface.
Step 3: As shown below, go to Step 4: Conversion Tracking and click on the Control Group checkbox to deselect it.

Click to enlarge
Step 4: As shown above, click the Save & Continue button to implement the change for all future runs of the campaign.
- Changes can be confirmed through the status indicated against Control Group under Step 6: Preview & Launch, as shown above.
- However, do keep in mind that removing Control Group will not affect the existing campaign stats in any way. New user data will simply be reflected against the various performance indicators shown under the Campaign's Overview.
How Revenue and Order Uplift are tracked for a Control Group?
In addition to Conversion Uplift, you can also calculate the revenue increment through Revenue and Order Uplift.
Revenue and Order Uplift metrics are flagged featuresThe Revenue and Order Uplift Metrics feature is currently flag enabled. To activate it on your dashboard, please reach out to our support team at [email protected].
Where can I view this?
You can navigate to the campaign overview section, where you can scroll down to the Control Group Report section. This report is divided into three distinct sub-categories for a comprehensive analysis.
By default, you are presented with the Conversion Uplift category, offering insights into the effectiveness of your campaigns in driving conversions.
We have added two more metrics here i.e. Revenue and Order Uplift by simply selecting the respective tabs. These categories provide valuable data on the financial impact and order volume improvements attributed to your marketing efforts, enabling you to assess the overall performance and ROI of your campaigns more effectively.
How are these uplifts calculated?
There are various different formulas we have to calculate the Uplift.
Revenue Uplift
Revenue Uplift indicates the increase or decrease in revenue achieved by the campaign.
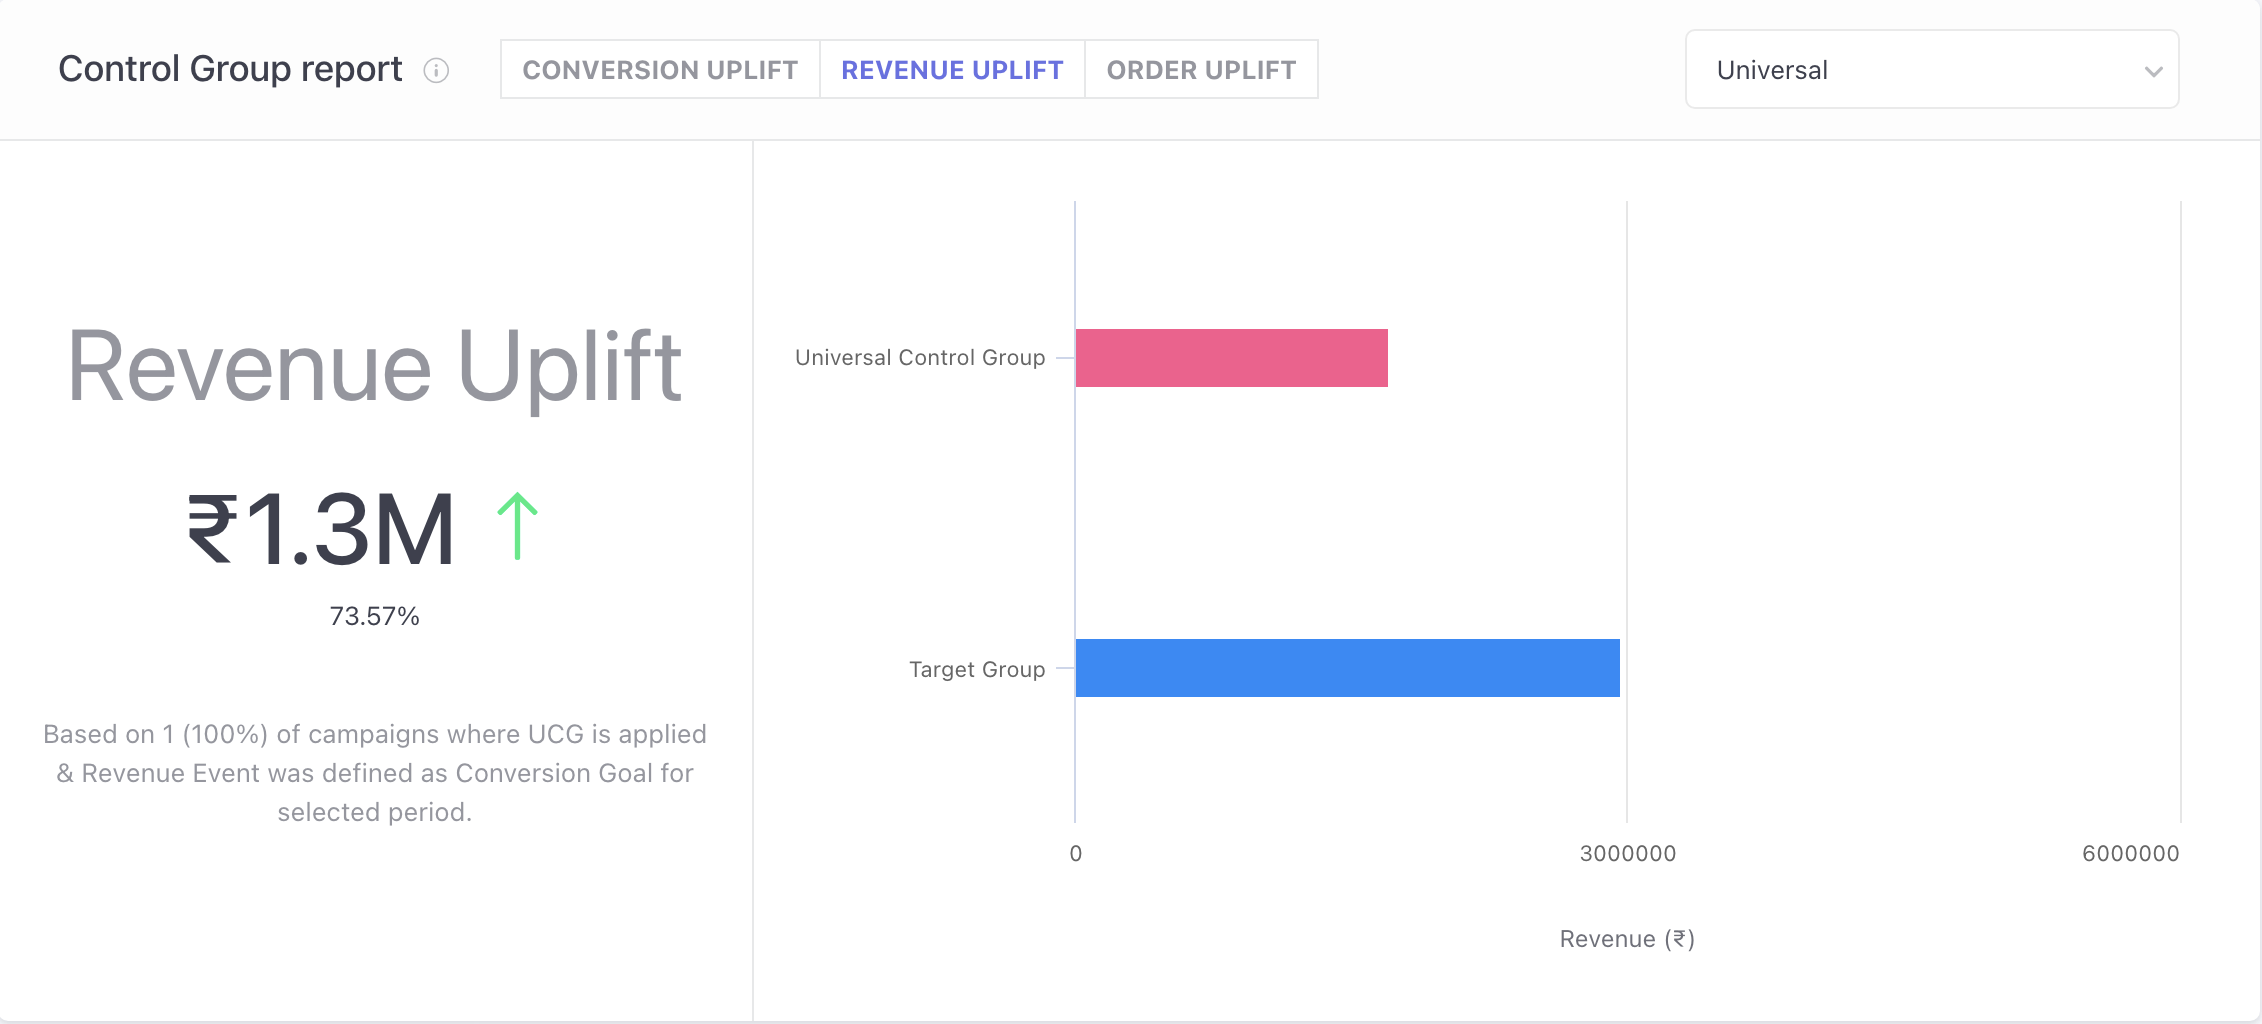
Formula to calculate Revenue Uplift :
- CG projected total revenue= CG(Total Revenue / Total Sent Count) X TG Total Sent Count
- Revenue Uplift (absolute value)= [TG Revenue - CG Revenue (Projected to TG Volume)]
- Revenue Uplift %= [TG Revenue / CG Revenue (Projected to TG Volume) X 100] - 100
Where CG is Control group, i.e. the set of users where the campaigns are not sent to; and TG is Targeted group, i.e. the other set of the users where the campaigns are sent to.
Order Uplift
Order Uplift indicates the increase or decrease in orders achieved by the campaign.
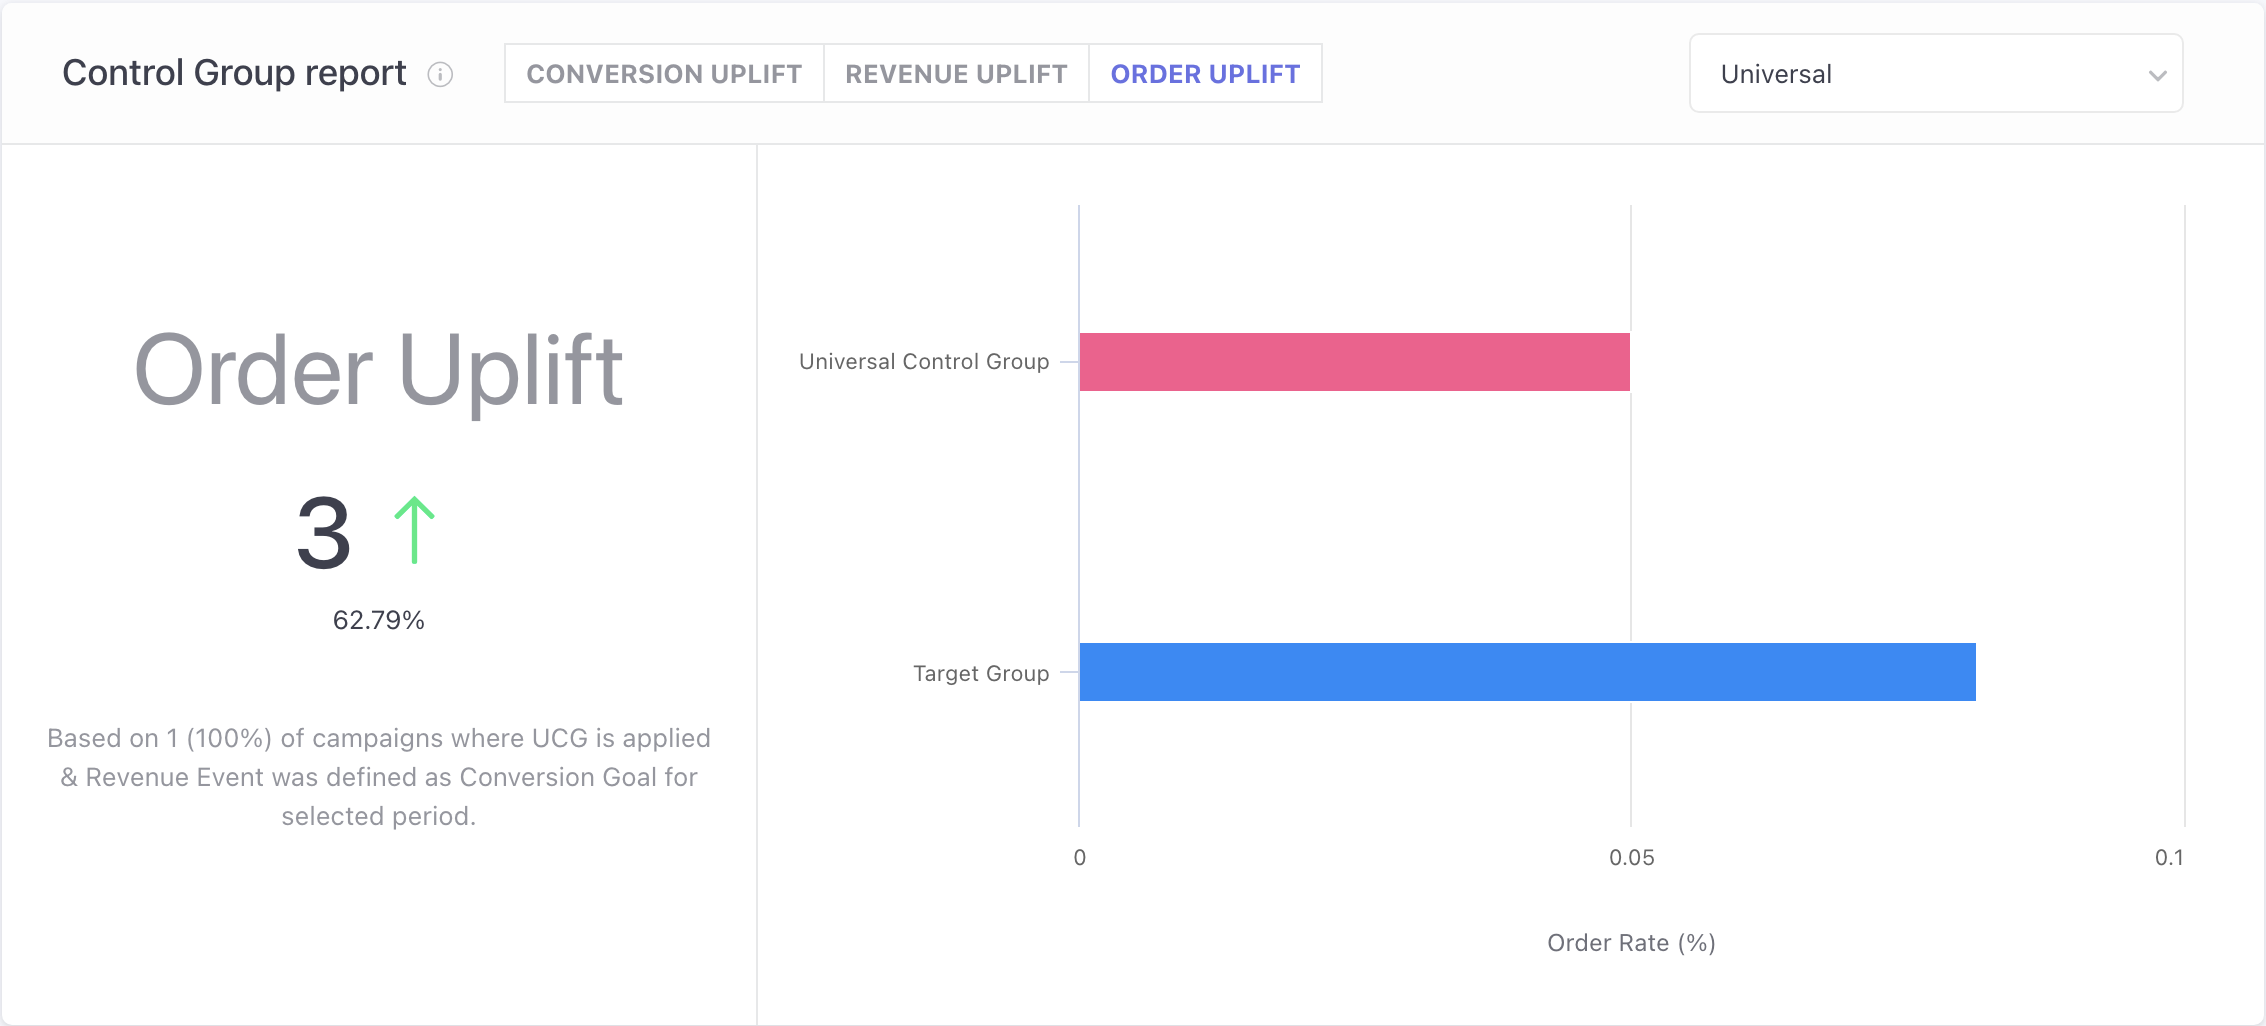
Formula to calculate Order Uplift:
- Order Uplift (absolute value)= (TG Order Rate - CG Order Rate) X TG Total Sent Count
- Order Uplift % = (TG Order Rate / CG Order Rate X 100) - 100
FAQ
- When is the Control Group (CG) defined during a journey?
Ans. The Control Group (CG) is defined when users encounter the first campaign block within the journey. Conversion tracking occurs at the journey level, not the campaign level. Users are classified into the Target Group (TG) or Control Group (CG) at this point and remain in the same group for the duration of the journey, including any re-entry.
- How does the Control Group (CG) distribution change with subsequent messages in the journey?
Ans. As users from the Target Group (TG) and Control Group (CG) exit the journey based on their actions, the distribution between TG and CG may change. Subsequent messages may have a different TG/CG spread depending on how many users have exited the journey.
- Does the size of the Control Group (CG) adjust during the journey to maintain a 50/50 split?
A: No, the size of the Control Group is maintained at the journey level. It does not adjust to maintain a 50/50 split as users exit the journey.
We hope this equips you with a robust understanding of how you can leverage Control Groups to measure the true ROI of all your campaigns and journeys. Please feel free to drop in a few lines at support (AT) webengage.com in case you have any further queries, we're always just an email away!
Updated 8 months ago