List of Campaigns
Understanding the central hub of In-app Notifications in your dashboard
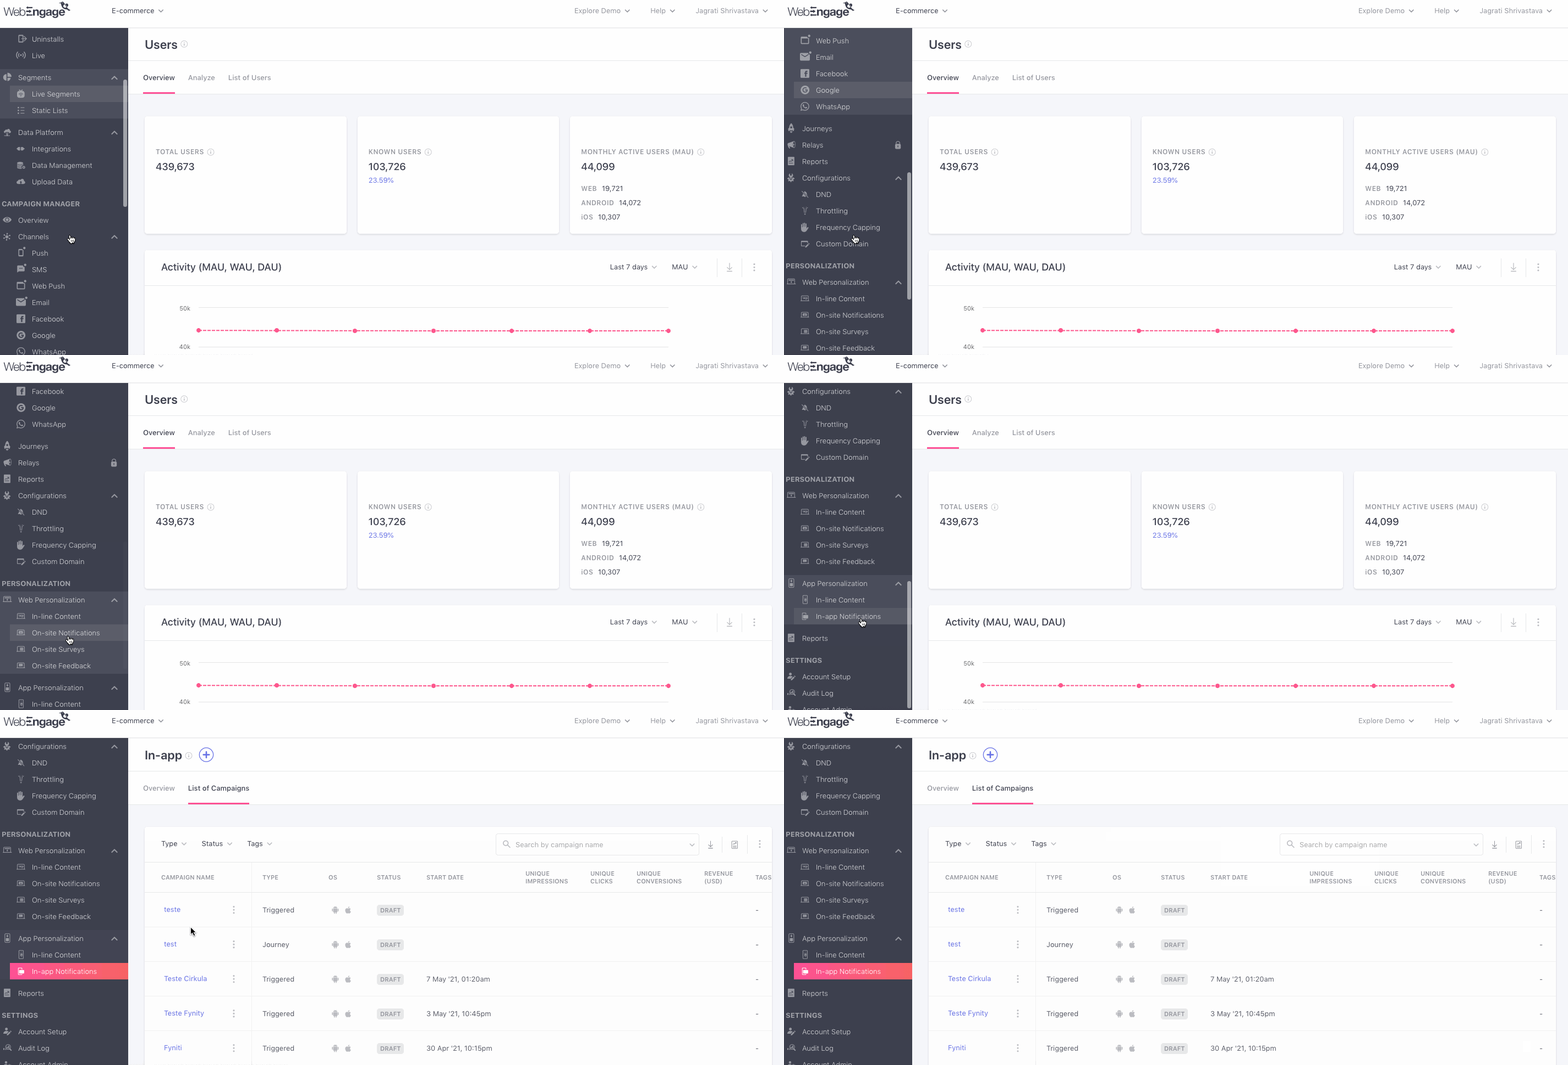
List of Campaigns is the first interface you'll experience when you select In-app from the navigation panel of your dashboard, as shown below. It's a central repository of all the In-app Campaigns created by you, making it easy for you to create, analyze and modify campaigns.
Click to enlarge
Analyzing List of Campaigns
This section presents a broad view of the performance of each In-app campaign against key indicators like Impressions, Clicks, Conversions and so on. Let's show you how you can customize the list to gain quick insights:
Step 1: Filter by Campaign Type
As discussed under Campaigns and Its Types, messages sent through the various channels of engagement are called campaigns and can be of the following types: One-Time, Triggered, Recurring and Journey.
However, given the real-time and targeted nature of the channel, you can only send Triggered and Journey campaigns through In-app.
Click to enlarge
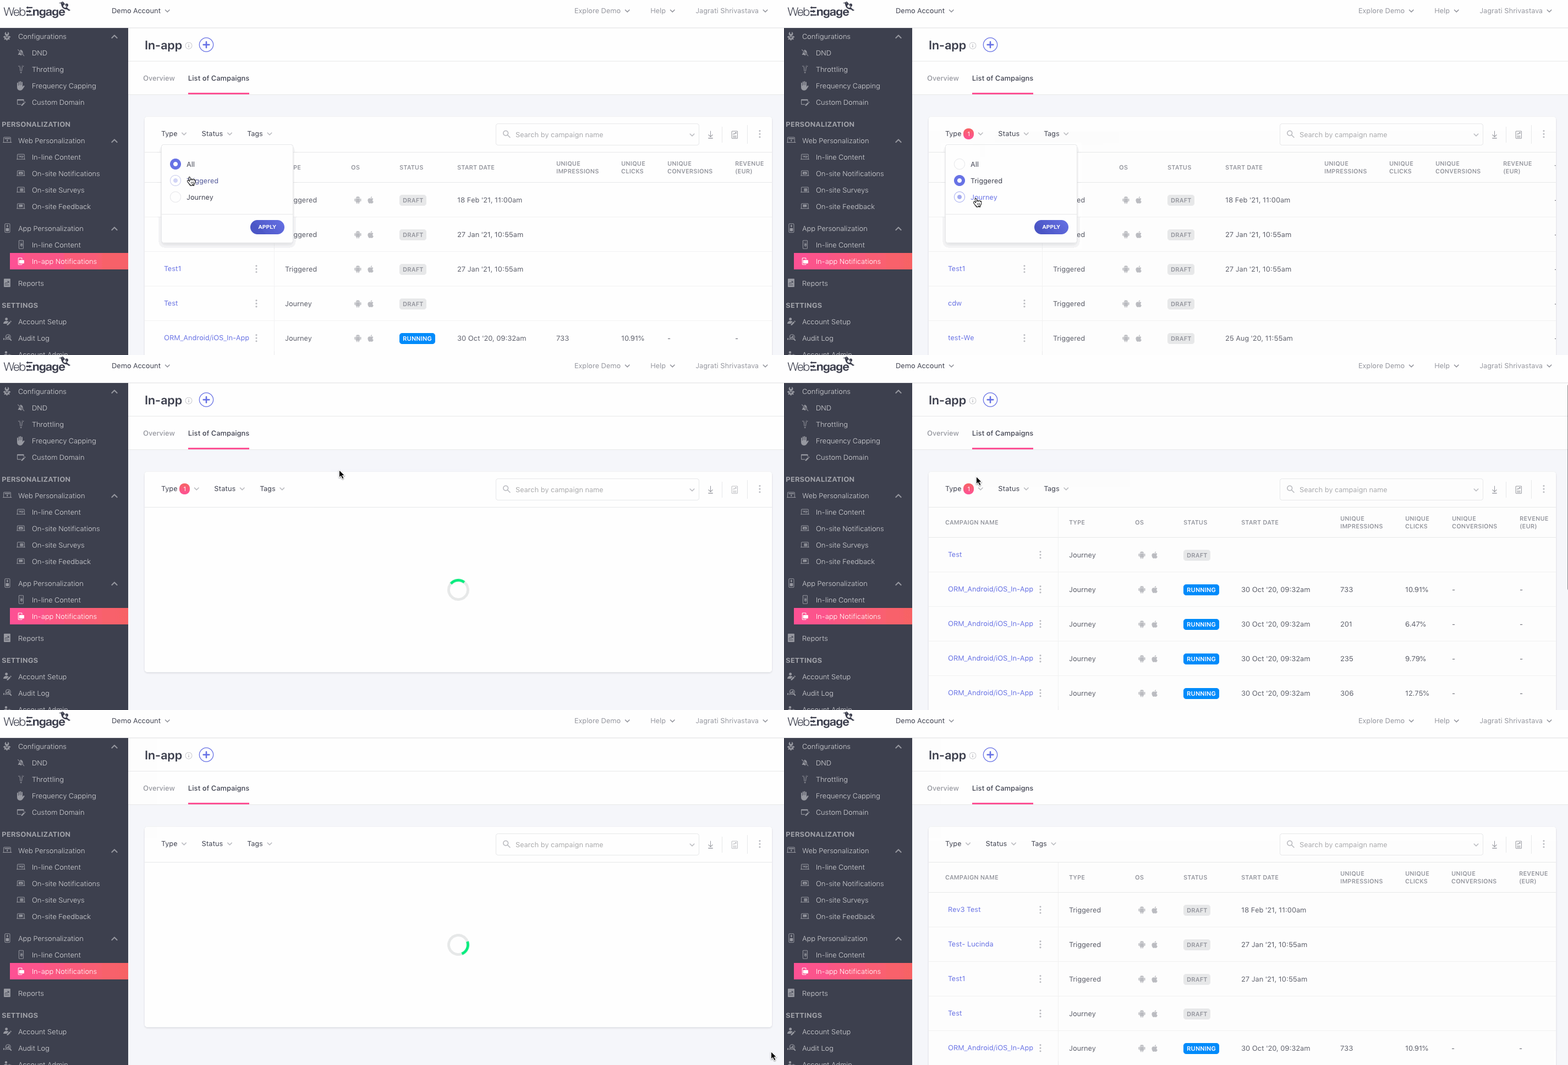
While the default view shows you All types of campaigns, as shown above, you can customize the list by selecting a campaign type.
The following options can be selected here:
All: Shows you all types of In-app campaigns created over the entire lifetime of your account. (When selected, an additional column indicating Campaign Type is added to the table)
Triggered: Shows you only those campaigns that have been created through the channel, over the entire lifetime of your account.
Journey: Shows you only Journey In-app campaigns, created over the entire lifetime of your account.
Drafts: Shows you only those In-app campaigns that are currently saved as drafts in your account.
Step 2: Analyze
Click to enlarge
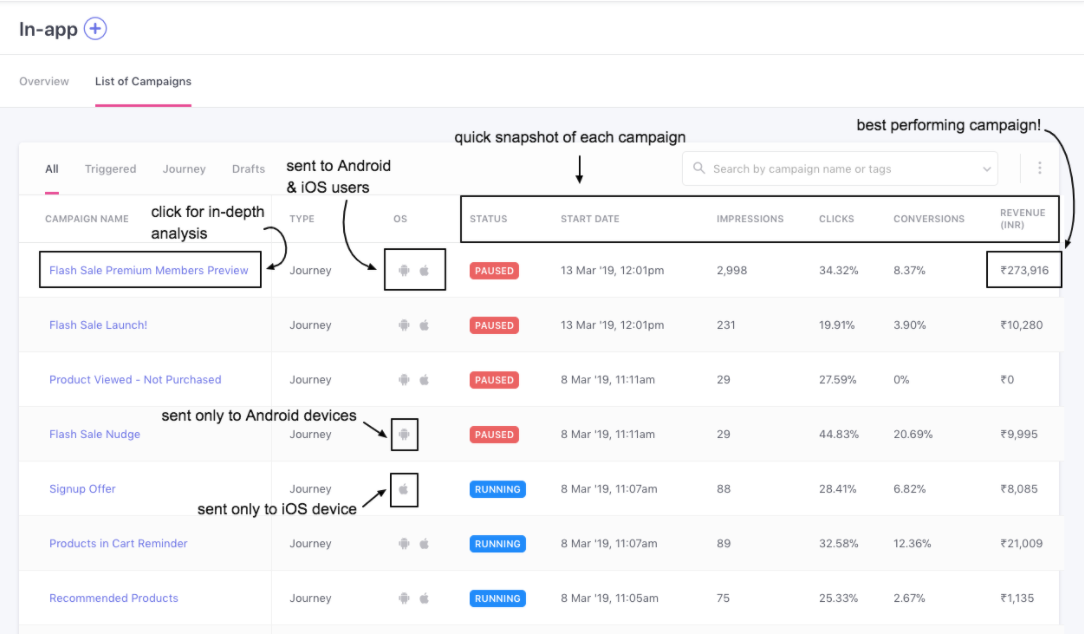
Let's walk you through all the column headers shown here:
Campaign Name: Includes a list of all the campaign titles, hyperlinked to the campaign's Overview section.
Type: Shown only when All is selected in the navigation bar, it indicates the type of campaign (One-time, Triggered, Recurring, Journey). Detailed read here
OS: Shows the platform targeted by the In-app campaign, indicated by:
- Android icon for campaigns sent just to Android devices
- iOS icon for campaigns sent just to iOS devices
- Both icons for campaigns sent to Android and iOS devices
Status: Each In-app campaign can have any of the following statuses, discussed in further detail here:
- Draft
- Upcoming
- Running
- Paused
- Ended
Start Date: Indicates the date and time at which the campaign started getting delivered to its target audience.
(Unique) Impressions: Indicates the total number of users that have viewed the In-app Notification at least once.
(Unique) Clicks: Calculated against Impressions, it indicates the percentage of users that have clicked on the In-app Notification.
(Unique) Conversions: Calculated against Impressions, it indicates the percentage of users that have performed the campaign's Conversion Event within its Conversion Deadline. Detailed read onConversion Tracking.
Revenue: Indicates the amount of revenue generated by the total number of times users have performed the campaign's Conversion Event, within its Conversion Deadline.
-
- Revenue is always shown in the Currency selected by you while setting up Revenue Mapping.Detailed read here.
Related ReadsA comprehensive list of all the performance indicators tracked for In-app Campaigns
Step 3: Select Data Format (Optional)
As shown below, using the overflow menu placed on the top left, you can choose to analyze Clicks and Conversions as a numerical value (by selecting #) or as a percentage value (by selecting %).

Click to enlarge
Features
Now, let's get you acquainted with all the actions you can take through this section:
Download / Schedule Reports
Please NoteReports can be downloaded and scheduled only by Admins who have access to Account Management. If you're unable to do so, then please get in touch with your account owner.
Here's how you can obtain a report to analyze the performance of multiple In-app campaigns over a specific time frame:

Click to enlarge
Downloading a Report: As highlighted above, click the Download icon placed on the top right to obtain a copy of performance stats for all your WhatsApp campaigns for a specific time frame. Here's a step-by-step guide.
Scheduling a Report: As highlighted above, click the Schedule icon placed on the top right to have performance reports delivered periodically to your teammates' inbox. Here's a step-by-step guide.
Prioritize Campaigns
In cases where you have a user qualified for multiple in-app notifications, the ‘Prioritize Campaigns’ feature comes to the rescue. With the help of this feature, you can now control which notifications should be shown to the users first as per the priority set by you. Prioritization makes sure the campaign which has a higher priority will be shown first to the end user.
Access Campaign Prioritization
Please Note:Here are certain prerequisites that you require to prioritise your campaigns:
- To prioritize you must have a campaign maker or campaign checker permissions
- There must be at least 2 campaigns that are running or an upcoming campaign.
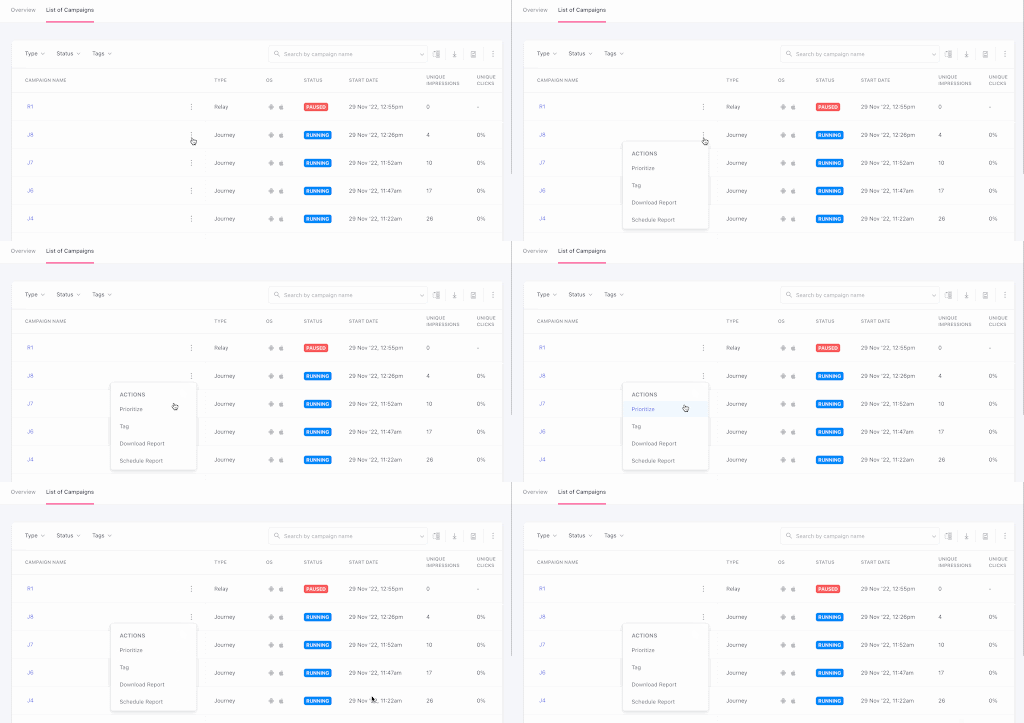
There are 2 ways to access this feature from the ‘List of campaigns’ page of in-app notifications:
- By clicking on the ‘Prioritize campaign’ icon beside the search box

- Or, Click on the actions dropdown menu of any running or upcoming campaign and select the ‘Prioritize’ option
Prioritize your Campaigns
Within the Prioritize Campaign modal, you will find all the notifications (standalone as well as journey campaigns) which are in running or upcoming (that will be run in the near future). By default, you will notice all the journey and relay campaigns (if present) will be listed together in the top priority bucket and all standalone campaigns will be listed together in the next priority bucket.
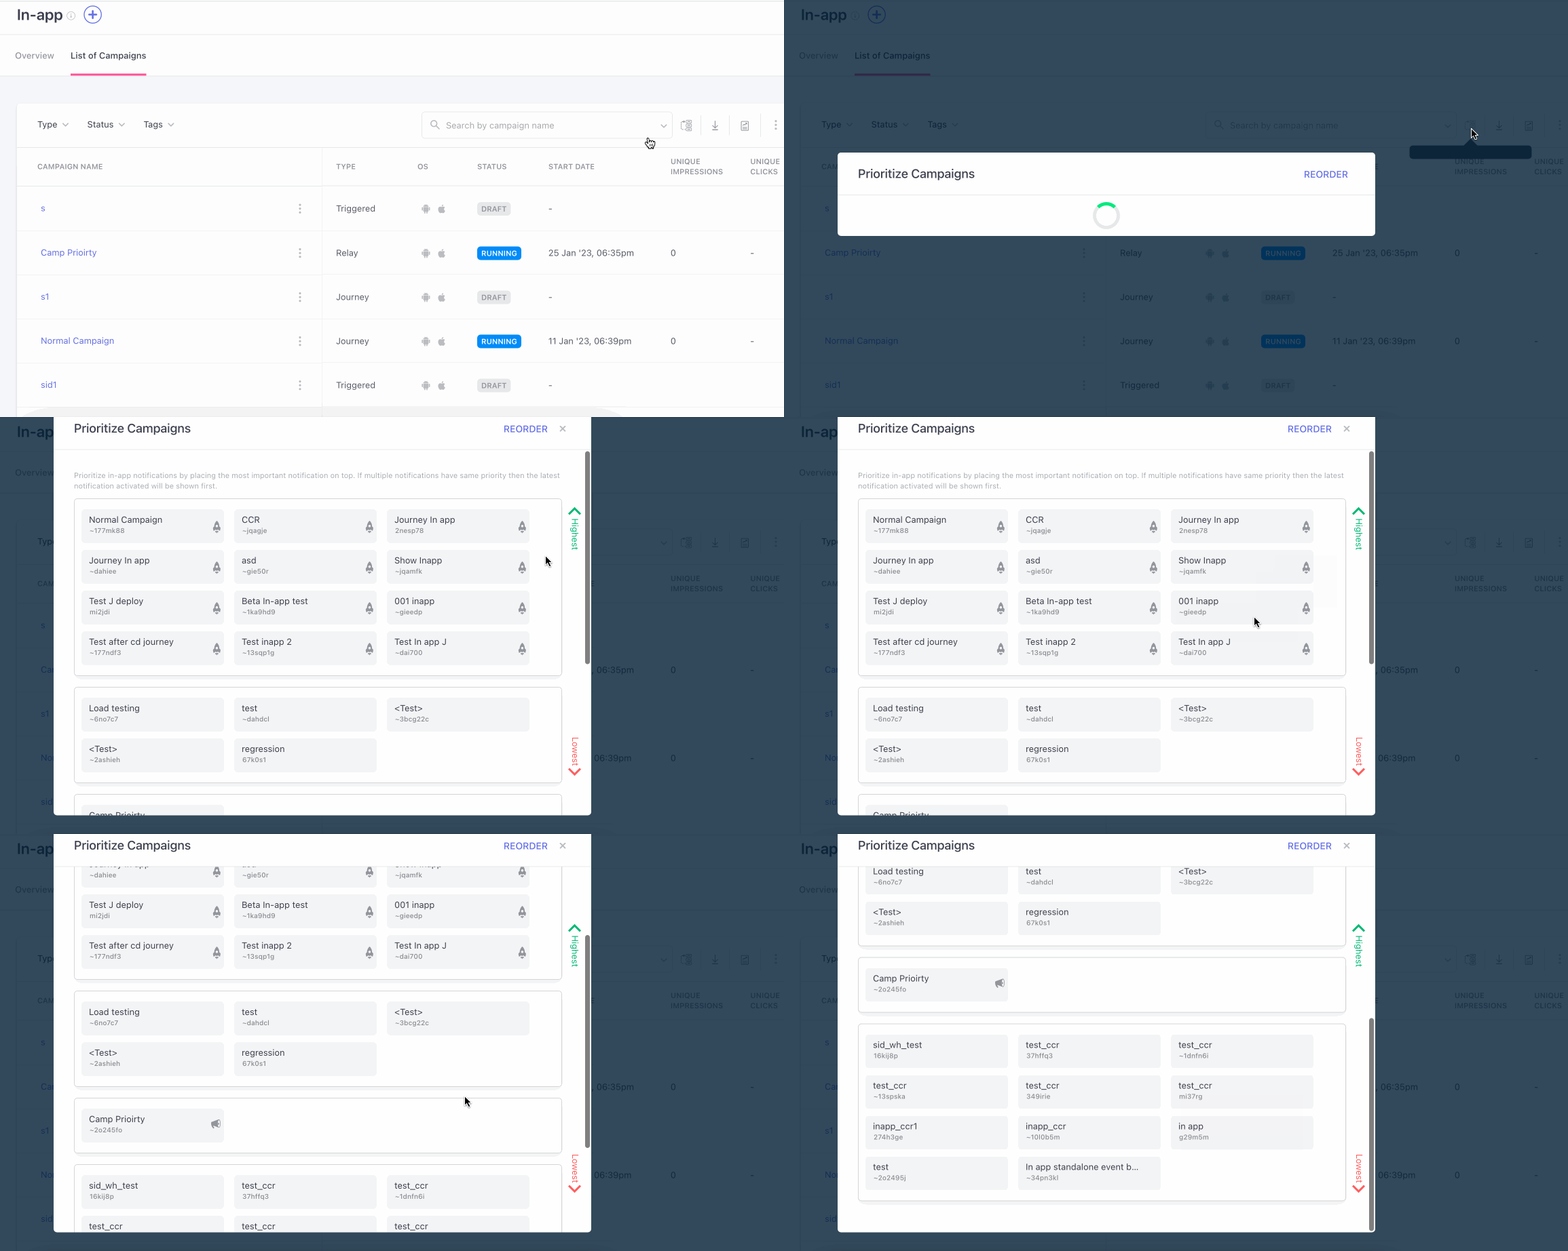
click to enlarge
Reorder the Priority of your Campaign
If you would like to change the priority of a particular campaign, use the following steps.
- Click on ’Reorder’
- Drag and drop the campaign that you would like to reorder
- Click on ‘Save’.
While reordering you can either drag the campaign to an already existing priority bucket or create a new priority bucket by clicking on ‘Click to add a new priority’
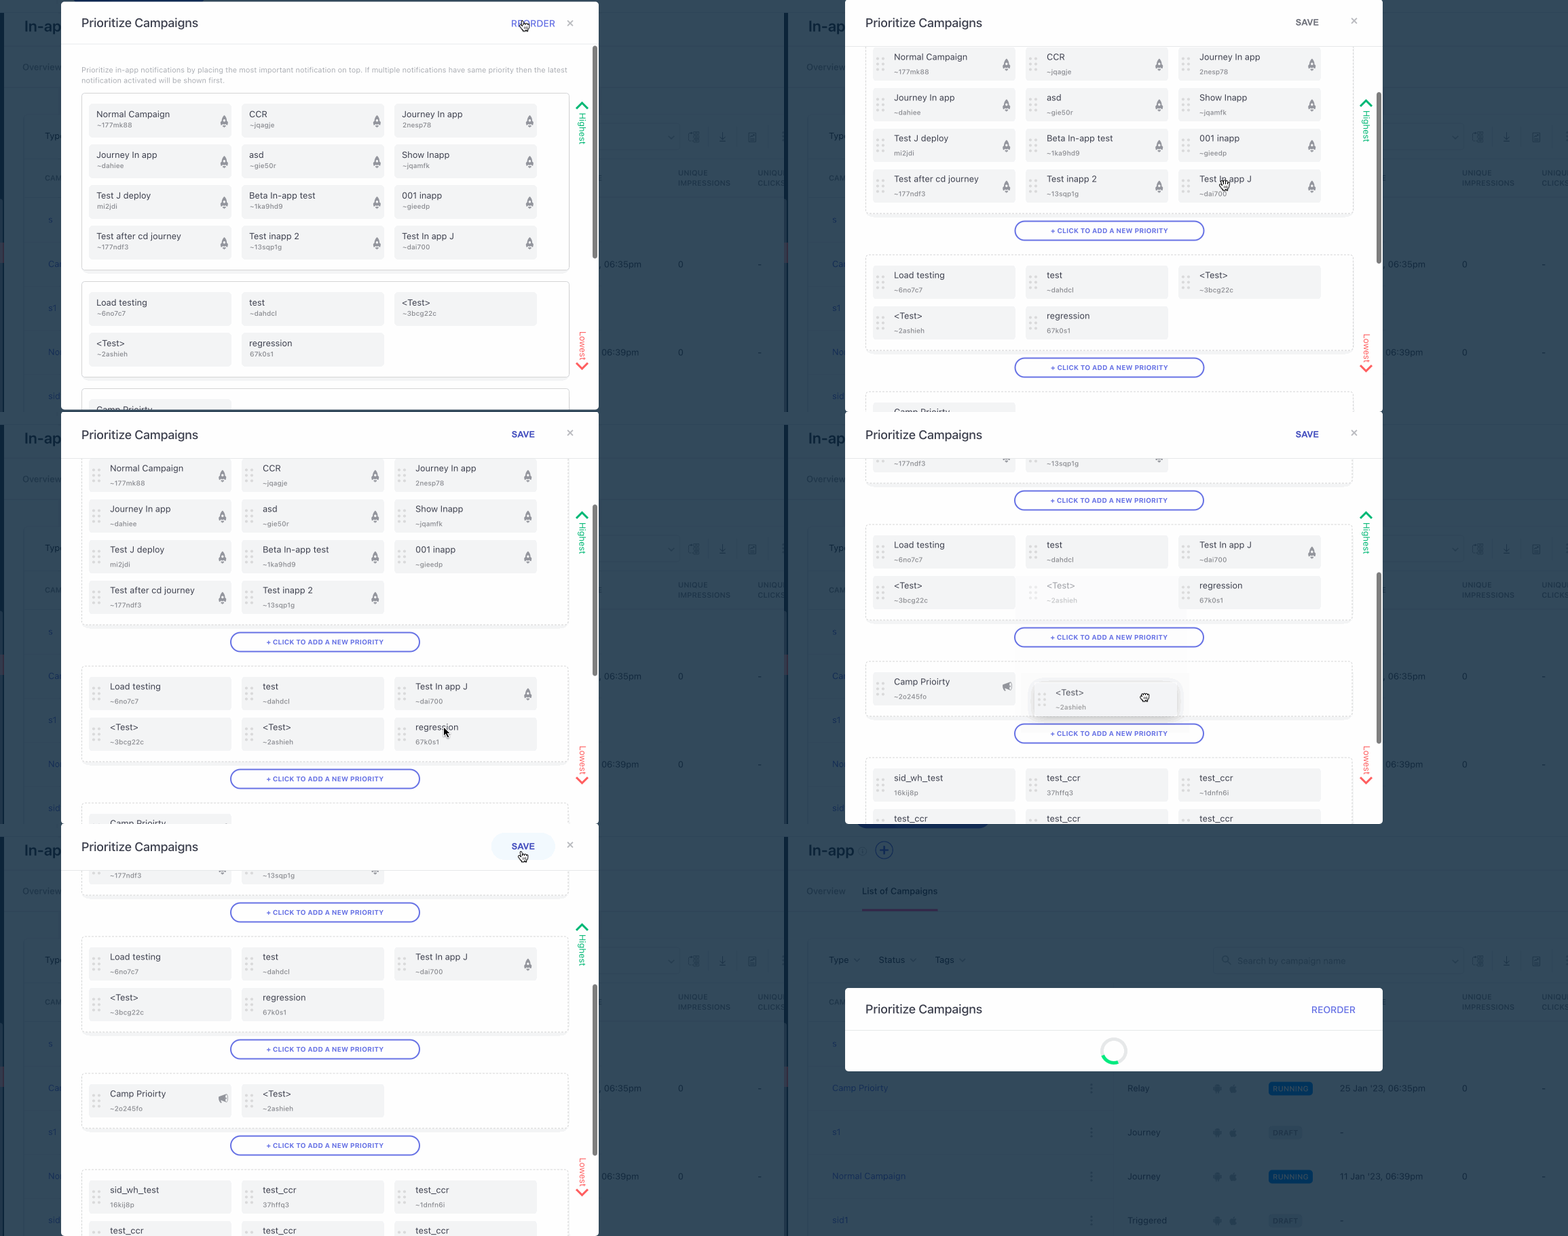
click to enlarge
Things to keep in mind:
- Campaigns at the top will always have the highest priority. Within the same bucket, campaigns will be shown in left-to-right order.
- If there are multiple campaigns within the same priority bucket, the latest campaign created will be shown first.
- Sometimes journey or relay campaigns may not show up as per their priority as updating the journey status of a user may take a few minutes. In such cases, the next prioritized campaign would be shown to the user
Access Channel Overview
You can choose to analyze the collective impact of all your In-app campaigns against key performance indicators by accessing its Channel Overview, as shown below.
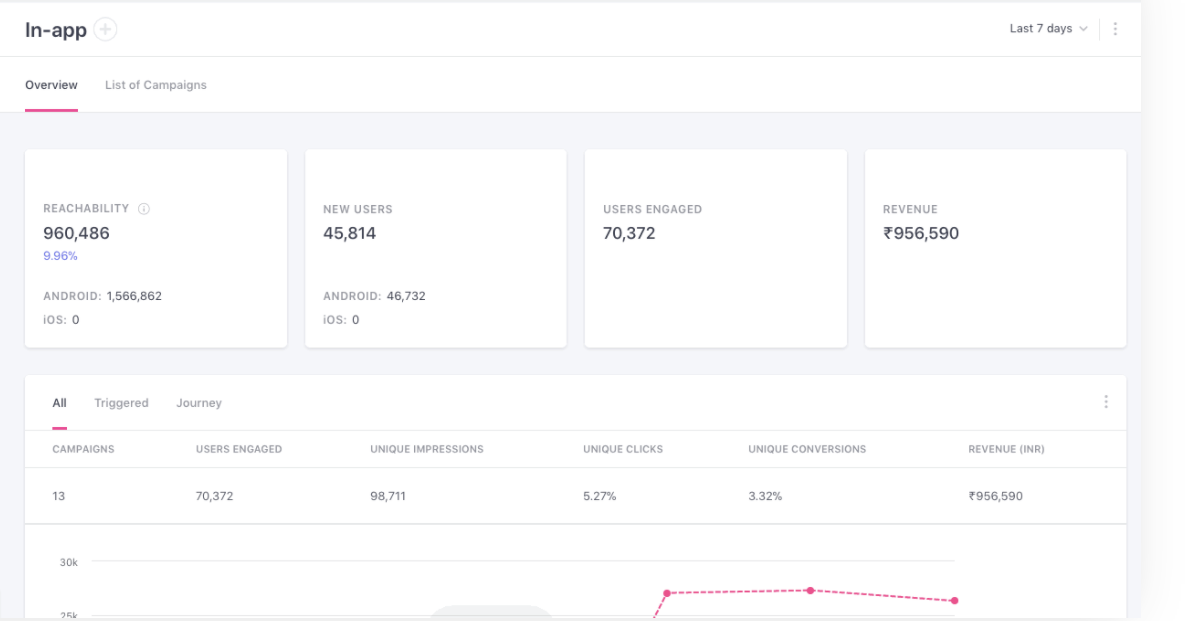
Click to enlarge
Access Campaign Creation
The campaign creation interface can be accessed by clicking the Plus icon placed on the top left of this section, as shown below.

Click to enlarge
Access a Campaign's Overview
You can choose to analyze the performance of an In-app campaign in detail by clicking its (hyperlinked) Campaign Name. Doing so will take you to its Campaign Overview section, as shown below.
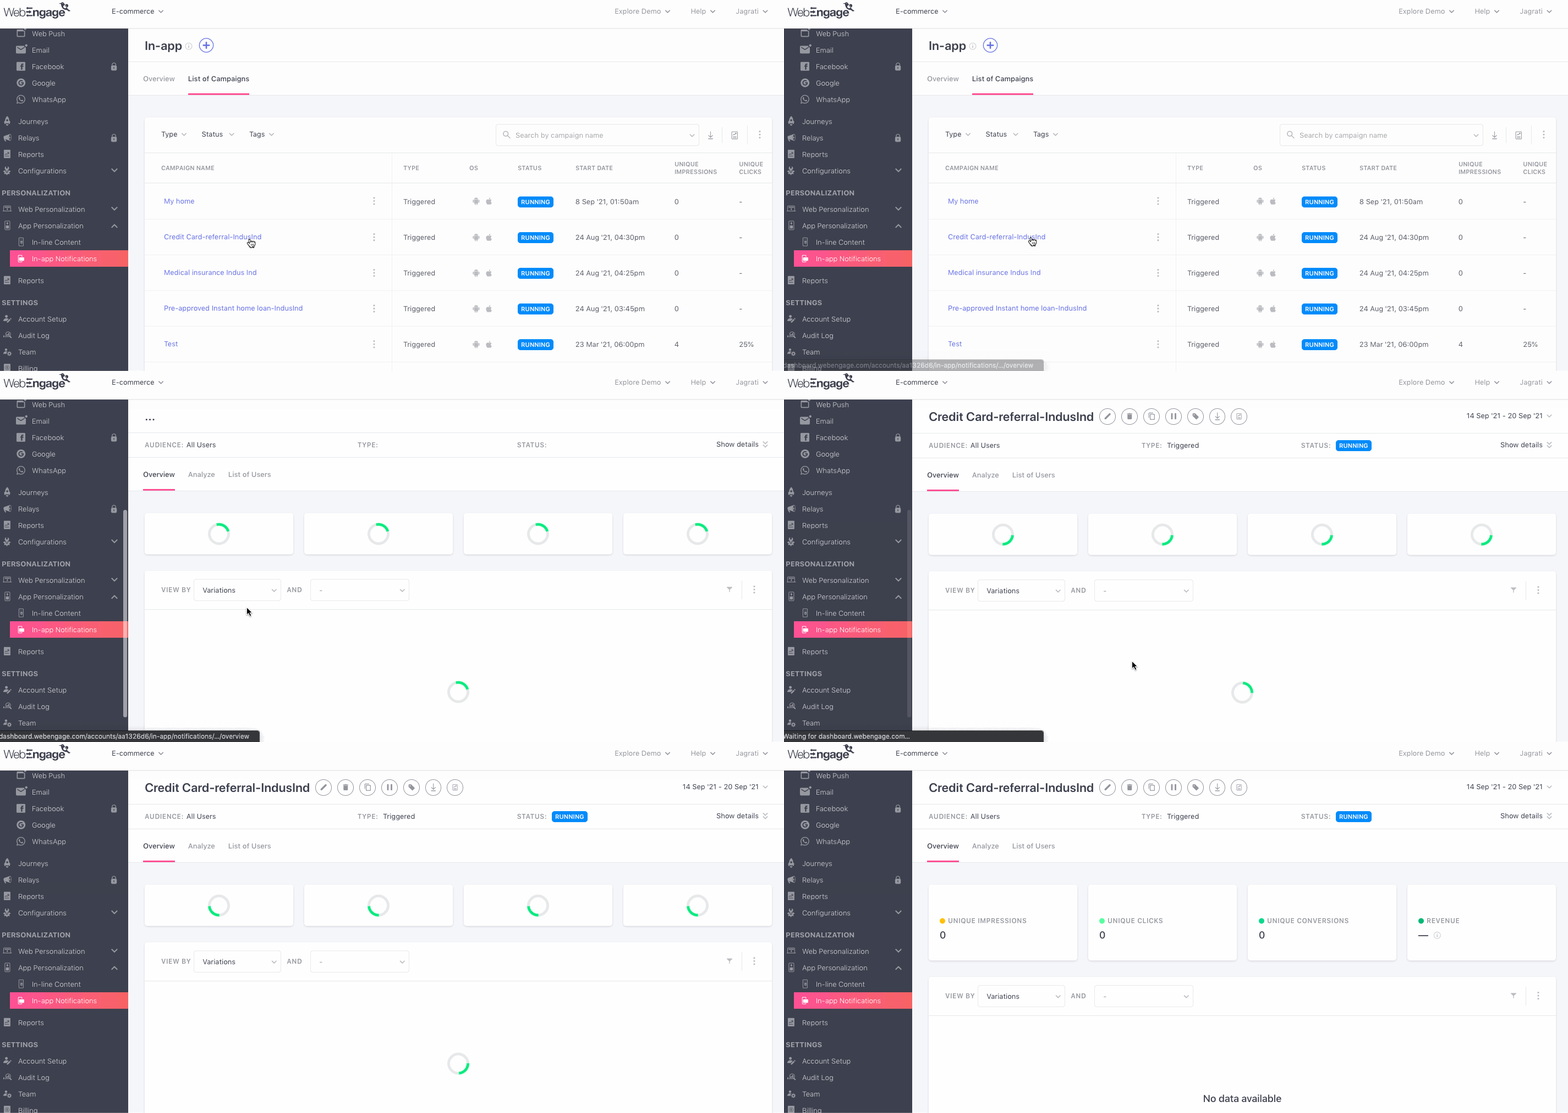
Click to enlarge
Modify a Campaign
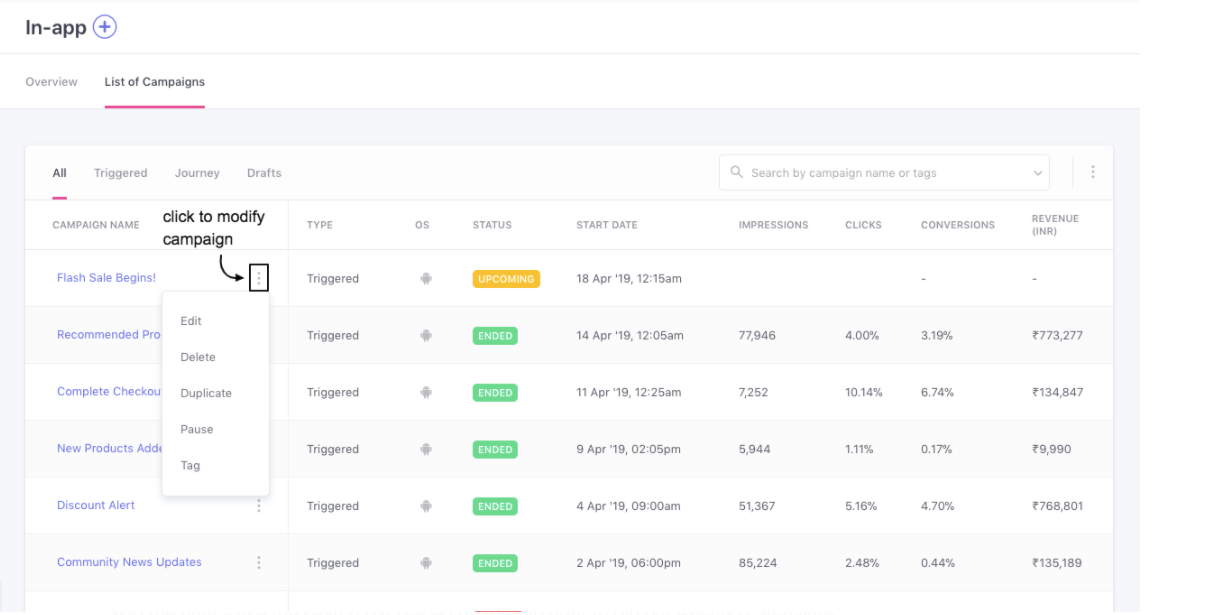
Using the options nested under the overflow menu placed next to a Campaign's Name, you can choose to Edit, Delete, Duplicate, Pause or Tag a campaign, as shown below.
Click to enlarge
However, you can edit journey campaigns only through the respective journey's Live View. For the same reason, no overflow menu is shown next to journey campaigns.
Search for a Campaign
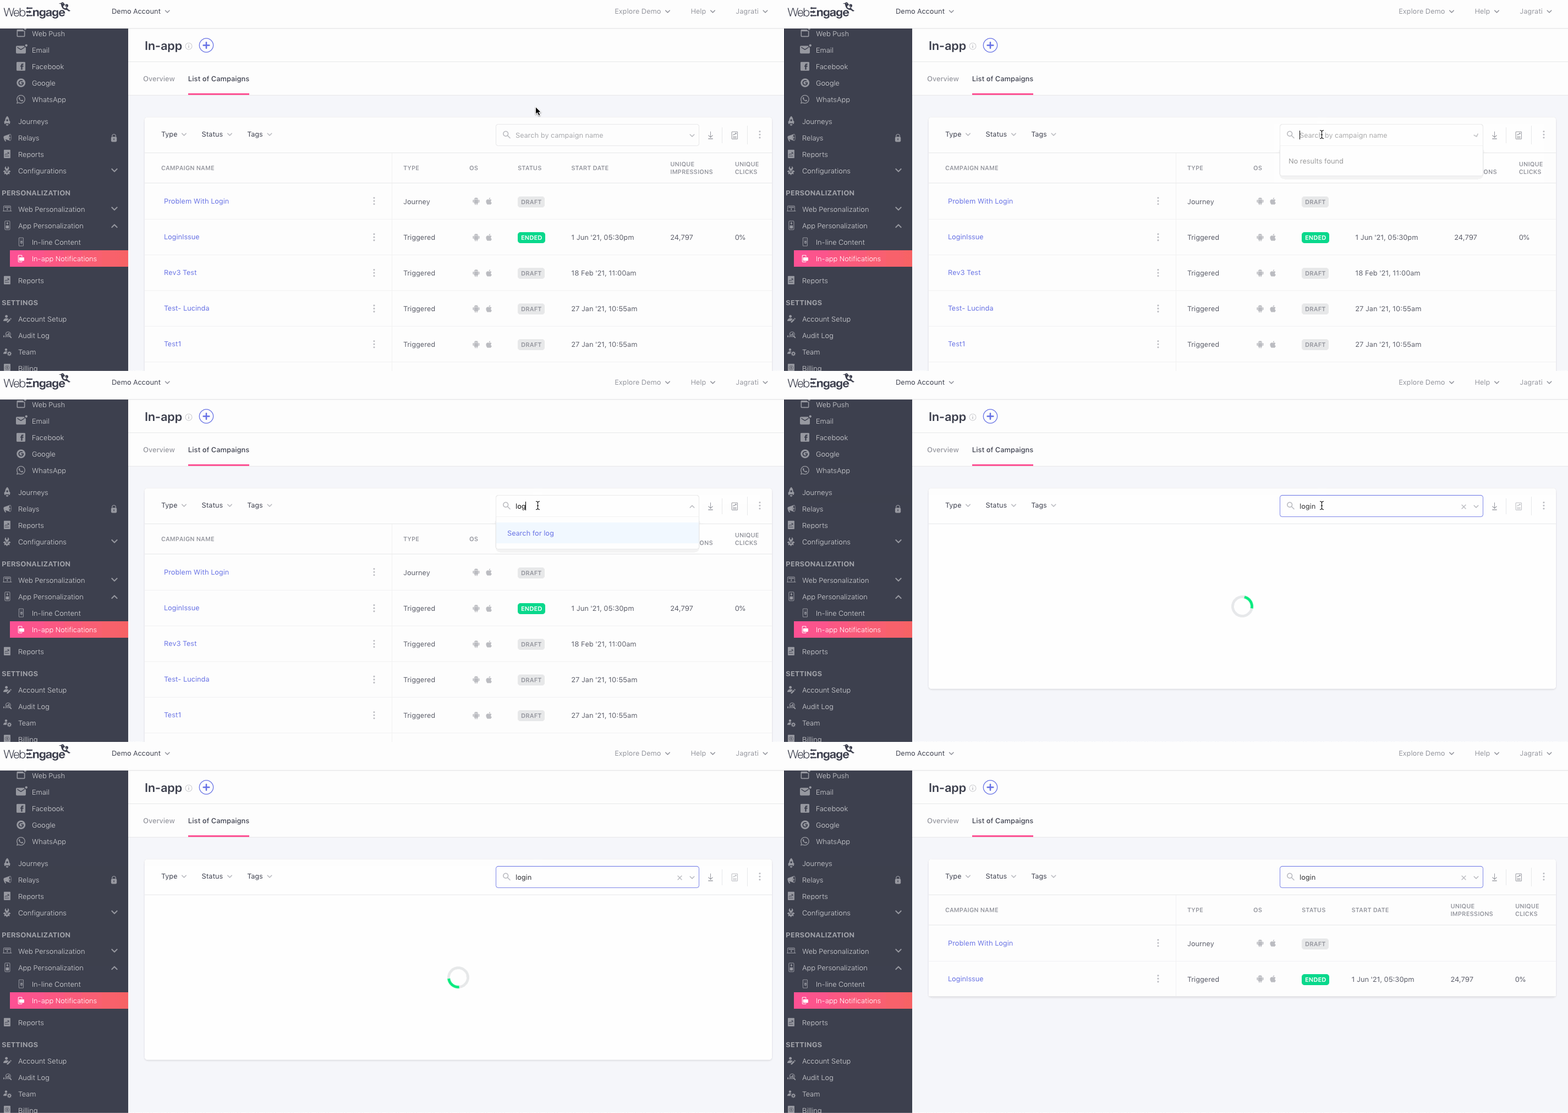
Skip the hunt - use the search bar placed on the top right to dig out existing campaigns. Type in a keyword, we'll match it to all the campaign titles and tags, presenting a list from which you can choose! (as shown below)
Click to enlarge
Updated 3 months ago