Using the Drag & Drop Editor
A step-by-step guide to leveraging our template library to create responsive & dynamically personalized email campaigns
Please NoteThis document is an extension of Step 3: Message of Email campaign creation and elaborates on how you can leverage our ready-to-use template library.
The Drag & Drop Editor can also be used to build Transactional Campaigns. However, please refer to this guide to personalize the campaign's text and links.
How to Access
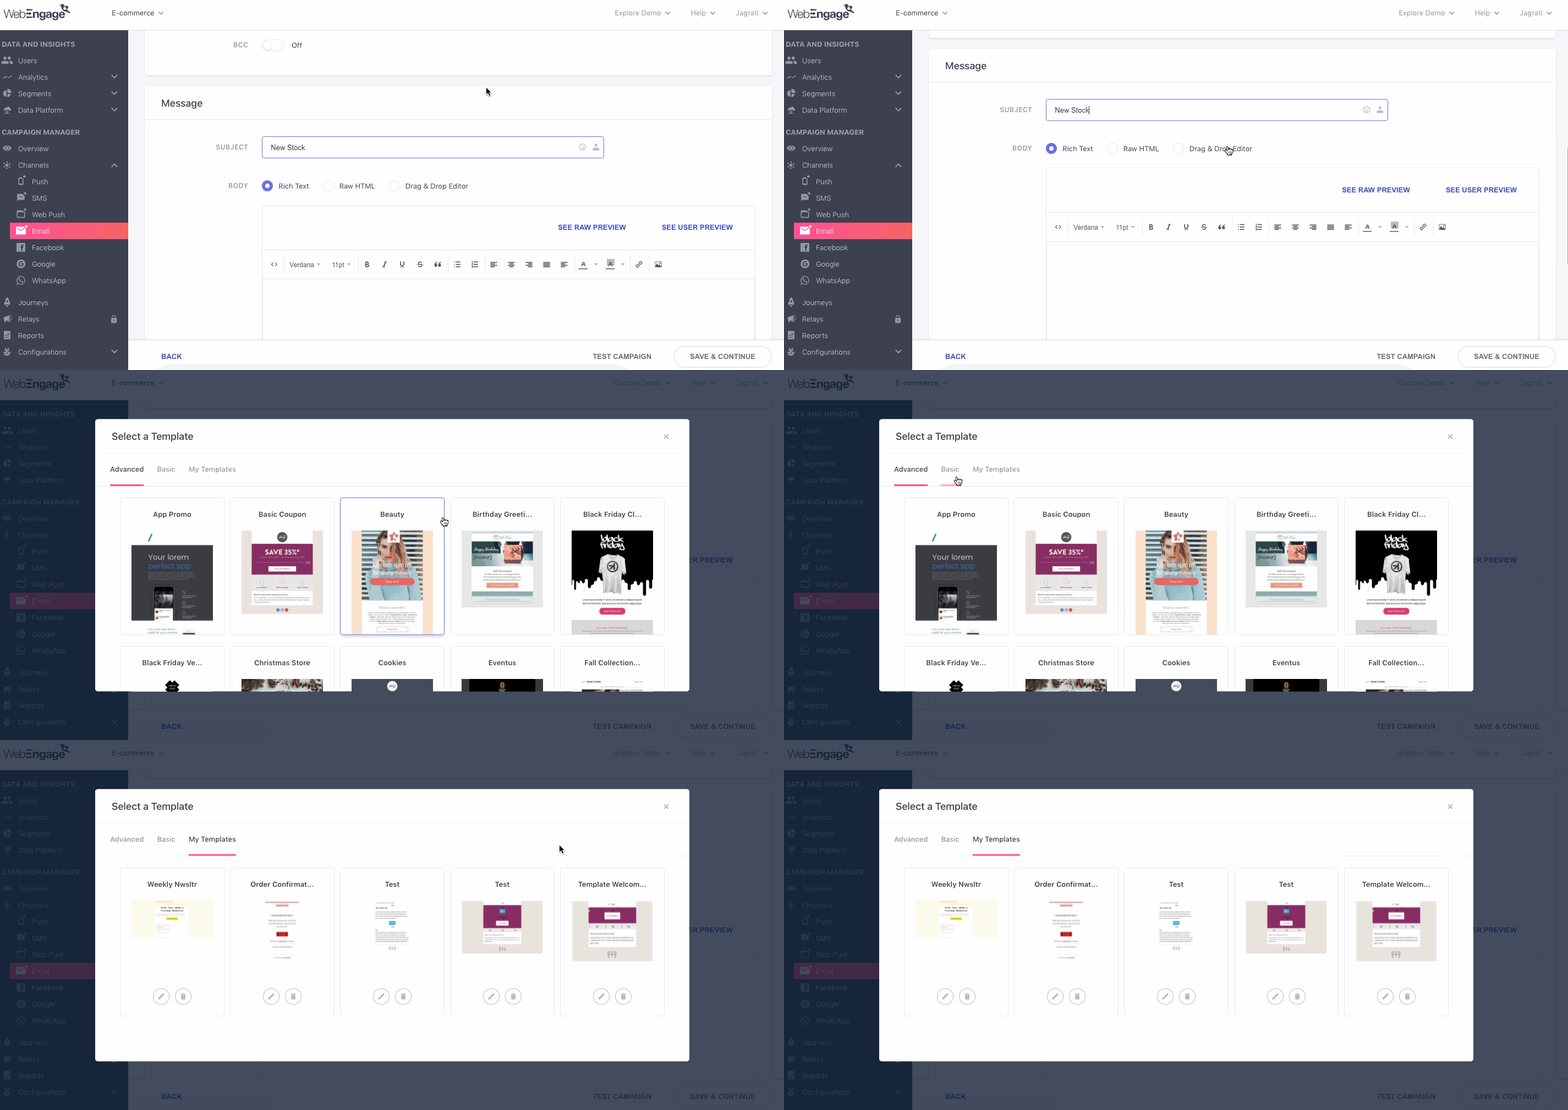
As shown below, you can access the email templates library and editor by selecting the option, Drag & Drop Editor, under Message at Step 3 while creating the campaign.
Click to enlarge
Templates Library
Let's quickly walk you through the various types of templates you can use to build your campaign:
Advanced
Click to enlarge
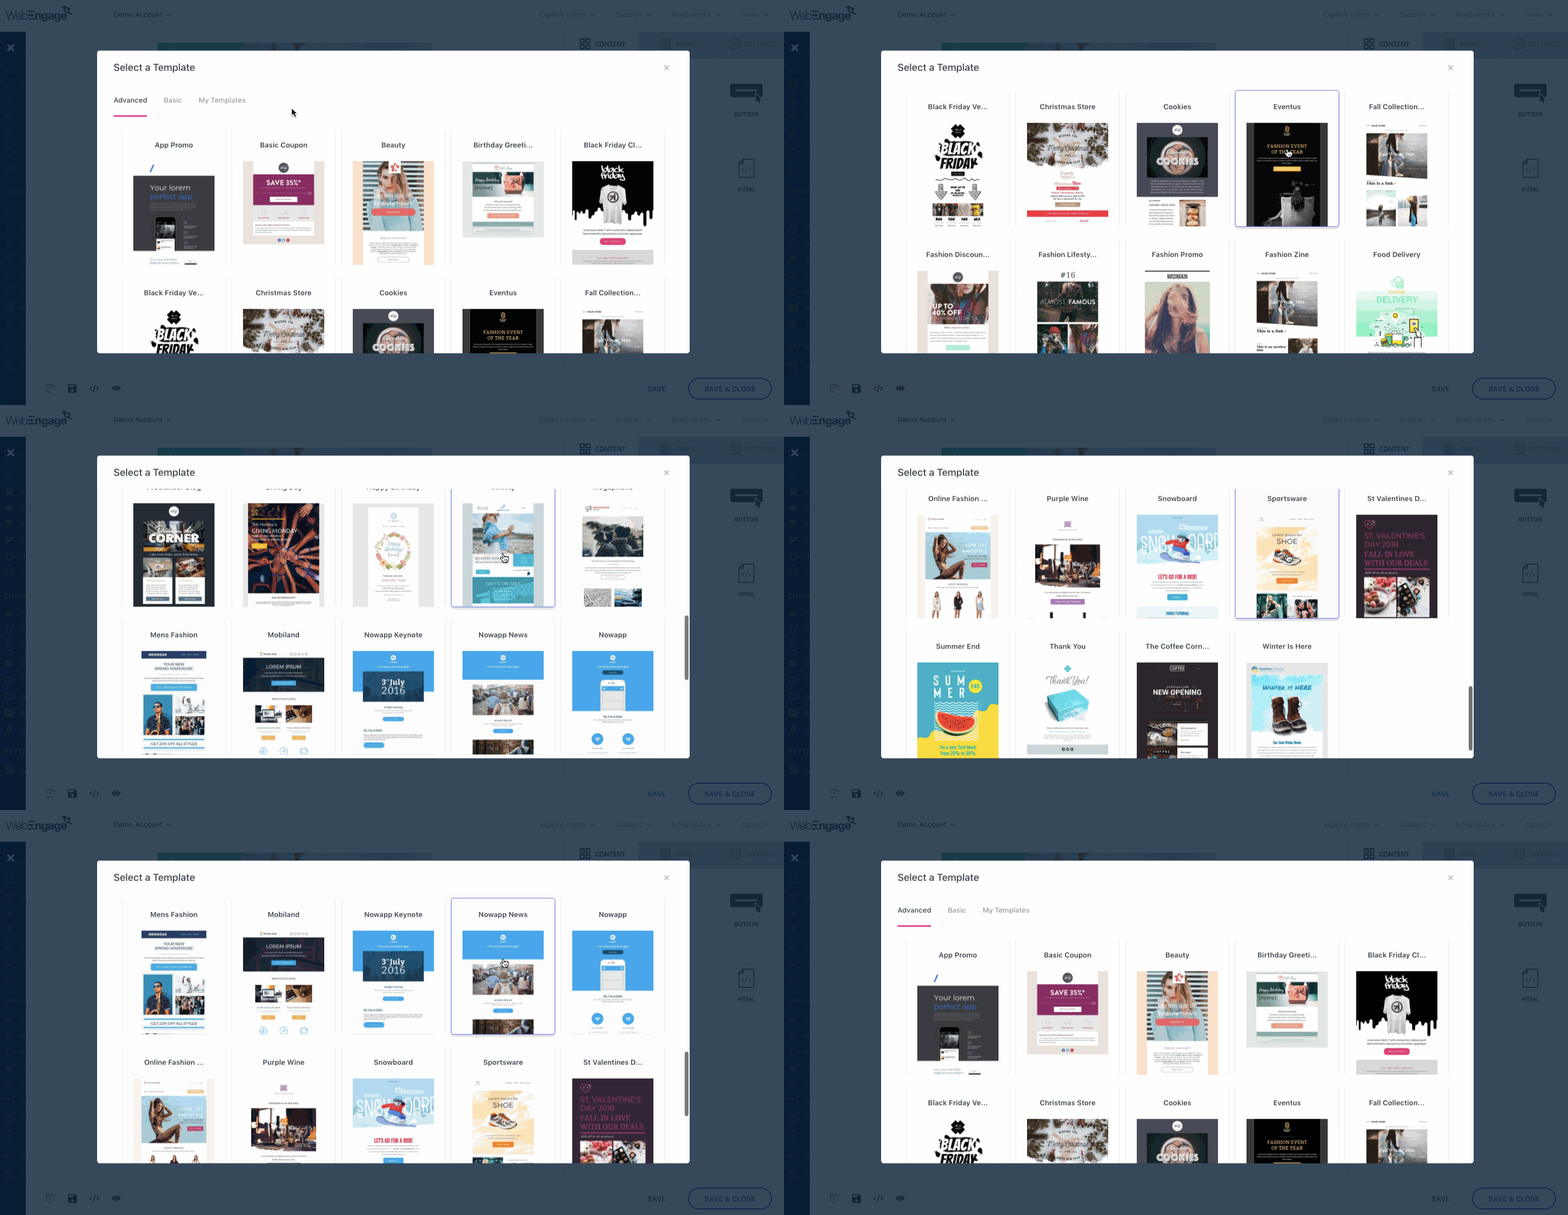
The advanced library comes packed with over 35 stylized templates, specially designed to convert any text message into a visually engaging delight. Simply select a layout that matches your messaging needs, customize the text, color, fonts images, buttons, links and you're good to go!
Basic
Click to enlarge
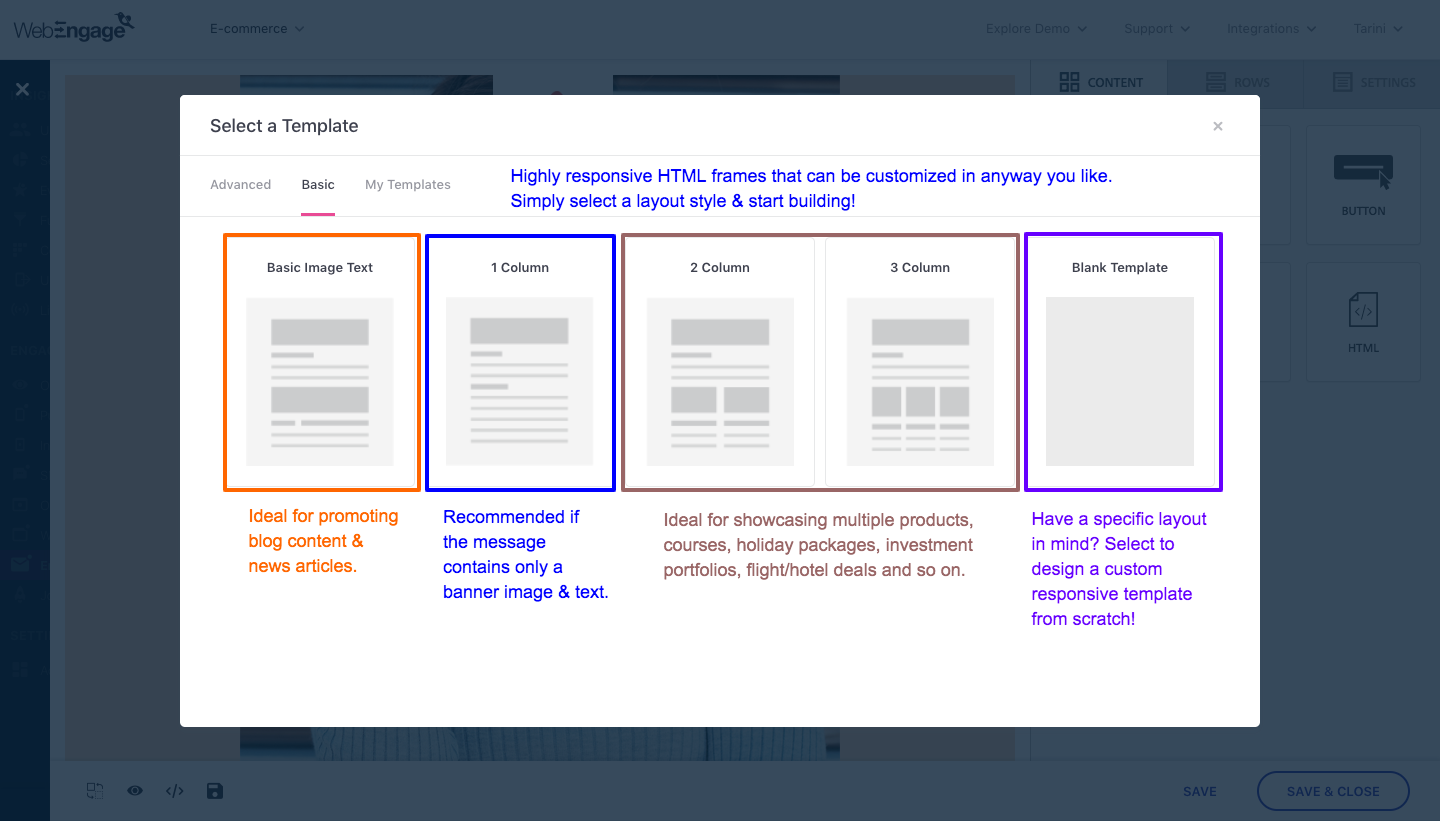
The basic library consists of 5 elementary HTML structures that can easily be edited and built upon to create that perfect layout you have in mind! Simply select a template that falls in line with your requirements, customize it by adding text, video, image, button blocks and you're good to go!
My Templates
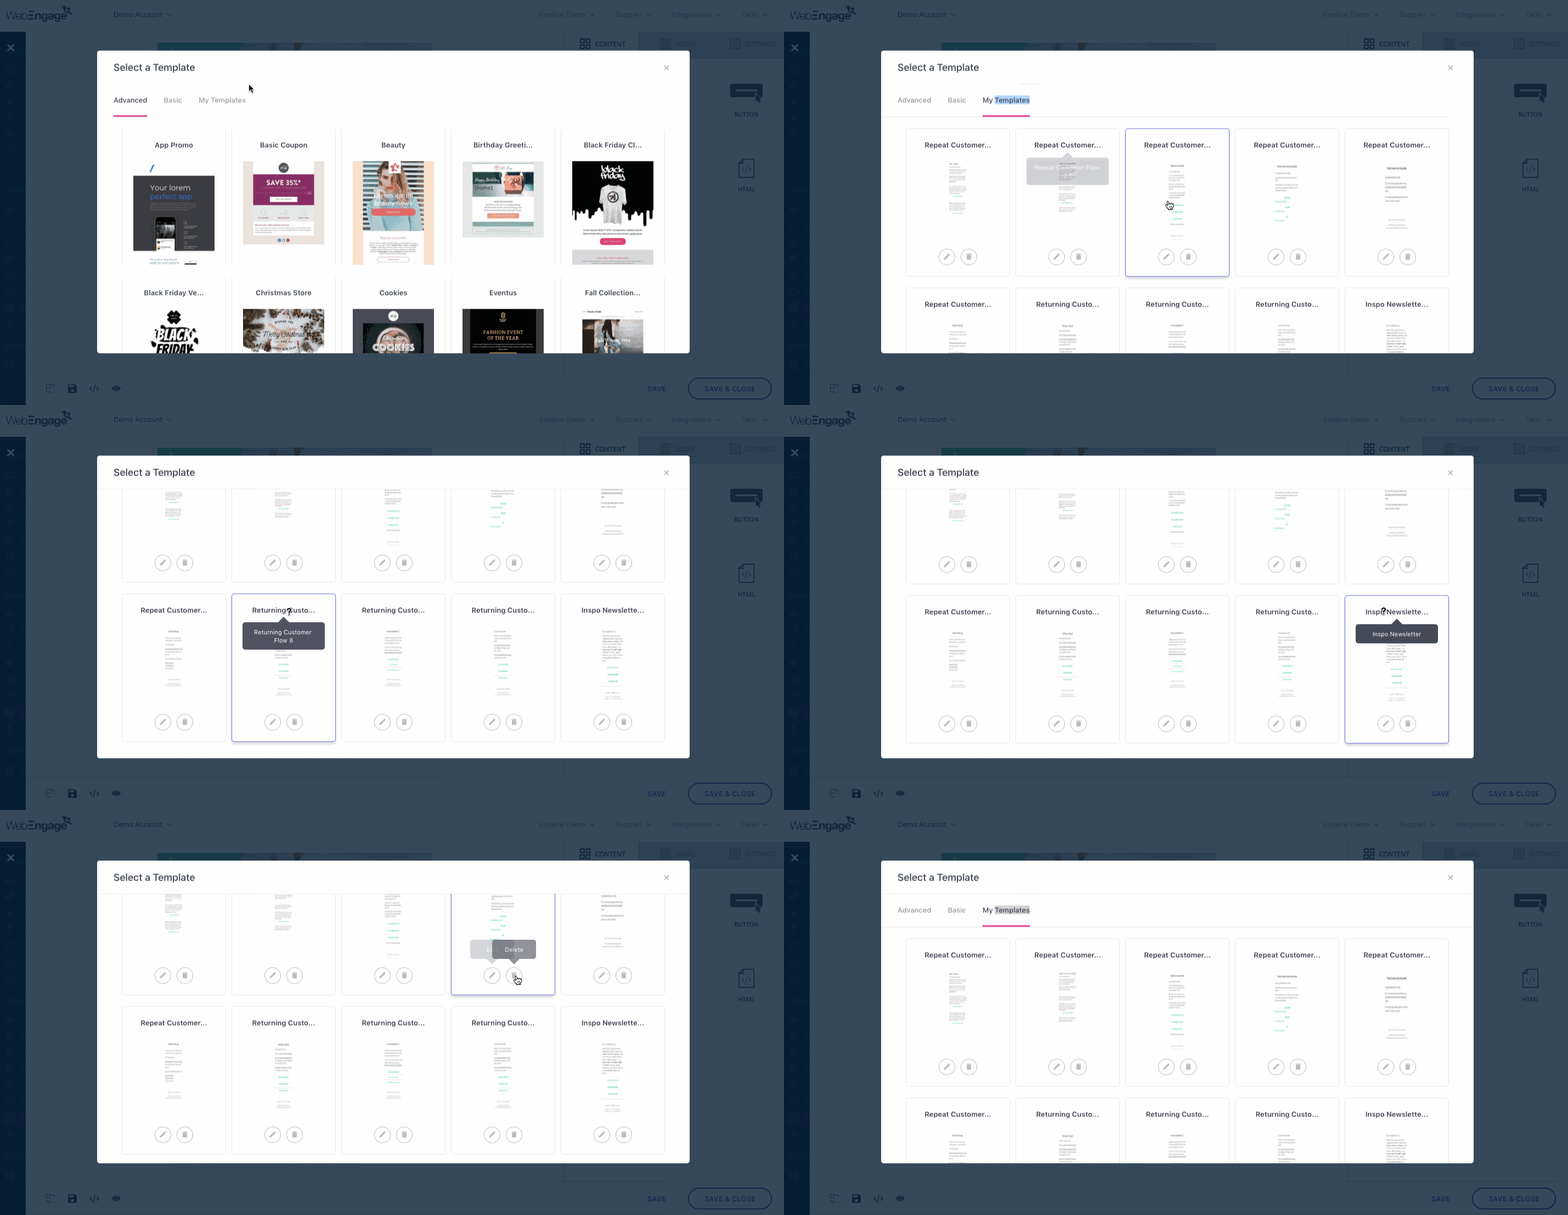
This section lists all the custom layouts that have been saved for your account. This is a great way to reuse email templates designed by your teammates to build similar campaigns. (How to save a template)
Click to enlarge
As shown above, you can also choose to Edit or Delete an existing template through this section.
- Deleting a saved template will have no impact on any campaigns in which it's currently being used. Doing so will simply make the template unavailable for future campaigns.
Using the Drag & Drop Editor
Before we deep dive into the workings of the editor, let's quickly touch-base with the basics, Rows, Columns, and Content Blocks.
-
Grids, comprising of Rows and Columns form the foundation of HTML codes. Be it a web page or an email template, each entity consists of 'code snippets' that define the way a particular row or column of the entire HTML grid must look like on various screen sizes.
- Each Row can include several Columns and each Column includes an element like text, image, link, button and so on.
-
In your email editor, these 'code snippets' manifest as Content Blocks that can be dragged and dropped into a specific Column of a Row, as shown below.
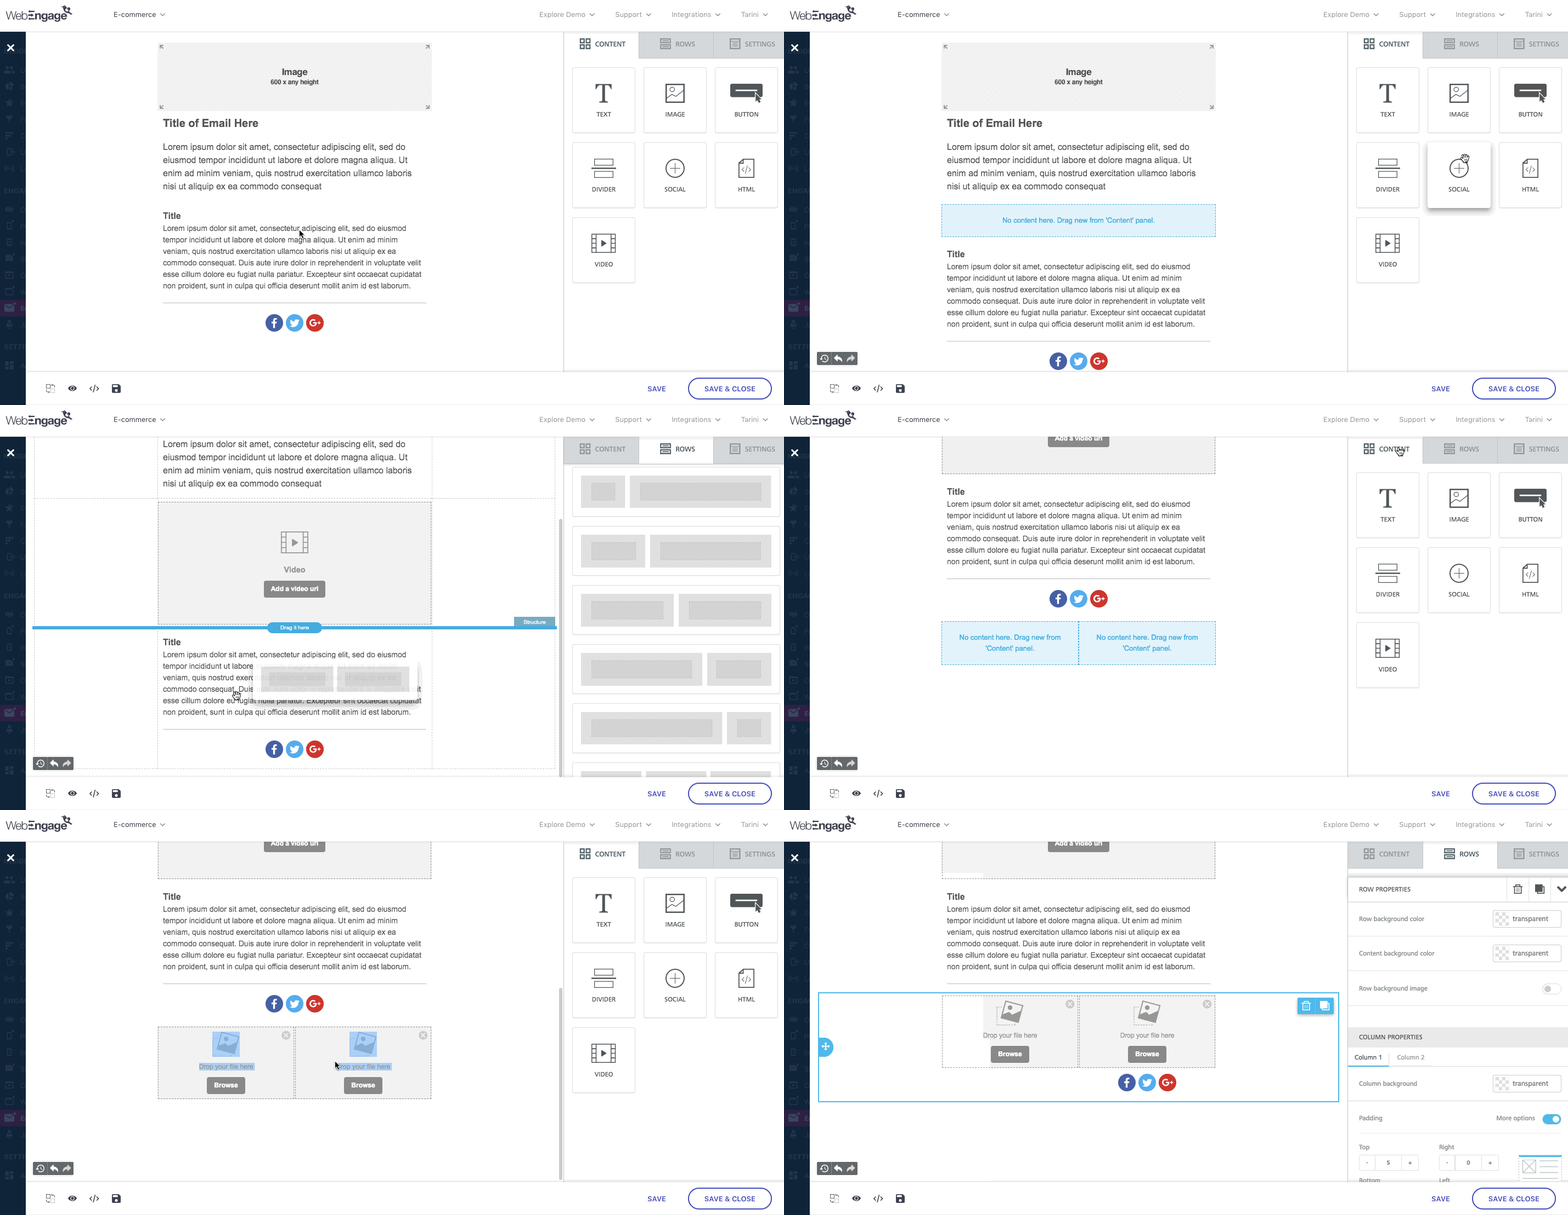
Click to enlarge
- Further, as shown below, you can add multiple Row Blocks to an email template, as per your messaging needs. While there is no upper limit on the number of Rows that can be added, a maximum of 4 Columns are available in a Row.
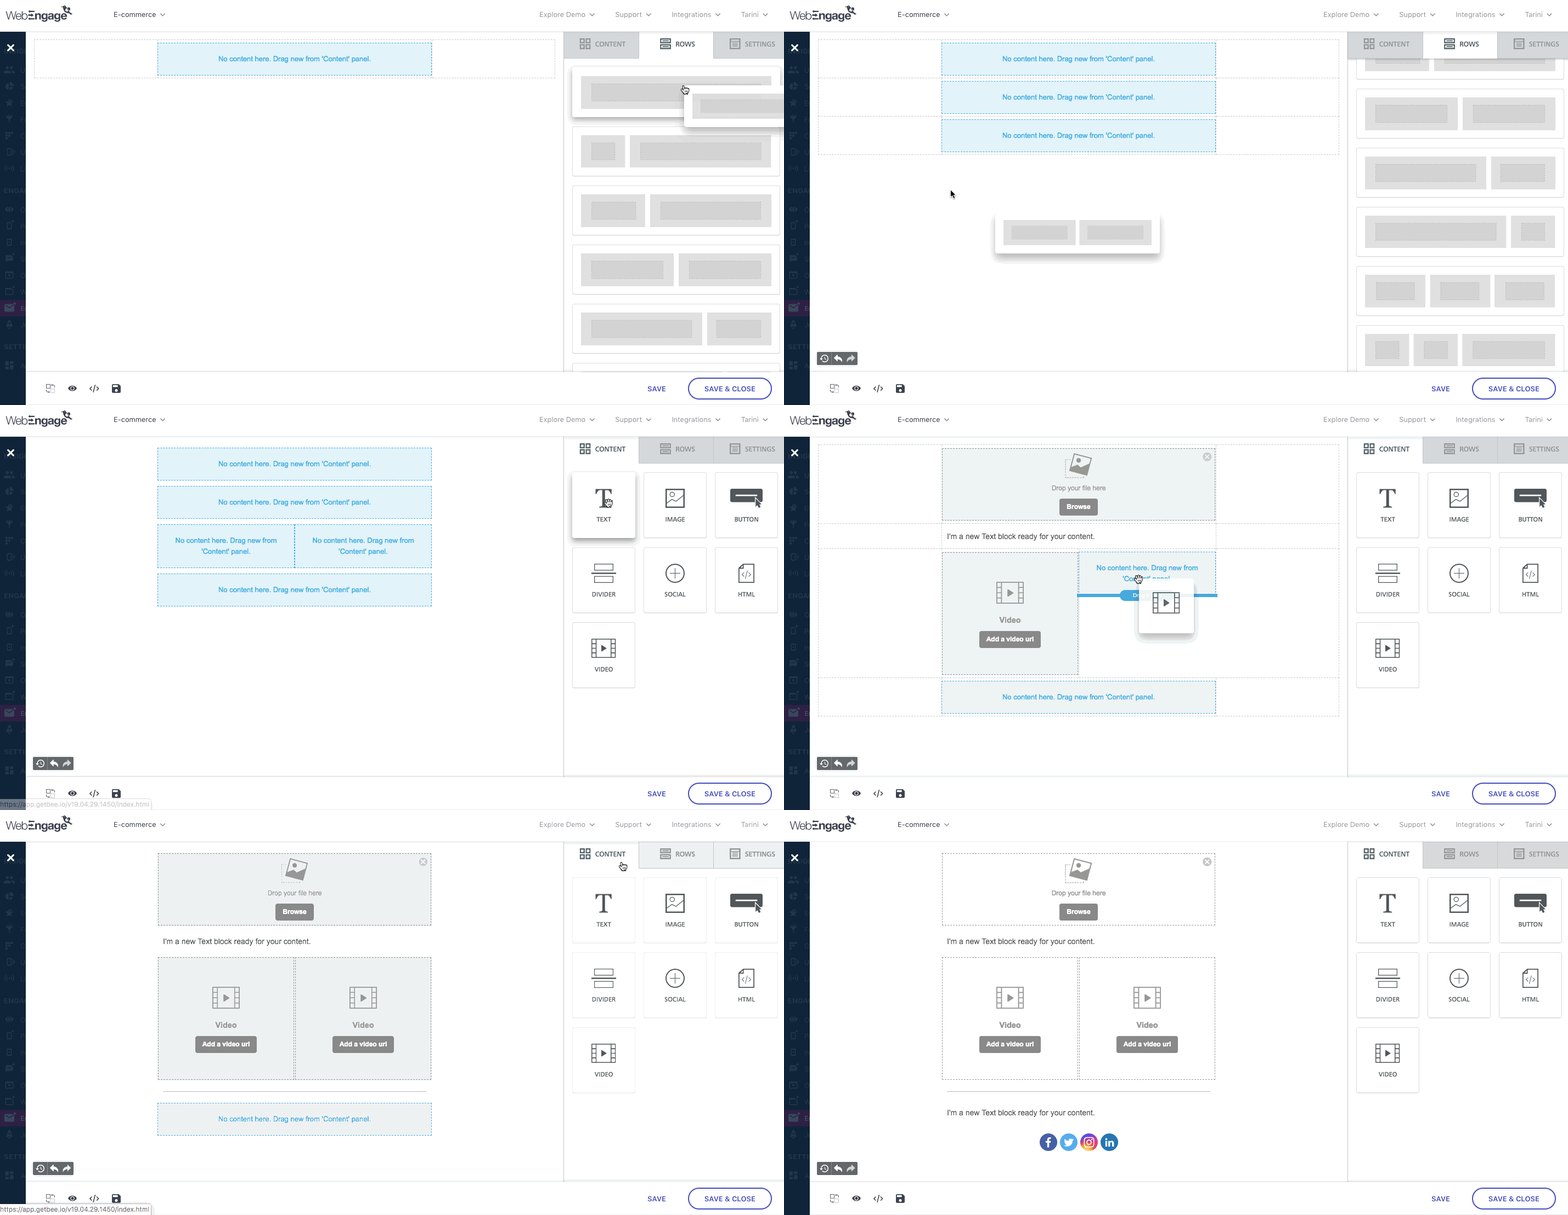
The blue blocks in the template represent a row and it's columns that can be filled with content blocks to create your template (click to enlarge)
- Thus, you can think of each Email Template as a table, that allows you to arrange Content Blocks in multiple ways under Rows and Columns, helping you build customized templates in no time at all! (And don't worry about the 'responsive' part of it, that's taken care of by our email editor.)
Now, let's walk you through all the features of the Drag & Drop Editor:
Customizing a Template
As shown below, all the Content Blocks and Rows of a template can be Deleted, Duplicatedand Shifted, as per your design needs.
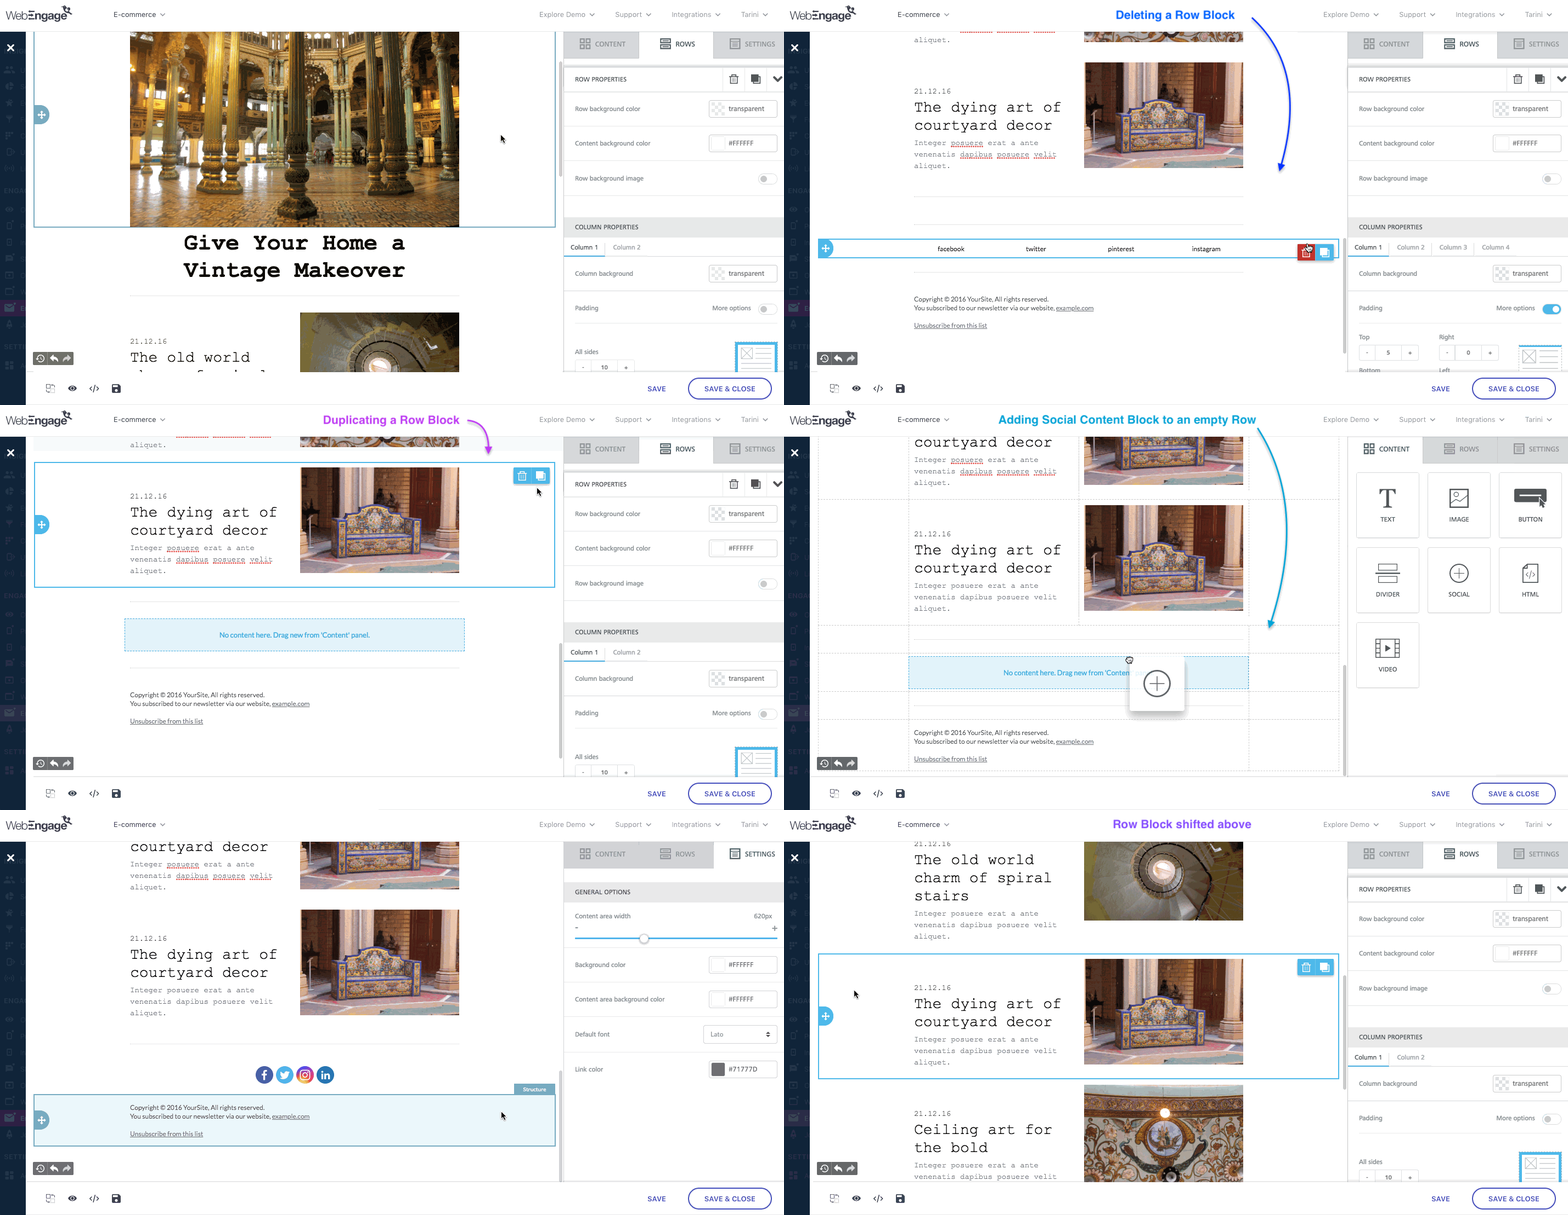
Click to enlarge
- Select the block and click on the Bin icon placed under the block or the one placed in the Right Panel to Delete.
- Select the block and click on the Duplicate icon visible under the block or the one placed in the Right Panel to Copyit.
- In doing so, a duplicate will emerge below the selected block, as shown above.
- Select the block and drag it to a new position in the template to Shift.
Further, you can customize the appearance of each Row (& it's Columns) through the Right Panel. For example in the below visual, we have:
- Customized the background color of the top & bottom sections of the template
- Added a bright border to the column containing the banner image
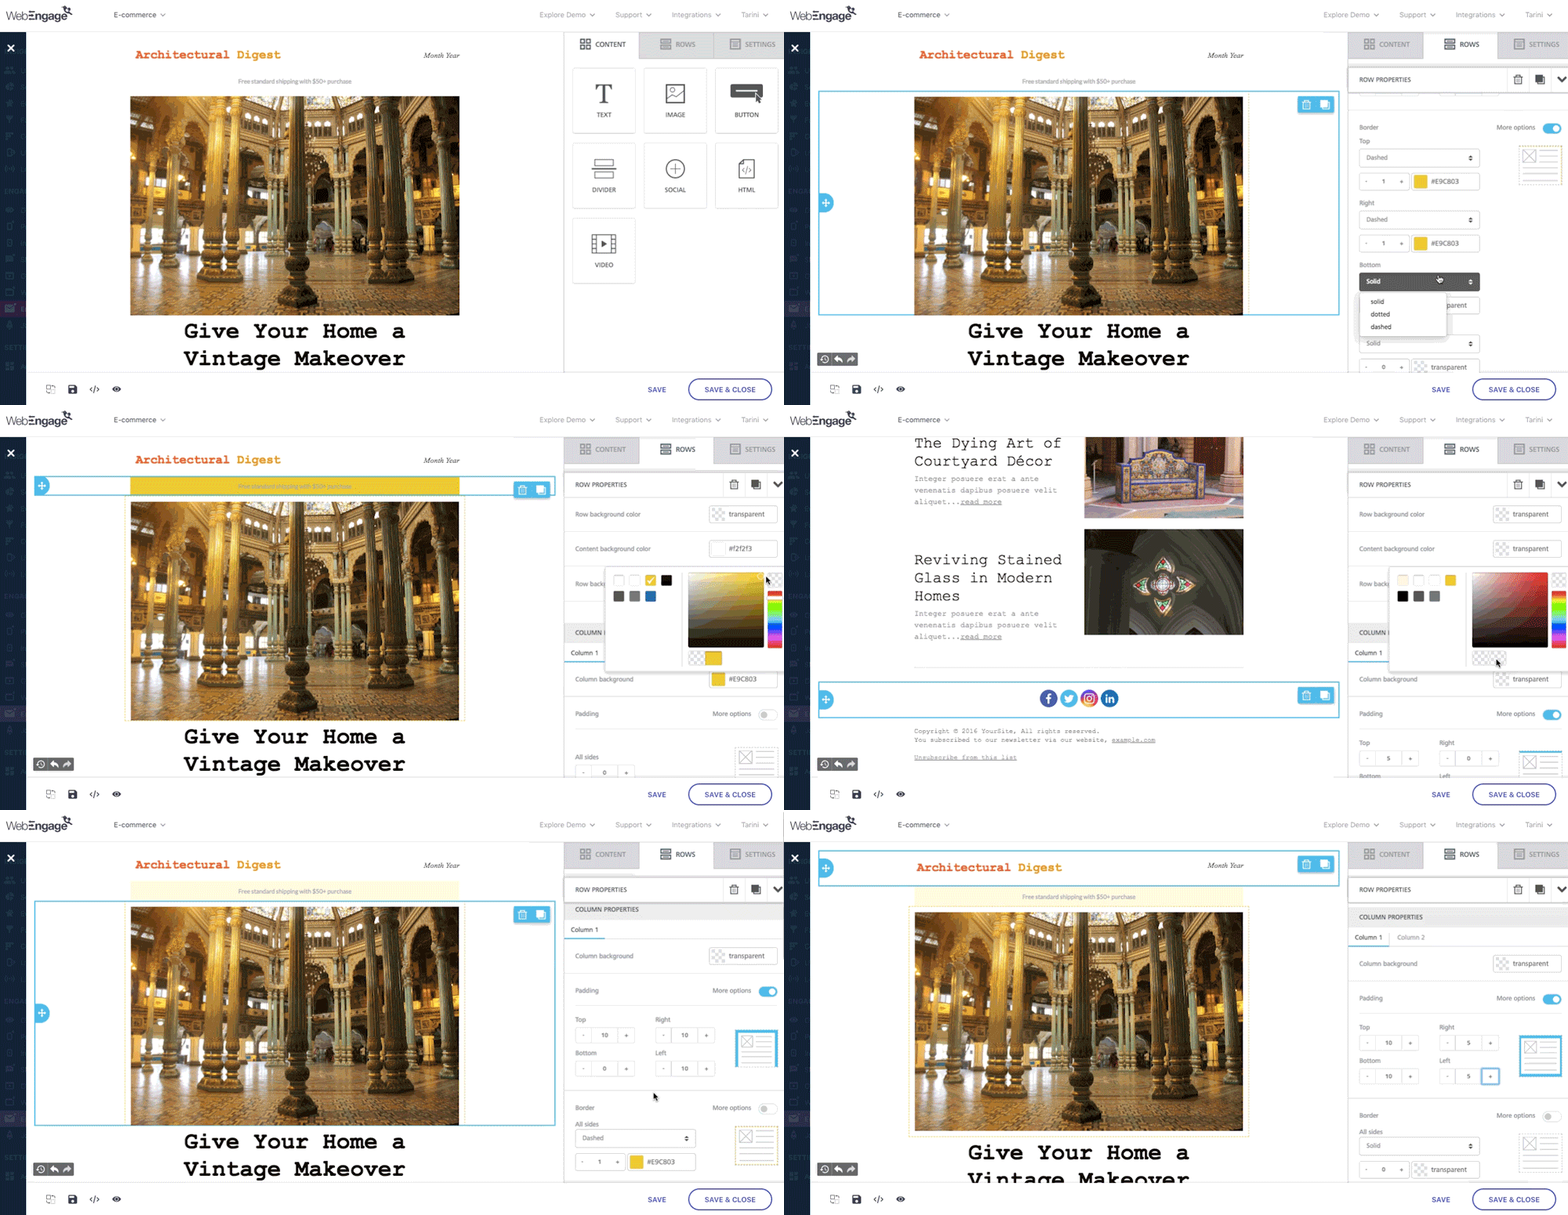
Click to enlarge
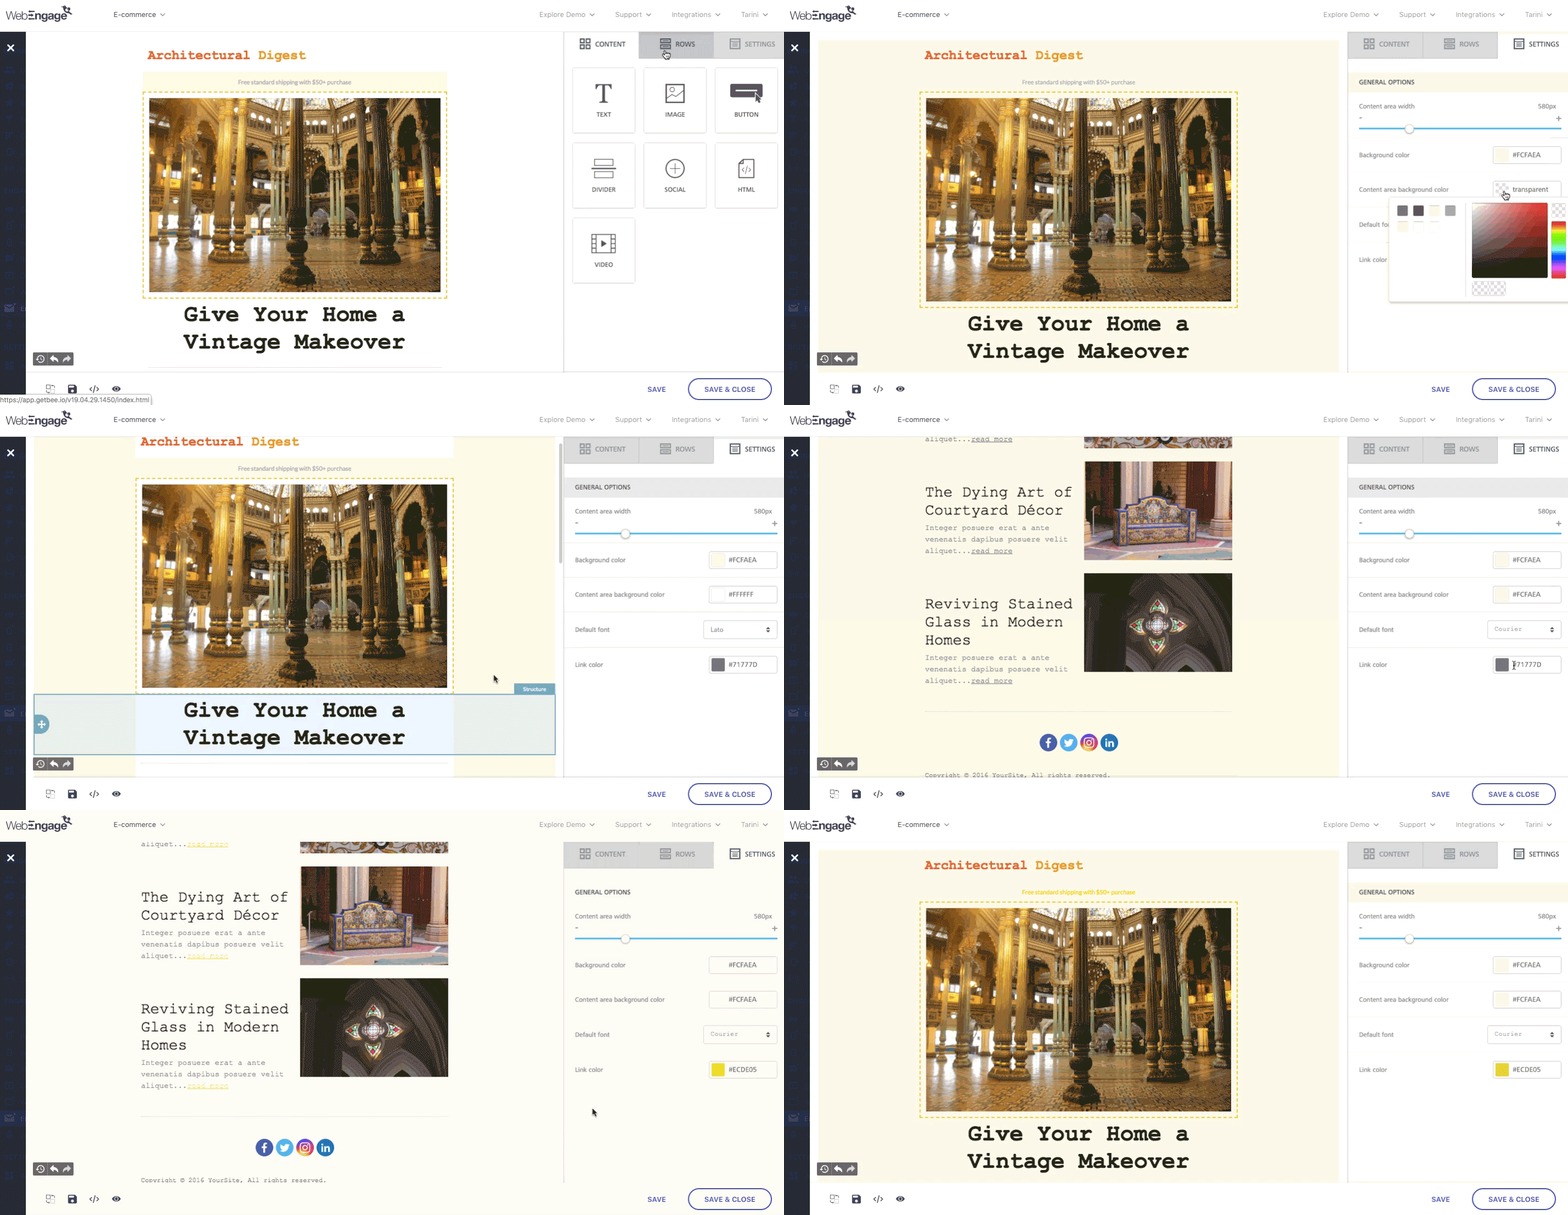
Lastly, you can configure the overall look and feel of the entire template through the Settings section nested under the Right Panel. For example, in the below visual we have:
- Customized the layout's background-color
- Increased the width of the content
- Customized the hyperlinked text's color
Click to enlarge
Personalizing the Message
Creating a Transactional Email Campaign?Please refer to this guide to personalize the text.
Steps listed below are applicable to all one-time, triggered, recurring & journey Email campaigns.
You can easily personalize your message to each user's personal details, preferences, and behavioral history by leveraging all the data (User Attributes & Custom Events) being tracked for your account.
Let's go over a short use-case to show you how it works:
Use-case: Personalizing Email Template's Message to User's Name & Behavioral HistoryLet's take the example of an online grocery store. Each time a user places an order, they track it as a Custom Event, Order Placed. Details of the order like Order ID, Delivery Address, Payable Amount, Discount and so on are tracked as the event's Custom Attributes.
Other details like the user's name, subscription status, LTV (life-time value) and other details are tracked as Custom User Attributes like First Name, Last Name, Subscription-Status, LTV and so on.
This enables them to dynamically personalize delivery updates to the latest order placed by each user.
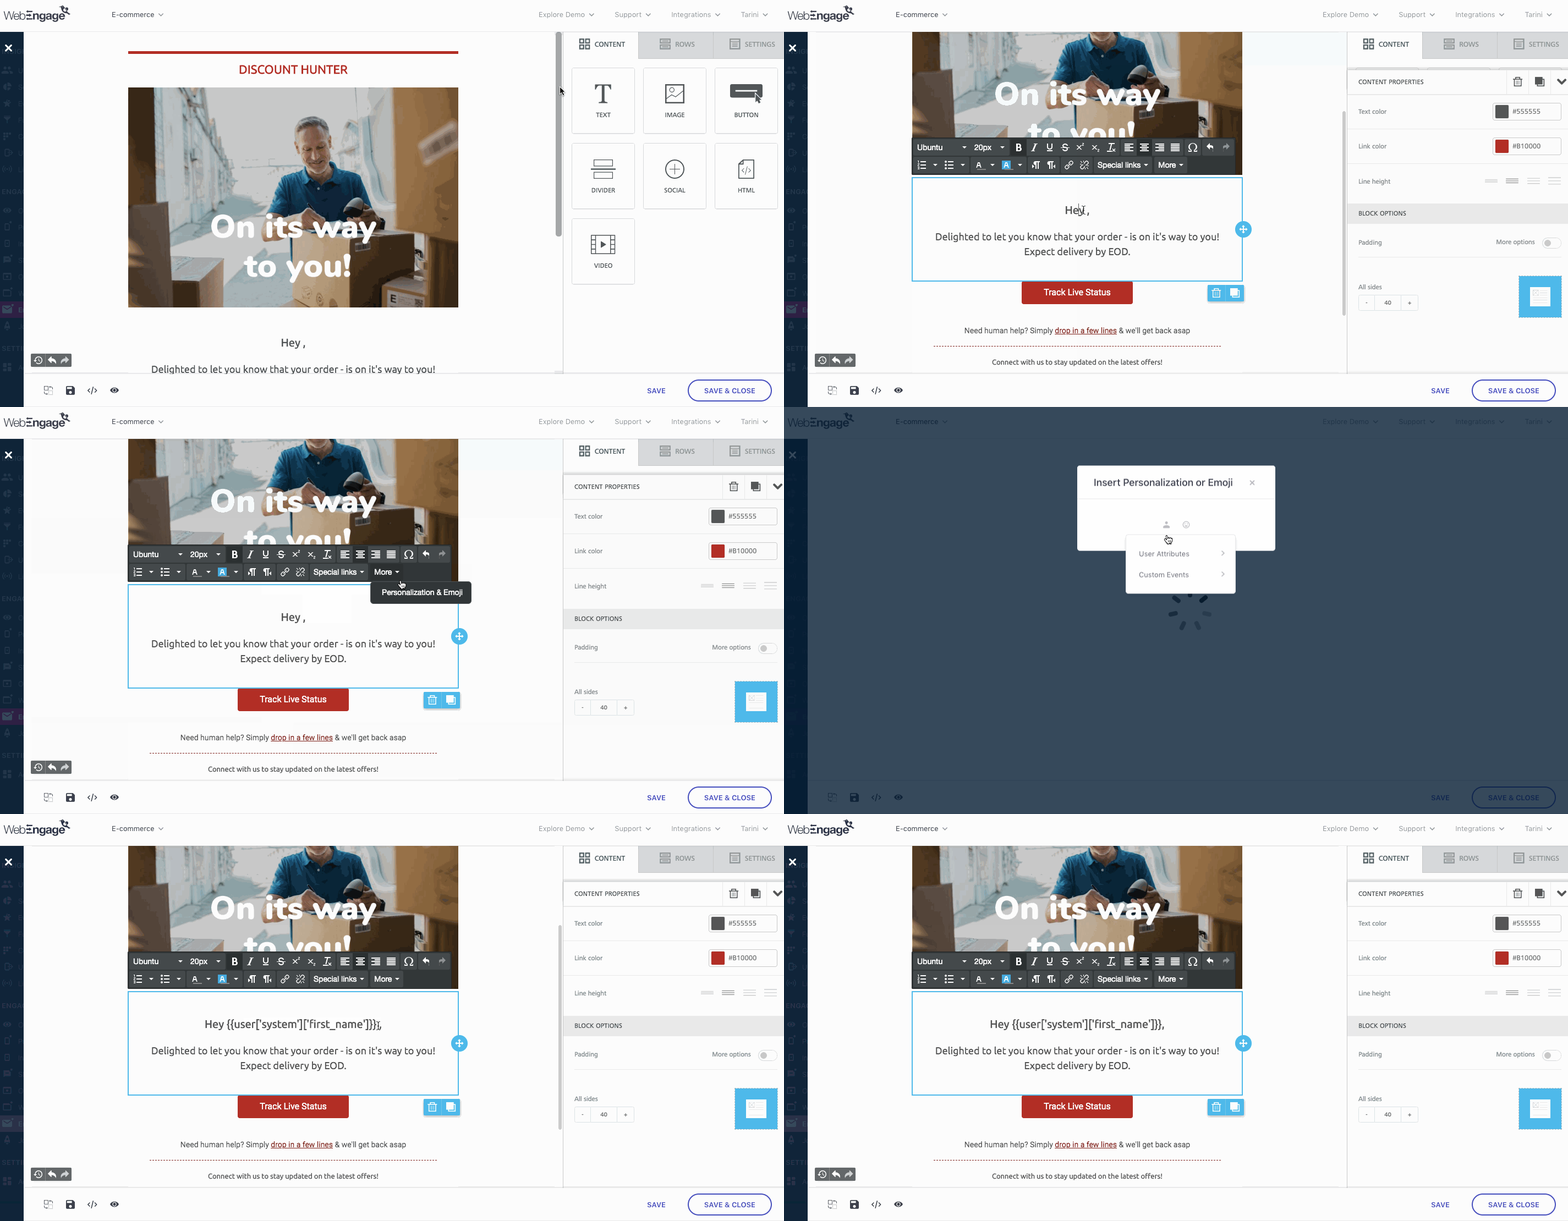
Here's how they personalized the first name:
Step 1: As shown below, click on the option, More in the formatting toolbar and select Personalization & Emoji. In doing so, a pop-up will appear on the screen.
Click to enlarge
Step 2: Click on the Personalization icon. In doing so you will be able to access the User Attributes and Custom Events being tracked for your account.
Step 3: Select User Attribute from the menu.
- In doing so, a list of all the user details being tracked for your account will open up.
Step 4: Select First Name from the list.
- In doing so, {{user['first_name']}} will get added to the template, as shown above.
Here's how they personalized the order details:
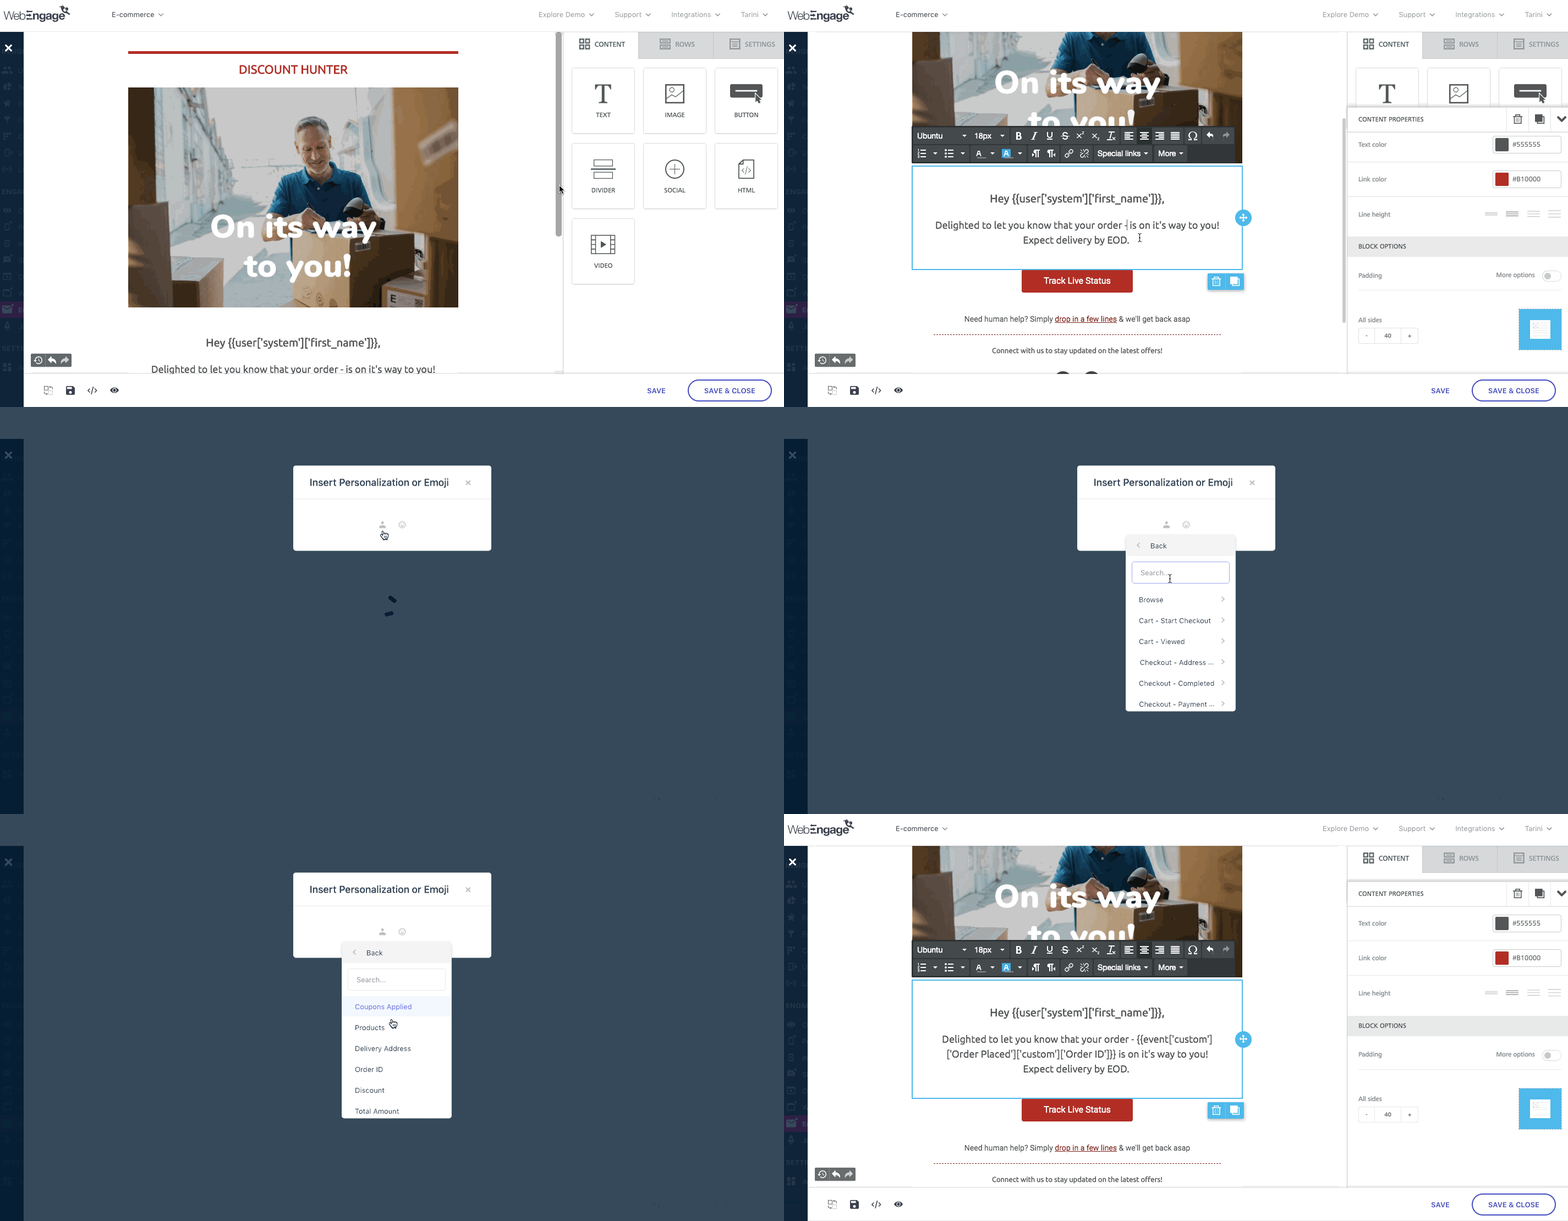
Step 1: As shown below, click on the option, More in the formatting toolbar and select Personalization & Emoji. In doing so, a pop-up will appear on the screen.
Click to enlarge
Step 2: Click on the Personalization icon and select Custom Event from the menu.
- In doing so, a list of all the custom events being tracked for your account will open up.
Step 3: Select Order Placed from the list.
- In doing so, a list of the event's custom attributes will open up.
Step 4: Select Order ID as the Custom Attribute.
- As shown above, in doing so {{event['custom']['Order Placed']['custom']['Order ID']}} will get added to your message as a placeholder.
Thus, whenever the email is sent to a user, we will populate the personalization tokens for first name and order ID with the respective values gleaned for them.
Hyperlinking Text
Fact CheckEach time a user clicks on hyperlinked text, it's automatically tracked as the Campaign Performance Indicators,Total Clicks and Unique Clicks for the Email Campaign and for Email as a channel.
While we recommend that you add a button to your template for the primary call-to-action, you can always choose to hyperlink text to direct users to blog posts, videos or help them unsubscribe. Additionally, using the Drag & Drop editor, you can also nudge users to make a call, send an Email, download a file or send an SMS through your email!
Here's how you can set up each CTA:
1. Open a Web Page
You can easily direct users to your website, blog, YouTube channel or any other web entity by hyperlinking the text. Here's how you can set it up:
Click to enlarge
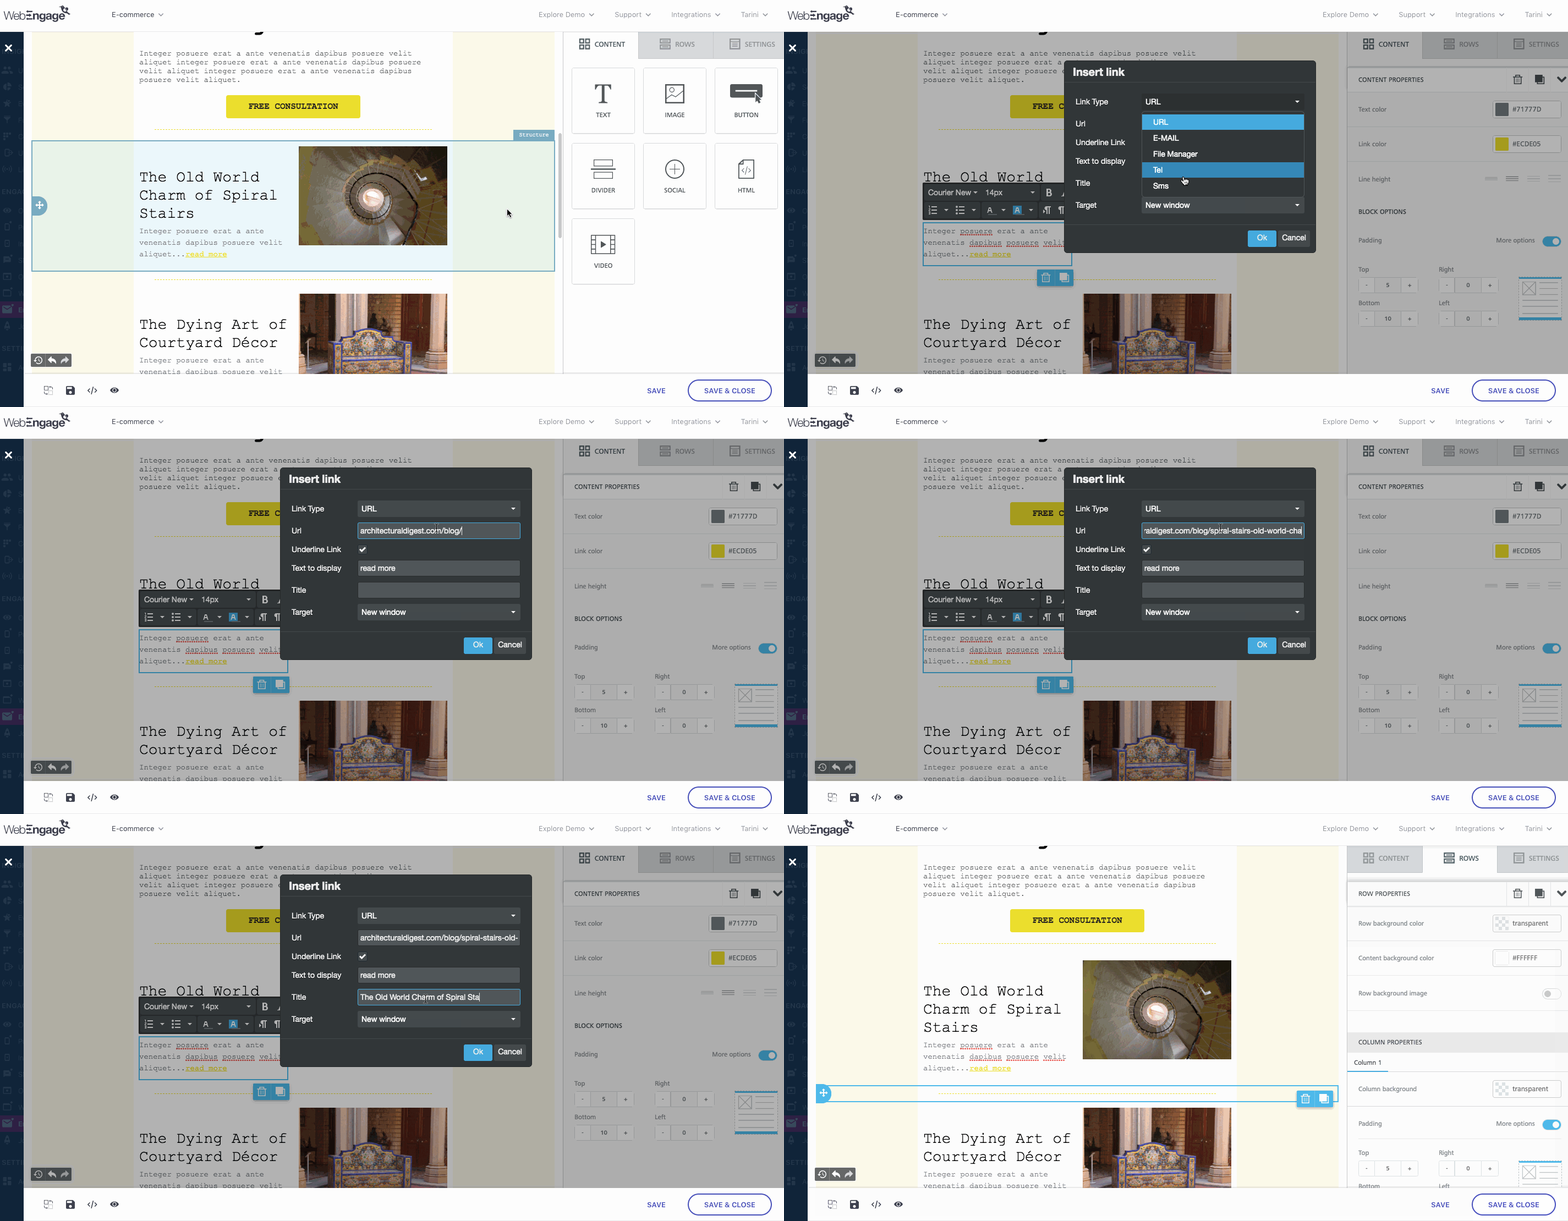
Step 1: As shown above, select the text you'd like to hyperlink.
Step 2: Click the Link icon in the formatting toolbar.
- In doing so, you will be prompted by a pop-up, allowing you to configure the link.
Step 3: Click on the first dropdown and select URL from the list.
- In doing so, you will be able to specify the link you'd like to direct users to, and whether or not a new window should be opened for loading the link.
- For example, in the above visual, we have configured the link to open in a new window once a user clicks on the text.
Step 4: Click OK to add the link.
2. Send an Email
You can easily prompt users to get in touch with you by hyperlinking text with an email address. Here's how you can set it up:
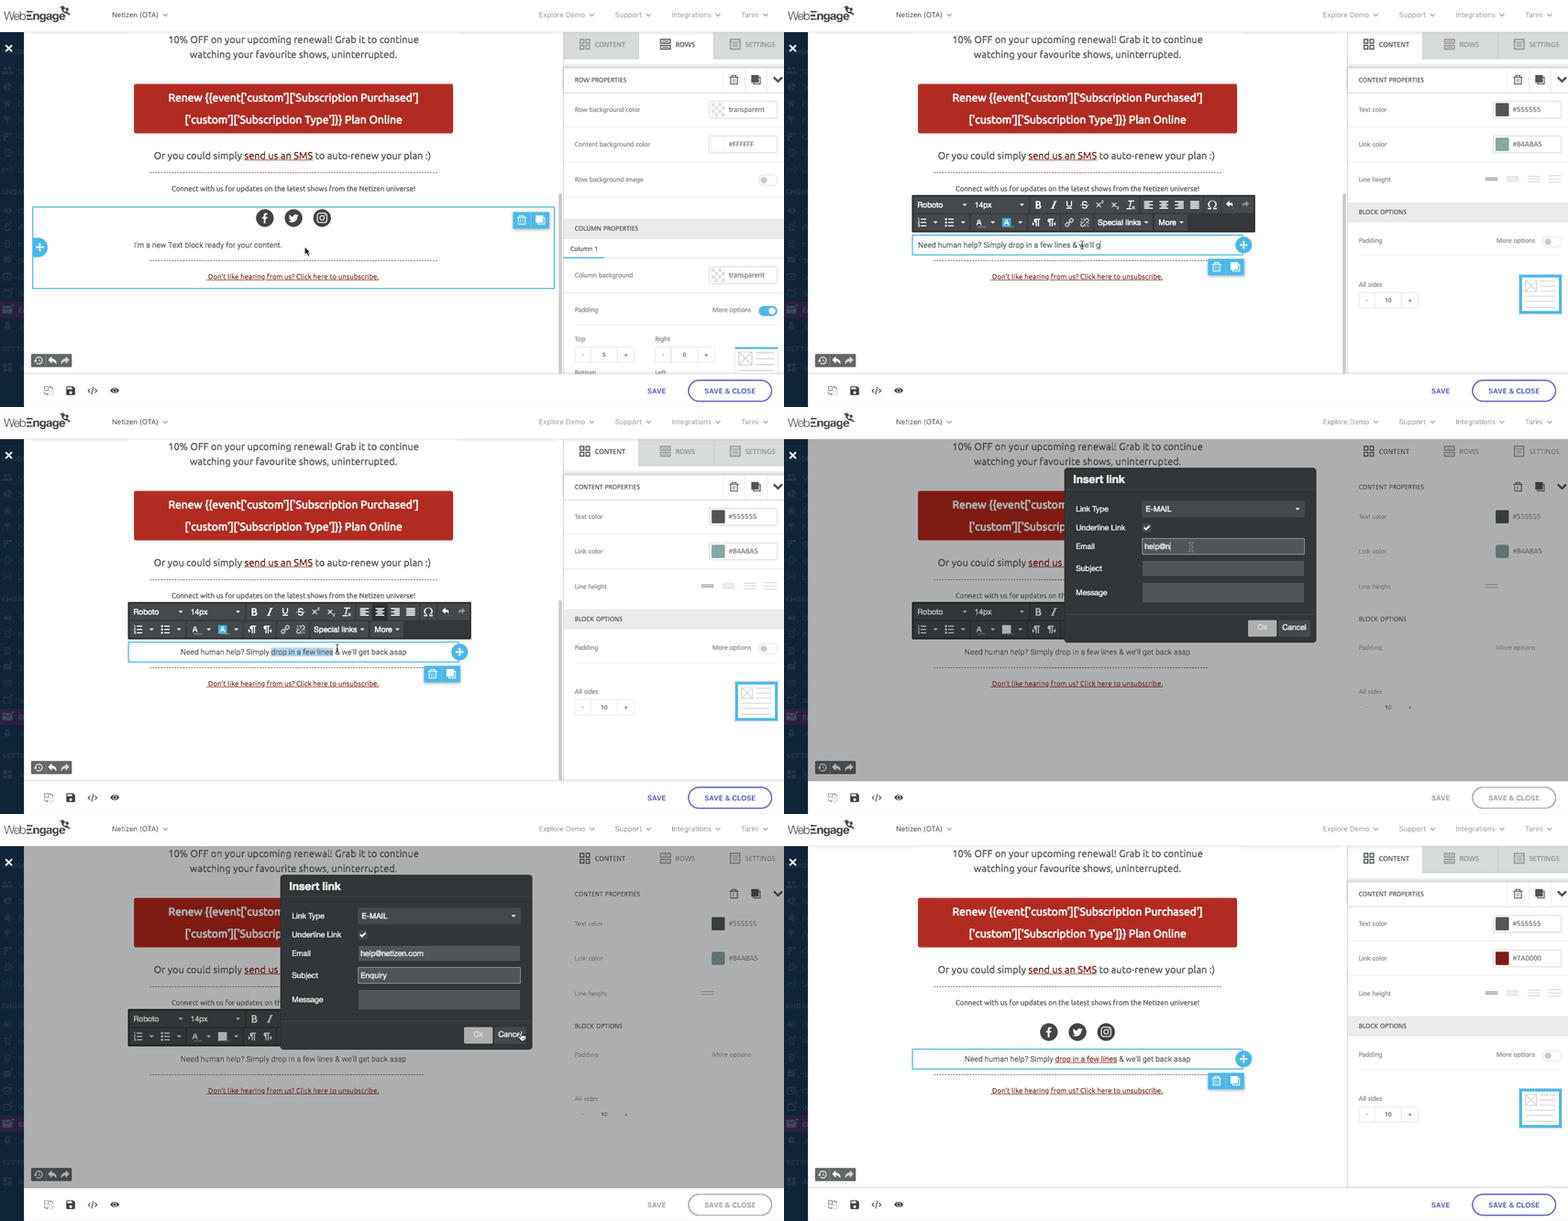
Click to enlarge
Step 1: As shown above, select the text you'd like to hyperlink.
Step 2: Click the Link icon in the formatting toolbar.
- In doing so, you will be prompted by a pop-up, allowing you to configure the link.
Step 3: Click on the first dropdown and select E-mail from the list.
- In doing so, you will be able to specify a receiving email address, the email's subject line, and a generic body copy, making it easier for users to communicate with you.
Step 4: Click OK to add the link.
3. Download a Document
You can easily embed downloadables such as a PDF file, audio/video clip or image in your email's text. Thus, whenever a user clicks on the link, the file will be auto-downloaded or they will be prompted to allow the download, depending on their inbox/browser settings.
Here's how you can set it up:
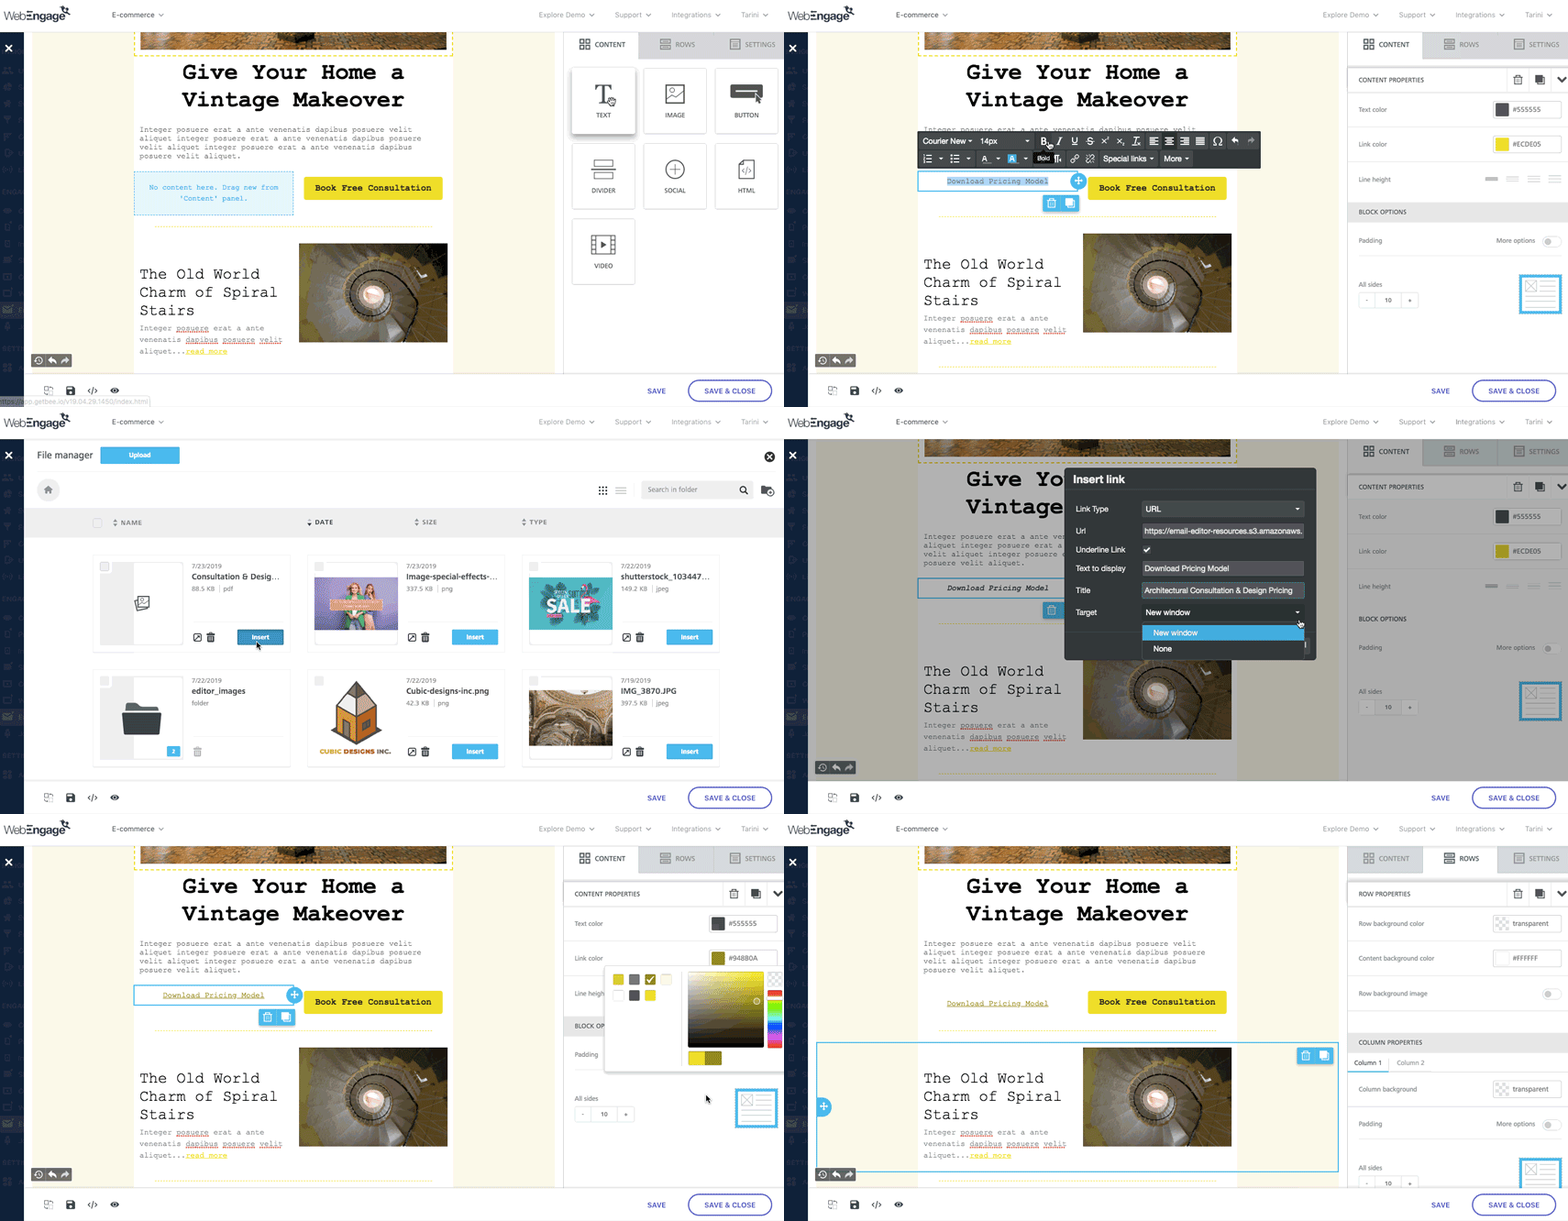
Click to enlarge
Step 1: As shown above, select the text you'd like to hyperlink.
Step 2: Click the Link icon in the formatting toolbar.
- In doing so, you will be prompted by a pop-up, allowing you to configure the link.
Step 3: Click on the first dropdown and select File Manager from the list.
- In doing so, you will be able to upload a document/add an existing file to the download link.
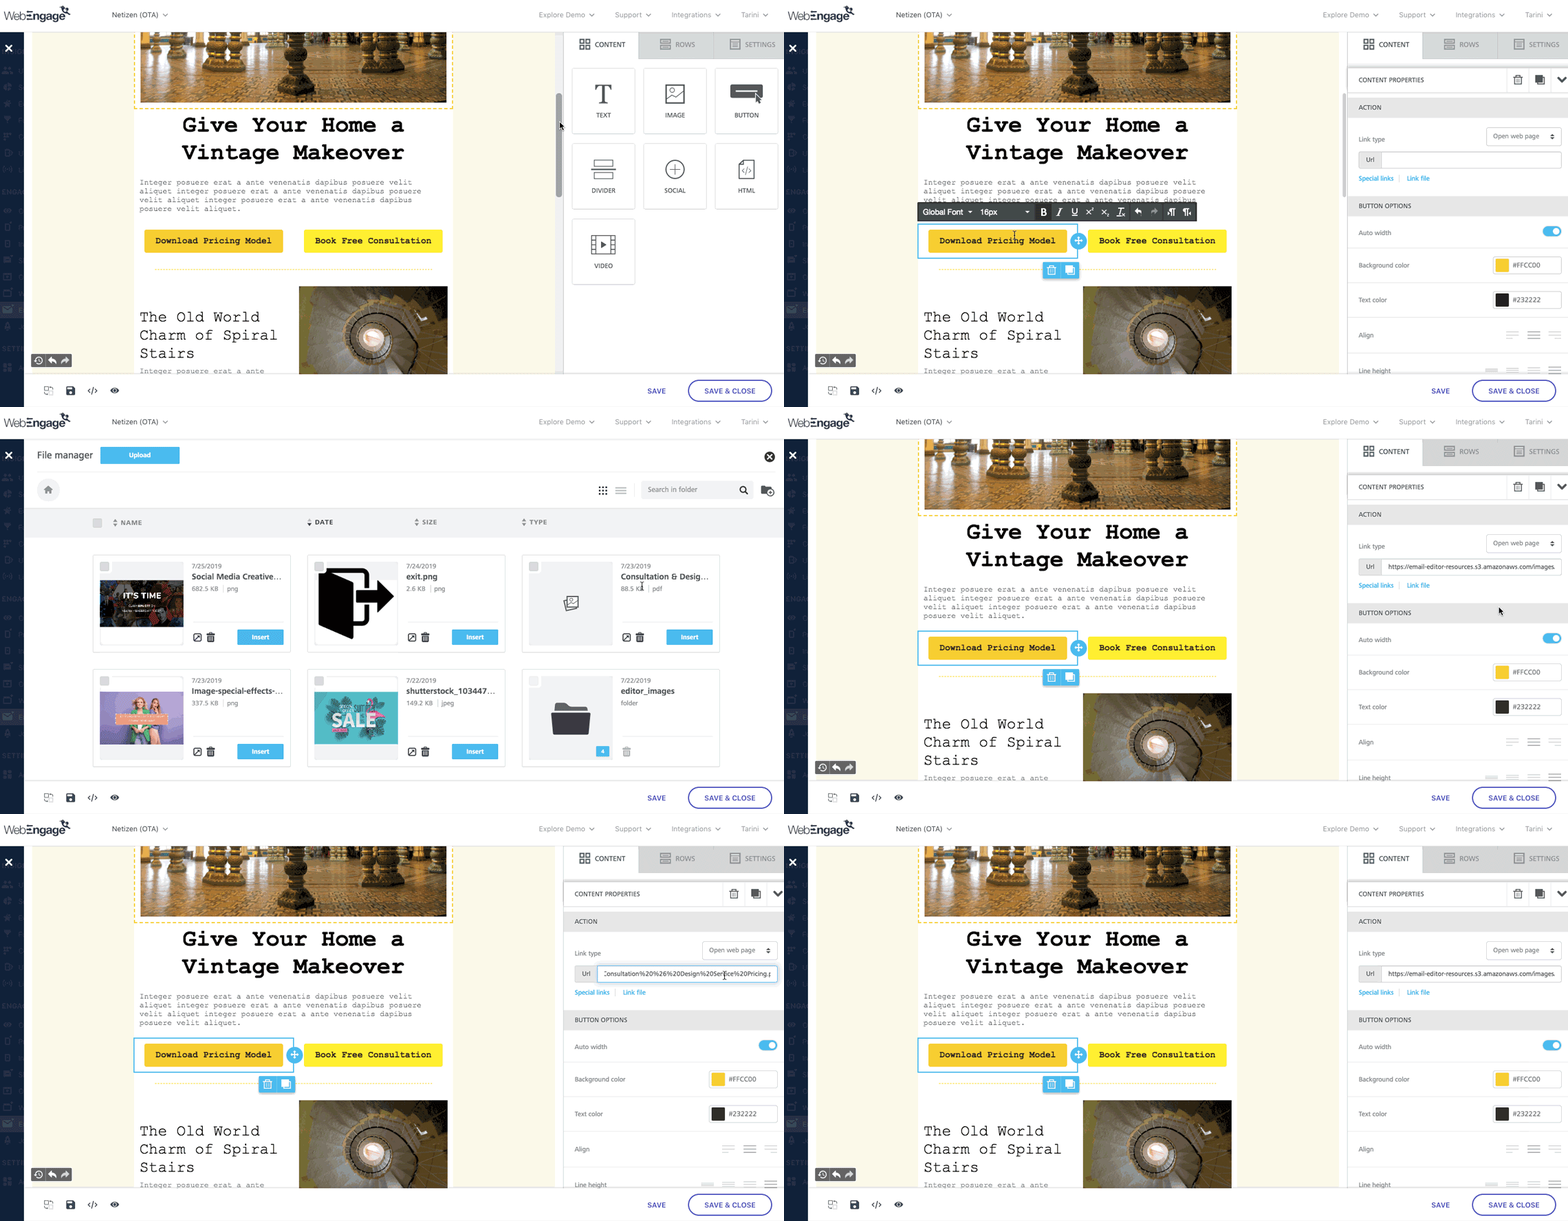
- For example, we have linked the design firm's services and consultation charges manual, in the above visual.
Step 4: Click OK to add the link.
4. Make a Call
You can easily prompt users to reach out over a call by hyperlinking text to the phone number. Thus, whenever a user clicks on the link, the device will invoke the phone app, allowing the call to go through. However, depending on the user's device settings, this CTA may not work on desktops.
Here's how you can set it up:
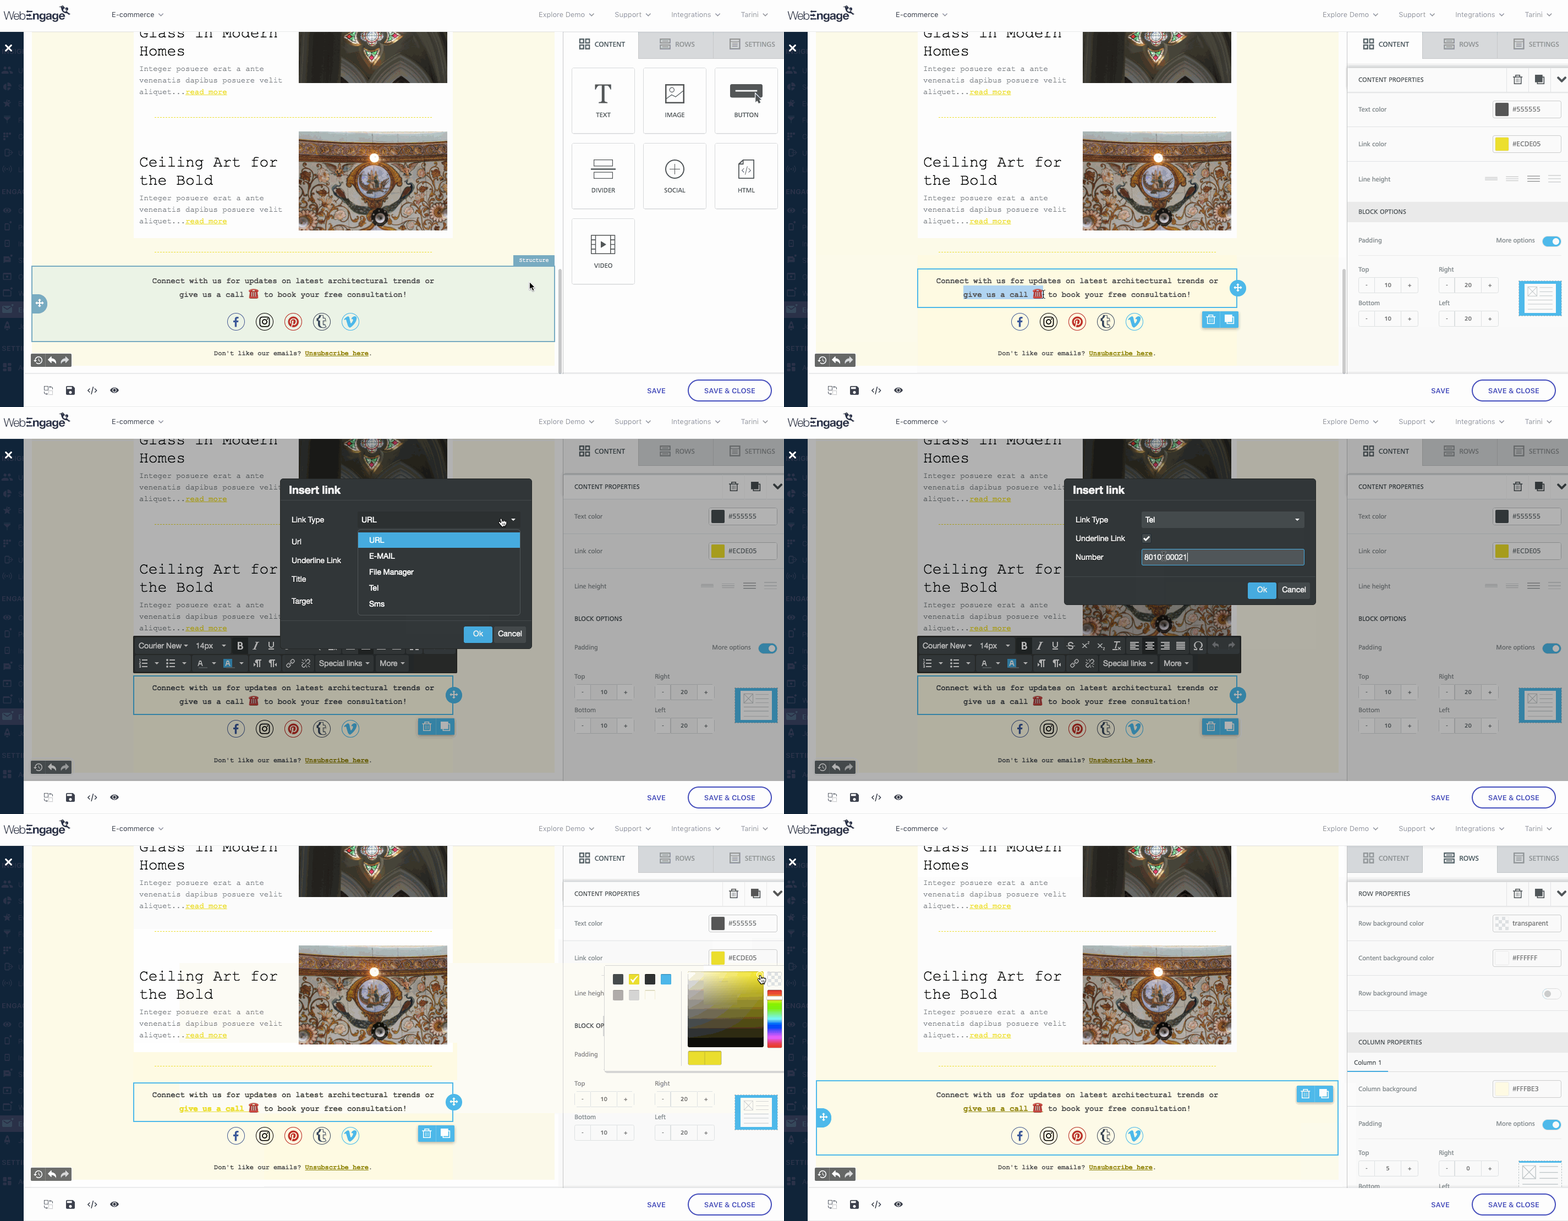
Click to enlarge
Step 1: As shown above, select the text you'd like to hyperlink.
Step 2: Click the Link icon in the formatting toolbar.
- In doing so, you will be prompted by a pop-up, allowing you to configure the link.
Step 3: Click on the first dropdown and select Tel (telephone) from the list.
In doing so, you will be able to specify the phone number through which you expect users to contact you.
Step 4: Click OK to add the link.
4. Send an SMS
You can easily prompt users to reach out via an SMS by hyperlinking text to the phone number. Thus, whenever a user clicks on the link, the device will invoke the messaging app, allowing the SMS to go through. However, depending on the user's device settings, this CTA may not work on desktops.
Here's how you can set it up:
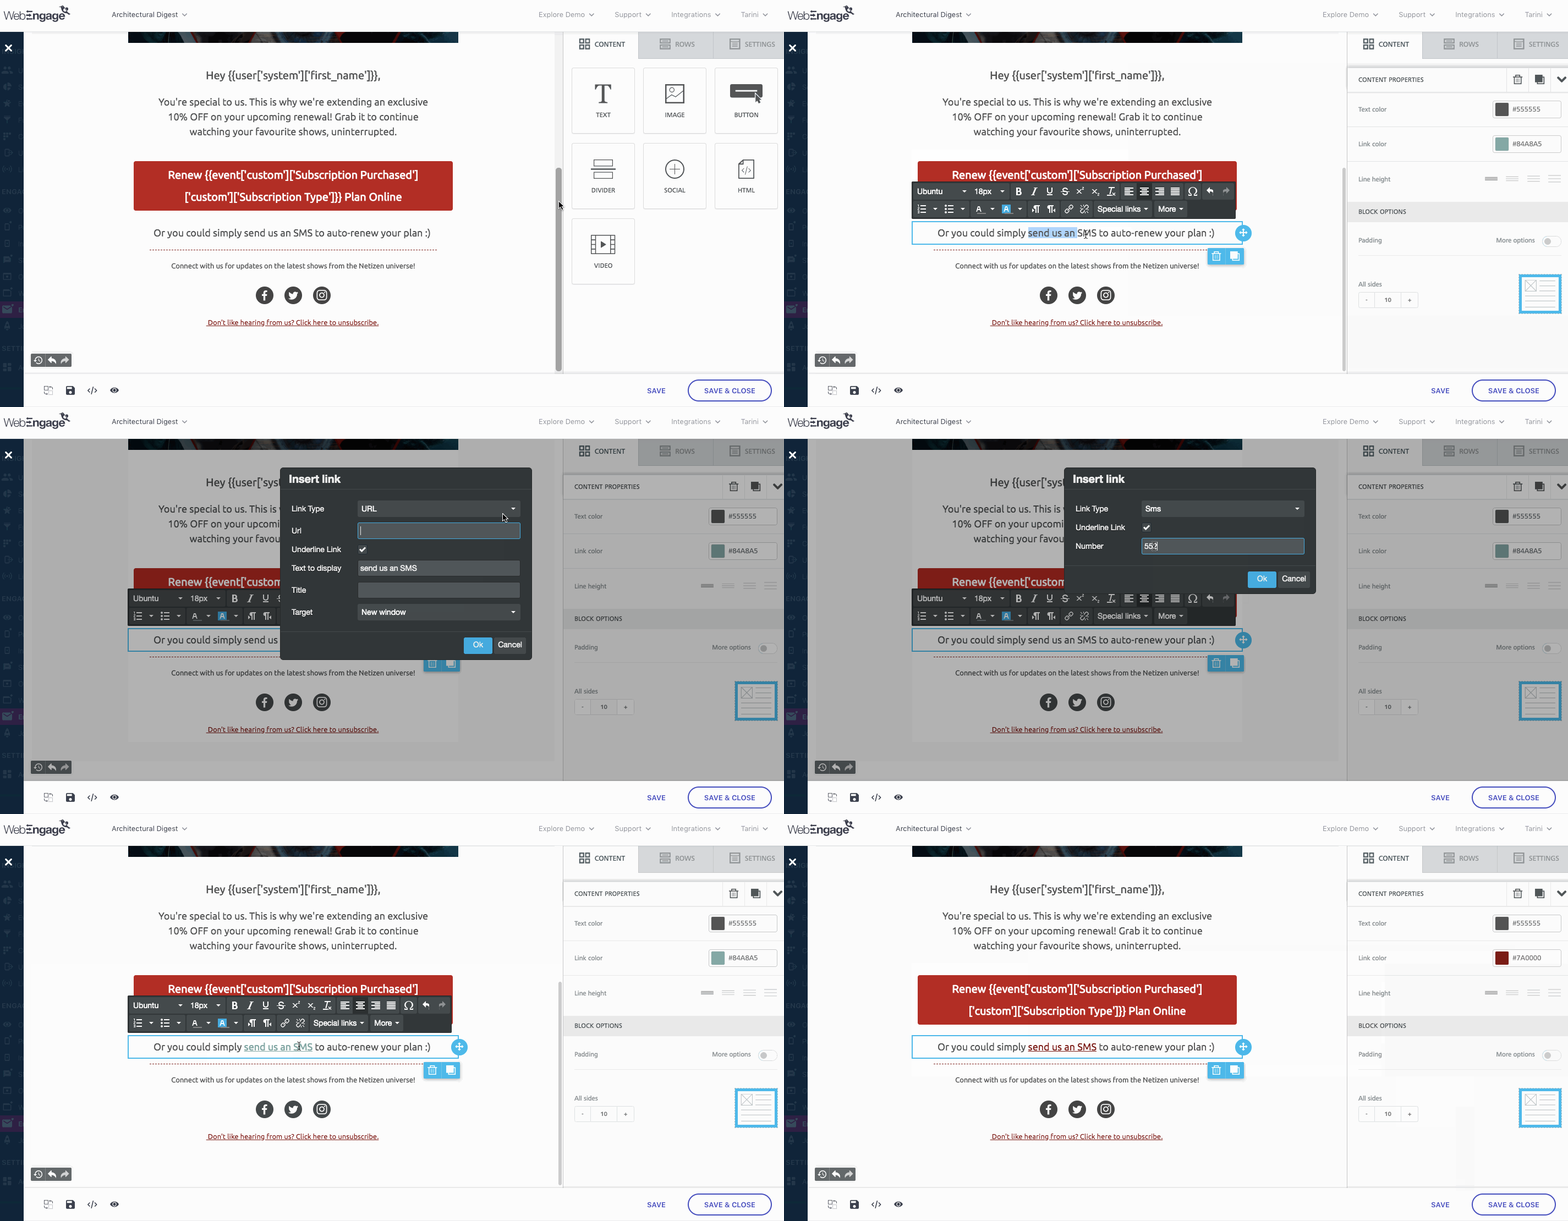
Click to enlarge
Step 1: As shown above, select the text you'd like to hyperlink.
Step 2: Click the Link icon in the formatting toolbar.
- In doing so, you will be prompted by a pop-up, allowing you to configure the link.
Step 3: Click on the first dropdown and select SMS from the list.
In doing so, you will be able to specify the phone number through which you expect users to contact you.
Step 4: Click OK to add the link.
Adding Buttons (CTAs) & Personalization
Adding strategically placed Buttons to your Email is one of the most prominent ways to grab a user's attention and nudge them to perform the desired action or the campaign's end-goal. This could be anything like getting your users to read a new article on your blog, avail a special offer, buy products, renew a subscription, stream a new video or podcast on your platform and so on.
Such actions are generally called conversions in marketing lingo. And in WebEngage, such actions can be tracked as the Conversion Event for your campaign at Step 4: Conversion Tracking.
Now, let's show you how you can add customized buttons to your template:
Click to enlarge
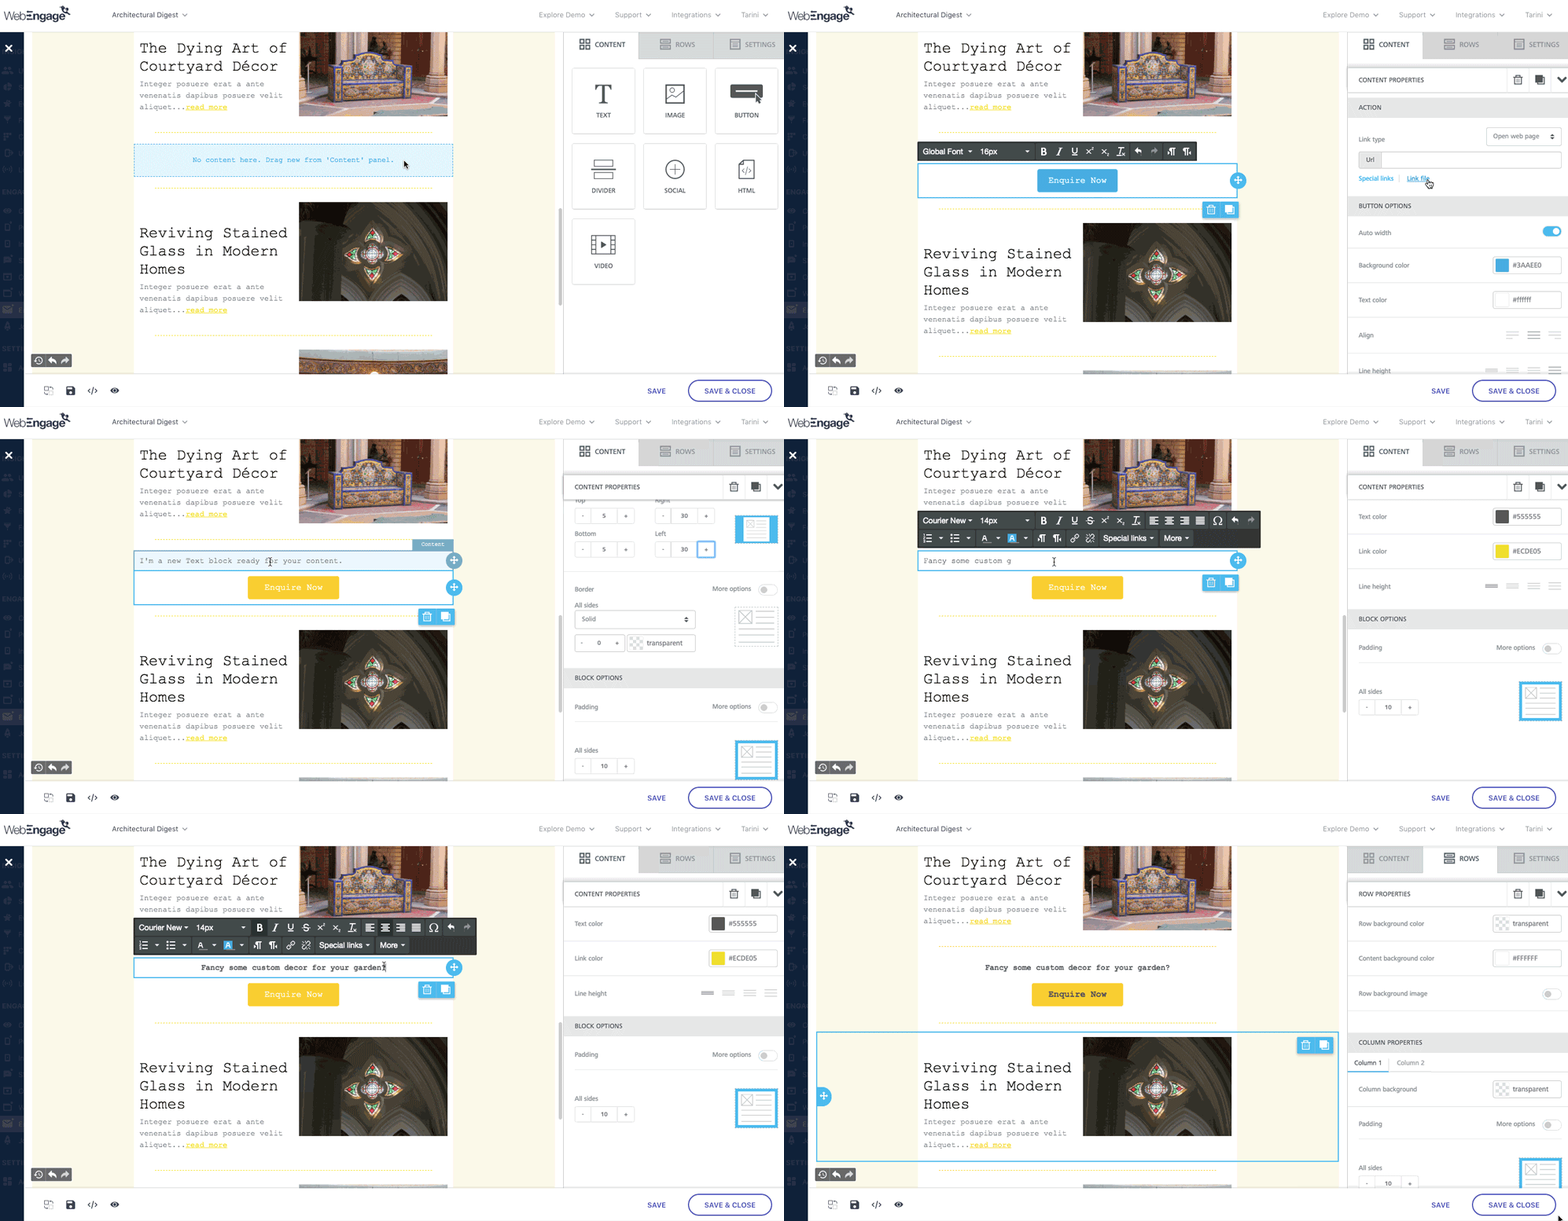
As shown above:
Step 1: Add a Row to the template. (skip if an appropriate placeholder already exists)
Step 2: Select the Button Content Block and drop it into a Row or a Column.
- For example, we have added a
Step 3: Select the button added to the template to add text and customize its appearance. (step-by-step guide on personalizing text)
- For example, in the above visual, we have altered the button's colors, padding, and width through the Content Properties menu in the right panel.
Step 4: Add a link to the button (step-by-step guide)
(repeat for all additional buttons you'd like to add to the template)
Personalizing Button Text
Creating a Transactional Email Campaign?Please refer to this guide to personalize the text.
Steps listed below are applicable to all one-time, triggered, recurring & journey Email campaigns.
You can easily personalize the button's label or text to each user's preferences or behavioral history. Let's demonstrate a short use-case to show you how it works:
Use-case: Personalizing Button's Label to User's Current Subscription PlanLet's take the example of an online video streaming service (OTA) that offers several subscription plans to their users.
In a bid to drive the subscription renewal rates, marketers of the platform created a series of campaigns through a journey, nudging users to renew their existing plan. As a part of their plan, they created an Email campaign and personalized the call-to-action to each user's existing subscription plan.
Prerequisites for personalization:
Each time a user purchases a subscription, they track it as the Cutsom Event, Subscription Purchased
Details of the plan like it's price, type, duration and so on are tracked as Custom Attributes like Subscription Value, Subscription Type, Subscription Duration and the likes of it.
Here's how they personalized the campaign:
Click to enlarge
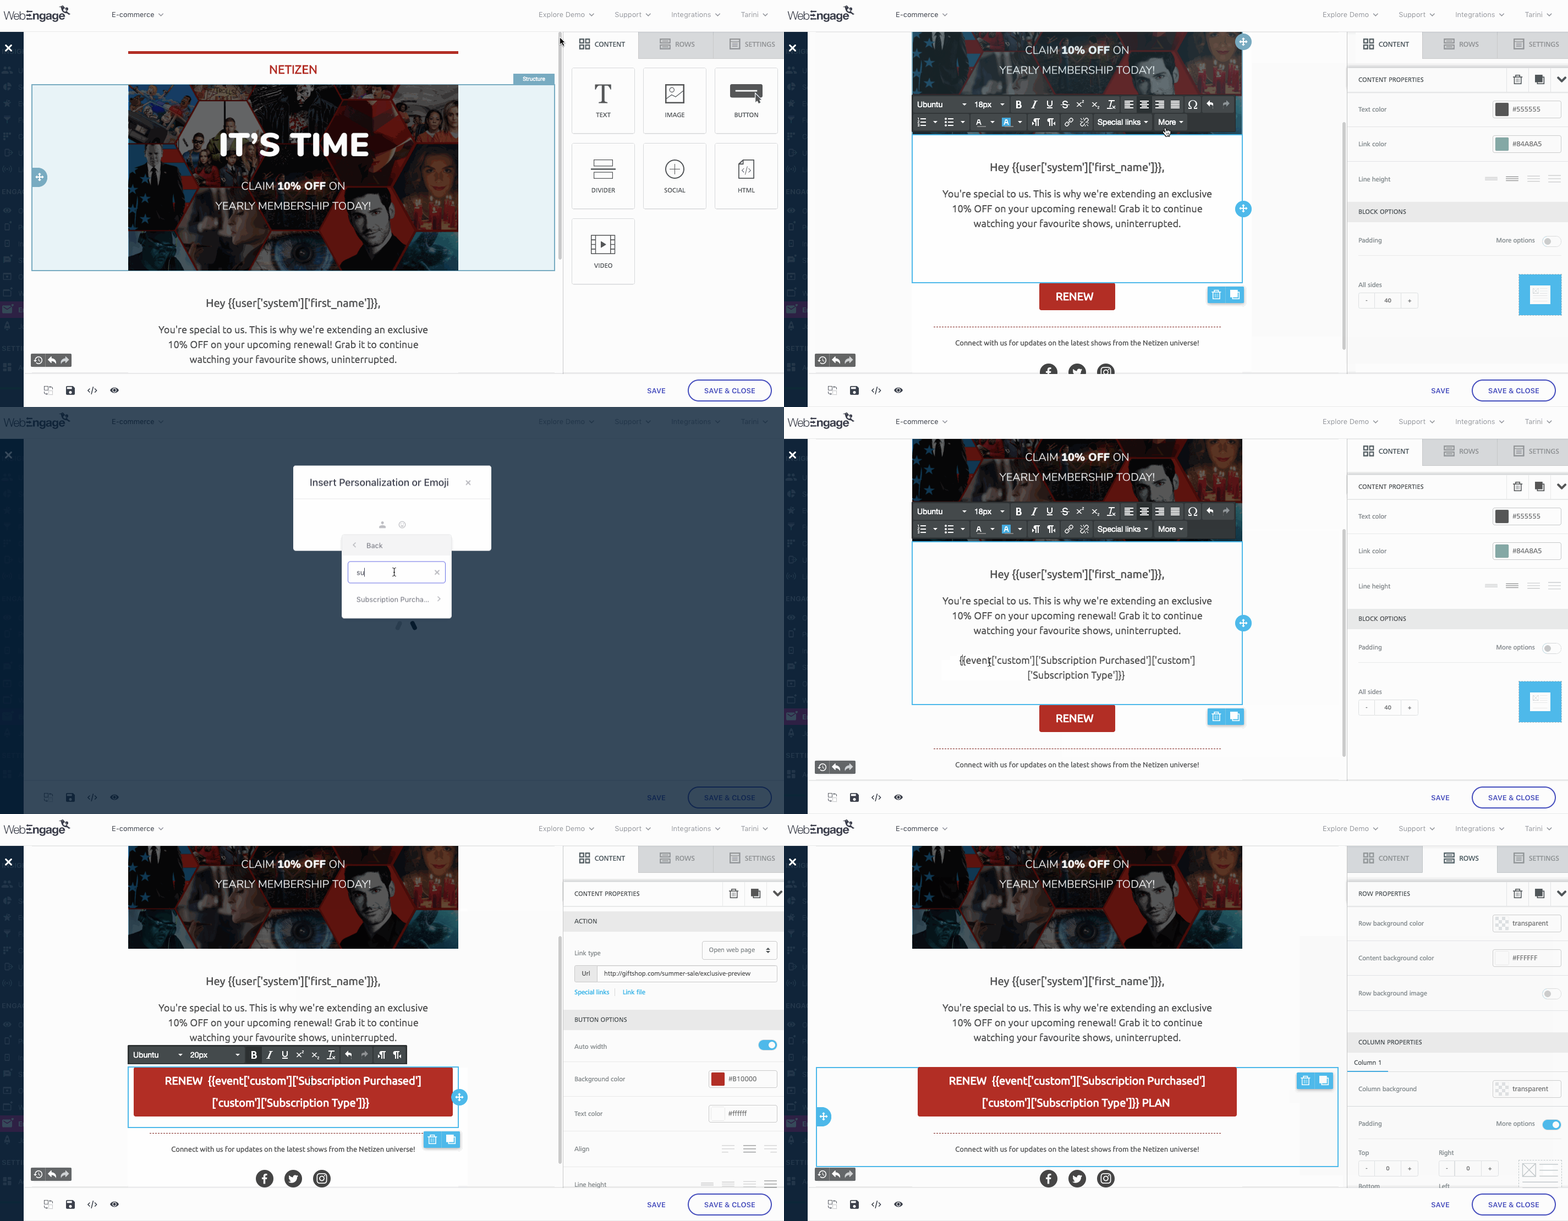
As shown above, due to the technical limitations of the Drag & Drop Editor, you will need to employ a small workaround to personalize the button's text by creating the personalization token in a Text Block.
Step 1: Select an existing Text Block, click the Link icon in the formatting toolbar and select the option, More < Personalization & Emoji.
Step 2: Click on the Personalization icon in the pop-up and select Custom Events from the menu.
- In doing so, a list of all the Custom Events, currently being tracked for your account will appear.
Step 4: Select Subscription Purchased from the list.
- In doing so, a second list, containing all attributes being tracked for the event will appear.
Step 5: Select Subscription Type as the Custom Attribute.
- In doing so, the personalization token, {{event['custom']['Subscription Purchased']['custom']['Subscription Type']}} will be added to the template.
Step 6: Copy-paste the personalization token to the Button as shown above, and delete it from the Text Block.
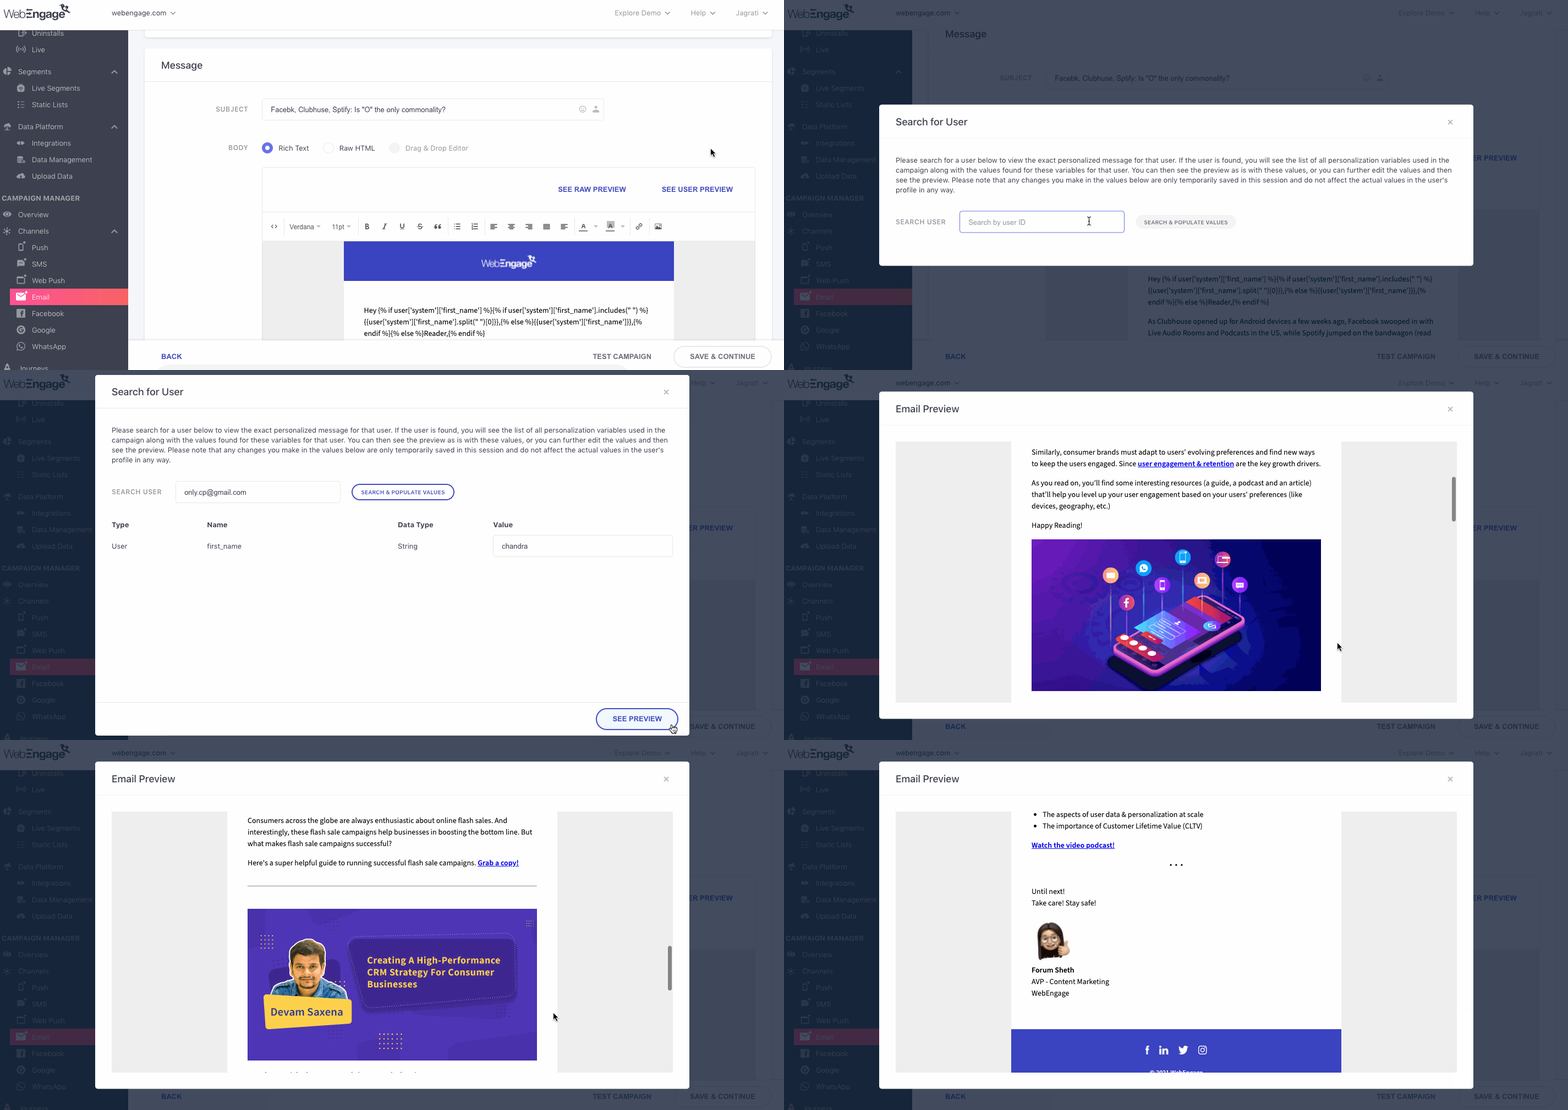
Thus, each time the email is sent to a user, we will populate the name of their existing subscription plan in the CTA. For example, as shown below, on previewing the Email for the User ID, allisonh_552, the CTA is personalized to their existing plan, Yearly.
Click to enlarge
Adding Button-Link
Fact CheckEach time a user clicks on a Button, it's automatically tracked as the Performance Indicators,Total Clicks and Unique Clicks for the Email Campaign and for Email as a channel.
You can easily link the button to open a webpage, make a call, send an SMS, download a file or send an email whenever a user clicks on it. Here's how you can set up each call-to-action:
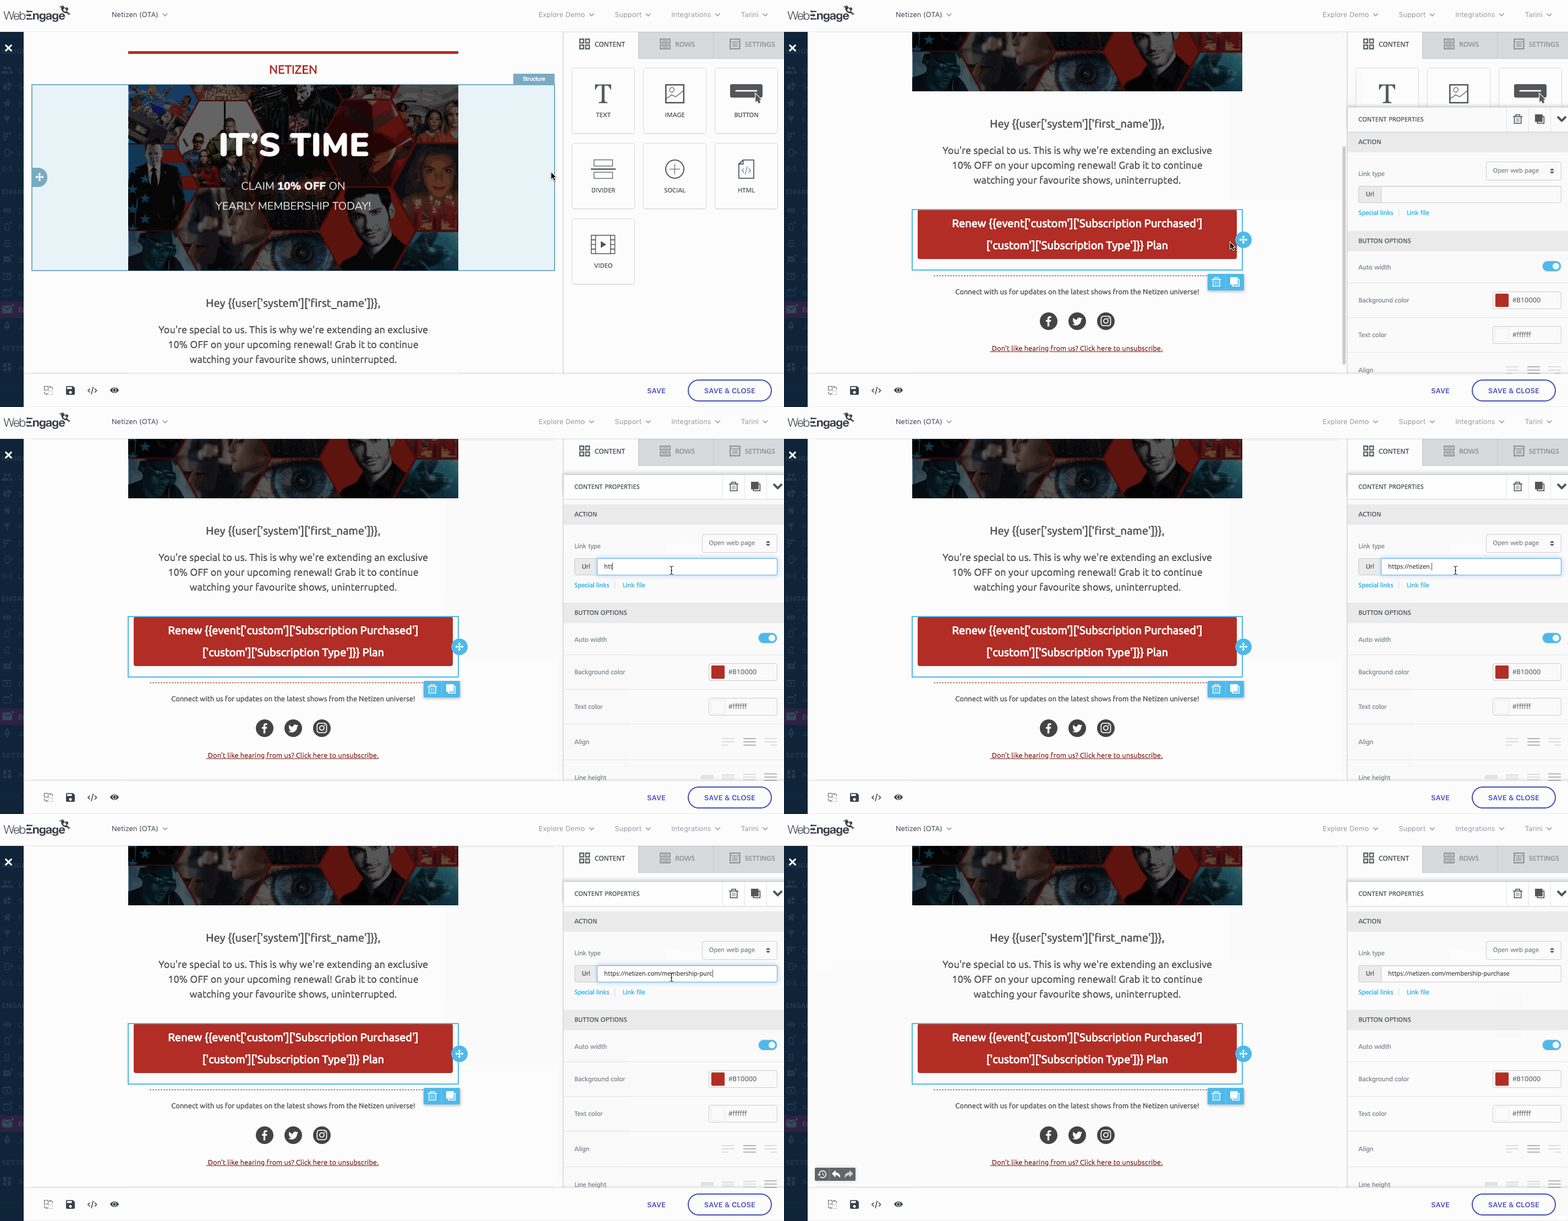
Open Web Page: The default selection, as highlighted below, simply add the link to which you'd like to direct users, in the right panel and click Save.
Click to enlarge
Download File: As shown below, you can prompt users to download a file by configuring the option, Link file. Thus, whenever a user clicks on the image, they will be prompted to download the attached image, document or audio/video clip. For example, in the visual below, we have linked a PDF document containing the design firm's service and consultation charges.
Click to enlarge
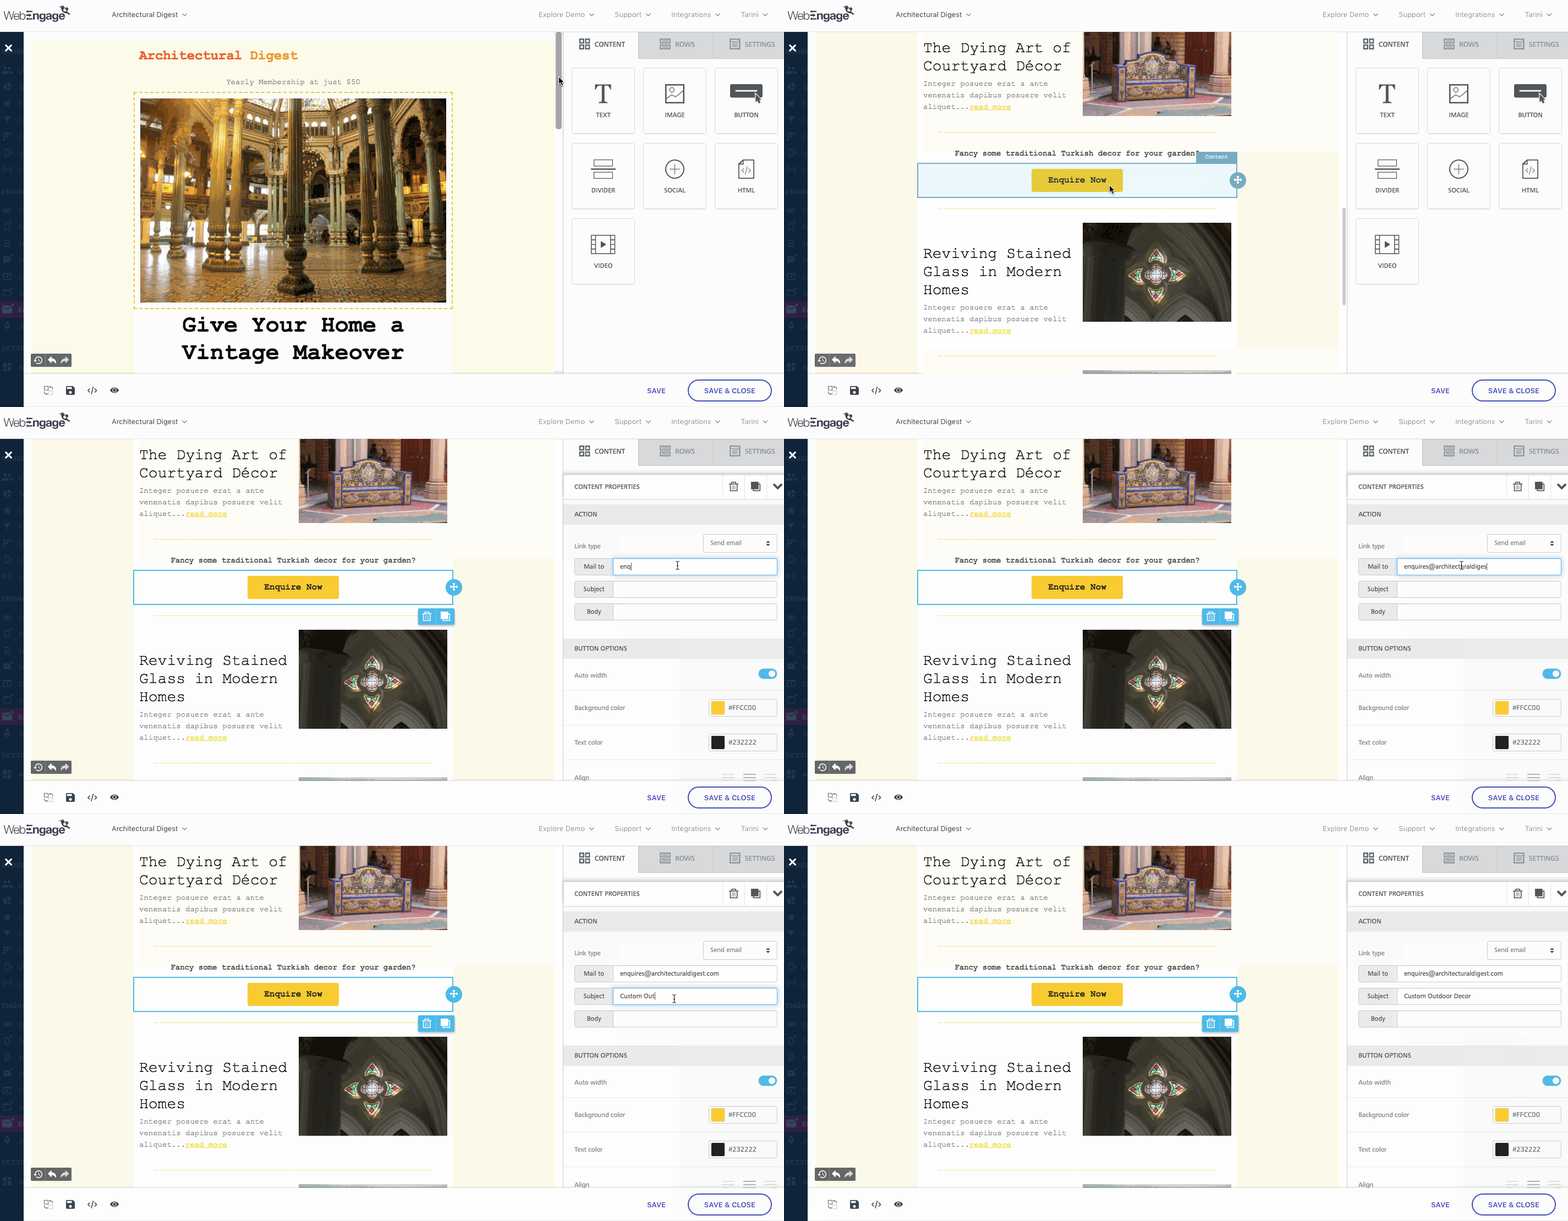
Send an Email: As shown below, click the dropdown nested under Actions to select the CTA. In doing so, you will be able to specify the receiving email address, the email's subject line, and a generic body copy, making it easier for users to get in touch with you. For example, in the below visual we have nudged readers to enquire about having outdoor or garden decor customized for their homes and offices by sending an email to [email protected].
Click to enlarge
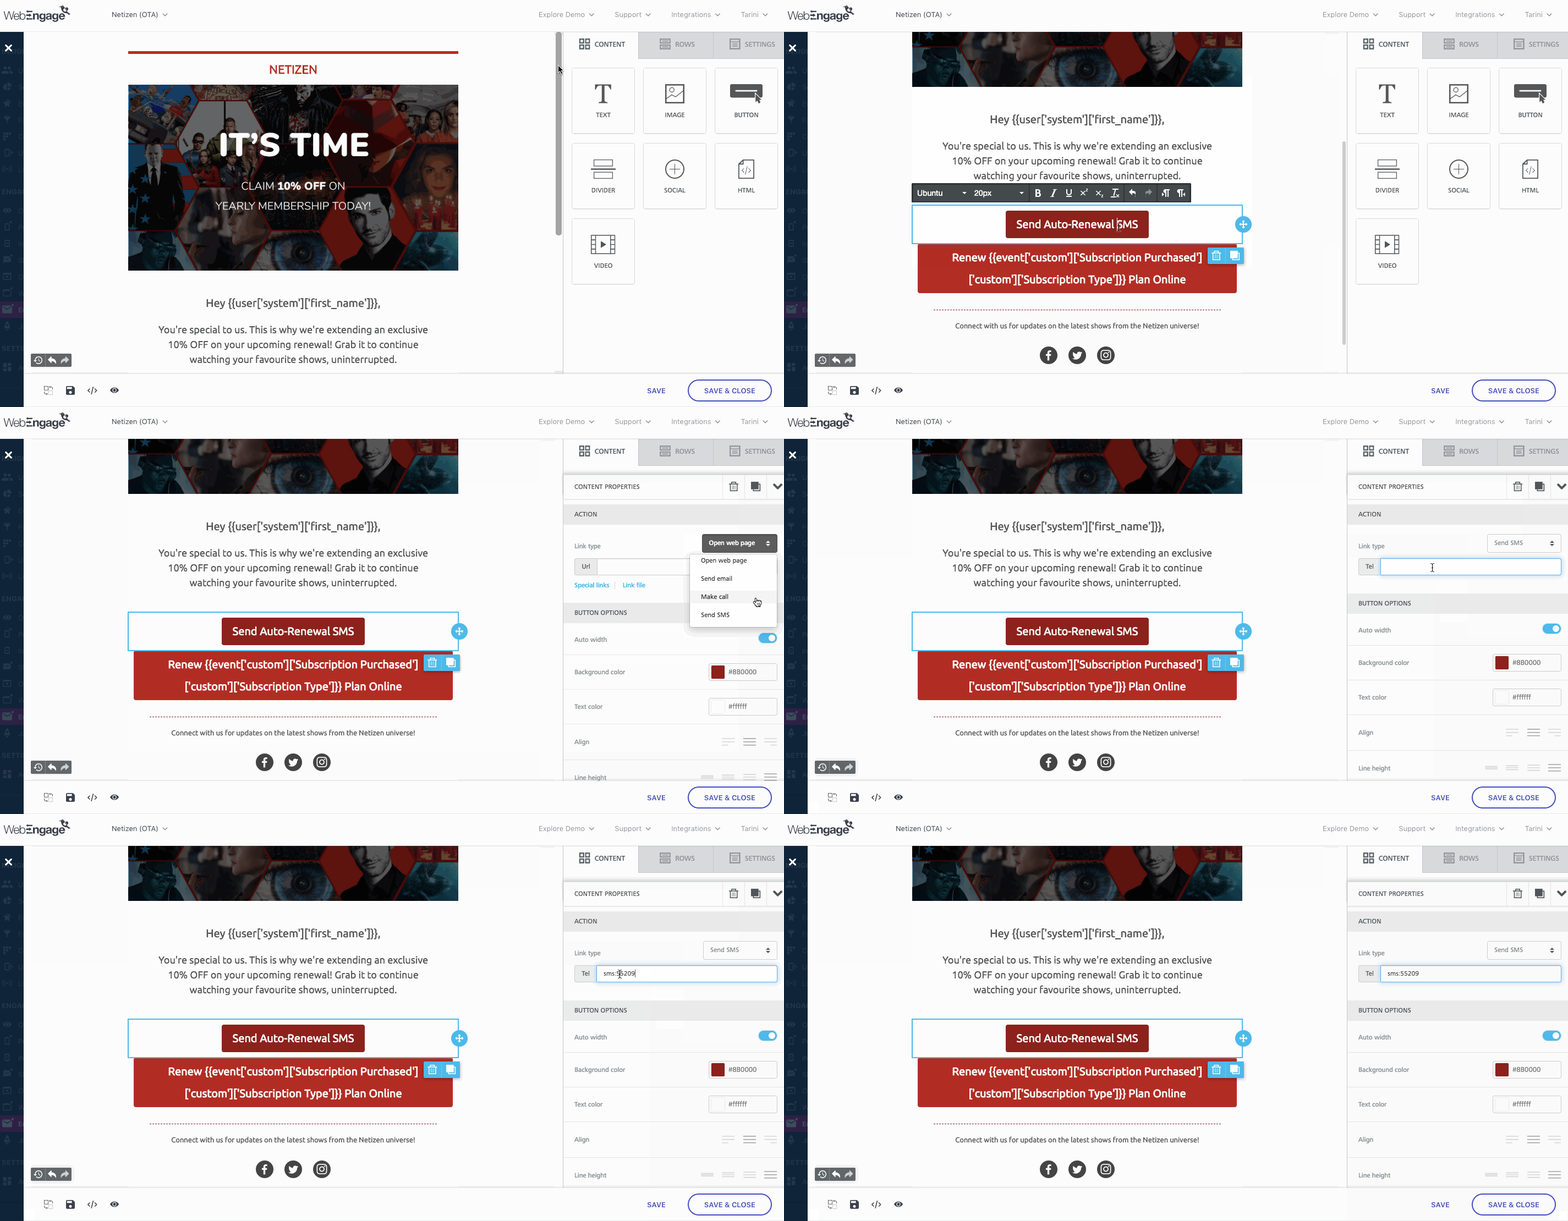
Make a Call / Send an SMS: As shown below, click the dropdown nested under Actions to select a CTA. In doing so, you will be able to specify the phone number through which you expect users to contact you. However, depending on the device and inbox settings of a user, Make Call and Send SMS may not work on desktops.
Click to enlarge
Adding Images & Personalization
You can easily add an image or GIF to your email template by replacing an existing image in an Advanced Template (how to add) or by adding the Image Block to a blank Row and configuring its appearance as per your needs. You can also choose to personalize the image to each user's preferences or behavioral history through dynamic images.
Let's walk you through all the features:
- Adding Generic Images
- Adding Dynamic Images (personalized to each user)
- Hyperlinking Image to Send Email/SMS, Make a Call or Open a Webpage
- Customizing Image Appearance
Adding Generic Images
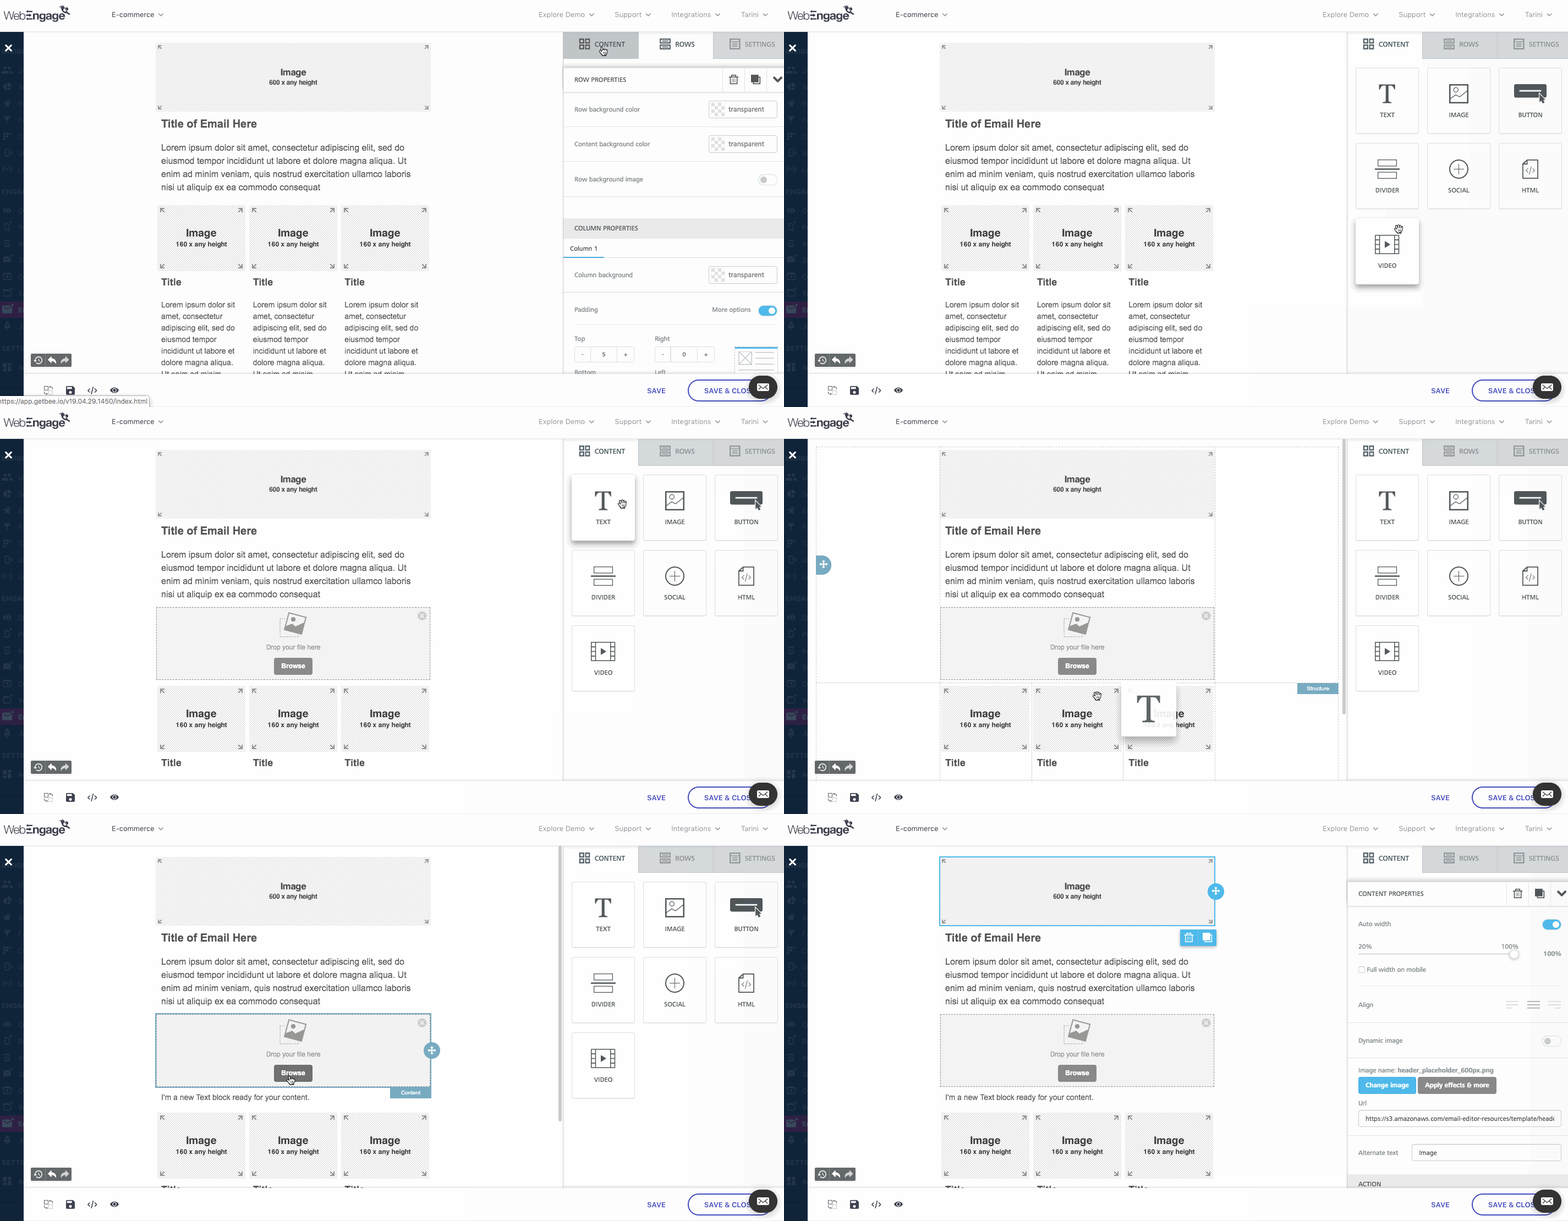
As shown below, select the Image Content Block from the right panel and add it to a Row to create a placeholder for your image. Or, you can simply add the image to an existing Image Block.
Click to enlarge
How to Upload Image to a New Image Block Added by You
Step 1: As shown below, click theBrowse button in the image block to upload a file from your desktop. In doing so, you will be directed to the File Manager.
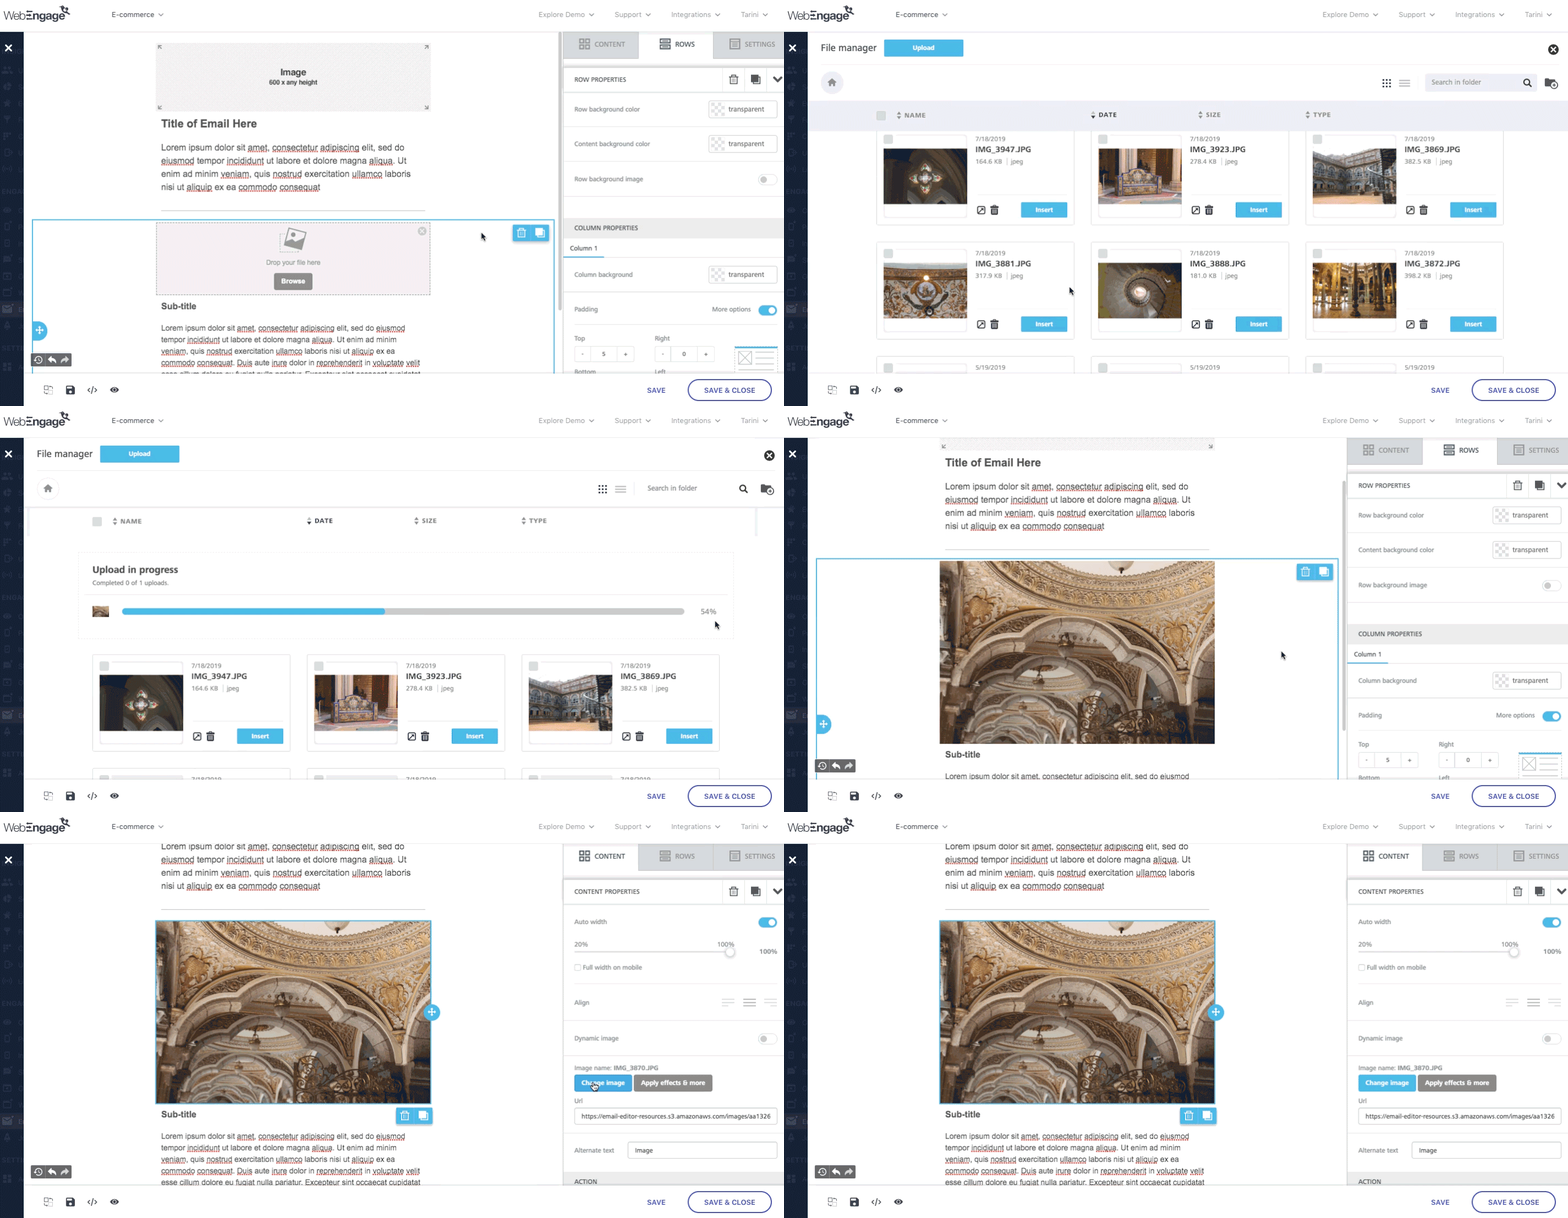
Click to enlarge
Step 2: As shown above, click theUpload button placed on the top left to select a file.
- In doing so, the image will get hosted on a secure Amazon AWS bucket owned by us.
- The image will be available for use in emails designed through the Drag & Drop editor by all account admins in the future.
Step 3: Click theInsert button placed below the uploaded image to add it to your template.
- Once added, as indicated above, you can click on the image to access it's Content Properties to modify its appearance, hyperlink it and add Alt text.
Why You Can't Add Dynamic Images/ Image URL to a New Image Block Straight Away
As shown in the above visual, the only way to add an image to a new Image Block is by uploading a file. Thus, if you wish to insert a link to the image or create Dynamic Images through a new Image Block added by you, then please upload a dummy image to enable these options. Once uploaded, you will be able to access both the options through the Content Properties menu in the right panel, as indicated below.
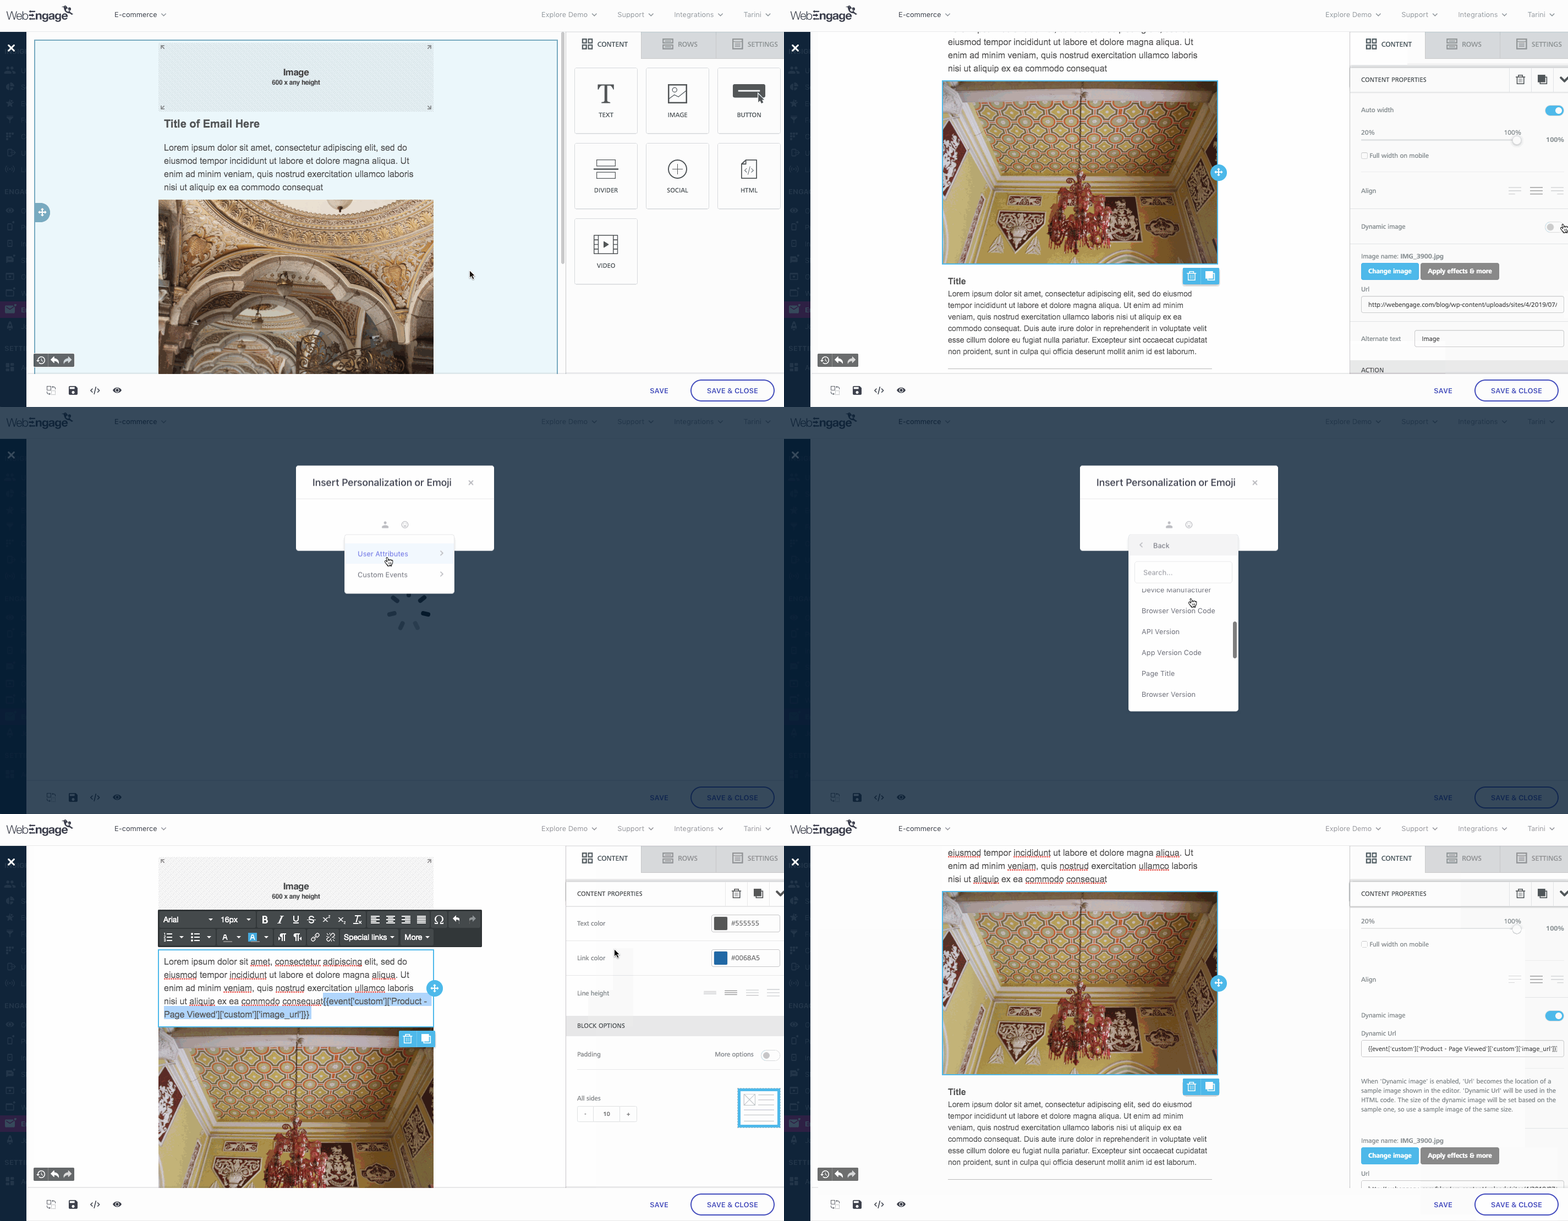
Adding Dynamic Image/ Inserting Image Link to a new Image Block added by you to the template (click to enlarge)
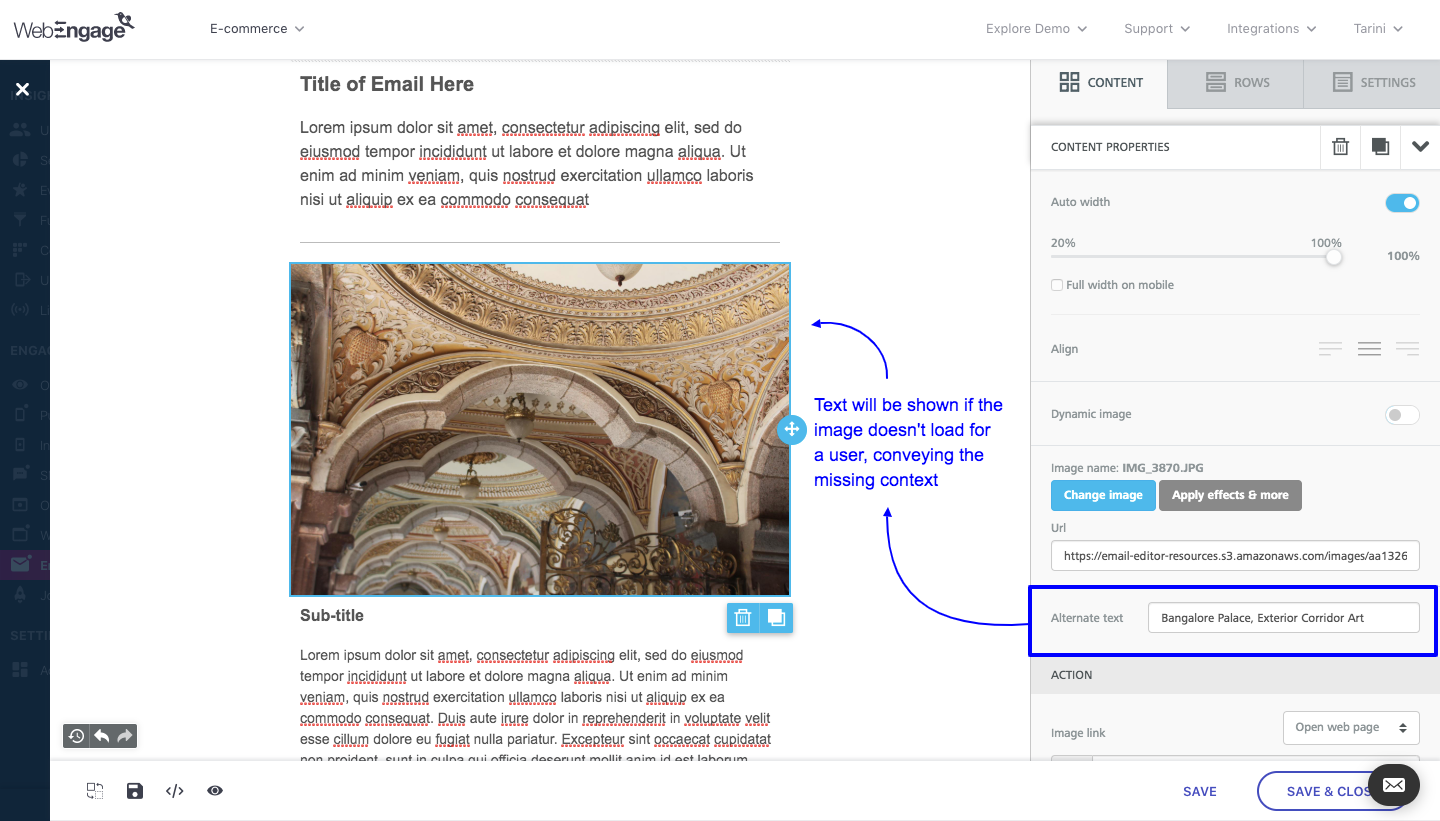
Step 4: As highlighted below, you can add a customAlternate Text to the image through the right panel. This text will be shown in cases where the image fails to load in time for a user due to their inbox settings or poor network connection.
Click to enlarge
Skip to:
Hyperlinking Image to make a call, send Email/SMS or open a web page
How to Add Image to an Existing Image Block
Step 1: As shown below, click on the block, to access its Content Properties in the right panel.
- Here you can choose to upload the image, insert image link or personalize the image to each user.
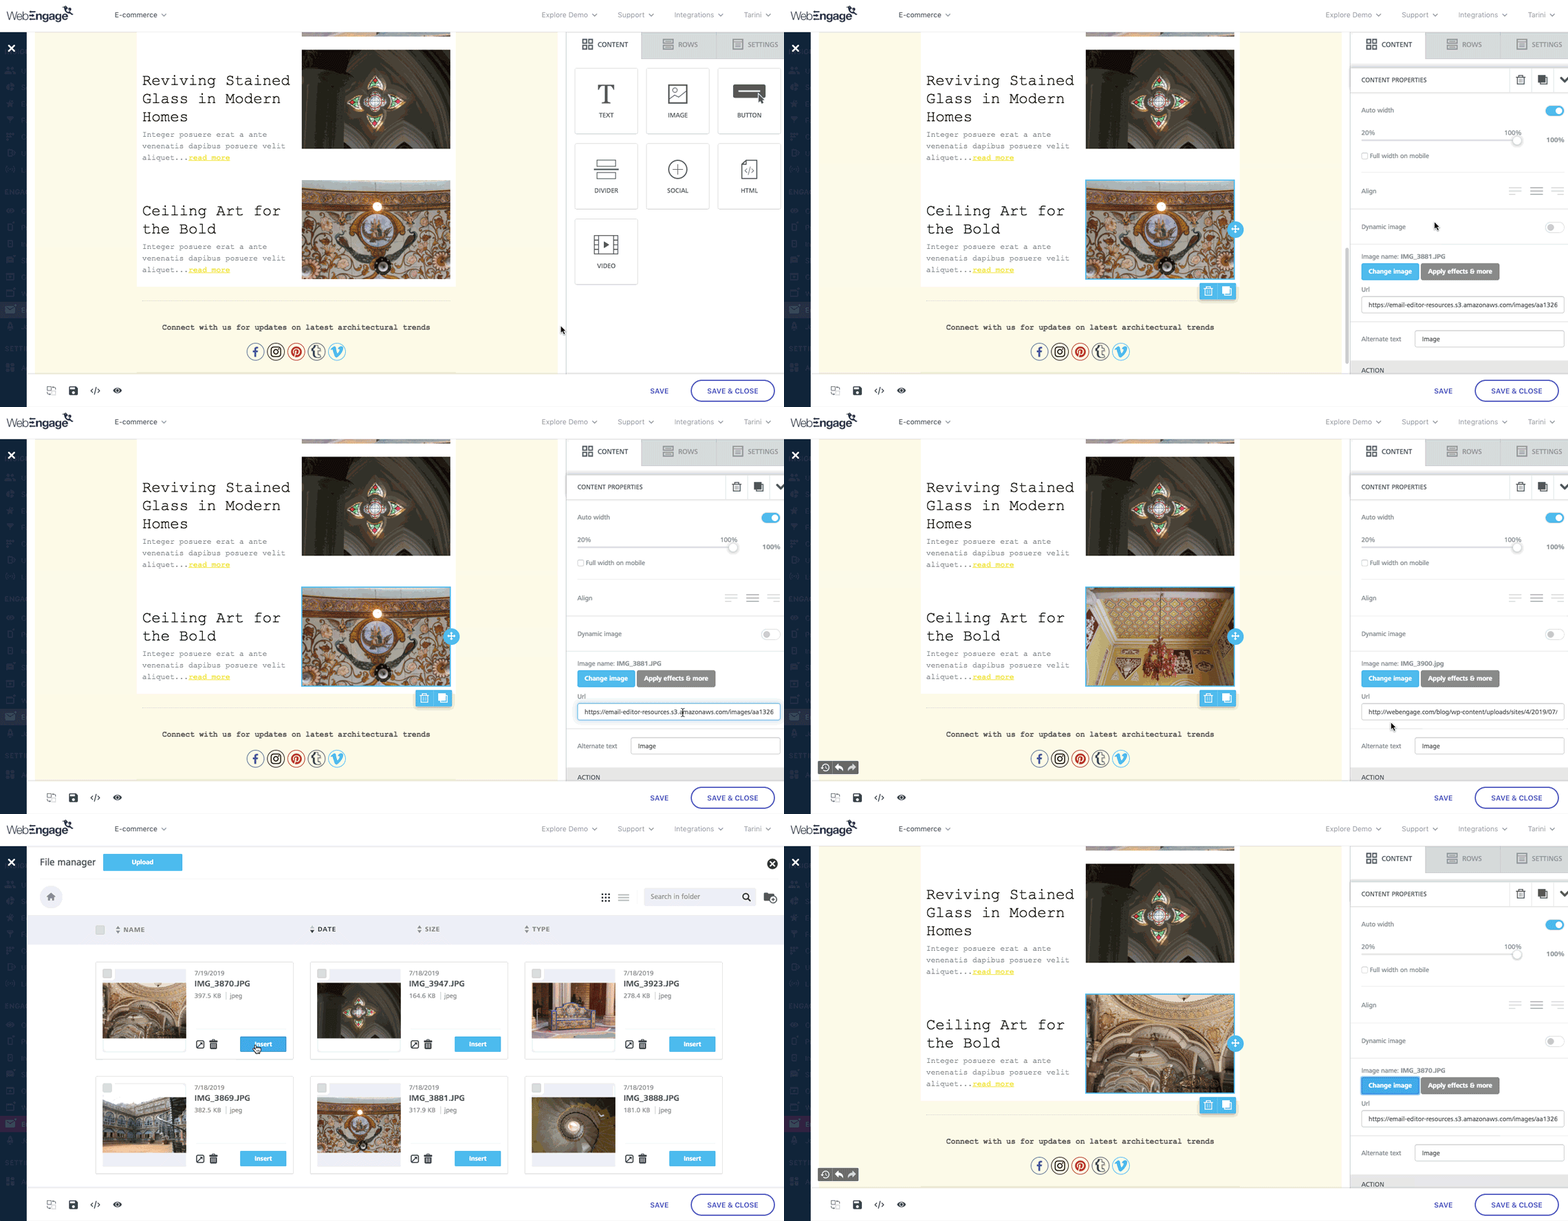
Click to enlarge
Step 2.1.: Upload Image
- As shown above, Click the Change Image button to upload a file from your desktop. In doing so, you will be directed to the File Manager.
- Click the Upload button placed on the top left to select a file.
- In doing so, the image will get hosted on a secure Amazon AWS bucket owned by us.
- The image will be available for use in emails designed through the Drag & Drop editor by all account admins in the future.
- Next, click the Insert button placed below the uploaded image to add it to your template.
Step 2.2.: Insert Image Link
- As shown above, you can simply add the link to the field, URL.
- The image must be hosted on a crawlable/publicly accessible domain to ensure that it renders for all users receiving the message.
Step 3: Add Alt Text & On-click Link
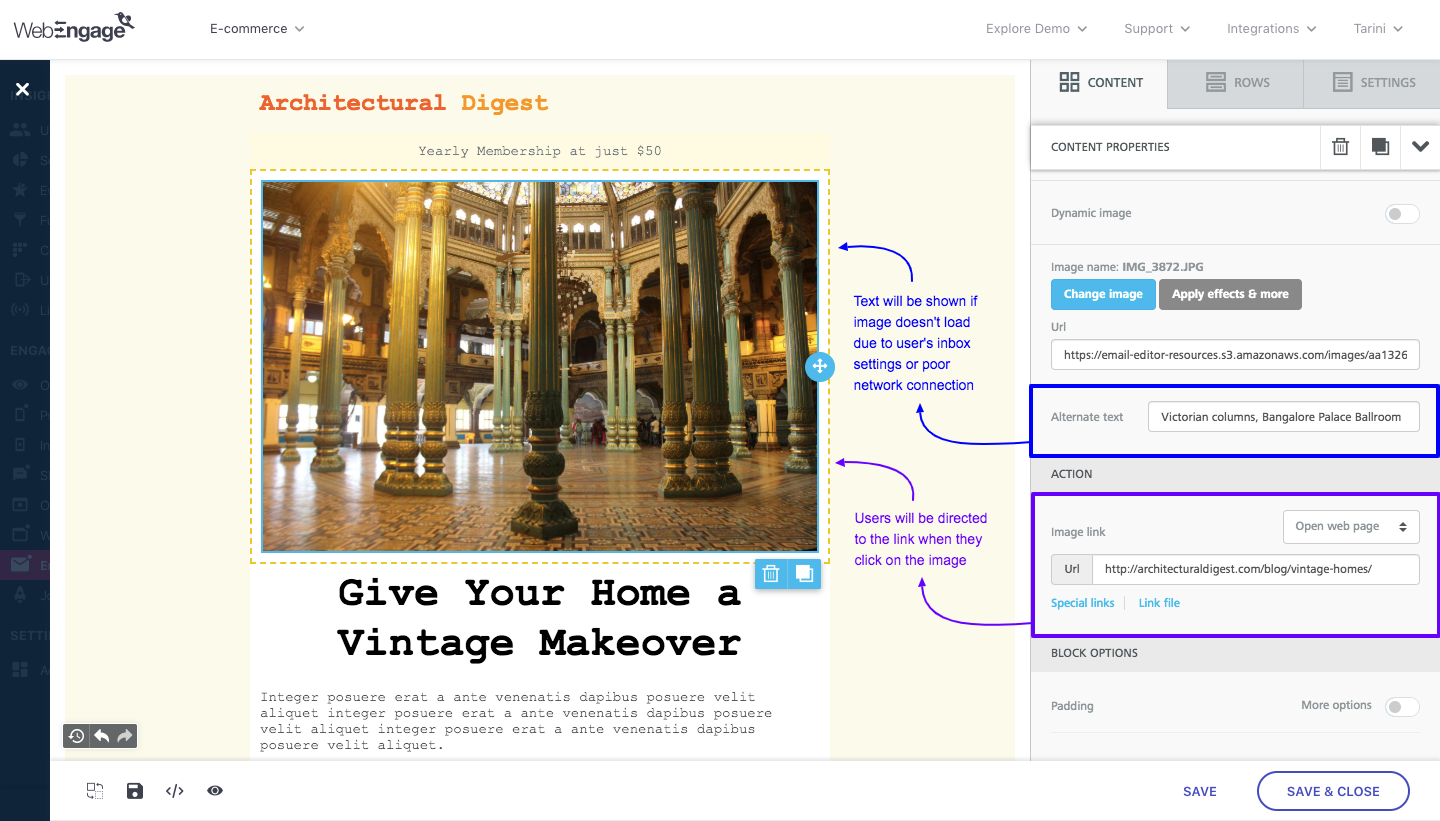
Click to enlarge
As highlighted above, you can add a custom alternate text to an image through the right panel. This text will be shown in cases where the image fails to load in time for a user due to their inbox settings or poor network connection.
- Further, you also choose to link the image to your website, YouTube video or prompt users to make a call, send an Email or SMS by configuring the field, Action in the right panel, as highlighted above.
Skip to:
Adding Dynamic Images
Creating a Transactional Email Campaign?Please refer to this guide to personalize images.
Steps listed below are applicable to all one-time, triggered, recurring & journey Email campaigns.
As highlighted below, you can easily personalize images to each user's preferences or behavioral history by enabling dynamic images. Doing so will allow you to add the user attribute or event attribute to which you'd like to personalize the image.
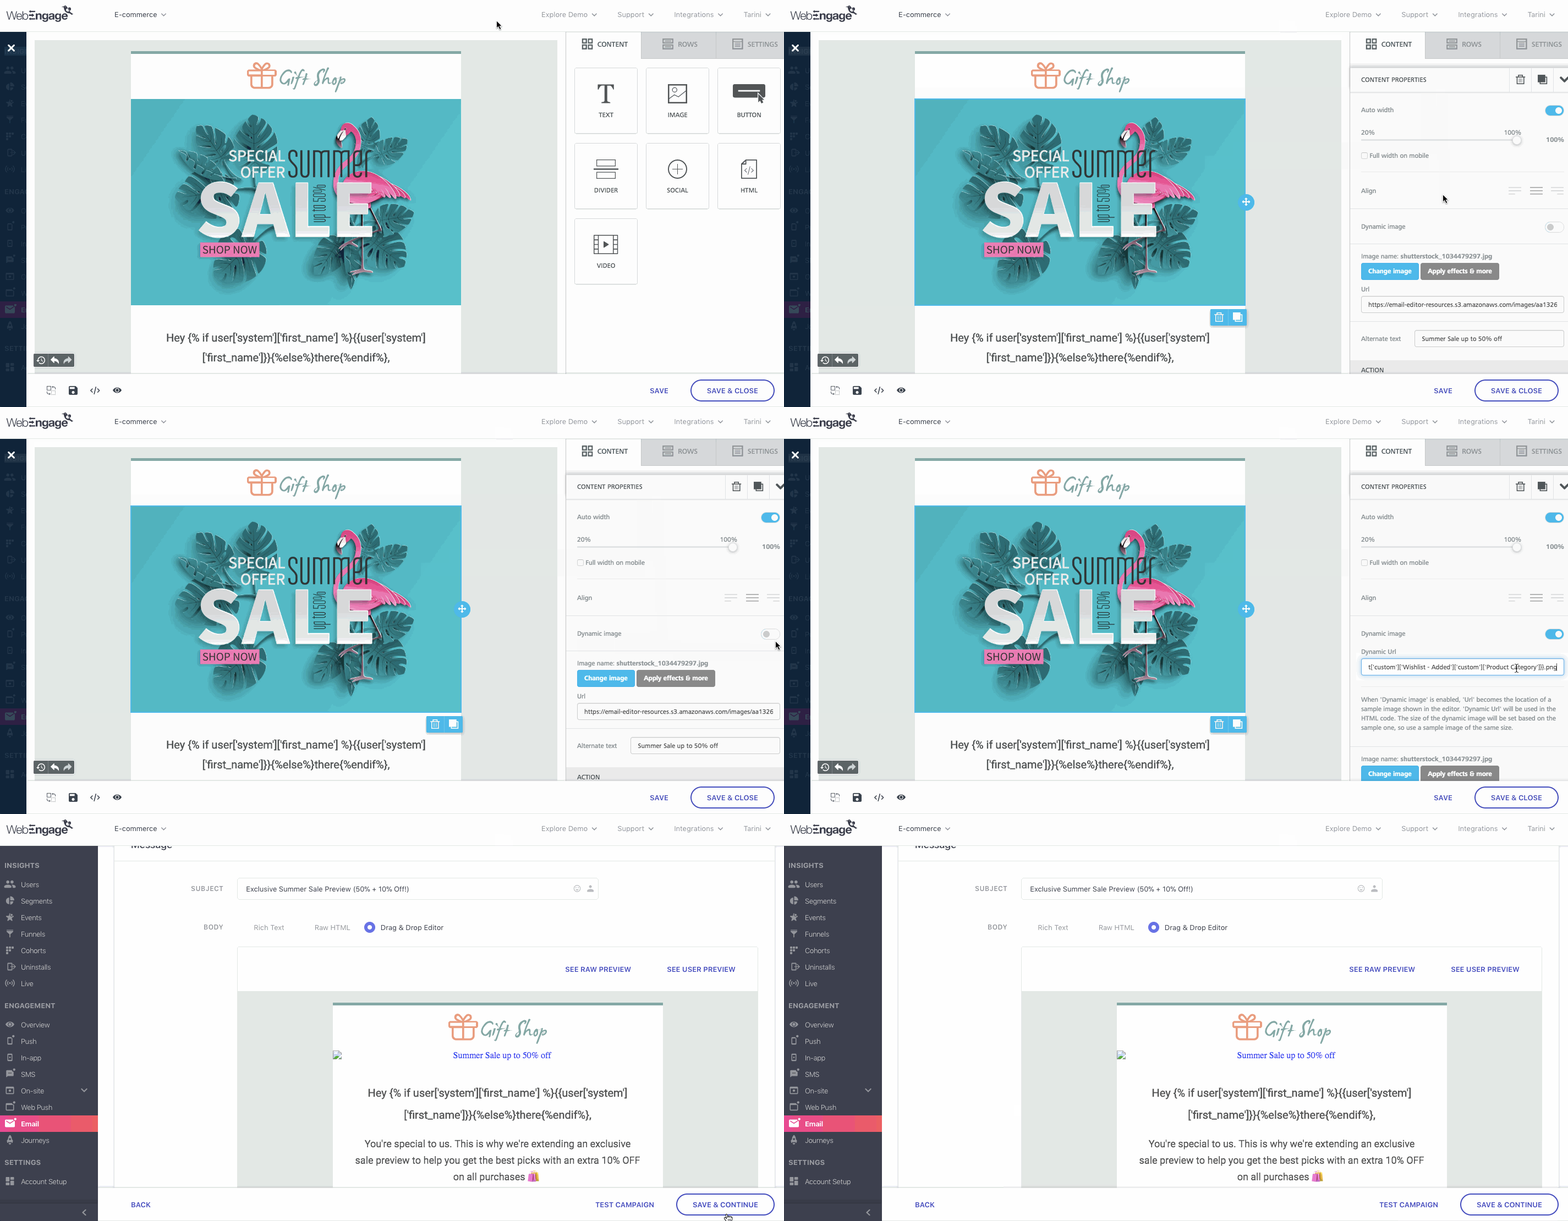
Click to enlarge
However, do keep in mind that the existing image in the block will be treated as a placeholder. This means that the actual image (populated for each user while sending the campaign) will be cropped/resized to the dimensions of the existing image.
Pro TipPlease try to ensure that the placeholder image's height-width ratio is equivalent to the actual images that will be populated for each user.
Let's demonstrate a use-case to help you understand how this works:
Use-case: Personalizing Banner Image to the Product Category of Items Added to WishlistLet's take the example of an e-commerce platform that deals in a wide range of gift items, accessories & clothing. They recently decided to host a Summer Sale. In a bid to reactivate existing users, they created an email campaign specifically targeted at users who have added products to their wishlist but have not made a purchase yet.
To drive higher engagement, they decided to personalize the email's banner image to the two main product categories of the sale - Men's Fashion & Women's Fashion. Hence, they created two banner images and personalized the email to the product category of items added to wishlist by a user.
Prerequisites for image personalization
Each time a user added items to their wishlist, it's tracked as the Custom Event, Wishlist - Added
Additional details of the products are tracked as Custom Event Attributes of the event like Product Category, Product Price, Product Quantity and so on.
The name of the two banner images were identical to the value tracked for the Custom Attribute, Product Category. This means;
- Banner for Men was named: Men-Clothing-Accessories
- Banner for Women was named: Women-Clothing-Accessories
Here's how they personalized the banner image:
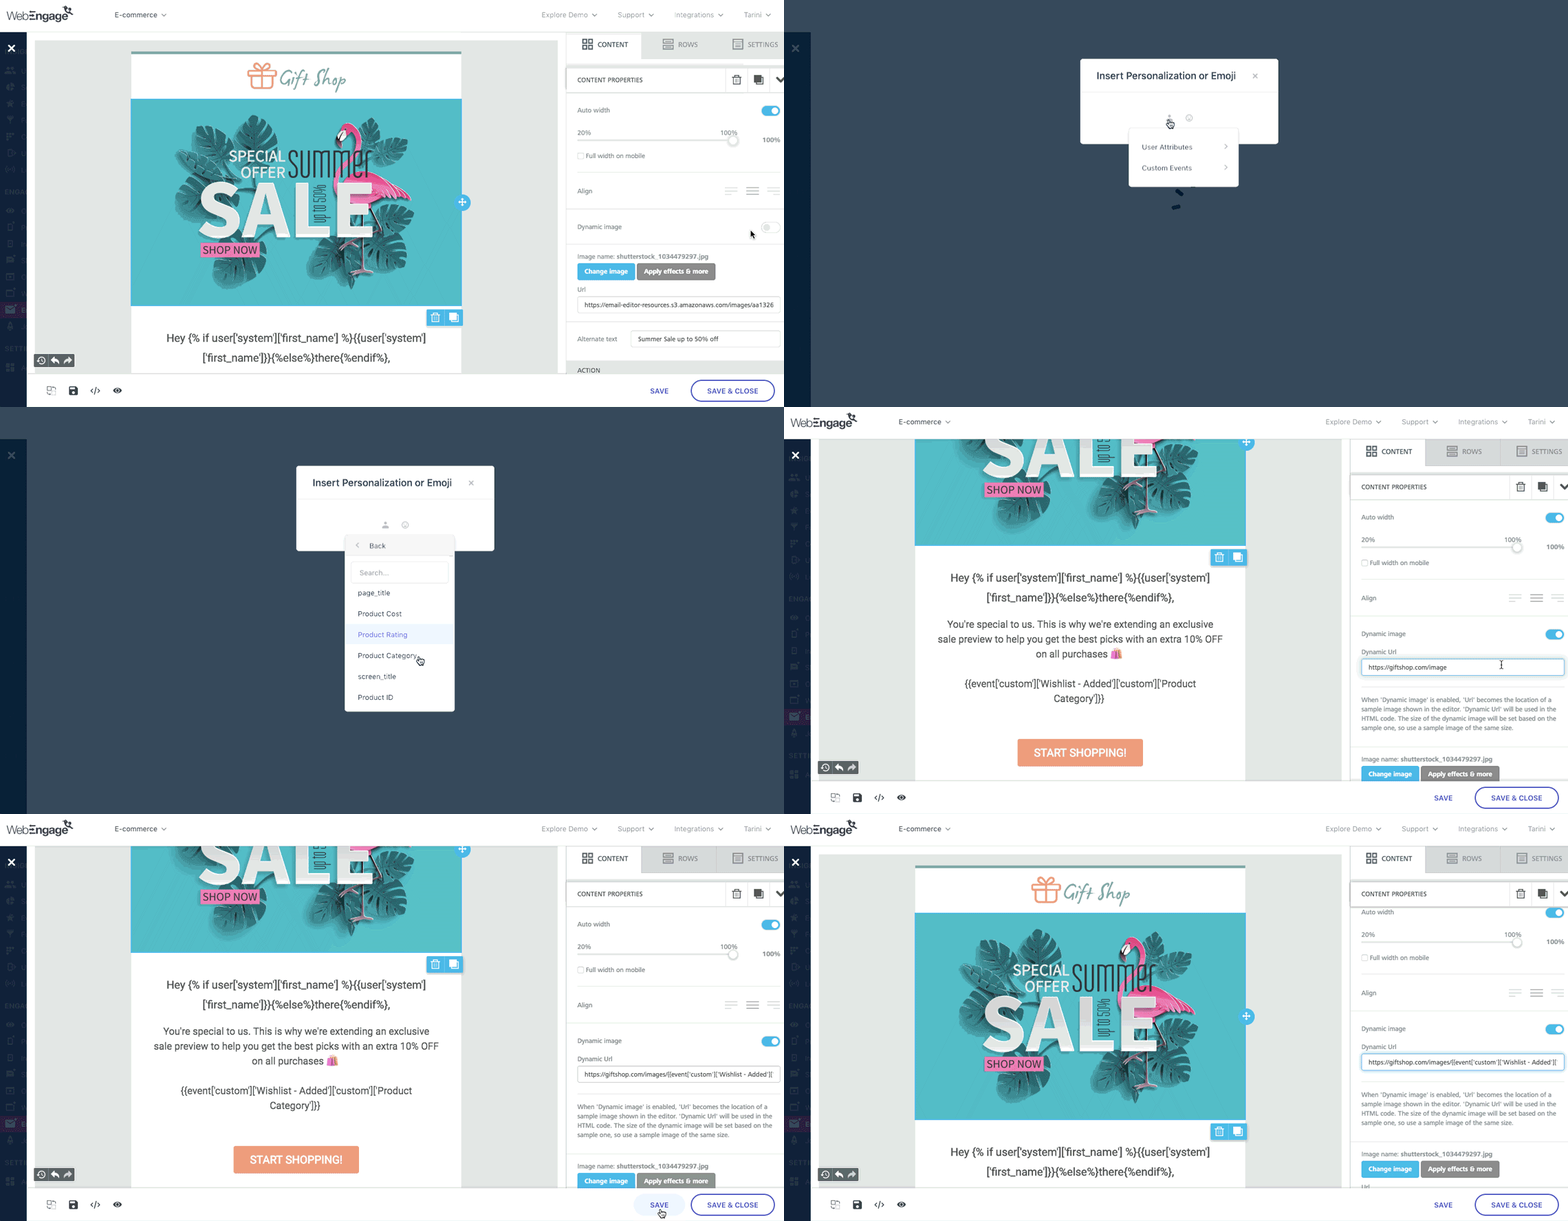
Click to enlarge
As shown above, due to the technical limitations of the Drag & Drop Editor, you will need to employ a small workaround to personalize images by creating the personalization token in a Text Block.
Step 1: Select an existing Text Block and click on, More < Personalization & Emoji in the formatting toolbar.
Step 2: Click on the Personalization icon and Select the Custom Event, Wishlist - Added from the dropdown.
- In doing so, a second dropdown will open up, allowing to select an attribute.
- Select the Custom Attribute, Product Category from the dropdown.
- In doing so, the personalization token, {{event['custom']['Wishlist - Added']['custom']['Product Category']}} will get added to the template.
Step 3: As shown above, add the parent link (where the image is being hosted), https://giftshop.com/images/ to the field, Dynamic URL, in the right panel.
Step 4: Copy the personalization token to the field and delete it from the text block.
Step 5: Add the image format (.png) towards the end of the URL to complete it.
Personalizing Images to Each UserYou can easily personalize images to your users' preferences and behavioral history is any of the following ways:
Method 1: Pass image_url as a custom event attribute, attached to a custom event gleaned for your app/website (Step-by-step guide on how to execute this)
Method 2: Build the image URL by specifying a parent link and adding a custom event attribute/custom user attribute as the path. Then manually add the image format like, .png, .jpeg, .jpg, .gif, at the end of the link structure (Step-by-step guide on how to execute this)
Step 3: Link the image to a webpage or a relevant call-to-action.
- For example, in the below visual we have linked our dynamic banner image to the page, https://giftshop.com/summer-sale
- Similarly, you can nudge users to make a call, send an SMS or Email by clicking on the image. (detailed read)
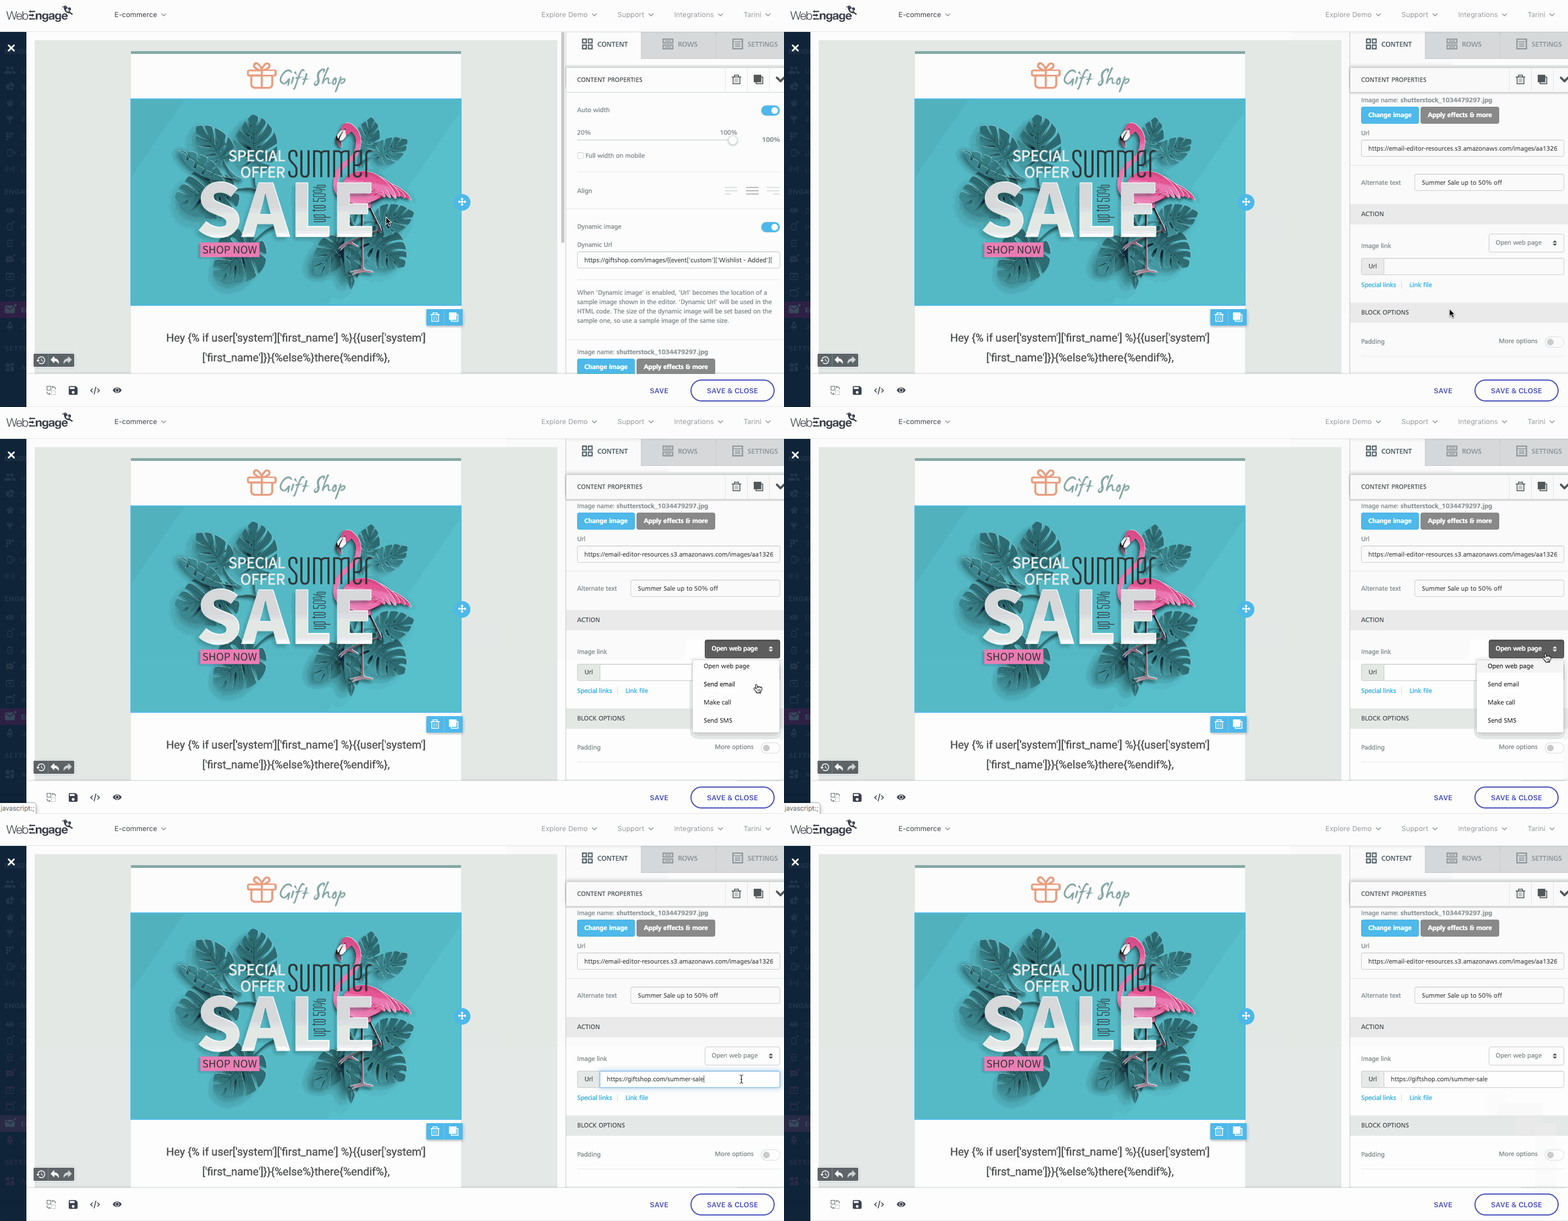
Click to enlarge
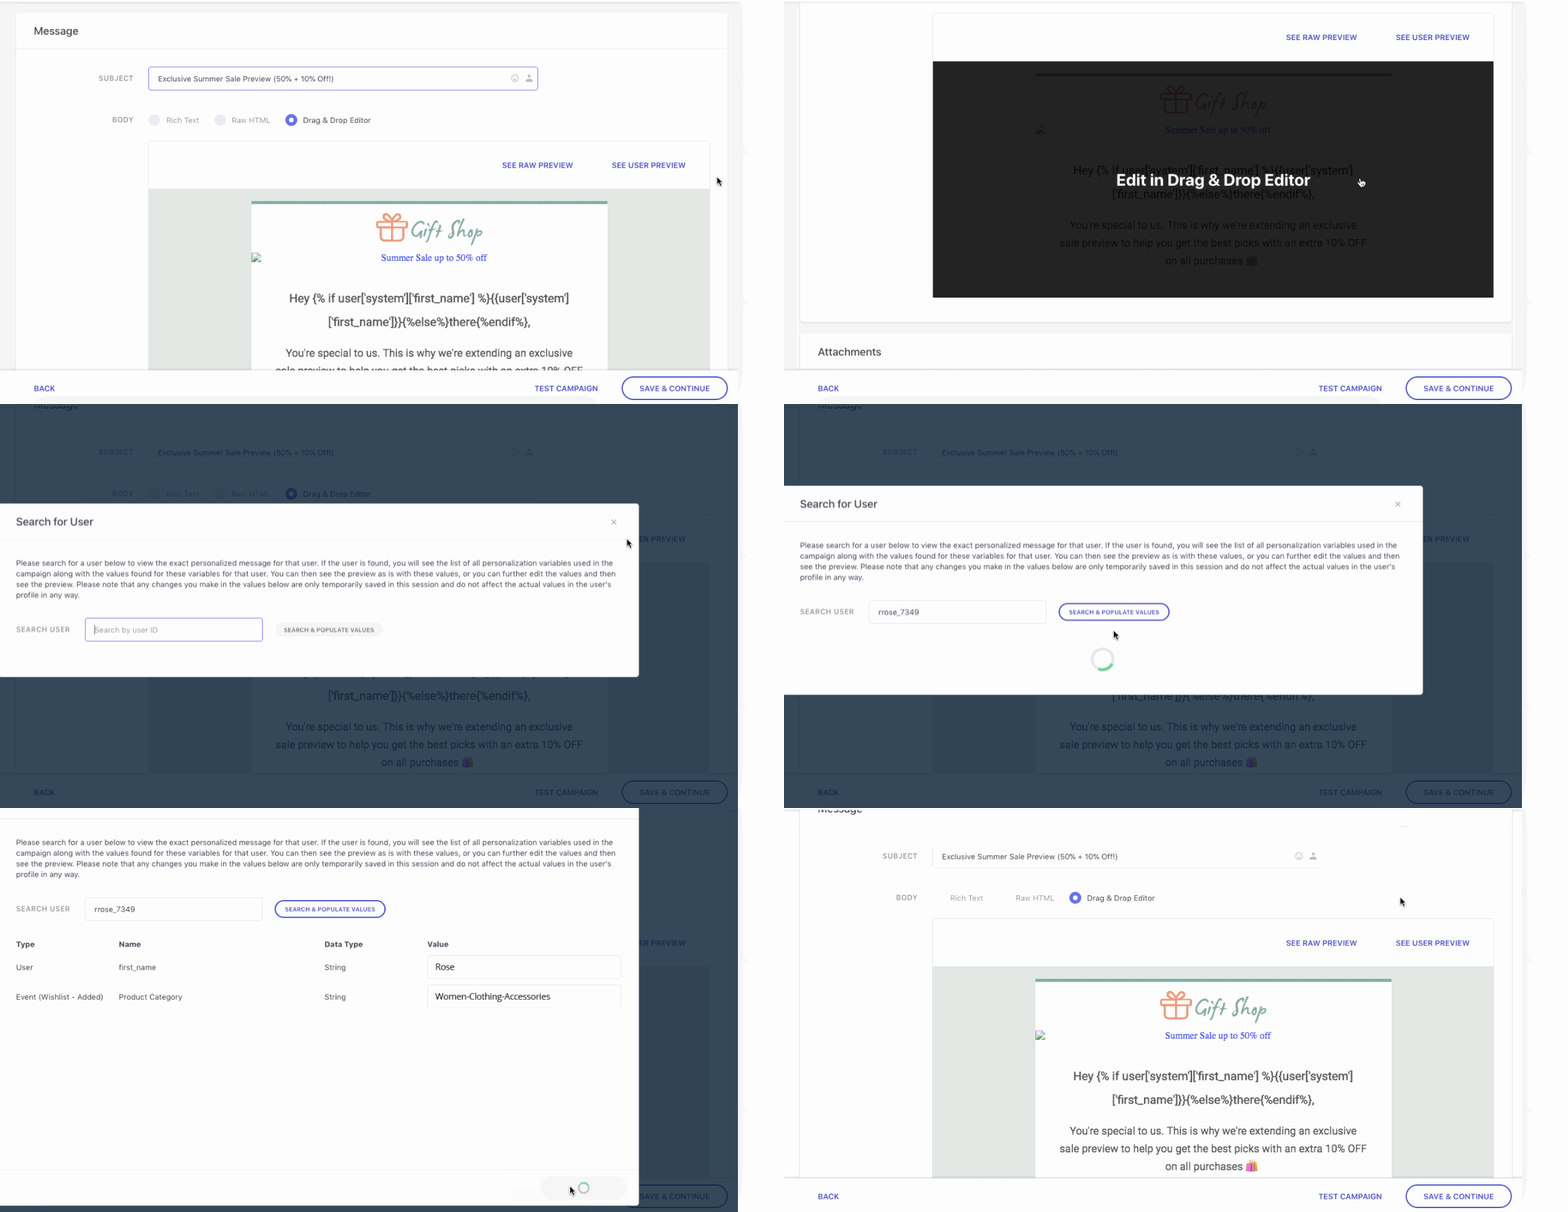
Step 4 (Recommended): Cross-check if you've added the correct attribute by seeing a User Preview at Step 3: Message, in the campaign creation interface.
- For example, in the below visual, on viewing the template for the User ID, rrose_7349 we see a banner personalized to the Product Category of items added to wishlist by her, Women-Clothing-Accessories.
Click to enlarge
Linking Images to Open a Web Page, Make a Call, Send an Email/SMS
Fact CheckEach time a user clicks on a linked image, it's automatically tracked as the Campaign Performance Indicators,Total Clicks and Unique Clicks for the Email Campaign and for Email as a channel.
Linking images, in addition to adding buttons, is a great way to drive click-through rates. You can easily nudge users to visit a page/video, download a file, send an Email/SMS or make a call by configuring a call-to-action through the Action menu in the right panel. Here's how you can set up each CTA:
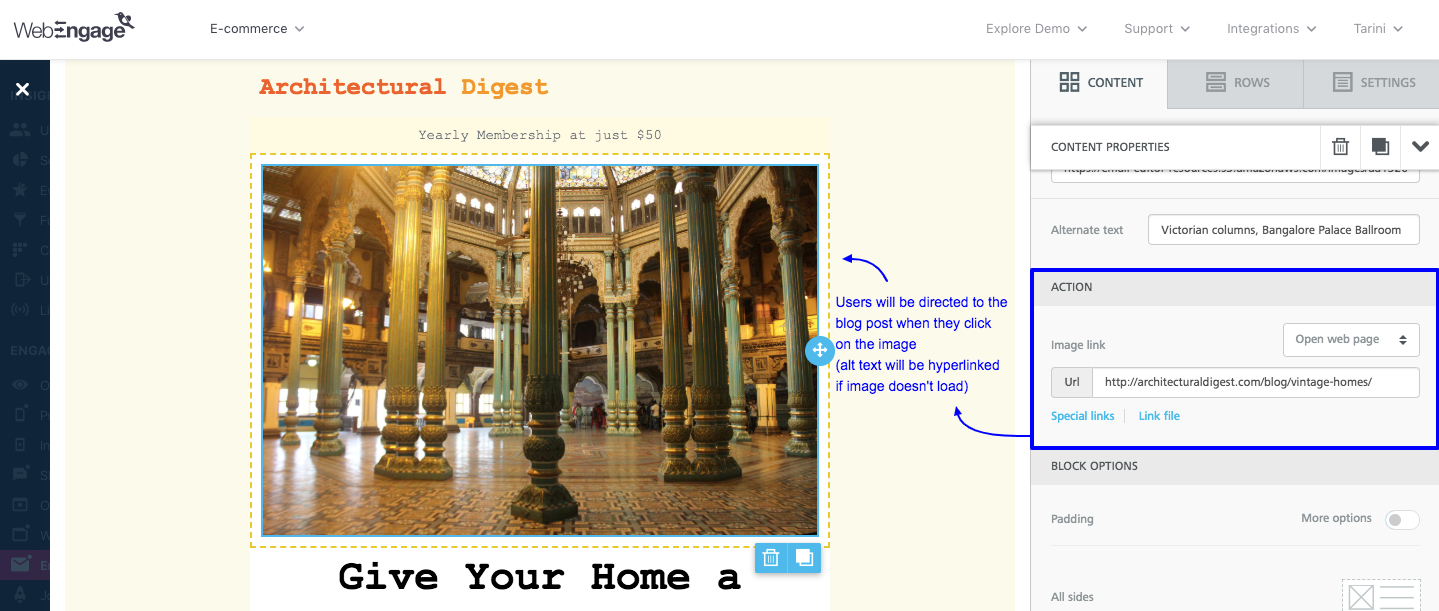
Open Web Page: The default selection, as highlighted below, simply add the link to which you'd like to direct users, in the right panel and click Save. The link will be added to the ALT text if the image doesn't load due to a user's inbox settings or poor network connection.
Click to enlarge
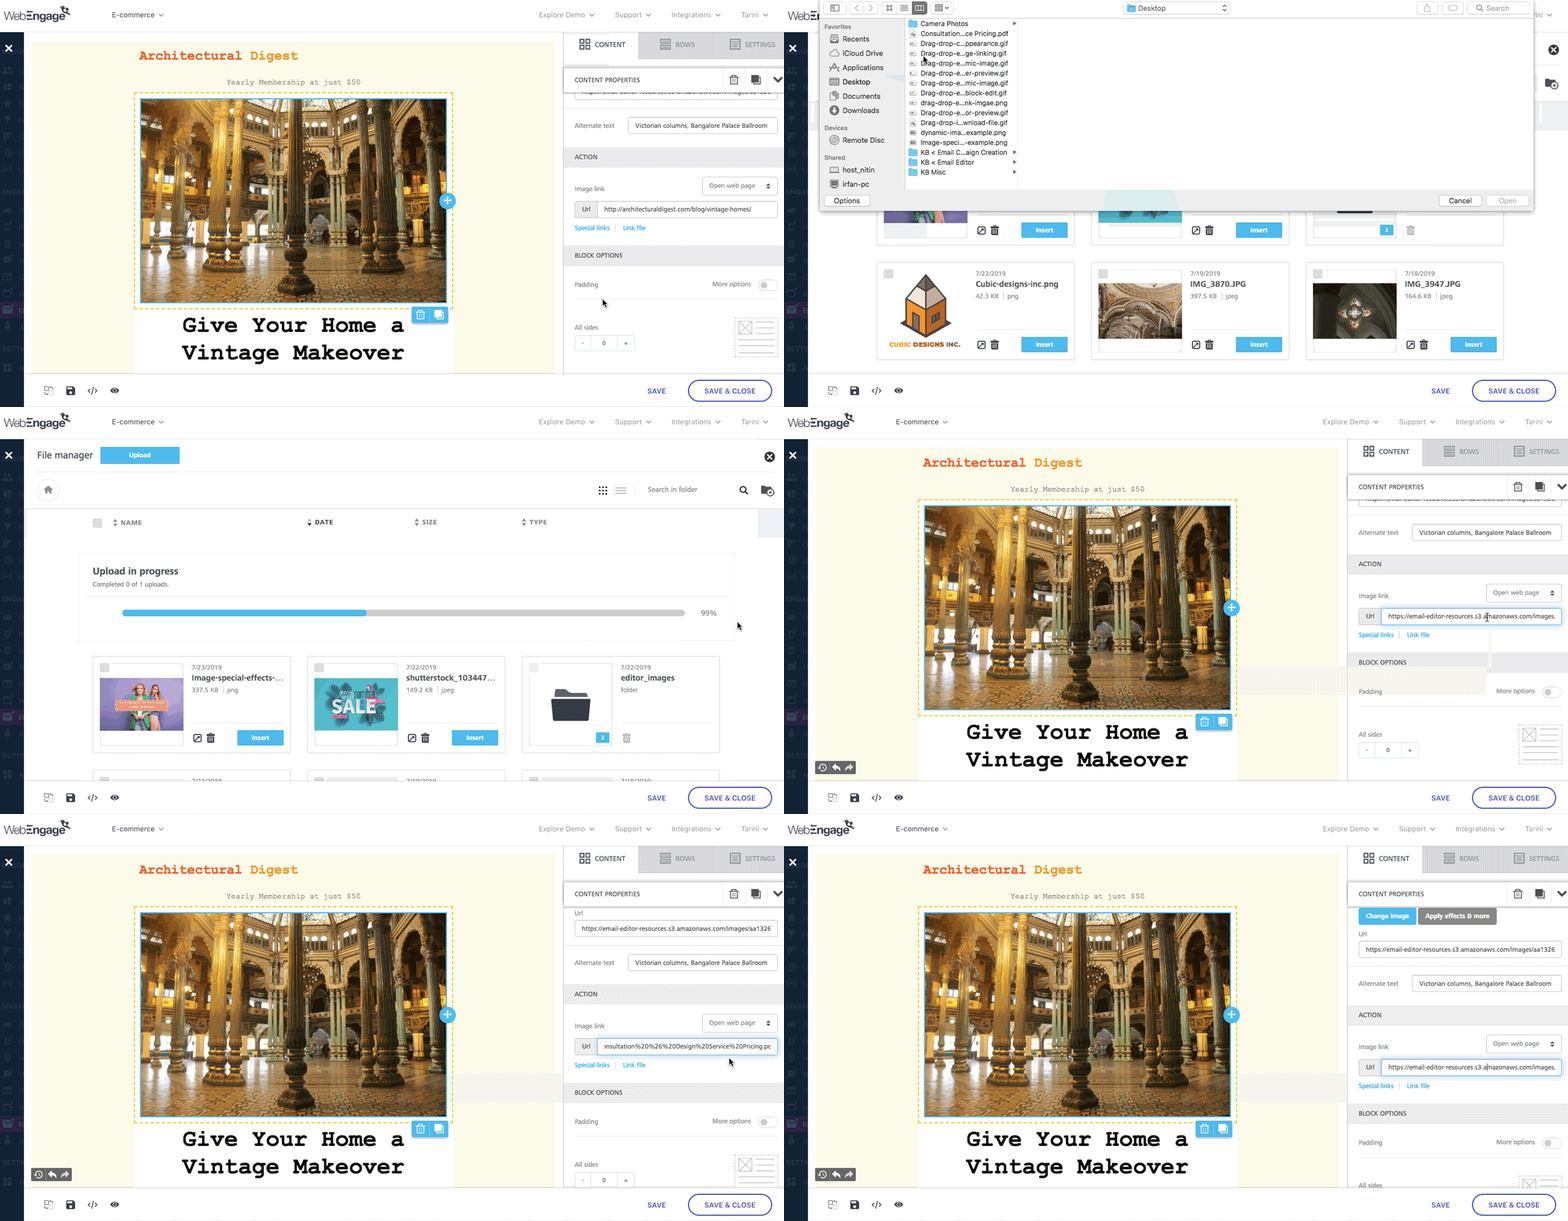
Download File: As shown below, you can prompt users to download a file by configuring the option, Link file. Thus, whenever a user clicks on the image, they will be prompted to download the attached image, document or audio/video clip. For example, in the visual below, we have linked a PDF document containing the design firm's service and consultation charges.
Click to enlarge
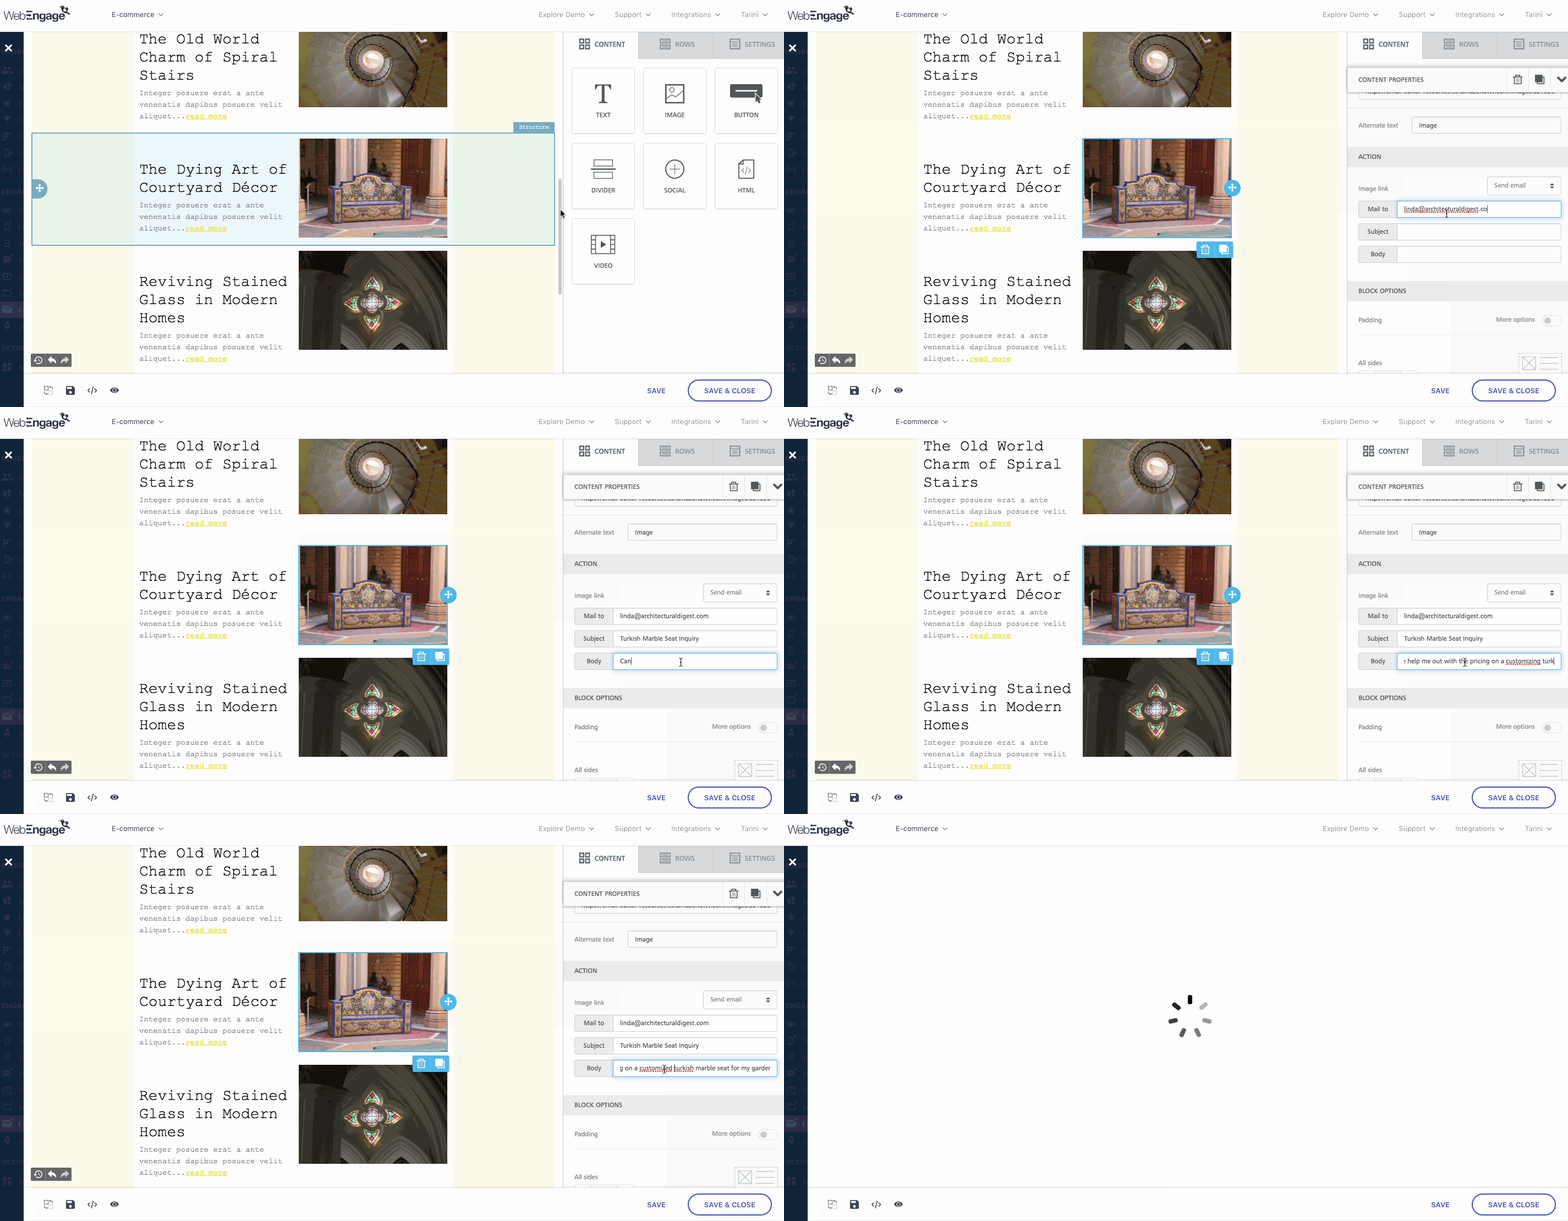
Send an Email: As shown below, click the dropdown nested under Actions to select the CTA. In doing so, you will be able to specify the receiving email address, the email's subject line, and a generic body copy, making it easier for users to get in touch with you.
Click to enlarge
Make a Call / Send an SMS: As shown below, click the dropdown nested under Actions to select a CTA. In doing so, you will be able to specify the phone number through which you expect users to contact you. However, depending on the device and inbox settings of a user, Make a Call and Send an SMS may not work on desktops.
Customizing Image Appearance
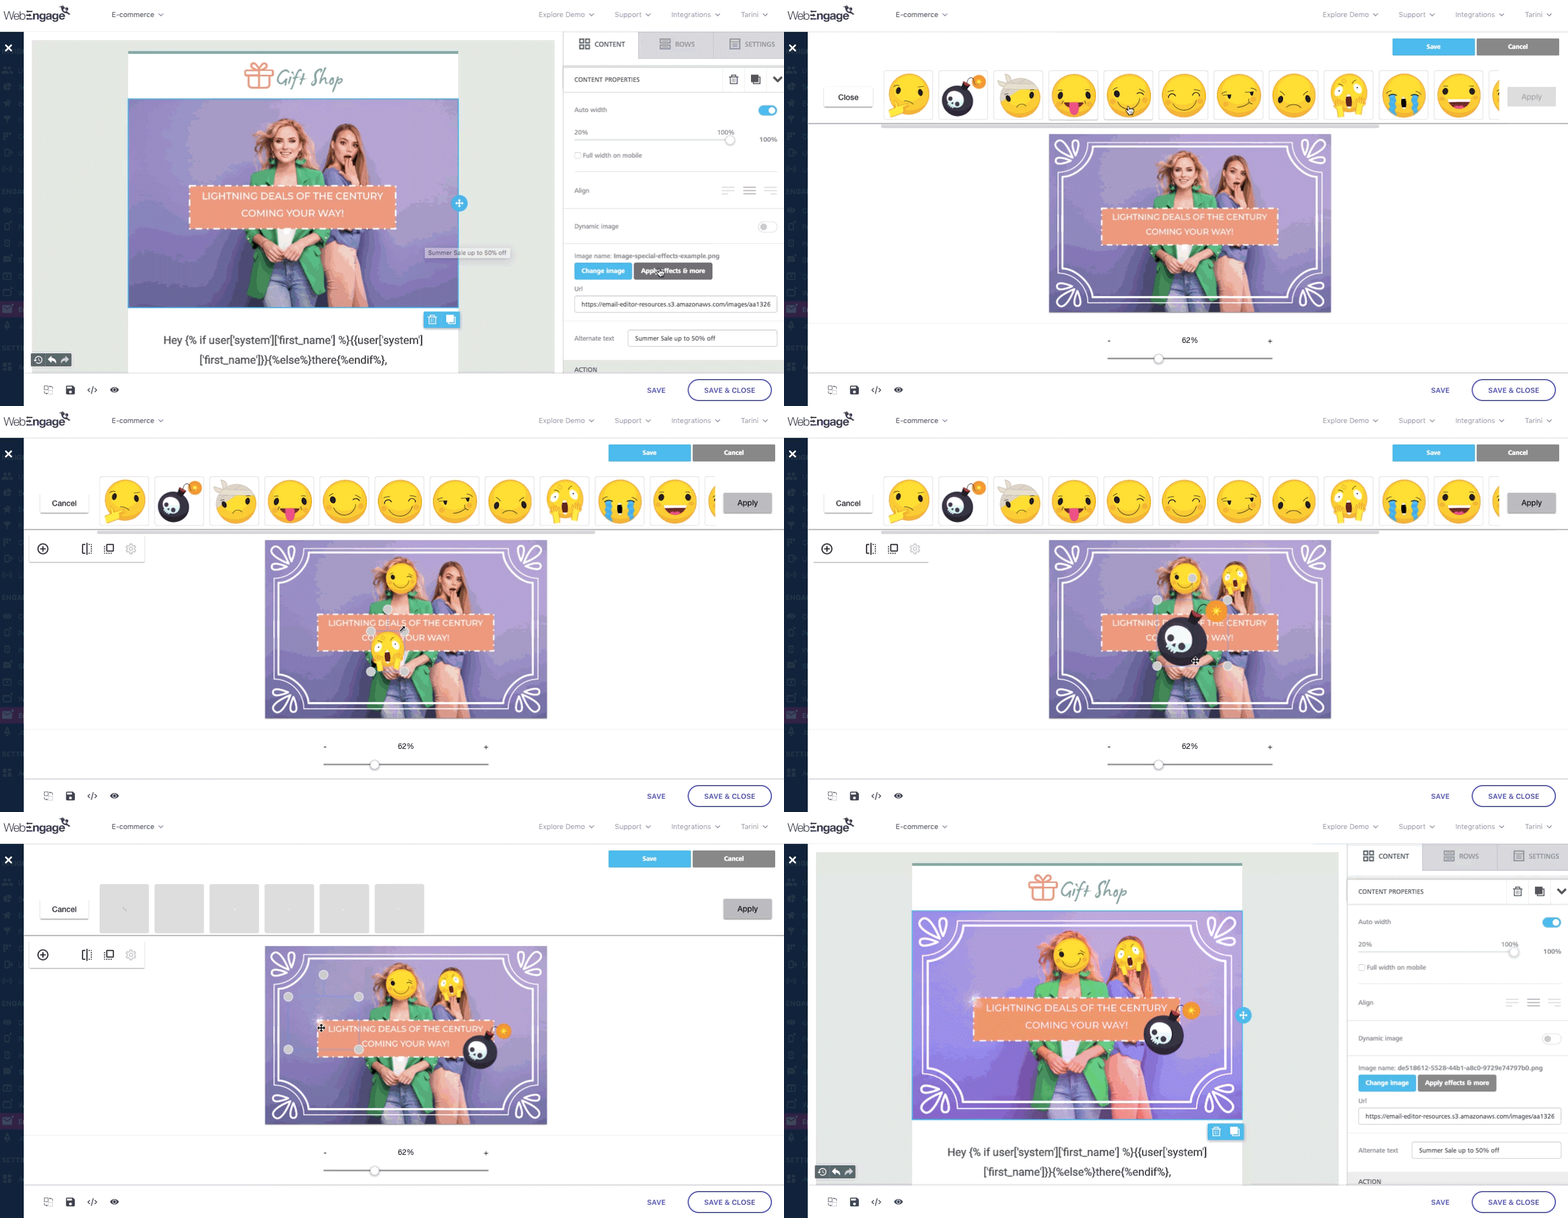
You can customize each image's appearance by applying special effects and altering its width, alignment, and block padding through the Content Properties menu in the right panel. For example, in the below visual, we have edited the banner image to resemble a meme, appealing to the millennial users. Similarly, you can edit your images by clicking the Apply effects & more button.
Click to enlarge
Adding Videos
Fact CheckEach time a user clicks on a video link, it's automatically tracked as the Campaign Performance Indicators,Total Clicks and Unique Clicks for the Email Campaign and for Email as a channel.
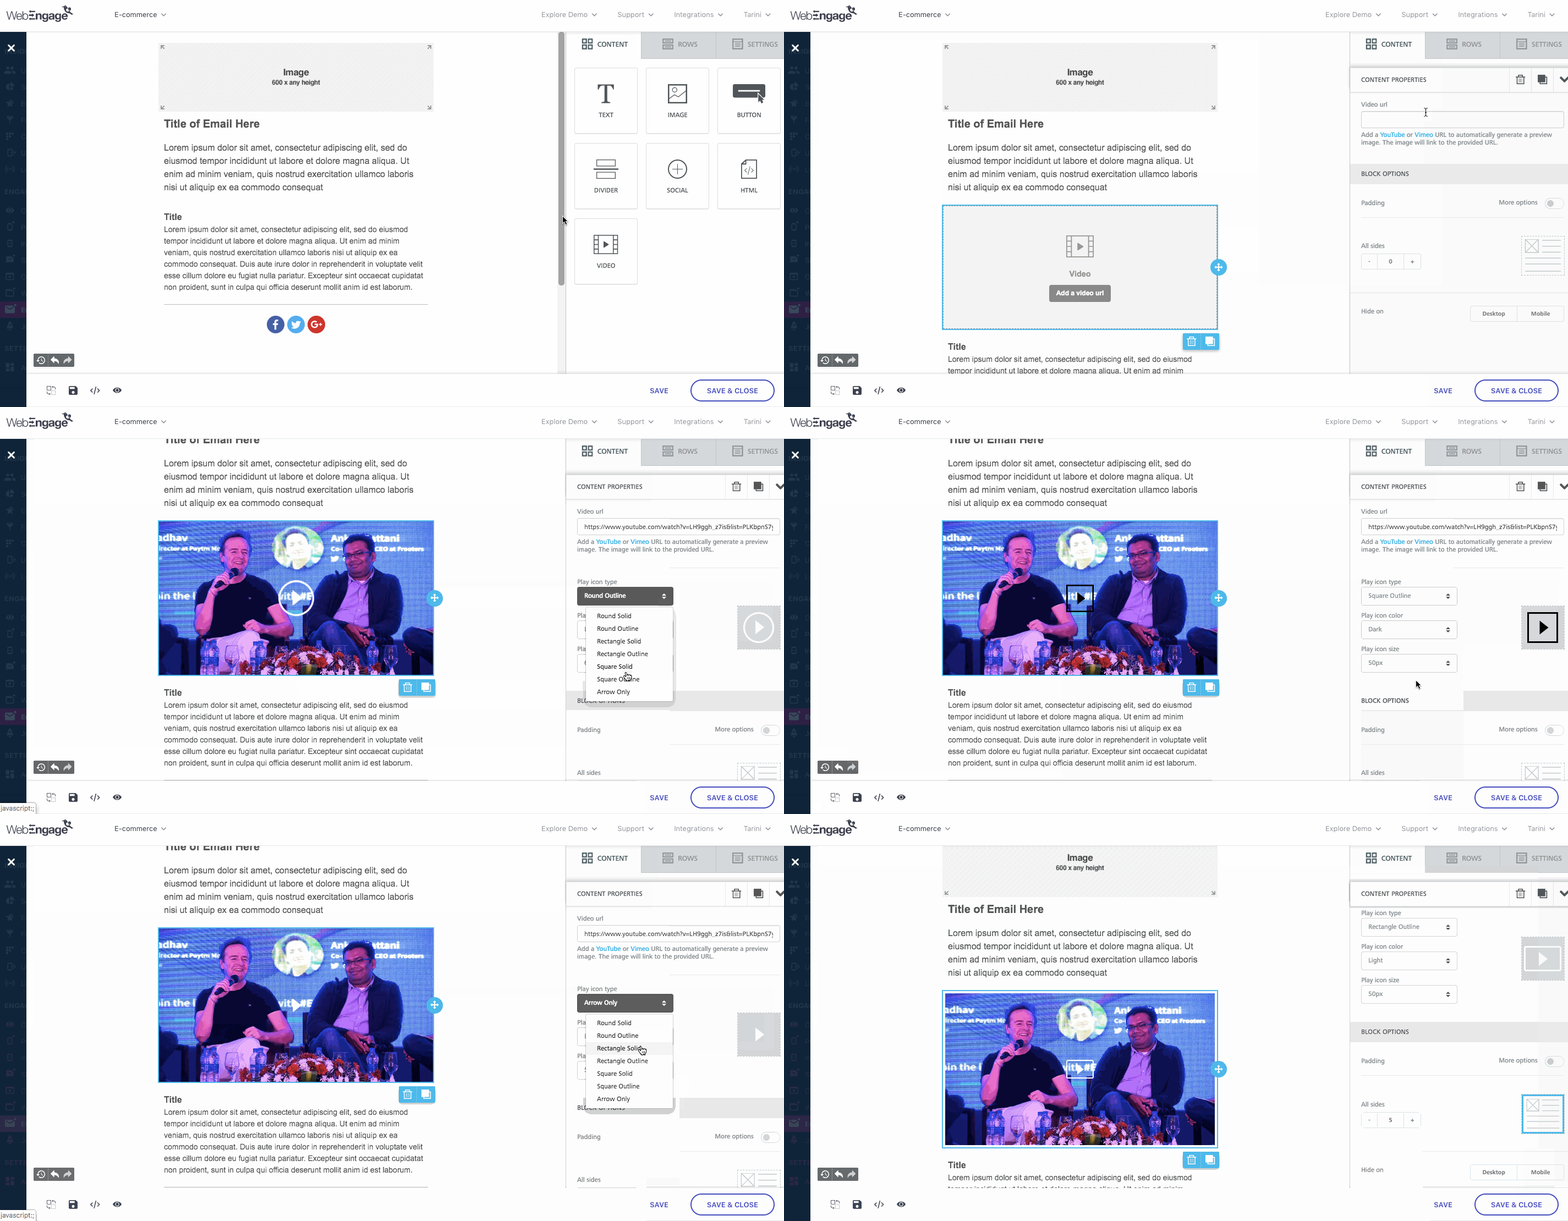
You can easily embed videos in your email template through the Video Content Block. Here's how you can go about it:
Click to enlarge
Step 1: Add a Row block to the template. (skip if a placeholder already exists)
Step 2: Select the Video Content Block and drop it into the Row.
Step 3: Select the block added to the template to add a YouTube or Vimeo link through the right panel, as shown above.
- In doing so, a thumbnail along with a Play icon will be added to the template.
Step 4: As shown above, customize the Play icon's appearance as per your template's theme through the right panel.
Step 5 (optional): You can further customize the block's appearance through the section, Block Options in the right panel.
Adding Custom HTML
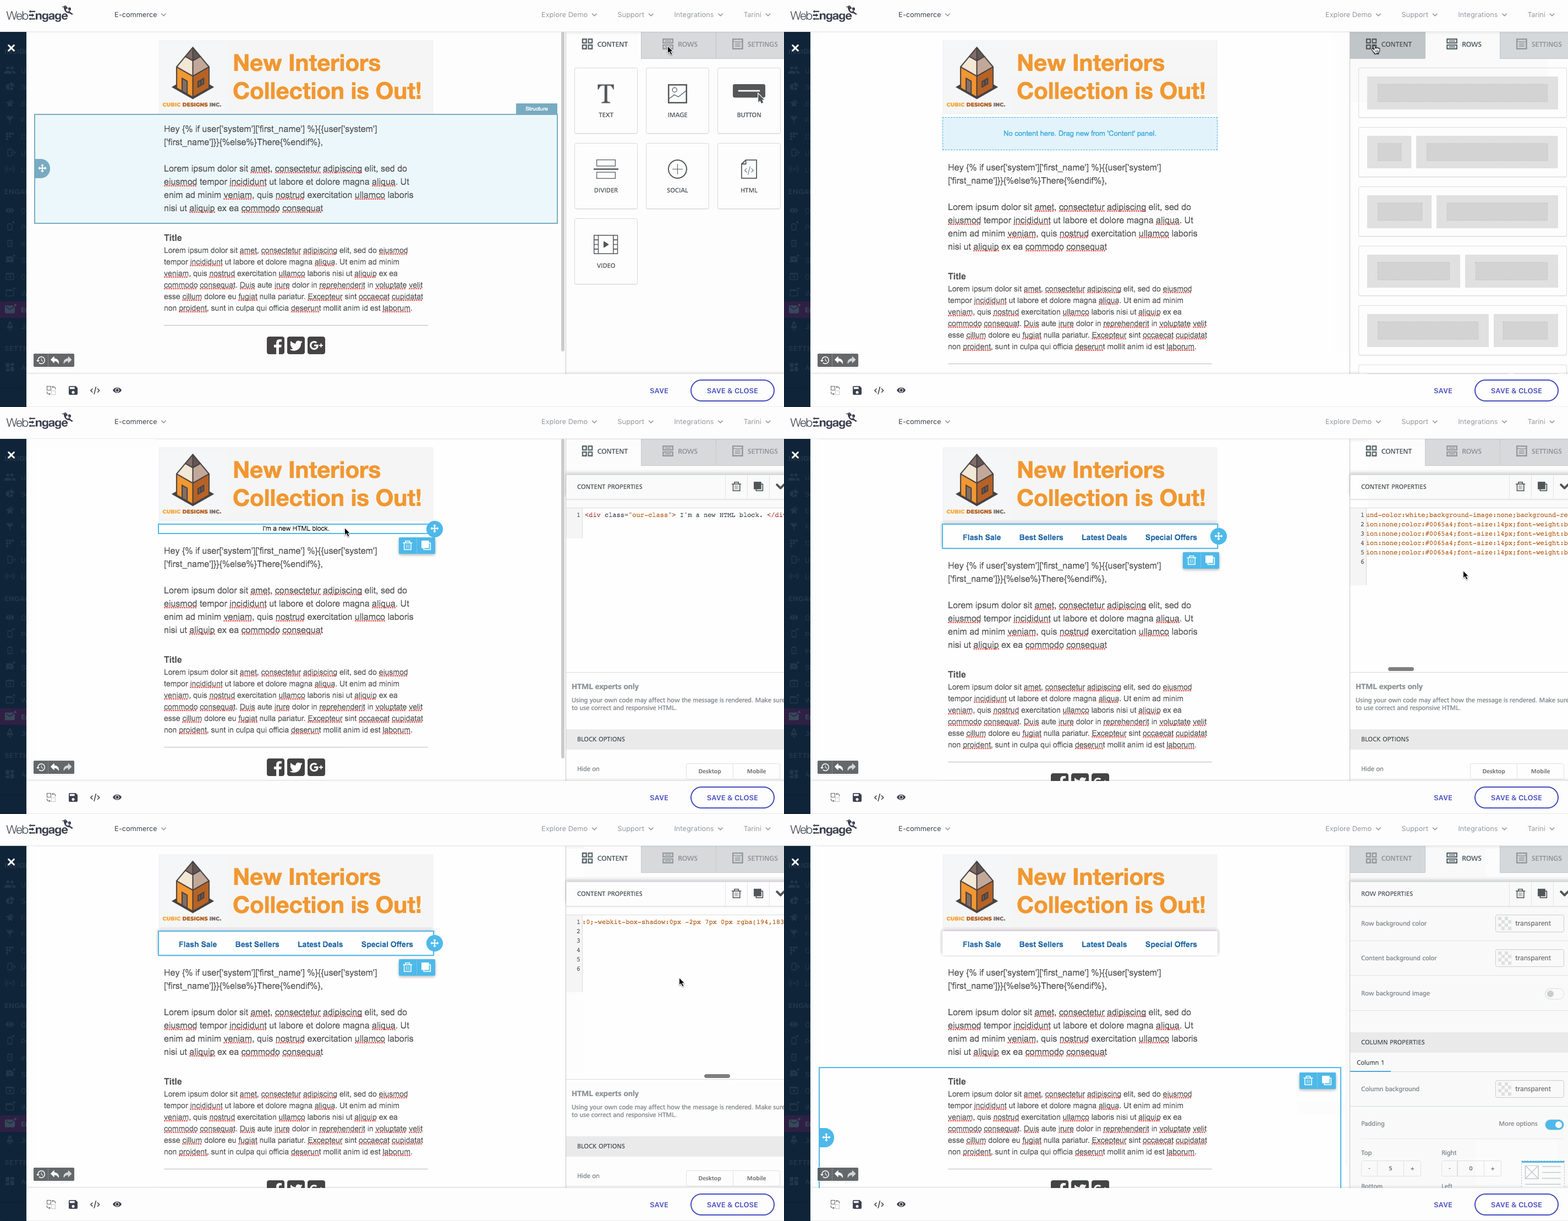
While the Content Blocks of the Drag & Drop Editor are adept at helping you create stellar campaigns in minutes, you can always choose to add custom HTML code snippets to your template to add additional sections like custom headers, countdown ticker, personalized offers, surveys, collecting ratings and so on.
Here's how you can go about it:
Click to enlarge
Step 1: Add a Row block to the template. (skip if a placeholder already exists)
Step 2: As shown above, select the HTML Content Block and drop it into the Row.
Step 3: Add the HTML code in the right panel, as shown above.
- In doing so, you will immediately be able to see it's output in the template. For example, we have pasted the code for a customized header in the above template.
Further, you can choose to hide the section for users who are viewing the email on Desktop or Mobile, as per your needs.
Adding Dividers
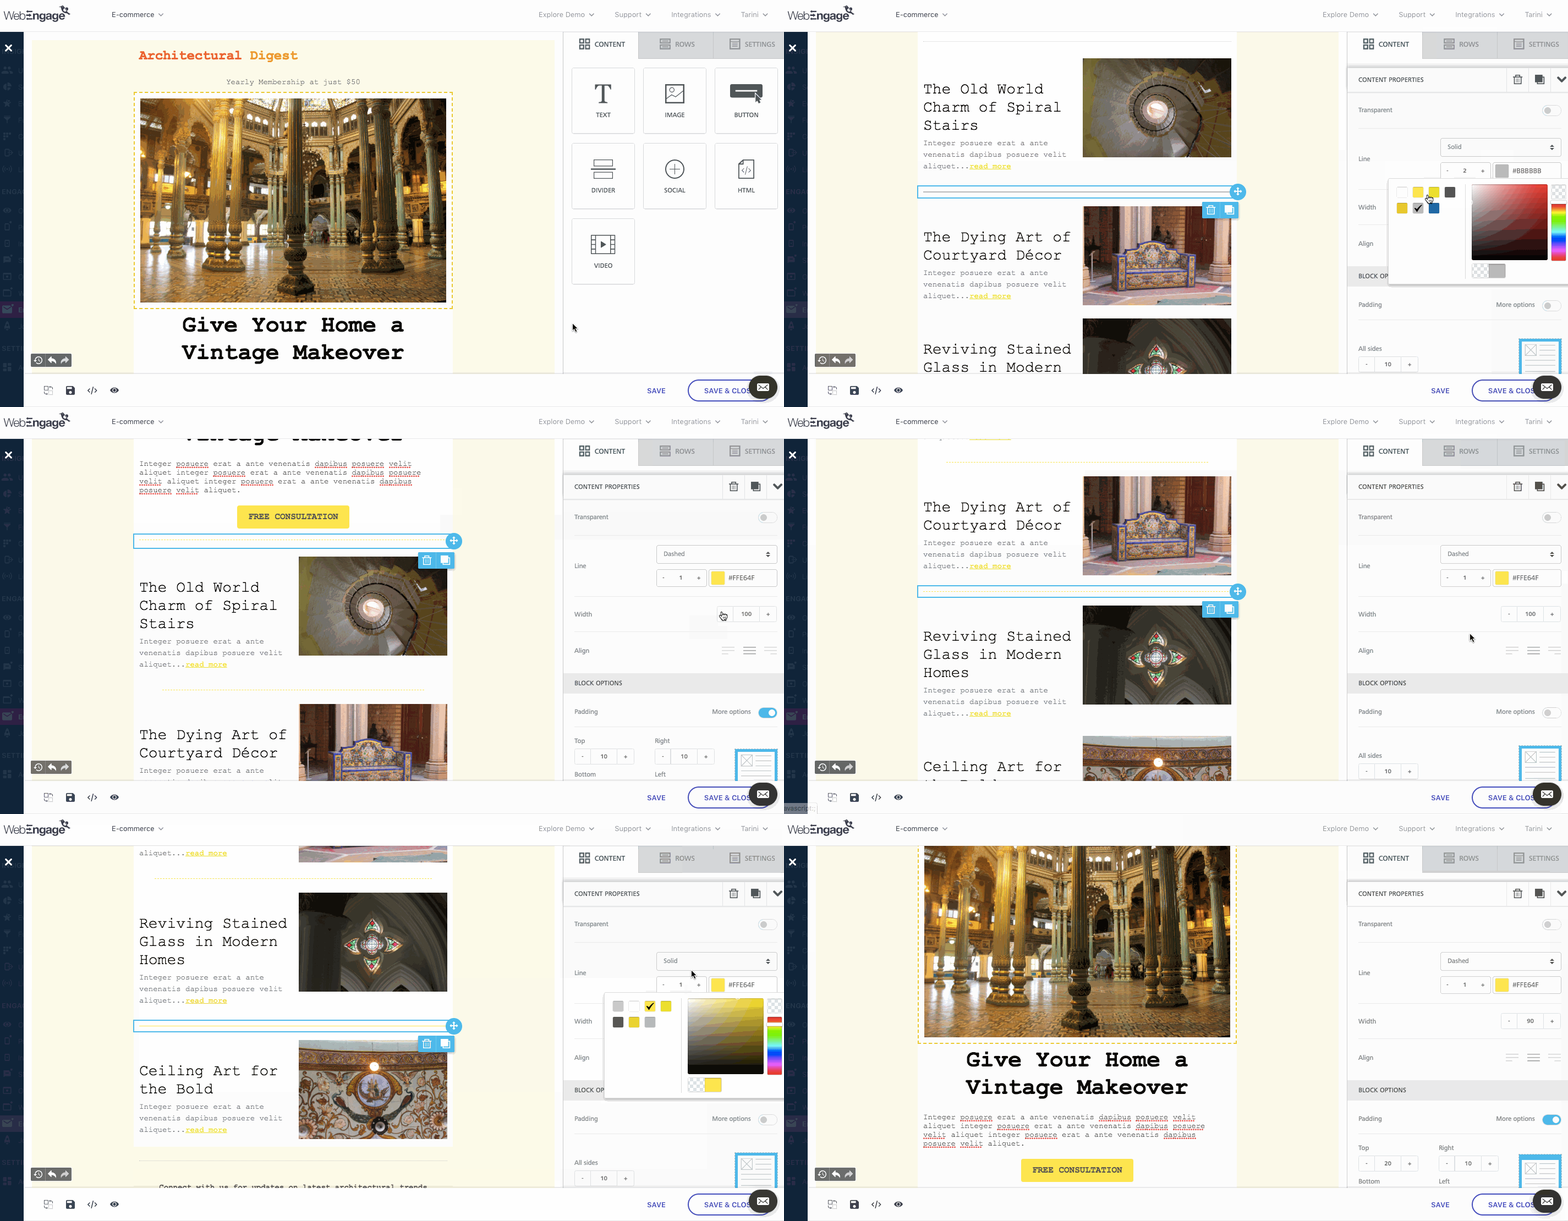
Dividers are small blocks of space that help you create different sections in your template. Using the Content Properties section in the right panel, you can easily modify its appearance. For example, in the below visual we have added a divider between each article and have changed its color, line-style & width to match the entire template's theme.
Click to enlarge
As shown above:
Step 1: Add a Row block to the template. (skip if a placeholder already exists)
Step 2: Select the Divider Content Block and drop it within the Row.
Step 3: Select the Divider added to the template to edit it's Content Properties like color, style, width, transparency, block padding, alignment and so on.
Adding Social Media Icons
The email editor comes pre-loaded with a library of all the popular social media platform icons and a variety of styles to help you configure their appearance. Here's how you can go about it:
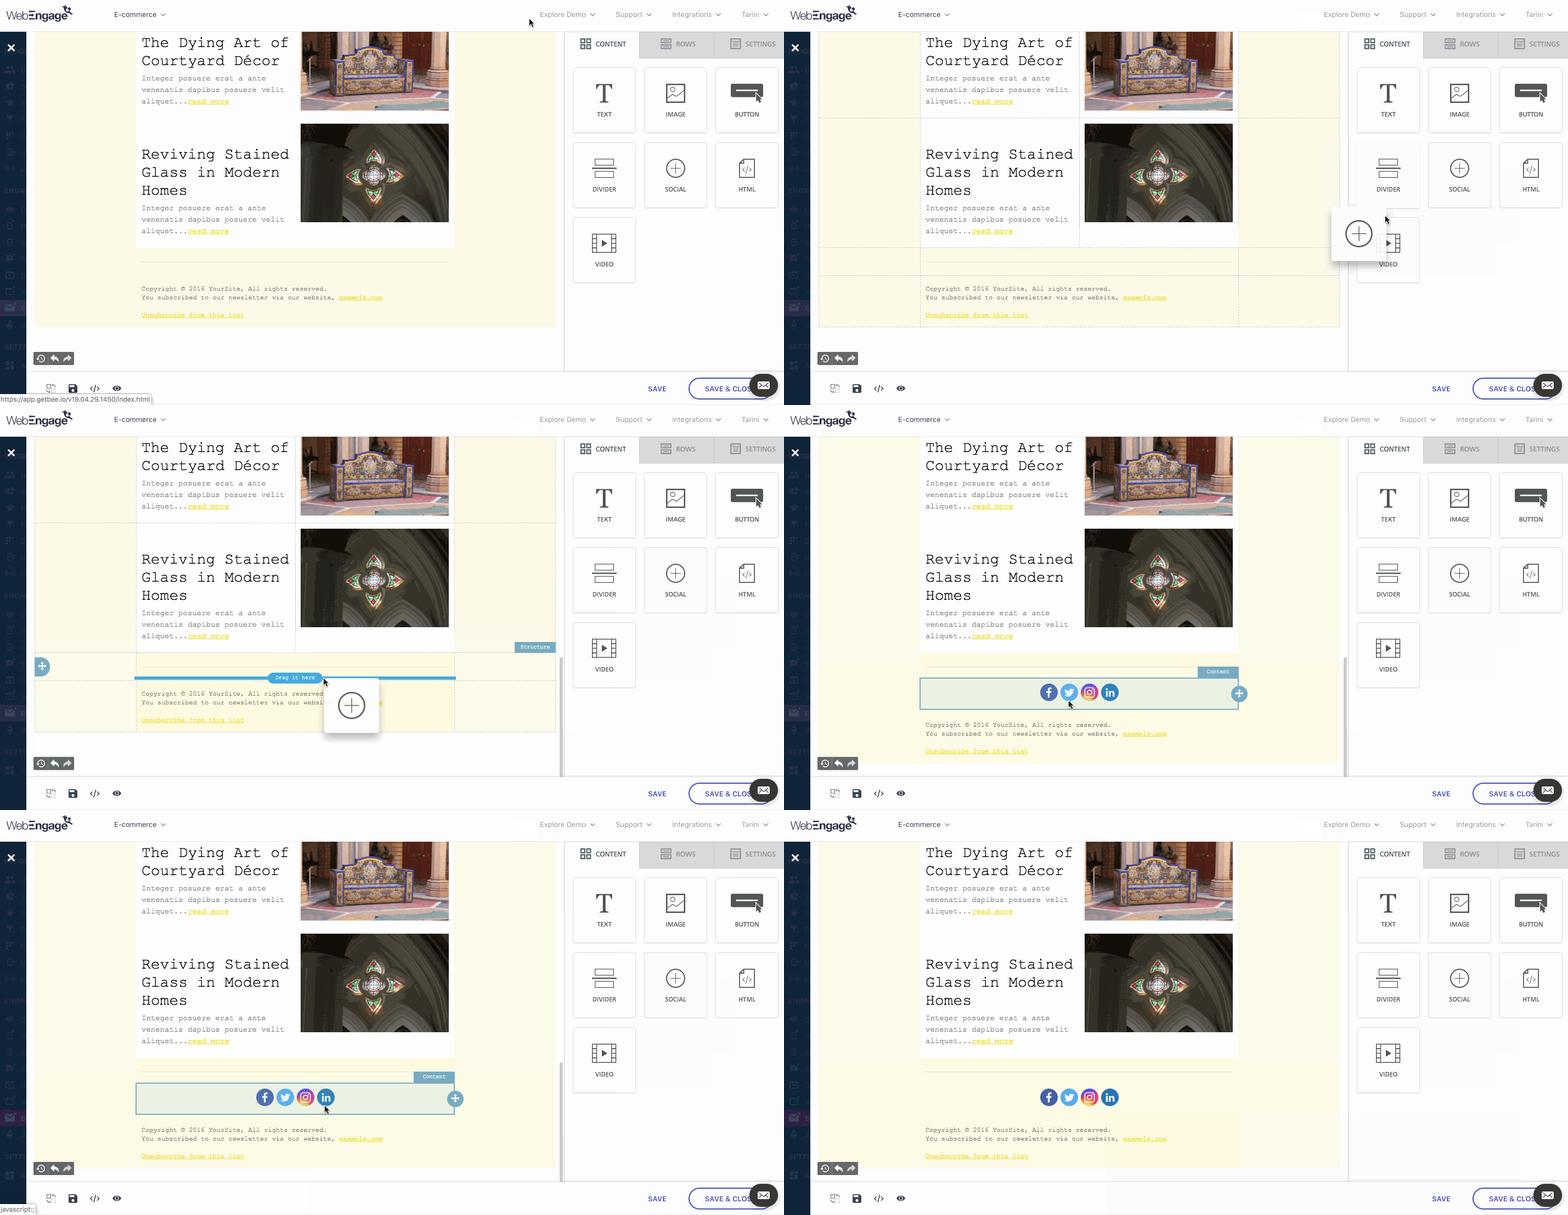
Click to enlarge
Step 1: Add Social Block to Template
- As shown above, select the Social Content Block and place it in the Row. In doing so, icons for Facebook, Twitter, Instagram, and LinkedIn will be added by default.
- You can further customize these, replace them or add more icons to the block.
Step 2: Remove/Add Icons
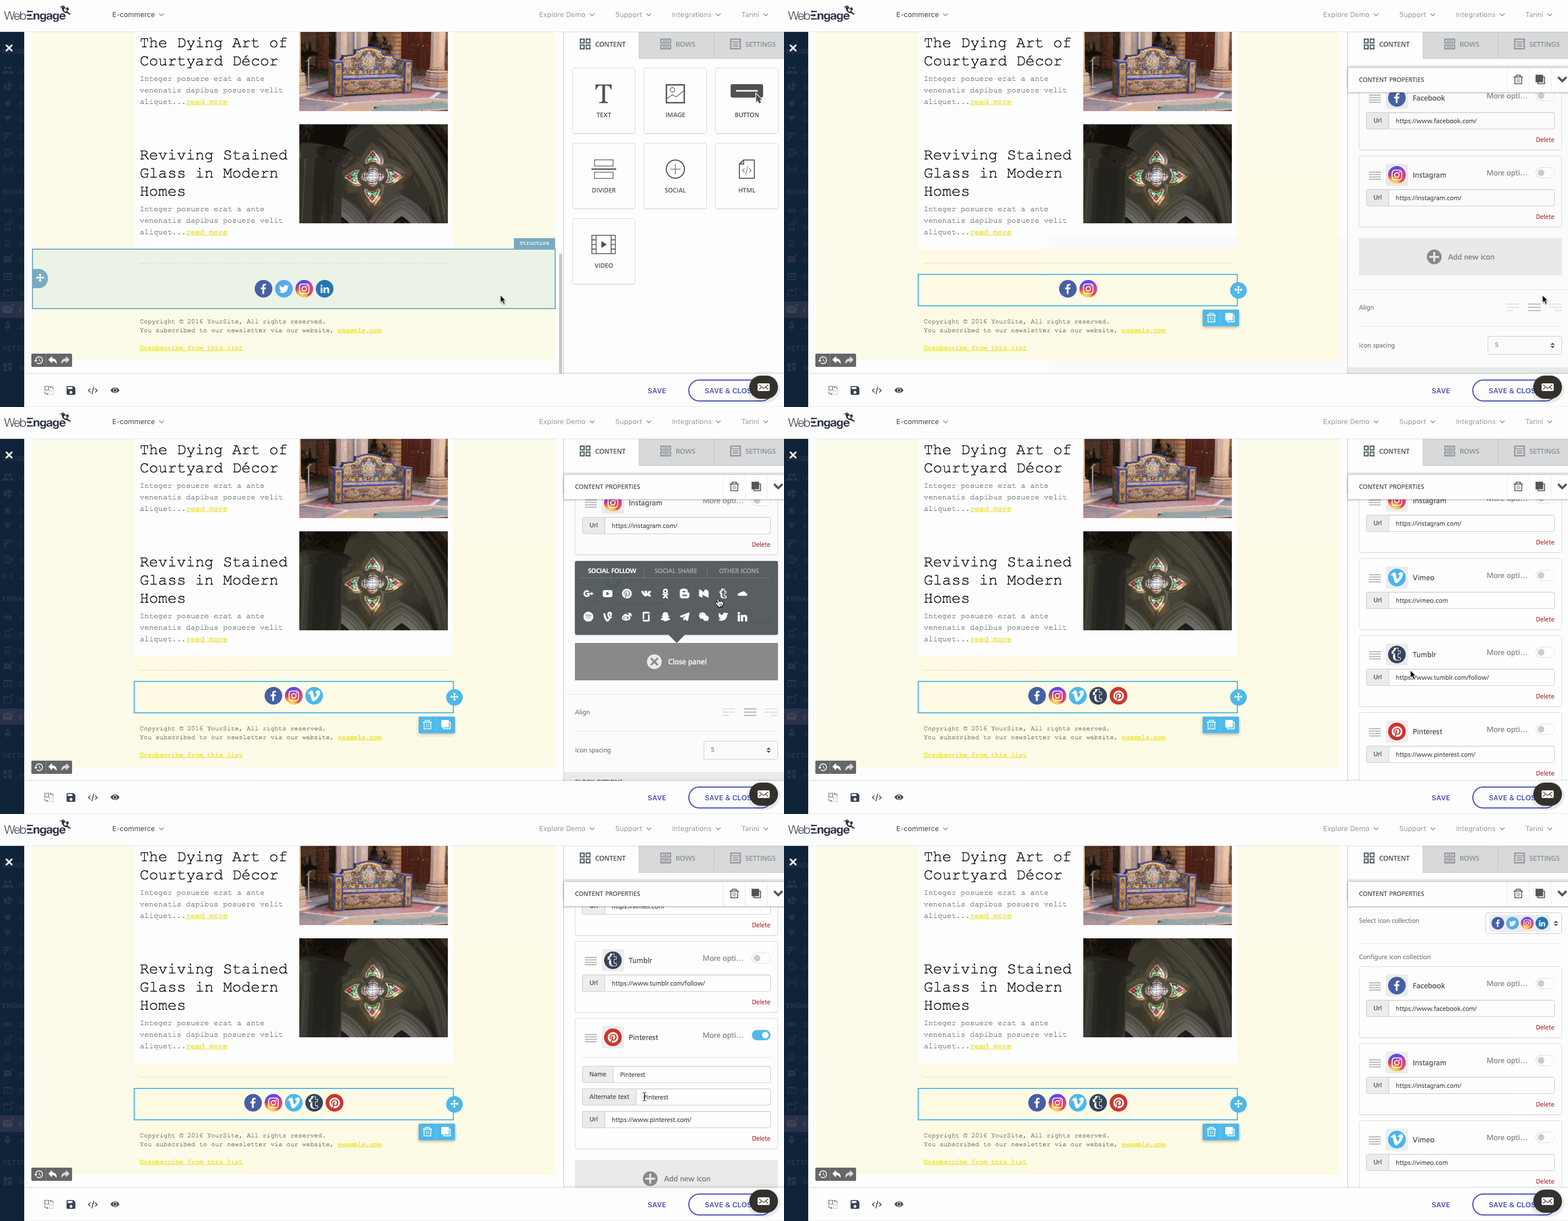
Click to enlarge
-
As shown above, click on the social block placed within the template. Doing so will allow you to configure various Content Properties through the right panel.
-
Scroll down the right panel and click on the Add New Icon button.
-
Select the platform you'd like to add to the email template and repeat for all the additional icons you'd like to add.
-
For example, in the above visual, we have deleted LinkedIn, Twitter and have added Vimeo, Pinterest, and Tumblr.
Step 3: Customize Icon Style
Using the Content Properties section of the block, you can completely revamp the appearance of the social media icons placed in your template.
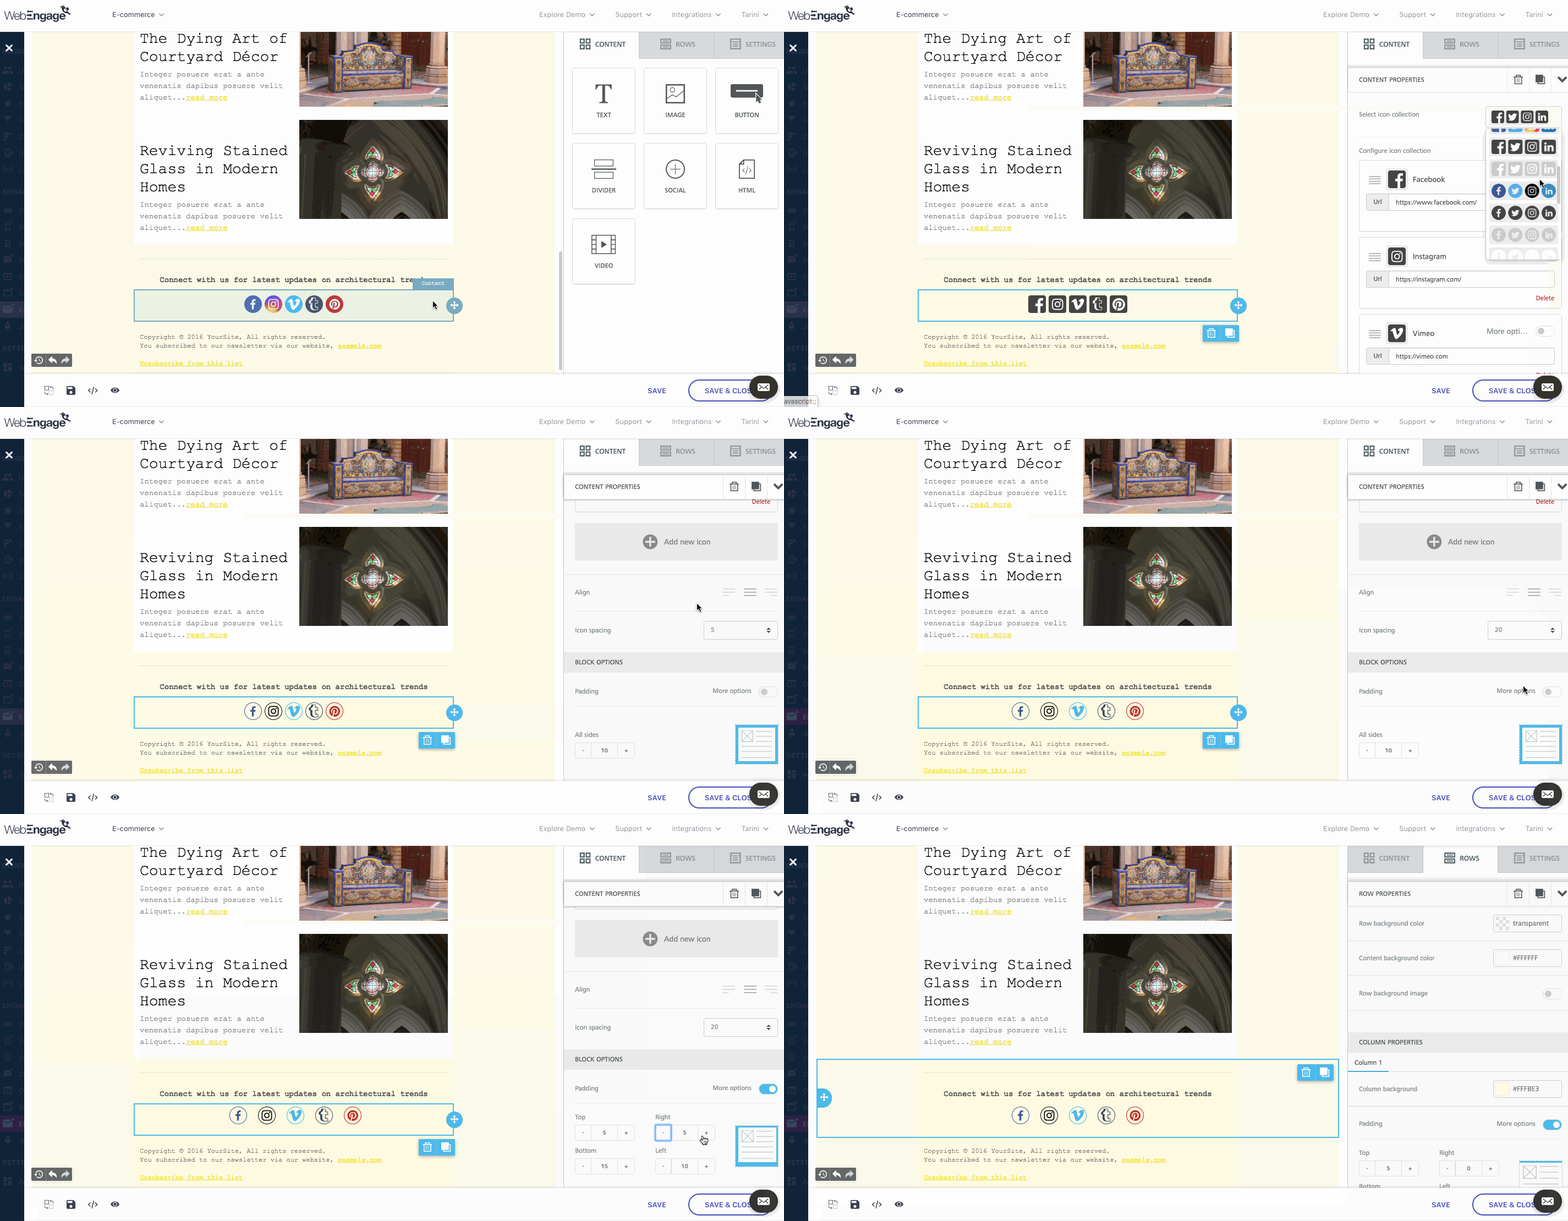
Click to enlarge
-
As shown above, you can access the library's Icon Collection through the first dropdown and select a style that resonates with the template's theme.
-
Further, you can adjust the spacing around the icons by configuring Icon Spacing and Block Padding.
Step 4: Link to Social Media Account
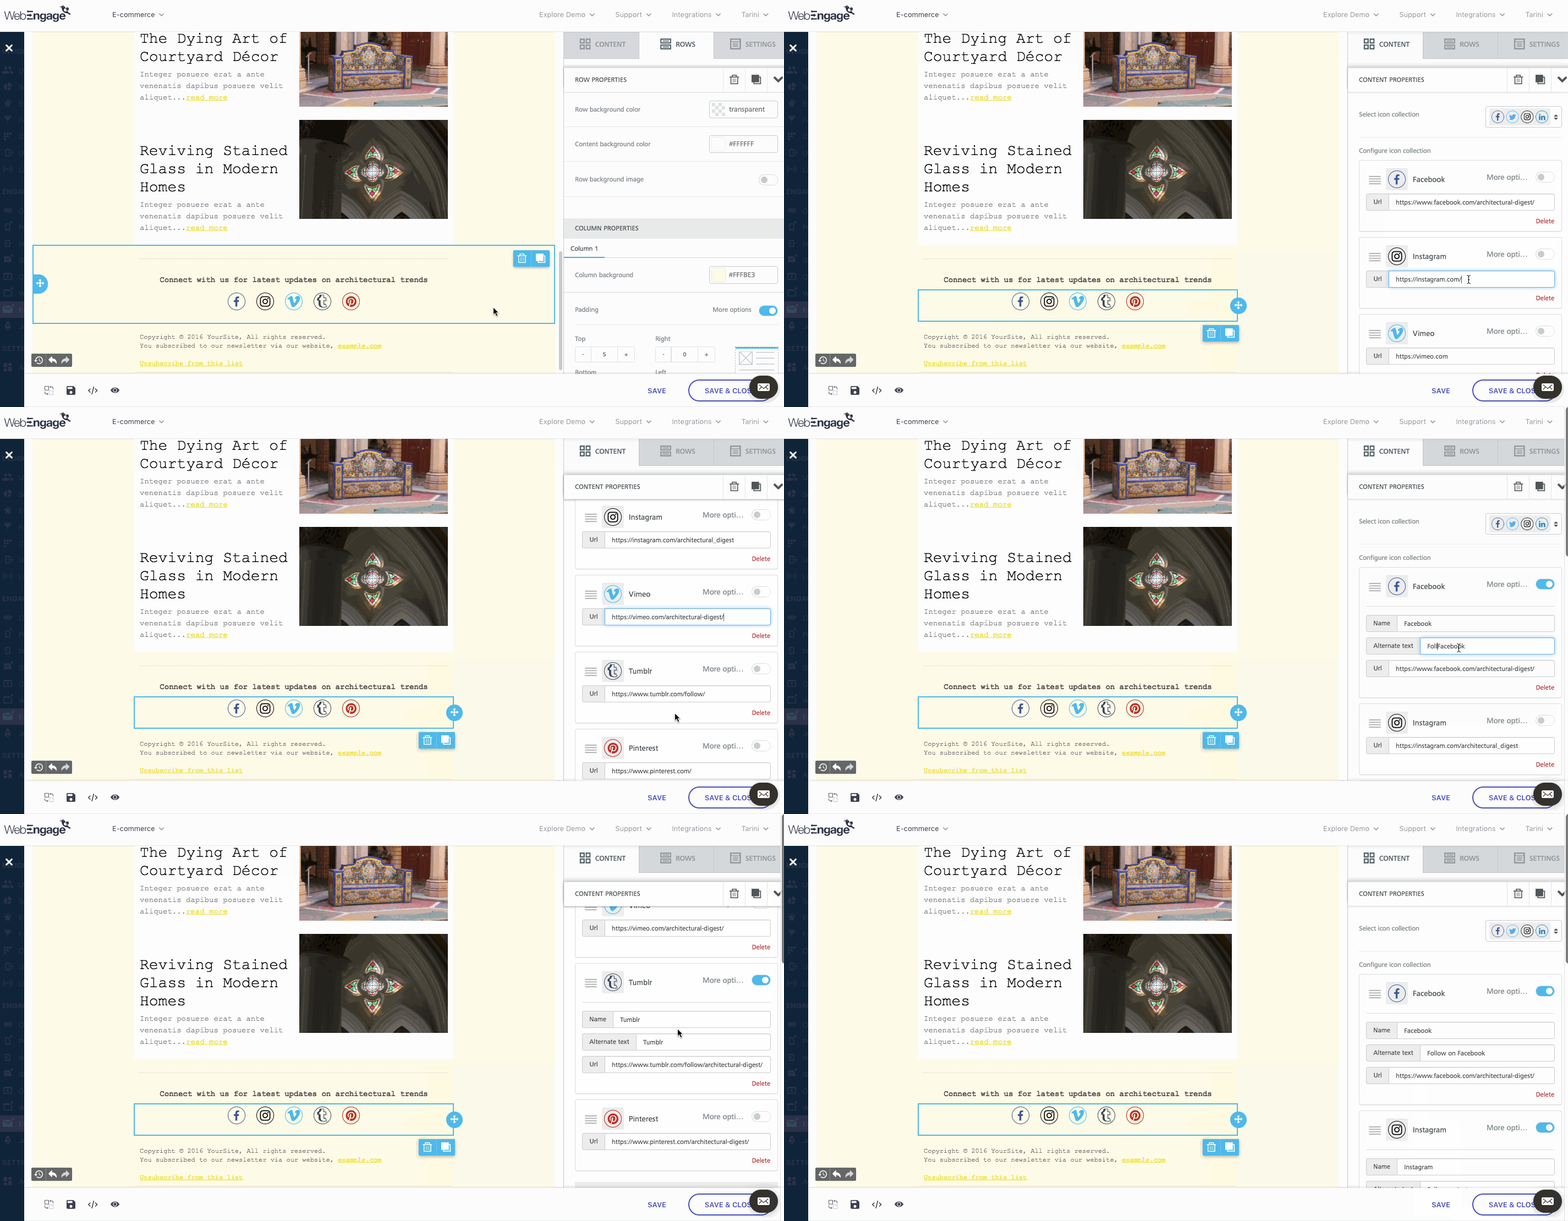
Click to enlarge
As shown above, you can easily link an Icon and configure its alternate text through each platform's settings, nested under Content Properties in the right panel.
Fact CheckEach time a user clicks on a link embedded in your email, it's automatically tracked as the Campaign Performance Indicators,Total Clicks and Unique Clicks for the Email Campaign and for Email as a channel. This includes links to your social media accounts.
Adding Unsubscribe Link
The most important step of Email campaign creation - adding an unsubscribe link to your email plays a big role in ensuring that your domain is not blacklisted by the user's email provider and that it doesn't land up in the spam folder. Here's how you can add the auto-generated unsubscribe link to your email template:
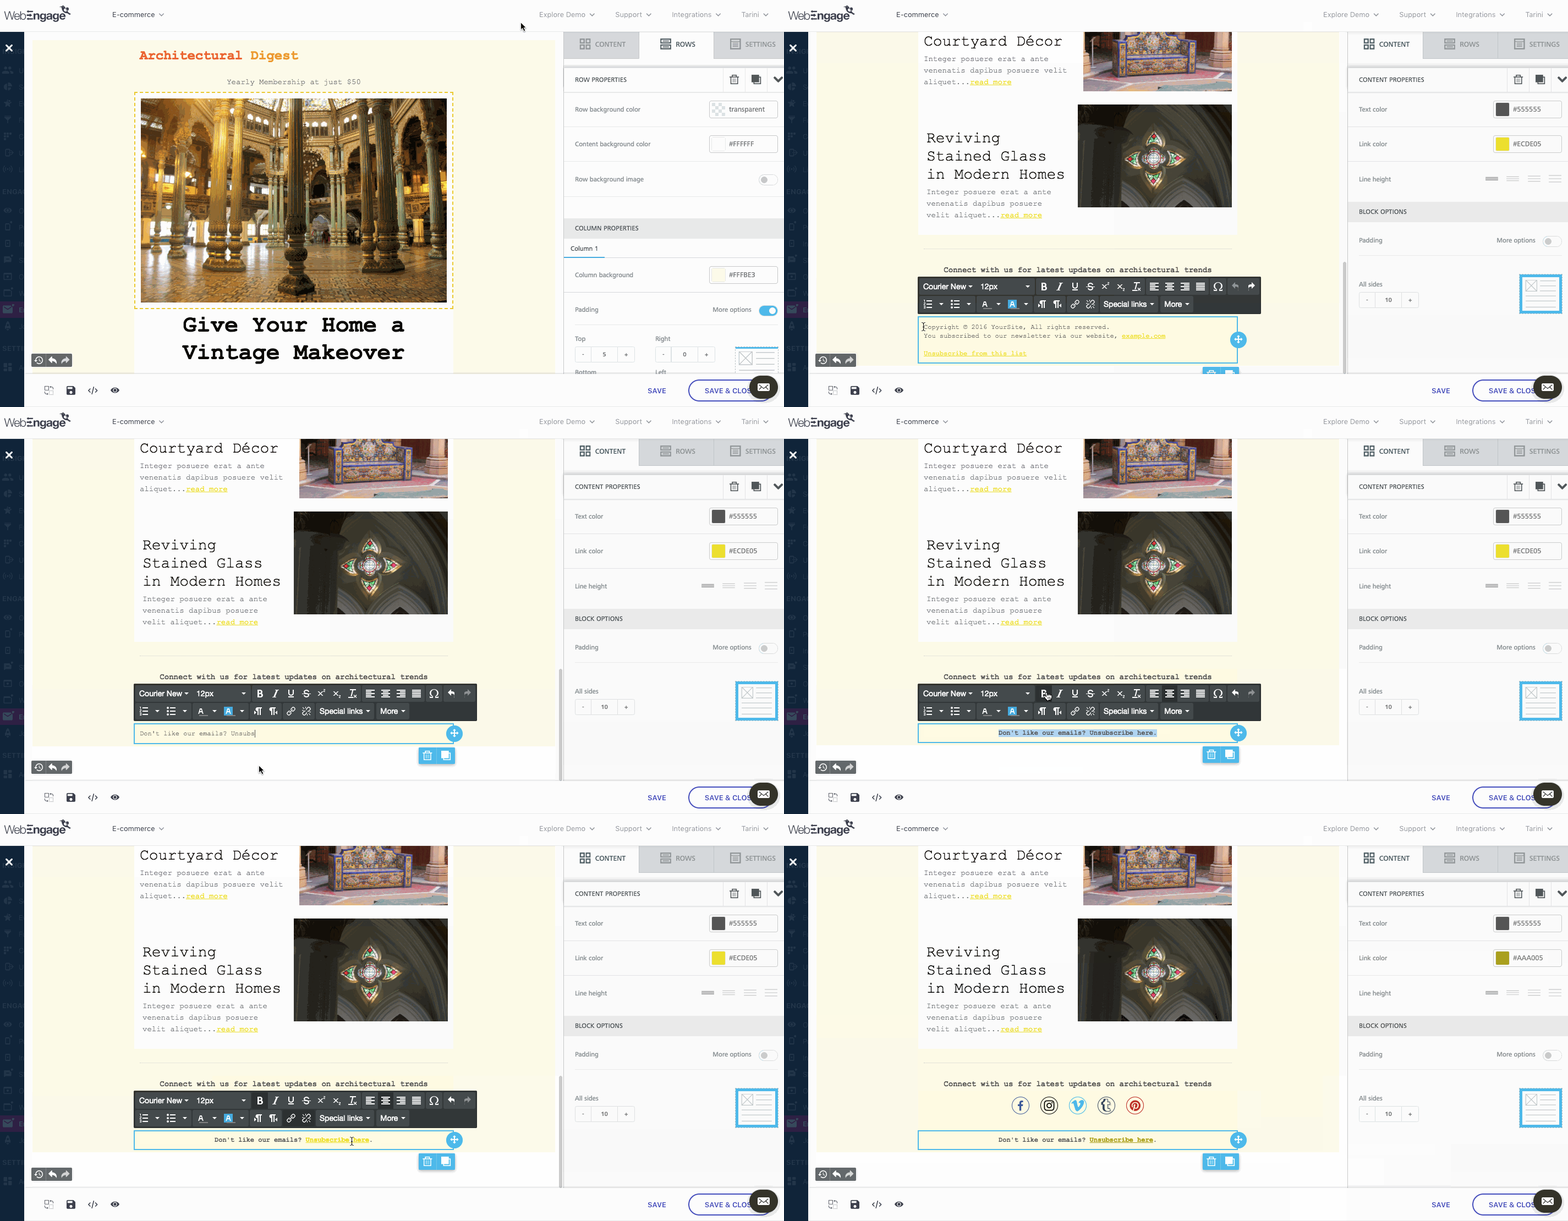
Click to enlarge
Step 1: As shown above, identify a prominent area in your template, like the footer to add text that clearly highlights a way for users to opt-out of your mailing list.
Step 2: Select the text in which you'd like to add the Unsubscribe Link. For example, we have chosen to hyperlink 'unsubscribe here' in the above visual.
Step 3: Click onSpecial Links in the formatting toolbar and select Unsubscribe Link to add the auto-generated link.
Fact Check
Each time a user clicks on the auto-generated unsubscribe link, we track it as the performance indicator, Unsubscribes for all your Email campaigns & Email as a channel.
All unsubscribed users are automatically deemed unreachable through the channel, indicated through Email Channel Reachability across your dashboard.
Preview Mode
You can easily preview the template on a Desktop and a Mobile device by clicking the Preview icon placed on the bottom left, as shown below. For example, in Mobile Preview we can see that the images have been shifted below the text in each Row (indicating that it's a highly responsive template).
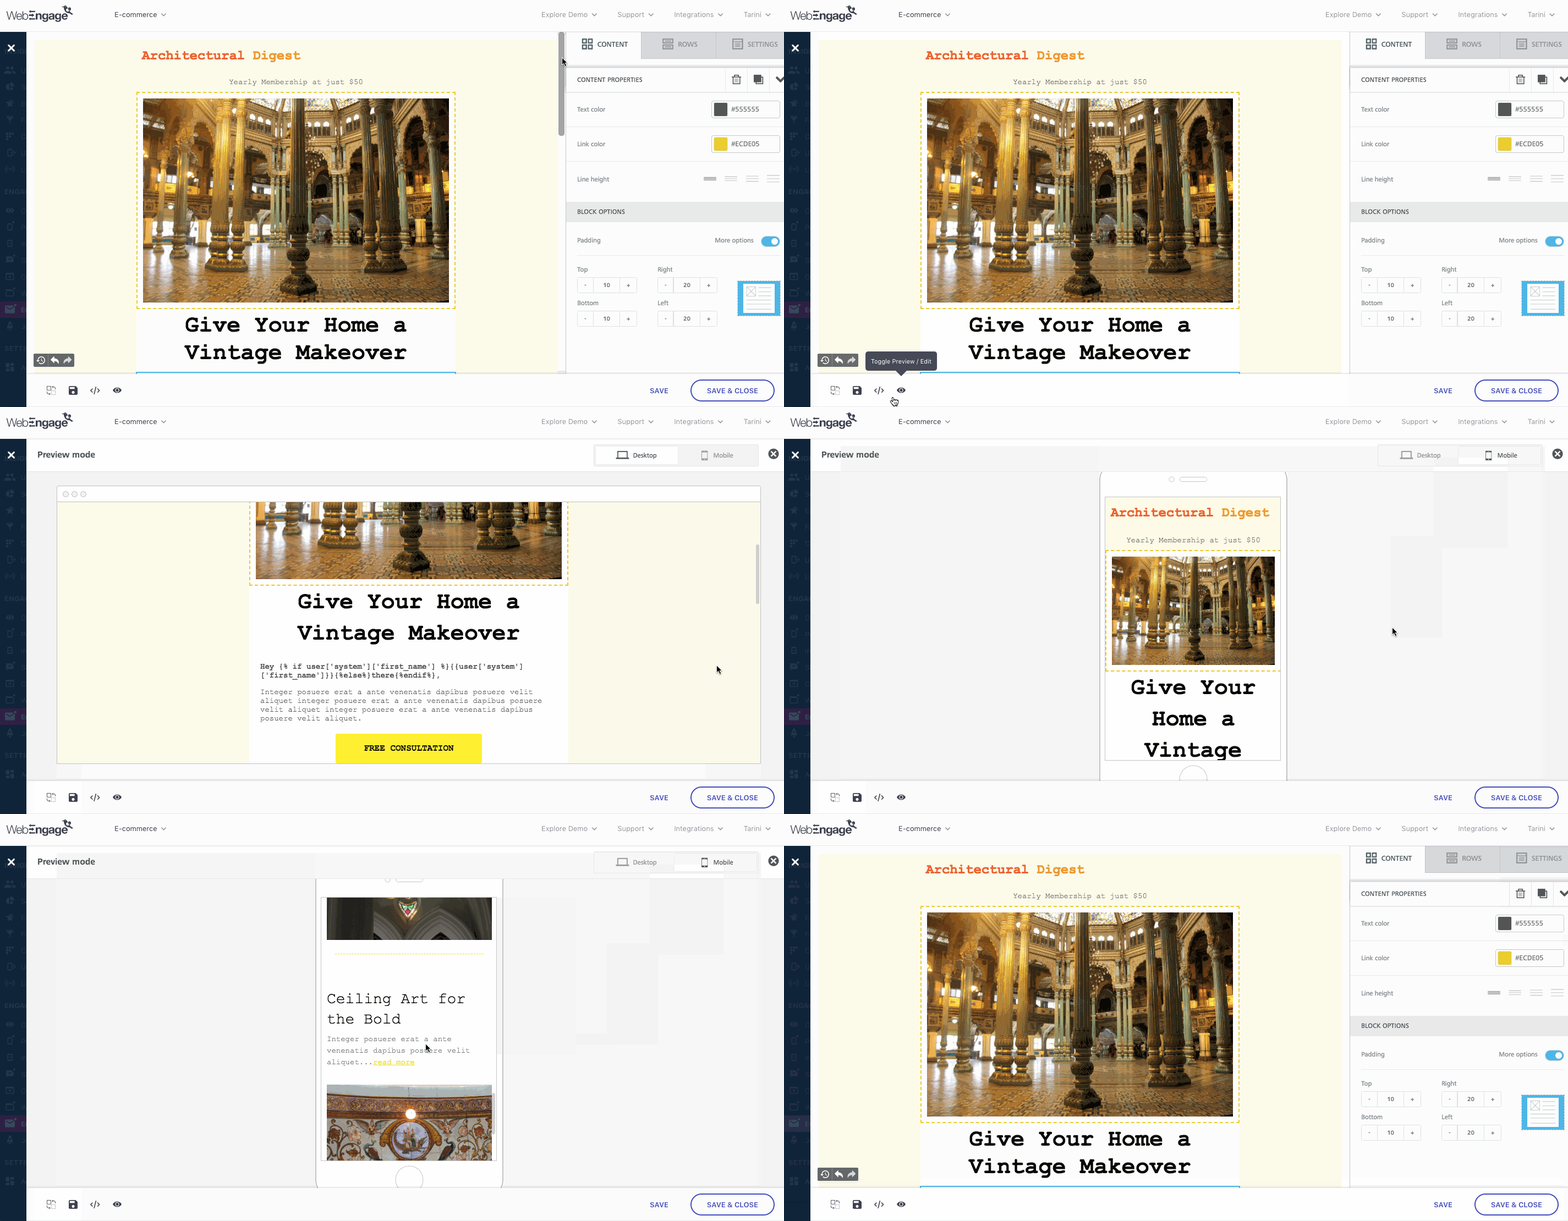
Click to enlarge
Pro TipWhile this a great way to visualize how your users will experience the template, Preview Mode doesn't accommodate the UI variations caused by different devices, inbox apps, and browsers. Hence, we recommend that you test the template with an internal test audience at Step 5: Test Campaign, before sending the email. (step-by-step-guide)
Saving a Template
As shown below, click the Save icon placed on the bottom left to archive the layout to My Templates. Simply add a name that helps you identify its purpose and click Save on the pop-up.
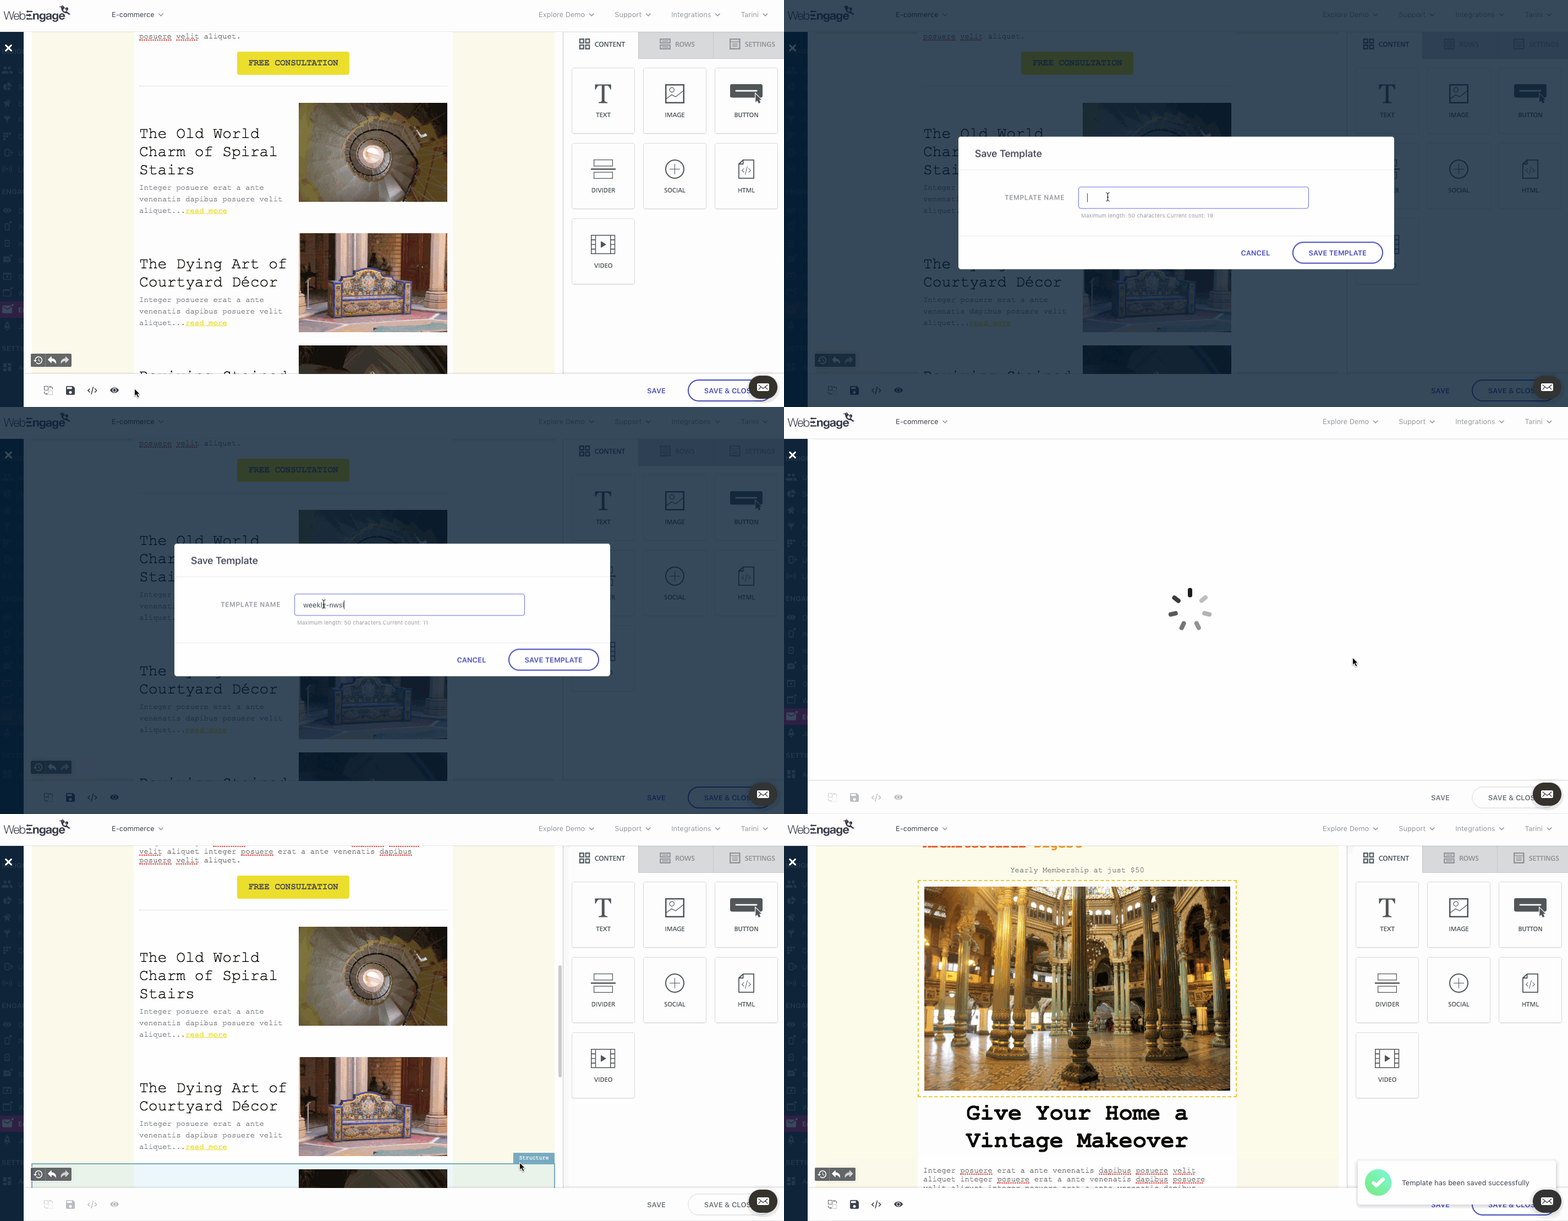
Click to enlarge
Export HTML
This feature comes in handy if you'd like to use the email template on another platform or simply archive the layout for in-house use. As shown below, click the </> icon placed on the bottom left to generate raw HTML.
- Copy and paste the code in a text file to save.
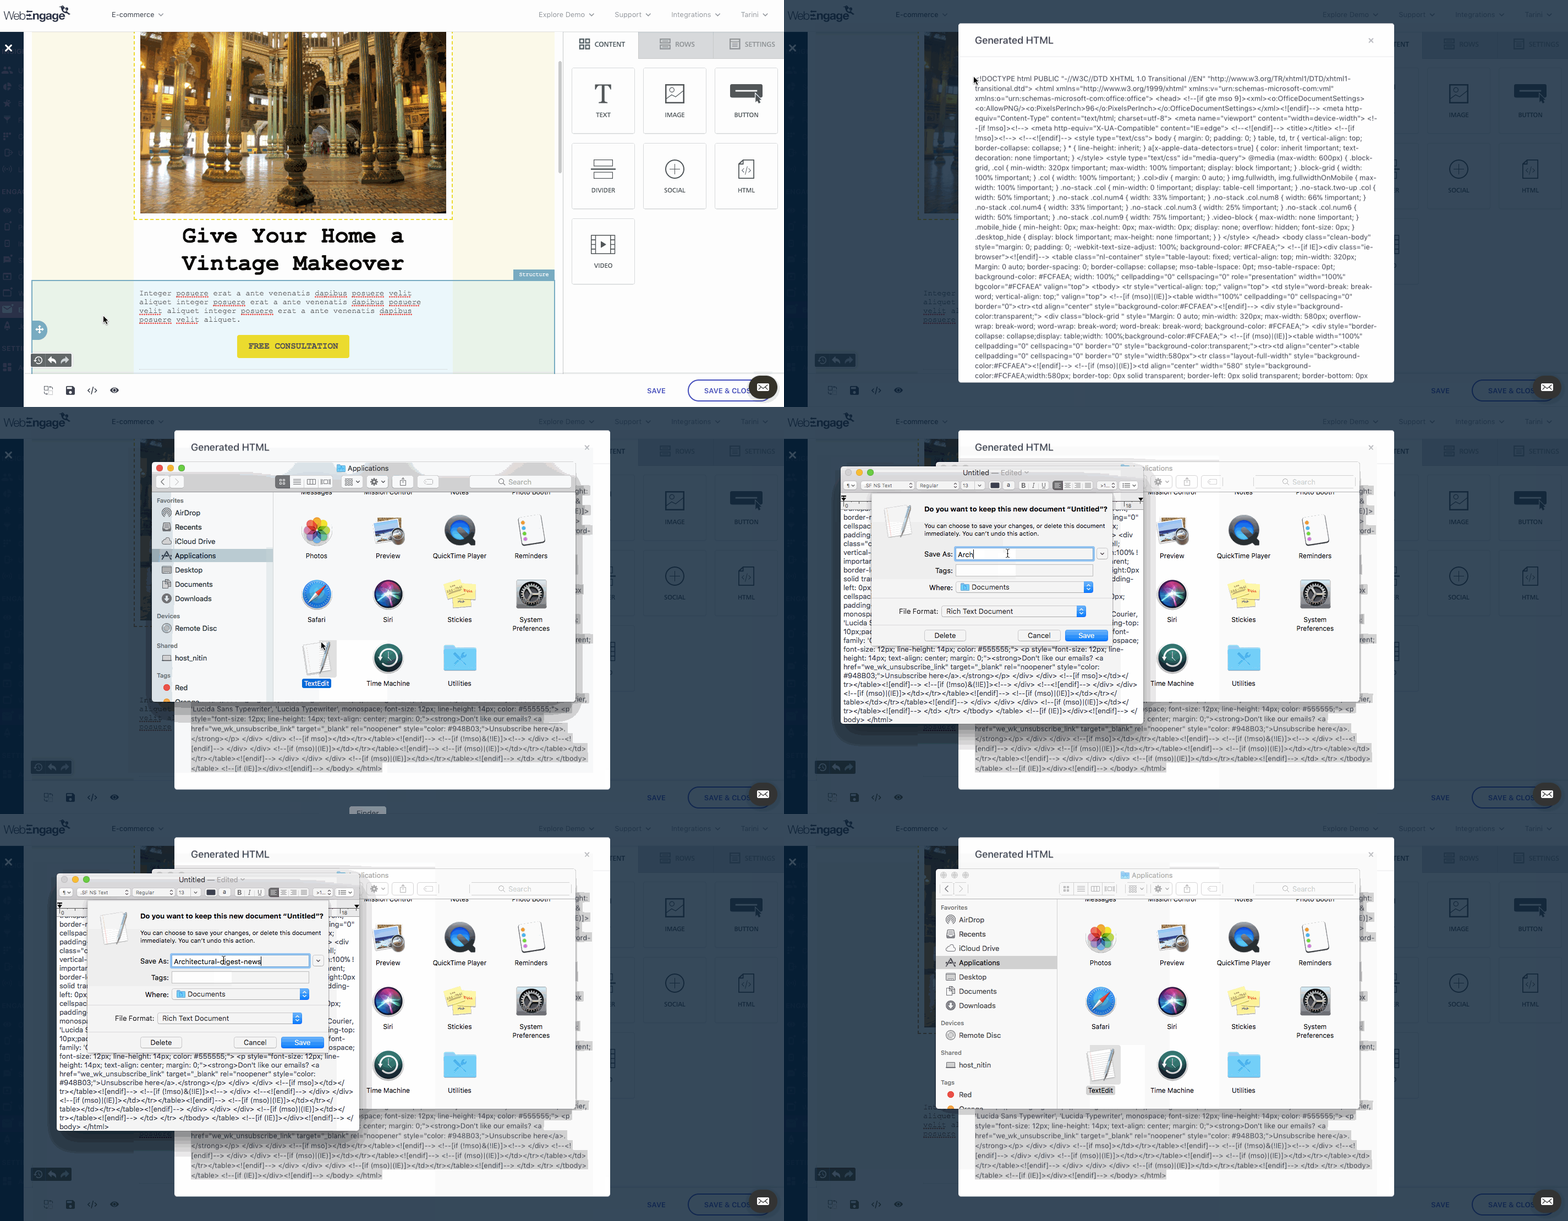
Click to enlarge
We hope this has enabled you to create an impressive email template for your upcoming campaign. Please feel free to drop in a few lines at [email protected] in case you have any further queries, we're always just an email away!
Updated 3 months ago
Let's take you back to Email campaign creation & launch your campaign!