Creating On-site Notifications
A step-by-step guide to engaging users with highly targeted notifications
Important
Please ensure that you've integrated your website with WebEngage & have enabled On-site Notifications in your dashboard. These are prerequisites to engaging users through On-site Notifications.
How to Access
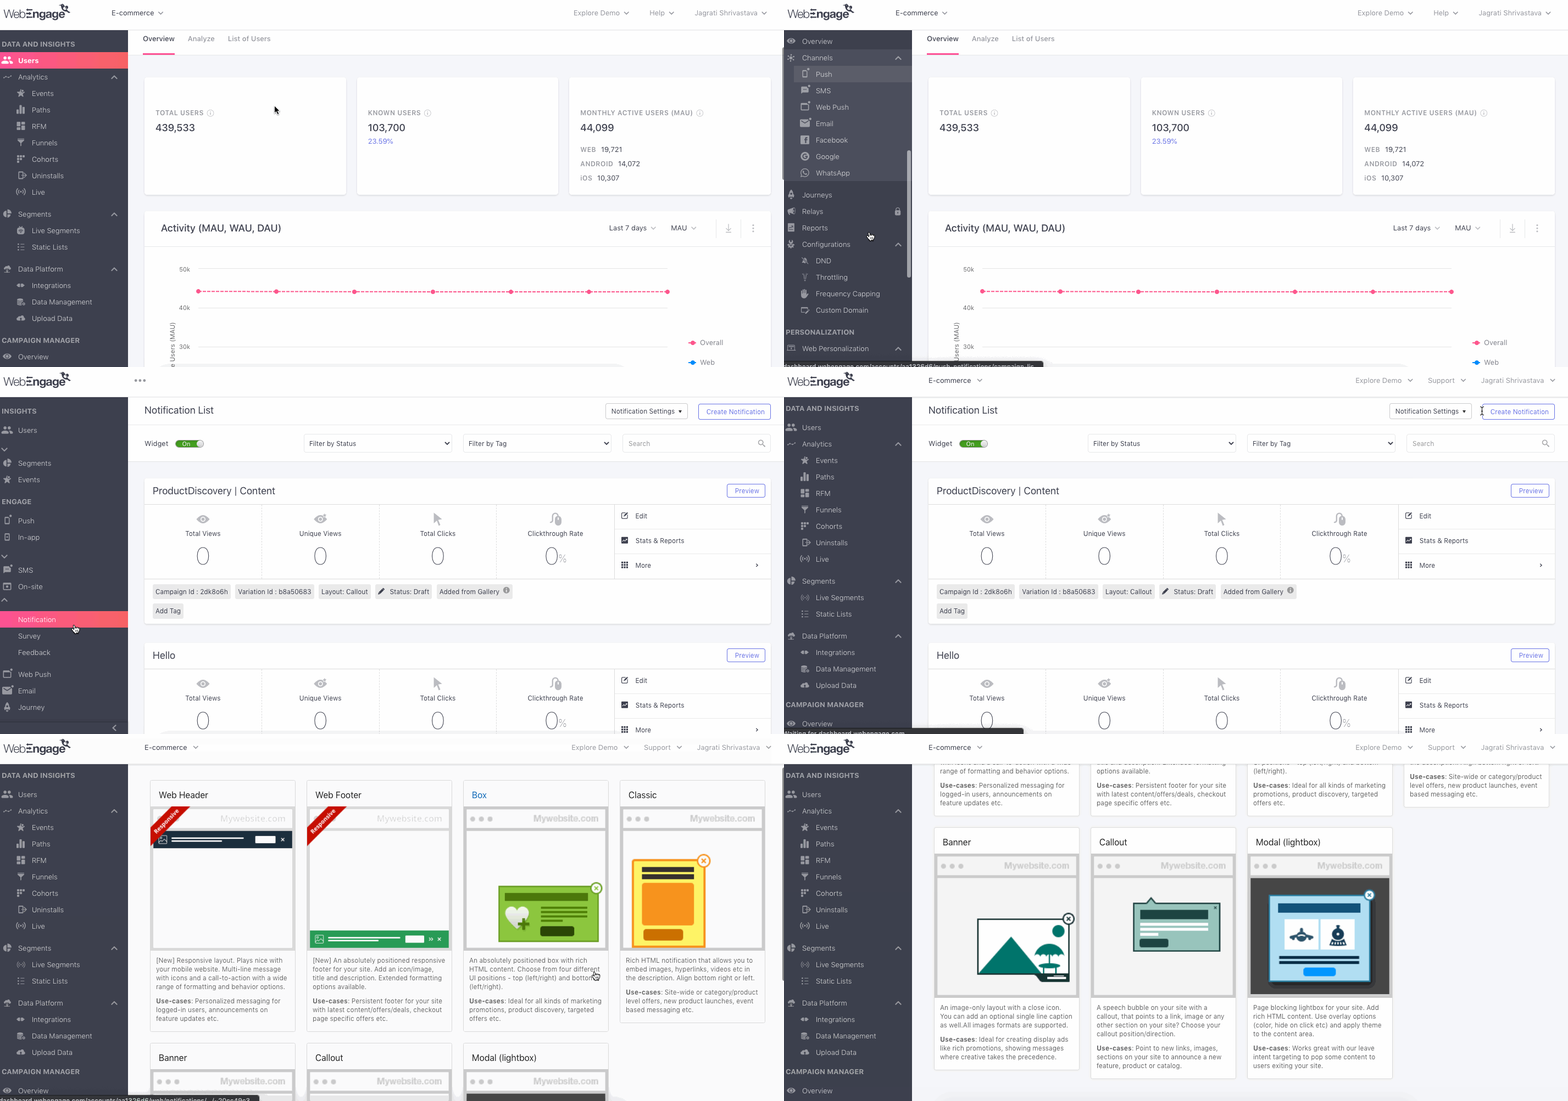
As shown below, click the Create Notification button placed on the top right in Notification List to get started.
Click to enlarge
Depending on your use-case and engagement strategy, you can choose to:
Let's walk you through all the steps of campaign creation:
Method 1: Create Your Own
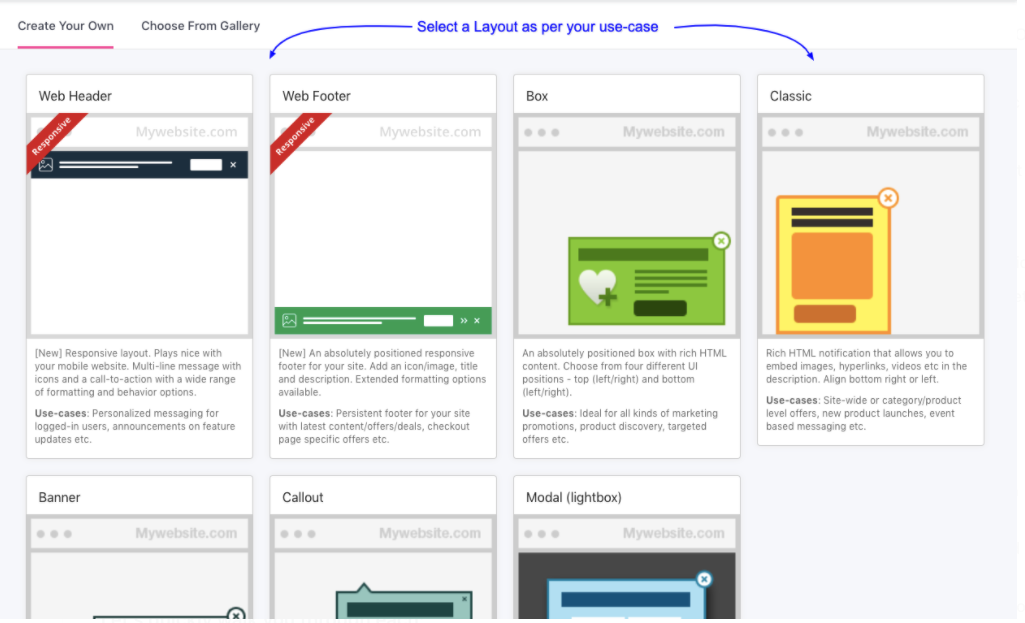
Step 1: Select a Layout
Click to enlarge
Let's quickly walk you through each:
Web Header: A highly customizable and responsive layout shown at the top of the user's mobile/desktop screen. It displays the message with a prominent icon and CTA. We recommend this for announcing new products/features/content. (How to Customize)
Web Footer: A responsive layout shown at the bottom of the user's mobile/desktop screen. It displays the message with a prominent icon and CTA. We recommend this for engaging users with contextually offers and messages on varying sections like Purchase, Custom Care, User Profile, Order Tracking, and so on. (How to Customize)
Box: A customizable box notification that can be positioned on any corner of your user's screen. It displays the message alongside a CTA button. We recommend it for a variety of use-cases including, product/feature/content promotion, engaging users with contextual offers, cross-selling, and up-selling. (How to Customize)
Classic: A rich media notification that displays the message along with an image, video, or hyperlink. It's shown on the bottom of the user's screen and is recommended for general use across your site. (How to Customize)
Banner: A rich media notification that displays a prominent banner image and a short message on any corner of your user's screen. We recommend it for contextually engaging users with visually enticing ads, offers, product announcements. (How to Customize)
Callout: A highly customizable notification that points to a particular element on the page with a callout. (How to Customize)
Modal (Lightbox): A customizable page blocker that's shown across the user's screen with a prominent CTA. We recommend it for exit-intent targeting, conveying important reminders, and so on. (How to Customize)
Step 2: Configure Basic Details
This section enables you to customize the notification's title, message, images, call-to-action, and appearance. Here's how you can go about it:
2.1. Add Details
Click to enlarge
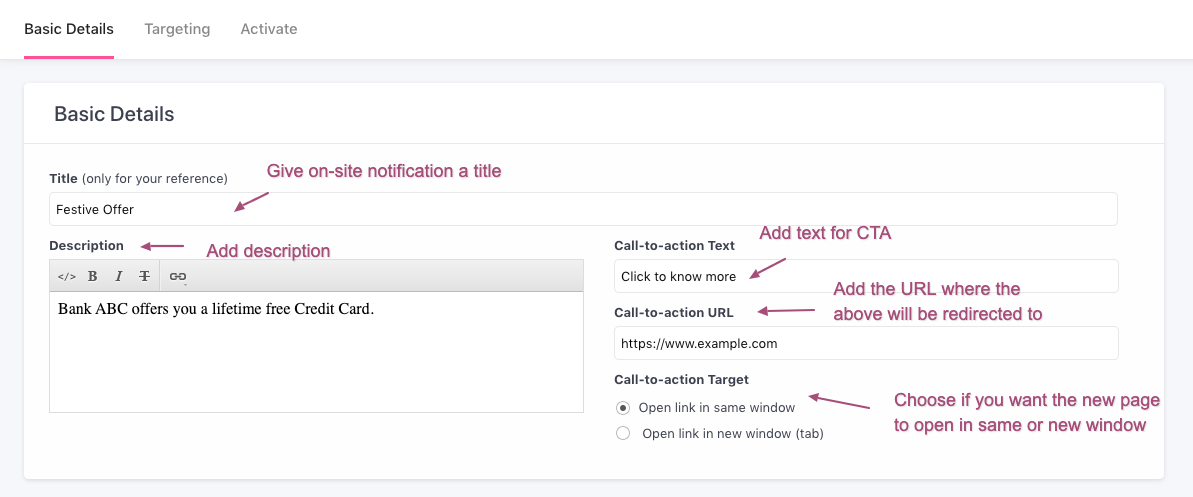
As shown above:
Step 1: Add a relevant Title.
-
By default, the title is not included in the notification and is only used for your reference in Notification List.
-
You can click the checkbox to show the title to your users. (Do ensure that it's user-friendly!)
Step 2: Create your message under Description.
- You can choose to add rich text as an HTML/CSS code or simply add plain text to the message.
Step 3: Configure the CTA (Call-to-action)
-
Add the button text in the field, Call-to-action Text.
-
Add the link to which you'd like to direct users when they click on the button in the field, Call-to-action URL.
-
Specify the preferred website experience for users who click on the button by selecting:
- Open link in the same window to disrupt their current experience.
- Open link in a new window (tab) to allow users the option to navigate back-and-forth between the two pages.
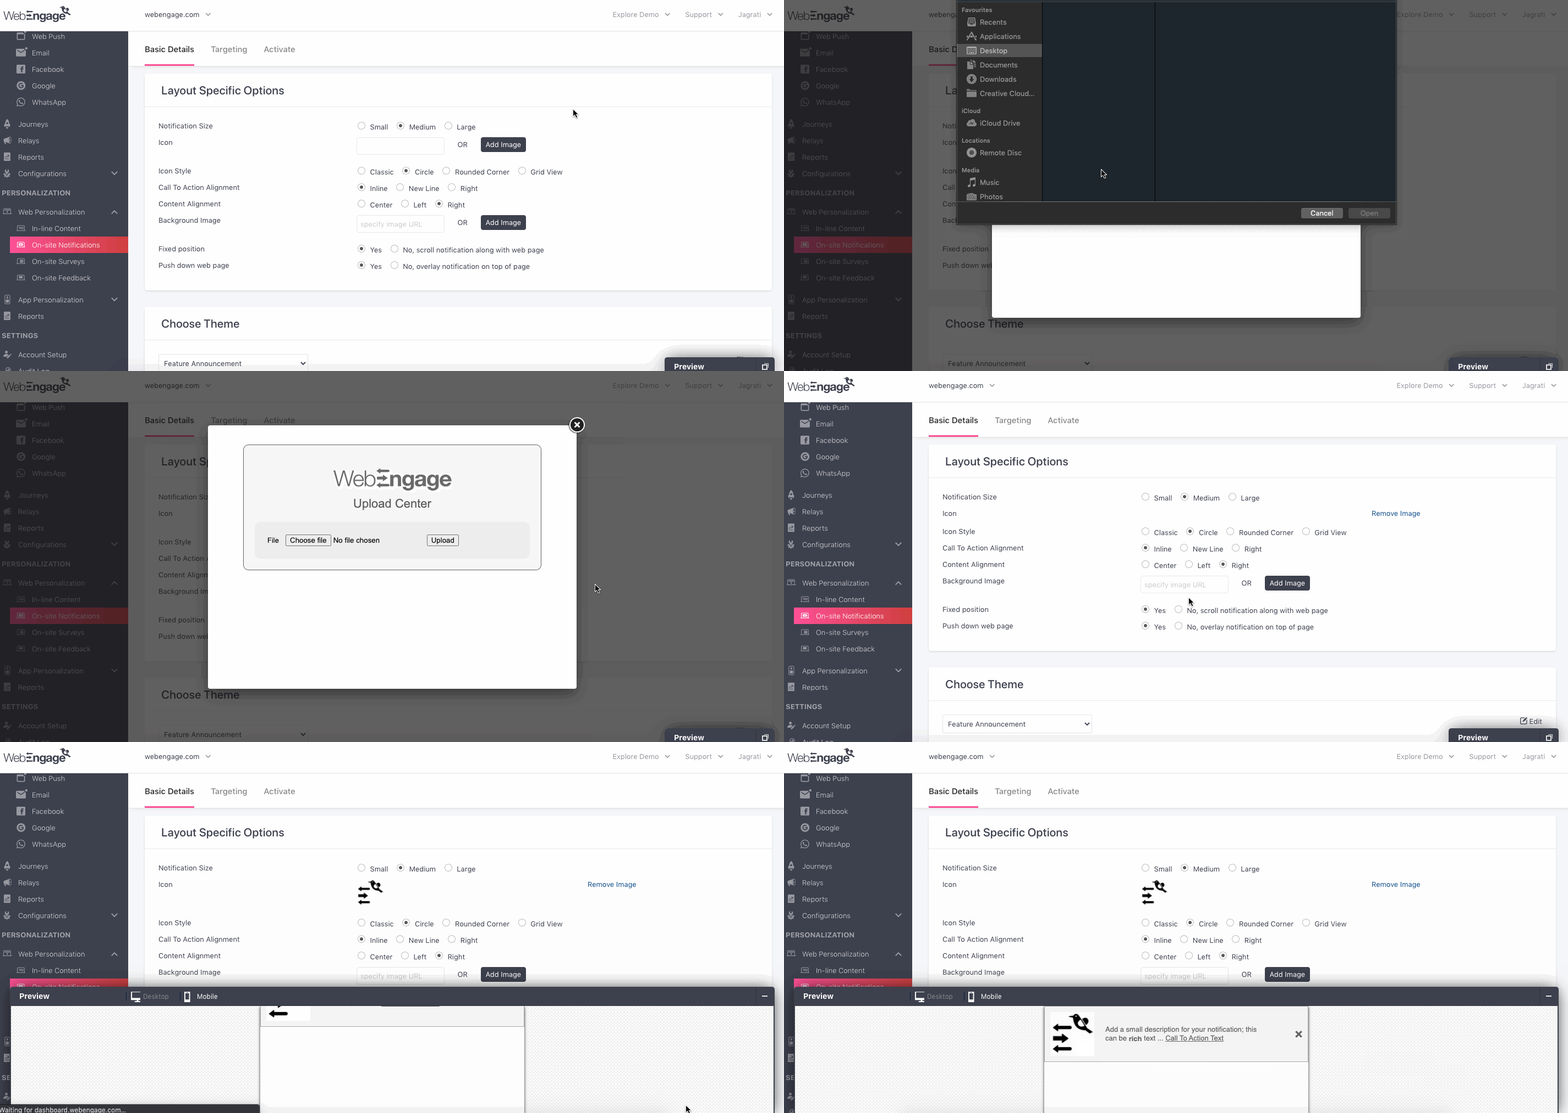
2.2. Customize Layout Appearance
Click to enlarge
The elements that can be customized depends on the layout selected at Step 1.
Navigate to Your Preferred Layout to Continue
Web Header
Close Notification Settings: By default, your users will be able to dismiss the notification after viewing it (in case they are unwilling to interact). However, you can choose to disable it if you'd like to reinforce the message throughout the user's session.
Notification Size: Depending on your use-case, you can choose from 3 sizes, Small, Medium, Large. These sizes help you determine the notification's font-size and height.
Icon: Upload the image or specify a link
Icon Style: You can customize the icon's appearance by selecting from any of the following styles: Classic, Circle, Rounded Edges, Grid.
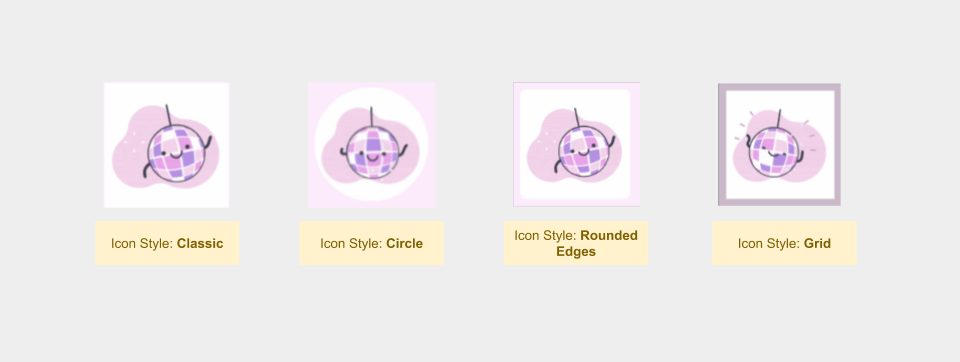
On-site Notification Icon Styles
CTA Button Alignment: Depending on the message added under the Description and your use-case, you can choose to place the CTA:
- Between the title and text (Top)
- Below the title and text (Bottom - default style)
- Left side of the text (Left)
- Right side of the text (Right)
Content Alignment: You can choose to align the message within the notification as per your needs.
Background Image: By default, the background color is determined by the theme selected at Step 2.3: Choose Theme. You can choose to override this setting by uploading a background image. (Avoid portrait-oriented pictures at all times!)
Fixed position: By default, Web Header Notifications are fixed to the top of the user's screen. You can disable this setting and have the notification float as the user scrolls through the webpage.
Push down Web Page: By default, Web Header Notifications are displayed between your browser's search bar and site's navigation bar. You can disable this setting and have the notification overlap the top section of your website.
Web Footer
Close Notification Settings: By default, your users will be able to dismiss the notification after viewing it (in case they are unwilling to interact). However, you can choose to disable it if you'd like to reinforce the message throughout the user's session.
Minimize Notification Settings: By default, your users will be able to minimize the notification after viewing it (and interact with it later). However, you can choose to disable this if you'd like to persuade the user to click on it.
Notification Size Depending on your use-case, you can choose from 3 sizes, Small, Medium, Large. These sizes help you determine the description and CTA's font-size and the height of the entire header notification.
Icon: Upload the image or add a link to an image hosted on a publicly accessible domain.
Icon Style: You can customize the icon's appearance by selecting from any of the following styles:
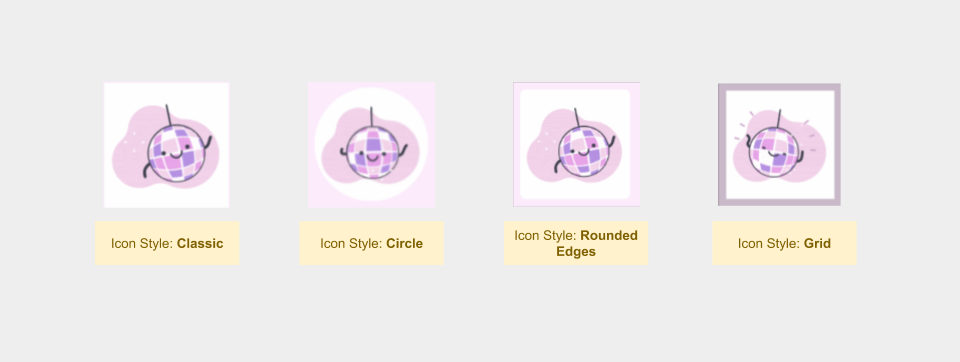
On-site Notification Icon Styles
CTA Button Alignment: Depending on the message added under the Description and your use-case, you can choose to place the CTA:
- Between the title and text (Top)
- Below the title and text (Bottom - default style)
- Left side of the text (Left)
- Right side of the text (Right)
Content Alignment: You can choose to align the message within the notification as per your needs.
Background Image: Customize the notification's background by uploading an image or adding a link. (Avoid uploading a portrait-oriented image at all times!)
Box Layout
Notification Width: You can specify a custom width in pixels for your notification and gauge its appearance through the Preview tab as you fine-tune it.
- The notification's length is determined by the number of characters added under the Description.
Box Alignment: Depending on the layout of your webpage, you can choose to display the On-site Notification on the Top Left, Top Right, Bottom Left, or Bottom Right of the user's screen.
- This will be applied to all mobile tablet and desktop screens.
Rounded Corners: Enable the field to give your notification a stylized appearance.
CTA Button Alignment: Depending on the message added under the Description and your use-case, you can choose to place the CTA:
- Between the title and text (Top)
- Below the title and text (Bottom - default style)
- Left side of the text (Left)
- Right side of the text (Right)
Classic Layout
Notification Width: You can specify a custom width in pixels for your notification and gauge its appearance through the Preview tab as you fine-tune it.
- The notification's length is determined by the number of characters added under the Description.
Notification Alignment: Depending on the layout of your webpage, you can choose to display the On-site Notification on the Bottom Left, or Bottom Right of the user's screen.
- This will be applied to all mobile tablet and desktop screens.
CTA Button Alignment: Depending on the message added under the Description and your use-case, you can choose to place the CTA:
- Between the title and text (Top)
- Below the title and text (Bottom - default style)
- Left side of the text (Left)
- Right side of the text (Right)
Banner Layout
Close Notification Settings: By default, your users will be able to dismiss the notification after viewing it (in case they are unwilling to interact). However, you can choose to disable it if you'd like to reinforce the message throughout the user's session.
Banner Image: Upload the banner image or add a link to an image hosted on a publicly accessible domain. Please ensure that the image is:
- Maximum 500px by 300px (w:h)
- In JPG/ JPEG/ PNG format.
Rounded Corners: Enable the field to give your notification a stylized appearance.
Banner Alignment: Depending on the layout of your webpage, you can choose to display the On-site Notification on the Bottom Left, or Bottom Right of the user's screen.
- This will be applied to all mobile tablet and desktop screens.
Padding From Corners: By default, a margin of 20px is maintained around the banner image added by you. You can choose to modify it by specifying a custom margin (padding value) in pixels.
Callout
Notification Width: You can specify a custom width in pixels for your notification and gauge its appearance through the Preview tab as you fine-tune it.
- The notification's length is determined by the number of characters added under the Description.
CTA Button Alignment: Depending on the message added under the Description and your use-case, you can choose to place the CTA:
- Between the title and text (Top)
- Below the title and text (Bottom - default style)
- Left side of the text (Left)
- Right side of the text (Right)
Arrow Position: Depending on the element you're highlighting on the page, you can customize the callout arrow's position.
Rounder Corners: Enable to give your notification a stylized appearance.
Shadow: Enable to add a shadow effect to the entire notification
Point the callout to: Link the entire notification to a specific element on your page. The element could be anything like a button, text, image, video and so on. This can be configured in any of the following ways:
-
Method 1: Select an HTML Element on your site
You can map elements that exist on your site to your dashboard. This enables you to show the Callout Notification on all pages the contain the specific element. Here's how you can go about it:- Step 1: Enter a link to a page and click the Open Link button.
- In doing so, you will be directed to a new window where our node selector is activated.
- Step 2: Select an element on the page.
- In doing so, you will be prompted to name and categorize it. (This comes in handy when reusing the element in future campaigns).
- Step 3: Click Save to implement!
- Step 1: Enter a link to a page and click the Open Link button.
-
Method 2: Specify HTML Element ID
Team up with your tech team to assign an ID to the elements that you'd like to target with On-site Notifications. Once you have the list, add the Element ID here to highlight it with a callout!
(Modal) Lightbox
Notification Width: You can specify a custom width in pixels for your notification and gauge its appearance through the Preview tab as you fine-tune it.
- The notification's length is determined by the number of characters added under the Description.
Rounder Corners: Enable the field to give your notification a stylized appearance.
CTA Button Alignment: Depending on the message added under the Description you can choose to place the CTA:
- Between the title and text (Top)
- Below the title and text (Bottom - default style)
- Left/right side of the text (Left/ Right)
Background: Depending on the theme selected by you, you can choose to apply a Black or White colored overlay on your site when the notification is shown.
Hide on Overlay Click: Enable to minimize the notification if a user clicks on the overlay. (Most users would rather click where their mouse is, instead of navigating to the close icon to dismiss it.)
2.3. Choose Theme
Your dashboard comes preloaded with several themes that can be applied to the selected layout.
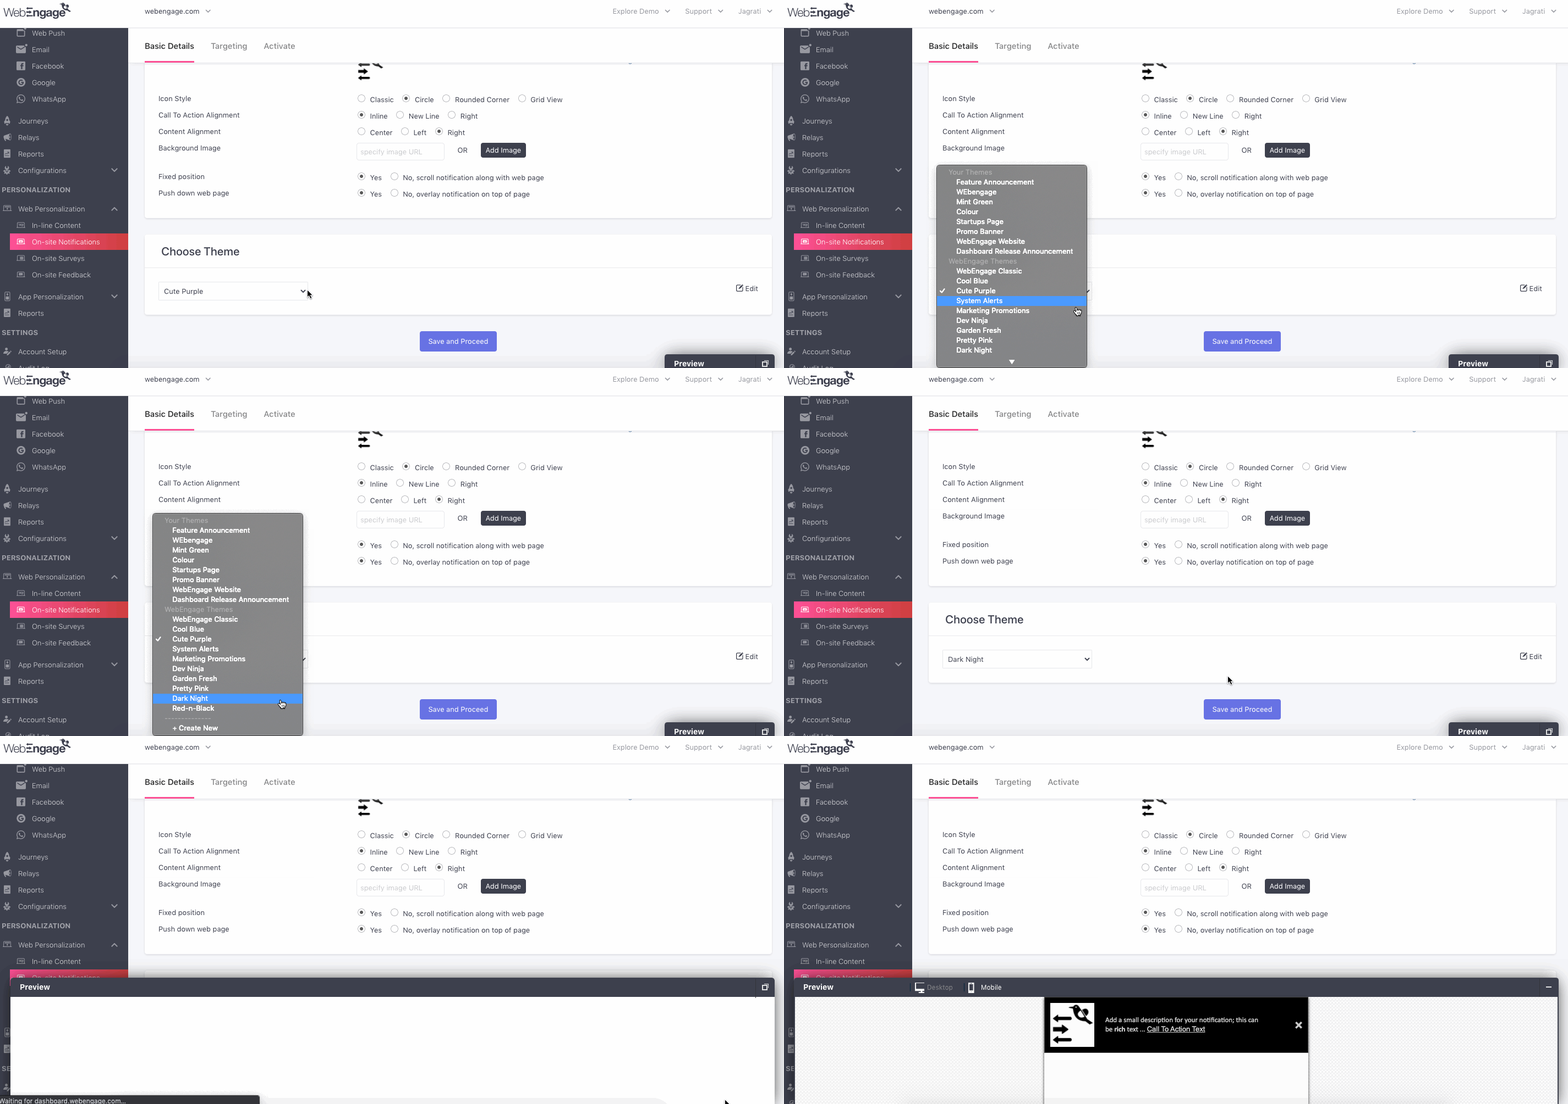
Click to enlarge
As shown above:
You can choose to customize an existing template by clicking Edit.
- You can create a new template as per your brand guidelines by selecting Create New from the dropdown.
2.4. Preview Notification
We recommend that you open the Preview tab nested on the bottom right of your screen while customizing the Layout's Appearance and Theme. It's a great way to gauge the notification as a user would experience it on your website.
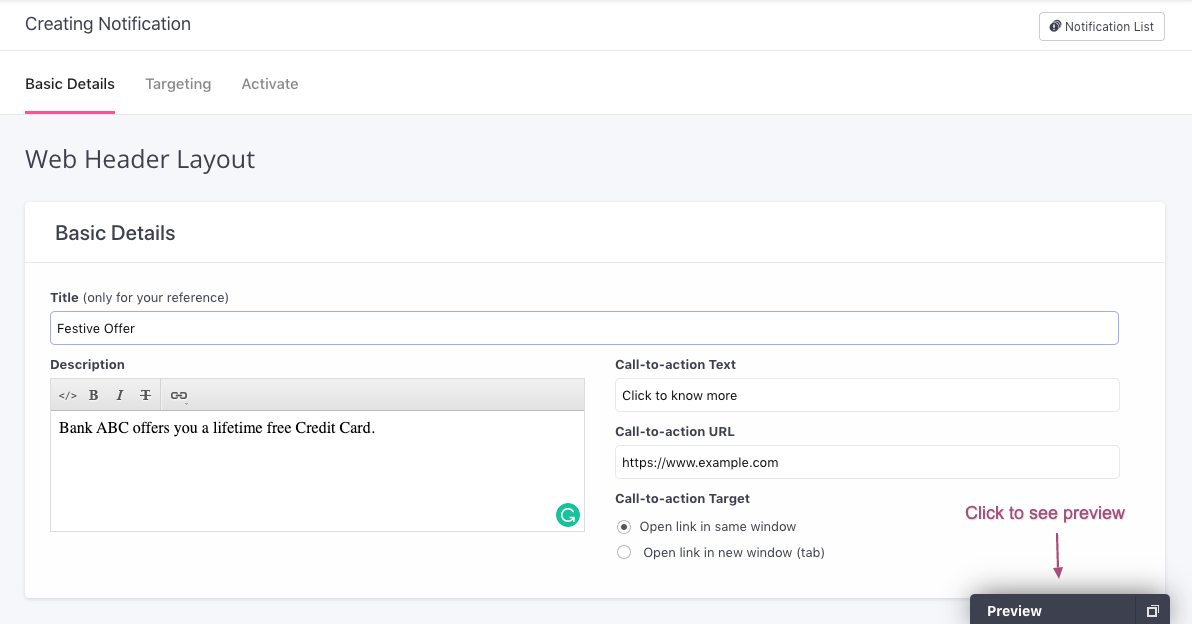
Click to enlarge
If you are using the Web Header Layout or Web Footer Layout, then you can toggle between a Desktop and Mobile preview (as these are responsive layouts).
Step 3: Configure Targeting Rule
Here, you can define the notification's target audience and control when and how it's shown to a user. Depending on your use-case, you may choose to configure multiple rules under each section - Whom to Show?, Where to Show? and When to Show?.
All the targeting rules are applied in conjunction. Let's go over a use-case to help you understand this better:
Engaging Newly Acquired Female Users with a First-time Purchase Offer on Select Collections
Let's take the example of an international fashion commerce site. They recently acquired a large userbase through social media ads and are actively working on strategies to convert and retain these users.
One such strategy specifically targeted women shoppers. Let's break it down for you:
Strategy:
When it comes to clothes and accessories, gender plays a significant role in determining your engagement strategy.
Due to the platform's presence in multiple countries, location is a critical factor in determining the kind of offers they can leverage to convert users.
- This is why marketers of the platform segmented all their new users by gender, location, and behavior (users who have never purchased).
Plan:
Offer free shipping on all products that are currently on discount sale for women.
We'll position it as a first-time purchase offer to make the users feel a bit special about being signed up on the platform :) (Thus, we'll be targeting only those users who've signed up within the last 7 days.)
Prerequisites:
Each time a user selects their gender preference while signing up, it's tracked as the Custom User Attribute, Gender.
Each time a user makes a purchase, it's tracked as the Custom Event, Checkout-Completed.
All pages of the website that list products on sale contain the path parameter, sale in their URL structure.
Details like the number of days since signup is tracked as the website data attribute, Days_after_signup.
Here's how they defined their segment, New Users (F) USA:
Visitor Type equals All Users + User Attribute, Gender equals Female + Location equals the USA + Did Not Perform the Custom Event, Checkout-Completed
Here's how they configured the targeting rules:
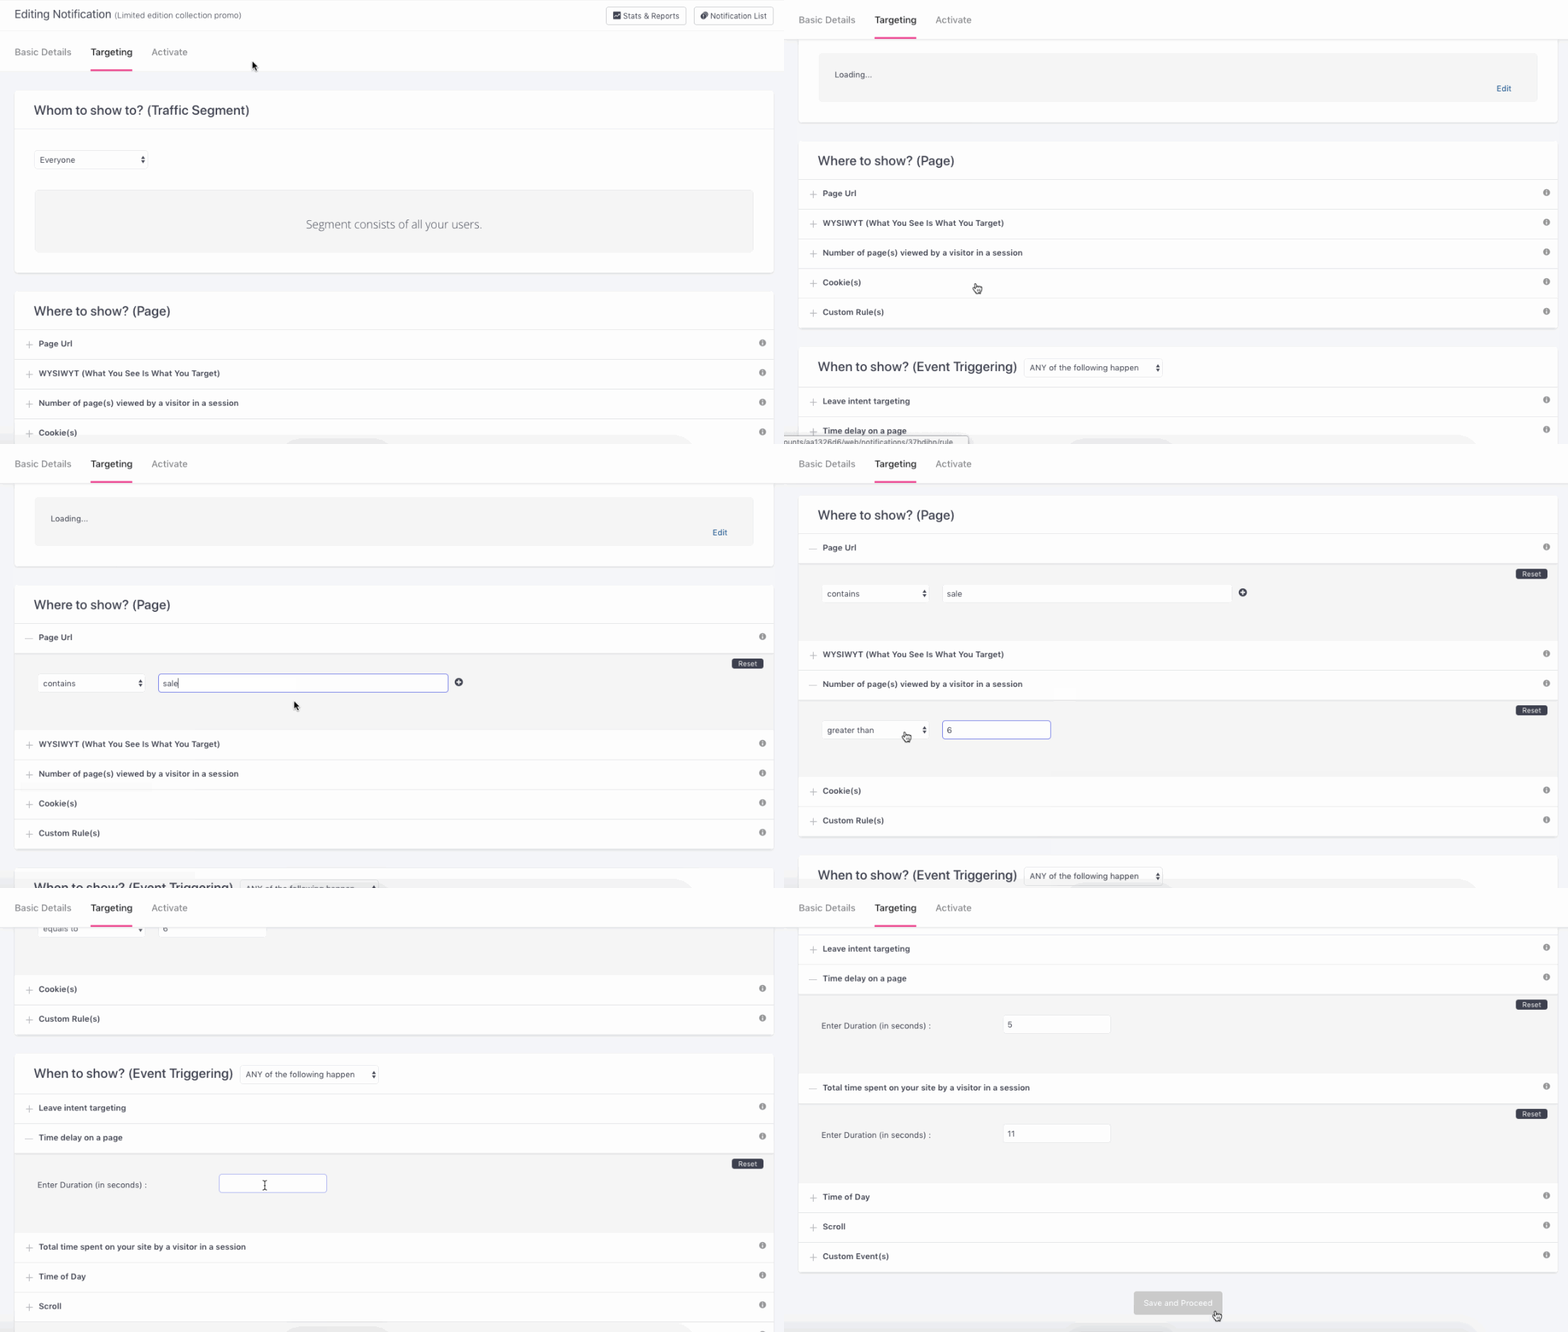
Click to enlarge
Step 1: Specify the segment, New Users (F) USA as the target audience under Whom to Show.
Step 2: Add the following rules under Where to Show:
-
Page URL contains the
path parameter,sale -
Number of pages viewed by a user in a session is greater than 6
-
Custom rule: Days_after_signup is less than 7
Step 3: Add the following rules under When to Show:
-
Time delay on a page is equal to 5 seconds
-
Total time spent by a visitor in a session is greater than 11 minutes
This means, the notification will be shown:
Only to Female users
- Who live in the USA
- Have signed up less than 7 days ago
- Have not purchased yet
Only on Pages that list products on sale
- After 5 seconds
- When the user spends 11 minutes browsing through more than 6 pages in a session
And just like that, the campaign resulted in over 8.75% conversions within just a week! (This was an uplift of 157% from the organic conversion rate of 3.4% for new users.)
Similarly, you too can optimize the performance of your notifications by targeting a niche set of users with contextually relevant content.
Now, let's deep dive into how each targeting rule works:
3.1. Whom to Show?
As shown below, click the drop-down to select a segment of users. In doing so, you will be able to preview a snapshot of its rules of segmentation.
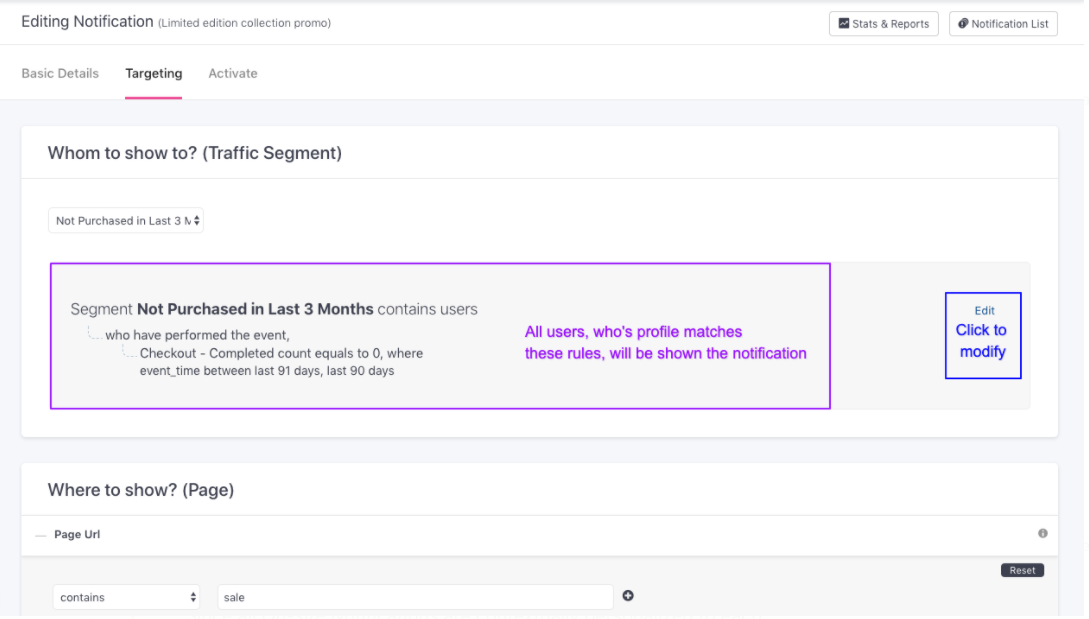
Click to enlarge
Click the Edit icon to modify the segment as per your needs. (Step-by-step guide)
Please Note
Since all On-site Notifications are contextually personalized to each user in real-time, you can only engage users included in Live Segments. You cannot select Static User Lists here.
3.2. Where to Show?
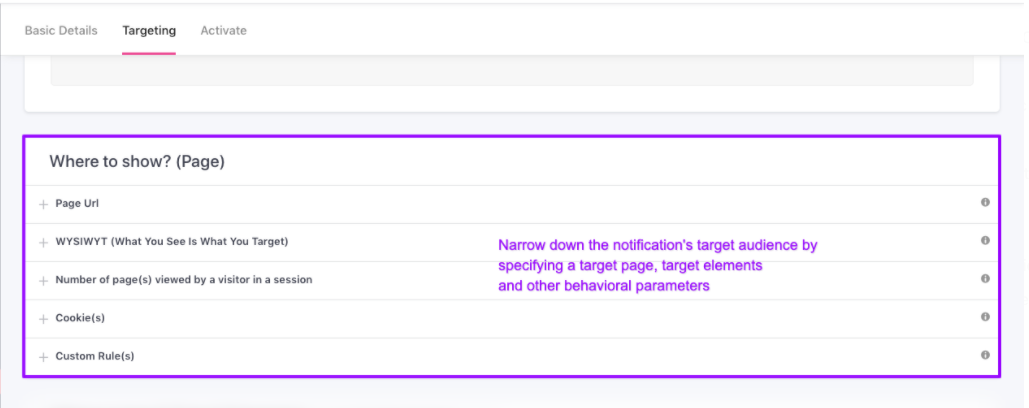
Click to enlarge
These settings allow you to specify when and where the On-site Notification must be shown to a user. Depending on your use-case, you can choose to:
- Engage/ exclude visitors of specific pages of your site. (How to configure page URLs)
- Engage users only when they view a specific section, discount offer, image or video on any page in your site. (How to configure WSIWYT)
- Engage users only after they have viewed a specific number of pages in a session. (How to configure no. of pages)
- Engage specific users by entering their Cookie-ID. (How to configure Cookie-based Targeting)
- Engage users in the context of a specific interaction (How to configure Custom Rules)
Let's walk you through each one:
Page URL
Configuring this rule enables you to:
- Show the notification to users only when they visit specific pages.
- Prevent the notification from being displayed on certain pages.
It can be configured in either of the following ways, depending on your use-case:
Method 1: Add the Page URL(s).
- Recommended when targeting or excluding visitors of a specific webpage/ a specific category of your website.
Method 2: Specify a Path Parameter that is included in multiple pages of your website. This could be anything like price, genre, category ID, offer ID or any other keyword and so on.
- For example, if you're running an On-site Notification that nudges users to explore the latest fashion collection on your website, then you can exclude the notification from being displayed on pages related to the collection.
Let's quickly revise the basics of a URL structure before we deep dive into each method:
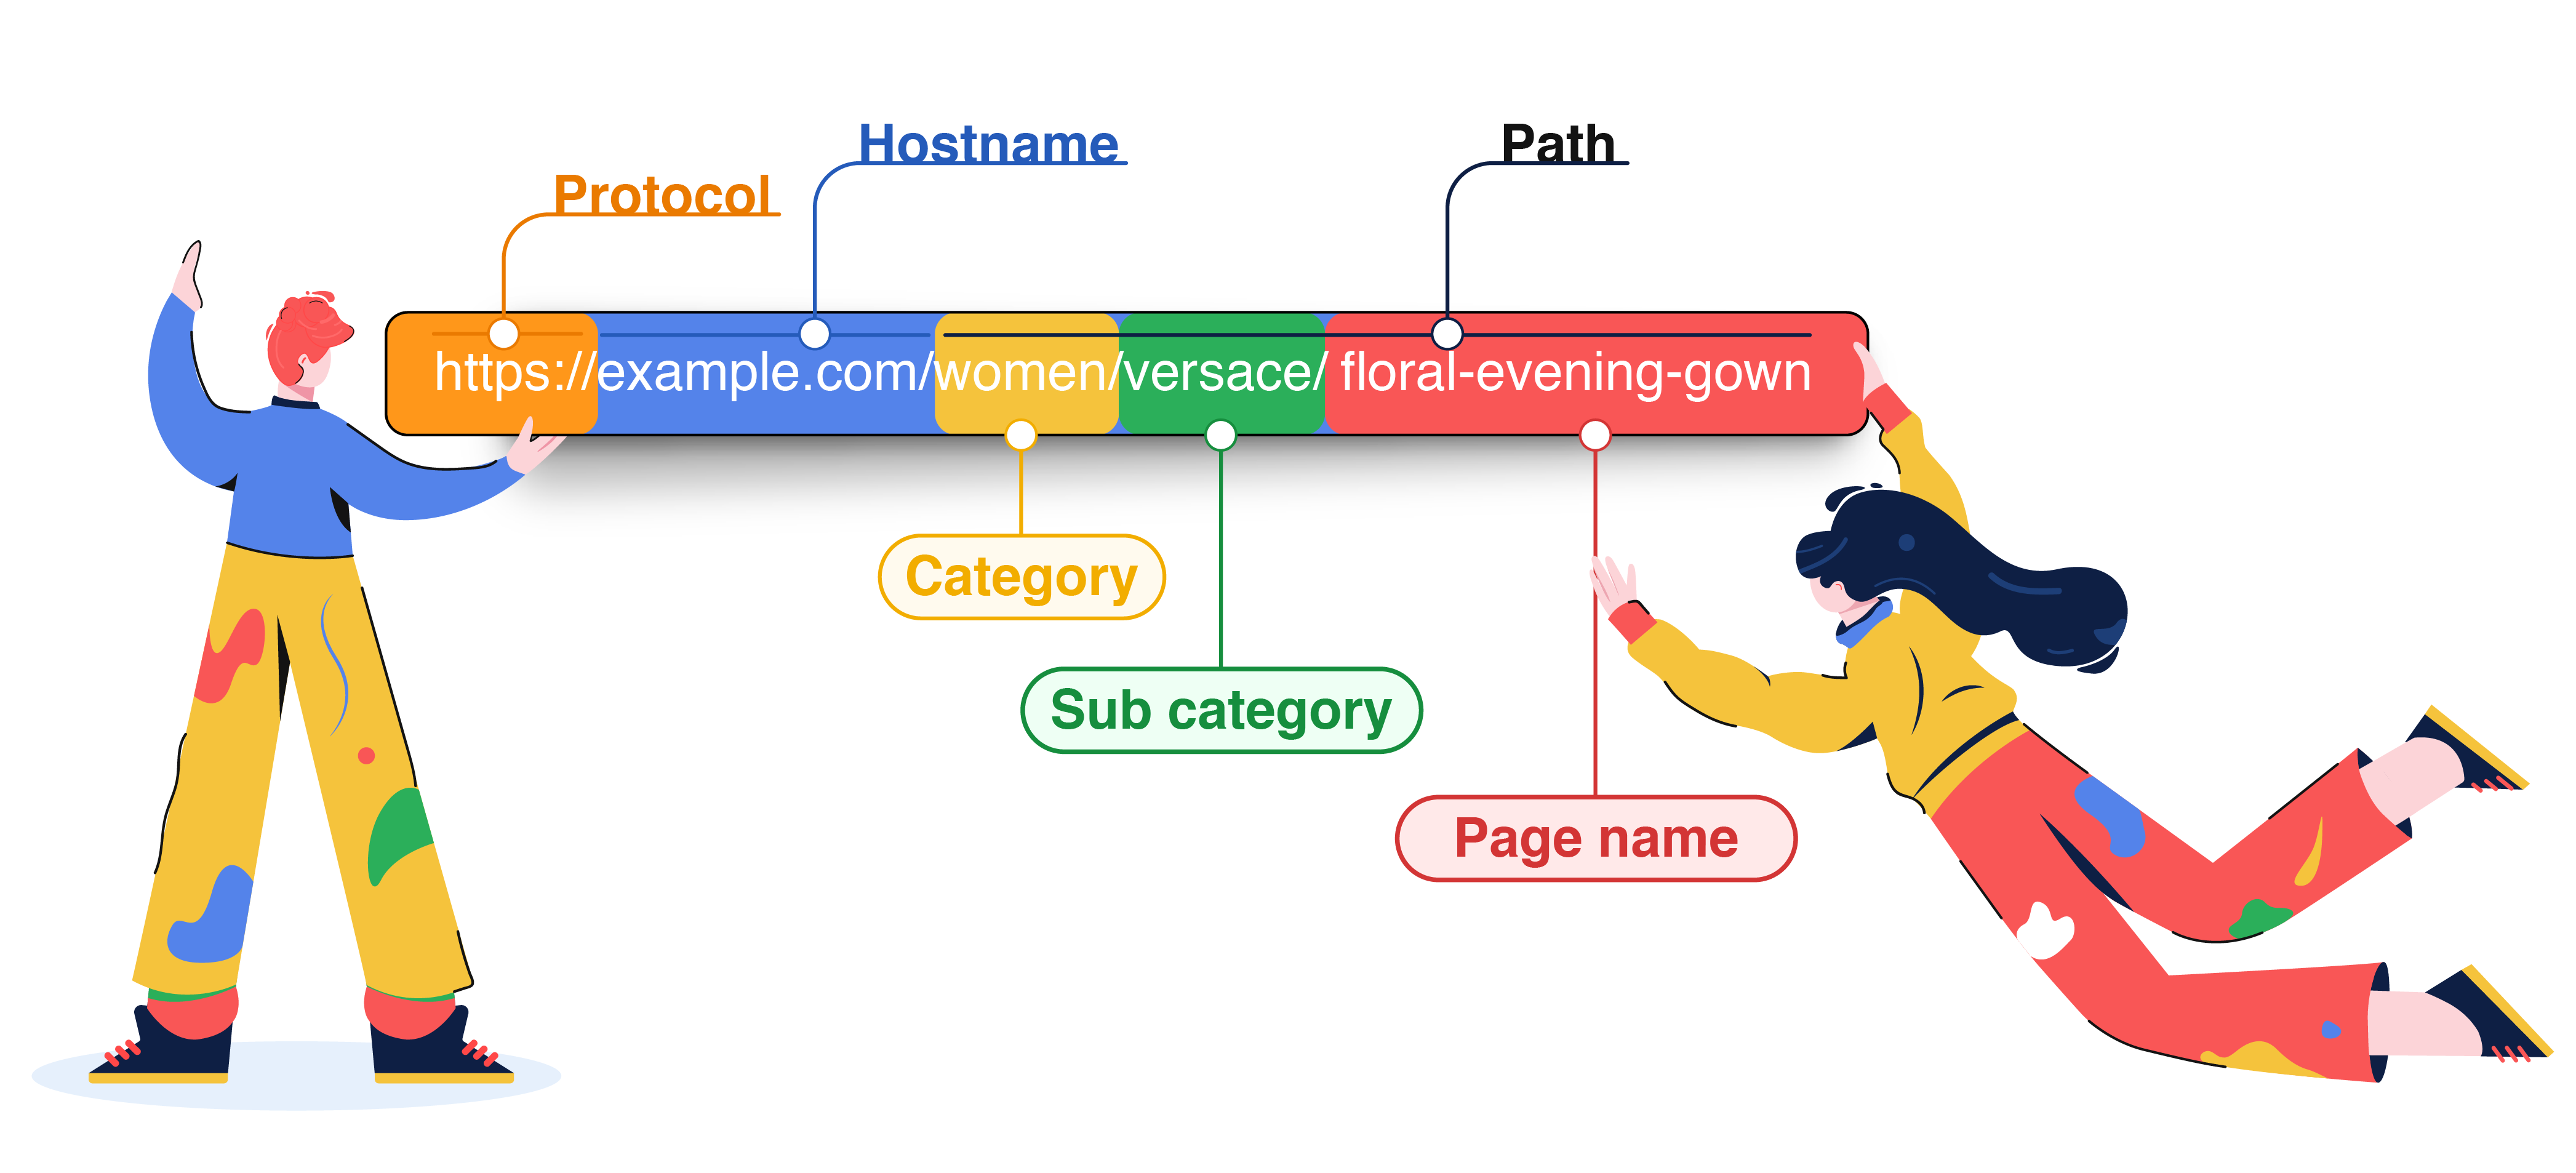
Anatomy of a URL
As highlighted above, a link has 3 parts: Protocol (http:// or https://), Hostname (domain) and Path (name of page/file hosted on the domain).
The Path indicates the exact location of a certain file or page in your domain's file structure and can consist of several hierarchies like Category > Sub Category > Page.
The Parent Link consists of the protocol, hostname and primary folder name under which a category or page is being hosted.
Now, let's walk you through each method:
Method 1: Add Page URLs
If you're looking to target/ exclude visitors of a specific webpage or a handful of pages that start with the same parent link, then we recommend that you add the page URLs here. Here's how you can go about it:
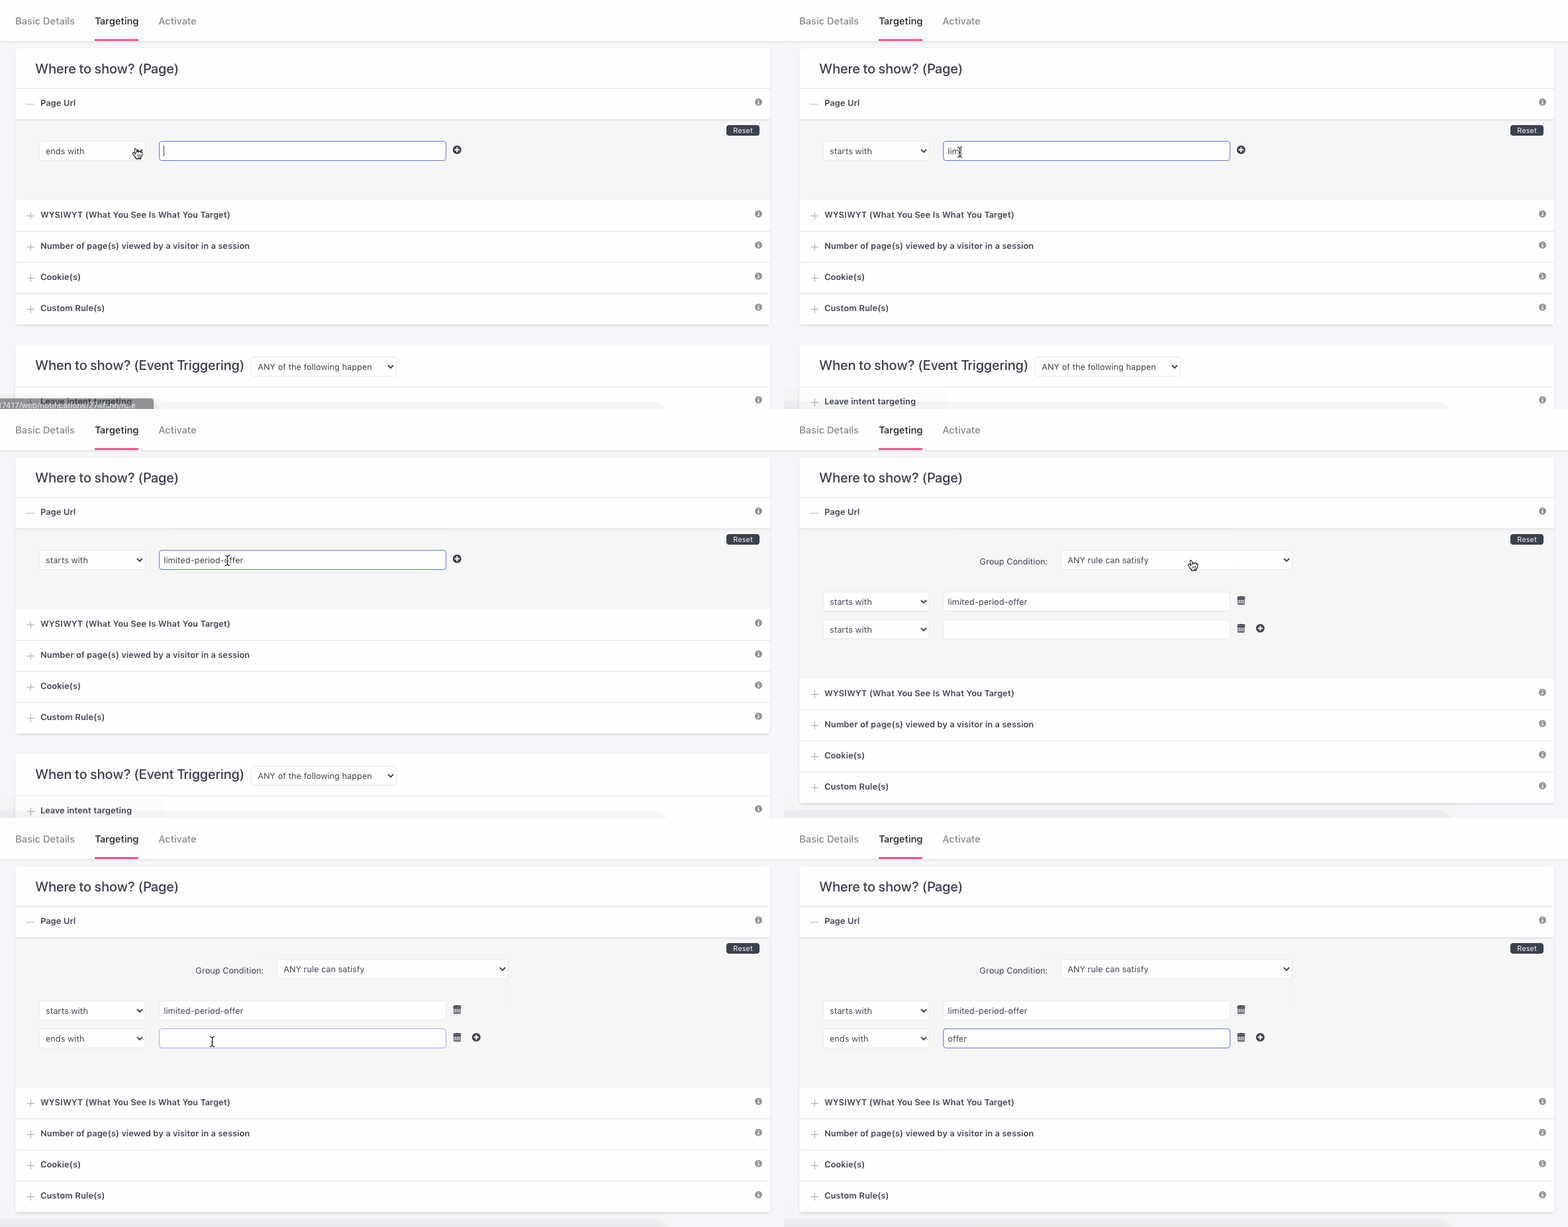
Click to enlarge
Step 1: Select a Condition
Depending on your use-case, you can prefix the page URL with any of these conditions:
-
Equals To: Implies that the On-site Notification will be shown only on the URL specified here.
-
Starts With: Implies that the On-site Notification will be shown on all pages whose URL starts with the specified parent link.
- For example, in the above visual we have specified www.example.com/gadgets/philips as the target URL.
- This means that the notification will be shown on all the pages listed under the folder, Philips. It could be anything like:
-
(Is) Not Equal To: Implies that the On-site Notification will not be shown on the URL specified here.
-
(Does) Not Start With: Implies that the On-site Notification will not be shown on pages whose URL starts with the specified parent link.
Step 2: Add the Page URL/ Parent Link
Please ensure that your URL(s) start with http:// or https:// when adding them.
Step 3 (Optional): Add More Links
When specifying multiple links, combine them by the logic - Any rule can satisfy to implement your use-case. (The logic, All rules must satisfy is valid only for combining path parameters.)
Method 2: Add Path Parameters
If you're looking to include or exclude visitors of a specific set of pages from the On-site Notification's target audience, then you can easily achieve this by grouping them by their path parameters. Here's how you can go about it:
Step 1: Select a Condition
Depending on your use-case, you can prefix the path parameter(s) by any of the following conditions:
-
Ends with: Implies that the On-site Notification will be shown only on those pages that contain the path parameter at the end of their URL structure.
-
For instance, if the path parameter is
bubblegum, then the On-site Notification will be shown only on the following pages: -
Contains: Implies that the On-site Notification will be shown on all pages that contain the path parameter in their URL, irrespective of their placement.
- For example, if the path parameter is
versace, then the notification will be shown on the following pages:
- For example, if the path parameter is
-
Matches Regex: (Regex is a sequence of characters that define a search pattern - used in several coding languages. Detailed read.)
-
(Does) Not End With: Implies that the On-site Notification will not be shown on the pages that contain the path parameter at the end of their URL structure.
-
(Does) Not Contain: Implies that the On-site Notification will not be shown on pages that contain the path parameter in their URL.
-
(Does) Not Match Regex
Step 2: Add the Path Parameter
Step 3 (Optional): Add More Path Parameters
Depending on your use-case, you can choose to combine multiple path parameters by any of the following logic:
-
Any Rule Can Satisfy: Implies that the On-site Notification will be shown to visitors of all pages whose URL structure contains any one of the path parameters specified by you.
-
All Rules Must Satisfy: Implies that the On-site Notification will be shown to visitors of only on those pages whose URL structure contains all the path parameters specified by you.
WYSIWYT (What You See Is What You Target)
This rule enables you to display the On-site Notification in the context of an element on your webpage. Here's how it works:
- You can highlight webpage elements like a button, text, image, video, coupon code through a contextual On-site Notification. This is referred to as Element Node targeting in your dashboard.
- This works only for Callout style Notifications where the notification will be pointing to the specified element (as shown below).
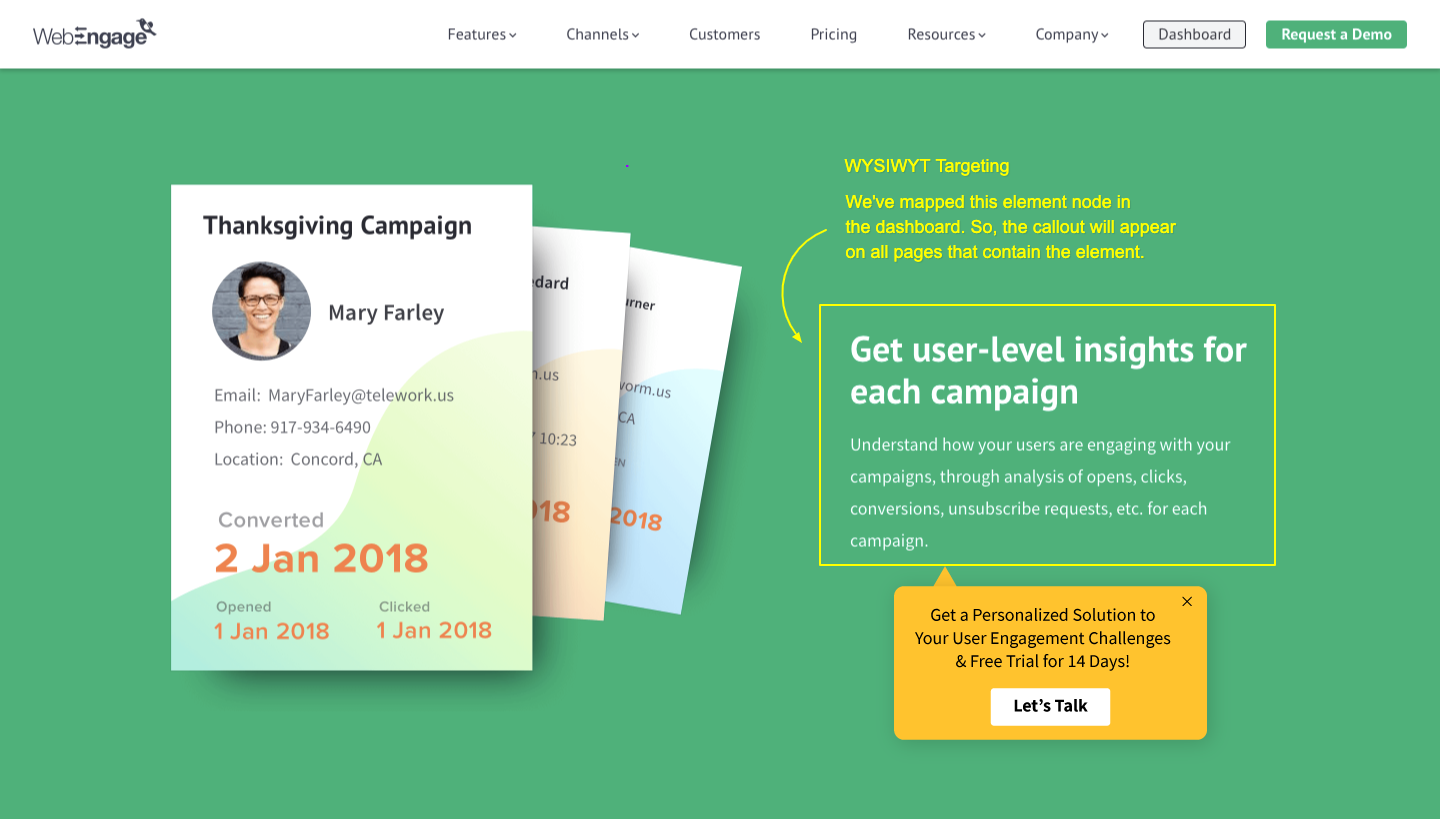
Click to enlarge
- You can leverage the dynamic value of a webpage element like price, product name, section header, column header, days to delivery and so on to engage users with a contextual On-site Notification. This is referred to as Element Value targeting in your dashboard.
- This works for all notification layouts where the notification can be displayed on all pages that contain the specified element value.
Both scenarios can be achieved by mapping an Element for targeting. Here's how you can go about it:
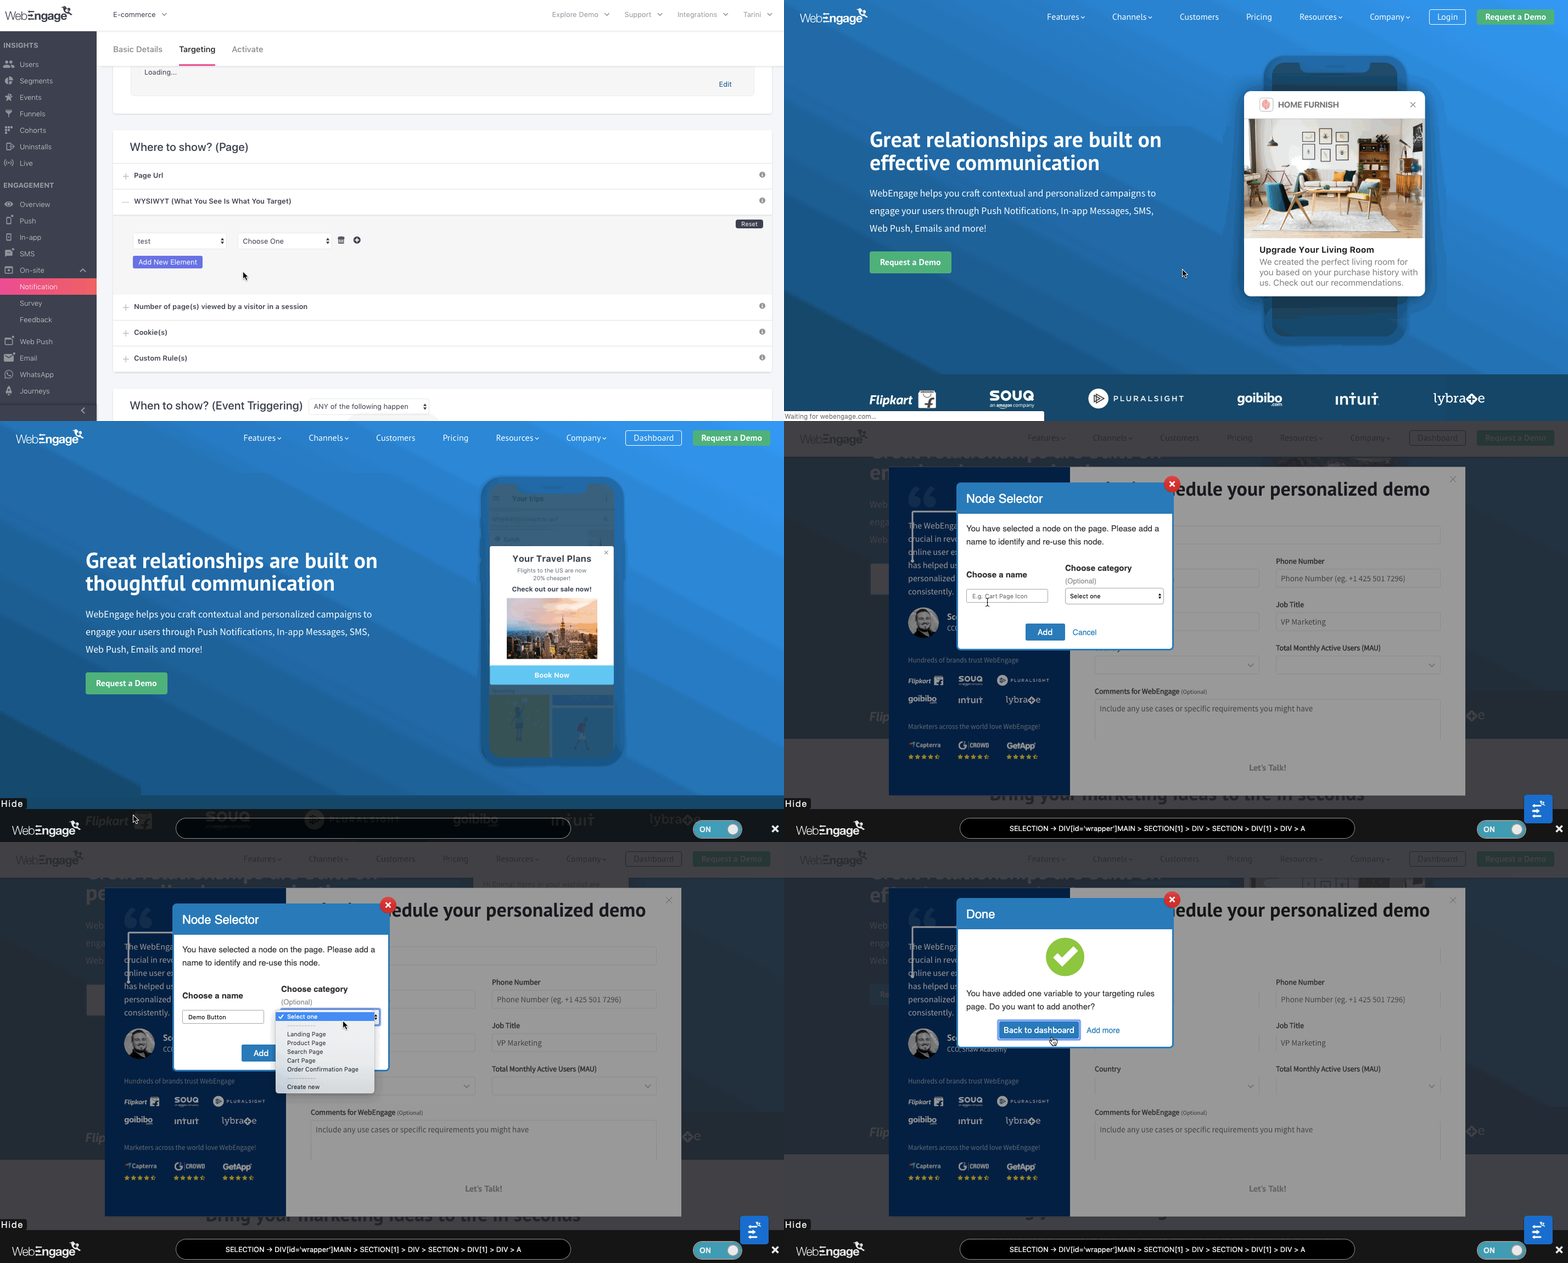
Click to enlarge
Step 1: Click the Add New Element button.
Step 2: Add a link to the page for which you'd like to map the element.
- Click the Open URL button. In doing so, you will be directed to a new window where our node selector will be activated.
Step 3: Select an element on your page.
-
In doing so, you will be prompted to name the element and categorize it. (This makes it easier for you to reuse the element in future campaigns.)
-
Once you've mapped a node, you can choose to display the On-site Notification on all pages where the node exists/ doesn't exist/ has a specific value.
Configuring WYSIWYT
Now that you've mapped webpage elements to your dashboard, it's time to configure targeting rules for displaying your On-site Notification!
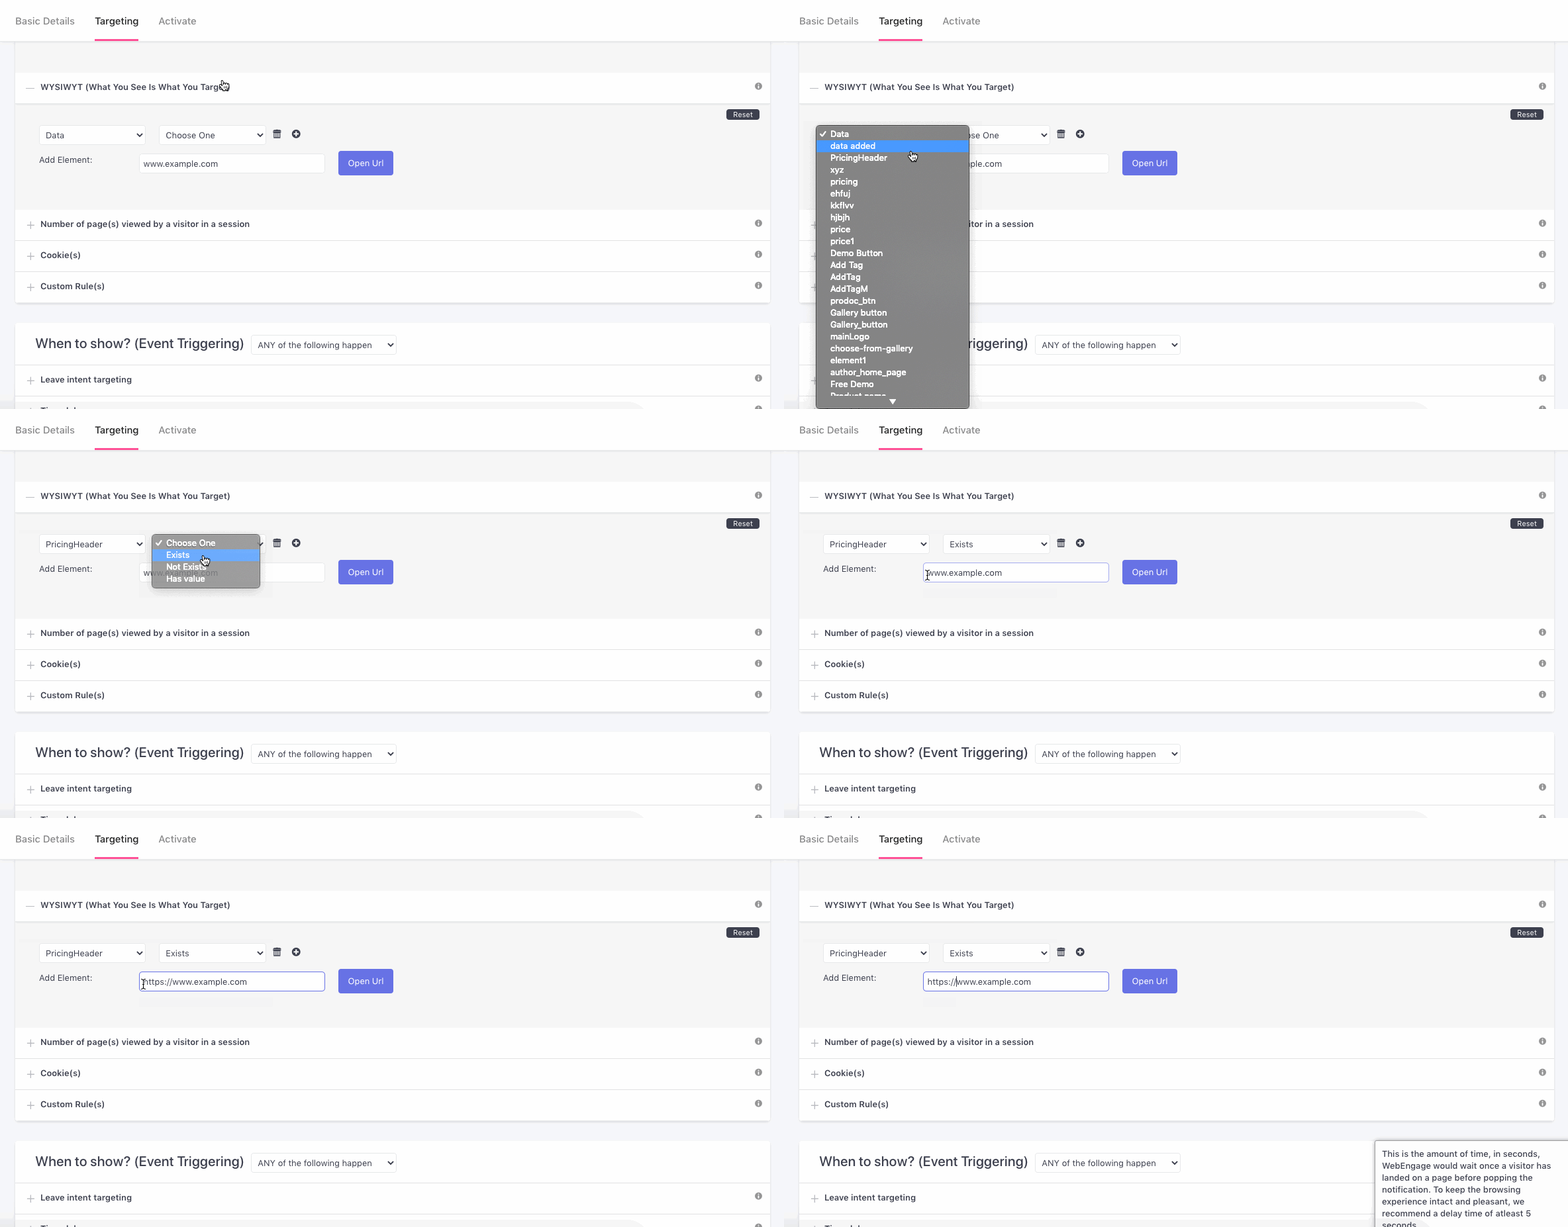
Click to enlarge
As shown above:
Step 1: Select an Element
As shown above, click the dropdown to select an element that was configured previously.
Step 2: Select a Condition
Steps of configuration differ depending on whether you'd like to target an Element Node or its Value.
-
When targeting Element Node:
- Select Exists to display the notification on pages where the selected element is present.
- Select Not Exists to display the notification on pages where the specified element is absent.
-
When targeting Element Value:
- Select Has Value to define the value that must be present on a webpage to display the On-site Notification. The Element Value can be:
- Number
- String (alphanumeric value like 2Days)
- Select Has Value to define the value that must be present on a webpage to display the On-site Notification. The Element Value can be:
Step 3 (Optional): Specify Multiple Elements
Depending on your use-case, you can choose to display the notification on multiple elements of a webpage. The elements can be clubbed by any of the following logic:
-
Any rule can satisfy: Implies that the On-site Notification will be shown on all pages that contain any one of the specified elements.
-
All rules must satisfy: Implies that the On-site Notification will be shown only on those pages that contain all the elements specified by you.
No. of Pages Viewed By a Visitor In a Session
Configuring this rule enables you to engage only those users who view a specific number of web pages in an ongoing session. This comes in handy when targeting high-intent users.
For example, in the below visual, we have specified that notification must be shown to only those users who have visited less than 5 pages in their session.
Highly Recommended!
Configure the targeting rule, Total time spent on your site by a visitor in a session to maximize the probability of converting high-intent visitors.
(As, the number of pages visited by a user in a session, and session duration are one of the primary indicators of a visitor's interest in your site.)
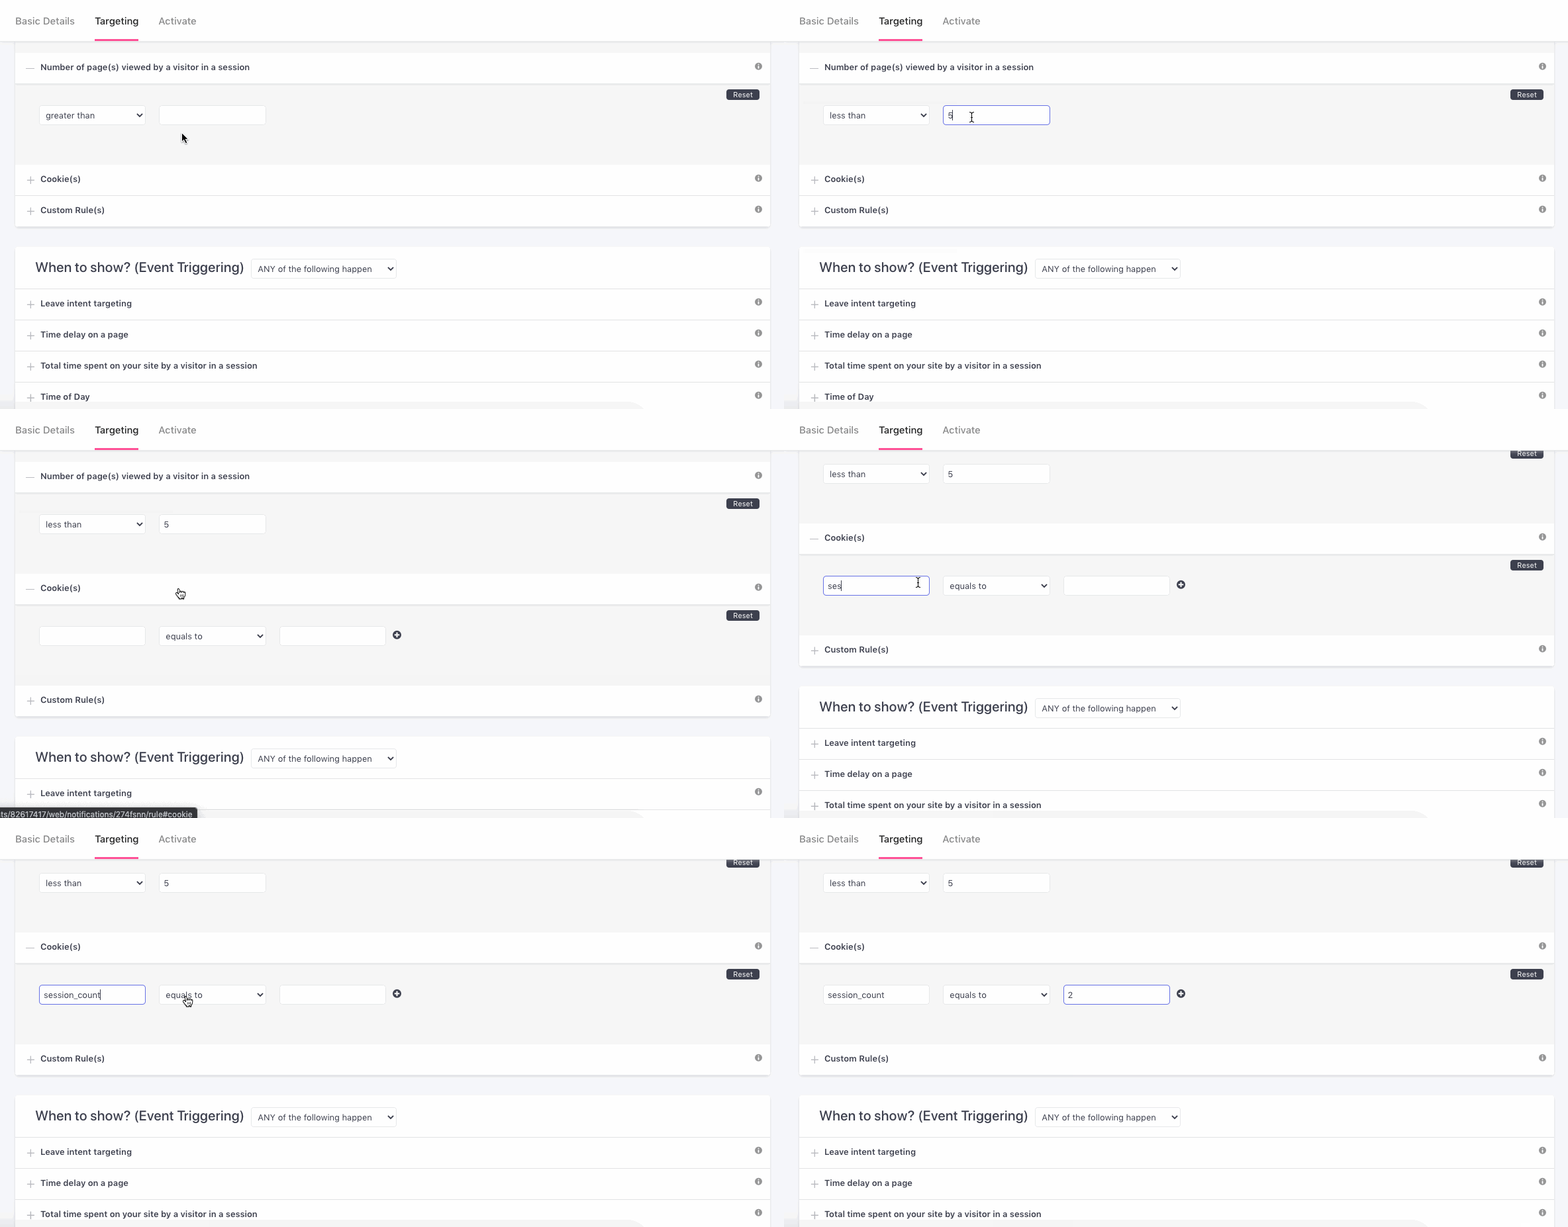
Specifying number of pages & cookie ID for targeting specific users (click to enlarge)
Cookie(s) Based Targeting
If you track cookies for your website visitors, then you can leverage that data to engage your users with contextually relevant On-site Notifications! Just add the Cookie ID, we'll ensure that the notification is shown to all users for whom the cookie is valid.
For example, in the above visual we have specified the cookie, session_count equal to 2 to ensure that the notification is shown only to returning users.
Custom Rules
Must Read
How Custom Rules Can Help You Create Contextually Targeted Notifications & Surveys
This field enables you to target specific user behavior through the On-site Notification. This could be anything like:
- Users who sign in after 30 days.
- Users who have not purchased for the last 60 days.
- Users who add specific product filters to any page.
- Users who view a particular category and so on.
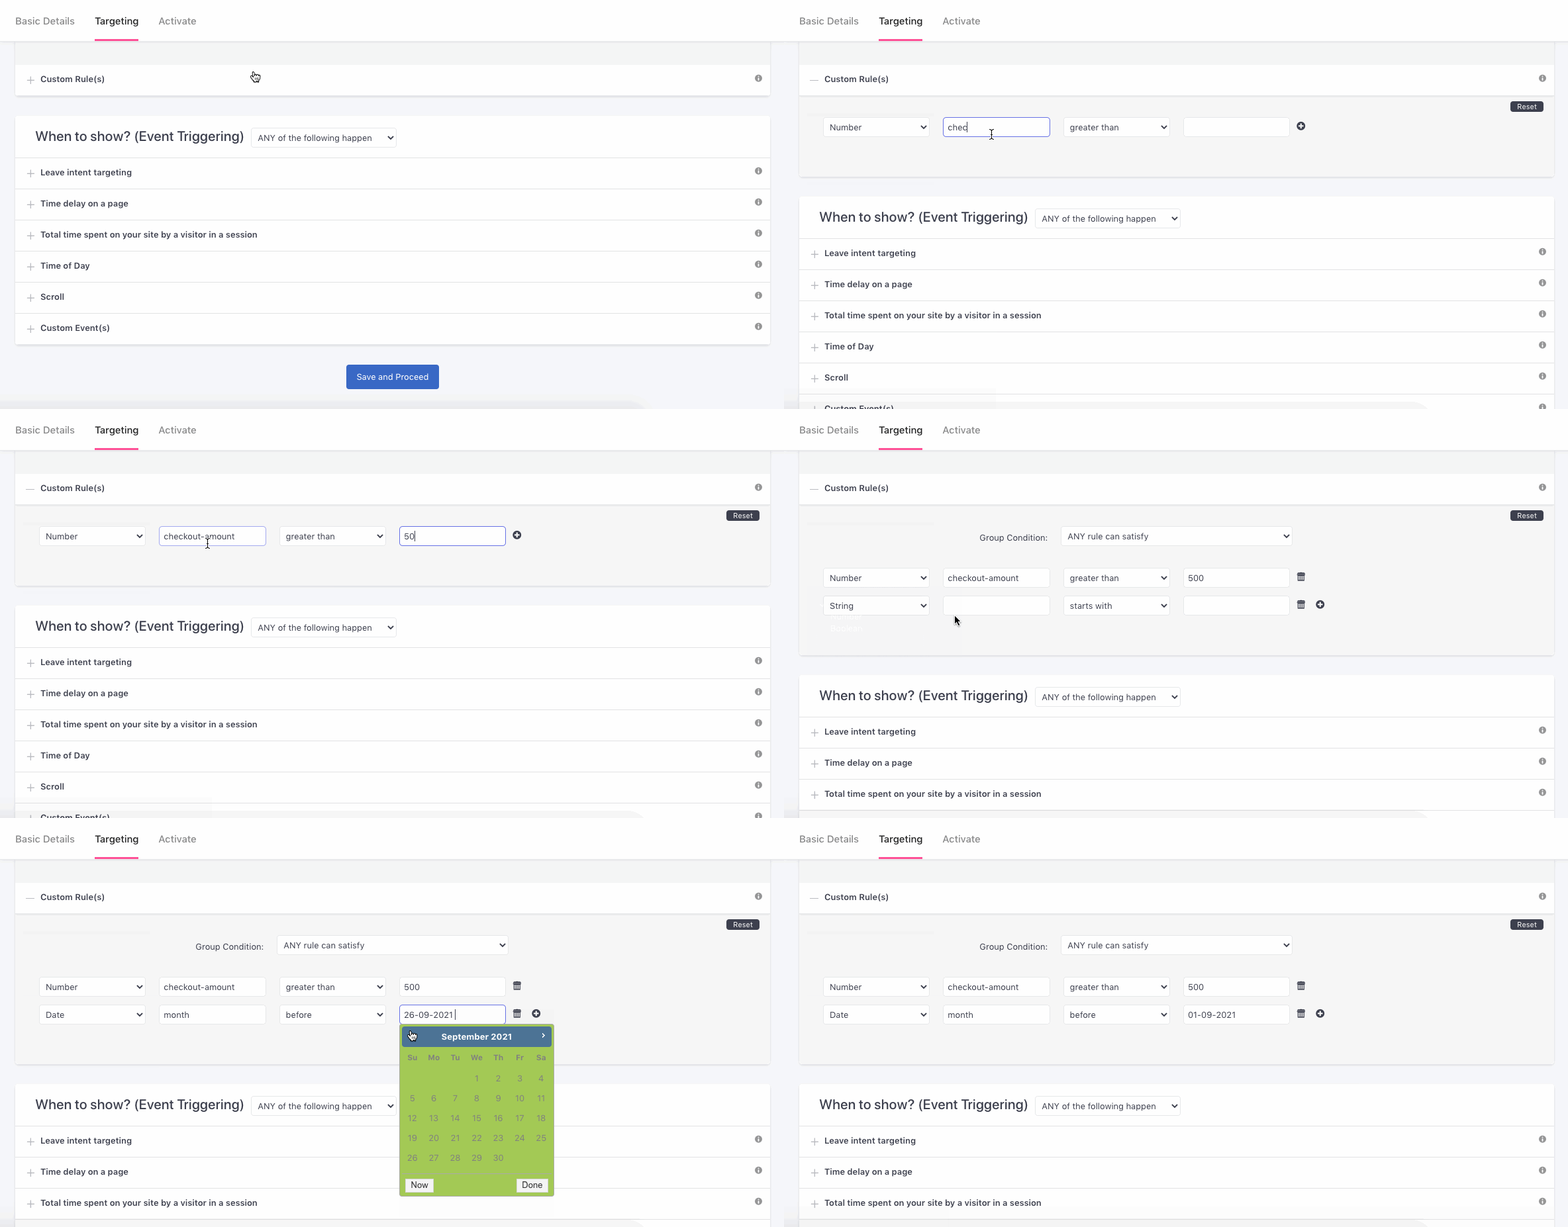
Notification will be shown to only those users who are purchasing products worth more than 500 + have bought from the category, women (click to enlarge)
As shown above:
Step 1: Select Data Type
Select the type of data that is tracked against the data attribute.
- Number: Select if only a numerical value is tracked.
- String: Select if an alpha-numeric value like class_10 is tracked.
- Boolean: Select if a True/False scenario like Paid User = True is tracked.
- Date: Select if only date (YYYY/MM/DD) is tracked.
Step 2: Add Data Attribute
Please check in with your tech team to ensure that the correct Data Attribute (and data type) are specified here (as per your use-case). Entering incorrect values may cause your notification to show up for all users!
Step 3: Select a Condition
Depending on your use-case, the Data Attribute's value can be prefixed by any of the following conditions:
Equals to
Starts with
Ends with
Is in
Contains
Exists
Matches Regex (Regex is a sequence of characters that define a search pattern - used in several coding languages. Detailed read.)
(Is) Not equal to
(Does) Not start with
(Does) Not End With
Is Not In
(Does) Not Contain
Does Not Exist
(Does) Not Match Regex
Excludes
Step 4: Specify a Value (Tracked against the data attribute)
Step 3 (Optional): Add Multiple Data Attributes
Depending on your use-case, you can choose to specify multiple data attributes to target specific user behavior. You can combine the attributes by any of the following logic:
-
Any Rule Can Satisfy: Implies that the On-site Notification will be shown to all users whose interactions match any one of the data attributes specified by you.
-
All Rules Must Satisfy: Implies that the On-site Notification will be shown only to those users whose interactions match all the data attributes specified by you.
3.3. When to Show?
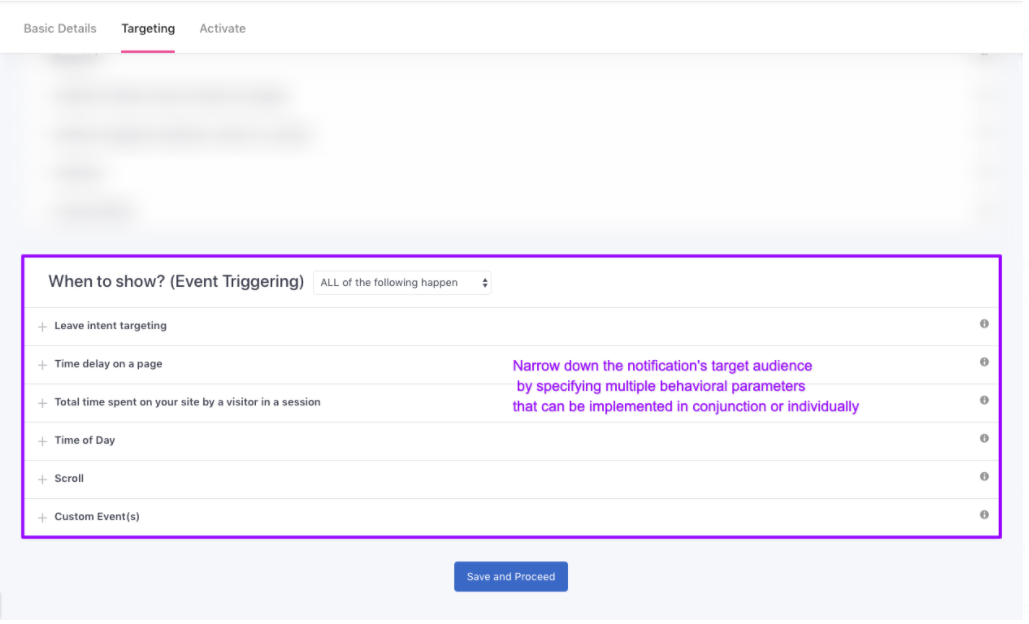
Click to enlarge
This section enables you to define the exact moment in which the On-site Notification must be shown to a user. Here's how you can go about it:
Step 1: Configure targeting rules as per your use-case. This could be anything like:
- When the user decides to exit a page
- When the user spends a certain amount of time on a page
- When the user spends a certain amount of time exploring your site, in a single session
- When the user visits during a specific time of the day
- When the user scrolls through a specific percentage of your page
- When the user performs a certain action on your site
Step 2: Select a logic to combine multiple targeting rules.
Let's walk you through each rule:
Leave Intent Targeting
At WebEngage, we track each user's mouse movement to detect leave intent. This mechanism enables us to trigger the notification as soon as we detect the cursor moving towards to another tab or the close button. As highlighted below, enable the field to target exiting users and we'll take care of the rest!
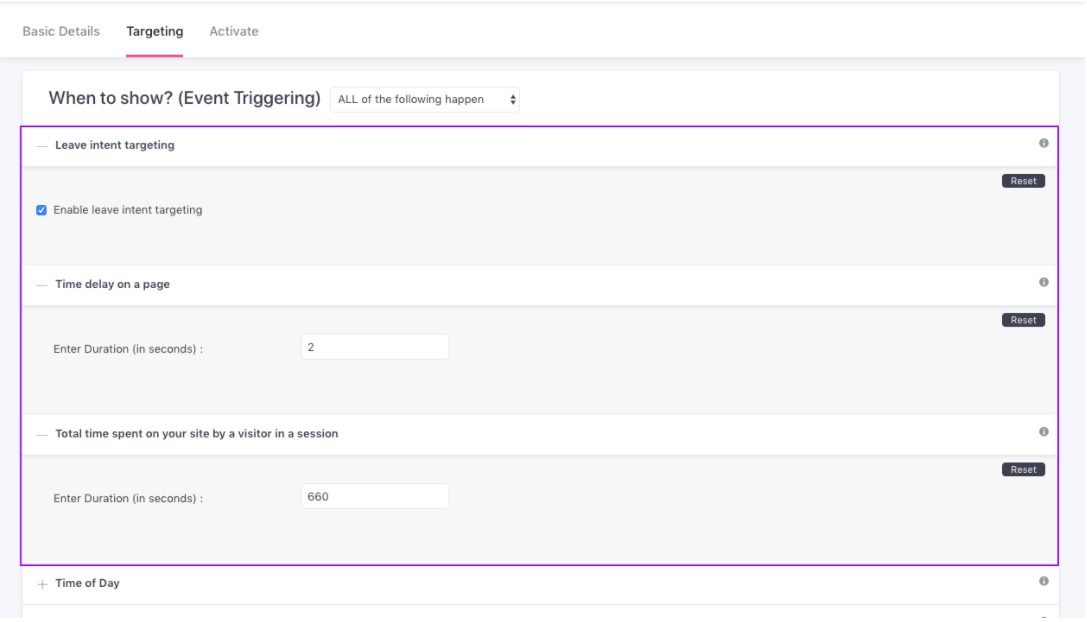
Click to enlarge
Time Delay on Page
You can choose to delay the notification's appearance by a few seconds after a user visits the webpage. As highlighted above, specify the duration, and you're good to go!
Total Time Spent on Your Site by a Visitor in a Session
Configuring this rule enables you to show the notification only to those users who spend a certain amount of time browsing through your website.
Highly Recommended!
Configure the targeting rule, Number of pages viewed by a visitor in a session to maximize the probability of converting high-intent visitors.
(As, the number of pages visited by a user in a session, and session duration are one of the primary indicators of a visitor's interest in your site.)
Time of Day
You can choose to engage site visitors with the On-site Notification during specific hours in a day. This comes in handy when:
- Targeting users with contextual messages to drive conversions during peak traffic hours
- Targeting users with a timebound offer or deal active on your site and so on.
Here's how you can set it up:
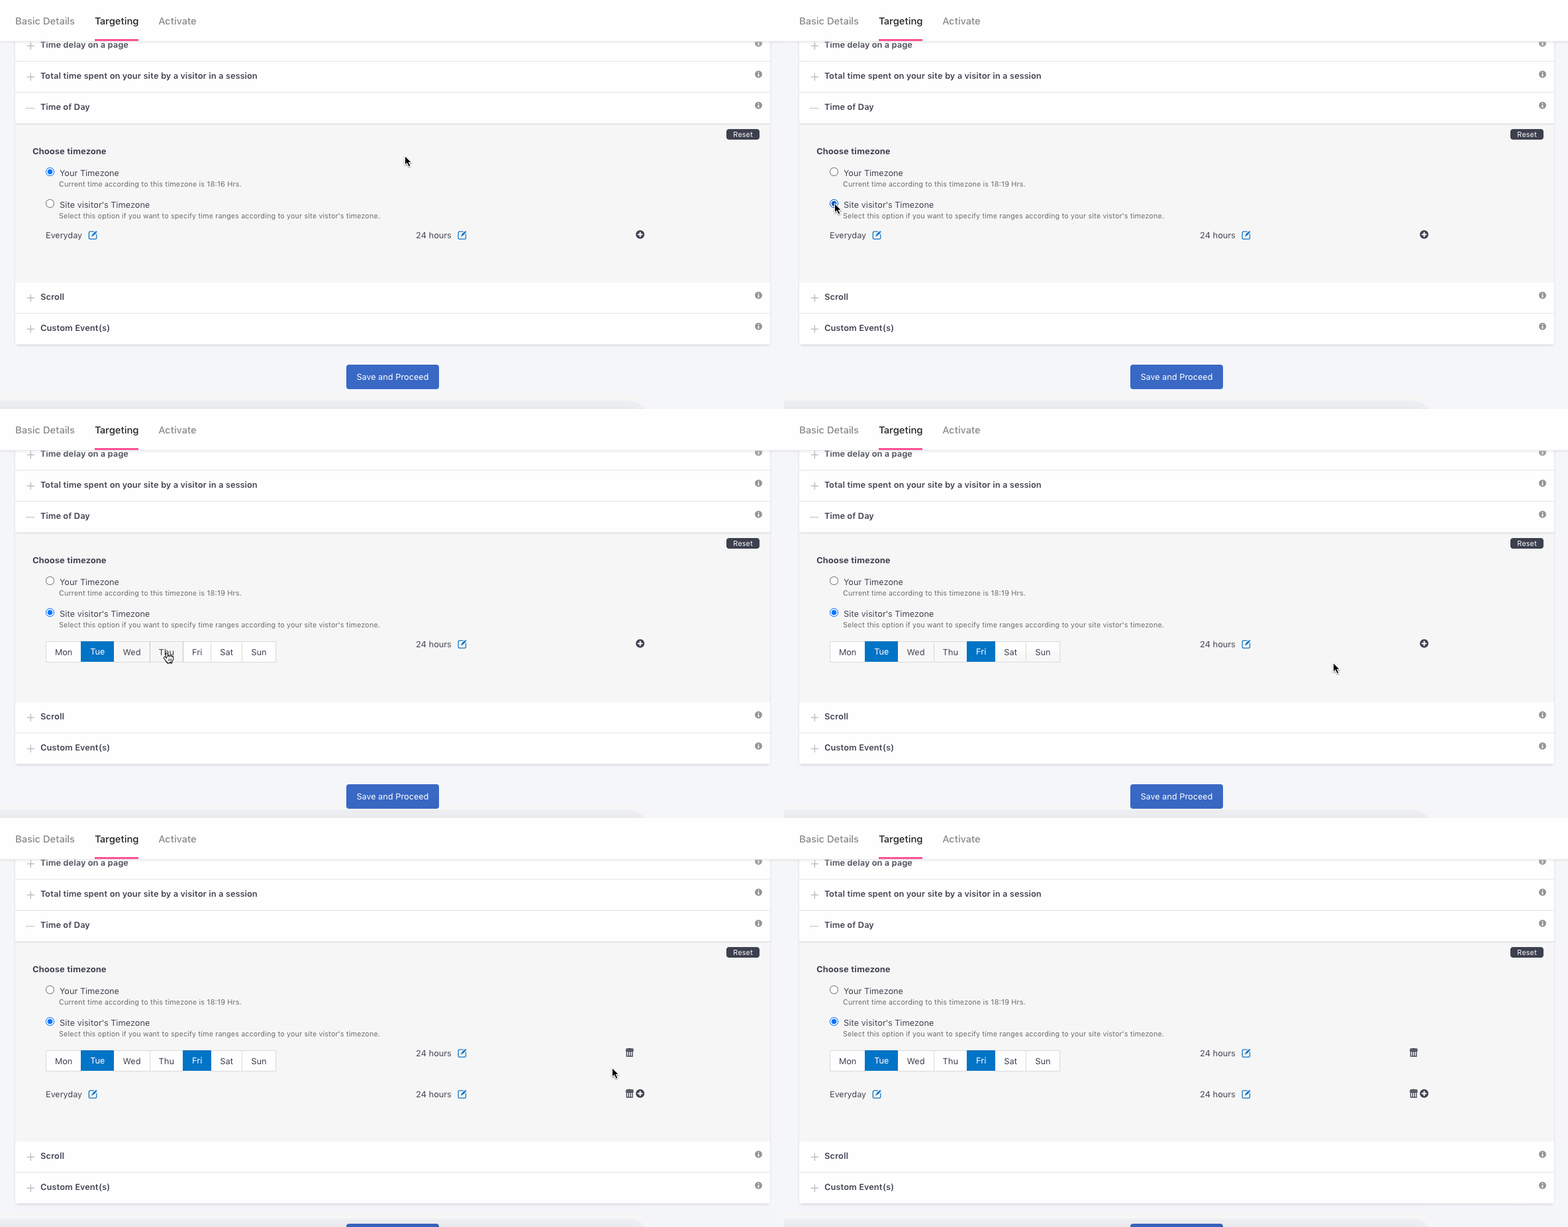
Click to enlarge
Step 1: Select a Timezone
At WebEngage, time is detected at two levels - for your account and each user. A user's timezone determined as per their current location and is updated by us in real-time. Thus, we're able to display the notification as and when the specified time occurs in their timezone.
Thus, as shown above:
- Select Your Timezone to display the notification as per the timezone selected while setting up your account.
- Select Site visitor's Timezone to display the notification as per the timezone in which your user is located.
Step 2: Specify Day & Time Slots
You can set up multiple time slots for each day to display the On-site Notification on your site. As shown above:
- Select a Day.
- Add a time slot in 24 hours format.
- Click the Plus icon to continue adding more time slots.
Scroll %
This rule enables you to target users who scroll down a certain share of your webpage. As highlighted below, enter a percentage, and we'll take care of the rest!
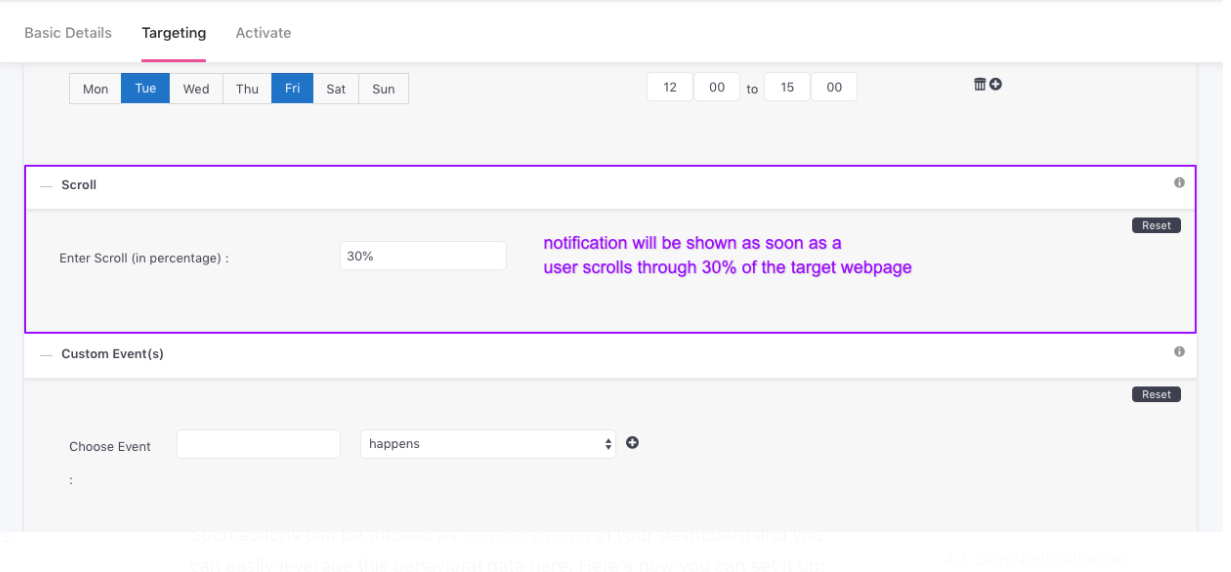
Click to enlarge
Custom Event(s)
You can choose to engage only those users through the On-site Notification who perform a specific action on your website. This could be anything like signup, purchase, video played, article viewed, product viewed, product added to cart/wishlist, course started/ended, portfolio investment completed and so on.
Such actions can be tracked as Custom Events in your dashboard and you can easily leverage this behavioral data here. Here's how you can set it up:
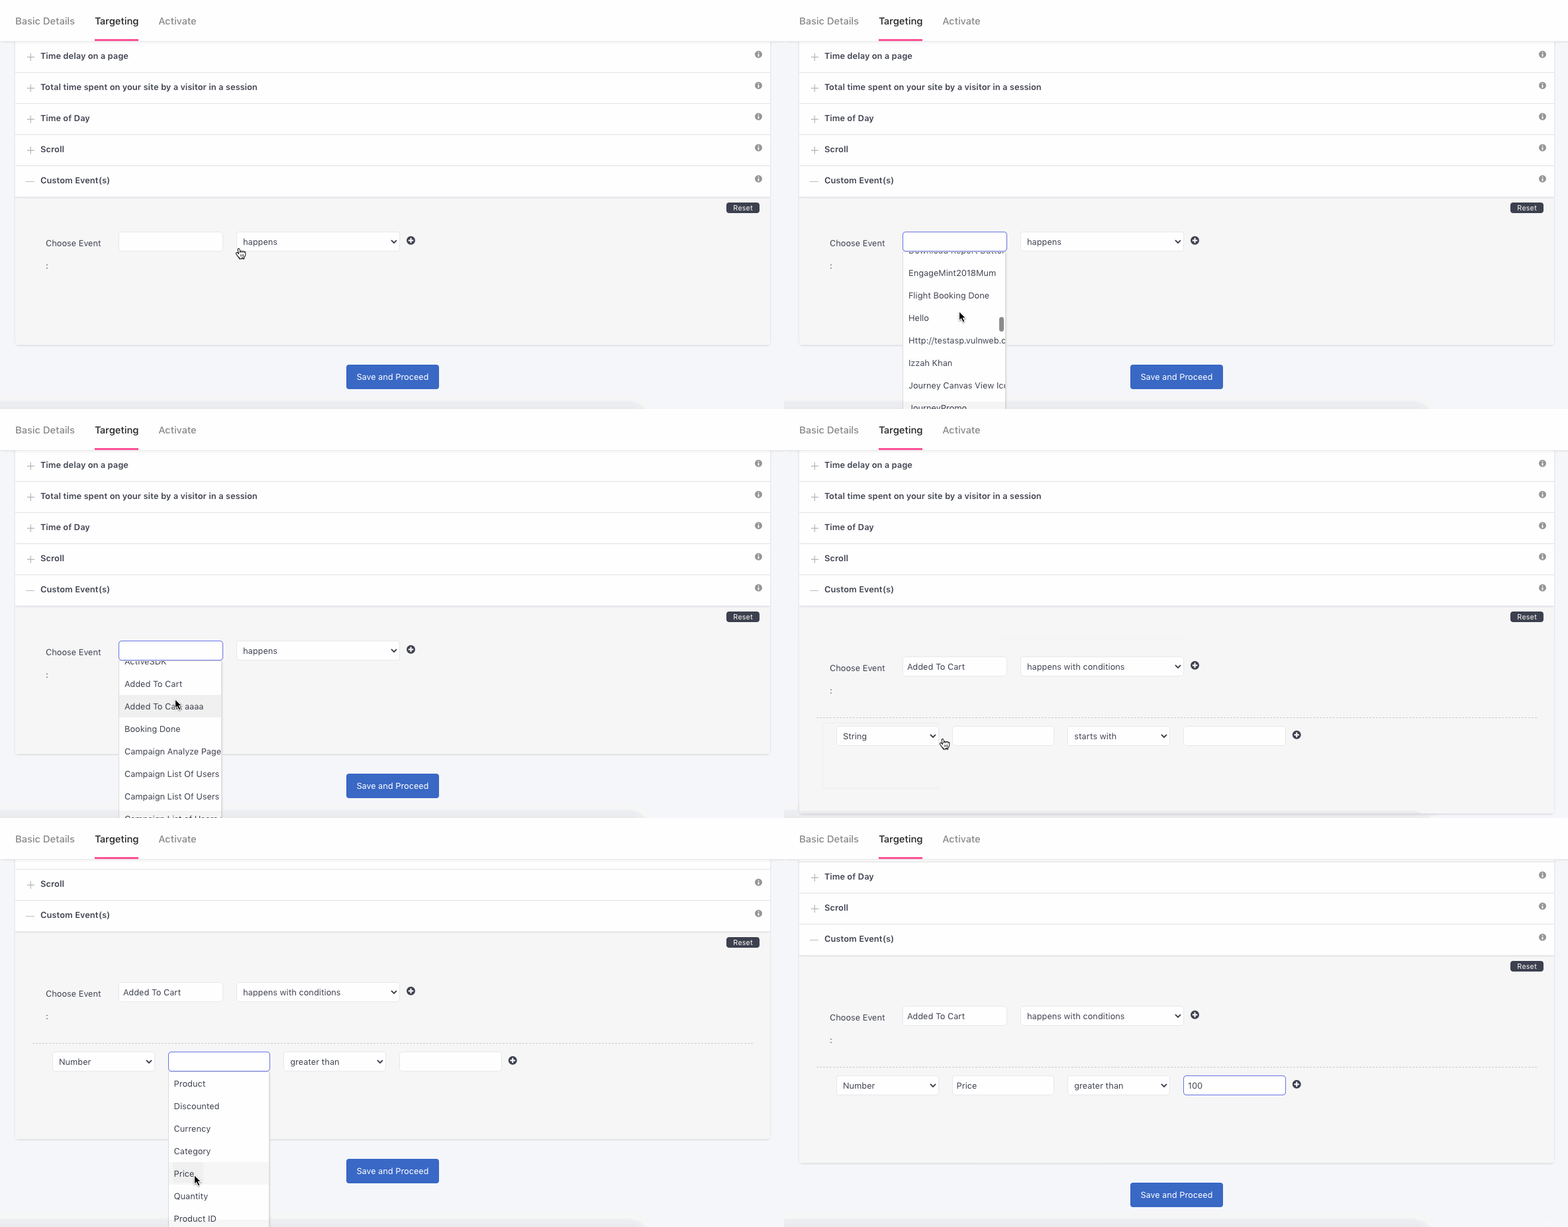
Click to enlarge
Step 1: Select an Event from the first dropdown
Step 2 (Optional): Add Conditions to the Event
Here, the term Conditions refers to the Custom Event Attributes that you track for each Custom Event performed by your users.
-
Thus, you can narrow down the scope of occurrence of an event by specifying a Custom Event Attribute. Doing so will ensure that the On-site Notification is shown to only those users who perform the Event in the context of the attribute.
-
You can choose to specify multiple conditions to further define the scope of occurrence. As shown above, conditions (Event Attributes) can be clubbed by any of the following logic:
-
Any rule can satisfy: Implies that the notification will be shown to all users who perform the Custom Event in the context of any of the conditions added to it.
-
All rules must satisfy: Implies that the notification will be shown to only those users who perform the Custom Event in the context of all the conditions added to it.
-
Step 3 (Optional): Add multiple Events
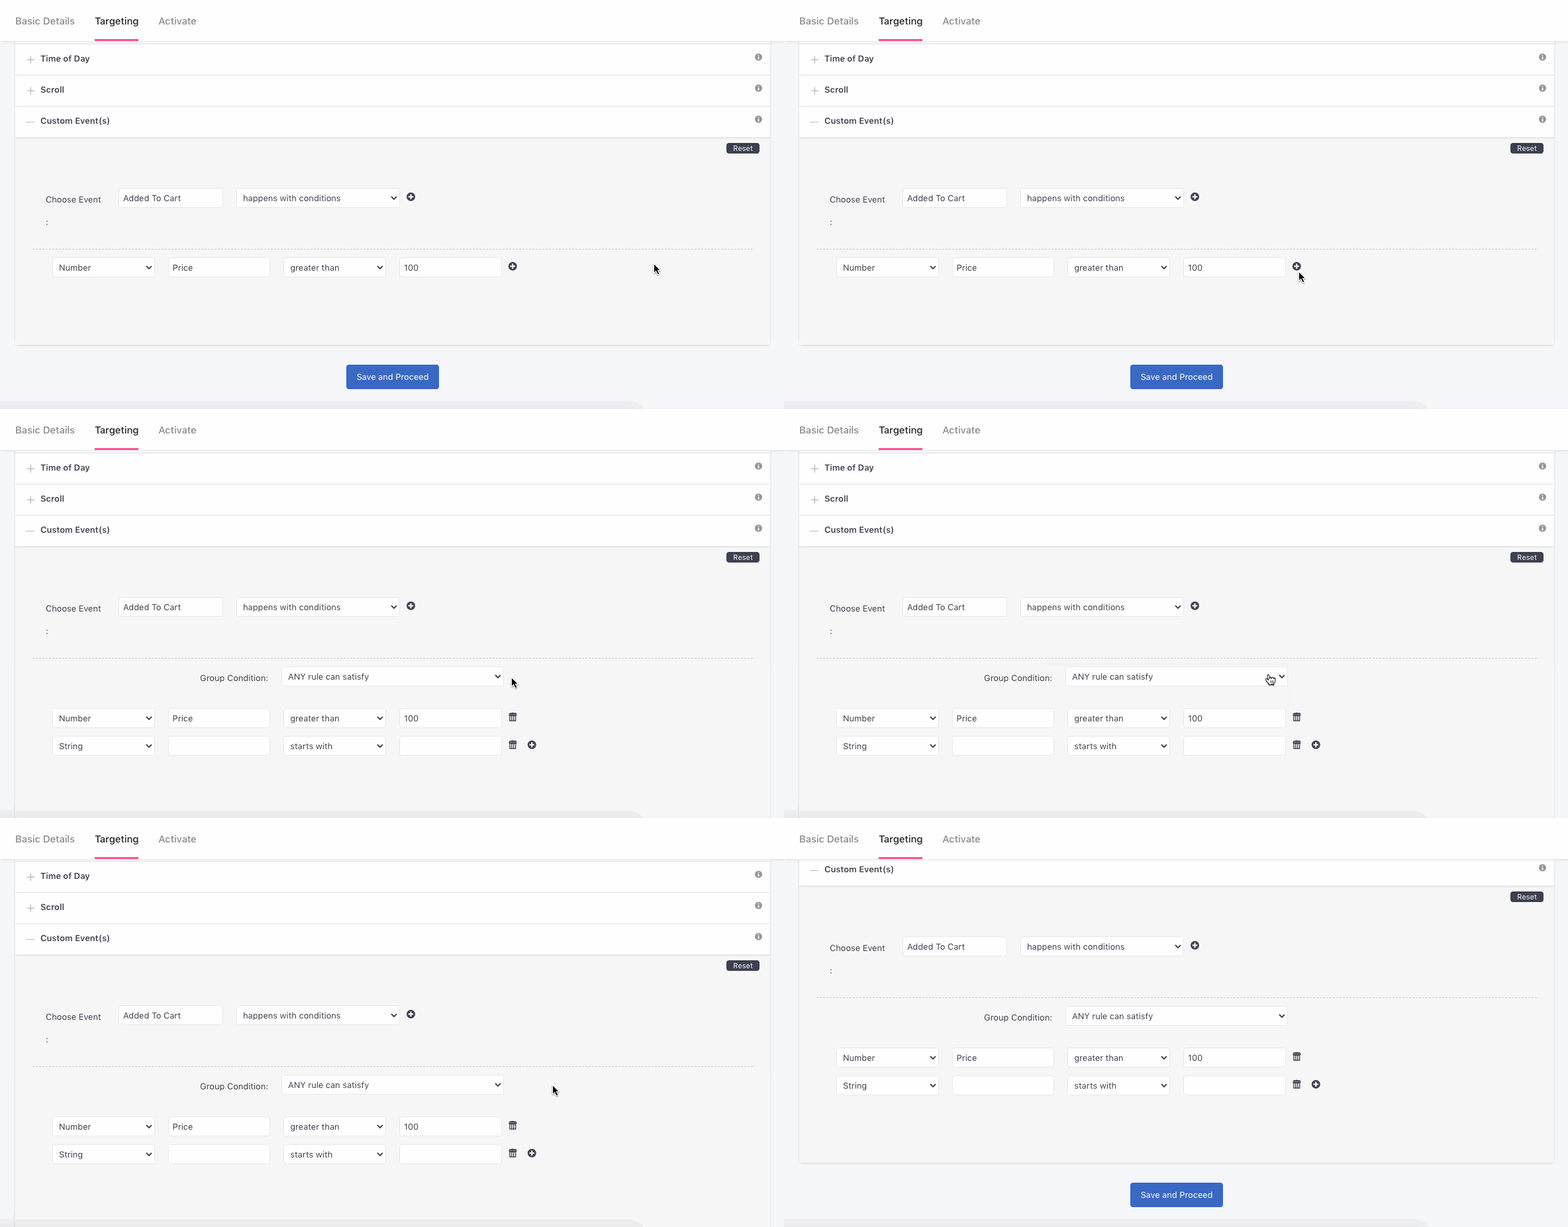
Click to enlarge
You can choose to target a niche set of users who perform a specific set of actions on your website. This comes in handy when targeting highly-engaged users with exclusive content or offers that facilitate retention.
-
As shown above, click the plus icon to specify more Events.
-
Select a logic to combine the Events.
-
Any rule can satisfy: Implies that the notification will be shown to all users who perform any one of the Custom Events (in the context of the conditions added to each).
-
All rules must satisfy: Implies that the notification will be shown to only those users who perform all the Custom Events specified by you (in the context of the conditions added to each).
-
Select a Logic to Apply Targeting Rules
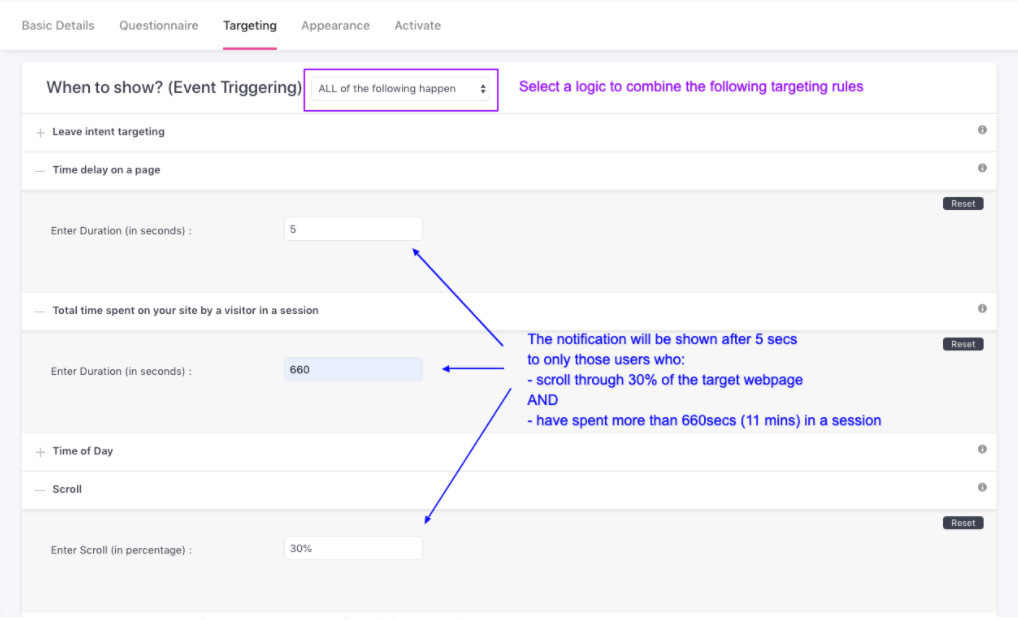
Click to enlarge
As highlighted above, you can combine the targeting rules specified under When to Show? by either logic:
(When) Any of the following happen: Implies that the On-site Notification will be shown to all users whose profile matches any one of the rules specified by you.
(When) All of the following happen: Implies that the On-site Notification will be shown to a user only when their profile matches all of the rules specified by you.
Step 4: Activate
These settings enable you to track the notification's impact on achieving your business goals, determine its run-time and fine-tune the way users experience it on your website. Let's quickly walk you through each setting:
4.1. Setup Conversion Tracking
(Optional, but recommended if you're nudging users to perform an action like purchase, signup and so on.)
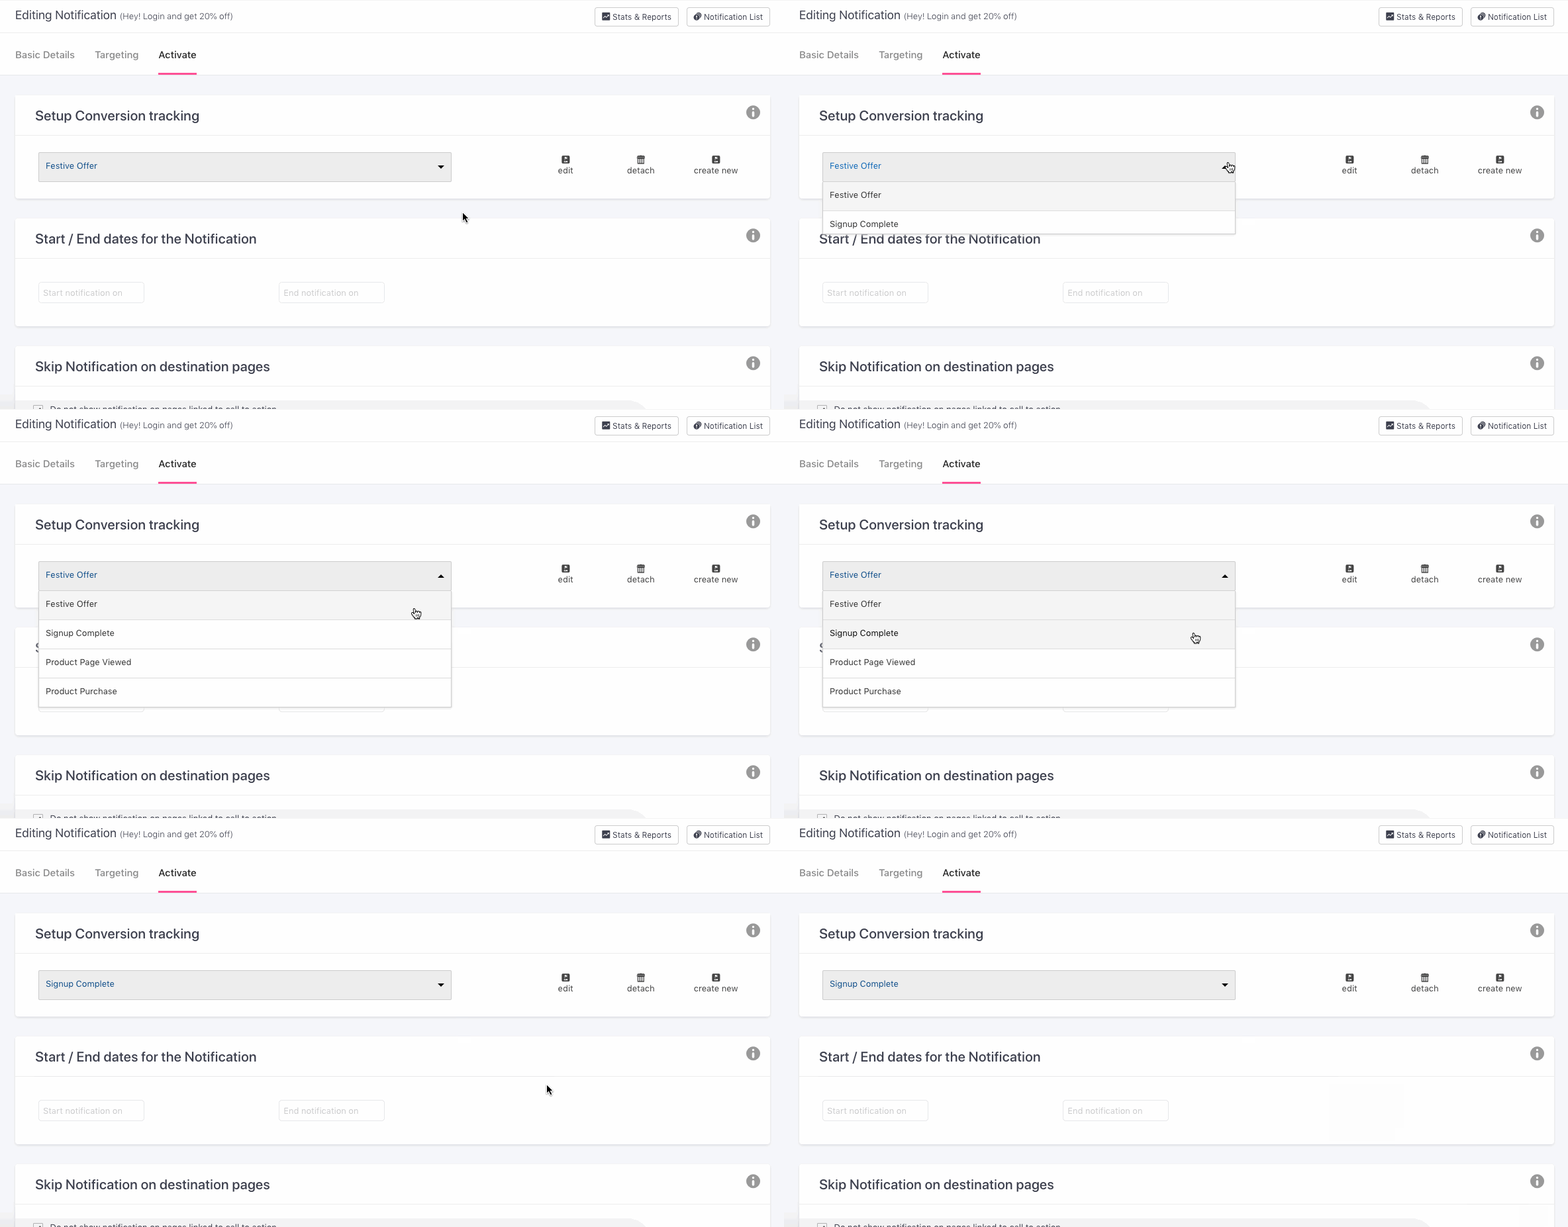
Click to enlarge
Please Note
For On-site Notification, by default tracking conversions on the basis of Goal set (which tracks conversion on the basis of destination URLs). If you would like to track conversions on the basis of events (similar to other channels) kindly reach out to your Customer Success Manager or [email protected]
If you have created Custom control groups, then it can be attached to an on-site campaign only if event-based conversions is enabled for your account.
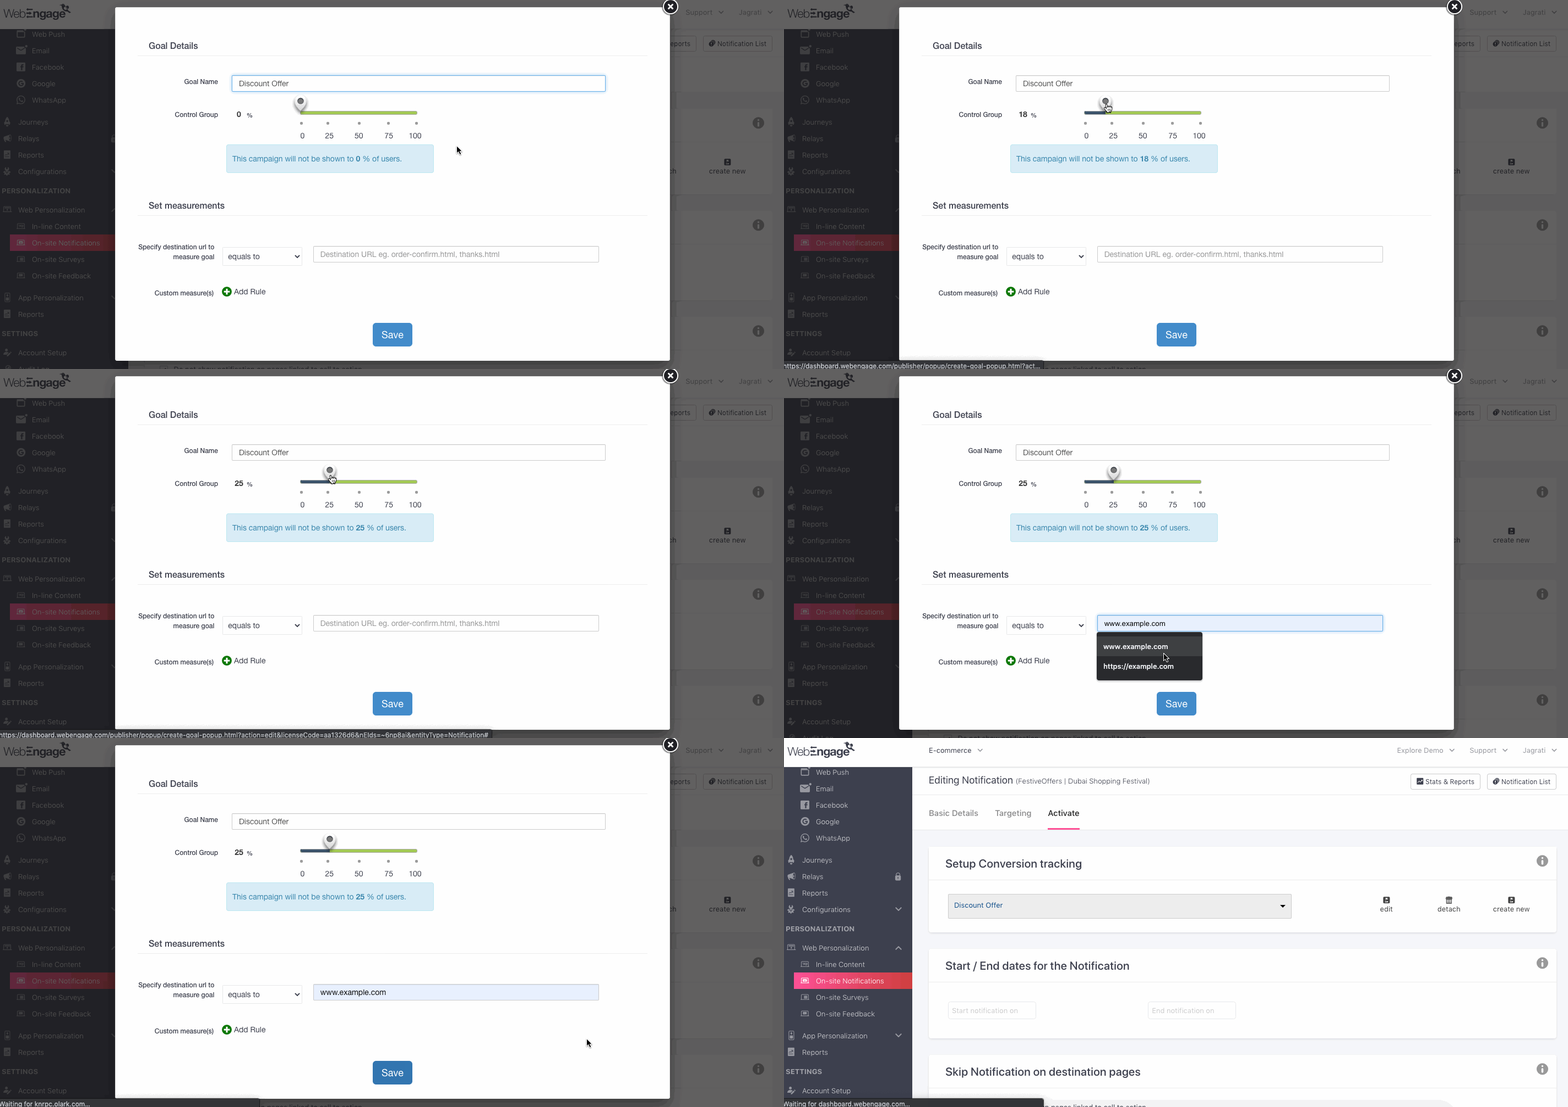
As shown above, select a Goal from the dropdown to track the campaign's impact on achieving it. Or you can choose to create a custom conversion goal for your notification.
- You can change the Goal by clicking Detach and selecting another one from the dropdown.
- You can analyze the overall impact of all your notifications on achieving the goal by clicking View Stats.
Creating a New Goal (URL Based)
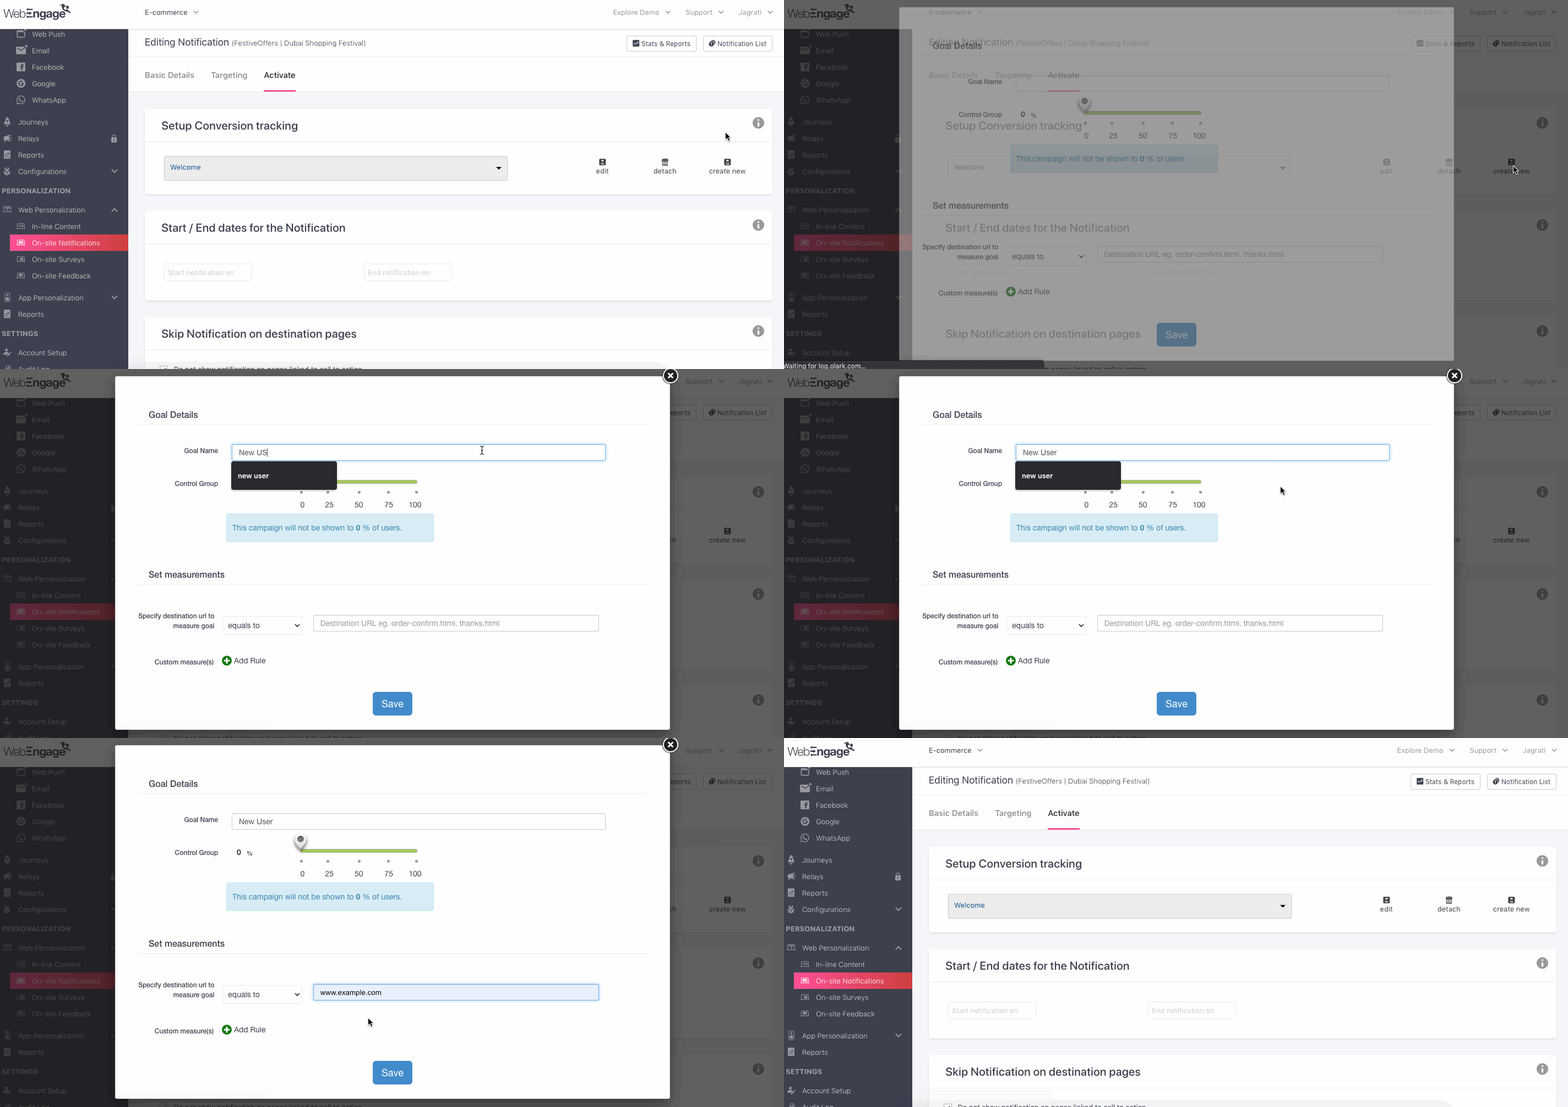
Click to enlarge
As shown above:
Step 1: click on Create New in the dropdown. In doing so, a pop-up will appear on the screen.
Step 2: Add a relevant name for the Goal.
Step 3 (Optional): You can choose to add a Control Group to the goal by setting a percentage value through the slider.
- Doing so will help you measure the On-site Notification's ability to influence goal conversion against organic user behavior.
Related Read
Why You Must (Almost) Always Track Campaign's Conversions Against a Control Group
Step 4: Specify Destination URL to measure Goal
Each time a user performs the Conversion Goal after interacting with your notification, you can track it through a Destination URL, which can be of the following types:
-
A page that a user is bound to visit once they perform the conversion goal like order confirmation and tracking page after purchase,
-
An intermediate link that acknowledges a user action like signup, download, and so on. Let's go over a use-case to help you understand the concept of intermediate links, better.
Tracking Signups Through an Intermediate Link
Let's assume a scenario where you're running an On-site Notification that urges users to create an account (signup) to better experience your site.
Each time a user signs up, you prefer to direct them to your homepage so that they can further explore your site.
However, before you direct them to your homepage, you can fire the link - www.yoursite.com/signup-complete as soon as a user clicks the signup button.
This intermediate link can be defined as the Destination URL for the Conversion Goal, signup.
You can set it up to redirect to the homepage within 5 seconds. Doing so ensures that you're able to track conversions without disrupting the user's experience.
Depending on your use-case, the Destination URL can be configured in any of the following ways:
Method 1: Add a page URL on which you'd like to track the Conversion Goal.
- Recommended for intermediate links or in cases where all users are directed to a specific page once they perform the Conversion Goal.
Method 2: Add a path parameter that's included in the URL structure of several pages
- The path parameter could be a keyword like refer, purchase, subscription, category ID, genre, offer ID and so on.
- Recommended in cases where the Conversion Goal can be achieved on multiple pages.
Here's how you can configure it:
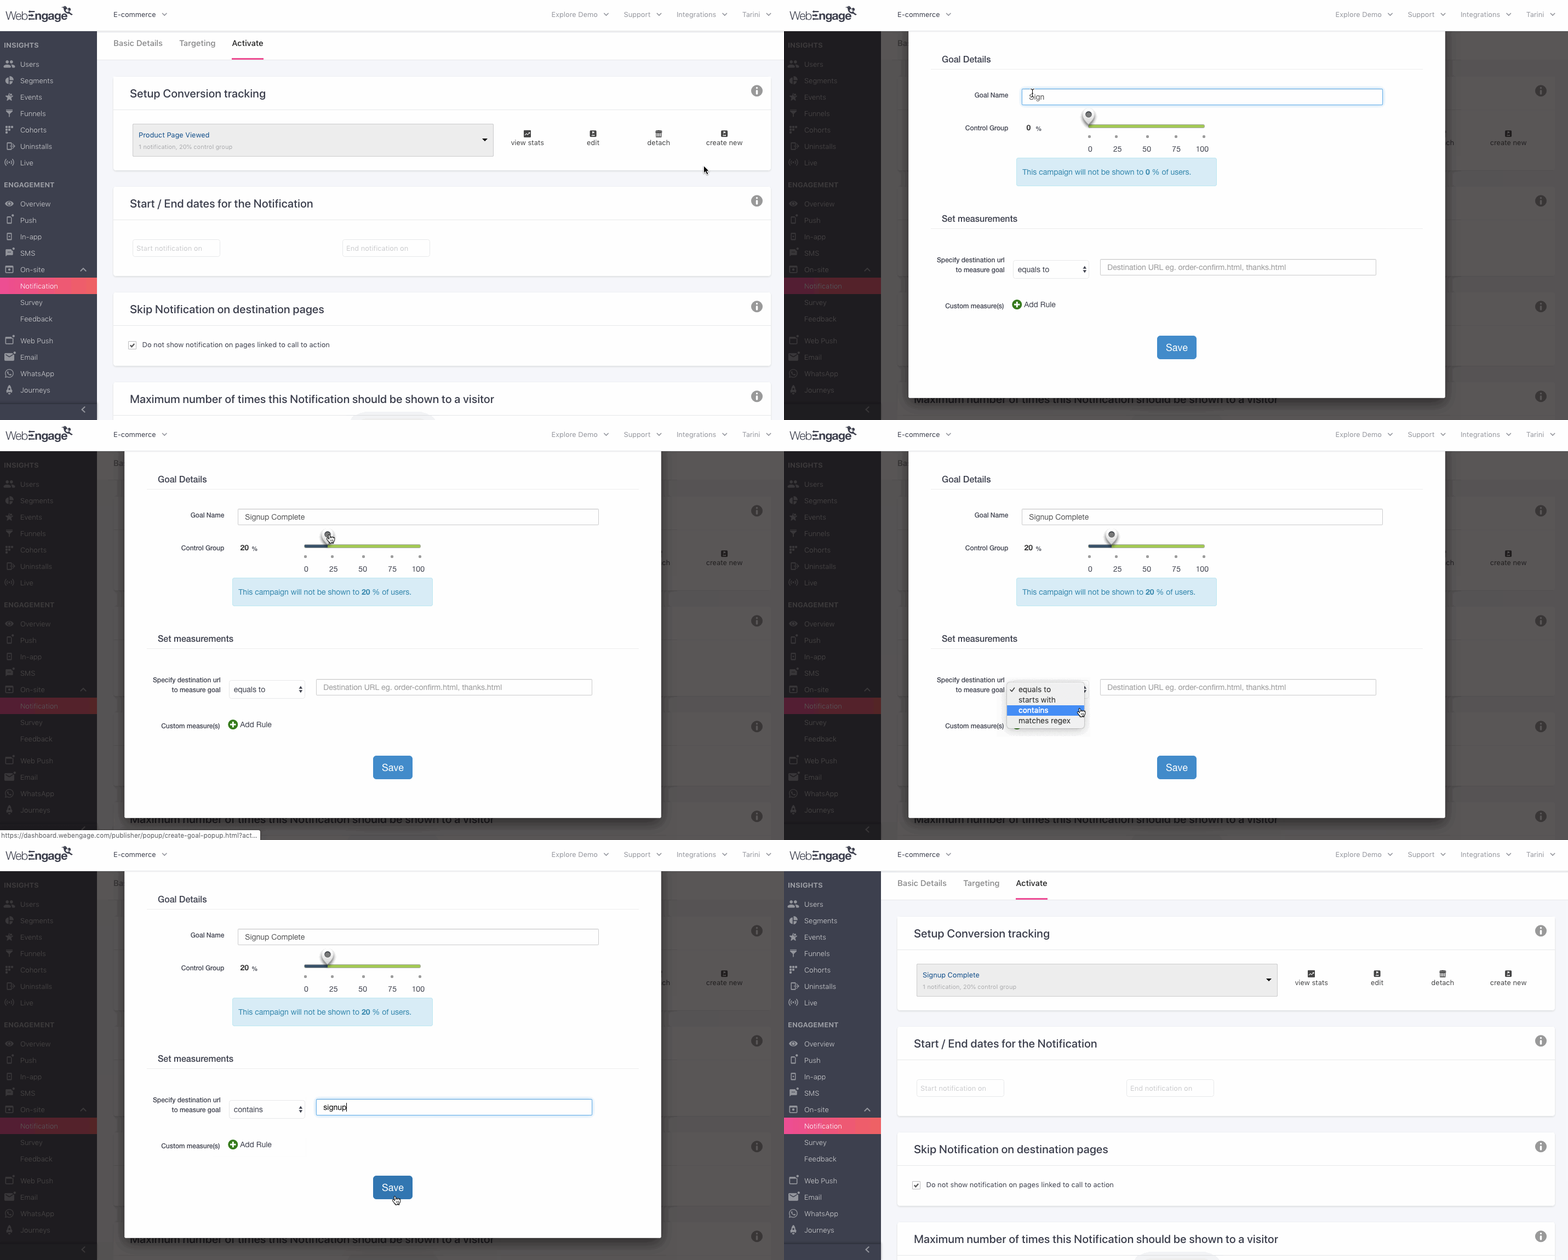
Click to enlarge
Step 4.1. Select a Condition
- Page URLs can be prefixed by Equals to or Starts With.
- Path Parameter or Regex can be prefixed by Contains or Matches Regex, respectively.
Step 4.2. Specify the URL/ Path Parameter/ Regex
- When adding page link, do ensure that it starts with http:// or https://.
Step 5 (Optional): Add Custom Rules
- You can choose to measure conversion on specific pages by adding custom rules. For example, in the below visual, we're tracking subscription purchases on all pages that contain the term,
subscription-planin their URL structure. (It works just like Where to Show? > Custom Rules)
Click to enlarge
Step 6: Click Save to add the Goal to your dashboard.
4.2. Apply Universal Control Group
Conditional Option
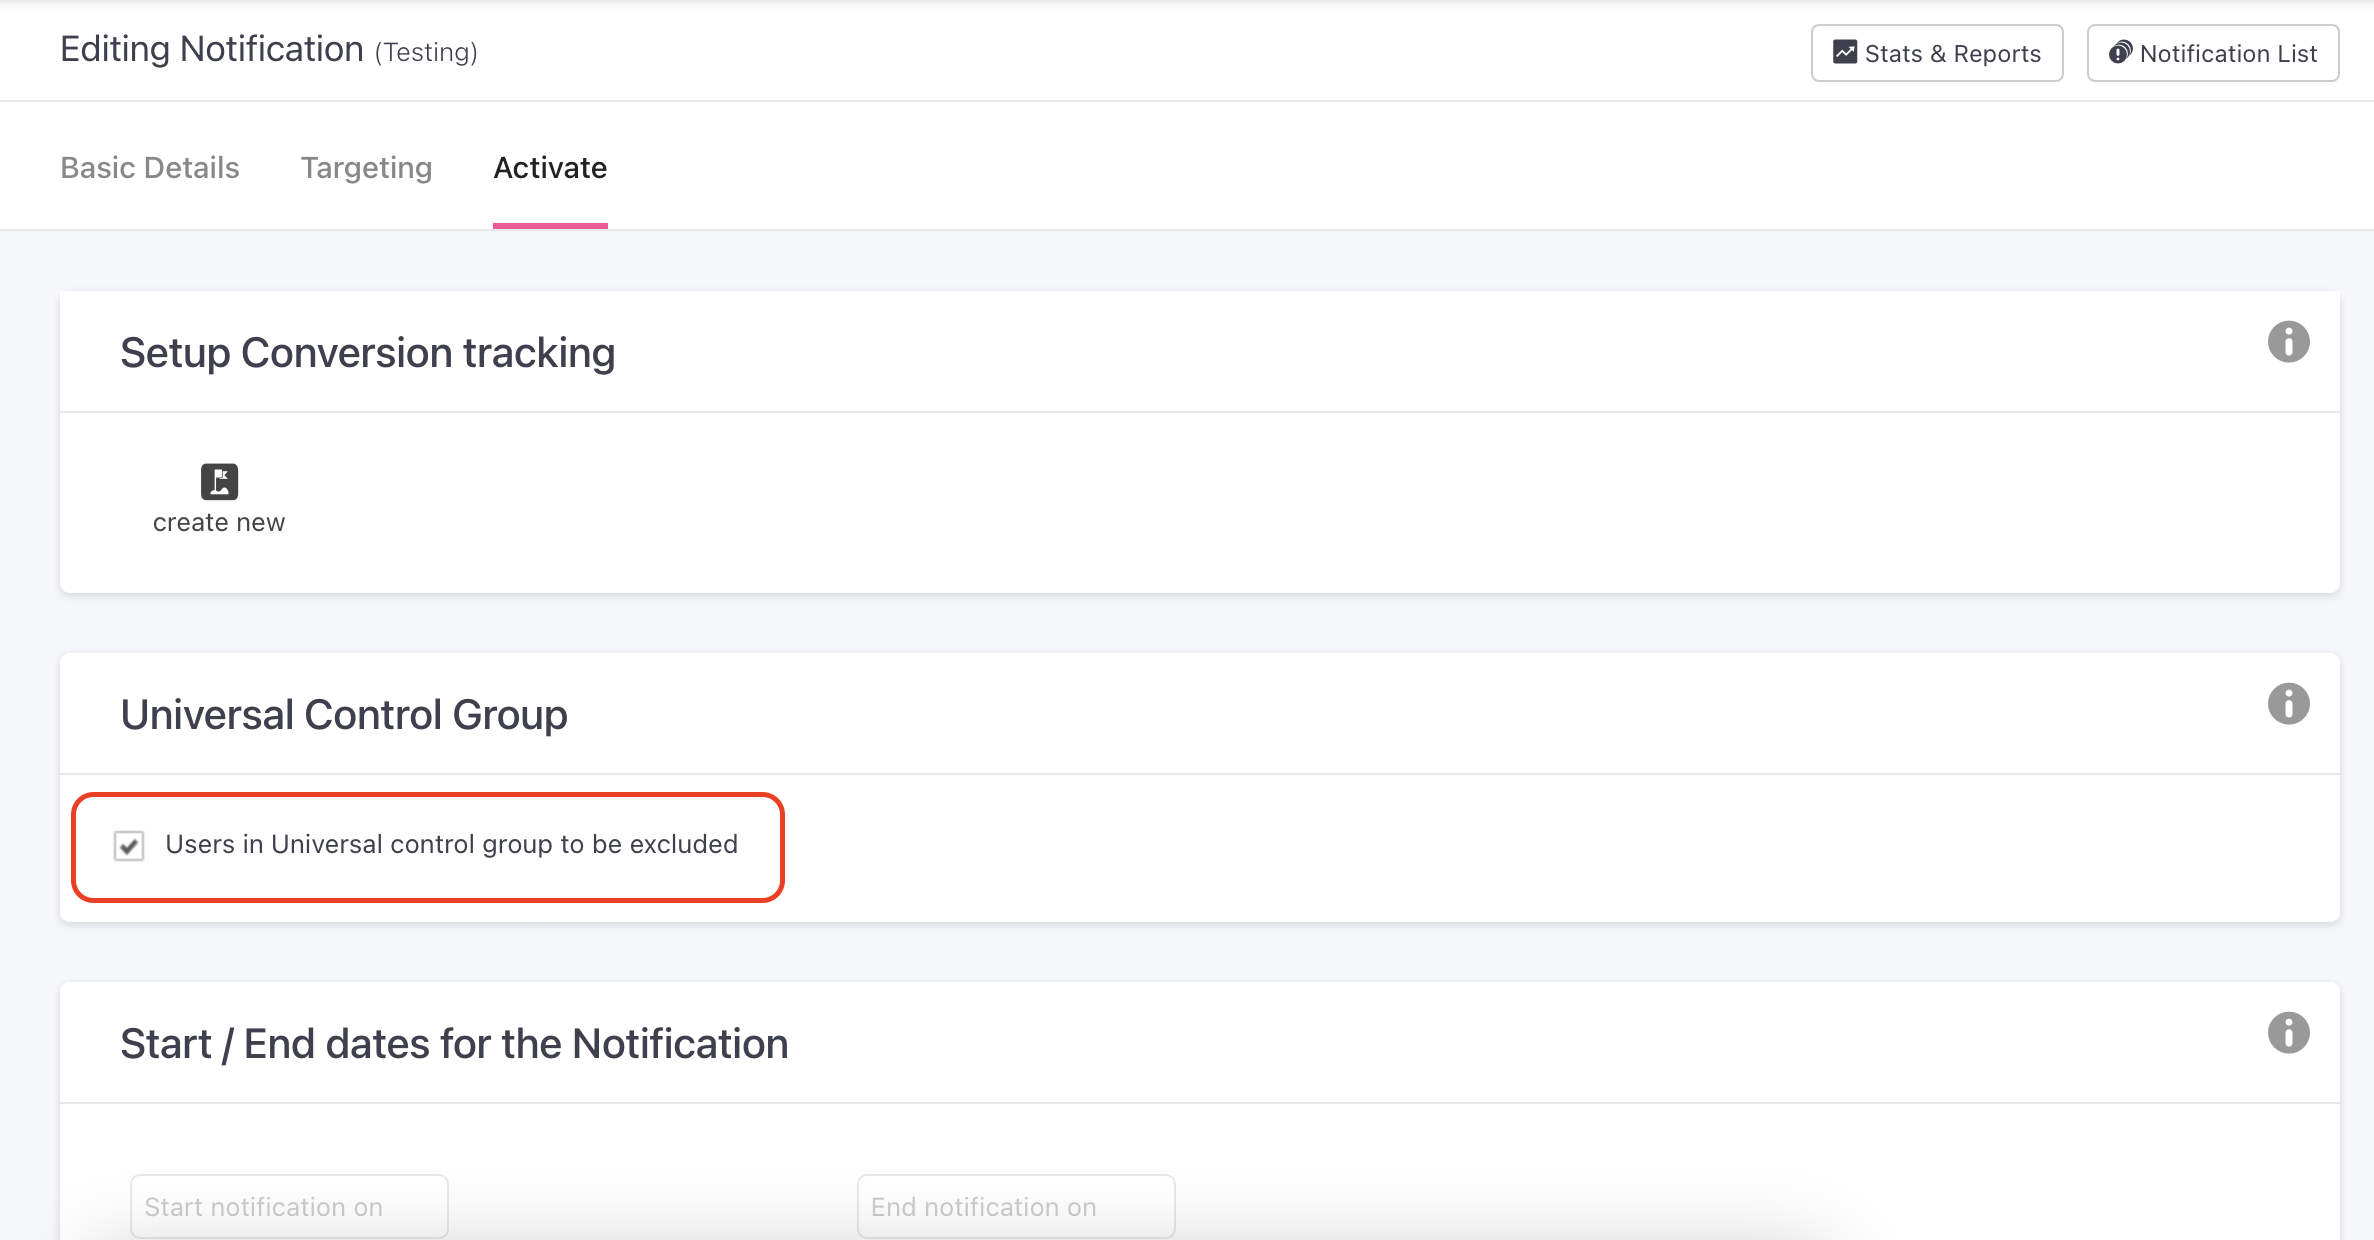
This is a conditional option which will be shown only if the you have created Universal control group in your account. Click here to know how to create Universal control group.
Click to enlarge
- When the box is checked, the campaign will not be sent to users who are part of the Universal Control Group in the segment that is selected.
- When the box is unchecked, the campaign will be sent to all users that are part of the segment inclusive of the Universal Control Group users.
4.3. Specify Start/End Date for Notification
(Optional fields, can be left blank if you'd like to activate the campaign immediately and run it indefinitely.)
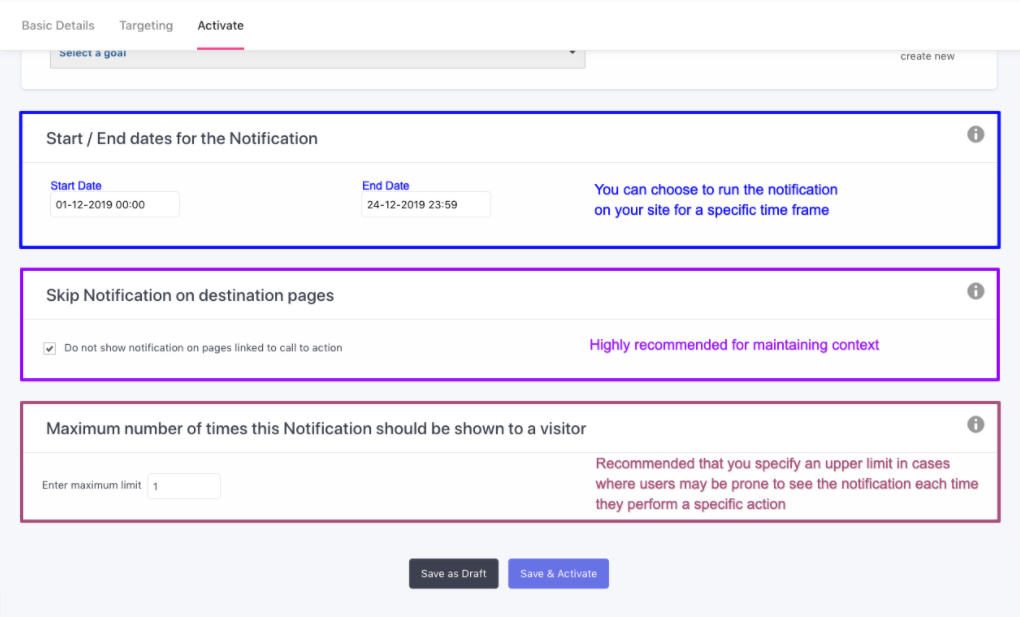
As highlighted below:
- You can choose to schedule your campaign for activation at a later date by specifying an upcoming Start Date.
- You can choose to end your campaign after it has served its purpose by specifying an End Date.
Click to enlarge
4.4. Skip Notification on Destination Pages
(Optional, but highly recommended to prevent users from receiving a redundant message.)
By clicking the checkbox highlight above, you can prevent users from seeing the On-site Notification if they organically visit the webpage linked to your CTA button. It's a great way to optimize your web user experience and keep your brand communication highly relevant, at all times!
4.5. Specify Maximum Show Limit
(Optional, but highly recommended!)
As highlighted above, you can specify an upper limit for the number of times the On-site Notification can be shown to a user. It's a great way to optimize your user experience for cases where users repeatedly visit a page or perform an action that matches your targeting settings.
Method 2: Choose From Gallery
Click to enlarge
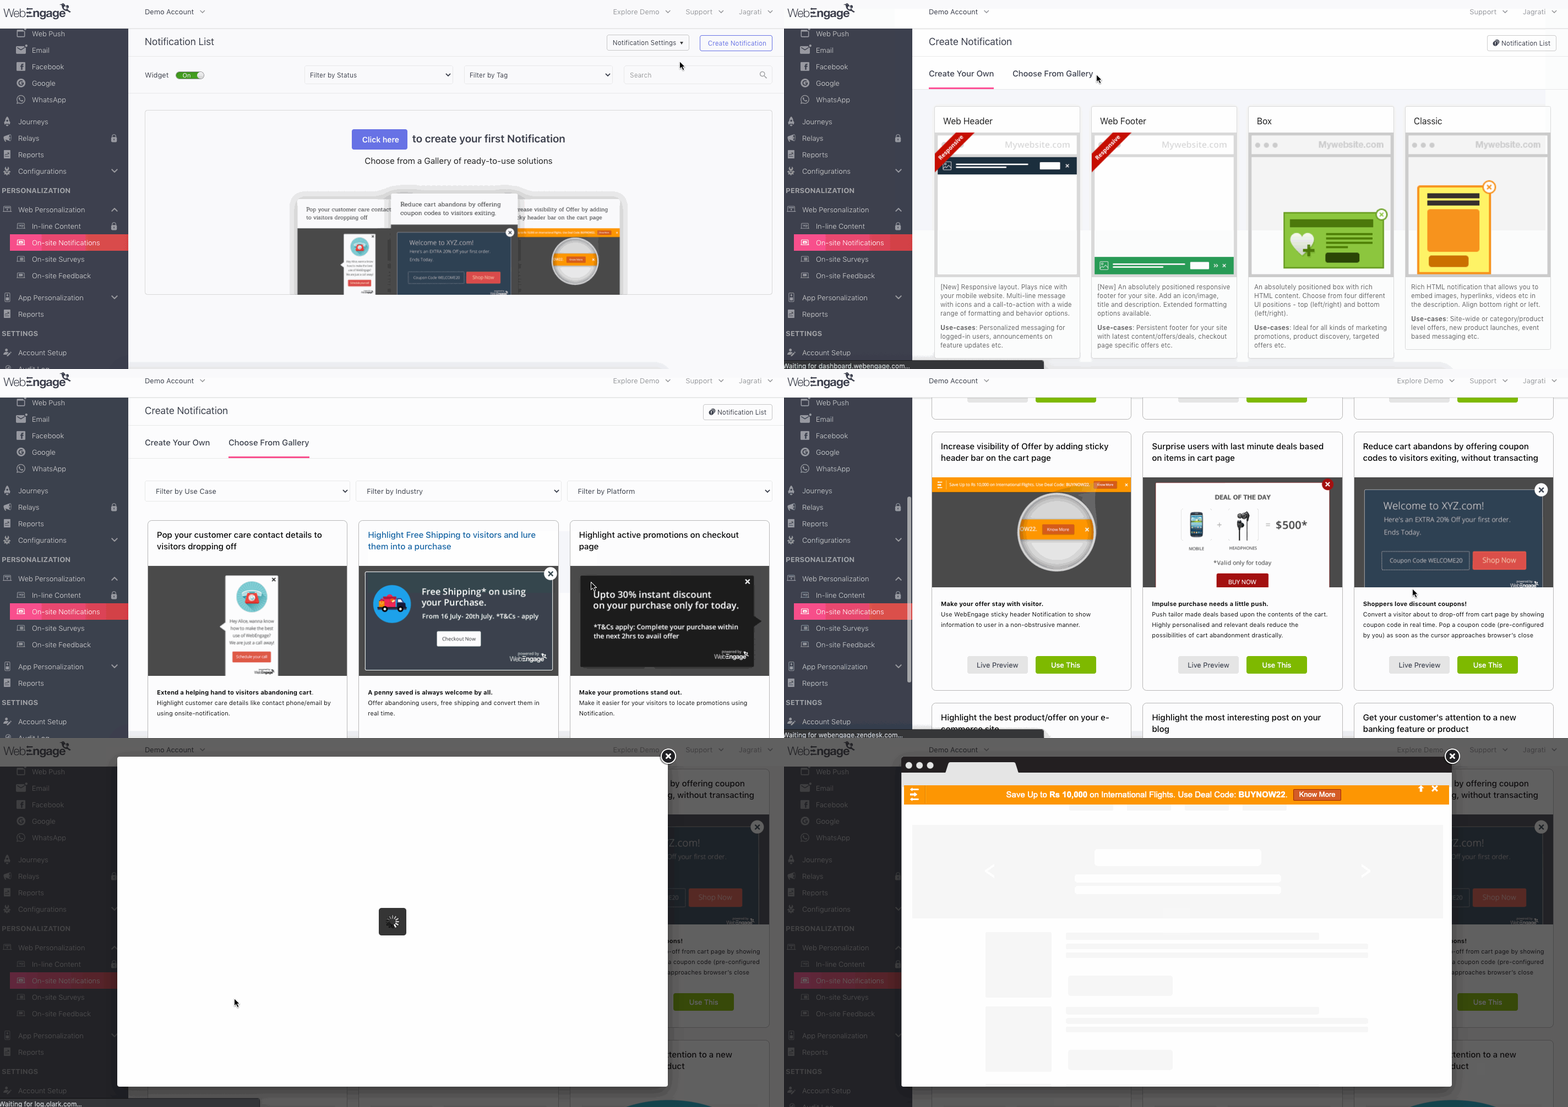
Your dashboard comes loaded with over 16 ready-to-use templates that cater to various use-cases like Product Discovery, Product/Service Promotion, Cart/Search Abandonment & Exit Targeting) for several business verticals including E-commerce, OTA, BFSI and Subscription Services like Ed-tech, Content & OTT. You can further filter the templates to engage mobile website users specifically.
Thus, you can customize any of these templates to launch your campaign instantly! Here's how you can go about it:
Step 1: Select a template that best serves your on-site engagement needs.
- Click Use This on the template to start editing.
Step 2: Customize the template's message, appearance, and targeting rules as per your strategy.
- You can follow the steps listed under Create Your Own to implement your changes.
Step 3: Click Save & Activate!
What happens once you activate an On-site Notification?
-
As soon as you activate a notification, we will start displaying it to users whose profile matches the targeting rules specified at Step 3: Targeting from the Start Date specified at Step 4: Activate.
-
You will be able to analyze the notification's performance by accessing Stats & Reports from its Campaign Card listed on Notification List. (As shown below)
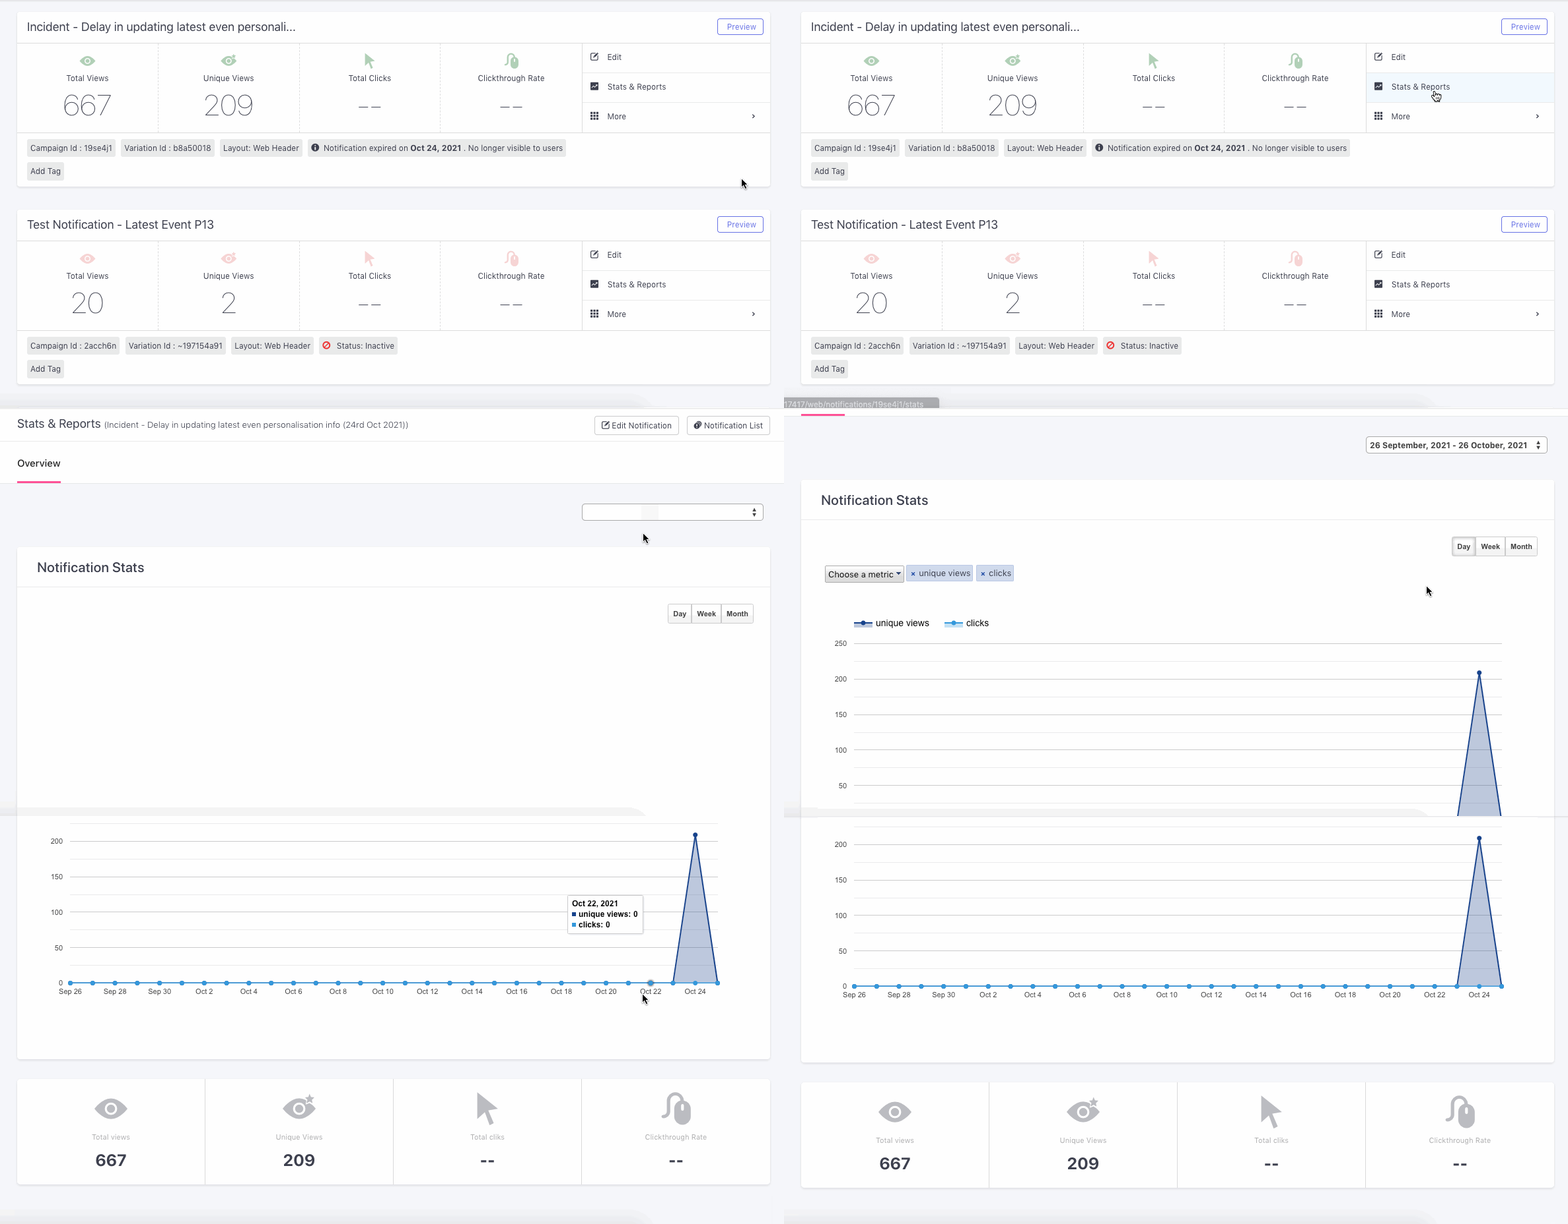
Click to enlarge
-
You can also compare the notification's performance against other active notifications for a specific time frame by Downloading a Report.
-
You can choose to Deactivate the notification anytime you like if you notice that it has a negative impact on your website's conversion/engagement rates.
We hope this has equipped you with a robust understanding of how you can create highly targeted & personalized On-site Notifications. Please feel free to drop in a few lines at [email protected] in case you have any queries or feedback. We're always just an email away!
Updated 5 months ago