

Recommendation Block
Add a grid or carousel of products to your campaigns, filled from your catalog or a recommendation strategy, without writing a line of code
Must Read
- Recommendation Block is available in Email and Web Personalization (inline) campaigns built with the drag-and-drop editor.
- You need at least one catalog uploaded before you add a block. To personalize products for each user, you also need a recommendation strategy built on that catalog.
A good store changes its shelves for every shopper. Recommendation Block lets your campaigns do the same. You drop a block into your template, pick where the products come from, and WebEngage fills each tile with the right product for each user when the campaign goes out.
Here are a few ways you can use it:
- Picked for you on your homepage, driven by each user's browsing or purchase history
- Customers also bought in a post-purchase email
- Trending this week for every visitor, using your top-selling items
- New season edit in a launch email, with products you hand-pick and order yourself
You build the block in a four-step wizard inside the drag-and-drop editor: Layout, Data Source, Styles and Preview. The canvas updates live as you change settings, so you always see what your users will see.
What You Can Do in Each Channel
| What you can do | Web Personalization (inline) | |
|---|---|---|
| Flat Grid layout | Yes | Yes |
| Carousel layout (arrows, swipe) | No | Yes |
| Hand-picked catalog items (Browse & Select) | Yes | Yes |
| Personalized recommendations per user | Yes | Yes |
| Style controls | Most (a few are disabled) | All |
Before You Begin
Make sure you have the following in place:
- A catalog. This holds your products. It needs columns for at least an image URL, a product name and a product page URL. Price, MRP, discount, description and a tag column are optional. Learn how to upload a catalog.
- A recommendation strategy (optional). You need one only if you want products to change per user. Create it under Recommendations. All four strategy types work: Top Items, Personalized, Relevant and Collections.
- A drag-and-drop template. The block lives in the drag-and-drop editor of an Email template or a Web Personalization inline campaign.
Add a Recommendation Block
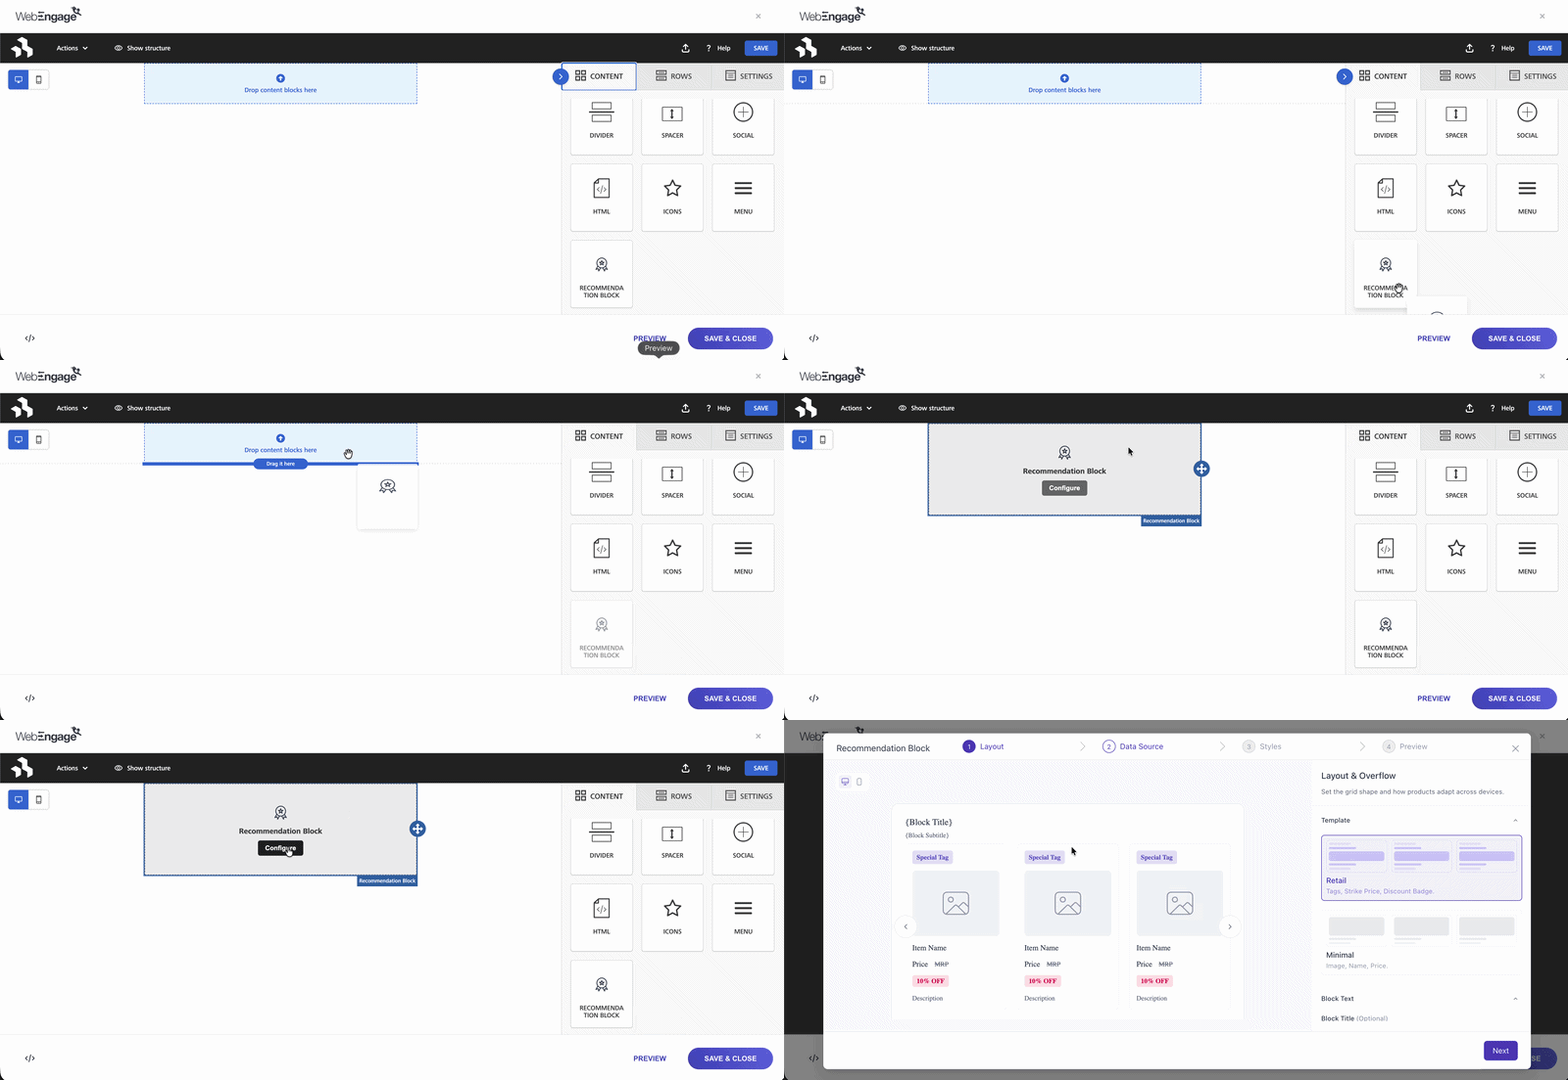
- Open the drag-and-drop editor for your Email template or Web Personalization inline campaign.
- From the Content panel, drag Recommendation Block into a row.
- Click Configure on the placeholder. The wizard opens.
The steps are the same in both channels. Where Email behaves differently, it's called out below.
Step 1: Layout
-
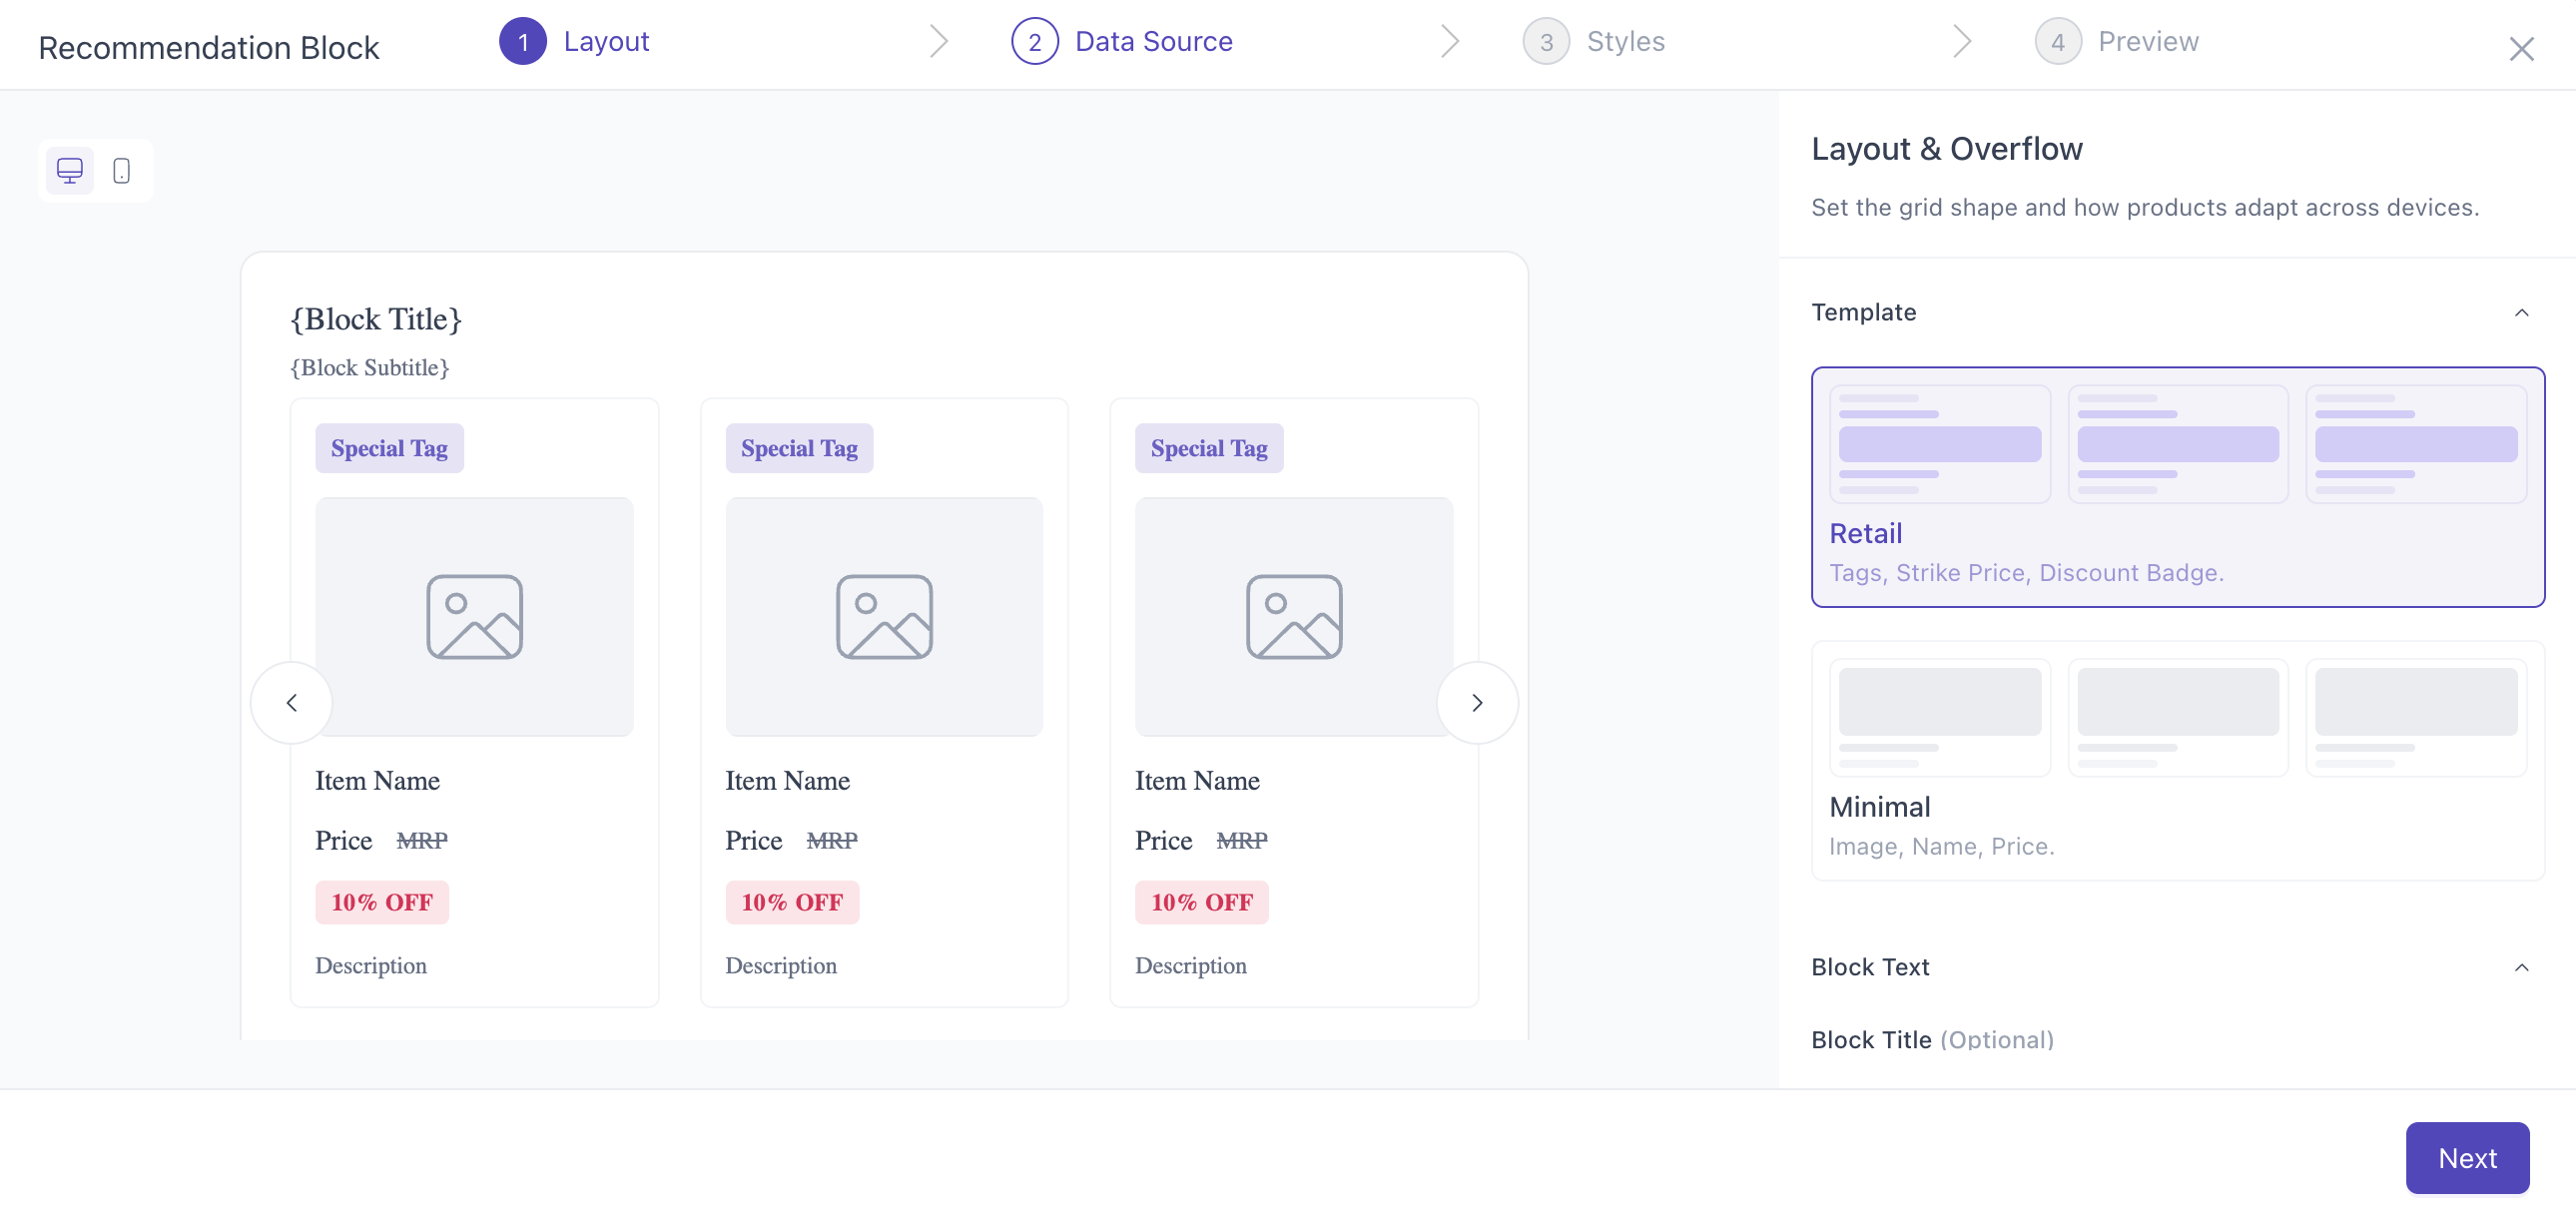
Pick a template. Each template turns on a set of fields by default. Every tile also links to the product page URL.
- Retail: Special Tag, Image, Name, Price with MRP struck through, Discount badge ("X% OFF") and Description.
- Minimal: Image, Name and Price.
You can switch any field on or off later, in Configure Fields.
-
Add a title and subtitle (optional). For example, "Picked for you".
-
Choose the layout.
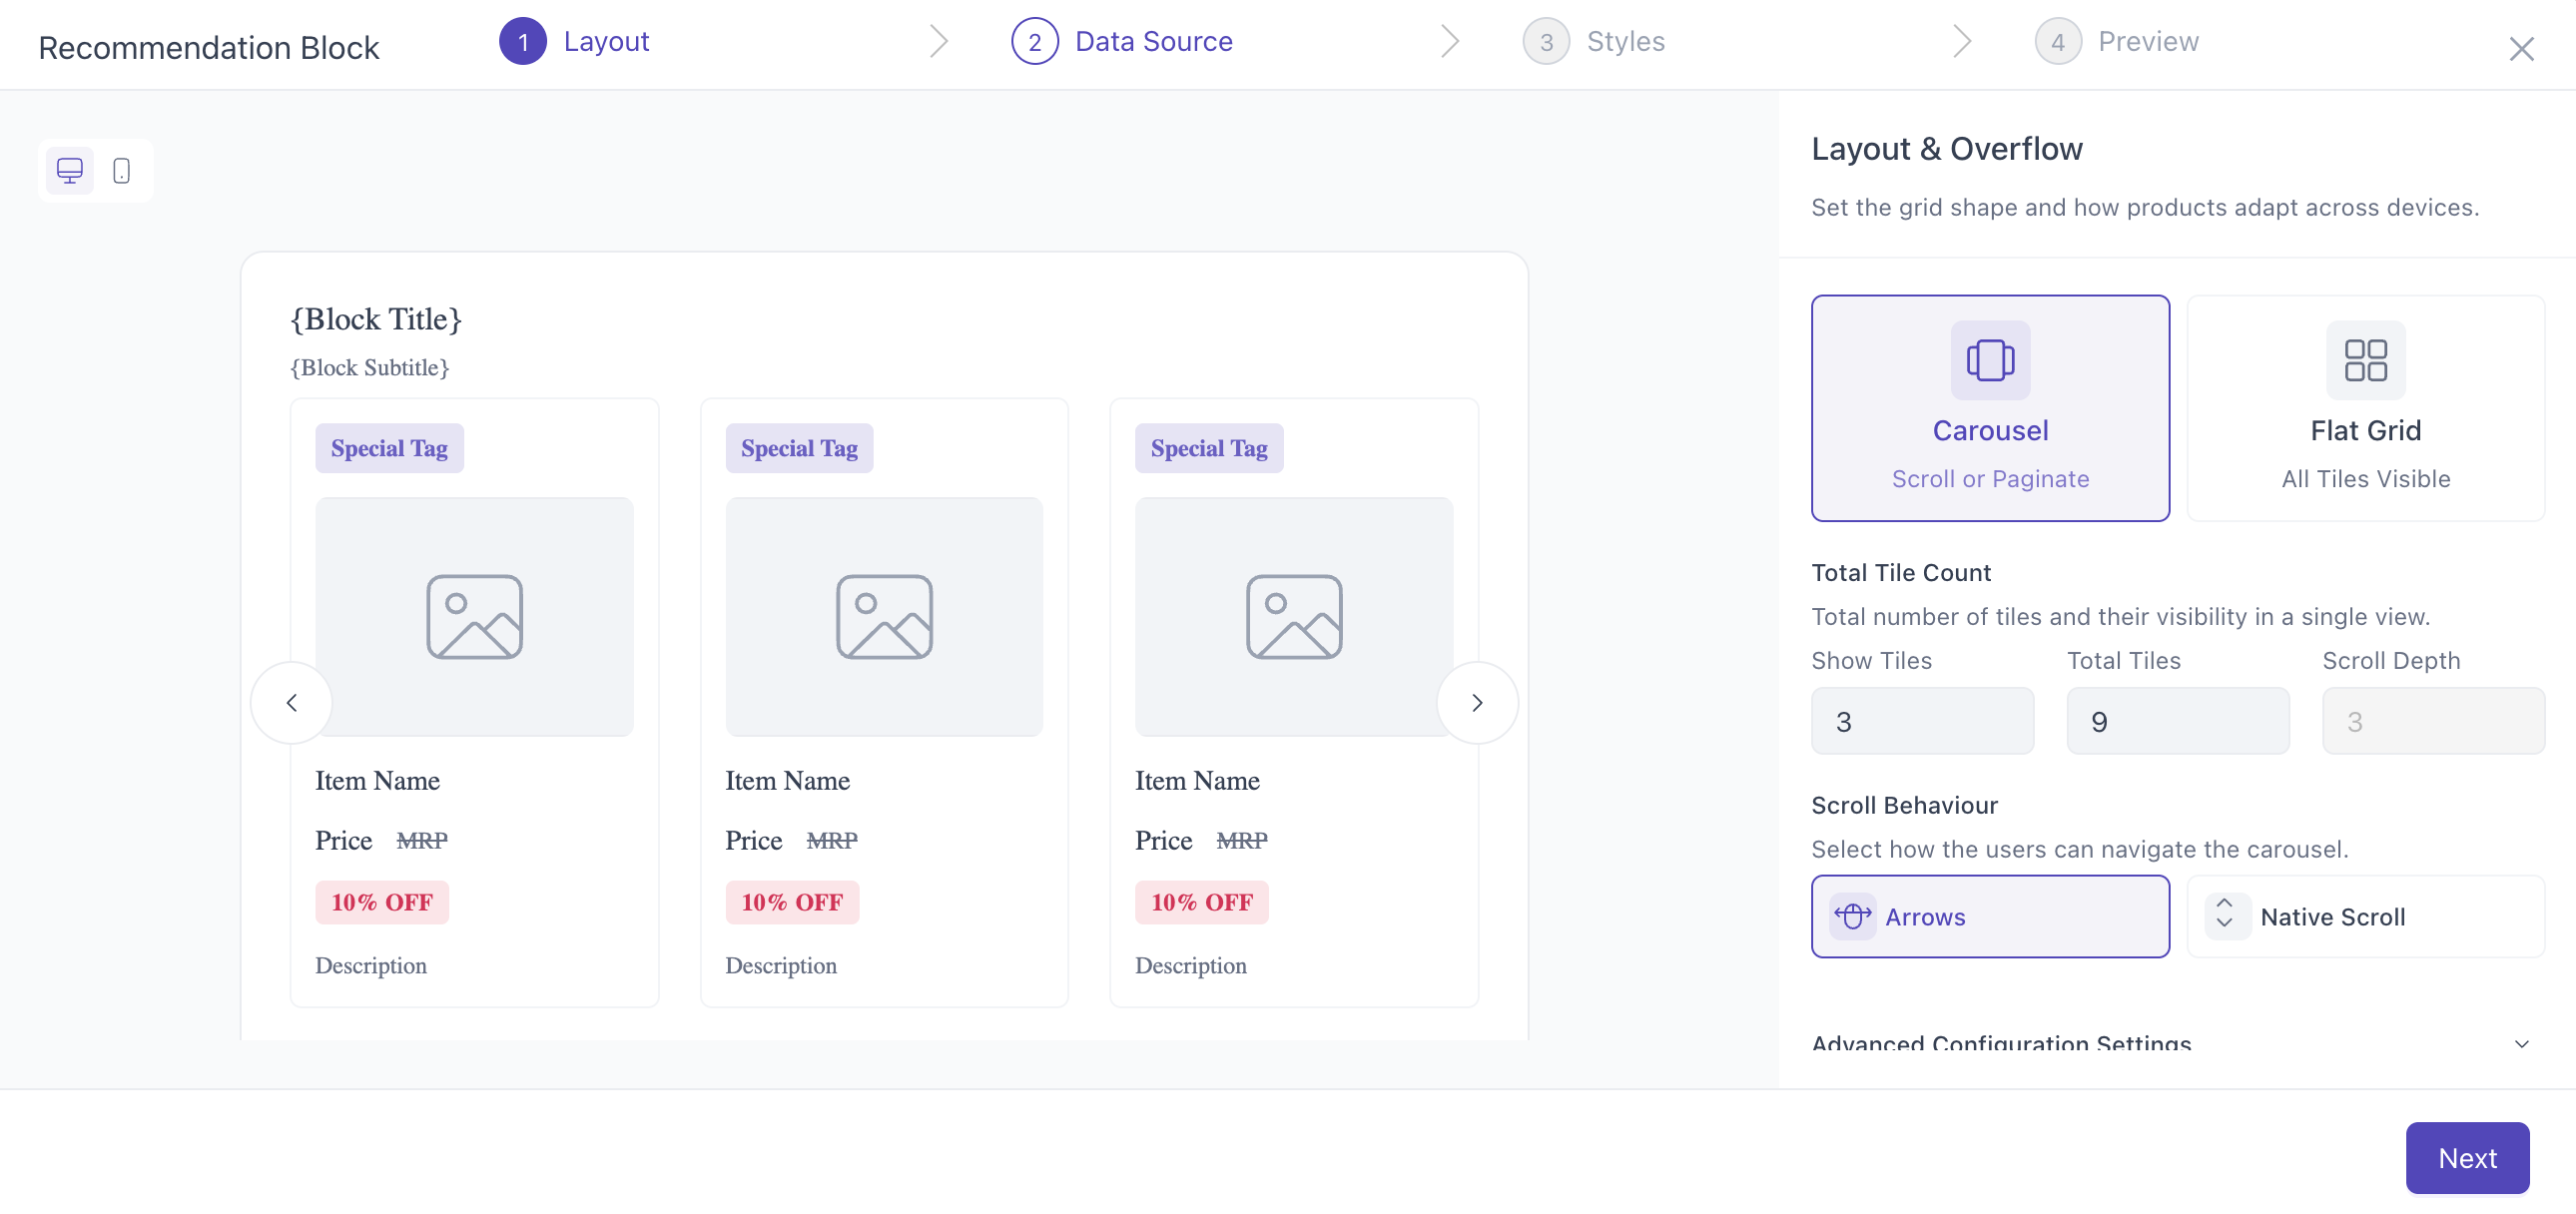
- Flat Grid (Email and Web Personalization): all tiles are visible at once.
- Grid Size: hover over the grid picker to preview, then click to set the rows (up to 10) and columns (up to 5).
- Cross Screen Visibility: set how many columns show on each device. Desktop allows up to 5 and mobile up to 2.
- Carousel (Web Personalization only): tiles sit in a single row that users scroll through.
- Show Tiles: the number of tiles visible at once. Desktop allows up to 5 and mobile up to 2.
- Total Tiles: the number of tiles in the carousel, up to 50.
- Scroll Depth: calculated for you. It shows how many scrolls it takes to see every tile on desktop.
- Scroll Behaviour: how users move through the tiles. Choose Arrows, Native Scroll (swipe or trackpad), or both. At least one must be selected.
- Flat Grid (Email and Web Personalization): all tiles are visible at once.
Step 2: Data Source
Here you choose how the tiles get filled. There are two options.
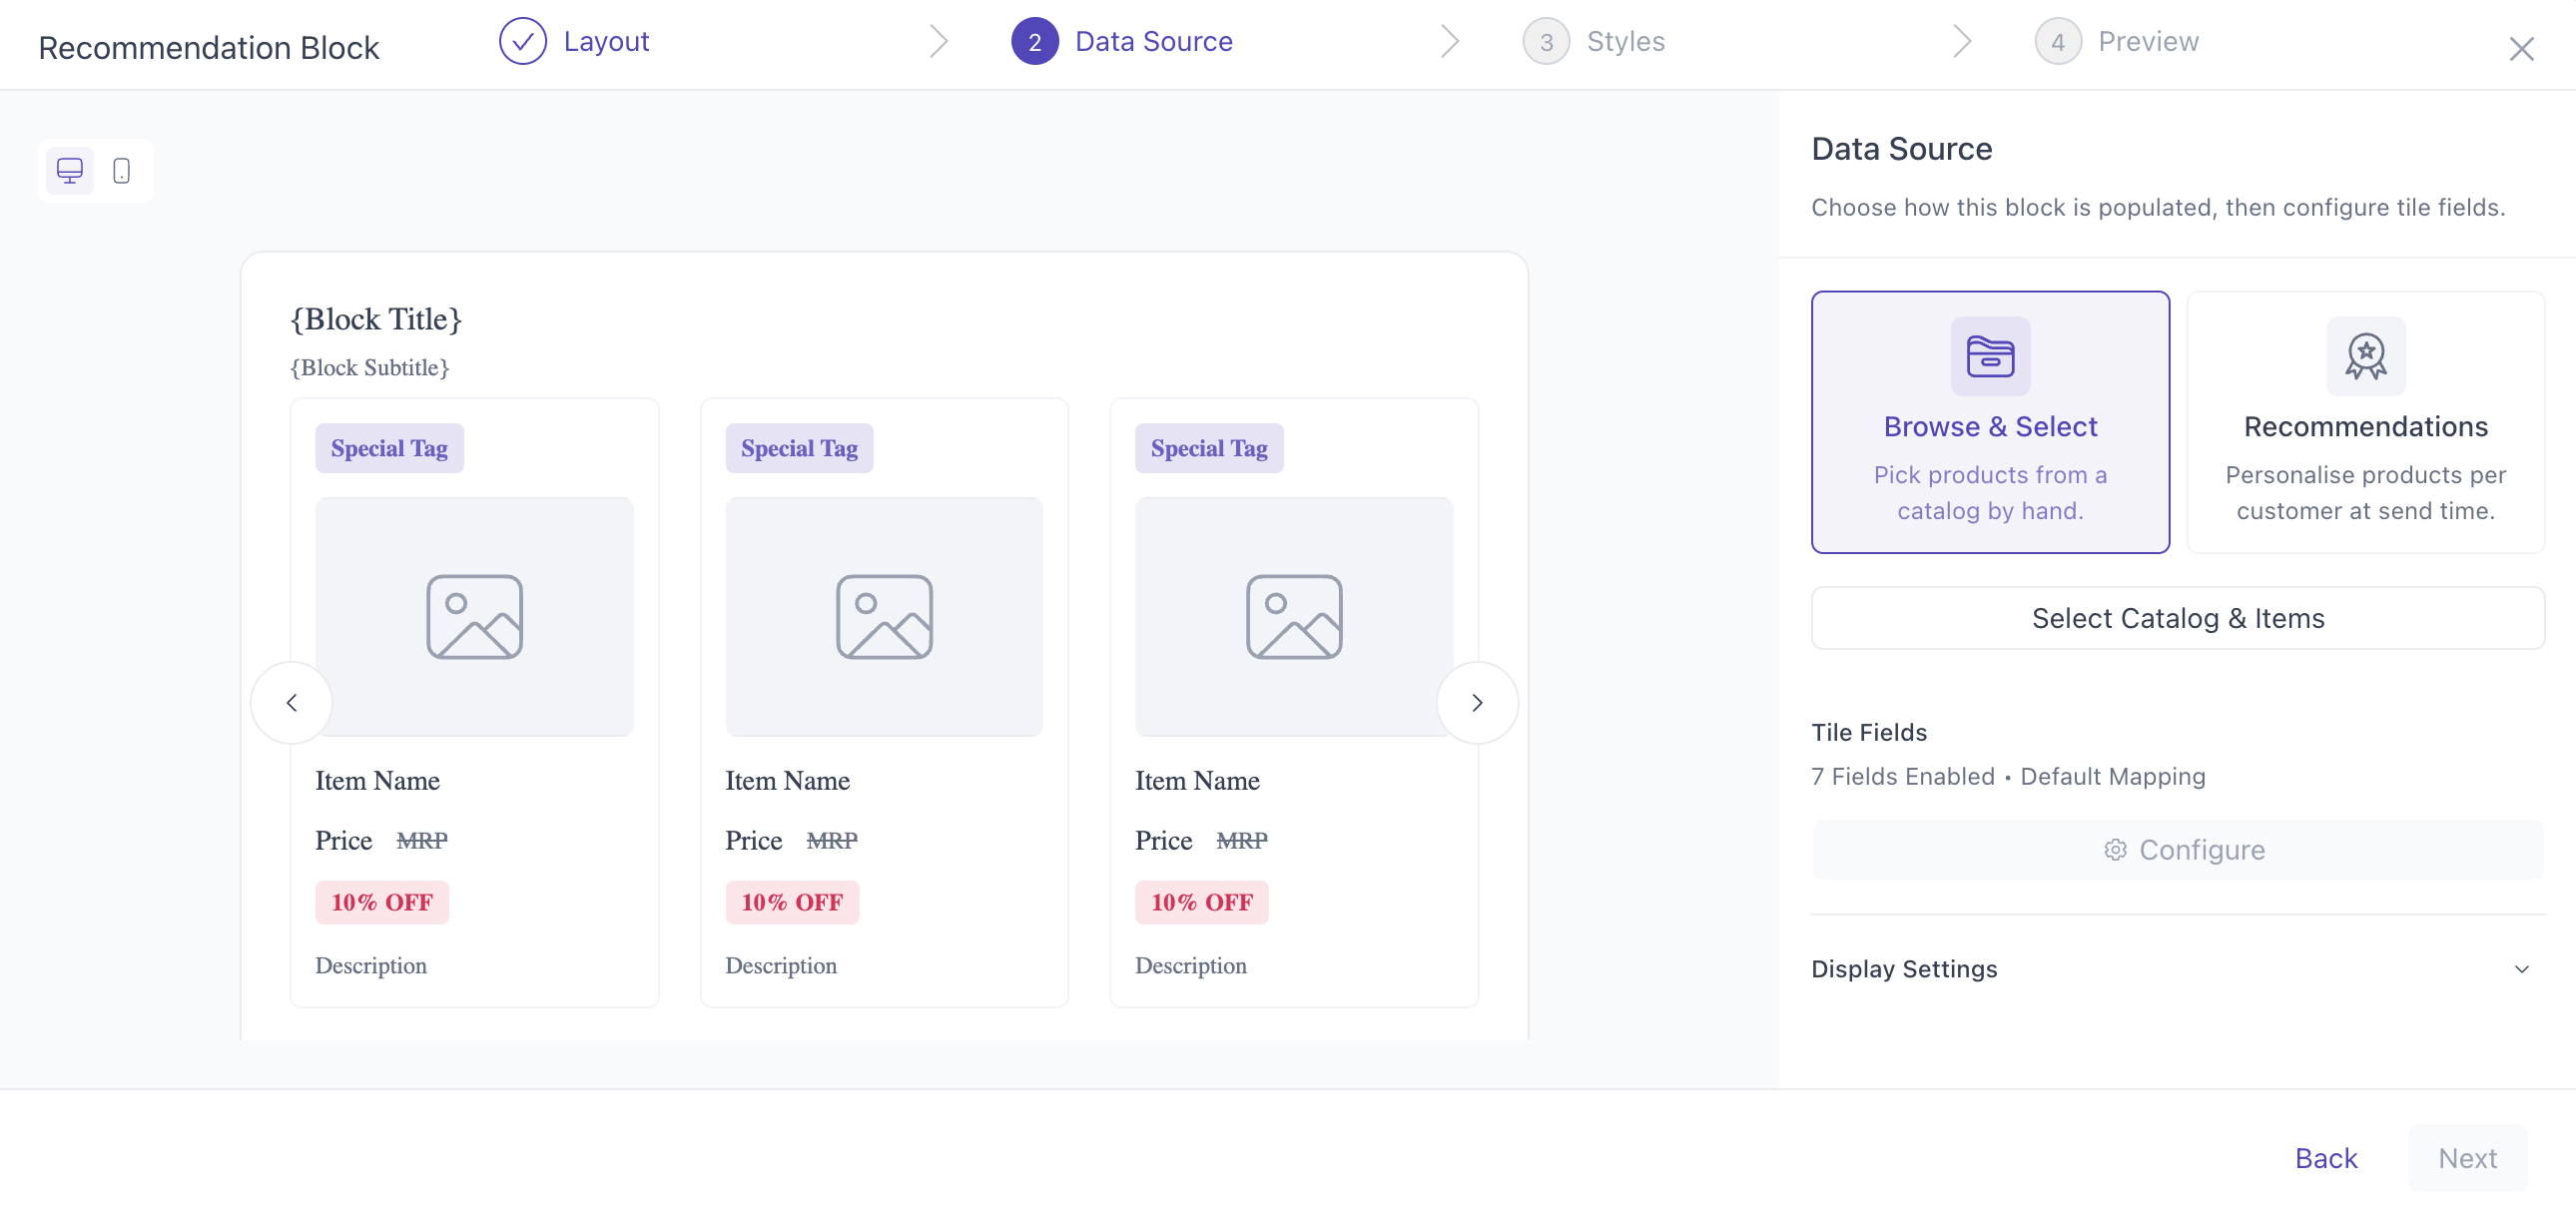
Browse & Select
Use this when you want to hand-pick products. Every user sees the same items, in the order you set.
Click to enlarge
- Click Select Catalog & Items and pick a catalog.
- The Configure Tile Fields window opens. Map each tile field to a catalog column (see Configure Tile Fields below), then click Save.
- Filter by any attribute and tick the products you want. You can pick up to the number of tiles you set in Layout.
- Click Next and drag the products into the order your users should see them. Click Save.
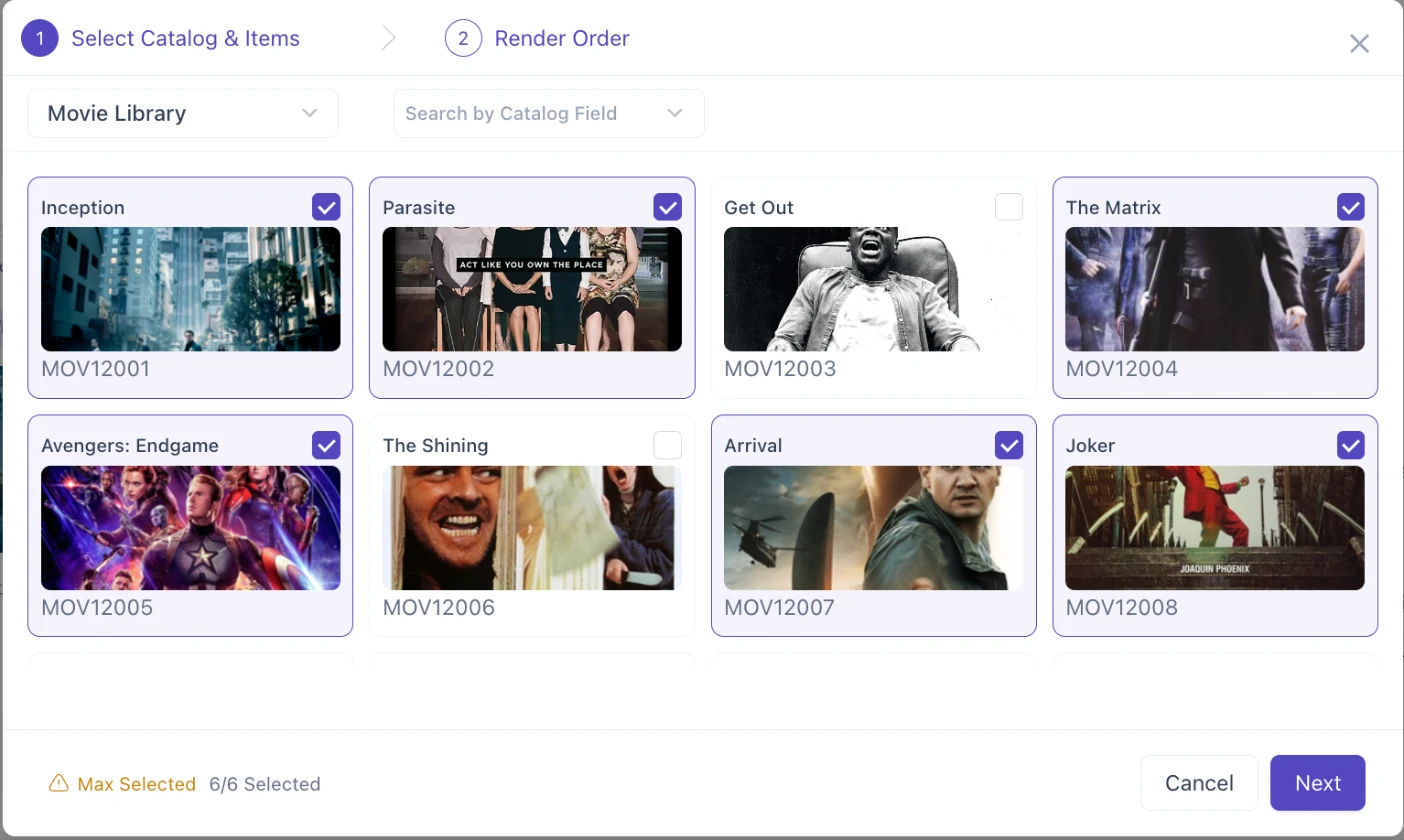
Click to enlarge
Recommendations
Use this when you want the products to change for each user. Products are picked at the moment the campaign goes out.
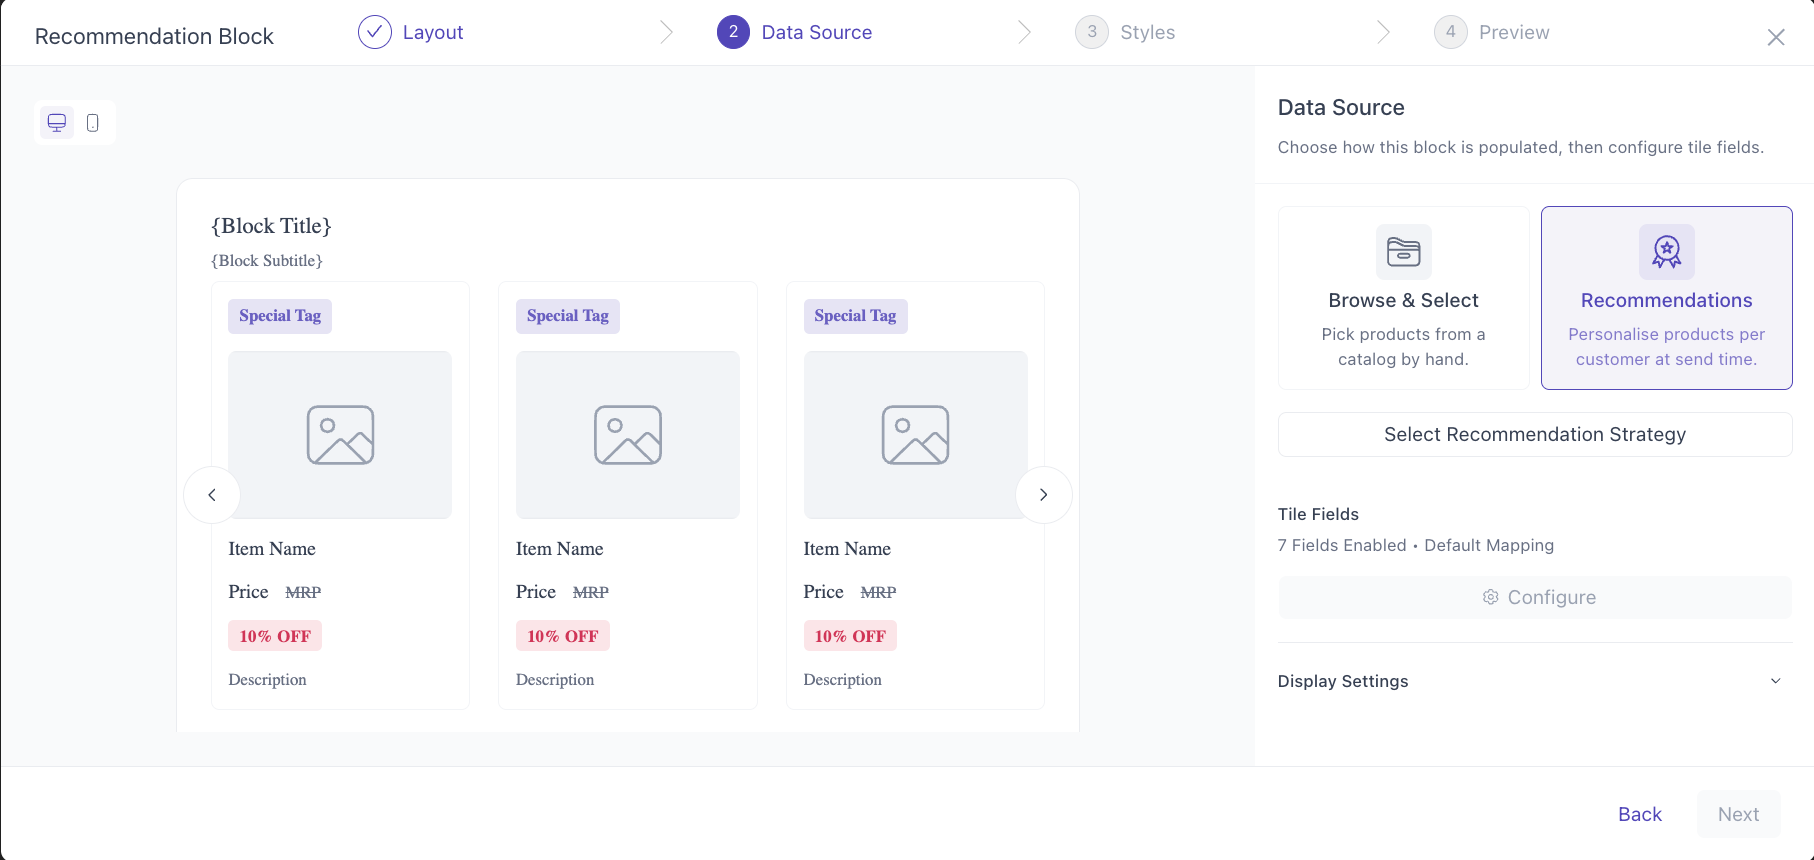
Click to enlarge
- Click Select Recommendation Strategy and pick a strategy. You can use any of these four types:
- Top Items: the same popular products for everyone, such as Top Selling, Top Added to Cart, Top Wishlisted, Top Viewed, or your own. No extra input needed.
- Personalized: products picked from each user's past behaviour, such as Personalised by Items Bought, Personalised by Items Added to Cart, Recent Items Viewed, or your own. No extra input needed.
- Relevant: products related to one reference product, such as Also Bought, Also Added to Cart, Also Viewed, or your own. Enter the Reference Item: type a product ID, or pick a user or event attribute that holds one.
- Collections: products that match a filter you define. Fill in each variable the collection asks for.
- Map the tile fields in the Configure Tile Fields window, as described below.
Configure Tile Fields
This window connects each part of the tile to a column in your catalog. It opens automatically when you pick a catalog or a strategy. To change the mapping later, click Configure next to the field summary.
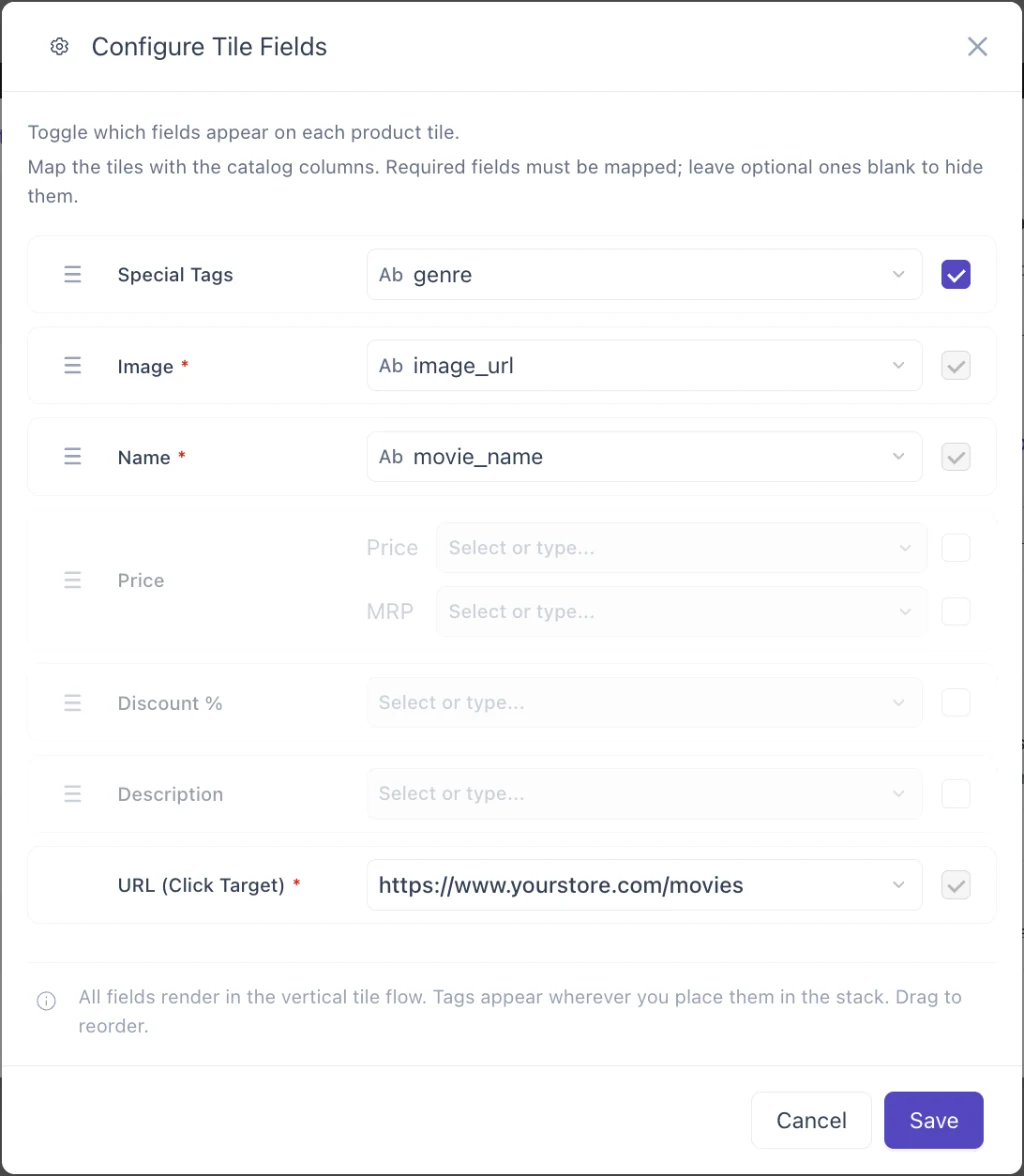
Click to enlarge
- Map a field: pick a catalog column from the dropdown. You can also type fixed text instead, for example a tag that reads "Bestseller".
- Turn a field on or off: use the checkbox on the right. Image, Name and URL are required and always on.
- Reorder fields: drag a field by its handle to change where it appears on the tile.
- Save: the button is enabled once every checked field is mapped.
WebEngage maps most fields for you. See How Auto-Mapping Works to skip manual mapping altogether.
Display Settings
These optional settings protect your users from a half-empty block when too few products come back.
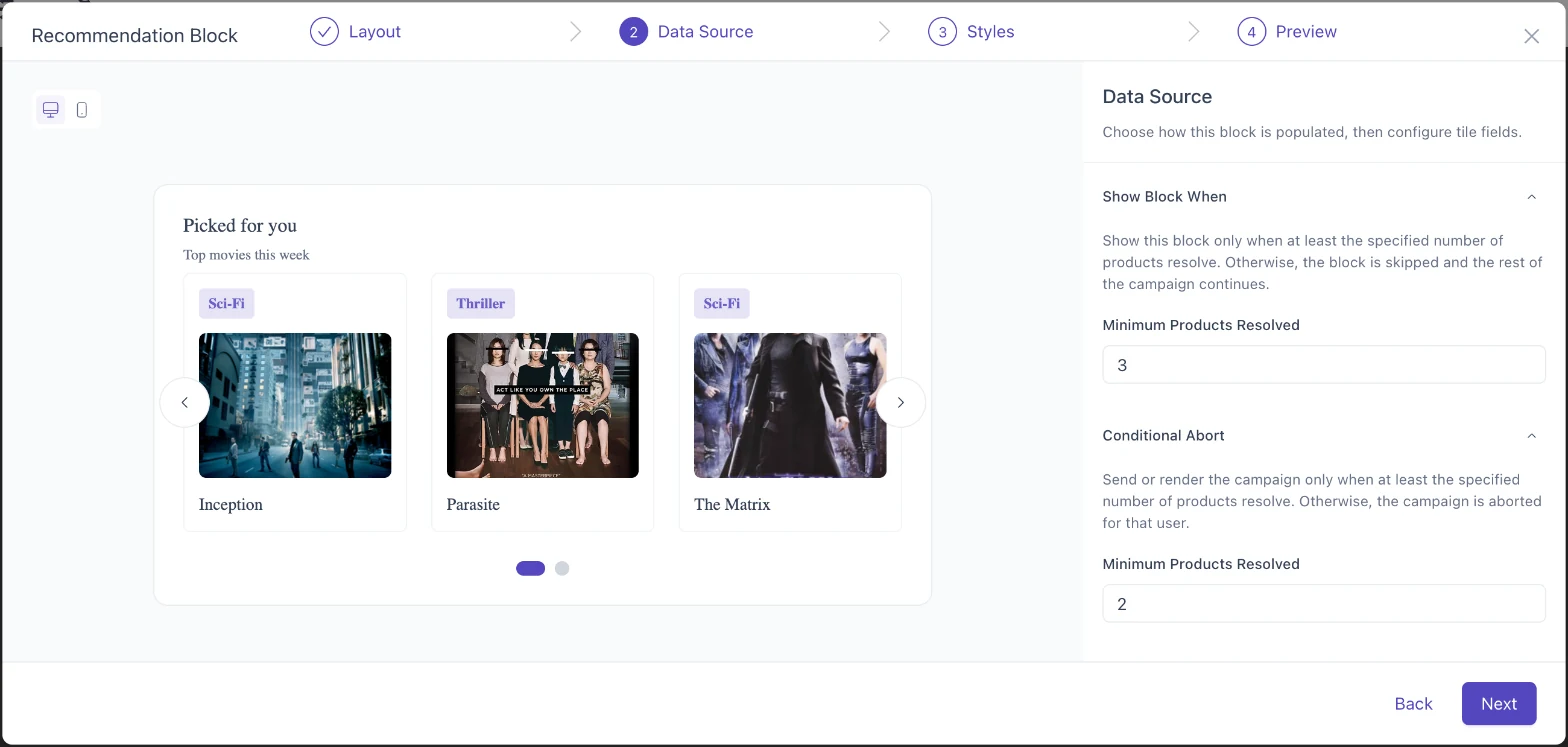
Click to enlarge
- Show Block When: the block is hidden unless at least this many products resolve. The rest of the campaign still goes out.
- Conditional Abort: the whole campaign is skipped for that user unless at least this many products resolve.
NoteUse Show Block When when the block is a nice-to-have in a bigger message. Use Conditional Abort when the products are the reason for the message, such as a "Picked for you" email.
Step 3: Styles
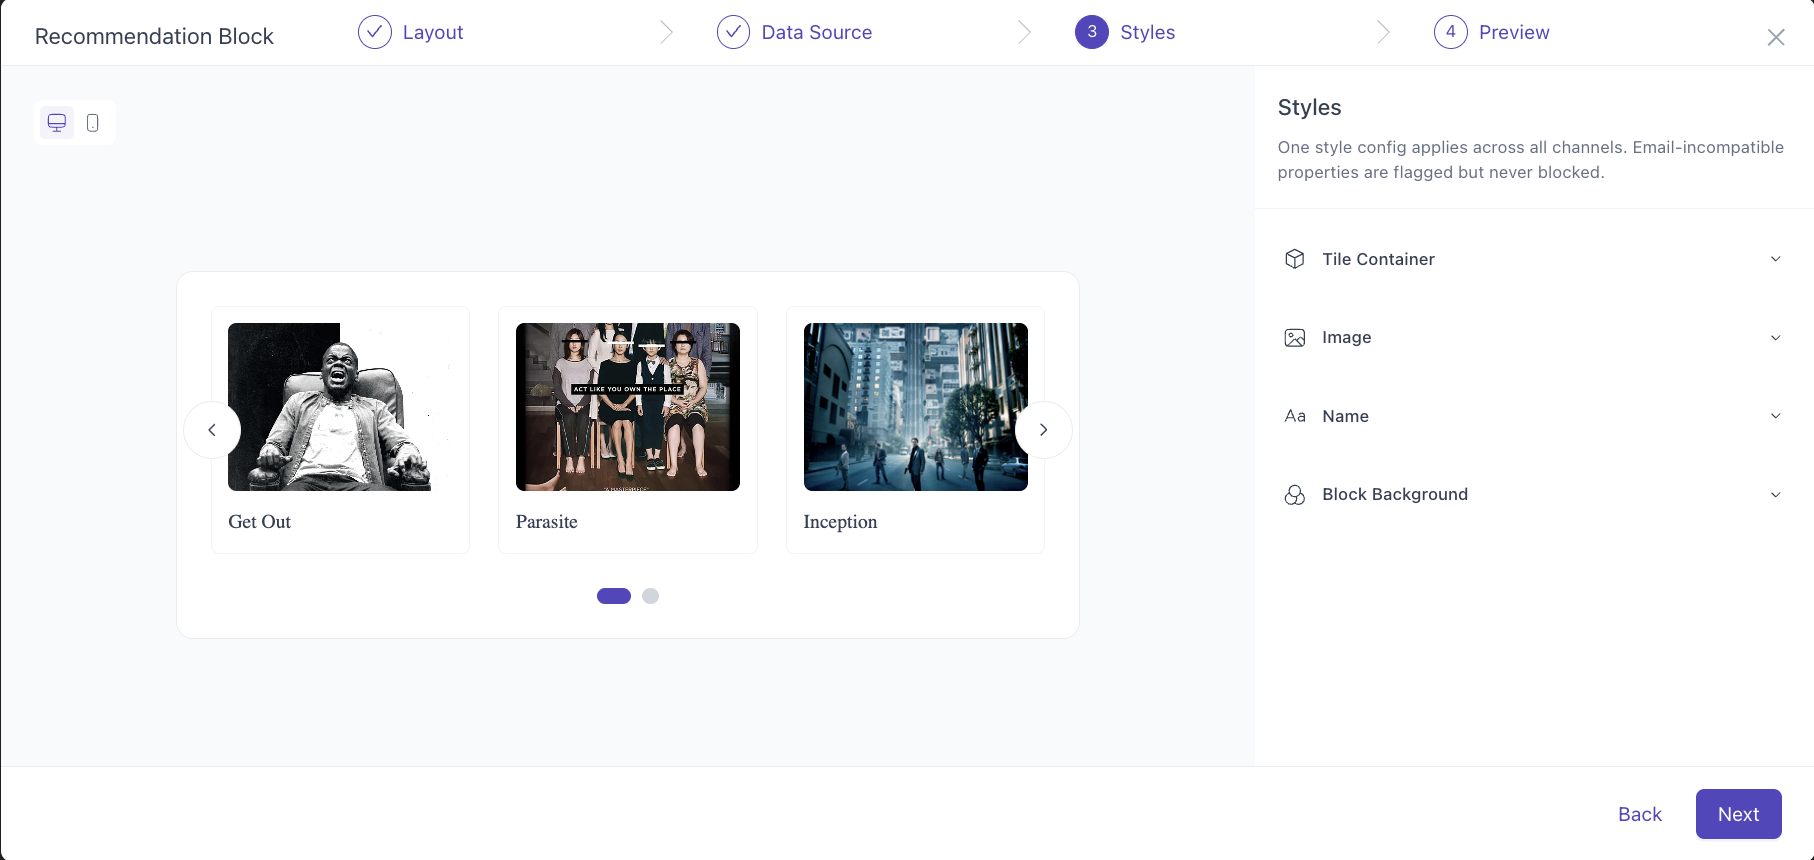
Style each part of the tile from the accordion: Tile Container, Image, Name, Description, Price, Discount Badge, Special Tags, Block Background, Title and Subtitle. You can change colours, fonts, sizes, line limits and alignment.
Click to enlarge
Styles unlock once you've selected a data source and configured its fields. One style setup applies to the block in every channel. Options that Email doesn't support are disabled there, with an info icon that explains why when you hover over it.
Step 4: Preview
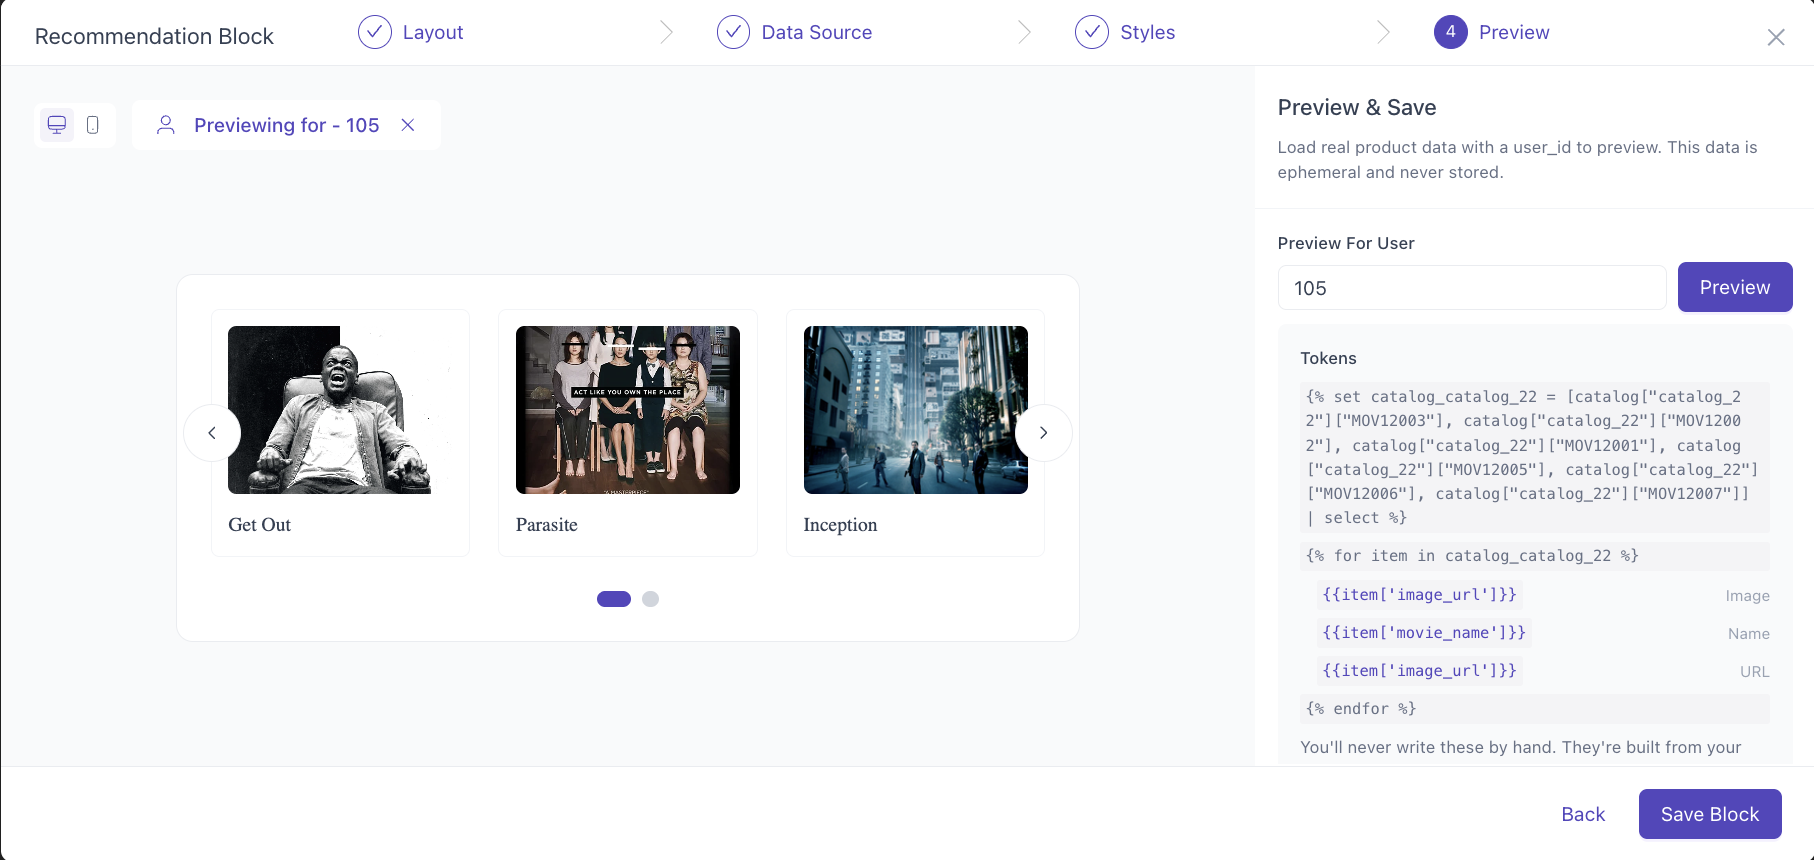
The Preview step lists the personalization tokens the block uses, so you can check exactly what WebEngage generated for you.
Click to enlarge
- Enter a User ID and click Preview to see the block exactly as that user would get it.
- You can edit the values for that preview session. This never changes the user's profile.
- Click Save Block to place the block in your template.
To edit the block later, click it in the editor. The wizard opens with your settings in place.
Email vs Web Personalization
Email clients don't run scripts and support less CSS than a browser, so a few options are limited in Email.
| Area | Web Personalization (inline) | |
|---|---|---|
| Layout | Flat Grid only | Flat Grid or Carousel |
| Corner Radius, Tile Gap, Drop Shadow (Tile Container) | Disabled | Available |
| Radius (Discount Badge, Special Tags) | Disabled | Available |
| Mobile layout | Switches to the mobile column count on narrow screens | Switches to the mobile column or tile count below 520px |
| Width | Fills the column it sits in | Fills the column it sits in, never wider than the page |
Tile Fields Reference
Image, Name and URL are always on. You can switch the rest off in Configure Tile Fields.
| Field | Required | On by default (Retail / Minimal) | Recommended column name | Notes |
|---|---|---|---|---|
| Image | Yes | Yes / Yes | image | Map to an image URL column |
| Name | Yes | Yes / Yes | name | Clamped to the line count set in Styles |
| URL (Click Target) | Yes | Yes / Yes | url | Where the tile links to. Always listed last |
| Price and MRP | No | Both / Price only | price, mrp | MRP shows struck through next to Price |
| Discount % | No | Yes / No | discount | Shown as a badge |
| Special Tags | No | Yes / No | tag | For labels such as "Bestseller" |
| Description | No | Yes / No | description | Clamped to the line count set in Styles |
How Auto-Mapping Works
When Configure Tile Fields opens, WebEngage maps each field to the first catalog column whose name contains the recommended column name, ignoring case. For example, a column called Product_Name maps to Name, and discount_pct maps to Discount %.
Name your catalog columns this way and you can skip manual mapping entirely.
Check your URL mappingWatch for columns whose names contain another field's word. A column called
image_urlalso containsurl, so URL may pick it up if it comes before your product link column. Always check the URL mapping before you save.
Price and MRP move together when you reorder fields.
We would love to hear from you! If you have any questions or feedback, drop us a line at [email protected].
Updated about 14 hours ago