Upload Process
Step 1: Prepare Your CSV File
Prepare your CSV file so that all the attribute names are in the first row and the data for each user/event is in subsequent rows.
For Uploading User CSV File
Following is a tabular representation of a sample User CSV file:
| user_id | phone | first_name | last_name | score | membership_type | |
|---|---|---|---|---|---|---|
| 2123414 | [email protected] | +1 925 336 0294 | Adam | Smith | 20 | Gold |
| 2384708 | [email protected] | +65 9039 1135 | John | Knowles | 10 | Silver |
Please take note of the following things when preparing your User CSV file:
-
The first row should contain the names of the attributes. You are not required to use all the system, and custom user attributes in each CSV file you create. However, if any of the subsequent rows contain data about an attribute, the corresponding attribute name is required in the first row. In other words, the first row cannot have any blank/empty values.
-
If you are using a system attribute, the name and data type of the attribute must match the name and data type defined here.
-
If you are using an existing custom attribute, then the name and data type of the attribute must match the data type you have already defined for this attribute in WebEngage. You can check the custom user attributes and the corresponding data types you have defined on your WebEngage dashboard under the Data Management > User attributes list section
-
If you’re defining a new custom user attribute, please note that you are not allowed to change its name once an attribute is set. Therefore, please be careful when creating new custom attributes.
-
If you’re defining a new custom attribute, please note that the attribute name's maximum length is 50 characters.
-
user_idneeds to be the first data point on each row of data (or in other words,user_idneeds to be the first column). -
The file must contain a unique user ID for each user.
-
The name of your user attribute should not begin with
we_ -
The maximum length of a
Stringdata type for an attribute is 1000 characters. -
Values of the attribute can only be of one of the following data types:
Boolean,Number,StringsandDates -
If you want a certain attribute to have a blank/empty value, please do not put
NULLas a value for those attributes. Instead, just leave the value blank/empty. -
A user profile can have a maximum of 25 custom attributes per data type (i.e., 25 custom attributes of
Numberdata type, 25 custom attributes ofStringdata type, etc.). -
The maximum file size allowed is 200MB. This should be more than sufficient for millions and millions of rows of data.
For Uploading Events CSV File
Following is a tabular representation of a sample Event CSV file:
| event_name | user_id | event_time | product | price | category |
|---|---|---|---|---|---|
| add_to_cart | 2123414 | 2018-01-21 10:23:21 | iPhone XS | $800 | Phone |
| add_to_cart | 2384708 | 2018-05-18 22:20:00 | Inspiron 6000 | $549 | Laptop |
Please take note of the following things when preparing your Event CSV file:
-
The first row should contain the names of the attributes. The three system attributes (
event_name,user_id,event_time) are mandatorily required in each CSV file. Also, the name and data type of the three system attributes must match the name and data type defined here. You are not required to use all the custom event attributes in each CSV file you create. However, if any of the subsequent rows contain data about an attribute, the corresponding attribute name is required in the first row. In other words, the first row cannot have any blank/empty values. -
If you are using an existing custom attribute, then the name and data type of the attribute must match the data type you have already defined for this attribute in WebEngage. You can check the custom event attributes and the corresponding data types you have defined on your WebEngage dashboard under the Data Management > Events list section.
-
If you’re defining a new custom attribute, please note that you are not allowed to change its name once an attribute is set. Therefore, please be careful when creating new custom attributes.
-
If you’re defining a new custom attribute, please note that the attribute name's maximum length is 50 characters.
-
event_name,user_idandevent_timeneed to be the first three data points on each row (or in other words,event_name,user_idandevent_timeneed to be the first three columns). -
One Event CSV file can have details of only one custom event. You cannot include more than one custom event on different rows in the same file.
-
If you’re defining a new custom event, please note that the event name's maximum length is 50 characters.
-
The name of your event or custom attribute should not begin with
we_. -
The maximum length of a
Stringdata type for an attribute is 1000 characters. -
Values of the attribute can only be of the following data types:
Boolean,Number,Strings,andDates. -
If you want a certain attribute to have a blank/empty value, please do not put
NULLas a value for those attributes. Instead, leave the value blank/empty. -
A custom event can have a maximum of 25 custom attributes per data type (i.e., 25 custom attributes of
Numberdata type, 25 custom attributes ofStringdata type, etc.). -
The maximum file size allowed is 200MB. This should be more than sufficient for millions and millions of rows of data.
Step 2: Upload Your CSV File
- Go to the Data Management section in your WebEngage dashboard to upload your file.
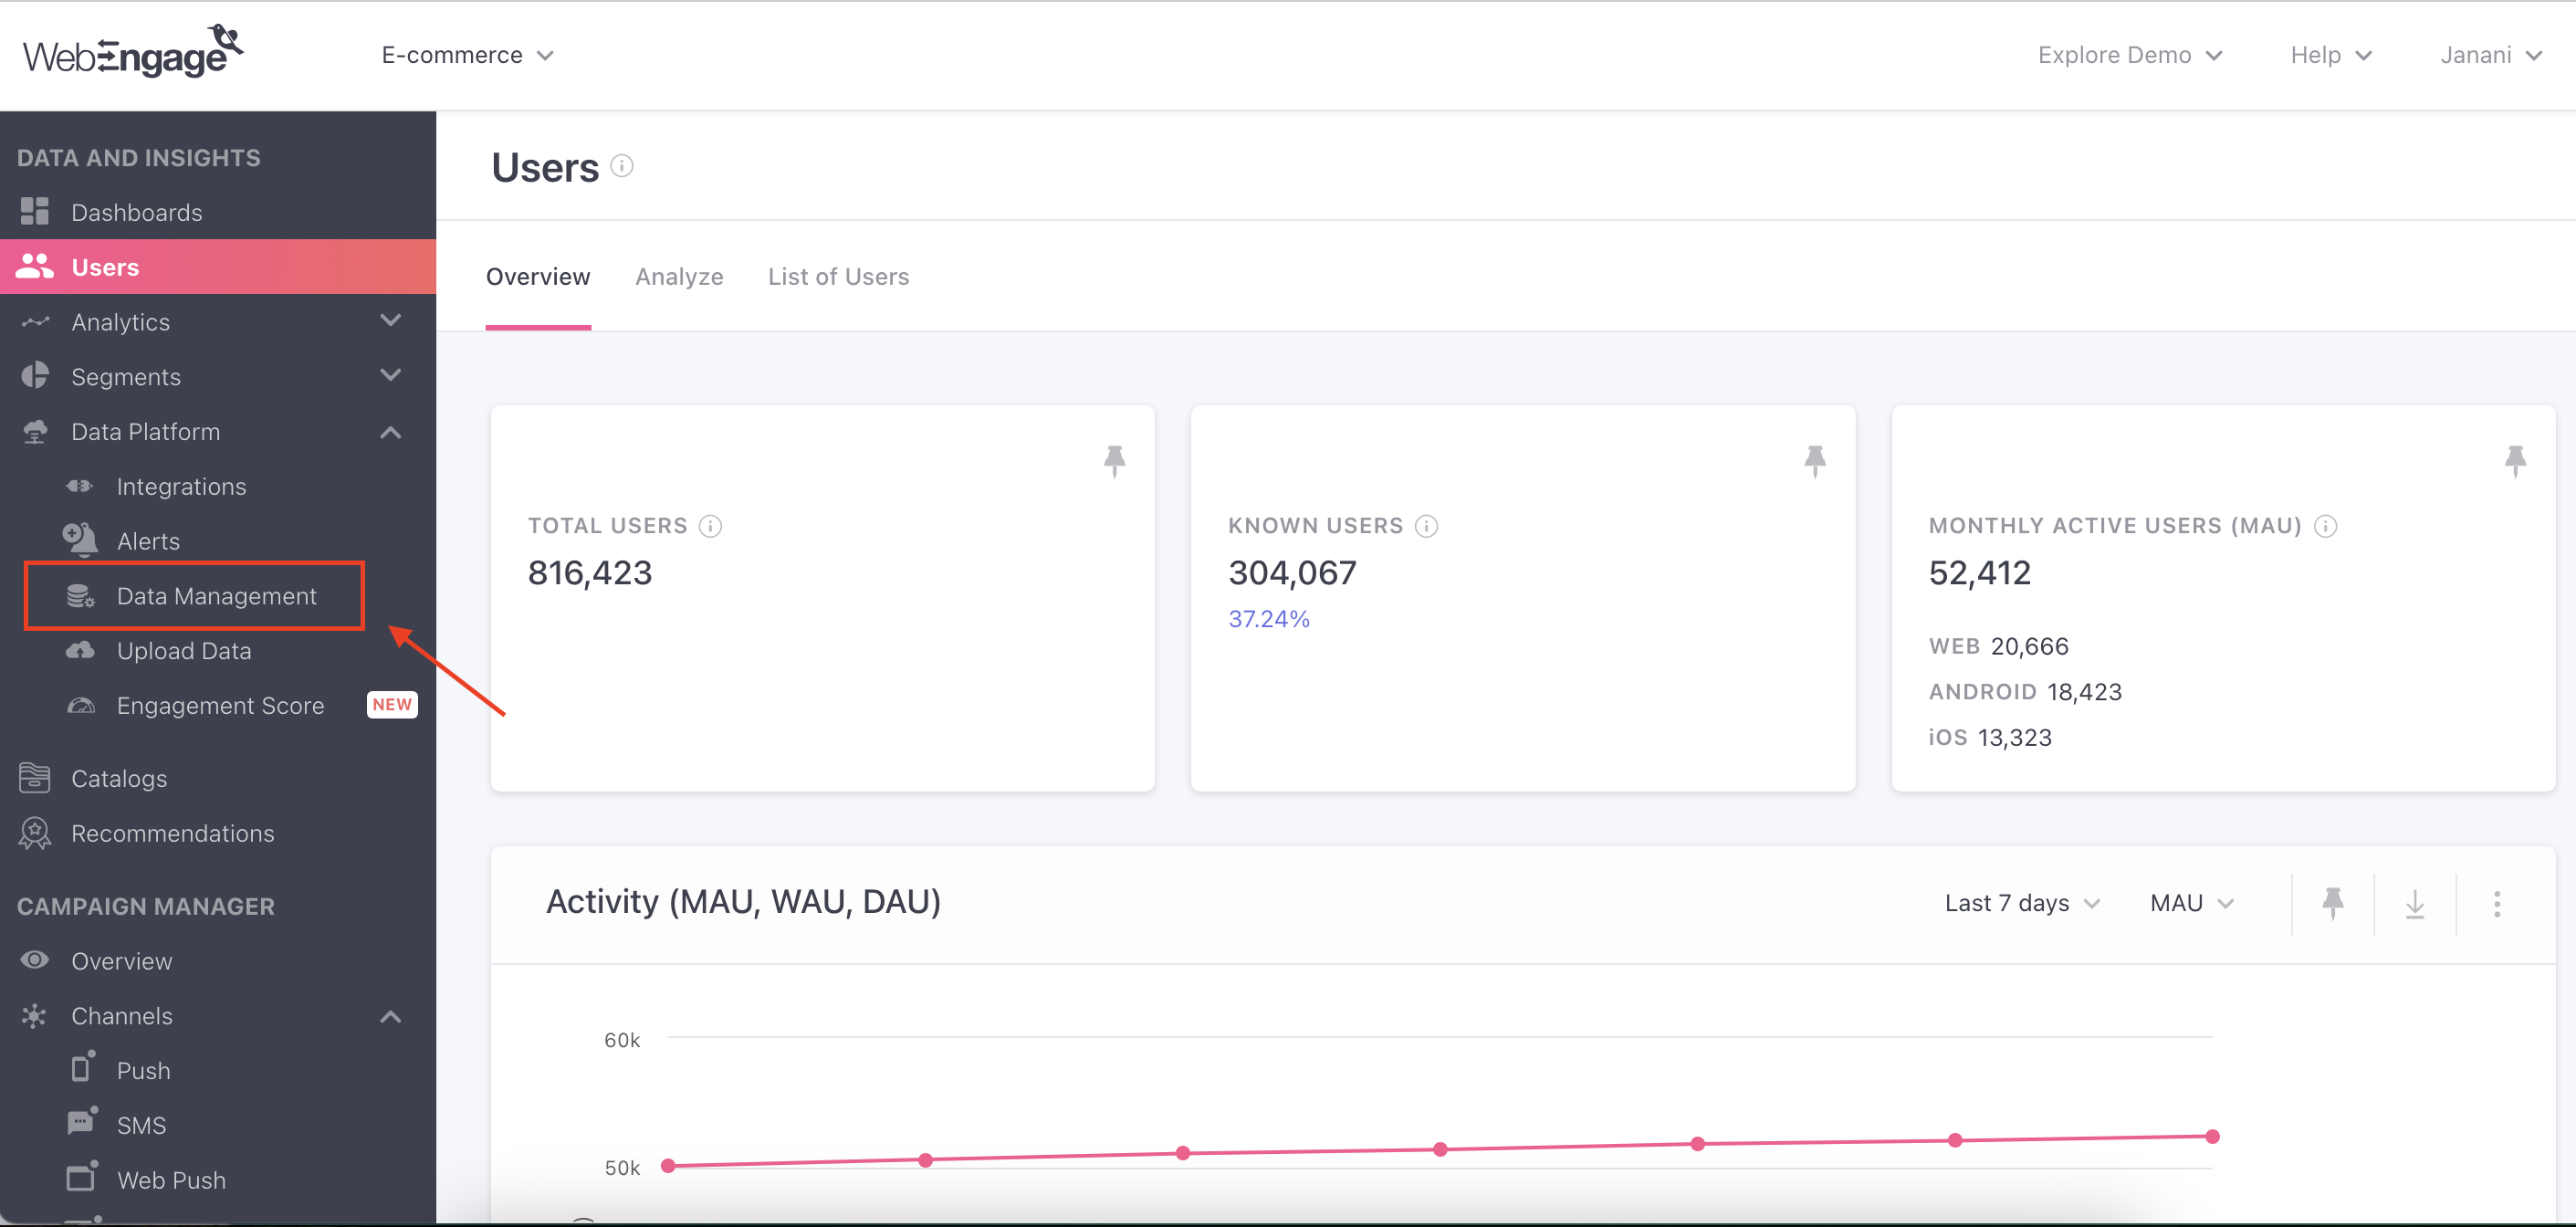
How to access Data Management in your dashboard (click to enlarge)
- In the Data Management section, go to the Upload user data or the Upload event data section:
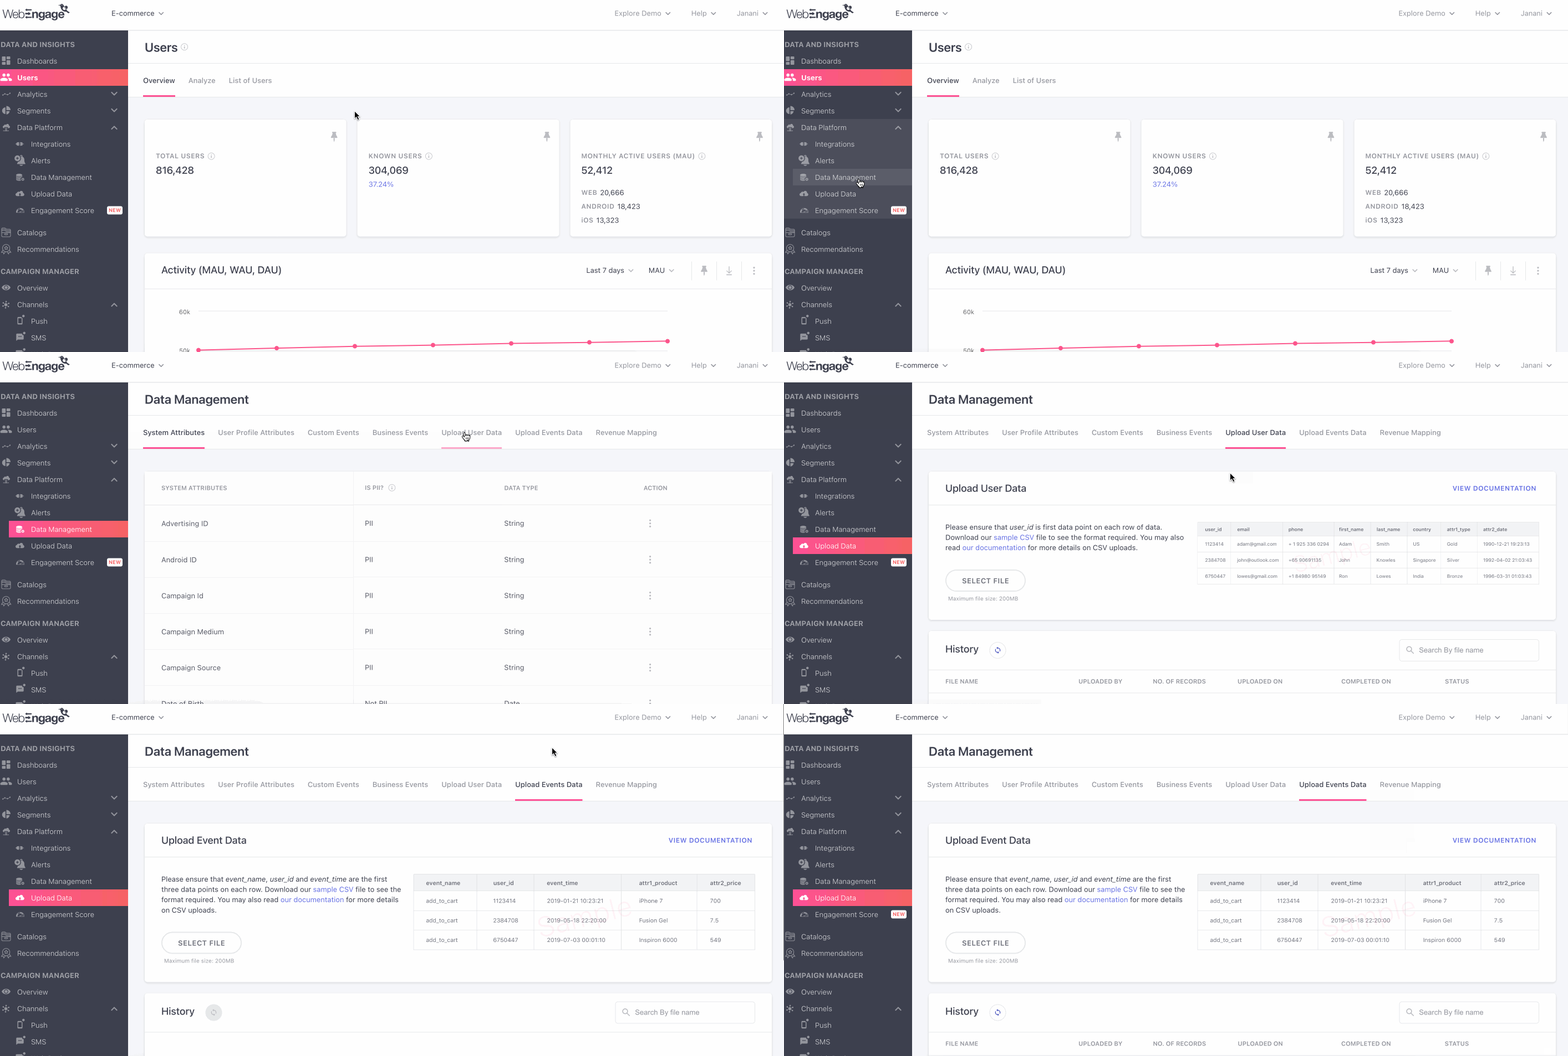
Accessing upload section in Data Management (click to enlarge)
In both Upload user data and the Upload event data sections, you will see two subsections:
-
Upload subsection where you can upload your CSV file.
-
Previous Uploads subsection where you can see the following details of the CSV files you had previously uploaded - file name of the CSV file that was uploaded, who uploaded it and when, the number of records found in the CSV file, the status of the upload (in progress, successful or failure). You may even download any of the CSV files you had previously uploaded by clicking on the download icon.
To begin the upload process, click the Select File button in the Upload subsection.
Step 3: CSV File Validation
Once you select your file and start the upload process, WebEngage will validate the CSV file before it is uploaded, and if validation is successful, the records will be saved in WebEngage.
There are two levels of validation as described below.
First Level of Validation
The first level of validation works on the first two rows of your CSV file, i.e., the first row containing the attributes' name and the second row containing the value of the first user's attributes.
If the first level of validation fails, then the file will not be uploaded, and the records will not be saved in WebEngage. The first level of validation can fail if any of the conditions described above for users or events is not followed. When the validation fails, the relevant message will be displayed on the dashboard.
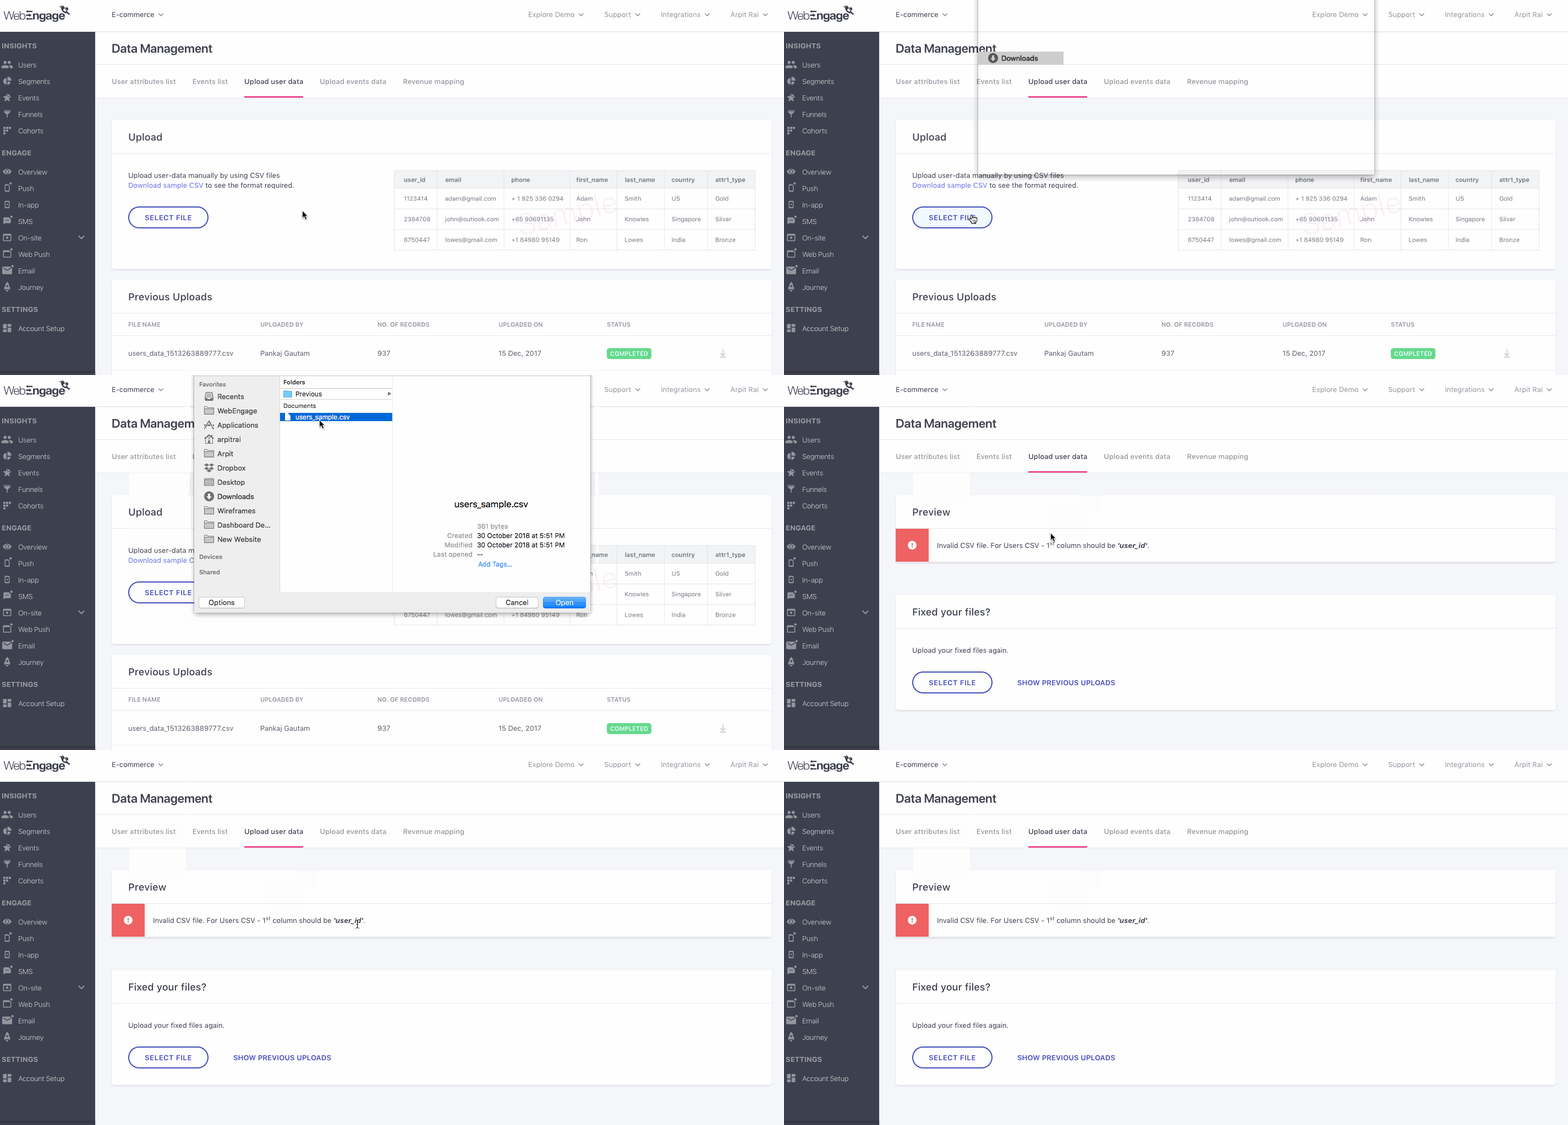
When first level of CSV file's data validation fails (click to enlarge)
When the first level of validation is successful, you will be asked to verify the data before the file gets uploaded and goes for the second level of validation.
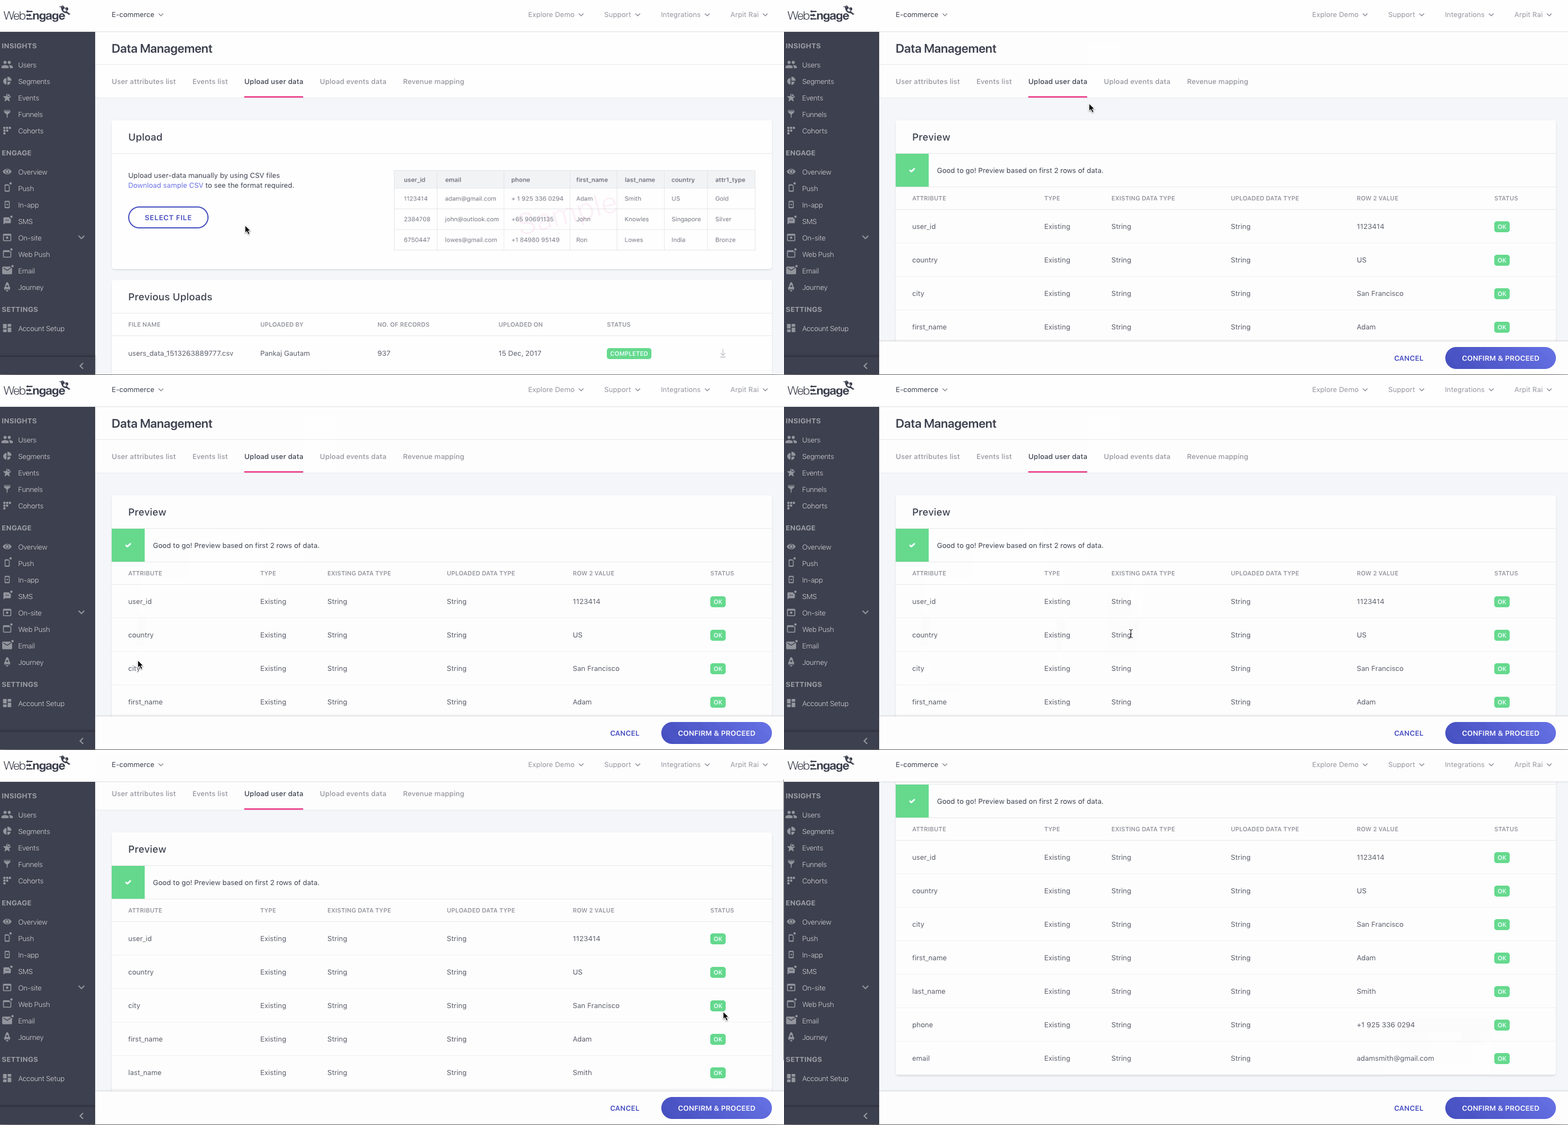
When first level of CSV file's data validation is successful (click to enlarge)
In the first level of validation, if WebEngage comes across any new attribute you had created, you will be asked to confirm the data type of the attribute before you can proceed to the second level of validation.
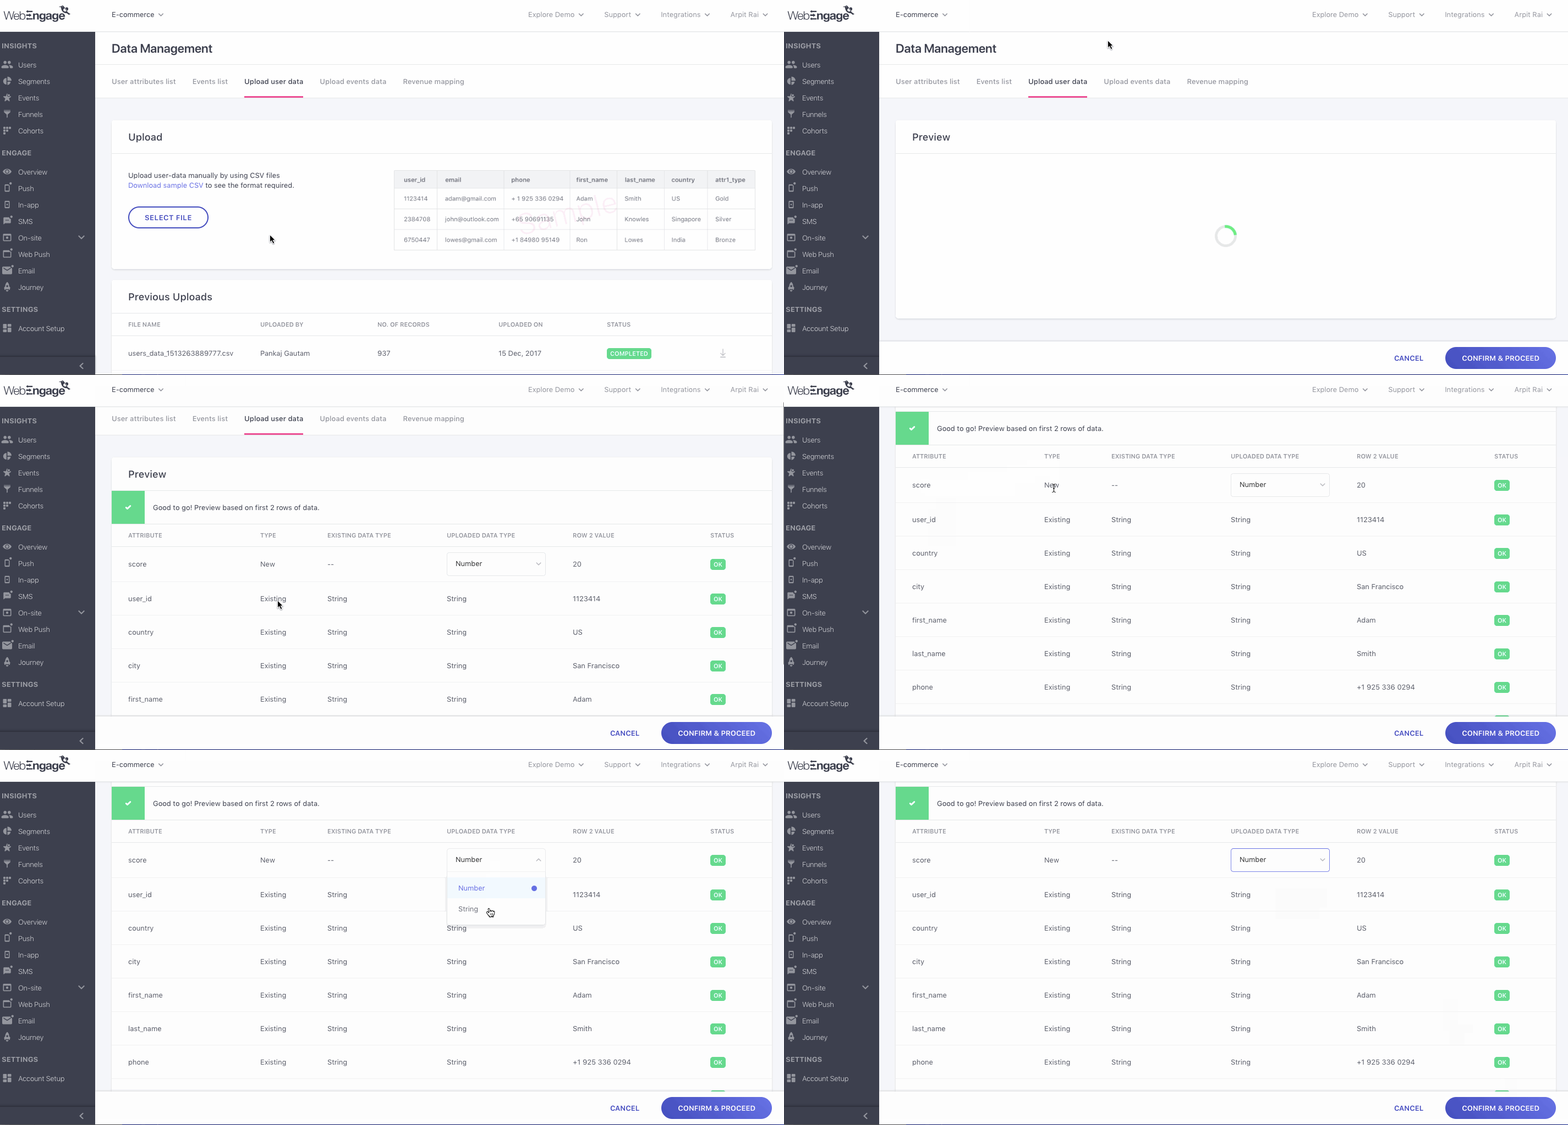
How to confirm data type of new attributes added through CSV upload (click to enlarge)
Second Level of Validation
In the second level of validation, WebEngage will go through each row of data to ensure that the conditions mentioned under Users and Events are met.
You can see the status of the second level of validation under the subsection called Previous Uploads.
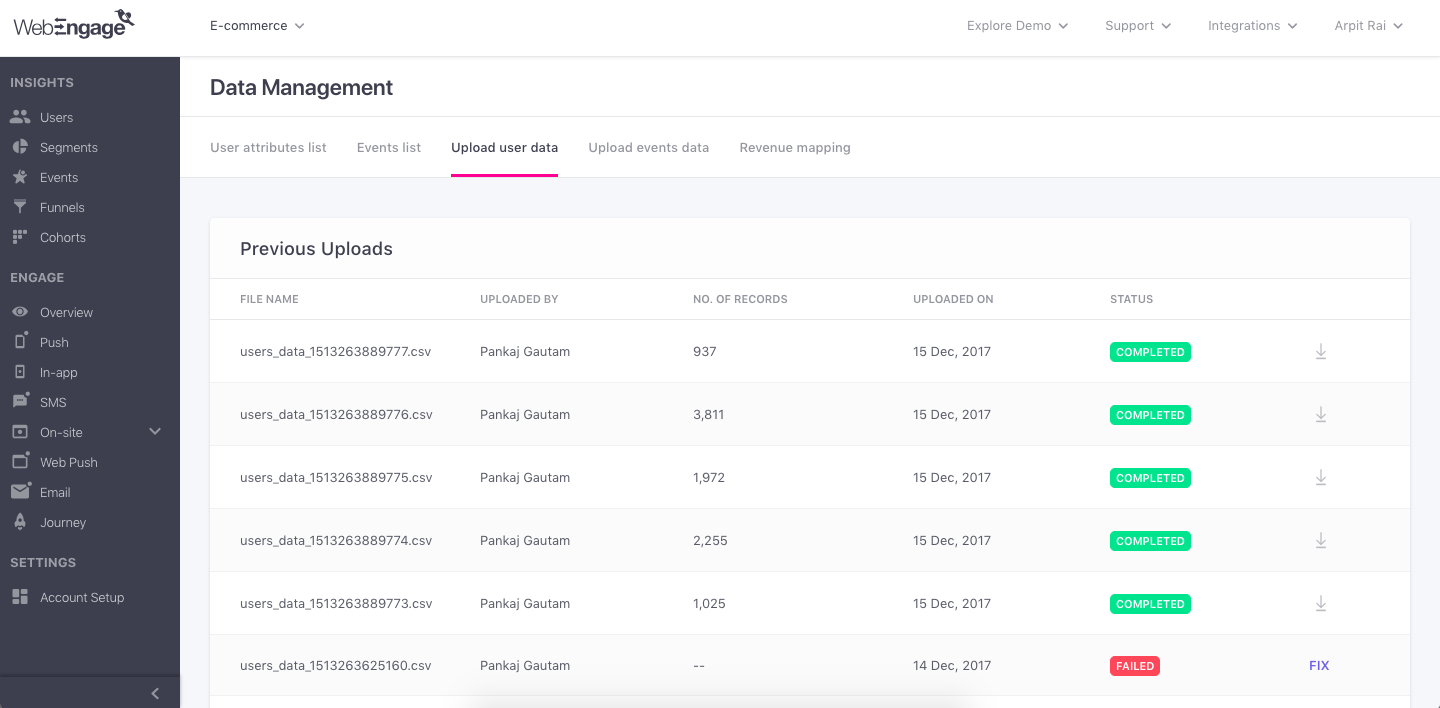
Second level of CSV file's data validation by WebEngage (click to enlarge)
Status of Second Level of Data Validation
Under Previous Uploads, the second-last column denotes the status of the second level of validation. It can be one of the following:
-
In Progress: The second level of data validation might take a few minutes to a few hours, depending on the number of records in your CSV file. When the validation is in progress, the status will be In Progress.
-
Failure: If the second level of validation fails, then the status will show Failure. You can click the Fix link to understand why the upload failed. On the Fix page, you will be able to download a new CSV file. This new CSV file contains your original data-points appended with a data-point at the end that denotes the error on that row (if an error exists on that row). You can then correct the errors and upload the file again.
-
Success: If the second level of validation is successful, then your data is processed and will appear on WebEngage in a few minutes to a few hours, depending on the volume of data in your CSV file.
Step 4: View Your Uploaded Data
Once the second level of validation is successful, you will be able to view the data on your dashboard in a few minutes to a few hours, depending on the volume of data in your CSV file.
Please take note of the following limitations for any historical events data uploaded manually through a CSV file:
-
Historical events data (e.g.
event_timemore than 31 days from now) will be available for creating segments only 15 minutes after the CSV file has been uploaded. -
Historical events data will be visible in event analytics, funnels, cohorts after 12.30 am UTC on the same day or the next day, whichever is earliest.
-
Historical events data will be readily available for creating triggered campaigns, journeys and adding event-based personalization in messages.
Updated 4 months ago